

I’ve made lots of clichéd re-enterings to this space after long absences, invoking mic taps and current event references and musings about audience and method, inspired by TV shows and restaurant meals and creations by friends. I wouldn’t have expected either reentry or inspiration to emerge by way of my dad, but here we are. Dad and I share several hobbies, chief among them photography and gardening. He is all in when our weekly phone conversation traipses through filters and framing, succulents and milkweed. But once Mom and I start talking about what we cooked that week, he usually drifts off.
 Until this past year, when Dad got into artisan pizza. They’ve been making pizza at home for a few years now, but recently Dad found himself sharing my obsession with the perfect, chewy, bubbly, hole-studded crust. Now suddenly we’re swapping flour blends and stretching methods and techniques for transferring the dough from board to peel. Just before the recent 4th of July weekend, he moved on to other flatbreads, quizzing me about and experimenting with naan.
This is just to say (if you’ll forgive the William Carlos Williams phrasing) that my decision to go with lavash as what I hope will be a strong return to the Breads of the World project stems entirely from Dad’s expanding interest in flatbreads.*

I thought of lavash because it, like naan – and like pizza, for that matter – carries with it a traditional cooking method that is difficult to duplicate at home. Hence it breeds obsession in the sense that many home cooks try to figure out adequate workarounds to a procedure that has nothing to do with stoves or grills. What is special here is not the list of ingredients. Like so many breads, this is another combination of flour, water, yeast, and salt (and just a touch of fat). But there’s no careful scoring or shaping or steam injecting here. There’s rolling to almost excruciating thinness and slapping directly onto the super-heated walls of a sometimes-subterranean oven: what the tandoor is to naan, the tonir, at least in Armenia, is to lavash.
 Before you protest, let me just say that lavash belongs to multiple cuisines. It is not tied to a single place or culinary story, but it is incredibly important in Armenia – a cultural and culinary staple. Like simit in Turkey (which also lays claim to lavash – this is dicey business, this yeasty proximity!) which has inspired poetry and painting alike, lavash and its traditional preparation have also served as subject matter for artists.
In looking for recipes and procedures to follow, I quickly found multiple pieces by Kate Leahy, as part of her 2018 explorations that led to her book – an entire book just about lavash bread! (Well, okay, and other Armenian recipes too, as the subtitle is quick to amend.)


Several things quickly struck me in reading her findings: first, there was no absolute consensus about ingredients, though the practice of using “old dough,” achieved by saving dough from a previous bake to leaven the new batch, seemed common. Second, a procedure that involves slapping a huge, tissue-thin piece of dough against the wall of a clay oven with a batat, which Leahy translates as a “large, firm pillow” (seriously, read her linked articles. They are fascinating!) only to remove it seconds later with a long, iron hook, would not be something I could replicate, so I didn’t have to worry overly much about authenticity – anything I produced would already be a pale comparison.
 Instead, my objective (which I hope I’m well on my way to achieving) became giving you a little bit of information about this amazing bread, which is such a long-lasting staple that it can be stored for almost a year at a time and refreshed with a few sprinkles of water to restore its flexibility. It’s frequently served with some variety of kebab, but also lends itself to a wrap for cheeses and herbs, as Irina Petrosian and David Underwood’s book Armenian Food: Fact, Fiction & Folklore delightfully outlines.
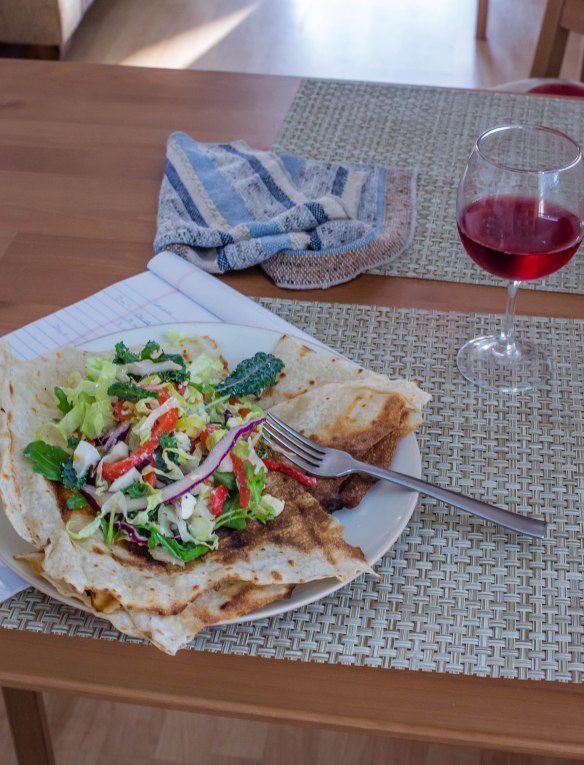
 We opted to use it in this application, intending to wrap basically a full salad inside the sheets of flexible, fresh-off-the-grill bread. Instead, thanks to cooking a trifle too long our sheets of lavash were almost cracker-crisp (which you don’t find out until they’ve been off the heat for a few moments), so we had to be the flexible ones, breaking them into an edible base for a mix of greens, roasted red pepper, feta, and hard-boiled egg.
I’ll give the ingredient quantities and procedure I followed below, but they follow Leahy’s own method from her book, as presented by Jennifer Guerrero on her blog, and on epicurious, with only a few adjustments. Leahy gives the option to complete the recipe all at once (if that is ever something that can be said about bread), or over the course of several days. Mine was, due to weather and grill considerations, a multi-day process.
 The biggest adaptation I made was using some sourdough discard instead of water and yeast in my “old dough” – since the traditional method seems to be saving a chunk from a previous bake, I decided a splotch of unfed sourdough starter mixed into a paste with some fresh flour would be a worthy substitute. A bit of tartness or sourness in the dough itself seems acceptable – among some “less than authentic” recipes buttermilk is included for tang.
You’ll see also that Leahy’s recipe offers multiple options for cooking – I went with the grill method, cooking my bread directly on the hot grates of our gas grill. Thus I can’t speak for the overturned-wok procedure, about which I am by turns fascinated and slightly nervous.
 What I can speak for, and will, vociferously, is a quick what-not-to-do. The more I experiment with flatbreads, the more I become convinced that the best way to handle them – in fact what they were likely designed for – is essentially a dough version of crepes or large pancakes. That is, dividing and shaping can happen for the whole batch all at the same time, but rolling out and cooking should probably be done one portion at a time. Instead, I rolled out all eight portions of dough while the grill preheated and, foolishly, as I completed each, stacked them like prosciutto: one atop the other with a layer of wax paper in between. When I went back to see if any of them would roll out a little thinner, I discovered the natural stickiness of the dough combined with the weight created by stacking had welded them so securely to their wax paper layers that it took N. and I at least half an hour – maybe longer – to carefully, excruciatingly, peel them away in one piece without folding over on themselves (which causes them to stick to themselves like cling-wrap and cannot be rolling or stretched back into their previous thinness).
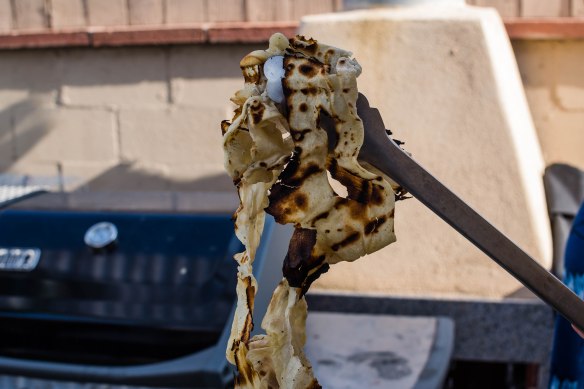
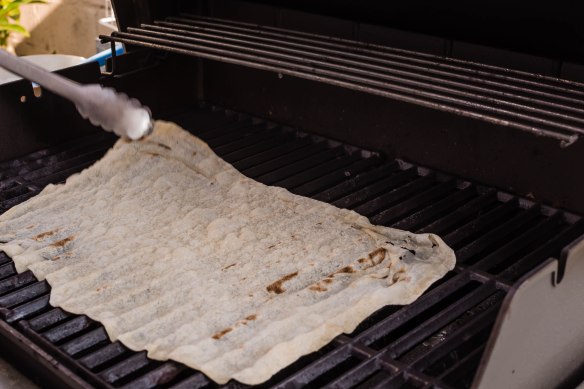
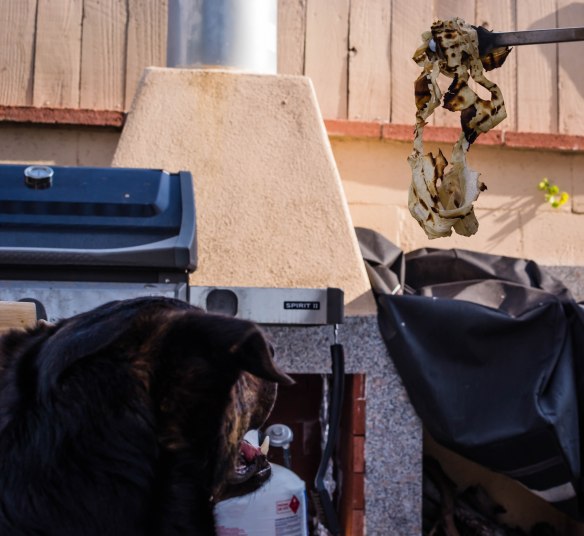 After that, to add insult to injury, of course my grill was too hot and my timer too long for the first one, which aside from the lightly charred edges was basically incinerated. I had anticipated this, however. Armenian poet Paruyr Sevak has charmingly compared the first lavash to face the fire to a first love: too hot to last. He says “whatever you do, it will fall off the wall of the tonir and burn away” (Leahy and Zada). Mine didn’t fall off, of course, since I was dealing with a horizontal set of grill grates. But most of it did burn away and the rest, much to the dismay of my hungry canine assistant, became a taste test for the humans rather than the dog.

I’ve noted my own texture challenges above – a little less time on the heat for each side would have helped produce a more flexible end product, though flipping would have been tricky because the half-cooked dough is so delicate. It’s possible I didn’t need to stretch mine quite so thin either, but in either case the lore about sprinkling is true: though the freshly grilled bread is satisfying in its crunchy form, it quickly starts to taste a little stale, so the next night when we had it as a side for shakshuka I tried out the “sprinkle with water to refresh method.” My method was more like… drench both sides under the faucet… but after a couple minutes in the oven it was flexible enough to fold without breaking, and it tasted fresh again. My hope is the same will be true tonight, when we call upon the leftovers to ride alongside grilled chicken and vegetables.
I can’t, based on all of my adjustments and challenges, call this a traditional lavash. But I can call it an experiment I’m glad I undertook (especially now that the wax paper fiasco is over), and a bread I’m glad to be acquainted with from both a culinary and historical perspective. And I’m glad to be back, at least for the moment, to this doughy little project.
* though it’s probably worth saying that he would hate this post, because I commit one of the two food blogger sins he grimaces the most about: introducing a recipe with a long, drawn-out anecdote. But what can I say? I’m a sucker for culinary background stories…
Grilled “Lavash”
Lightly adapted from Leahy and Zada’s Lavash: the Bread that Launched 1,000 Meals, Plus Salads, Stews, and Other Recipes From Armenia, recipes here and here
Makes 8 large sheets of lavash
5-6 hours or as long as 3-4 days with refrigerated resting time
I took a multi-day approach here, but I’ll offer options in the procedure section as Leahy and Zada do in their recipe. I also used a stand mixer, so my instructions are for that method. Leahy and Zada include instructions for mixing by hand – see linked pages above.
Old dough:
¼ cup sourdough discard
¼ cup all-purpose flour
Remaining ingredients:
1 cup lukewarm water
1 tablespoon vegetable oil for dough, plus more for brushing just before grilling
3 cups + 2 tablespoons all-purpose flour for dough, plus more for dusting
2 teaspoons kosher salt
- My day 1: make the old dough by mixing and pressing the sourdough discard and additional flour together into a thick paste. Let sit at room temperature at least 1 ½-2 hours, or refrigerate overnight, then let sit at room temperature for at least two hours before using. (Leahy’s recipe says it will double. Mine did not, but seemed to work just fine anyway)
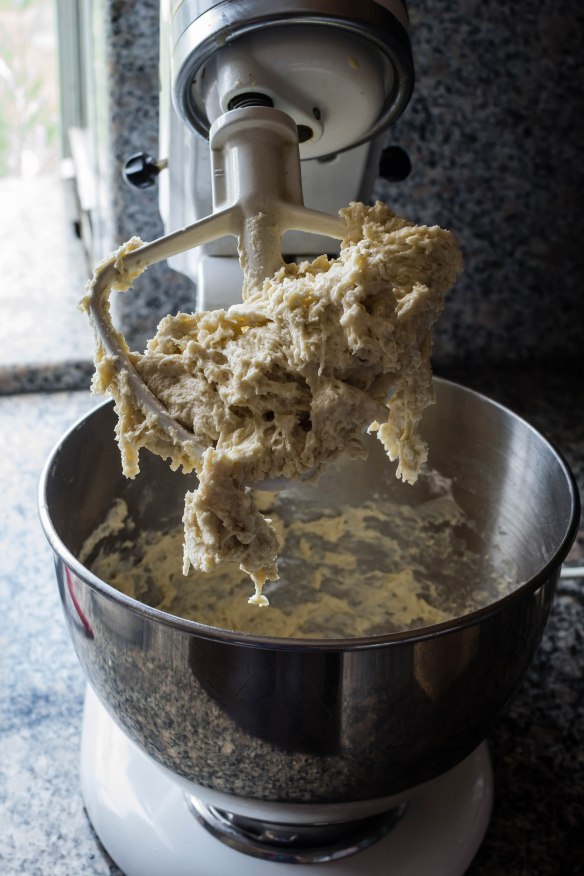
- My day 2: in the bowl of a stand mixer, combine the risen “old dough” with the 1 cup lukewarm water and the 1 tablespoon vegetable oil. Squish and squash the “old dough” to work it in, though a few chunks are okay. Add the 3 cups + 2 tablespoons flour and mix thoroughly using the paddle attachment, being sure to scrape down the sides and bottom of your bowl at least once to ensure the “old dough” is well incorporated. Pull the dough off the paddle attachment, cover the bowl with plastic wrap or a clean kitchen towel, and let it sit 20 minutes to begin hydrating the flour.
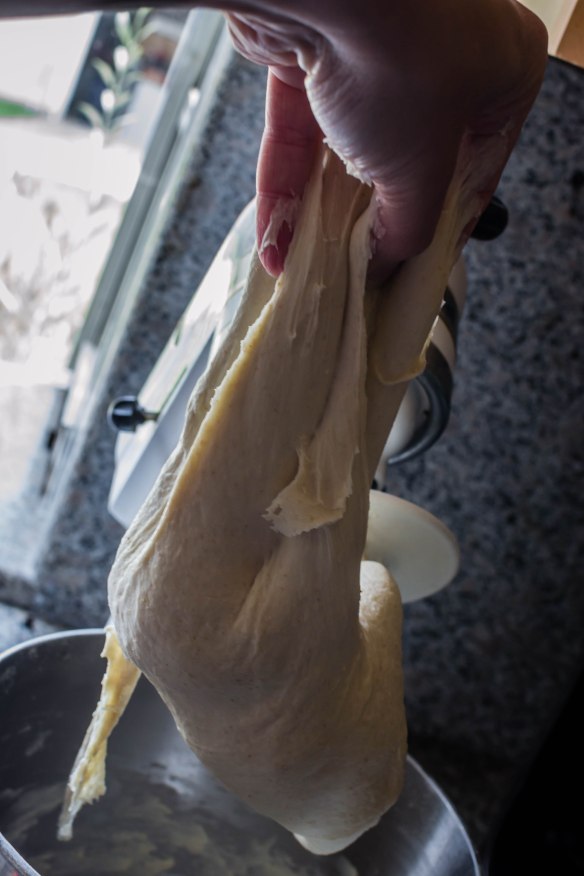
- Replace the paddle attachment with the dough hook, and begin to knead the dough at medium speed. After about a minute, add the salt. Continue to knead until a smooth but slightly sticky dough is formed: about 3 more minutes. Lightly oil the sides of the bowl, then cover and let rise for about 3 hours, or until doubled, OR stow in the refrigerator overnight (if you follow the fridge method, again, you’ll want to let the dough come to room temperature – about 2 hours – before proceeding).
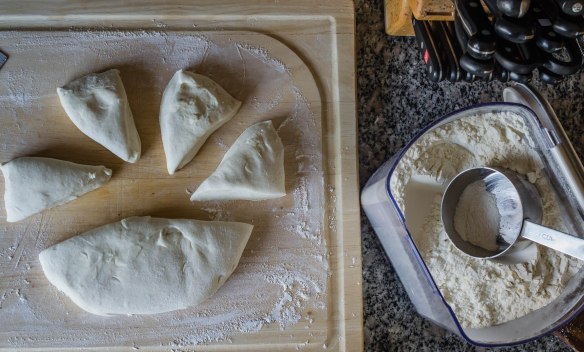
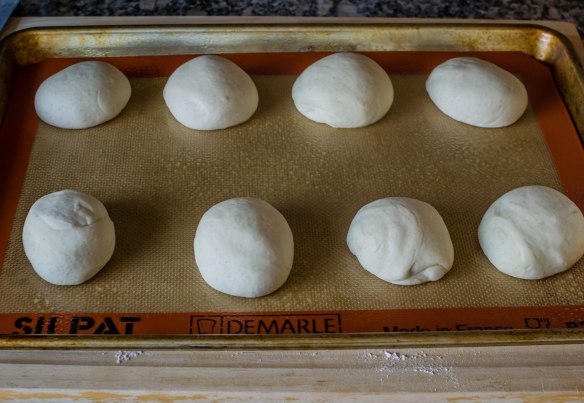
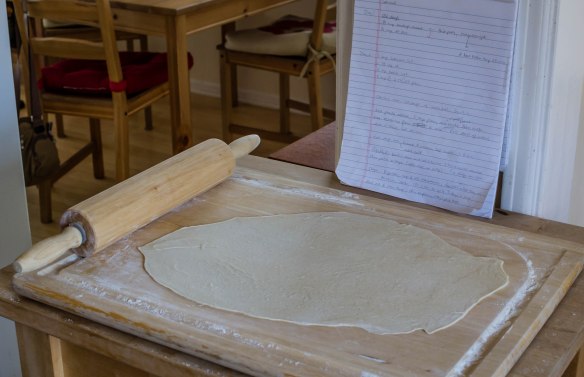
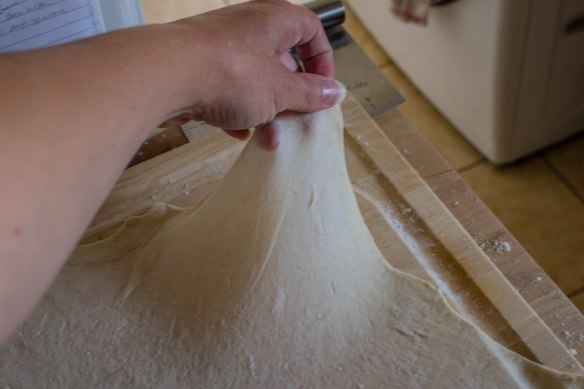
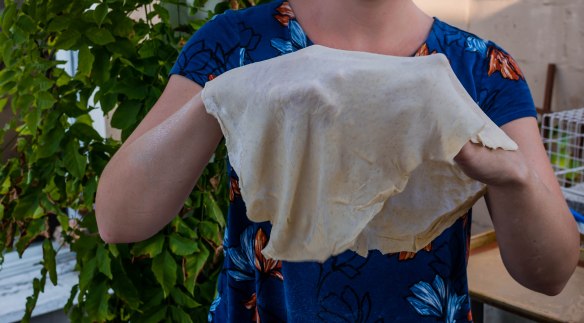
- To portion and shape the dough, once it has risen, tip and scrape it out onto a floured surface and divide into 8 equal pieces. The easiest way to do this is to divide it in half, then half again, etc. If you’ve done this from a circular starting shape, your 8 pieces will be small triangles, as pictured. Working with one piece at a time, fold the edges into the center. Then turn over so the folded-in edges are against a very lightly floured work surface, and hold your hand around the ball of dough like a loose cage. Use the palm of your hand to roll the ball around in little circles inside your curved fingers until the ball is smooth (see photos above, or see here for photos with captions). If the dough won’t roll smoothly, you might have too much flour on your board. Dust some of it away – a little bit of friction between dough and board is necessary to roll it smooth.
- After you’ve folded and rolled all 8 pieces of dough into smooth balls, place them on a lined baking tray, not touching, cover with plastic wrap or a kitchen towel, and either let them rise 1½-2 hours OR pop them in the fridge for up to 3 days. I fridged mine for 2 days and then continued as below.
- My day 3: let the refrigerated dough balls come to room temperature – at least 2 hours. Without this warming and resting time, they will be very frustrating to work with. While they are resting, preheat a gas grill over high – you want at least 450-500F.
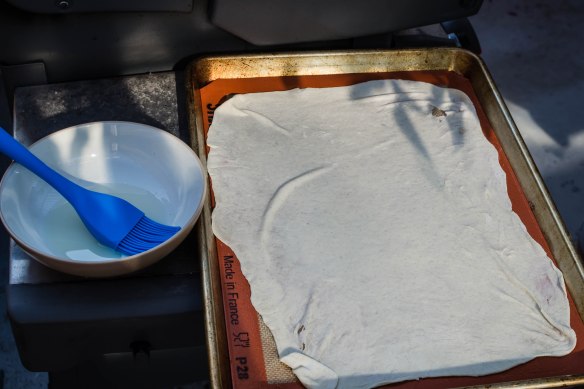
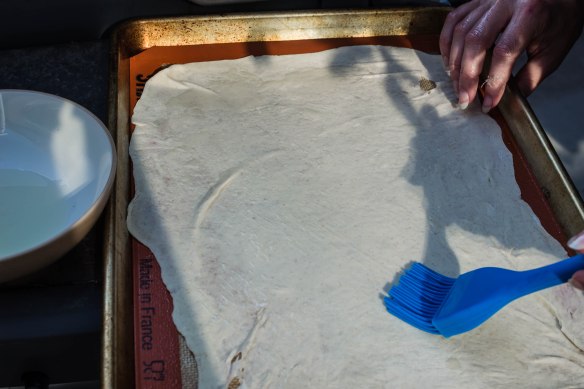
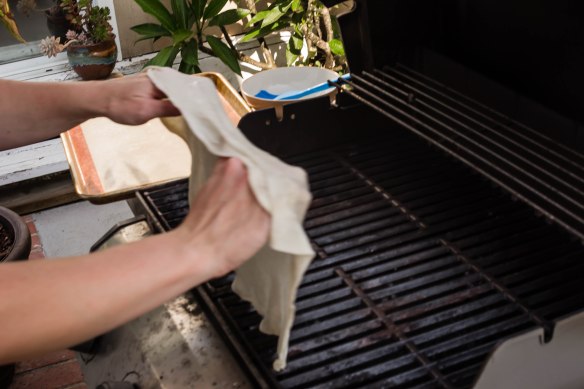
- As you wait for the dough and the grill to be ready, prepare your workspace: near the grill, you will need a lightly oiled 9×13 inch baking tray with vegetable oil, and about 2 tablespoons additional oil ready in a small bowl with a pastry brush. You will also need a lightly floured work surface for the dough, and additional flour for dusting in between. You are going to roll out and cook one piece at a time, not roll them all out at once (see above for commentary on relentless stickiness). You will also want a clean baking tray or large plate on which to stack the cooked lavash, and a clean towel to cover the cooked lavash. Finally, you will need a pair of metal tongs for flipping and removing the lavash from the grill surface once it is cooked.
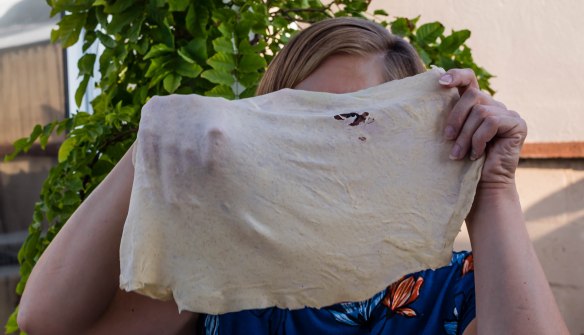
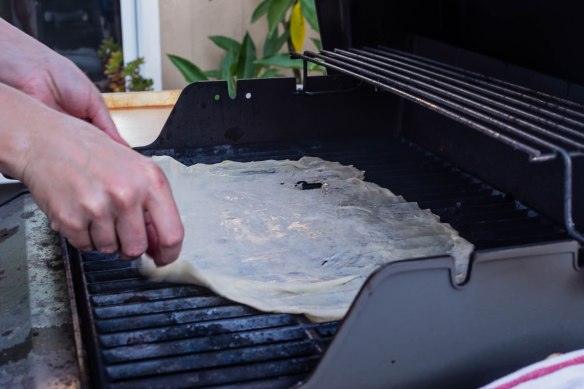
- Working with one dough ball at a time, use a floured rolling pin or the backs of your hands to roll or stretch the dough into a rectangle about 9×13 inches. It doesn’t have to be perfect. If the dough springs back considerably, let it rest another 10 minutes and then try again.
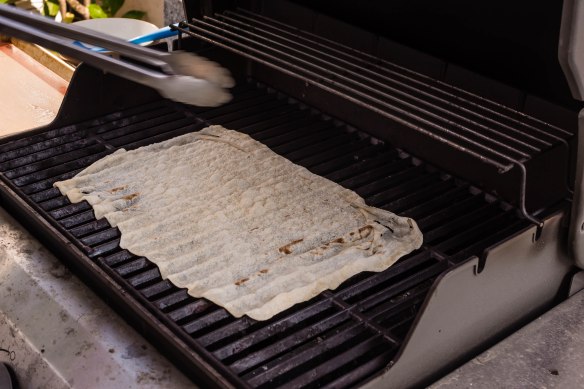
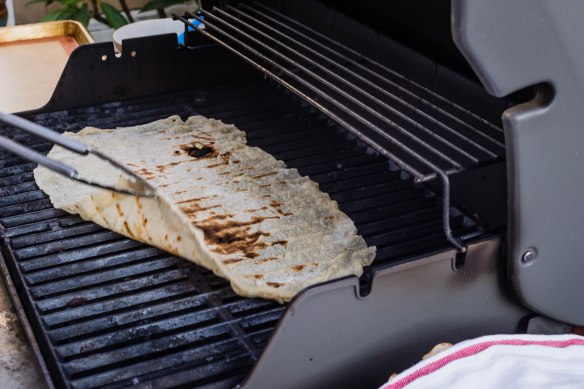
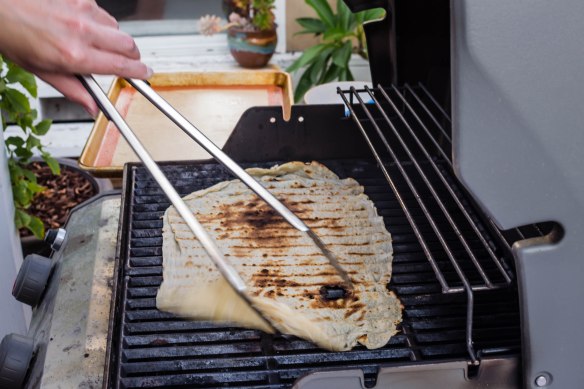
- Once it is rolled out, gently move the tissue-thin sheet of dough to the oiled pan and use the brush and additional oil to lightly brush the top side. Now both sides of the dough are oiled. Open the grill, and gently but quickly lift the lavash sheet and carefully lay it directly on the grill grates, trying not to let it fold over on itself. Close the grill and let the lavash cook for 15-25 seconds. Open the grill and, using the tongs, gently flip the lavash sheet. Allow it to cook with the grill lid open for another 15-25 seconds, until it is nicely charred on both sides. Remove it to the clean baking tray or plate and drape a clean kitchen towel over it.
- If you can get into a rhythm, or if you are working with someone else, you can try rolling out the next dough ball while your lavash is cooking. I’m not that fast, but that’s okay – the grill will probably need a little bit of time to come back up to temperature after cooking with the lid open, so you can use that time to roll out your next sheet.
- Repeat the rolling, oiling, and grilling process until all 8 pieces cooked, then eat immediately with meat, herbs, cheese, etc., or save until later, sprinkling with water to refresh if needed.

Love the instruction photos! And I for one enjoy the stories behind the recipes!
Thanks, Dorothy – I’m glad you like the step-by-step images! And I love those behind-the-bread stories too (obviously!). I think in another life I would have been a culinary historian for sure.