Breads of the World: Lavash

Blog 2021 June July August-0679

I’ve made lots of clichéd re-enterings to this space after long absences, invoking mic taps and current event references and musings about audience and method, inspired by TV shows and restaurant meals and creations by friends. I wouldn’t have expected either reentry or inspiration to emerge by way of my dad, but here we are. Dad and I share several hobbies, chief among them photography and gardening. He is all in when our weekly phone conversation traipses through filters and framing, succulents and milkweed. But once Mom and I start talking about what we cooked that week, he usually drifts off.

Blog 2021 June July August-0685Until this past year, when Dad got into artisan pizza. They’ve been making pizza at home for a few years now, but recently Dad found himself sharing my obsession with the perfect, chewy, bubbly, hole-studded crust. Now suddenly we’re swapping flour blends and stretching methods and techniques for transferring the dough from board to peel. Just before the recent 4th of July weekend, he moved on to other flatbreads, quizzing me about and experimenting with naan.

This is just to say (if you’ll forgive the William Carlos Williams phrasing) that my decision to go with lavash as what I hope will be a strong return to the Breads of the World project stems entirely from Dad’s expanding interest in flatbreads.*

Continue reading

Breads of the World: Paska

For our first entrée into European breads, we’re again following a holiday track. Paska is a traditional Ukrainian Easter bread (there’s a Russian version as well, called kulich), tall and stately, enriched with milk, butter, sugar, and a boatload of eggs, and ornately decorated in celebration of both the holiday and the season. Sometimes it includes citrus zest, sometimes a splash of liquor, and sometimes even raisins. Typically the decoration, which can use up to a third of the total dough, includes braids, twists, intricate crosses and sun symbols, and sometimes flowers or birds or other indications of springtime.

My favorite detail about this bread is that it was frequently baked on Good Friday, then taken to church on Holy Saturday to be blessed by the priest before it was eaten on Easter. I’ve seen some speculation this may have been due to its pre-Christian origins – a bread that is originally made to celebrate the coming of spring, covered in dough-shaped symbols of fertility, might need a little shepherding back into the Christian fold (all puns intended). Korena in the Kitchen, my main recipe source, includes some other fascinating traditions surrounding this bread in her post about it.

Since part of spring celebrations – Christian and otherwise – involve acknowledging return to life and freedom from fasts brought on by the scarcity of winter or the restrictions of Lent, this bread is about abundance. Not only is it a sweet dough that requires plenty of rising time; it traditionally makes a huge quantity. The “Ur” recipe that seems to be floating around out in the internet world – at least what many of the sites I looked at seem to use or match up with – involves a staggering 12 cups of flour, 3 whole eggs and 8 egg yolks, an entire stick of butter and equal amount of vegetable oil, oh, and ANOTHER egg (at least!) to glaze the top. Marie Porter, in her bread-fueled reminiscence of childhood Easters, basically fills every loaf pan in her kitchen trying to contain it all.

I elected to halve the recipe. This is of course not simple when dealing with odd numbers of eggs, so I polled the cooks in my family and R., of course, had the answer: “Just beat up the whole eggs, measure out half, and have a scramble for lunch with the other half.” Works for me. I’ve included measurements below.

To achieve the traditional look, a paska should have tall, straight sides, with all the decoration crowded in on the top. If you have a tall-sided cake pan, use that. If not, as you can see in my photos, you can construct a collar out of parchment paper – be sure it’s long enough to wrap all the way around the inside of your baking pan plus a bit (I didn’t, which is why my loaf is a little wonky in shape), then fold it in half for a double layer. Remembering a similar move with souffles in an old Great British Baking Show episode, I tried fastening the edges of my parchment together with a paperclip. This was semi-successful, though it would have worked better if I’d followed my own advice here and used just one long sheet of parchment, not two. The dough is persistent, and it pushed its way through, creating gaps where my parchment connected.

Most recipes recommend waiting until this loaf is completely cool before tearing into it, ahem, slicing out wedges. We couldn’t wait that long, and ate embarrassingly big pieces as an afternoon snack while it was still warm. And you know what? Even though that’s not traditional, I wouldn’t have had it any other way. Somewhere between cake and bread, lightly sweet and somehow not overly eggy, this probably won’t replace challah as my typical Easter bake, but it will certainly make a more-than-occasional-appearance.

Paska
Mainly adapted from Olga Drozd on Ukrainian Classic Kitchen and Korena in the Kitchen
Makes 1 large round 9-inch loaf
5-6 hours, including rising/resting time
2 teaspoons active dry yeast
1½ teaspoons sugar
1½ teaspoons flour
2 tablespoons warm water
6 cups flour (you may use less) – I combined all-purpose and bread flour: about 3 cups of each
1 cup warm milk
1½ whole eggs (¼ cup or 2 fluid ounces) (I agree this is annoying, but you can eat the other egg-and-a-half for lunch, right?)
4 egg yolks
1/3 cup granulated sugar
½ teaspoon salt
½ teaspoon vanilla
Zest of ½ a lemon (optional)
Zest of ½ an orange (optional)
2 tablespoons brandy (optional)
4 tablespoons (¼ cup) butter, melted + more to grease the pan, if you want to use butter
¼ cup vegetable oil
1 egg, separated, for decorations and glazing


  • In a large bowl, combine the yeast, 1½ teaspoons sugar, 1½ teaspoons flour, and 2 tablespoons warm water. Set aside for 10-15 minutes to activate the yeast.
  • Once the yeast is bubbly and smells like bread, add 2 cups of all-purpose flour and all of the milk; stir together with a rubber spatula or wooden spoon or knead by hand until well integrated, then cover and let rise 30 minutes.
  • Near the end of the 30 minute rise, combine the 1½ whole eggs, 4 egg yolks, and sugar in the bowl of a stand mixer and whisk with the paddle attachment until the mixture becomes pale and thick – this will take about 5 minutes.
  • Add the risen yeast and flour mixture to the whisked eggs. Add the salt, vanilla, zests and brandy, if using, melted butter, and oil. Switch to the dough hook and begin to combine at the lowest speed.
  • After a minute or two at the lowest speed, increase to medium low and continue to knead, adding flour as needed to create a smooth, elastic dough. I used both all-purpose and bread flour in my dough, but you could likely use all one or the other with similar results. Kneading in the stand mixer at medium low will take 7-8 minutes.
  • After you bring the ingredients together you could also tip out onto a well-floured board and knead by hand, adding flour as needed. By hand this will take 10-15 minutes.
  • Once you have a smooth, elastic, plastic-y dough (mine passed the windowpane test), let it rise, covered, in a large bowl for 1-2 hours until it has doubled.
  • While the dough is rising, prepare the baking pan: butter or grease a 9-inch round baking pan – it’s best if this has high sides but low sides work too. Cut a piece of parchment paper long enough to make a full circle around the inside of the pan. Fold it in half so you have a double layer, then wrap it around the inside of the pan to make a kind of collar – this will ensure the loaf rises straight up instead of bulging out as it bakes. You can use a paperclip at the top to hold the edges of the collar together.
  • Punch down the risen dough and remove 1/3 of it – this is for decorations. Set this 1/3 aside in a medium oiled bowl. Carefully place the other 2/3 of the dough into the prepared baking pan, being careful not to push the collar out of place. Cover both portions of dough and let rise 30 minutes.
  • After the dough has rested and risen for 30 minutes, use the 1/3 portion to make decorations. A twist or braid around the outside of the loaf is traditional, as are braided or twisted crosses, suns, flowers, and other Christian or spring-like shapes.
  • Separate the final egg, whisking the white until slightly frothy. Paint the top of the main loaf with the egg white, then place on your decorations. You can use toothpicks to keep them in place, but as they bake the egg white will serve as “glue.”
  • With all decorations adhered, cover and rise a final 30 minutes. During this rise, preheat the oven to 350F.
  • Just before baking, remove the cover from the loaf. Beat the separated egg yolk with a little bit of water, then paint this over the top of the loaf, decorations and all, for a glaze.
  • Bake in the 350F oven for 10 minutes, then turn the heat down to 325F and bake an additional 45-50 minutes, until the temperature inside is at least 190F.
  • Cool in the pan at least 30 minutes to ensure structural soundness, then remove from pan and parchment collar, carefully extract toothpicks, and cool on a wire rack. Most instructions say cool completely. We were only able to bring ourselves to wait an hour before slicing out fat wedges and having a taste while it was still warm.

Breads of the World: ojos de Haman

It’s rare for me to be organized enough to produce a holiday dish sufficiently in advance of the actual holiday that you, my readers, could – gasp – make the dish for the holiday if you so desired. And yet here, for once, I’ve managed it. Purim is at the end of this week, an important holiday in the Jewish calendar, which celebrates the overthrow of the evil Haman. Royal advisor to the King of Persia, Haman planned to slaughter the Jews, and was thwarted by Esther, the queen, and her cousin Mordecai.

Purim is celebrated with feasting and can be, by all accounts, quite raucous. My friend M. relates childhood memories of delivering and receiving Purim baskets to and from family and friends, akin to an Easter basket, but more likely to be filled with hamantaschen and preserves than with chocolates and egg-shaped candies. In the Talmud, M. says, Jews are instructed to make themselves “so fragrant with wine” that they can’t tell the difference between “wicked is Haman” and “blessed is Mordecai.” This intensity of celebration sometimes produced dangerous results, as people would fall over at Temple (or right into the fire, per M). Other Purim traditions include retelling the whole story (the “Purim Spiel”), and using noisemakers to drown out Haman’s name every time it is uttered, which sounds like excellent fun.

The most common food related to the holiday is hamantaschen, the delicious triangular cookie with sweet filling, which I’ve seen translated both as “Haman’s pocket” and as “Haman’s ears.” Deb at Smitten Kitchen has a new one, and Jake Cohen has opinions about the filling. Kreplach, a savory dumpling, is another popular option.

Neither of these is bread, of course, but while I was poking around that weird neighborhood “the internet,” I came across two possibilities for this year’s project. Keylitsh, according to the blog Poppy and Prune, is an elaborately braided Eastern European challah served for numerous holidays. At Purim, the fancy braids are symbolic of the rope used to hang Haman. I am well versed in the three-strand challah I learned from my mom, and I’ve tried a six-strand once that went… poorly… so I kept going.

Poppy and Prune goes on to say:

If that’s not enough gore for your Purim table, I have just the thing for you: a traditional Moroccan bread known as boyoja ungola di Purim or ojos de Haman. This is a round, flattish loaf decorated with two hard boiled eggs in their shells, which are meant to represent Haman’s eyes. Each egg is held down with two thin strips of dough arranged in an x, and, once the bread is baked, it’s a traditional to rip them out of the loaf—you know, like ripping Haman’s eyes out. The dough for this bread is traditionally studded with anise and sesame seeds, as well as coarsely chopped almonds.

This sounded promising, and delightful, so I set about finding more information and a recipe that incorporated these flavorings. Kosher Cowboy offers a story about the symbolism of this bread, though I’m unclear on his source.

Some incarnations of this bread don’t stop at the eyes, but decorate the loaf to look like a magnificently evil head, complete with a long beard darkened by poppyseeds and round cheeks that puff up during baking. Mine, as you can see, were not that elaborate, although I appreciate that where the dough tore slightly below the eye crosses it left a pale stripe, then a darker, browned lower half that could, if you squint a bit, be seen as a thick beard.

Many of the recipes and traditions of this loaf come courtesy of Maggie Glezer’s A Blessing of Bread and Phyllis and Miriyam Glazer’s The Essential Book of Jewish Festival Cooking,  both of which look like beautiful books that might end up on my already-overpacked cookbook shelves…

The best part about this bread, besides eating it, is the shaping. It’s a lovely dough to work with, as are most enriched doughs, elastic and puffy. After lightly flattening and scoring the main ball, you get to poke in two divots, insert a hard boiled egg* into each, and add two pieces of dough in an X shape across the eggs and pressed into the main loaf, where they hold the eggs in place during baking. If you’re going the fancy route, you can use additional pieces of dough to make Haman’s facial features or, if you’re keeping it comparatively simple, as I did, you can just snip around the edge of each loaf at one inch intervals with scissors, which makes a lovely pattern like sunflower petals or, I suppose, like thick locks of Haman’s beard and hair.

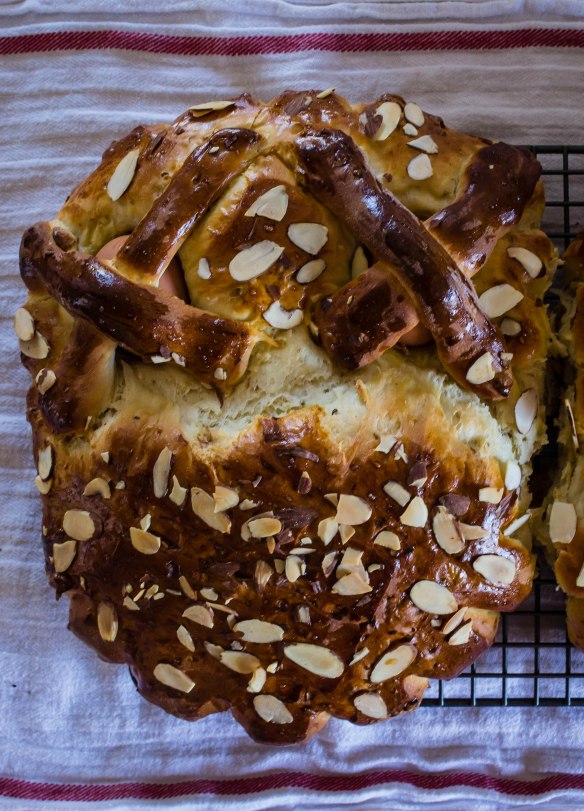
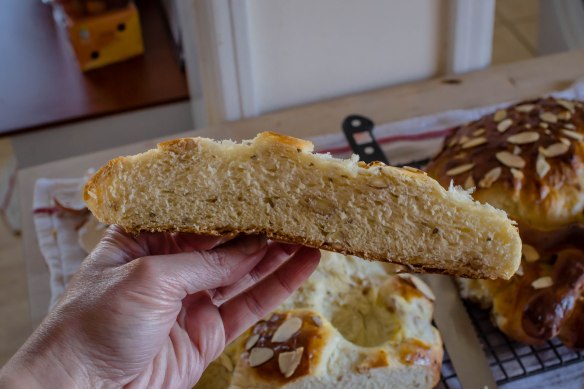
As expected, in addition to being a lovely dough and a gorgeous loaf – deeply golden brown, shiny from egg wash, and scattered with sliced almonds – it is also delicious. We found it slightly sweeter and also less eggy than the challah my family makes, and the nuts and seeds were a lovely addition. I wasn’t sure how I would feel about chopped almonds inside, but I found I loved the added texture. I tend to avoid anise and anise-flavored things, but here it’s such a small amount it isn’t overpowering, and I found it reminded me slightly of a good, traditional biscotti (in flavor alone, though – the texture of this bread is much lighter and softer). Oh, and peeling back the X of dough to gouge out the hard-boiled egg “eye” on either side is, as you can imagine, also a delight.

Because Purim involves exuberant eating and drinking, many of the recipes I found for this bread, which is essentially an unbraided challah with added flavoring agents, make a LOT. I’m talking, 8 cups of flour, 3-4 loaves a lot, or even more: some recipes offer the more modest quantities for 3-4 loaves, and then provide instructions for a full 5 pounds of flour. I scaled mine back a little bit to just 2 loaves, one of which, eyeballs already extracted, is sitting happily in our freezer waiting for a weekend when we want something more celebratory than my standard sourdough toast.

* thanks to careless proofreading on a recent Whole Foods order, I ended up with a package of medium – rather than the grocery standard large – sized eggs. I used these smaller ones to make Haman’s hard-boiled eyes and was pleased with the results. Large eggs would work too, but depending on the size of your loaf they might be a tight squeeze to fit in.


Ojos de Haman
Adapted from Phyllis Glazer’s recipe at The Times of Israel, and shaping instructions from STL Jewish Light
Makes 2 loaves
3½-4 hours
5 1/3 cups all-purpose flour
1 TB + 1tsp active dry yeast
2/3 cups granulated sugar
2 tsp sesame seeds
2 tsp anise or fennel seeds
2/3 cups coarsely chopped almonds
½ tsp salt
2 large eggs
1/3 cup vegetable oil
1½ cups warm water
4 hard boiled eggs (I used medium eggs because I happened to have some and found they fit well. Large eggs would work too, but might be a tight squeeze on Haman’s face)
1 yolk + 1 tsp water, to glaze
2 TB sliced almonds


  • In a large bowl or the bowl of your stand mixer, combine the flour, yeast, sugar, sesame seeds, anise or fennel seeds, and chopped almonds. Whisk or mix to combine with the dough hook. Once well combined, add the salt and whisk in.
  • In a smaller bowl or a large glass measuring cup, stir together the eggs, oil, and warm water. Make a well in the flour mixture and pour in the wet ingredients. If you’re working with a stand mixer, knead with the dough hook on medium speed into a soft, slightly sticky dough: about 7-8 minutes. If you aren’t using a stand mixer, first stir the wet ingredients into the dry with a wooden spoon or a sturdy spatula, then turn out onto a floured board and knead by hand until soft and smooth: about 8-10 minutes.
  • Let the dough rise, covered with plastic wrap or a clean towel, until doubled: 1 – 1½ hours. Meanwhile, hard boil the eggs: bring a small pot of water to a rolling boil, then use a spoon to gently add the eggs. For large eggs, boil 10 minutes and then remove eggs and set aside to cool. For medium eggs, boil 8 minutes and then remove and set aside to cool. Remember: the eggs will bake along with the bread.
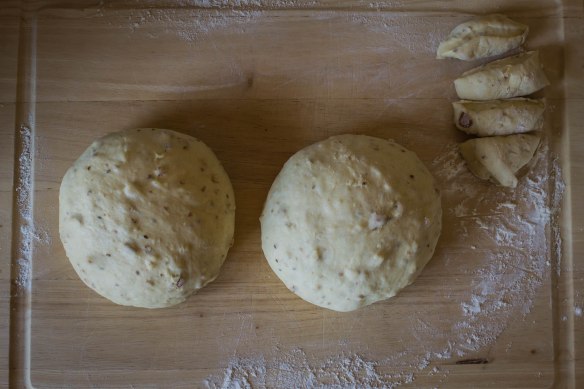
  • Once the dough has doubled in size, turn it out onto a lightly floured board and remove a piece the size of a small fist. Cut this into four pieces, then roll each into a thin strand about 6 inches in length. Cut each thin strand in half: these are for your Xs to hold in the egg “eyes.”
  • Divide the remaining dough in half. Working with one half at a time, roll into a ball, then use a rolling pin or floured hands to flatten into a disk 8-9 inches in diameter. With a razor blade or a sharp knife, slice a shallow crosshatch pattern into the surface of the dough.
  • Using your thumb or the knuckle of your index finger, firmly press two indentations into the dough about two inches apart in the top third of the disk. Place one cooled hard-boiled egg into each indentation. Use your reserved strips of dough to make an X shape across each “eyeball,” pressing firmly into the rest of the loaf to adhere, as in the photos above. Transfer to a baking tray lined with parchment paper. With scissors or a sharp knife, snip around the edge of the loaf at 1-inch intervals to create a petal pattern. Repeat with remaining loaf.
  • Let the shaped loaves rise, covered with a clean kitchen towel, for 30 minutes. Meanwhile, preheat the oven to 350F.
  • After 30 minutes, combine the egg yolk and 1 tsp water in a small bowl. Remove the kitchen towel and glaze the loaves with this egg wash, trying to avoid the hard-boiled eggs as much as possible. Scatter or press on the sliced almonds, then bake in the preheated 350F oven for 20-25 minutes, until they are deeply browned.
  • Cool at least 15-20 minutes before eating. We started by peeling off the X of dough to pluck out Haman’s eye, but you should proceed as desired. Enjoy!


Breads of the World: Simit (project cook, no recipe)

One of these days, I’m going to have a bread post for you that has a clear recipe, accurate cultural and historical background, and beautiful pictures. What I have for you this week is a DELICIOUS bread, in spite of a narrowly skirted disaster I wasn’t sure would work.

Simit is a much lauded bread from Turkey: a deeply burnished, twisted ring coated in crunchy, well-toasted sesame seeds (though sometimes other seeds like poppy or flax are used), which cling on thanks to a pre-baking dunk in a thin syrup of water and molasses. They are sold by street vendors who sometimes push trolleys, but sometimes carry dozens and dozens of these rings, carefully and intricately stacked and balanced, on their heads, calling out the relative heat and freshness of their wares. More than one site I explored while looking for a recipe and information about this bread reminisces eating simit with Turkish tea while on an Istanbul ferry ride. It even holds a place in the art world: there is poetry about simit, though I wasn’t able to find an example in translation. Several artists have painted simit vendors selling their wares. This bread is a cultural icon.

It’s a bit worrying, then, that during the process of making this batch I wondered if there was a bread version of Cake Wrecks I could submit my attempt to. This is the fault of neither the bread itself nor the recipe I used – the baker whose version I made created a clear, fairly easy-to-follow set of instructions and ingredients (which I’ve linked to below). It was just… a series of challenges I wasn’t sure I’d be able (or willing) to overcome: my sourdough starter was sluggish. The resulting dough Just. Wouldn’t. Rise. When it finally did and I made the twisted rings, they were almost unmanageably sticky and welded themselves to both my silicone baking mats (thanks, Mom!) and the plastic-wrap I carefully draped over them. Basically, my dough was just too soft to work easily with.

My last ditch attempt to save the bread was to shove the still raw, mostly-risen rings into the refrigerator, hoping that would firm them up somewhat, since I knew I still had to dunk them first into the water and molasses dip, and then into a heaping pile of sesame seeds to coat both sides.

Delightfully, this worked. I was able to pry the sticky rings of dough up from their mats, dunk them in hot liquid and then sesame seeds, transfer them back to the baking sheets, and they didn’t fall apart! They didn’t get misshapen (at least not any more than they already were… Turks around the world, I’m sorry for my maltreatment of your beautiful bread)! And most gratifying of all, they rose in the oven into gorgeous, deeply bronzed rings well-coated with sesame seeds, and though we had them as part of a meze platter for dinner rather than the traditional tea pairing, we could see why they are so beloved: that nirvana of crunchy crust and chewy interior, the discernible bitter sweetness of molasses, like a caramel gone almost too far, and the toasty sesame seeds. I tore off a piece to try while I was cleaning up the kitchen, and I kept finding myself wanting another bite.

Because my own method was a bit… shall we say agitated… I’m not going to post a recipe here today. Please use Cenk’s sourdough simit recipe over at his site Cafe Fernando. It’s simple, the photos are beautiful, and I’d bet my next paycheck it’s a better representation of this classic twisted ring than my ministrations would offer. And yes, you really do need that enormous quantity of sesame seeds!

I will say, if you decide to make simit, I’d suggest one adjustment to Cenk’s method. As you’ll see, he calls for creating the twisted rings by rolling out a piece of dough into a 35 inch rope, then cutting that in half and twisting the halves together. In my small kitchen with limited counter space, I found it slightly easier to make two 18-inch ropes instead (try to keep them even in thickness or even a little thinner at each end, so, basically the opposite of my photograph…) and just twist them together, then connect the edges to make your ring.

Reflections: Jubilee Red Beans and Rice (no recipe), and Bread in a Pandemic

Jubilee Red Beans and Rice:

I don’t have any bread to share with you today, based in part upon some complications I’ve realized my “Breads of the World” project poses. More on that below if you’re interested, but first, instead of a typical recipe post I thought I’d share a few images and considerations about the meal we ate on Saturday. In an effort to diversify my cookbook shelves, one of my recent acquisitions is the beautiful volume you see above: Jubilee: Two Centuries of African American Cooking by Toni Tipton-Martin. As numerous Black cooks and food historians have in recent years, Tipton-Martin wants to acknowledge the tremendous role of Black cooks in “soul food” and “Southern food.” But she also wants to push beyond that – to restrict African American food to stereotypes is to perpetuate caricatures and poor representation. Tipton-Martin’s recipes come with history lessons – not all are extensive, but she recognizes and shares the background and development of the dishes she offers, sometimes with original recipes from centuries-old collections, and then her updated or adapted version.

Although the book certainly pushes beyond the borders of “The South,” on a cold, rainy day in Los Angeles I wanted something deep and warm and spicy I could spend the afternoon checking on, so I went with red beans and rice. Tipton-Martin’s recipe headnote is about Louis Armstrong and his devotion to the dish despite changing circumstances, a consideration of how traditions are sustained even as they undergo adaptation. Unless I’m baking, these days I tend to see recipes as guidelines rather than rules, but this one I followed to the letter, and it was basically perfect. A mound of hot, buttered rice underneath and a final sprinkle of cayenne pepper on top, and we were the happiest of quarantine campers.

Bread in a Pandemic:

Speaking of quarantine, while I continue to be enthusiastic about my “Breads of the World” project, I’m starting to realize it carries a few distinct challenges, emphasized thanks to pandemic conditions. First and perhaps most obvious: N. and I are going to eat a lot of bread this year. That doesn’t sound like a big or particularly intelligent revelation, I know, but it is a blessing-curse I hadn’t quite realized the magnitude of when I started collecting ideas. As my friend D. commented the other day, when you are a happy household of two working from home, baked goods weigh more heavily (all puns intended) in your day-to-day. Were this a typical year, I would just bring my bread of the moment to work and leave it in the department mail-room. It would be gone by mid-afternoon, and I’d be headed home ready to think through the next one. Now, although I certainly could (and probably should) engage in some bread-drops for local friends (what would you call a drive-by bread drop? A roll-out? A loafing?), the reality of making a loaf or a batch of buns is that most of the time N. and I will wind up eating them all. “We’re going to be having a lot of bread and salad this year,” I told him yesterday. He was delighted, but I can imagine weekly dosings might become less appealing than the panem et circensus alternative.

Second, there are a lot of breads to choose from! Again, not exactly an epiphany, but I could easily bake one or even two a week and still have pages of recipes to sift through in December. I don’t agree with all of their choices, but the list of breads on Wikipedia is both an entertaining read-through and a fair example of what I mean. I’m not obsessed with authenticity (and I don’t want every selection to turn into the intensive research I did for the naan-e-komaj I made earlier this month), but because I do want this project to be representative in both its scope and its recipes, I do want to look into the breads I’ve chosen at least a little bit, and if possible, to find a recipe or an overview from someone of or familiar with the culture or region that produced the bread. That takes time. Especially when the semester begins, my imaginary second career as a culinary historian will resume its usual status as unpaid-side-hustle, which means less time for exploring and writing about the breads I decide to recreate.

Third, and related to the point about being representative, breads from areas that are typically less well represented also often use less typical, and thus less accessible, flours. Cassava, teff, and millet flour are certainly not impossible to locate, especially with the whole internet at my literal fingertips, but they aren’t on the shelves at my usual grocery store. And since I’m not shopping as often as I would be under non-COVID conditions, I can’t just decide on a whim to make, say, pao de queijo one afternoon unless I already have tapioca flour on hand. That’s not a complaint, per se, but it is a realization that I’m going to have to plan around. You know, like everything else these days!

Until next time, then…

Breads of the World: Naan-e-komaj

Last week I took you on my own rabbit-hole investigation of a Persian bread called komaj or naan-e-komaj that I had chosen as the inaugural bread for my 2021 project. This week, I present the end result: a set of soft, pillowy, sunshine-yellow date-stuffed buns, and the recipe I used to make them. Since you’ve already got the potential history behind them – I’ll admit, the trail I followed last week could just be a set of coincidences; sometimes different dishes are called the same thing – I’ll try to keep my introductions here short and just give you some thoughts on process and flavor, and plenty of photos to enjoy.

Stretching the dough for the “windowpane test”

Almost there…

These are definitely a “project cook” item, as I suspect most of the breads I offer this year will be. Yeast-risen bread needs time, and these require not the usual two, but three rises before they are ready to bake. I tried to streamline a bit: unable to compromise the length of the rises much, even in my unseasonably warm Southern California kitchen, I settled instead for simplified shaping. The Maloufs, and the baking group who led me to their recipe, shape their buns with a cookie cutter, rolling out a rectangle of dough, brushing with water, milk, or egg to ensure adherence, placing the filling, folding the dough over itself to encase the filling, and stamping out a round or heart shape. I decided instead to go with my usual bun shaping method, which consists of folding, pinching, and rolling a rectangle of dough into a ball using the slight tacky tension between dough and board to seal the seam. You can see this process in my photos below or, if you need a more detailed step-by-step, check out yesterday’s instagram post for a short (awkward, one-handed) video demo of the folding and rolling: over there I’m just blackberryeating.

The only disadvantage to my method is that it can, if you’re not careful, result in the filling starting to protrude through the now-overly-thin top layer of dough. The solution is, I think, to flatten the corners rather than the middle of your dough rectangle before filling and folding, and to execute the roll-to-seal process fairly quickly. The good news is, since you’re making 16 buns you do have ample opportunity to perfect your method.

Shaping the buns: place about 1 teaspoon date filling in the center of a dough rectangle. Keep the center thicker than the corners, if you can.

Fold the corners of the dough rectangle up over the filling, then pinch together into a little purse.

Roll the ball, pinched side down, in little circles on a barely floured board with your fingers in a cage shape.

Rolling in a little circle between your fingers and palm helps close up the bottom seam.

This was my bottom seam – now it’s starting to seal together. A few more rolls and it will be ready!

Ultimately, these were 100% worth the time and the research. They are delicious. The date and cardamom filling, to which I couldn’t resist adding some orange zest, is rich and sweet, but each bun holds only a teaspoon or so, which means it’s also not overwhelming. The bun itself is soft with a slight chew, not too sweet, and on the edge of doughy inside, which makes me think of an almost-underbaked challah, or the perfectly moist interior of a Hawaiian roll. Yours will be slightly less bright yellow than mine – my hand slipped as I was measuring out turmeric and I ended up with a fair bit more in the mix than my recipe calls for. It may seem a bit odd to have cumin – a decidedly savory flavor – along with a sweet date filling, but don’t skip it. The play between the toasty, almost smoky cumin and the sugary dates is lovely, and makes these buns less a dessert item, perhaps, but a definite contender for breakfast, and perfect as a mid-morning or mid-afternoon snack with tea or coffee.

(Naan-e-)komaj
Makes 16 buns
About 3½ hours
This recipe is my version of two interpretations: it starts with the recipe from Saraban: A Chef’s Journey Through Persia, Greg and Lucy Malouf’s recreation of the bread they loved in southern Iran, and pulls in some suggestions from SaffronAmbrosia, the site of a participant in the baking group who auditioned and adapted the Maloufs’ recipe. The addition of the orange zest is my own; given the love of rose- and orange-blossom water in Persian cooking, I couldn’t resist a bit of citrus flavor to brighten the date filling.
For dough:
2 teaspoons active dry yeast
2 tablespoons warm water
pinch + ¼ cup sugar, divided
⅔ cup warm milk (or water)
1½ tablespoons olive oil
1 egg
3¾ cups bread flour
1 teaspoon turmeric
1 tablespoon whole cumin seeds, toasted and lightly crushed, divided
¾ teaspoon kosher salt (or ½ teaspoon table salt)
For filling:
12-15 medjool dates, pitted and cut into chunks (if they are firm rather than soft and sticky, soak them in hot water for about 10 minutes before chopping)
2 tablespoons unsalted butter, softened
1-2 teaspoon(s) ground cardamom (start with 1; cardamom is strong!)
zest of ½ an orange, optional
pinch of salt, optional
To finish:
Milk, cream, or egg yolk to brush on top before baking
Optional: powdered sugar to dust after baking


  • Combine the yeast and 2 tablespoons warm water in a large bowl (I used the bowl of my stand mixer) and let sit for 10-15 minutes, until the yeast is bubbly and smells like bread. Using a wooden spoon or the paddle attachment, stir in the remaining sugar, warm milk (or water), olive oil, and egg.
  • Now add 3 cups of the bread flour, the turmeric, 2 teaspoons of the cumin seeds, and the salt. Stir with a spoon or the paddle attachment until the dough is starting to come together – it will have a rough, shaggy consistency. Switch to the dough hook or, if you aren’t using a stand mixer, tip the mixture out onto a well-floured board and knead until the dough becomes smooth and pliable and is no longer sticky. If it seems too wet, add the remaining flour ¼ cup at a time as needed – you might not use the whole amount. I ended up using only 3¼ cups total. When your dough is smooth and elastic, set it in a lightly oiled bowl, cover it with a clean cloth or plastic wrap, and set it aside until it has doubled – about an hour, depending on how warm your kitchen is.
  • At the end of the first rise, when the dough has doubled in size, “punch it down” by deflating it gently with your fist, then re-cover and set it aside to rise again for another hour. During this second rise, make the filling: combine the dates, butter, cardamom, orange zest, and optional pinch of salt. You can just mix them in a bowl if you want a chunky filling, or if you want something smoother, like a paste, use a food processor and pulse until the filling reaches your desired consistency.
  • When the dough has finished its second rise, turn it out onto a lightly floured board and divide it into 16 even pieces. I find this is easiest by first dividing into 4 large pieces, then cutting each in half and then in half again. Working with one piece at a time, roll or gently pull to flatten into a rough rectangle. There are two approaches you can use to shaping these. My method is to roll round buns, which I think is slightly easier but your filling may end up off-enter. The Maloufs and the baking group stamp out theirs with a round or heart-shaped cookie cutter, which is pretty and results in a centered filling, but requires rerolling the scraps. If you’d like to use that method, go here for instructions.
  • If you’re using my method, working with one piece of dough at a time, add a teaspoon of filling into the center of the dough rectangle. Fold each corner up and over the filling, trying not to stretch the dough too much. Pinch together the folded corners into a seam, but don’t press too hard, or the filling may start to poke through the top. Turn the dough ball over and form your hand around it like a cage, then roll gently with very little pressure in light circles on the board to form a smooth, taut round (see Joe Pastry’s excellent tutorial if you need help with this, or check my  instagram post from yesterday for a video demo). Let the shaped, sealed buns rise, covered, on the cookie sheet for about 15-20 minutes.
  • While the buns have their final rise, preheat the oven to 400F. After this final rise, paint the tops of the buns lightly with milk, cream, or an egg wash (egg yolk combined with 1-2 teaspoons water). Sprinkle the remaining 1 teaspoon cumin seeds over the top of each one, then bake in your preheated 400F oven for 8-10 minutes.
  • Let the finished buns cool on a rack for at least 10-15 minutes, then dust with powdered sugar if you wish. Serving with tea, like a spicy-sweet chai, or a cup of Turkish coffee would be ideal. Like many sweet buns these are best the day they are made, but leftovers are easily and deliciously reheated.

A small hungry helper who protests that she did not get any komaj to sample…