Cheesy Brussels and Bacon Mashed Potato Cakes

Generally speaking, N. and I are boring restaurant attendees. One drink apiece, no appetizers, an entrée for each, and by then we are too full for dessert. The most exciting thing we do (hold your breath, folks) is to share plates, particularly when we are torn between what we want to order. This is likely borne out of graduate school poverty, though in a world of extravagant portion size it seems like a reasonable practice to continue.

Food Blog January 2014-3026But once in a while, an appetizer or a side dish sounds so luscious, or so interesting, or so, I don’t know, good (are we still allowed to use that word?), that we can’t resist it. At one of our more favorite haunts a week or two before the holidays, we were enticed by just such a side – a craggy mass of mashed potatoes threaded with strands of Brussels sprouts and bacon, a suggestion of cheddar, and broiled until the top was smattered with crusty dark bits. It sounded like a dream. It was… fine.

Food Blog January 2014-3014Photo Friday 2013-2940Food Blog January 2014-3015
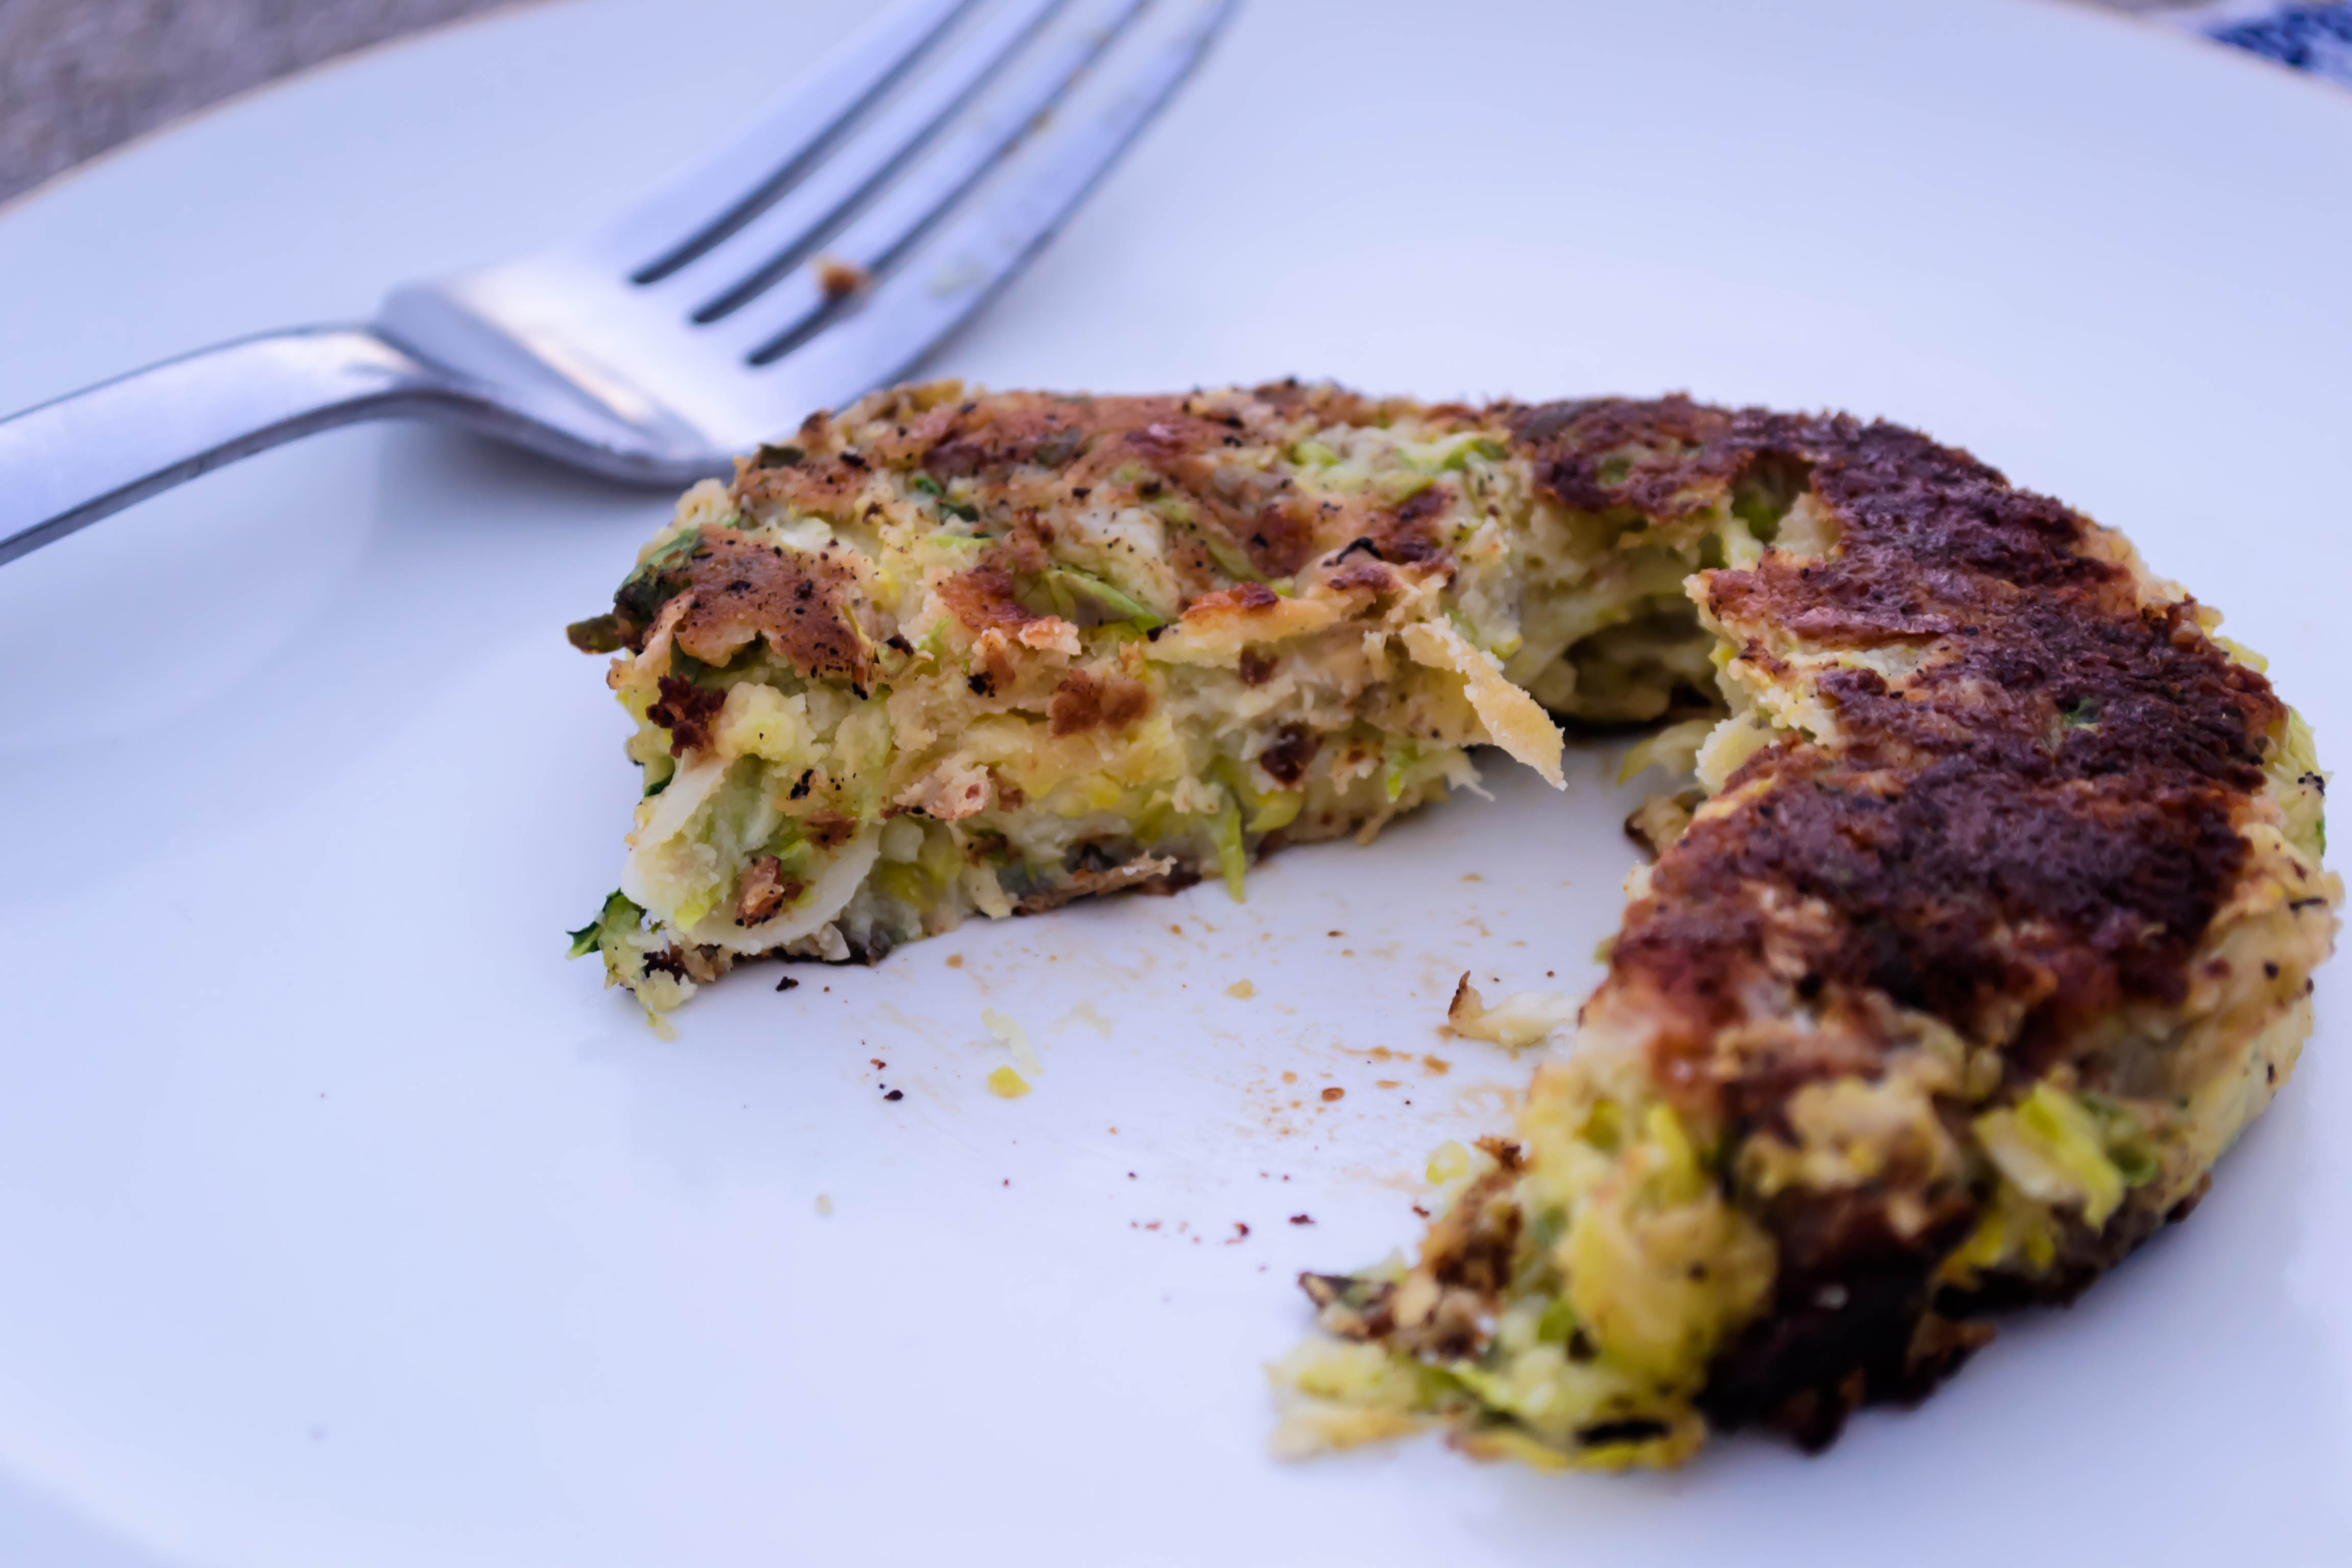
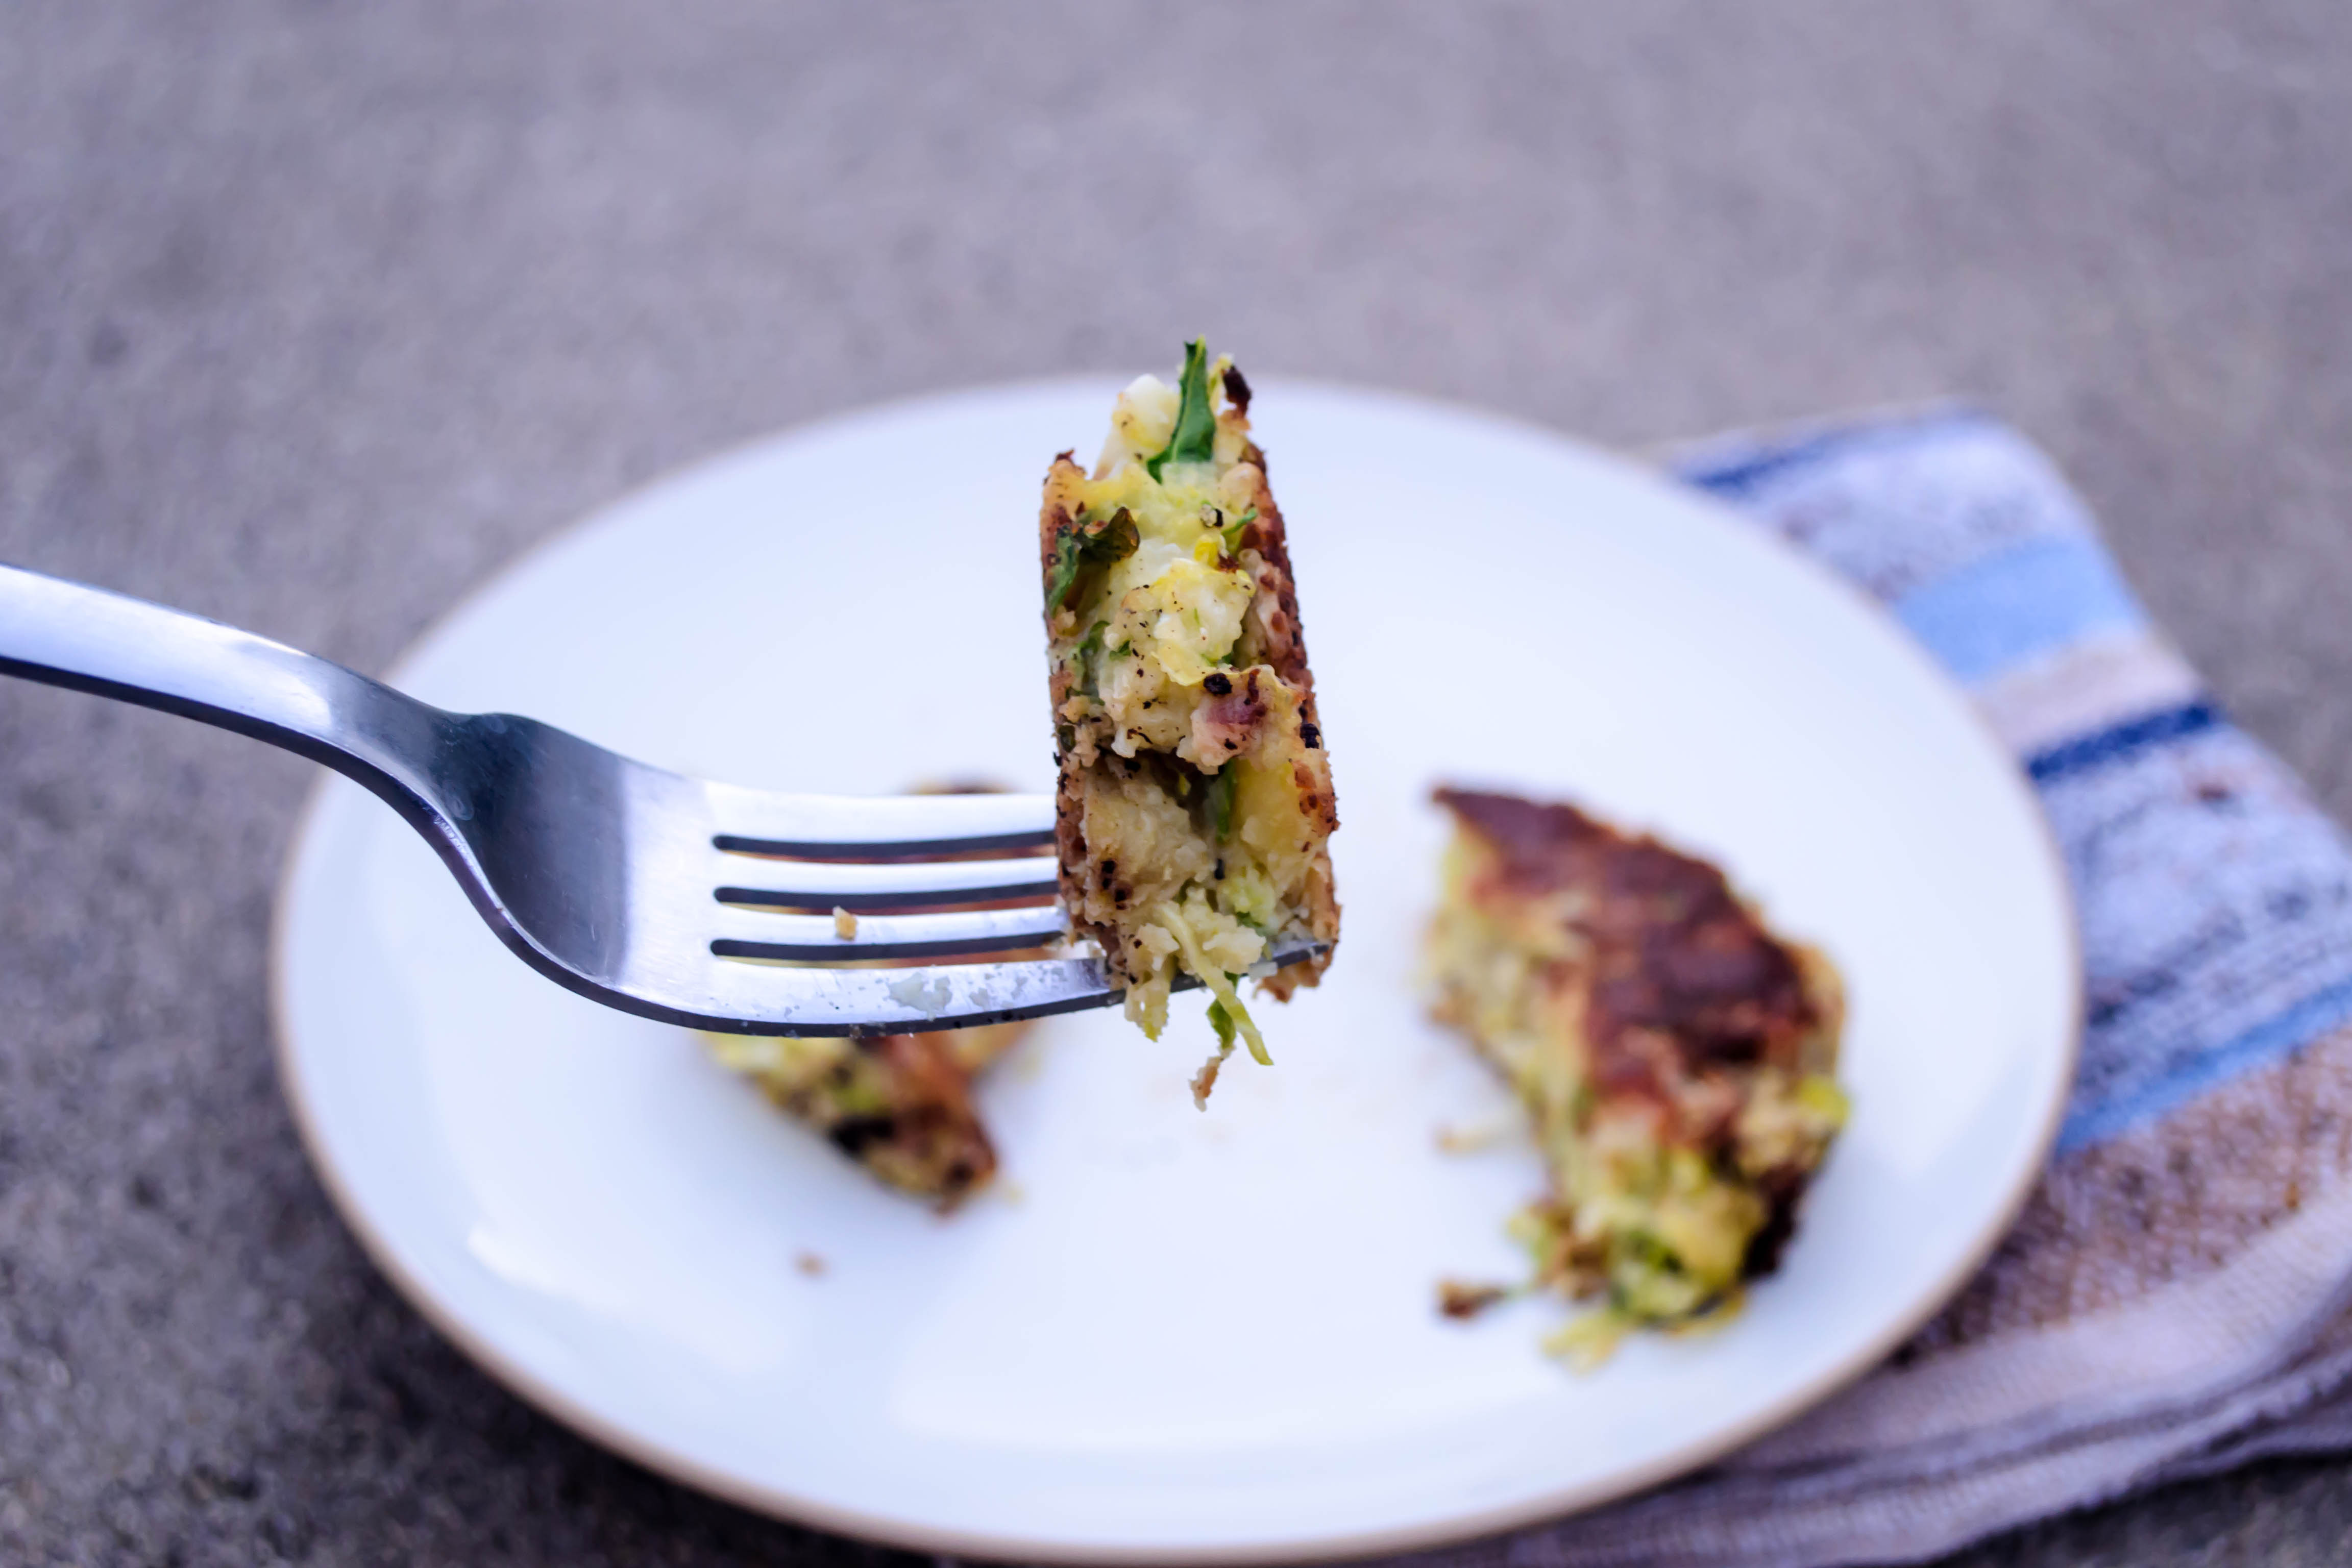
As I ate it, I couldn’t help but feel that the flavors could have been stronger. More cheese. More bacon. More crunch. It needed to be, perhaps not a heap of mash subjected to broiling, but shaped into tender cakes and fried in a pan. Yes, cheesy patties shot through with ribbons of Brussels sprouts and chunks of bacon, fried up in the very bacon grease the meaty bits had expelled as they cooked. Crunchy, creamy, melting, with enough green that a very imaginative person could just barely declare them virtuous.

Food Blog January 2014-3016What I ended up with was a marriage of that classic British leftovers dish bubble and squeak (though certainly in a modern reinterpretation), and a latke so unkosher that we might as well have piled shrimp on top and called it a day.

Food Blog January 2014-3052Yukon gold potatoes have quickly become my standard for mash (I could even call them the “gold” standard, but you might groan at that, eh?), and this dish is no exception. Their flavor is terrific – hearty and rich – and they whip into lovely buttery fluff. And here, where texture is intentional, there is no need to peel them. The tissue-thin skins shred into the mix and echo the ribbons of Brussels sprouts. Chewy crisp hunks of bacon stud the cake with smoky saltiness, and do yourself a favor and use the sharpest cheddar cheese you can find – it needs to be saliva-inducing to stand up to the other flavors here. A single egg, lightly beaten and worked in, holds the cakes together, and then it’s just a question of heating up your cast iron skillet and frying them to order. I can imagine scarfing these for breakfast, lunch, or dinner, and I’m admitting nothing, but they are even acceptable stolen cold out of the fridge.

Food Blog January 2014-3053*A note about bacon grease: I found, as I fried these, that bacon grease lends terrific flavor, but because it can be shot through with remnants of browned bits from frying the bacon, it can make the exterior of the cakes quite dark. To prevent this, as in the directions below, I recommend that you pour out the grease, reserving only a tablespoon or two. If you’re feeling particularly fussy, you can strain this reserved portion, but I wouldn’t be too worried about that. Discard the rest (or save for some other application) and wipe out your pan in between frying the bacon and frying the cakes. When it is time to fry again, combine the reserved bacon grease with some olive oil. You’ll still get the smoky, unctuous flavor, but the olive oil raises the smoke point and will produce a golden, rather than an almost-black, crust.

Food Blog January 2014-3054Cheesy Brussels and Bacon Mashed Potato Cakes
Makes 12-14 cakes of 3-inch diameter
4 medium Yukon gold potatoes (about 1 pound), each cut into large chunks of roughly equal size
2 tablespoons milk
Salt, pepper, and garlic powder to taste
8 ounces Brussels sprouts (about 12 large), stemmed and stripped of any discolored or damaged outer leaves
8 ounces bacon, diced
4 ounces shredded cheddar cheese, the sharpest you can find
1 egg, lightly beaten
2 tablespoons bacon grease reserved from frying the bacon
2-4 tablespoons olive oil
  • Deposit potato chunks in a pot of salted water, bring to a boil, and cook until they are fork tender but not mush. This should take, depending on the size of your potato chunks, 7-10 minutes after the water comes to a boil. Drain and cool potatoes completely.
  • While potatoes are cooling, fry the bacon pieces in a skillet (my preference is cast iron) over medium heat until they are golden, almost crispy, and cooked through. Fish them out with a slotted spoon and set aside on a plate lined with paper towels. Reserve 1-2 tablespoons of the grease, discard the rest, and wipe out the pan to clear any bacon bits residue (see note above).
  • Using the slicer disc on a food processor (or a very steady hand and a sharp knife), shred up the Brussels sprouts into a mixture of ribbons and wafer-thin slices.
  • Shred the cheddar cheese.
  • By this time, your potatoes should be just about cool! When they are at room temperature, place them in a large mixing bowl and add the milk, salt, pepper, and garlic powder. Whiz them up with an electric mixer until more or less evenly combined. It won’t be a completely smooth mixture, because we’ve left the skins on, but it will come together into a buttery golden mash.
  • Add the cheese, Brussels sprouts shreds, and bacon pieces to the potatoes and mix well. I started out using a rubber spatula for this, but quickly switched to my hands, which did a much more thorough job. Taste for seasoning and add more salt, pepper, and garlic powder if needed.
  • Add the lightly beaten egg and mix to combine.
  • Using your hands, shape the potato cakes. Gently form rounds slightly bigger than a golf ball, then flatten them into patties about 3 inches in diameter. As you finish each patty, set it aside on a plate.
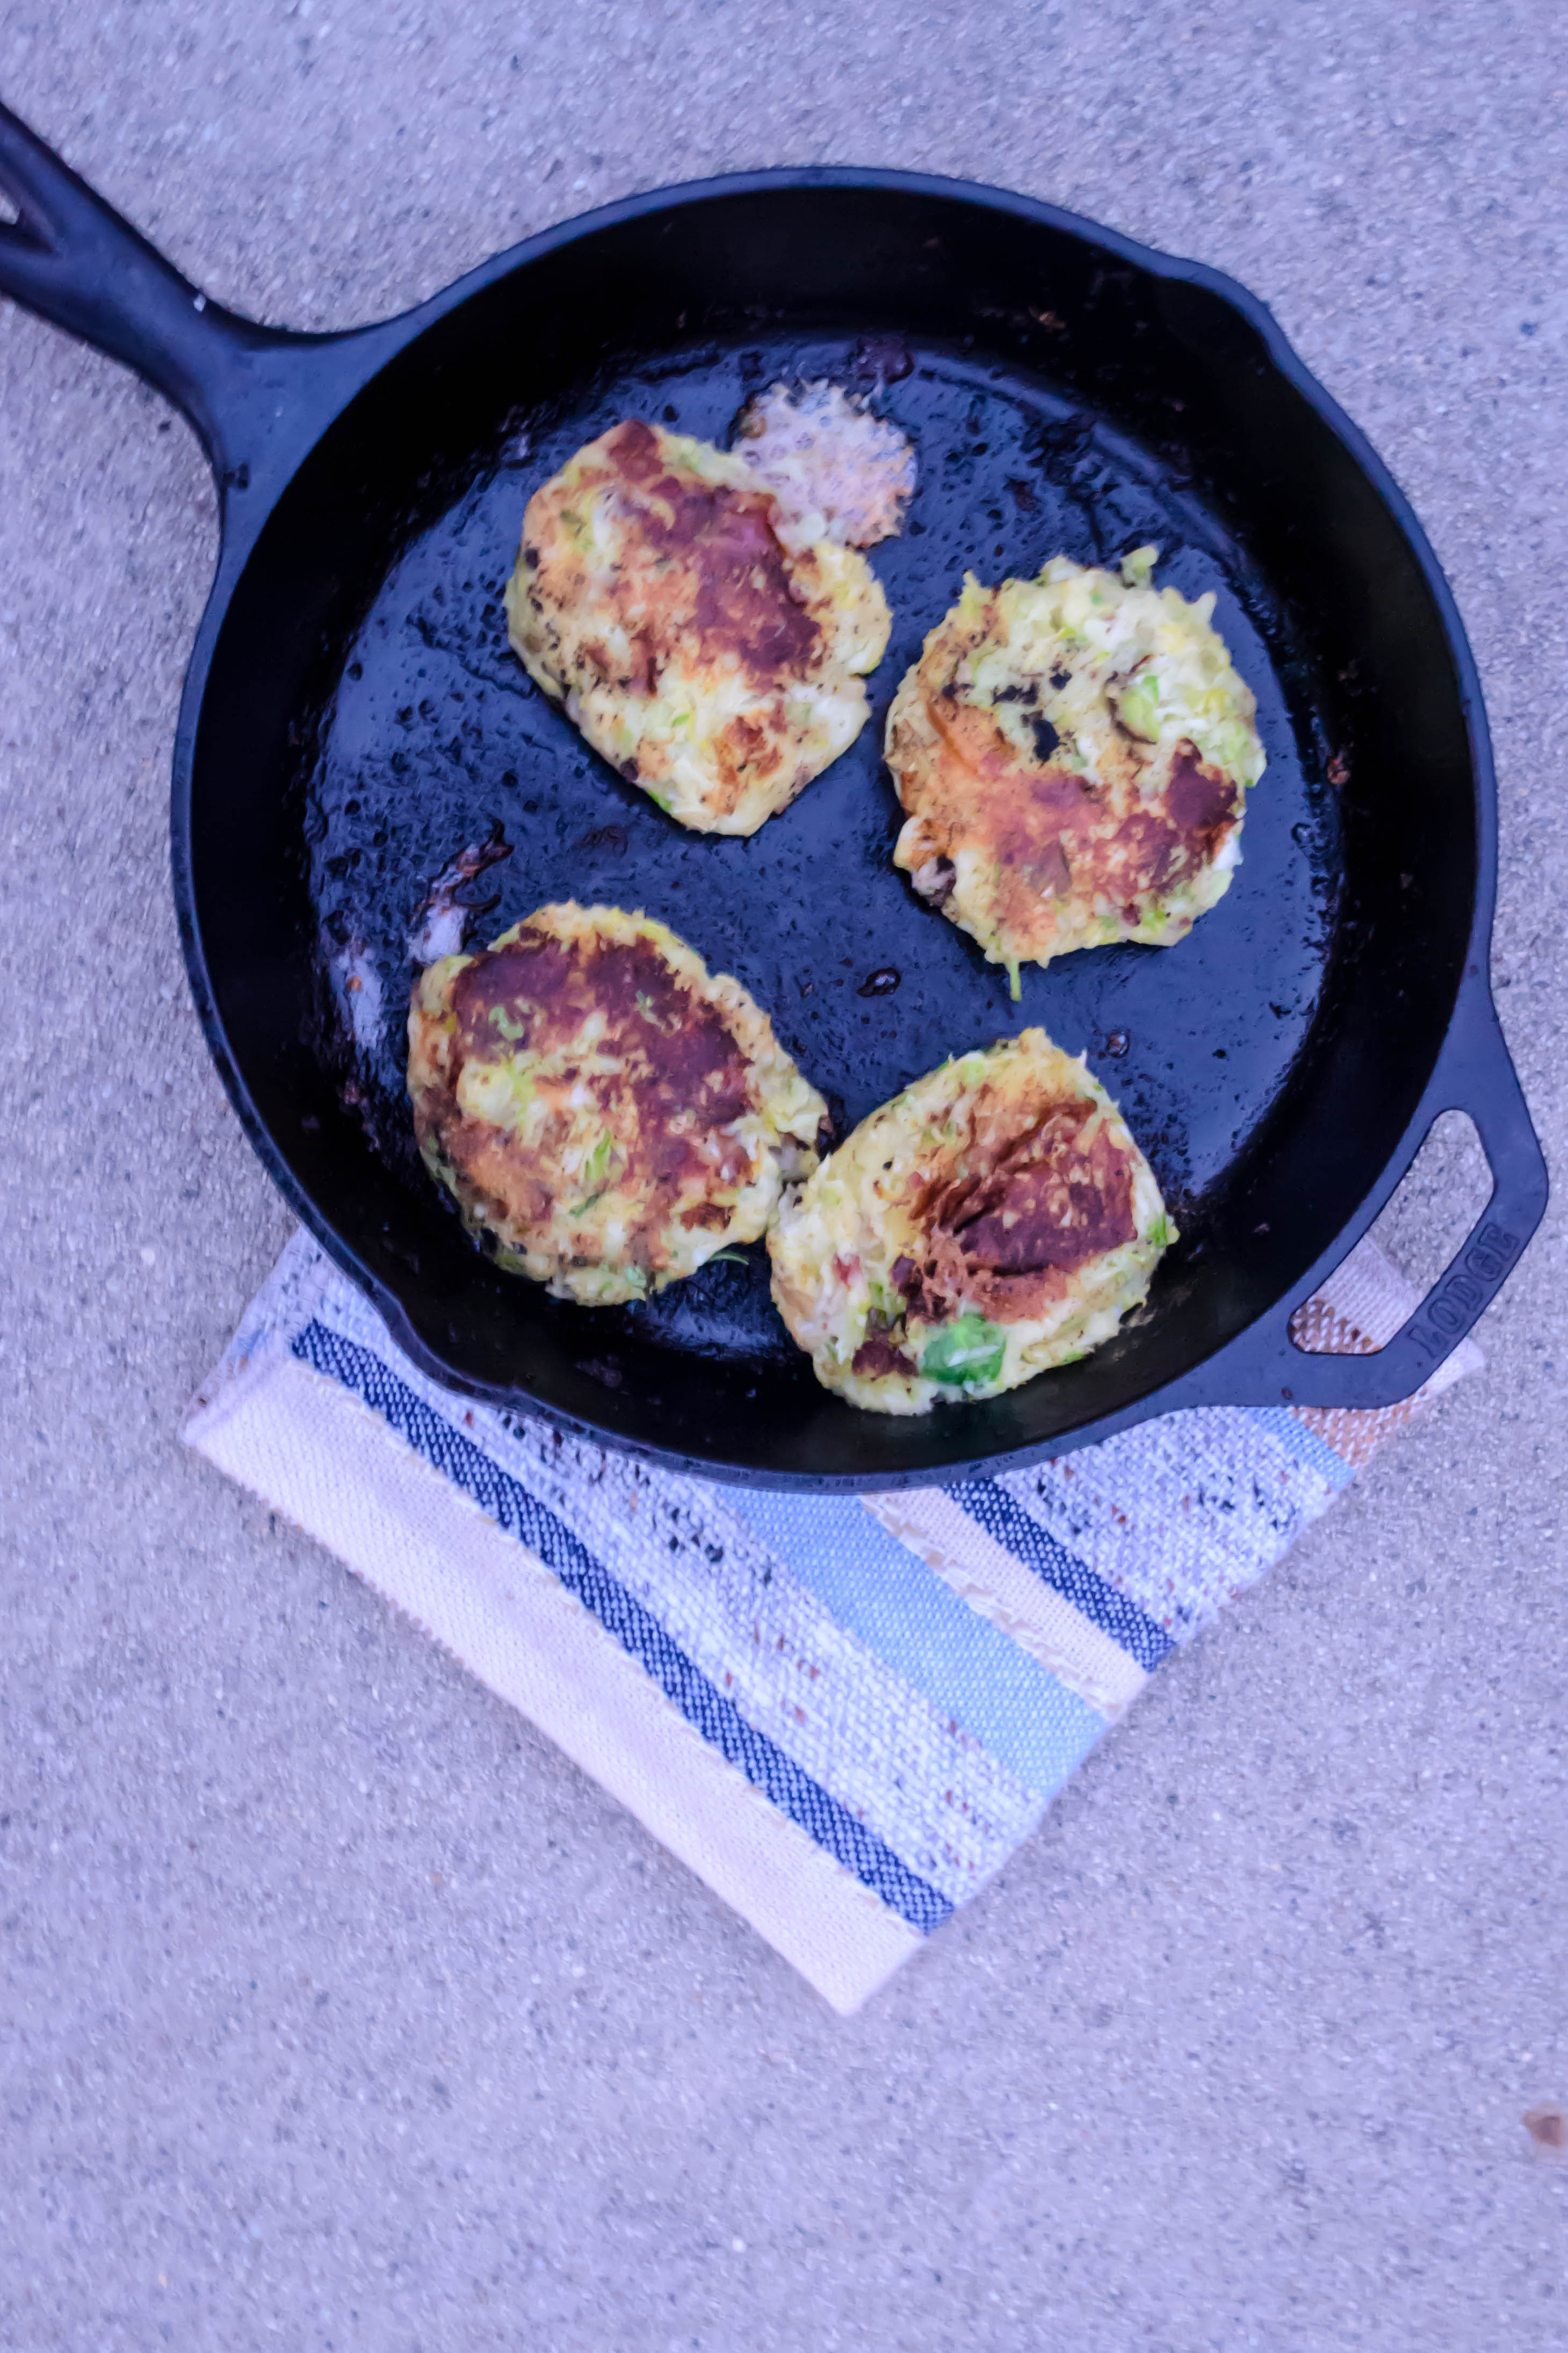
  • When your patties are formed, heat the olive oil and the reserved bacon grease in your skillet (to save on dishes you can, and should, use the same skillet you cooked the bacon in) over medium-high heat. When the oil shimmers, add the cakes. Don’t crowd them, though. Each one should have space around it – they shouldn’t touch one another. In my 9 inch cast iron skillet, 4 at a time was perfect.
  • Once you have placed the cakes, don’t mess with them. Leave them alone for 4-5 minutes (4 minutes and 30 seconds was perfect for me) before flipping. You will need to do this with deliberation. Slide a thin spatula under each one quickly and firmly, then flip and leave alone for another 4-5 minutes. Disrupting the cakes too early, or fussing with them too much, will result in sticking, smashing, and general disintegration. They need time to form a stiff crust on each side before they will consent to flip cleanly.
  • Continue, frying 4-5 patties at a time for 4-5 minutes on each side, until all cakes have been cooked. You may need another dollop of olive oil after a few batches to re-slick the skillet. If the oil starts to smoke or the cakes are frying up darker than you like, turn the heat down to medium.
  • As you finish each batch, serve them immediately, or to hold them until all are cooked, stow on a cookie sheet lined with a wire rack in a 200 degree oven.
  • As with all fritter-type beasts, these are best consumed as soon after taking them out of the oil as possible.

Peppermint Marshmallows

Last week I promised you something sweet and holiday inspired, but gave you very little else to go on.  I didn’t know, yet, that what I would have to offer would be a beautiful red and white swirl, a puffy, gooey, perfectly melting cube of magic, like a candy cane exploded into clouds and rained powdered sugar all over my kitchen.

Food Blog December 2013-2952Marshmallows.

Food Blog December 2013-2944Specifically, peppermint marshmallows, flavored with mint extract and swirled with a few drops of red food coloring to emulate the striping in a candy cane.

Food Blog December 2013-2935Marshmallows look like an ambitious cooking project, and I’ll admit they are not quite as easy as, say, your average chocolate chip cookie or gingerbread recipe. But they are so, so worth trying. When you compare store-bought marshmallows to homemade they are, as I explained yesterday, like the difference between those sheets in a discount motel, and the Egyptian cotton sheets with the sky-high thread count you dream about treating yourself to maybe that’s just me…). The homemade ones are soft and luxuriously puffy, and they linger on your taste buds without that powdery residue you get from the kind that come out of a bag. Plus, you get to play with gelatin and egg whites.

Food Blog December 2013-2921Food Blog December 2013-2927Food Blog December 2013-2930Food Blog December 2013-2931To make mine, I looked to two of my sweets inspirations: David Lebovitz and Irvin Lin. I’ve been reading these two men’s blogs for years now, continually impressed as they churn out ambitious baking projects I never, three or two or even one year ago, would have considered attempting. Then over this summer my sister and I decided to try Irvin’s red velvet s’mores with cream cheese marshmallows, and the recipe he put together was so precise and, once I got over my fear of the boiling sugar syrup, so unthreatening that I decided homemade marshmallows should become at least a semi-regular part of my repertoire.

Food Blog December 2013-2923This is essentially a three-part recipe. First, you dissolve some gelatin in cold water.  While it softens and thickens and turns into a curious gooey business that resembles nothing so much as that sticky glue magazine companies use to affix perfume fold-outs and coupons to their pages (how delicious does that sound?!), you melt some sugar with corn syrup and a touch more water, making a barely golden syrup that bubbles and thickens but doesn’t hurt you, because you stir carefully and make sure you have shoes on, in case of disasters. It takes some time for the syrup to come up to the requisite 240F degrees, so while you wait, you whip some room temperature egg whites to soft peaks, helping them along the way with a pinch of cream of tartar.

Food Blog December 2013-2936Food Blog December 2013-2942Food Blog December 2013-2941Then all that remains is to combine. Off the heat, you scrape the gelatin, now congealed into this weird, pecan-pie-filling consistency, into the syrup, whisk to combine, and then pour the still-hot gelatinized syrup carefully into your egg whites. You whip them for a long time – ten minutes long! – and they expand triumphantly until you aren’t sure your stand mixer can hold them all. At the last minute, you add some vanilla and mint extract, and then deposit into a well-greased baking dish, swirl with some food coloring if desired, and stow in the fridge overnight to cure.  The next day, you have a wide dish of marshmallow, which you can slice, toss with powdered sugar, and use for whatever purposes your heart desires.

Food Blog December 2013-2945I found, through intense and repeated experimentation (I do these things for you…) that they melt with almost no resistance in cocoa, and would be a revelation dipped in dark chocolate. You could likely torch them just a bit to top a peppermint variation of a grasshopper or chocolate cream pie. But I find that with this peppermint flavor in particular – swirled for the holidays and almost aggressively minty – I like them best straight out of the refrigerator.

Food Blog December 2013-2951

Peppermint Marshmallows
Adapted from Eat the Love and David Lebovitz
Makes one 9x13x2 inch pan slab of marshmallow, which you can cut to your desired size
2 envelopes unflavored gelatin (about 14.5 grams, though the quantities on the Knox brand box are not very forthcoming)
¾ cups water, divided
4 egg whites, at room temperature (being at room temp helps them whip faster)
¼ teaspoon cream of tartar
1 cup granulated sugar
⅓ cup light corn syrup
1 teaspoon vanilla
1 teaspoon peppermint extract (or less – it’s quite strong)
10-12 drops red food coloring (optional)
1-2 cups powdered sugar, for coating cured marshmallows to prevent sticking


  • Grease a 9x13x2 inch baking dish with non-stick spray. Mine was butter flavored and looked a little yellow – I’d advise a white or clear version.
  • In a small bowl, sprinkle the gelatin powder over ½ cup of the water, then set aside to gel.
  • In a small saucepan, combine the sugar, corn syrup, and remaining ¼ cup of water, then stir over medium heat. Use a candy thermometer to moderate the temperature – you are looking to heat this to 240F.  This will probably take about 8-10 minutes, with the last 10 degrees taking the longest. You can turn away from this now and then, but be sure to stir regularly as the sugar dissolves to prevent it from burning.
  • While the syrup heats, beat the egg whites with the cream of tartar in the bowl of an electric stand mixer (or in a large bowl with a hand-held mixer, but using a stand mixer is much easier and faster) until they form soft peaks. When the whisk or beater attachment is pulled out of the eggs, what remains on the attachments will droop a bit back toward the bowl – those are soft peaks – peaks that fold over.
  • When the syrup reaches 240F, remove it from the heat and scrape the gelatin into the hot syrup, stirring with a whisk to dissolve. Drizzle a few tablespoons of the hot syrup mixture into the egg whites and mix gently, just to warm them up so they aren’t shocked.  Then, with the mixer on medium speed, pour the syrup into the egg whites in a slow but steady stream, being careful to aim for the whites themselves, not for the whisk or the side of the bowl, which can cause droplets of hot syrup to fly out onto you. As Irvin says, this sounds scarier than it is. Just be careful and you’ll be fine.
  • With all of the syrup poured in, turn the mixer speed up to medium-high and beat for 5 minutes. The egg whites will take on the consistency of a thick whipped cream.
  • After five minutes, add the vanilla and peppermint extract, then increase the mixer speed to high and beat for another five minutes. The mixture will increase dramatically in volume, become glossy and thick, and resemble that marshmallow fluff you can buy in jars.
  • You’ve now beaten your egg whites for a total of ten minutes. Use a rubber spatula, greased for extra insurance if you wish, and pour/scrape the mixture into your greased 9×13 inch pan. For the swirly candy cane effect, drip 10-12 drops red food coloring over the surface of the marshmallow, spacing the drops evenly for best coverage.
  • Gently insert the tip of a butter knife into the marshmallow mass and swirl around, dragging the food coloring over and through the pan to create a swirled effect. Don’t overdo it, though – you want well-defined swirls, not pink marshmallows.
  • When you are satisfied with your swirls, cover the pan tightly with plastic wrap, taking care not to let it touch the top of the marshmallows (it would stick like crazy), and stow it in the fridge overnight, or at least 8 hours, to let the marshmallows cure.
  • After marshmallows have cured, all that remains is to liberate them from the pan, slice them to your desired size (I used a pizza wheel for this), and toss them in powdered sugar to keep them from sticking to everything they come in contact with. To do this, I put 1-2 cups sifted powdered sugar in a brown paper bag, added the marshmallows, and shook them gently until they were evenly coated. Then, remove and consume as desired!

Photo Friday

Food Blog Photo Fridays 2013-2735Recipe development at work… those are beads of yeast clinging to my tablespoon.

Incidentally, apologies for last week’s lack of Photo Friday post.  It’s Week 12 of my school’s semester and I’ve been wading through a paper sea for the past three weeks.  Sometimes these things get away from us.

Have a glorious weekend, all.

Smoked Salmon Ravioli with Leek Pesto Cream

Call it my literary background, but I love a good origin story. When random thoughts occur, I like to trace them back through my train of thought to see what the sequence was (why did I just think of that bartender in Eugene? I was considering more efficient ways to load the dishwasher just a few seconds ago!). Ask me sometime about one of my nicknames for our dog. You’ll see what I mean. This spills over into my cooking as well. I suppose if I were a real writer, I’d resist or deny the question “where do you get your ideas?” as so many of them do (although some do answer the question, in wonderful and terrifying ways).

Food Blog November 2013-2776So I like to take you back where I came from. In this case, we’re going back to a tired, tired late afternoon in August. N. and Lucy and I had started the day in Brookings, OR, wound our way down the beautiful stretch of Highway 101, twisting through dusty redwoods, pastoral dreamland, and ragged juts of ocean cliffs. In the parking lot of a grocery store in Fort Bragg, we decided enough was enough. We just weren’t going to make it to the Bay Area that night. It was time to call the driving day finished.

Food Blog November 2013-2764Food Blog November 2013-2767Food Blog November 2013-2768We found ourselves a restaurant with a view of the ocean and ordered what sounded like amazing entrees. At the ha-ha-we-got-you-you-tourist prices, they should have been amazing. They were… fine. N.’s dinner, which is of most import here, was a plate of smoked salmon ravioli, dull and a bit tough, sputtering and drowning in a heavy, almost alfredo-style sauce. I had to fix them. (I had, in case you’re wondering, a hunk of unevenly crusted halibut, teetering over a tangle of roasted, balsamic drenched vegetables. It has promise as well… consider it in progress…)

Food Blog November 2013-2771This, then, is what resulted. A mundane, heavy plate of pasta became a rich, vibrant, tangy blend of smoked salmon, dill, and cream cheese sealed in won ton wrappers (I’m all for from scratch, but in a weekend when at least two dozen papers had to get graded, I decided I was okay with using a shortcut stand-in for homemade pasta dough). To replace the thick, gloppy alfredo of the summer, I spooned on a tangy, barely creamy sauce overloaded with herbs and sautéed leeks, that fell somewhere between a pesto and the kind of white wine and cream sauce you’d toss with spaghetti and clams. (Note to self: spaghetti and clams would be spectacular here!)

Food Blog November 2013-2772I stopped at 24 ravioli, each one loaded with a spare ½ tablespoon of filling, but had enough smoked salmon mixture left that I could have easily made 36. I figured we would each eat 12, but they were so rich and lovely that, particularly with a piece of garlic rubbed toast on the side, you could probably get away with serving 8 to each diner. You will have enough sauce for the full 36, if not more.

Food Blog November 2013-2775This dish is, perhaps, better suited for spring, bursting as it is with fresh herbs and buttery leeks and the pinks and greens of new growth. But it’s so good, so perfectly silky and creamy and fresh and tangy, that I think you should make it anyway.

Food Blog November 2013-2780

Smoked Salmon Ravioli with Leek Pesto Cream
Serves 4-6
For ravioli:
⅓ cup finely diced shallot (about 1 medium)
2 cloves garlic, minced
2 tablespoons butter
8 ounces smoked salmon
8 ounces (1 cup) cream cheese, at room temperature
1 tablespoon chopped fresh dill
1 egg, lightly beaten
1 tablespoon heavy cream
Won ton wrappers, round or square (twice as many as the number of raviolis you want) or fresh pasta dough
¼ cup or so warm water, for sealing the ravioli


For sauce:
1 large leek
2 tablespoons butter
½ cup dry white wine (be sure you like the flavor – you will definitely taste it)
¼ cup fresh parsley
¼ cup fresh dill
¼ cup fresh basil leaves
1 garlic clove
¼ cup pine nuts, toasted if you wish
½ cup heavy cream


  • To make the raviolis, heat 2 tablespoons of butter in a small pan over medium heat. When it has melted, add the shallot and garlic and cook, stirring frequently, until they become translucent. You don’t want them to brown, you just want to sweat them gently to remove the rawness. When they are tender, turn the heat off and let them cool.
  • While the shallots and garlic cool, mix together the cream cheese, smoked salmon, 1 tablespoon dill, egg, and 1 tablespoon heavy cream in a mixing bowl. A fork or a spatula works well. Combine into a fairly homogenized mixture, though you will still have chunks of salmon, which is fine. Once the shallots and garlic have cooled, add them to the salmon mixture.
  • To form the raviolis, set up an assembly line: salmon mixture on one end, then won ton wrappers on a cutting board, then a small bowl of warm water, and finally a cookie sheet dusted lightly with flour.
  • Top one won ton wrapper with a scant ½ tablespoon of salmon mixture right in the center. Using your fingertip, dampen the outer edge of the wrapper with the warm water, then place a second won top wrapper on top. Press the edges to seal with your thumbs and forefingers, working air bubbles out so you just have a solid lump of filling in the center. I like to match up the poles of each wrapper – the very top and very bottom – so they are flush, then press together the sides simultaneously, one with each thumb and forefinger pair. As you complete each ravioli, place in a single layer on the floured cookie sheet.
  • When you have a full tray (I wouldn’t put too many more than a dozen on each sheet; you want them all touching the flour and not touching each other too much, or they will stick), refrigerate for at least 30 minutes.
  • Once the raviolis have had at least 30 minutes in the fridge, all that remains is to heat a large pot of salted water to a rolling boil and drop them in. They are done when they float to the top, which only takes 3 or 4 minutes. Remove them with a slotted spoon (they are too delicate to pour into a colander) and add them to the sauce.
  • While the ravioli are chilling, make the sauce. Cut off the root end and the dark green leaves of the leek. Slice the remaining log lengthwise, leaving two long rounded planks as in the photo above. Run these planks under running water, flipping through the layers with your thumbs, to release dirt. Then cut each plank in half lengthwise again, and slice horizontally across into thin ribbons.
  • In the same pan you used to cook the shallot and garlic, heat the remaining 2 tablespoons of butter over medium heat. Once it has melted, add the leeks and cook for 5-8 minutes, stirring frequently, until the leeks are tender and smell garlicky and sweet.
  • Add the wine and simmer 3-5 minutes. Season with salt and pepper and turn off the heat, letting the leek and wine mixture cool slightly.
  • While the leeks and wine cool, add the parsley, dill, basil, garlic clove, and pine nuts to a food processor. Pulse in 2 second bursts 5 or 6 times, or until everything is finely chopped and paste-like. Add the cooled wine and leek mixture and process until only very fine pieces remain.
  • As soon as you drop the raviolis into the boiling water, warm the cream in the pan you used for the leeks and wine. When it reaches a bare simmer, add the leek and wine mixture back into the pan and stir to combine with the cream. Heat through. Season to taste, if needed, with salt and pepper.
  • To serve, swirl the raviolis gently with the sauce. If the sauce is too thick for your liking, add a ladle of pasta water to thin it just a touch.

Root Vegetable Barley Risotto

As I move on through my weird little life, I have come to realize that there are some rather shocking details in my relationship with food. Example: I just don’t like yellow curry. I’ve tried it. I’ve played with multiple applications. It just doesn’t work for me. Example two: Kraft Macaroni and Cheese is without a doubt my favorite hangover food. Well, that or biscuits and gravy with a side of hash browns. But only if those biscuits, gravy, and hash browns are from Brails Restaurant in Eugene, Oregon. Otherwise I’d take the boxed macaroni, complete with its powdered fluorescent orange box-mate, any day of the week.

Food Blog October 2013-2732But a more pertinent example for us today is risotto. I like risotto. I like the creaminess, the cheesy finish, the number of vegetables you can load it with; I even like the endless stirring. It’s therapeutic in a lot of ways. The only thing, in fact, that I don’t like about risotto is the rice. I know; who AM I? But the rice too often gets sticky and gloppy, and if it’s not gloppy, it’s soupy but somehow still underdone, and frankly I’m over it. No, if I’m going to have something toasty and nutty but also somehow creamy and chewy, I’m going with barley.

The idea of risotto without the rice is something like ice cream without the cream: contradiction central. Here, though, the truth is in the technique: the slow, steady stirring that lets the grain release its starches and become a warm, comforting dish of welcome-to-fall-I’m-so-glad-you’re-here.

Food Blog October 2013-2721If we were going to have fall, I decided, we were going to need root vegetables. Discs and sticks and chunks of rutabagas, carrots, sweet potato, and parsnips, all gleaming with olive oil and garlic herb salt, roasted until caramelized and tender. I folded these into the barley just as it finished, then dolloped in sizable lumps of soft, creamy goat cheese, a scattering of toasted pecans, and, because if it’s worth doing it’s worth overdoing, some whole fried leaves of sage and rosemary.

Food Blog October 2013-2724Alterations apropos of the season might entail swapping out the sweet potato or carrot for hunks of pumpkin or butternut squash, and you can certainly use walnuts or even pine nuts if you don’t like pecans. But I wouldn’t skip the goat cheese. Its insistent tang is a needed foil for the mellow autumnal combination of root veggies and barley.

We ate this so fast our forks had whiplash. It is warm and hearty, certainly, and the clamor of different flavors settles together so nicely that you can’t help but keep going back for another taste. The sage and rosemary mellow as they fry, producing a toasty earthiness rather than the overwhelming pine-forest flavor you might expect.

Food Blog October 2013-2728

Root Vegetable Barley Risotto
Serves 4-6
3 medium carrots
3 medium parsnips
2 medium rutabagas
1 medium orange fleshed sweet potato
¼ cup olive oil
1-2 teaspoons salt (a nice garlic and herb salt works well here, if you have it)
½ teaspoon pepper
¼ cup chopped pecans
¼ cup butter
10 sage leaves
1-2 teaspoons whole rosemary leaves
Scant 1 cup chopped onion (from ½ a medium onion)
4-6 cloves garlic, minced
1 cup pearled barley
½ cup dry white wine
Additional salt and pepper, to taste
6 cups chicken or vegetable broth, warm but not boiling
8 oz. soft goat cheese


  • First, preheat the oven to 400F and line two cookie sheets with aluminum foil. Place the cookie sheets in the oven while it preheats.
  • Peel the root vegetables (except the onion) and cut them into discs, slices, or chunks of approximately the same size, no thicker than about ½ inch. Place them in a bowl and toss with the olive oil, salt, and pepper.
  • Spread the vegetable chunks evenly in a single layer on the preheated trays, then return trays to the oven and roast for 45-60 minutes, tossing halfway through, until vegetables are fork tender and nicely caramelized. Set aside until risotto is ready.
  • While the roots are roasting, warm the broth in a medium pot. You want it at a bare simmer at most. No more, or too much will evaporate while you wait to add it to your risotto. (It shouldn’t be cold either – this will increase the risotto’s cooking time.)
  • In a large saucepan, toast the pecans over medium-low heat until they begin to take on a caramel aroma and look lightly browned. Be careful with them; they will burn easily. Don’t take your eyes away too long. When they are toasty, remove them from the pan and set aside.
  • In the same pan, melt the butter over medium heat, then add the sage and rosemary leaves. Be careful; sometimes they will spit a bit when they touch the hot fat. Fry them for about 45 seconds, agitating the pan a little to turn them around in the butter, until they have darkened just a bit. Remove them, reserving the butter in the pan, and drain them on a paper towel. They will crisp up as they cool.
  • Again in the same pan (see how economical we are being for whoever washes the dishes in your house?!), add the chopped onion and garlic. Sweat the onions and garlic for 5-8 minutes, until the onion is translucent and the garlic smells just the way it is supposed to. You know what I mean.
  • With soft, tender onions, turn the heat up to medium high and add the barley. Stir briskly for 1-2 minutes until the barley is fully coated in butter and has toasted a touch.
  • Deglaze the pan with the white wine, stirring vigorously to detach any browned bits from the bottom of your pan (but be careful not to be too vigorous, lest you ignite your wine). Continue stirring slowly until the wine is almost completely absorbed into the barley.
  • When the pan is nearly dry, add about a cup of the broth and stir to incorporate. Let it simmer, stirring frequently, until the broth is almost absorbed. The first time you add broth, this will take 10-15 minutes. The amount of time it takes for the barley to absorb the broth will increase as you add more liquid.
  • Repeat this process, adding broth and stirring, until the barley is tender but chewy and you have added all of the broth. This will take about 45 minutes.
  • When the barley has almost absorbed the last of the broth (it will be slightly soupy, but don’t worry), add the roasted root vegetables and season to taste with salt and pepper.
  • To serve, scoop some risotto into a shallow bowl, dollop on a good portion of goat cheese, sprinkle with pecans, and top with a few fried herb leaves.

Cilantro Lime Rice

Once you live in an area long enough, you start to notice food trends, especially if you like to eat out (which I do).  In Los Angeles, when you’re not focusing on the grass-fed beef and the house-made buffalo mozzarella and the artisan cocktails, you start to notice side dishes.  It wouldn’t be Los Angeles, I suspect, without the ubiquitous kale salad.  These folks love their kale.  And when it’s not kale, it’s quinoa, toasted or steamed or boiled, getting cozy with vegetables or dried fruit or the lightest of vinaigrettes.  Sometimes, in a really ambitious nod to “California Cuisine,” kale and quinoa get combined in the healthiest, hipster-est, most trendy-bohemian side dish the world has ever seen.*

Food Blog September 2013-2636But the other side dish I’ve been noticing a lot lately, spurred along, no doubt, by the dozens of Chipotles lining every other street corner, is cilantro lime rice.  Whether it’s speckled with zest or dotted with the occasional herb fleck, or the bright green of a rice dish Sam I Am would be proud to serve alongside some huevos rancheros verdes, it shows up on so many menus that at some point I was bound to become either totally sick of it, or completely obsessed.

Food Blog September 2013-2631Clearly, my palate chose the latter.  I adore it.  At one of our current favorite Culver City haunts, my dinner choice is based on which dish comes with a side of cilantro lime rice.  I fall on the love side of the Great Cilantro Divide – I admit that there is a soapy quality to it, both in taste and in aroma, but it appeals to rather than repulses me – and lime is quite possibly my favorite citrus option.  These flavors paired with a fluffy, starchy, perfectly cooked scoop of rice are a side dish I would eat next to almost anything.

Food Blog September 2013-2633But the problem, as with most things I end up obsessed with, is that not all cilantro rice is particularly good.  The herbs are dull and flavorless, or the lime isn’t assertive enough, or the rice is mush, or I don’t want to pay for the accompanying $20-30 entree as often as I want the zesty side.  And so, as usual, I have to saunter into the kitchen to make my own.

Food Blog September 2013-2626I toyed around with some flavor combinations, playing with spices and vegetables and heat, and ended up with something so bright and tart and satisfying that we almost didn’t want the blistered corn quesadillas I’d made to go along with our rice.  This was fresh, and vibrant, and almost overloaded with lime and cilantro flavor – maybe my favorite rice side dish since my mom’s pilaf (which I’m convinced will never be topped).

Food Blog September 2013-2630Make this for your family.  Pair it with grilled fish or carne asada or stewed black beans or chile relleno.  And if you like it, let me know!  Maybe it can serve as my penance for the overly complicated, labor intensive loaf I pushed upon you last week.

* I’m not saying this is a bad thing.  I don’t have anything against kale or quinoa, and I agree that they are quite tasty together.  But then, I am a bit of a healthy bohemian type, though certainly not very trendy.  Which is why it’s taken me till now to fall for this dish…

Food Blog September 2013-2638

Cilantro Lime Rice
Serves 6-8 as a side dish
¼ cup olive oil
½ teaspoon whole cumin seeds
½ teaspoon coriander seeds, crushed in a spice grinder or with the side of a knife blade
4 cloves garlic, minced
¼ – ½ cup diced onion (I used a red onion, but yellow or white would be fine too)
1 ½ cups long grain white rice
½ teaspoon salt
¼ teaspoon black pepper
3 cups low sodium chicken broth, vegetable broth, or water
2 bunches cilantro
1 – 2 limes (using 2 whole limes results in a very strong lime flavor.  This was what I wanted.  If you want less or you aren’t sure, start with the juice from 1 lime and work up from there)
  • Heat the olive oil in a medium pot over medium heat.  When it is shimmering, add the cumin and coriander and turn the heat down to medium low.  Let the spices warm and release their aroma – this should take about 3-5 minutes (it will look like a lot of oil for just this little palm-full of spices.  Don’t worry.  We are using this for the vegetables and toasting the rice as well).
  • While the spices are heating up, prep your onions and garlic.  When the cumin and coriander smell toasty and begin to pop occasionally in the pot, add the onions and garlic and sweat them over medium low heat for 5-8 minutes. You want the onions to get translucent and the garlic to become aromatic, but not browned or crisp.
  • Add the rice and turn the heat up to medium high.  Let it sizzle, stirring frequently, until some grains of rice are opaque and bright white but some are still translucent and pale.  It will smell a bit reminiscent of popcorn or puffed rice, and that is a good thing.
  • When the rice is toasted, add the salt, pepper, and broth or water.  Stir well and cover to bring to a boil.  Once boiling, turn the heat down to medium or medium low and simmer for 15-18 minutes, or until liquid is absorbed and rice is tender but not mushy.
  • While the rice simmers, prepare the cilantro.  Tear or chop the leaves and tender upper stems from the tough ends and place in a blender or food processor (alternatively, if you don’t want the extra dishes or don’t mind big pieces of cilantro, you can just chop it up with a knife).  Add the lime juice and pulse in 3 second bursts until the herbs are very finely chopped and almost become a paste.
  • When the rice is done, uncover it, fluff it with a fork, and add the cilantro and lime juice mixture.  Combine thoroughly to ensure even greenness, then serve immediately.  Too much time between adding the cilantro and serving the rice will result in a less vibrant green color.