Project Sauce: Gnocchi and Broccoli with Blistered Sauce Mornay

Food Blog February 2014-3291I think a lot about what I put on this blog – the content, the recipes, the types of food – and this often leads me down a rabbit-hole of consideration about what kind of blog this is. Perhaps because I’m an academic, or maybe just because I watch an awful lot of food TV, this frequently kindles an urge in me to categorize what I do here, to define myself and my food. This is not a baking blog, though I produce a lot of baked goods. It’s not a dessert blog or a gluten-free blog or a vegan blog or a comfort foods blog, and it’s certainly not an “easy and fast” blog… what is it? To figure out if I’m doing what I’m doing well, I feel I have to know what it is that I do.

Food Blog February 2014-3260And yet at the same time, that same academic part of me that studied too much post-structuralism in graduate school screams “No! Don’t limit yourself! Don’t draw yourself into a box! Categories are restricting. Categories are unnecessary. Categories are a lie.”

Food Blog February 2014-3266True enough. Too often, categories are a lie. They lead me into grandiose, Walt Whitman-esque resistance. And yet, because blogging is, by being essentially writing, an experiment of selfness, in order to better understand myself, I have to better understand what I do here.

Food Blog February 2014-3268And maybe that’s it. Rather than stating what this is, blocking myself into a stationary category that may someday become too small for my own swelling and developing, maybe it’s better to talk about what I do, and what this blog does.

Food Blog February 2014-3272Here’s my latest approximation: I re-imagine classics. Not the most original or most creative, I assure you, and not always strictly true, but I think it’s a pretty good explanation for most of the recipes that end up here. Discontent with as is, I poke around and try anew. Ignoring, in some respects, the idea that a classic is a classic for a reason, I demand that it learn flexibility and try on new styles, metamorphosing, growing, moving. Do, don’t just be.

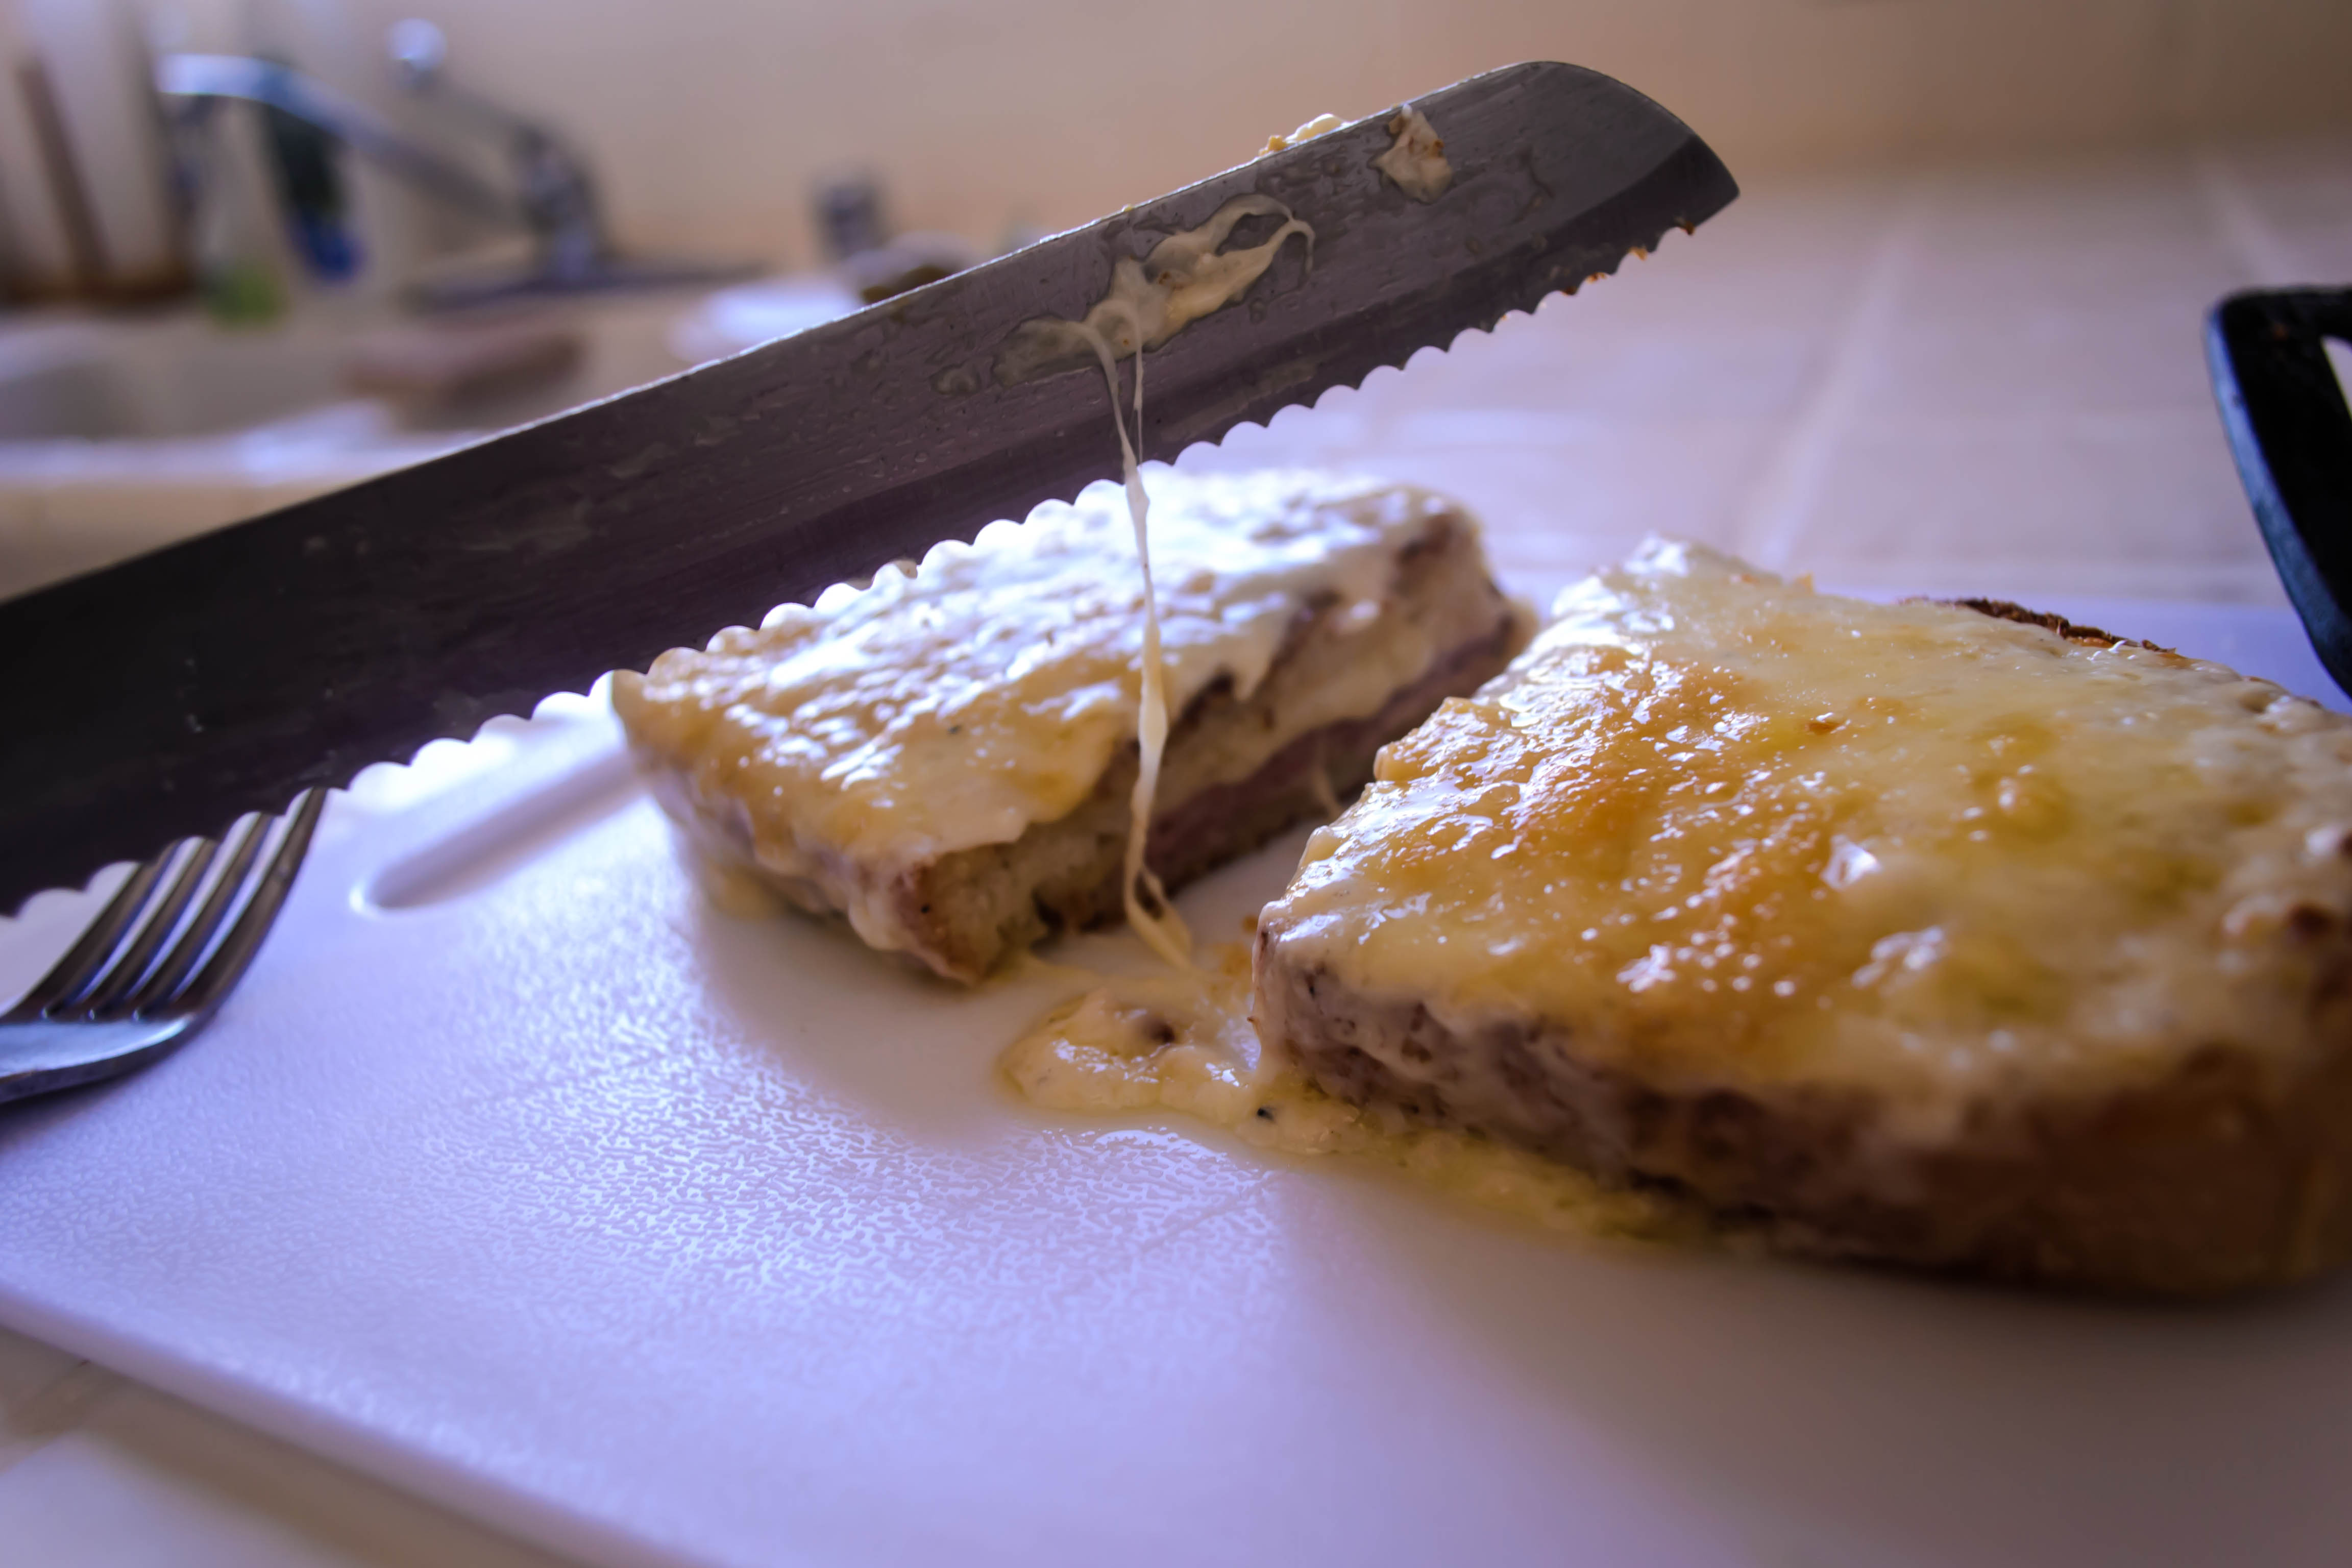
(Obligatory, shamelessly decadent sauce-pouring pictures)

Food Blog February 2014-3276Food Blog February 2014-3277Food Blog February 2014-3278
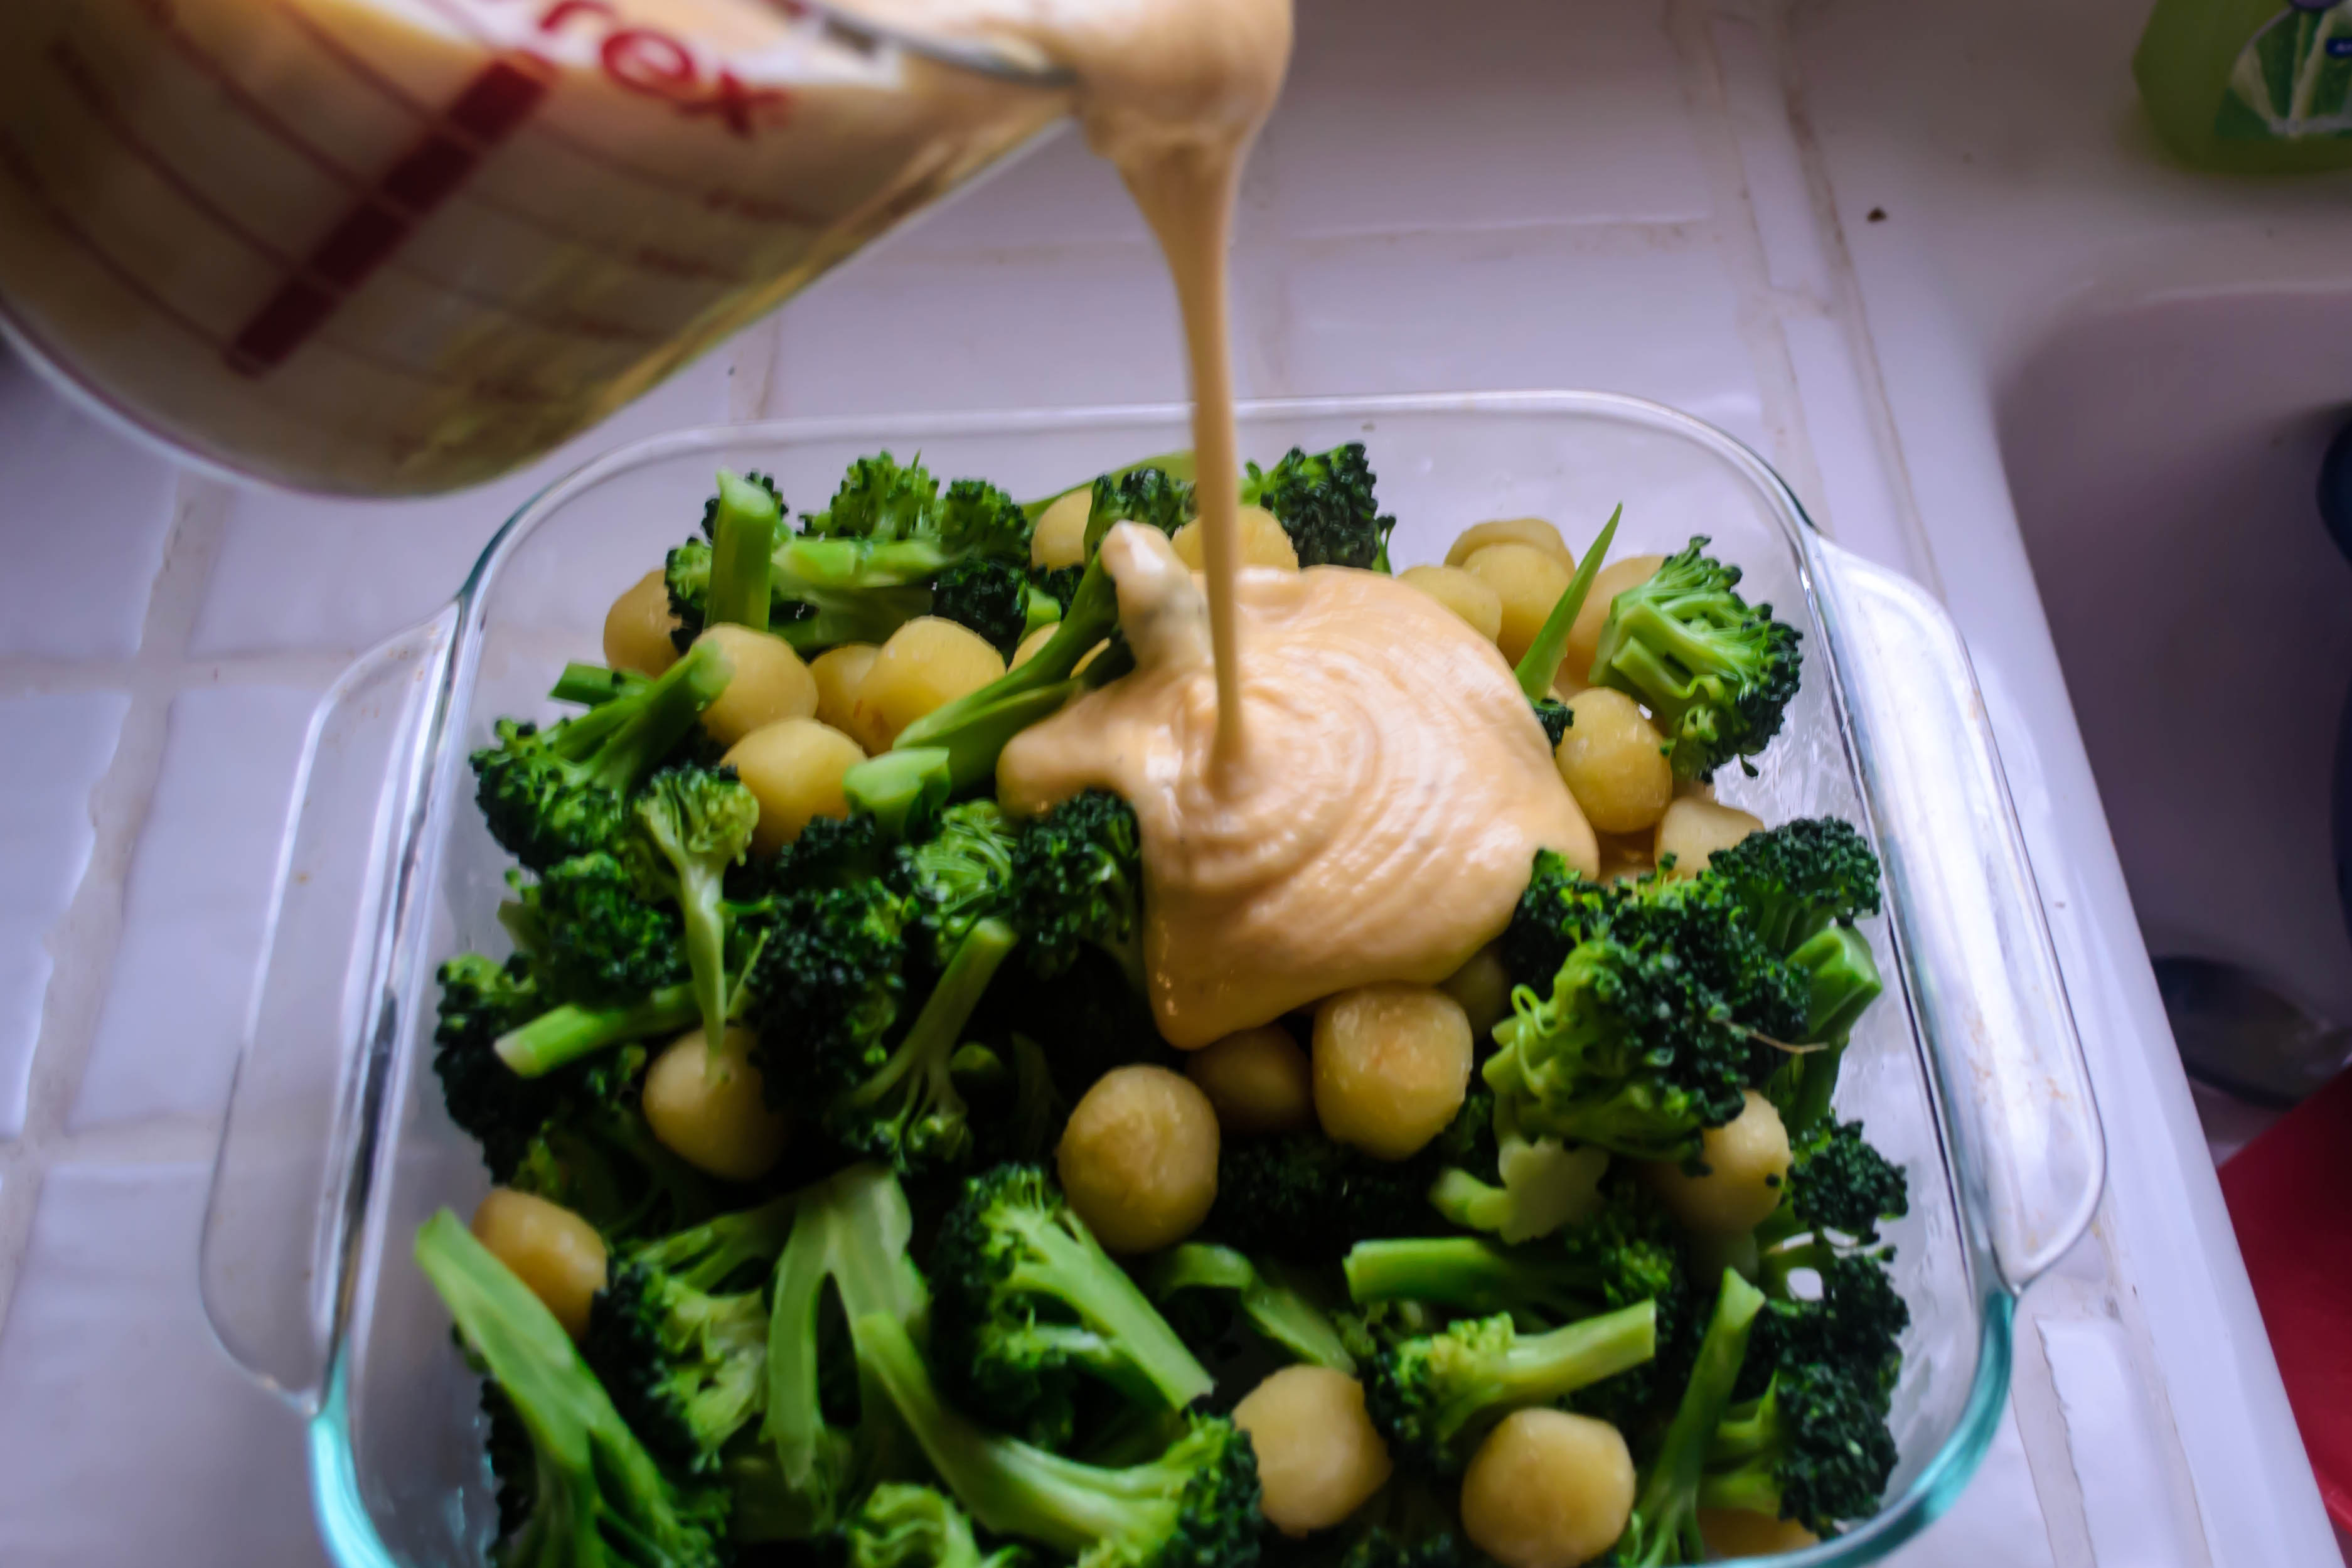
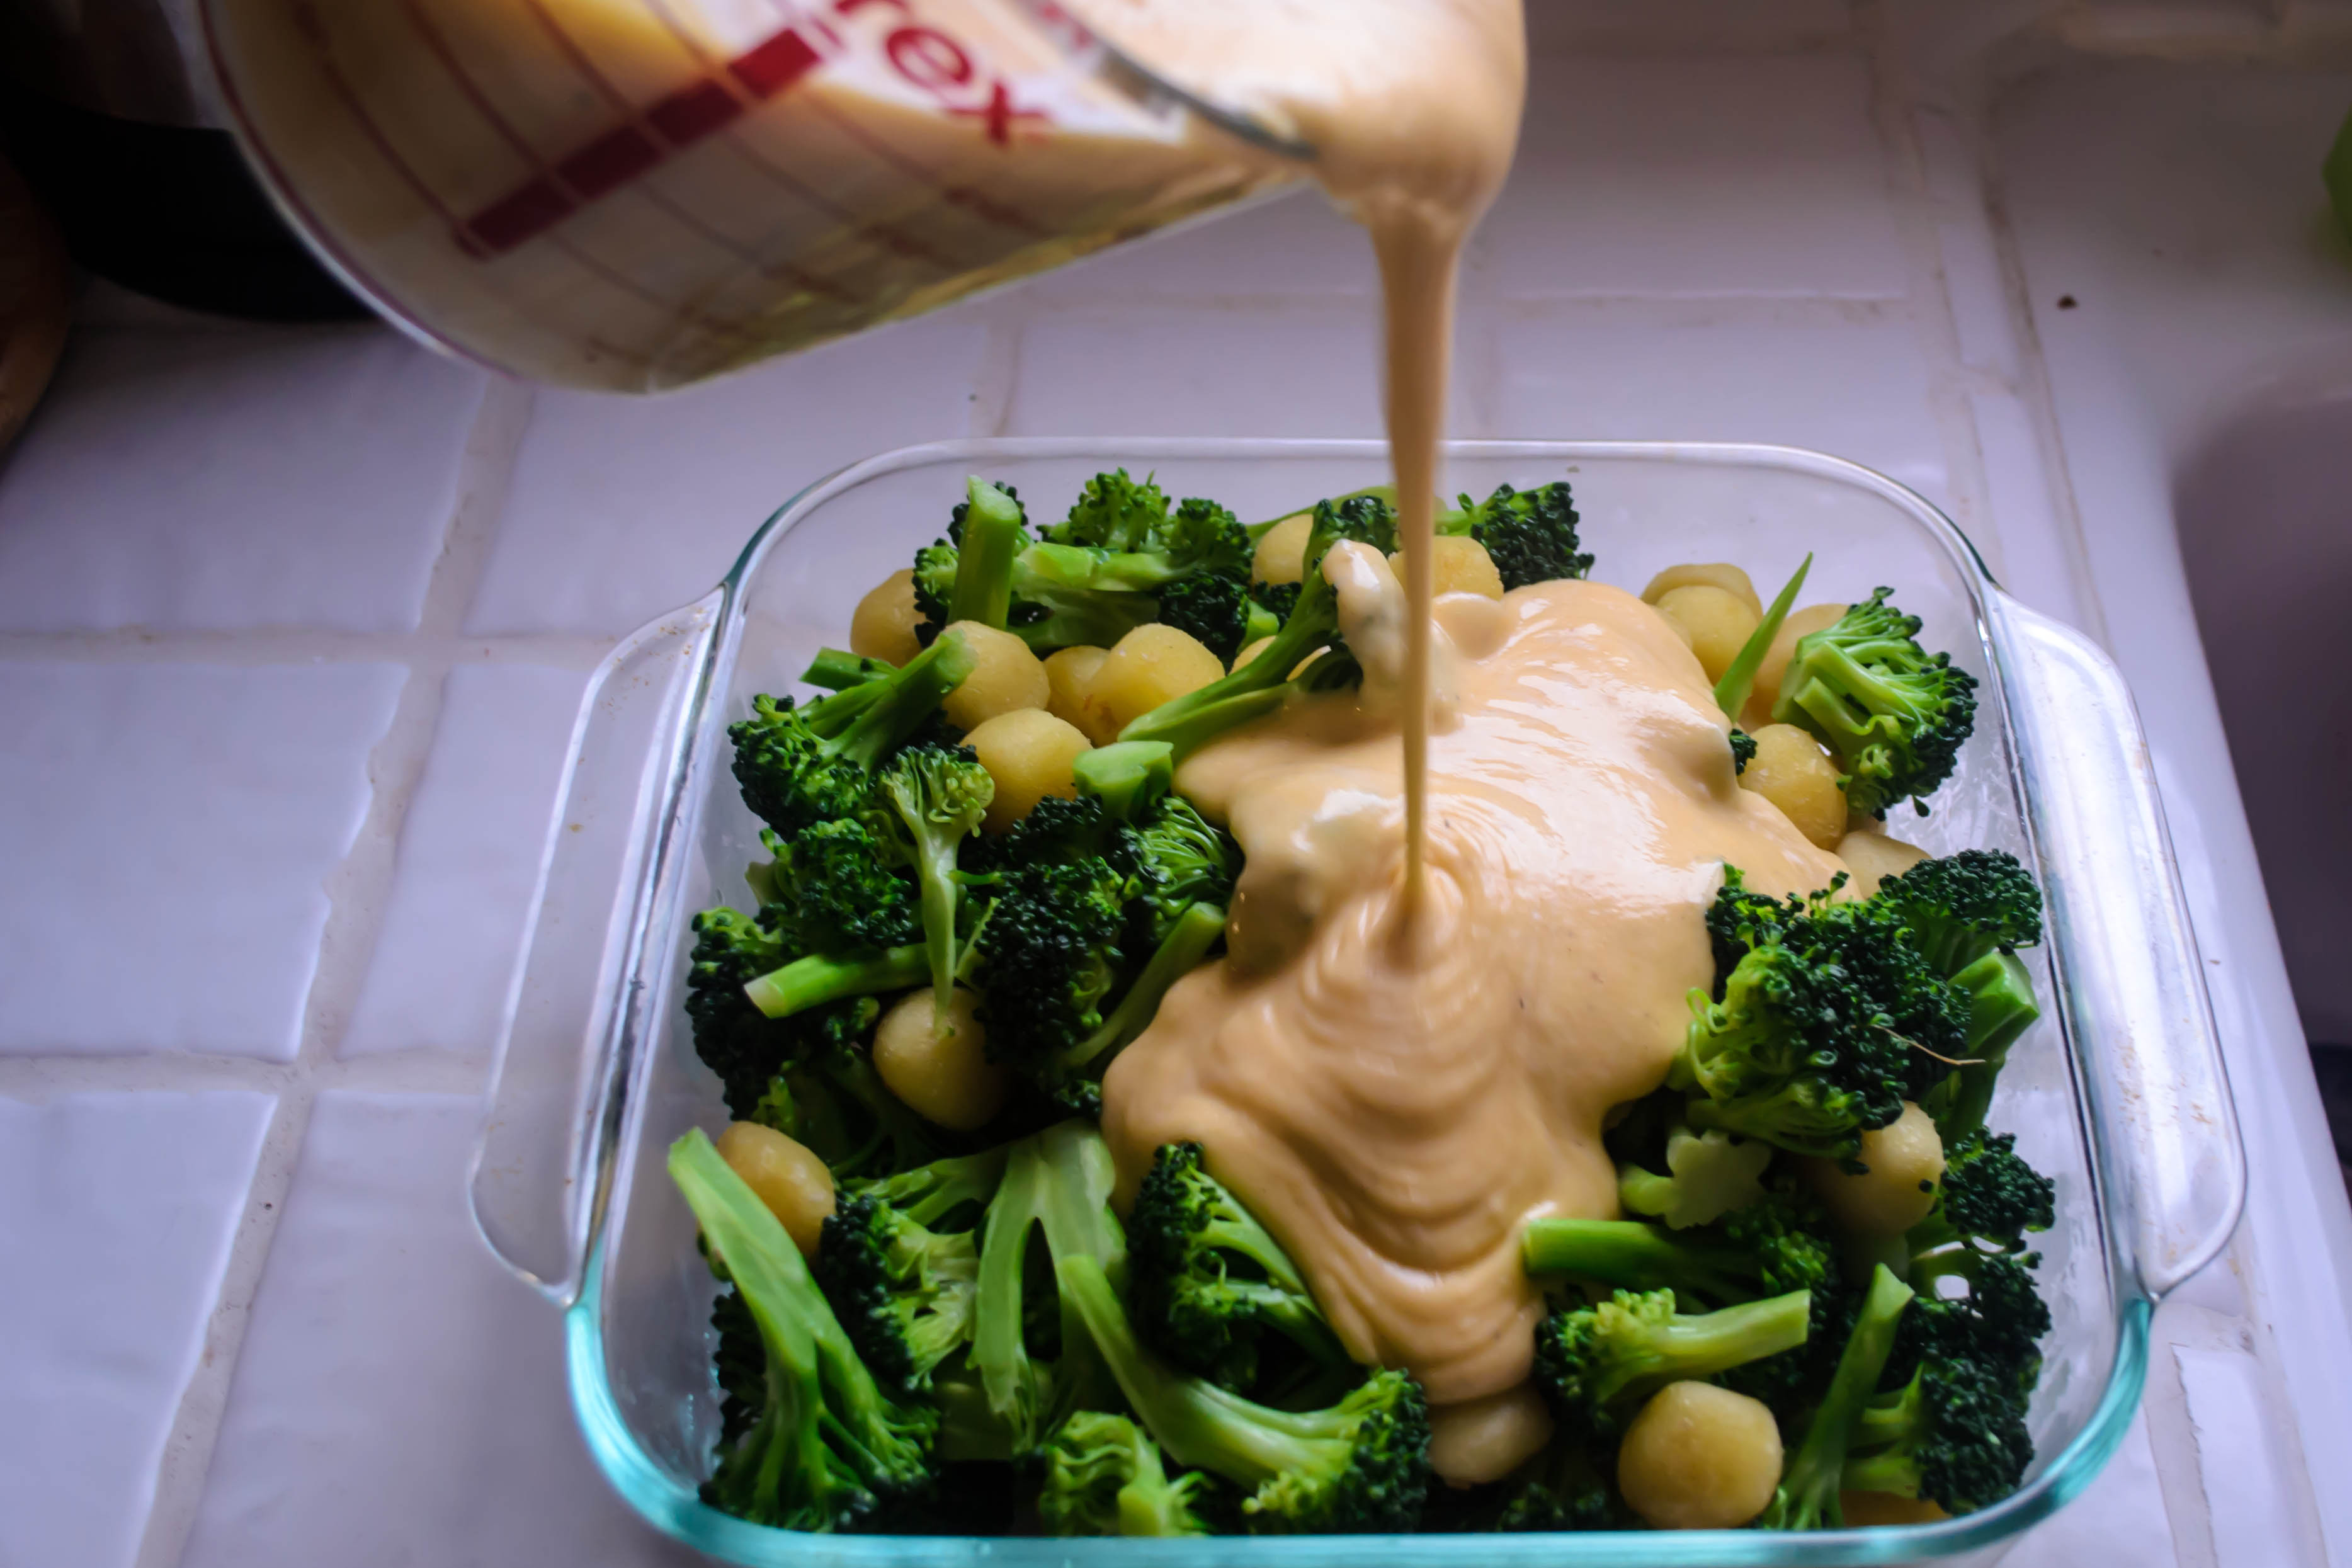
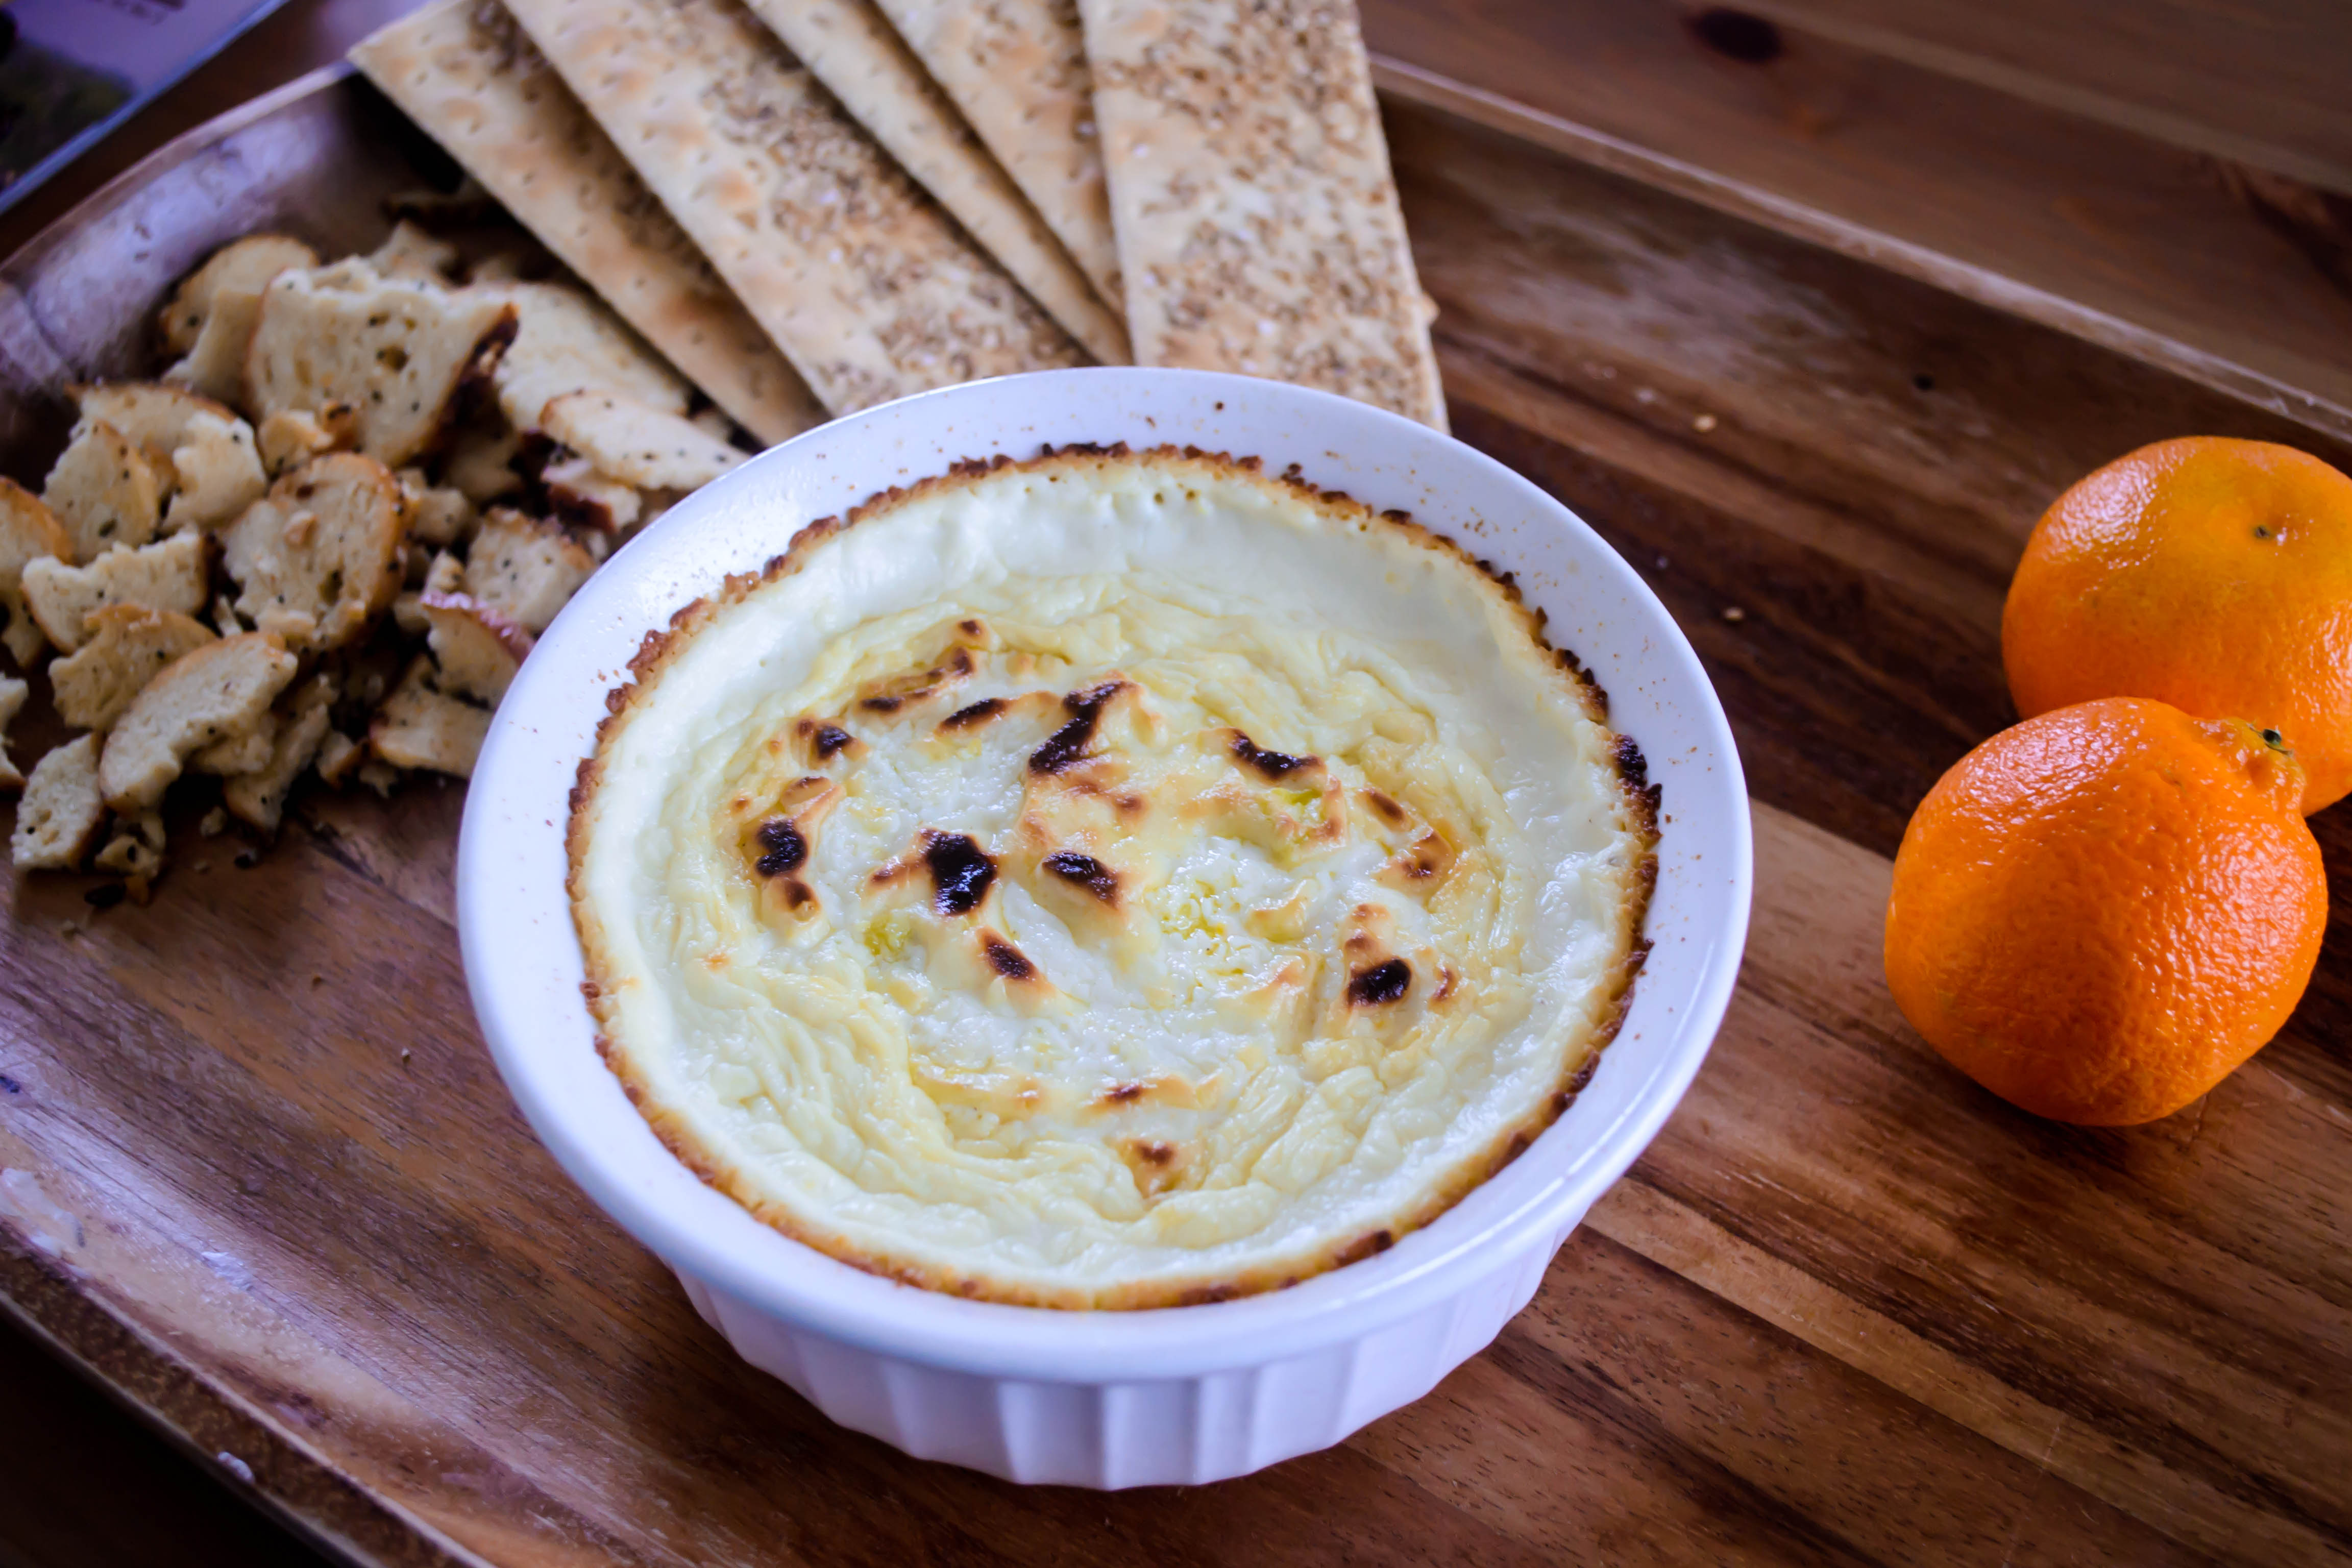
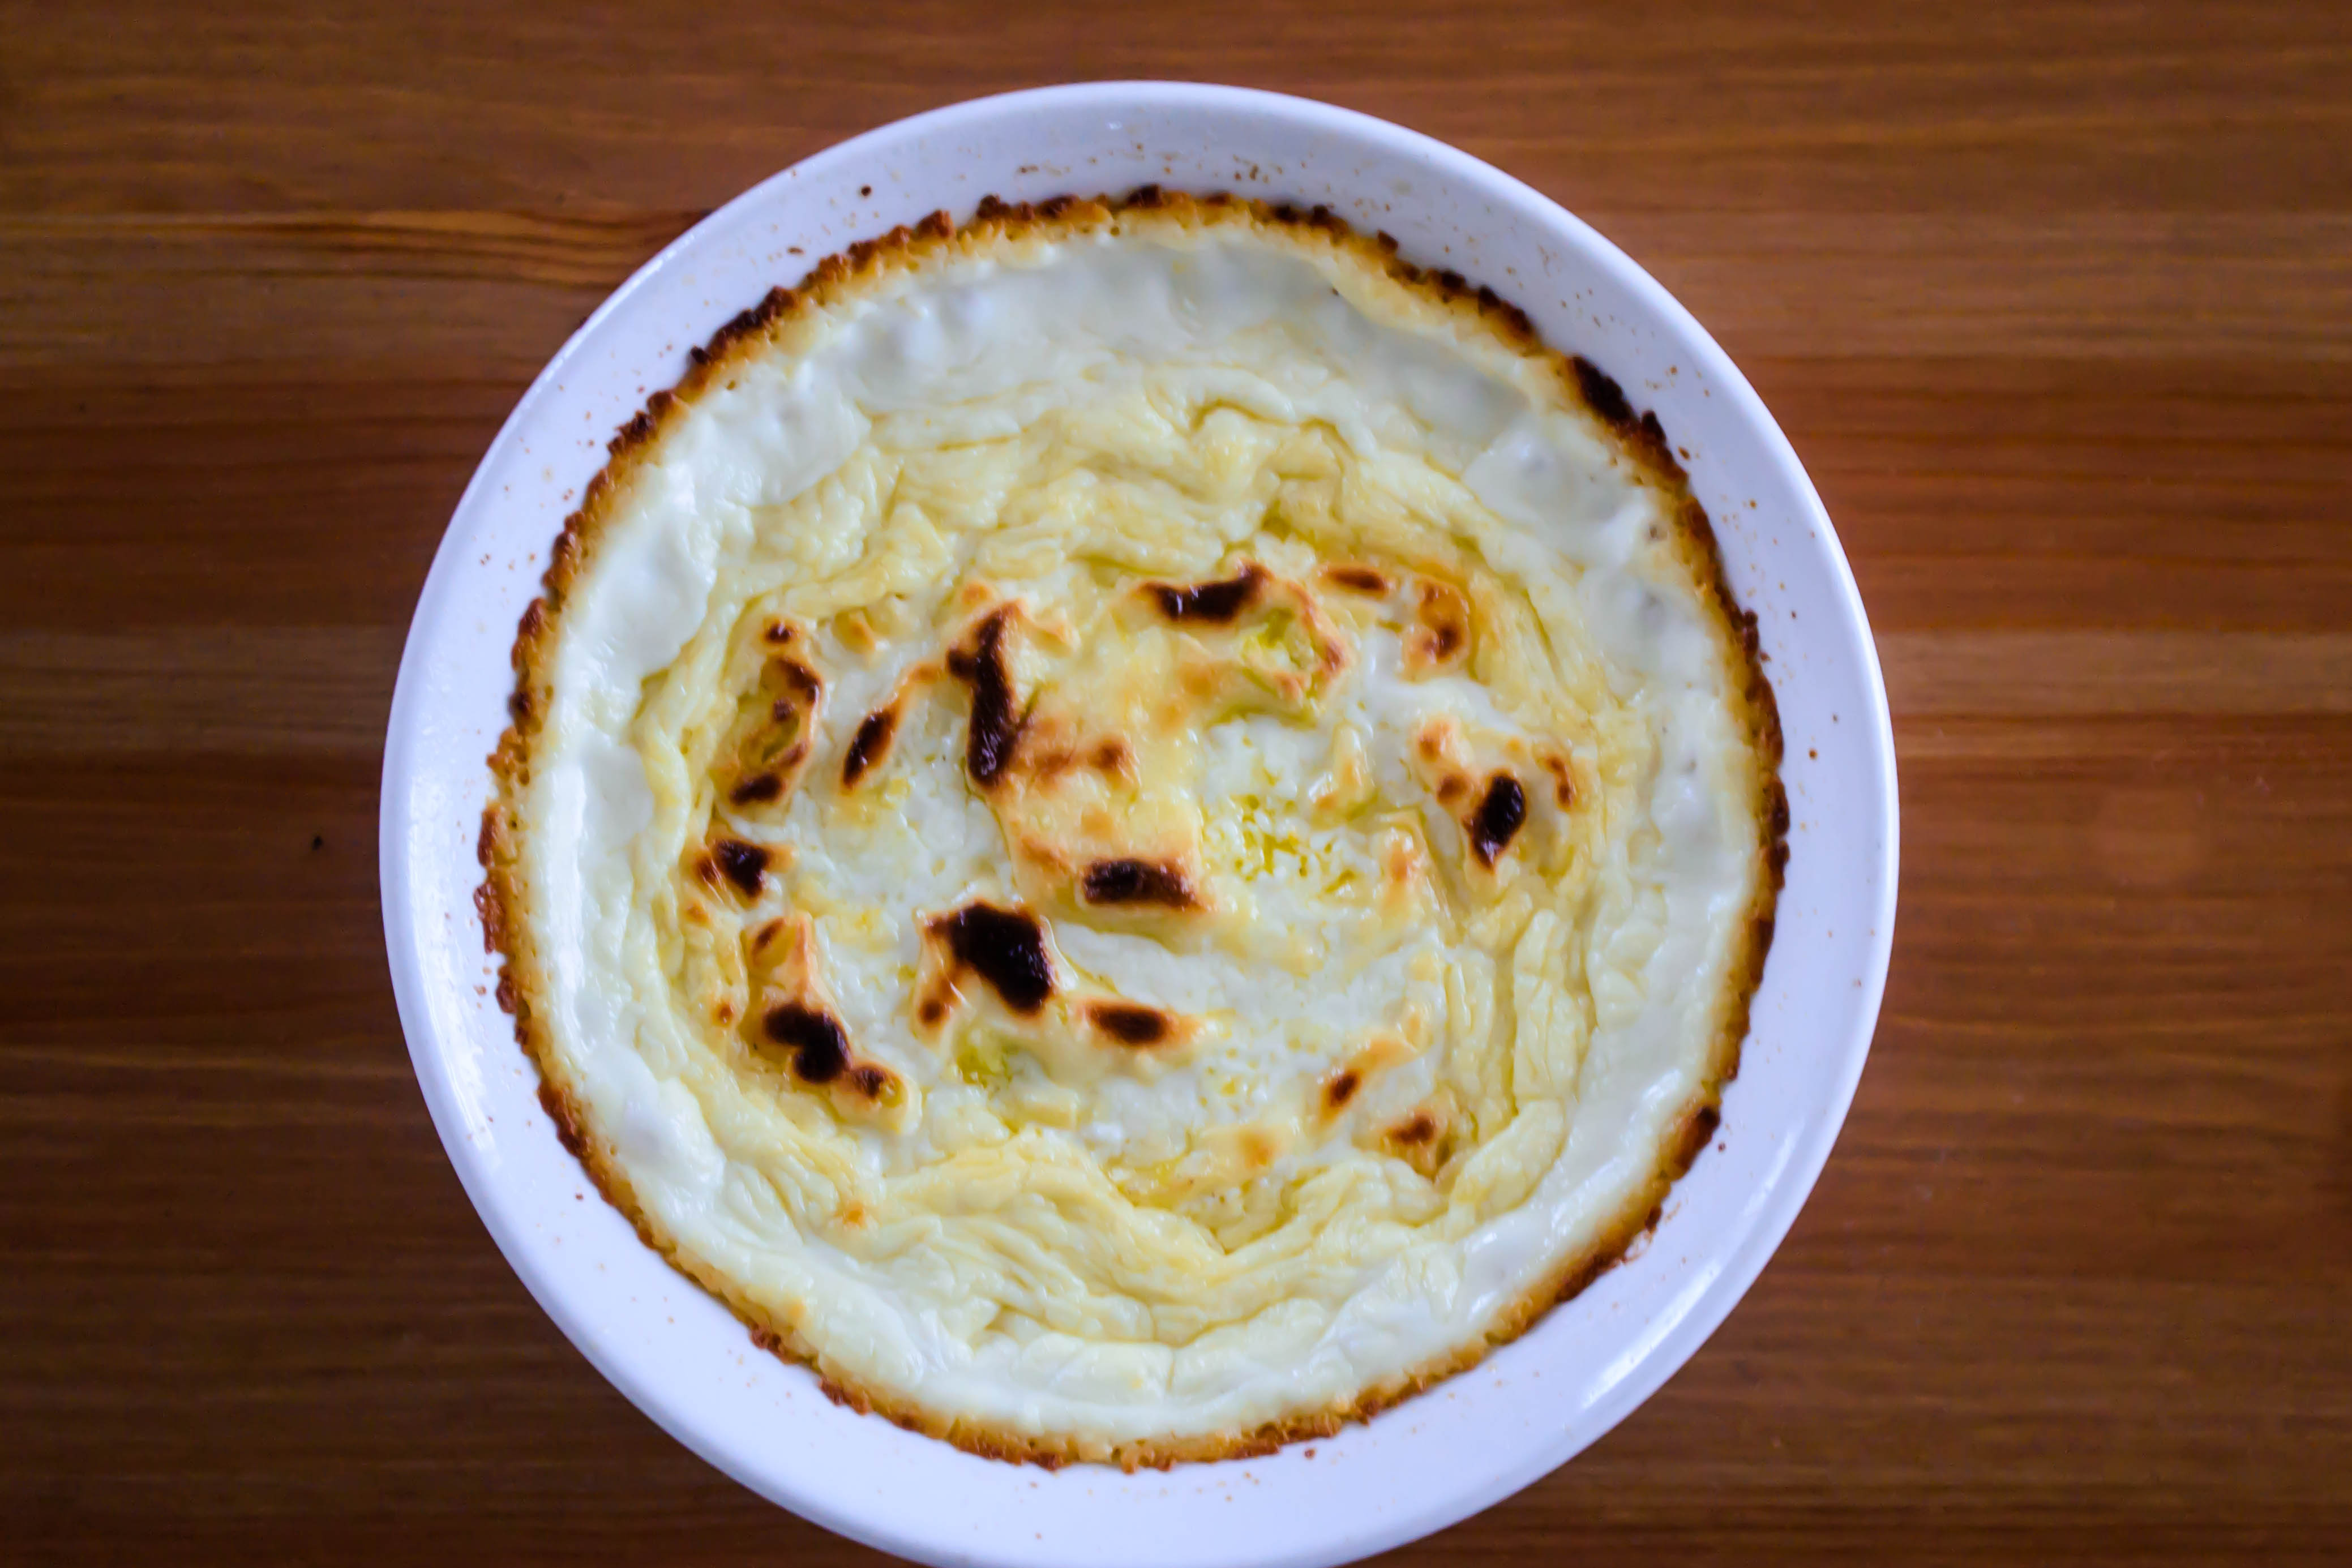
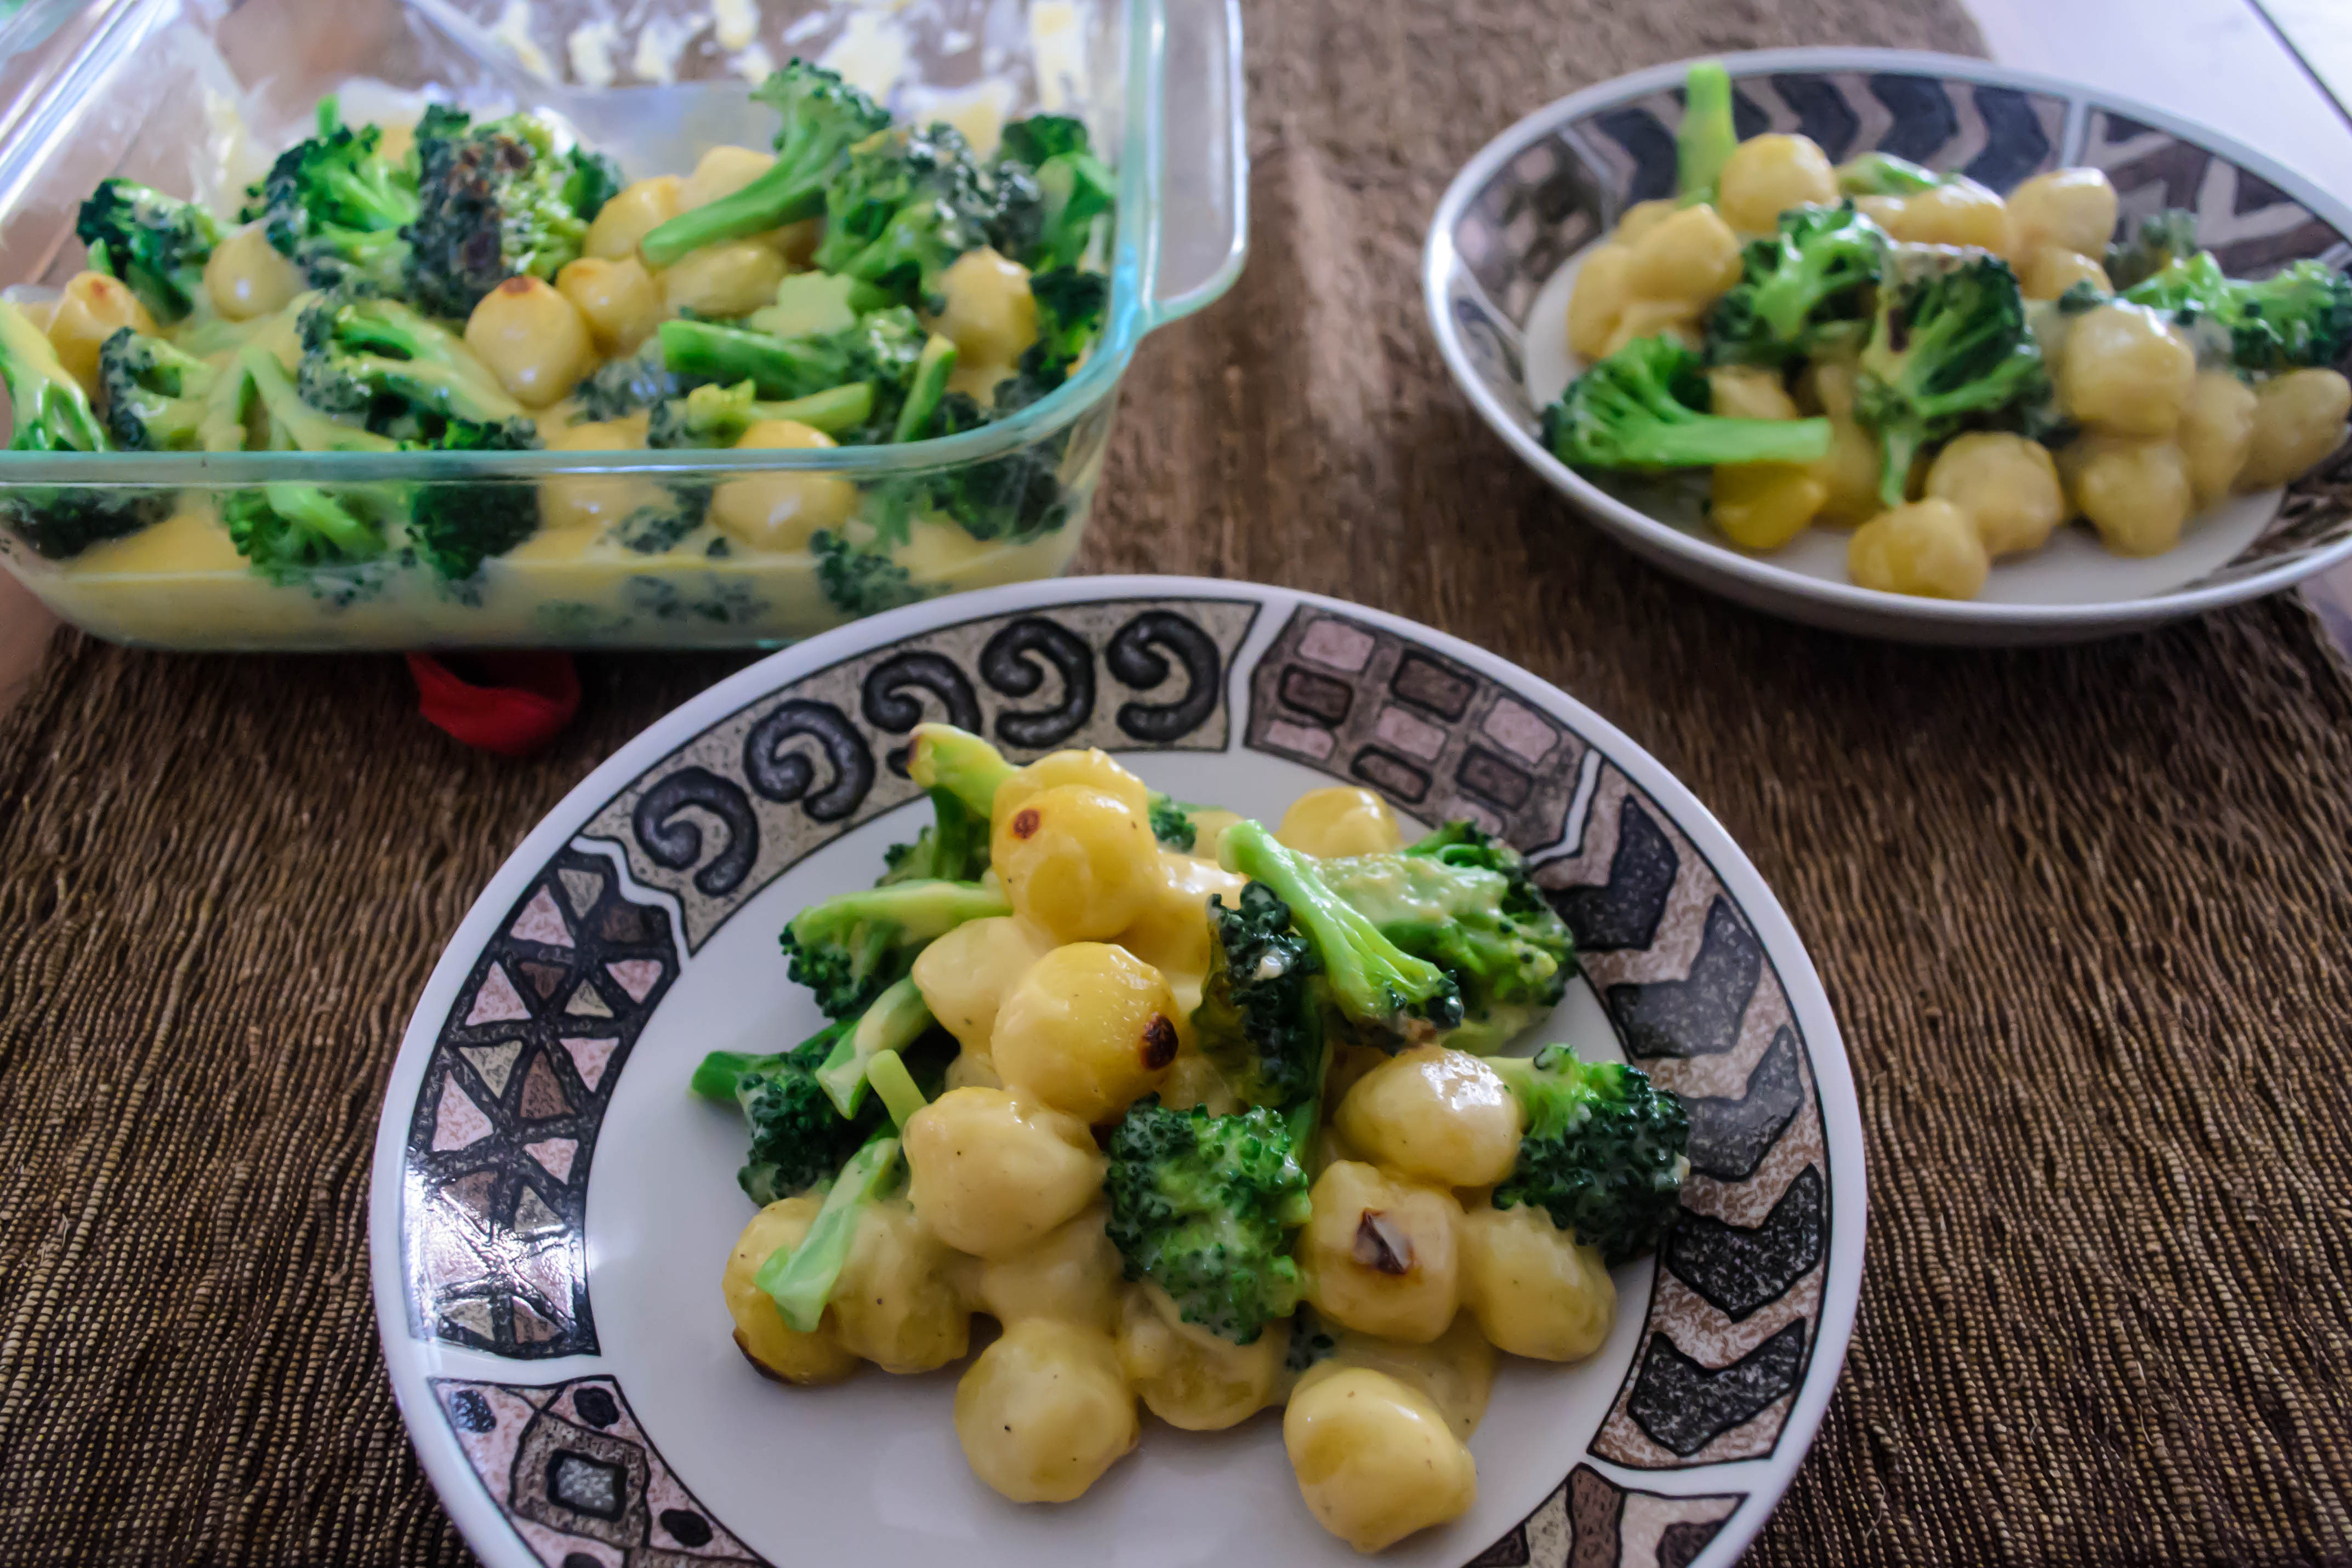
This week’s recipe is definitely one of those that define what I do here. Furthering our exploration into the sauce world, I take a classic, simple, comfort food: broccoli cheese potatoes, and turn its world over, draping thick, cheddar-laden robes across a dish of pan-fried gnocchi and lightly blanched broccoli, letting the cheese sauce sink gracelessly into the crannies between before blistering the whole top under the broiler for a few minutes. It’s a revelation. But then, that shouldn’t be so surprising, because the classic combination it pulls from is already so good.

Food Blog February 2014-3280Sauce mornay is basically a béchamel that’s been dressed up with the addition of cheese. It is French, as so many of them are, and in application can be used to add gooey goodness to everything from crepes to vegetables to macaroni and cheese. Not a fan of cauliflower? Roast it and drench it in a mornay sauce. I can almost guarantee you’ll be a convert. Making a cheese-y potato soup? The base to which you add broth or stock will likely be something very similar to a mornay. Fondue and Welsh rarebit are other closely related preparations, though whether they are offshoots, coincidences, or legitimate progenitors is likely not provable.

Food Blog February 2014-3283
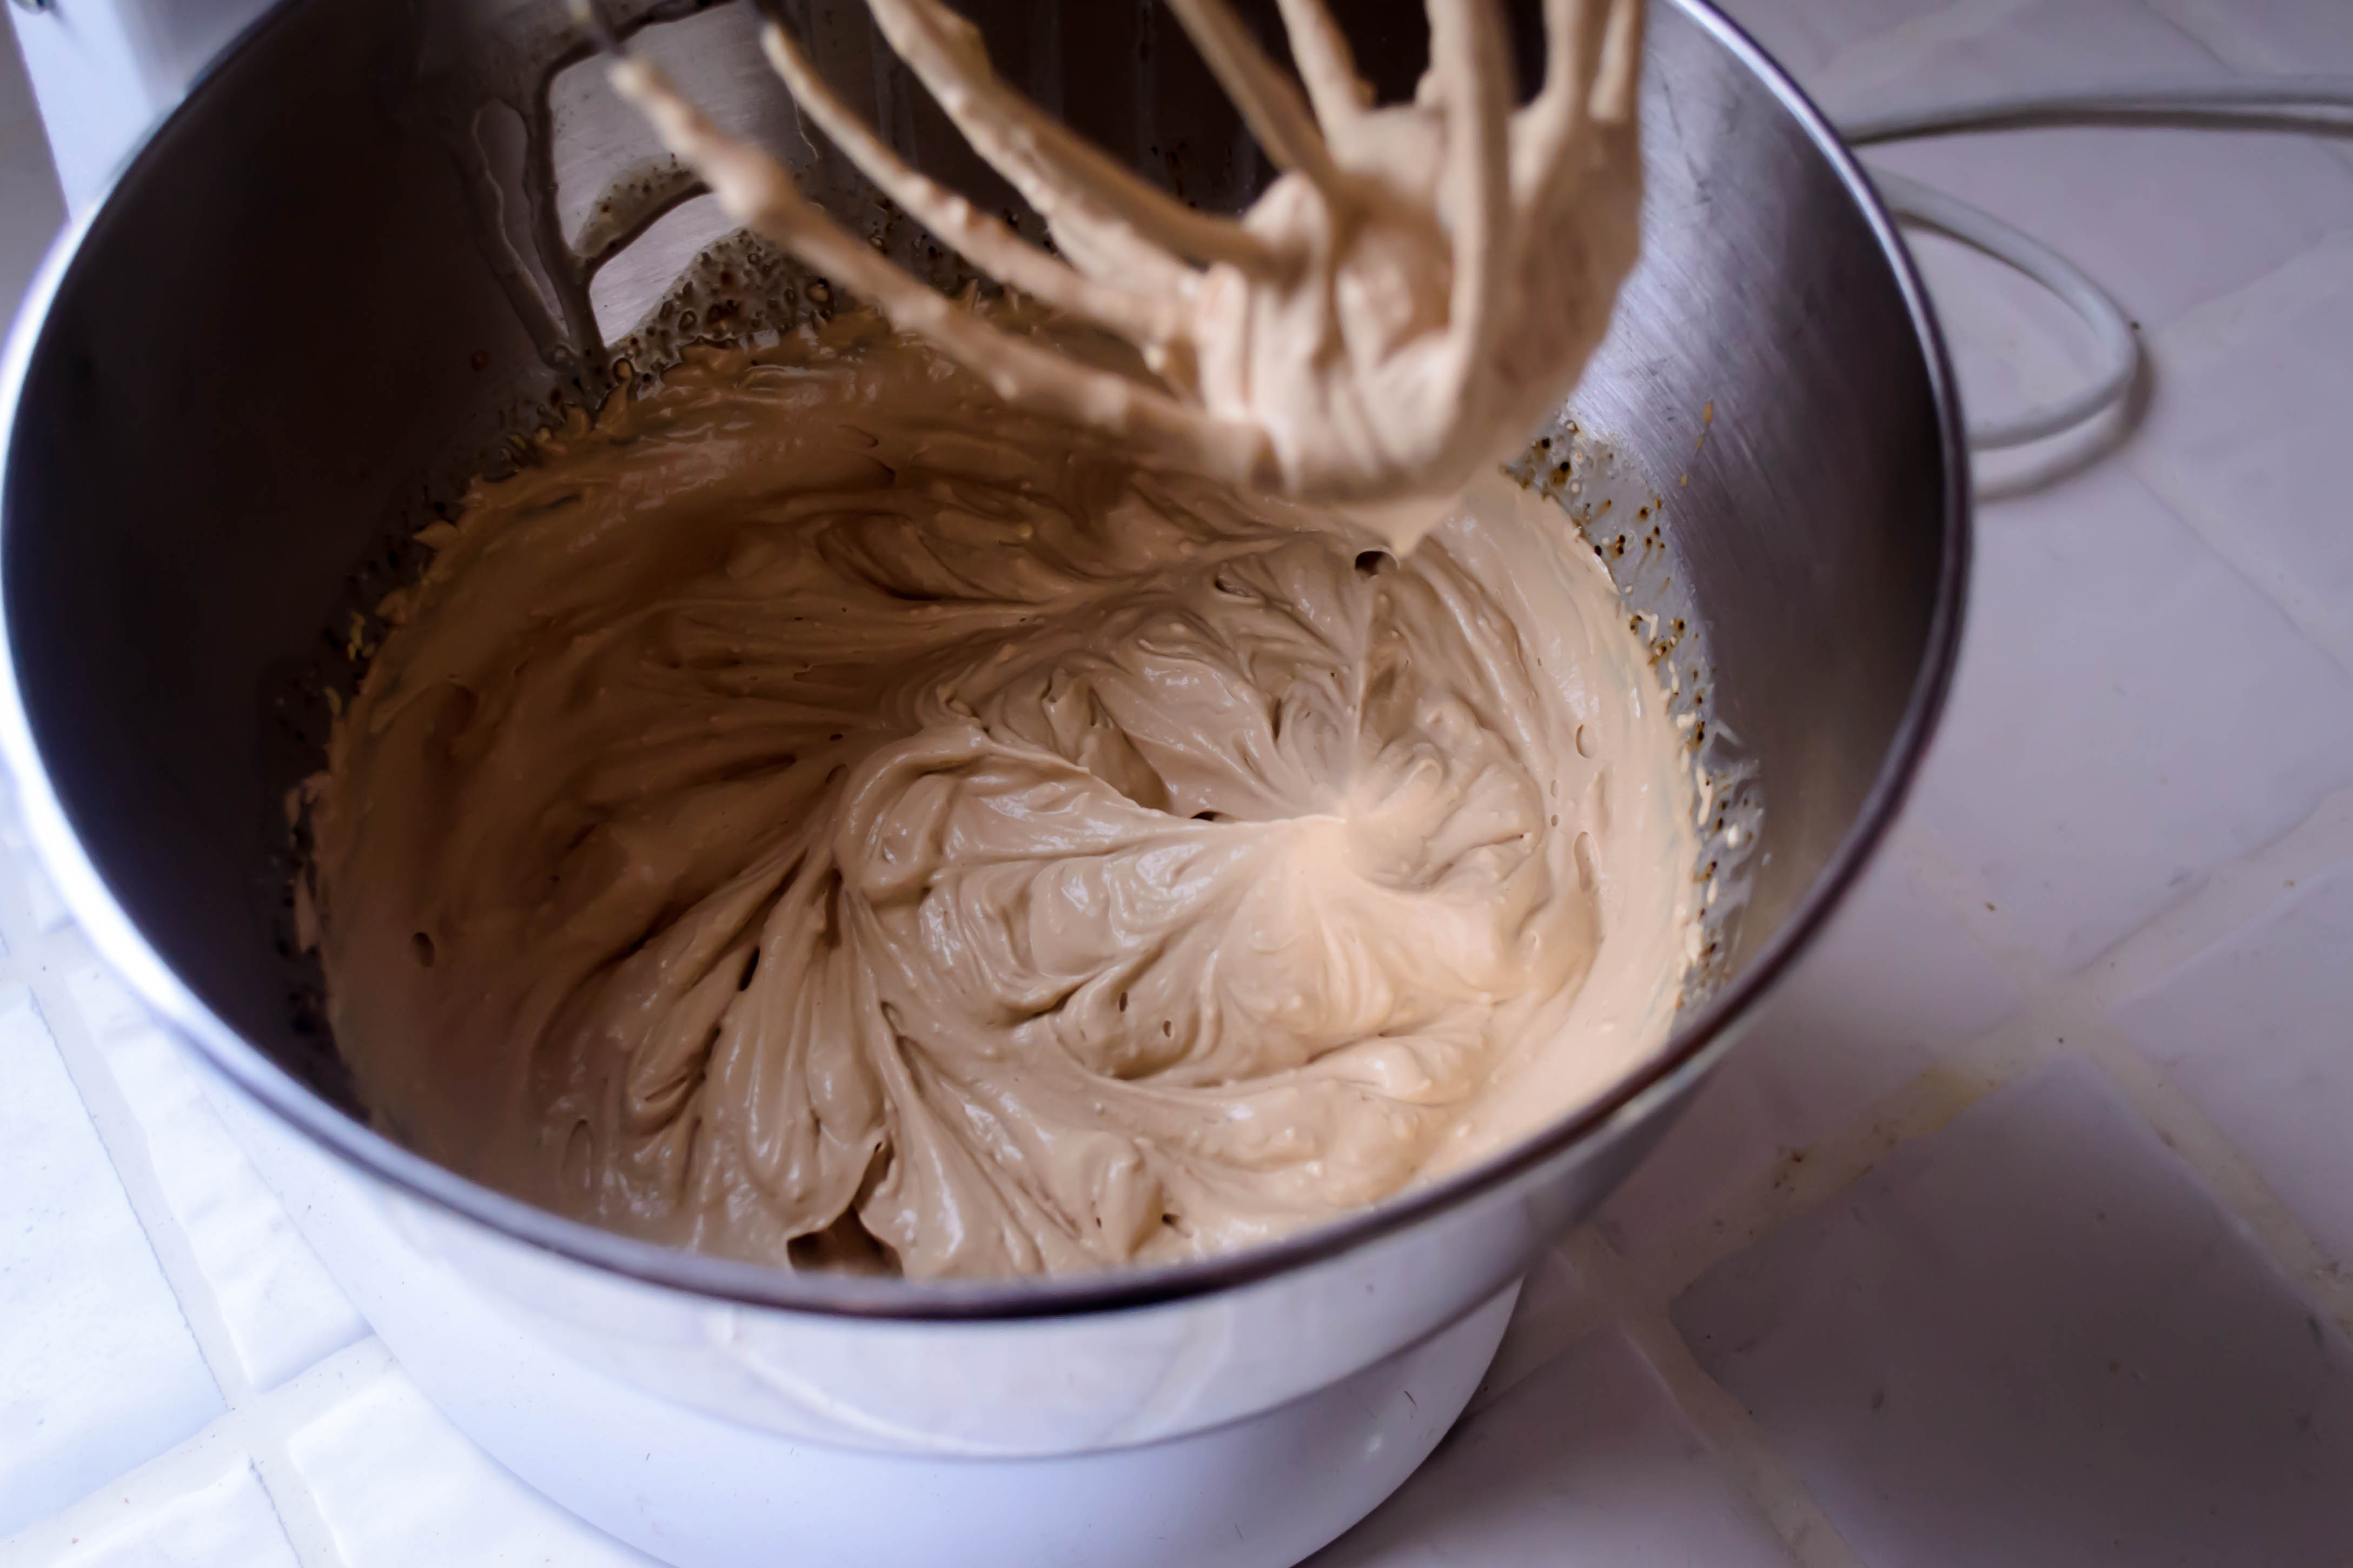
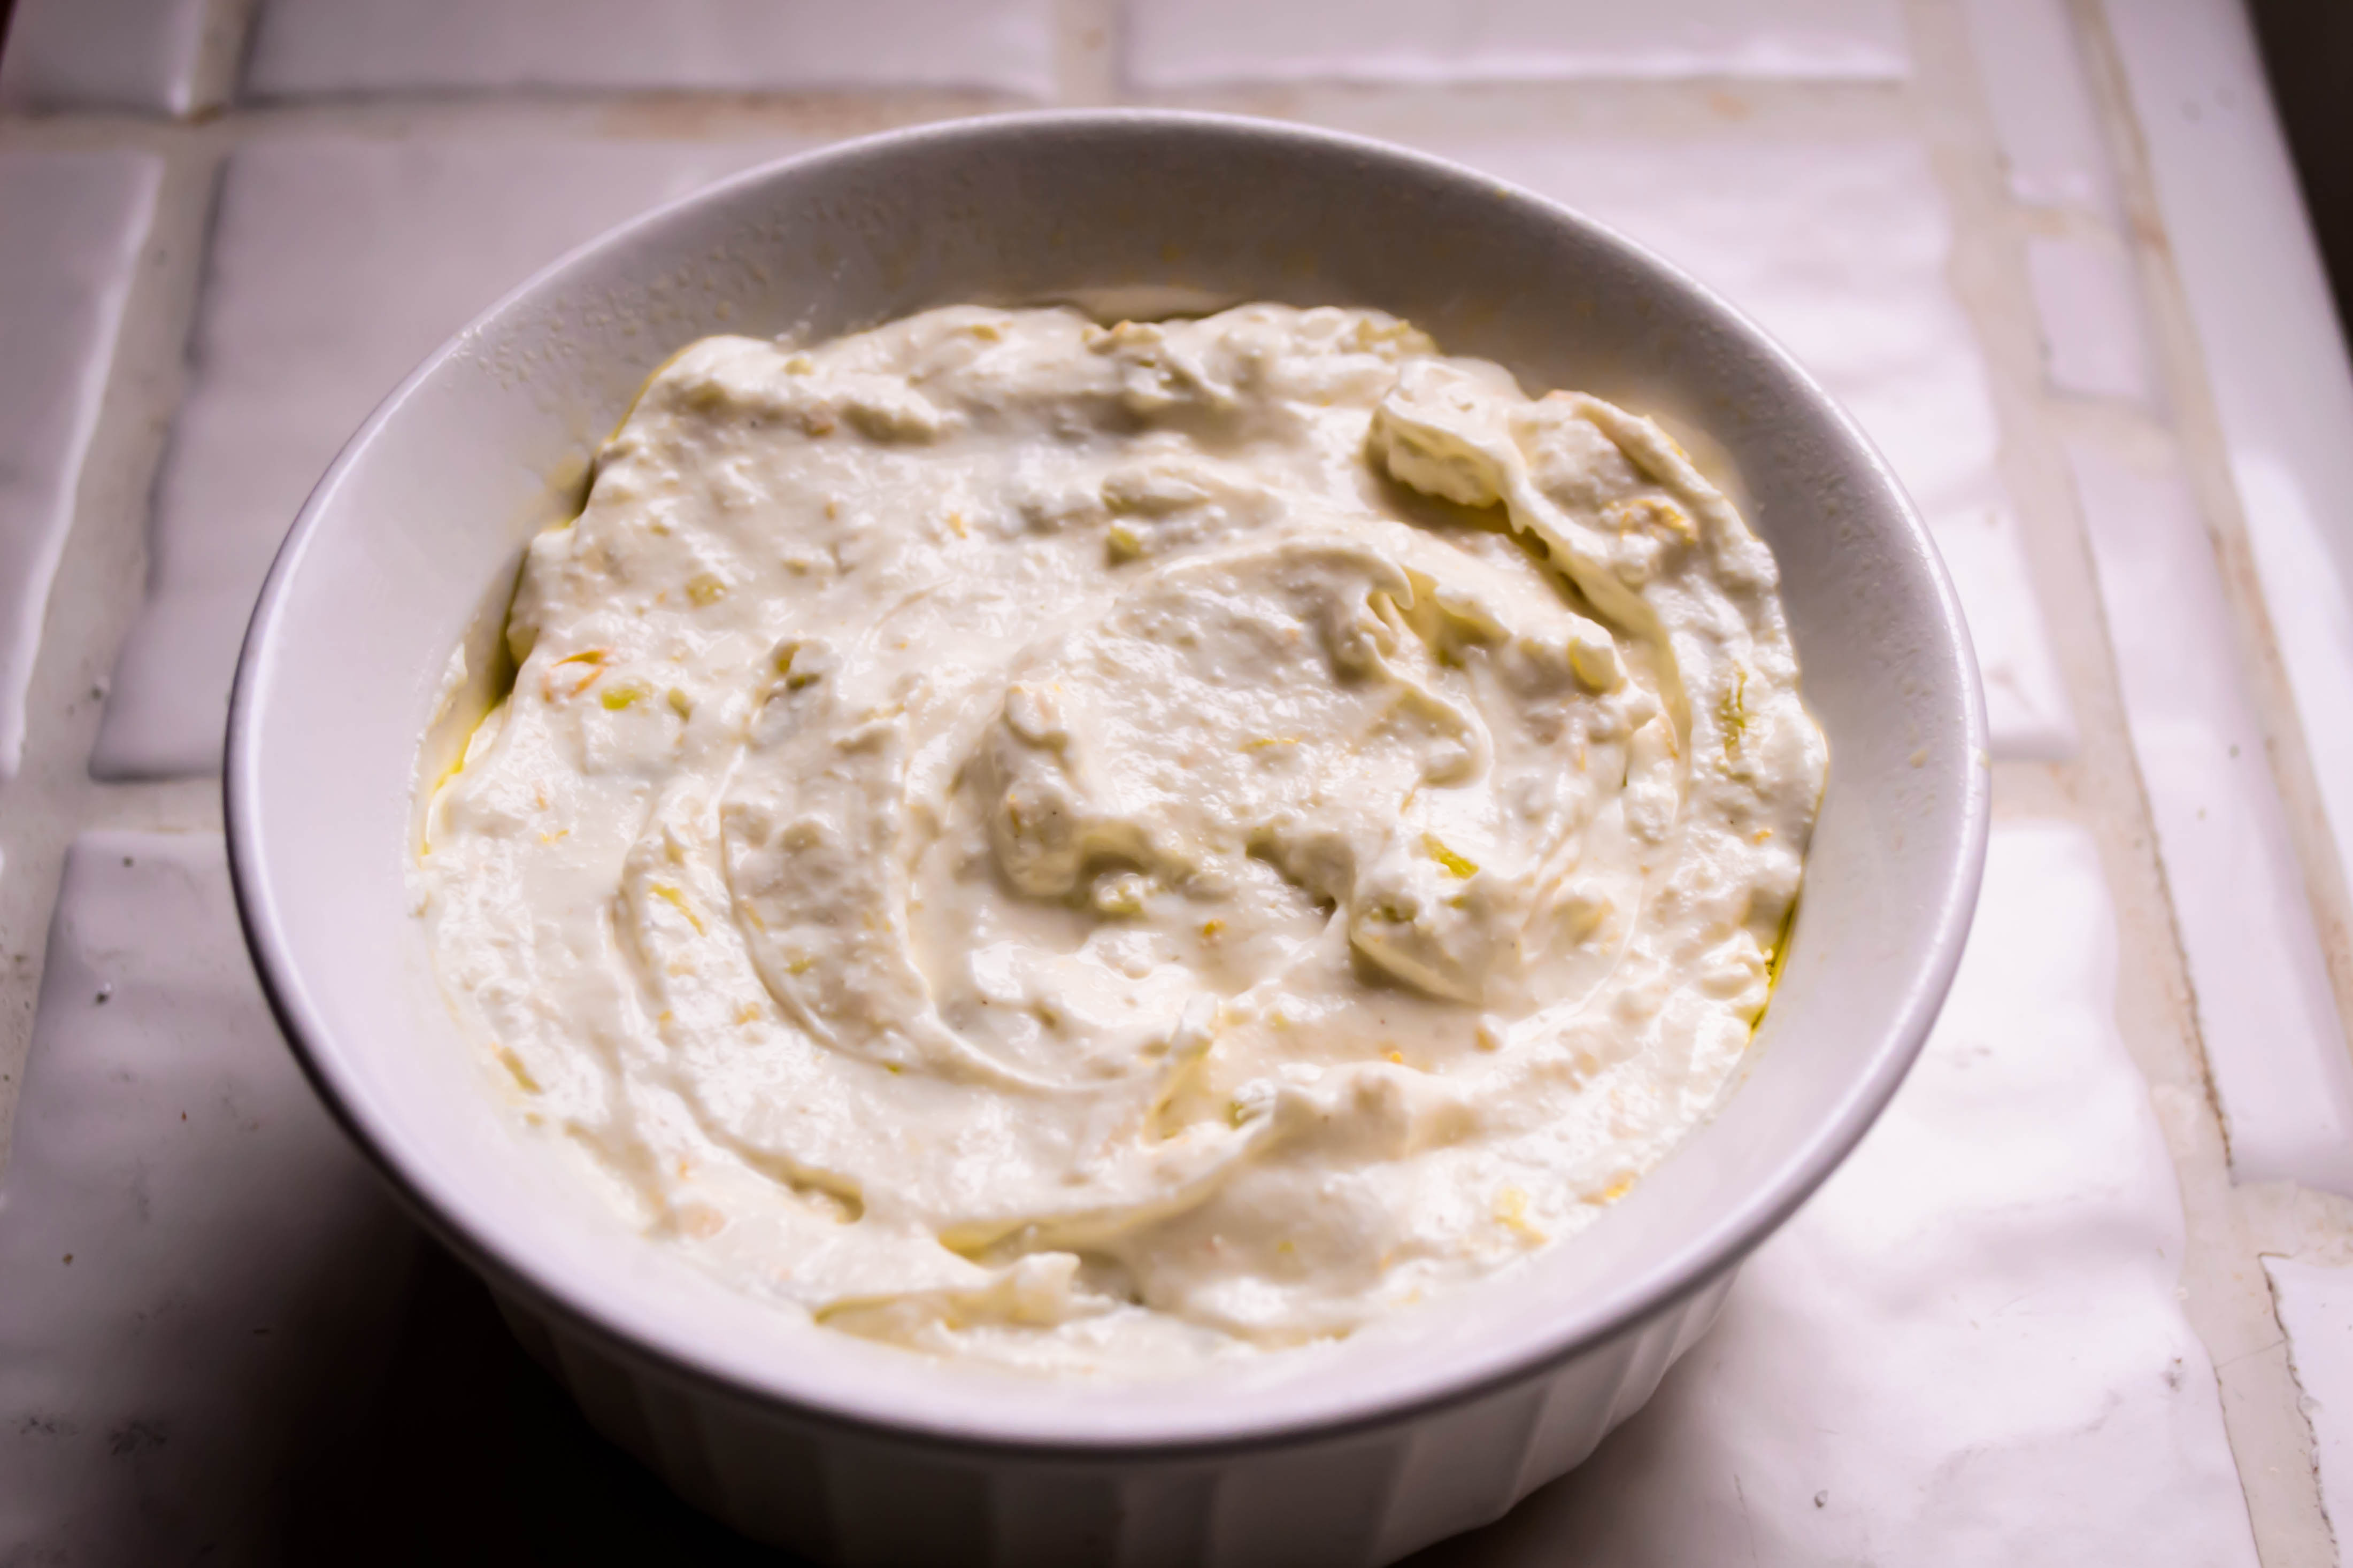
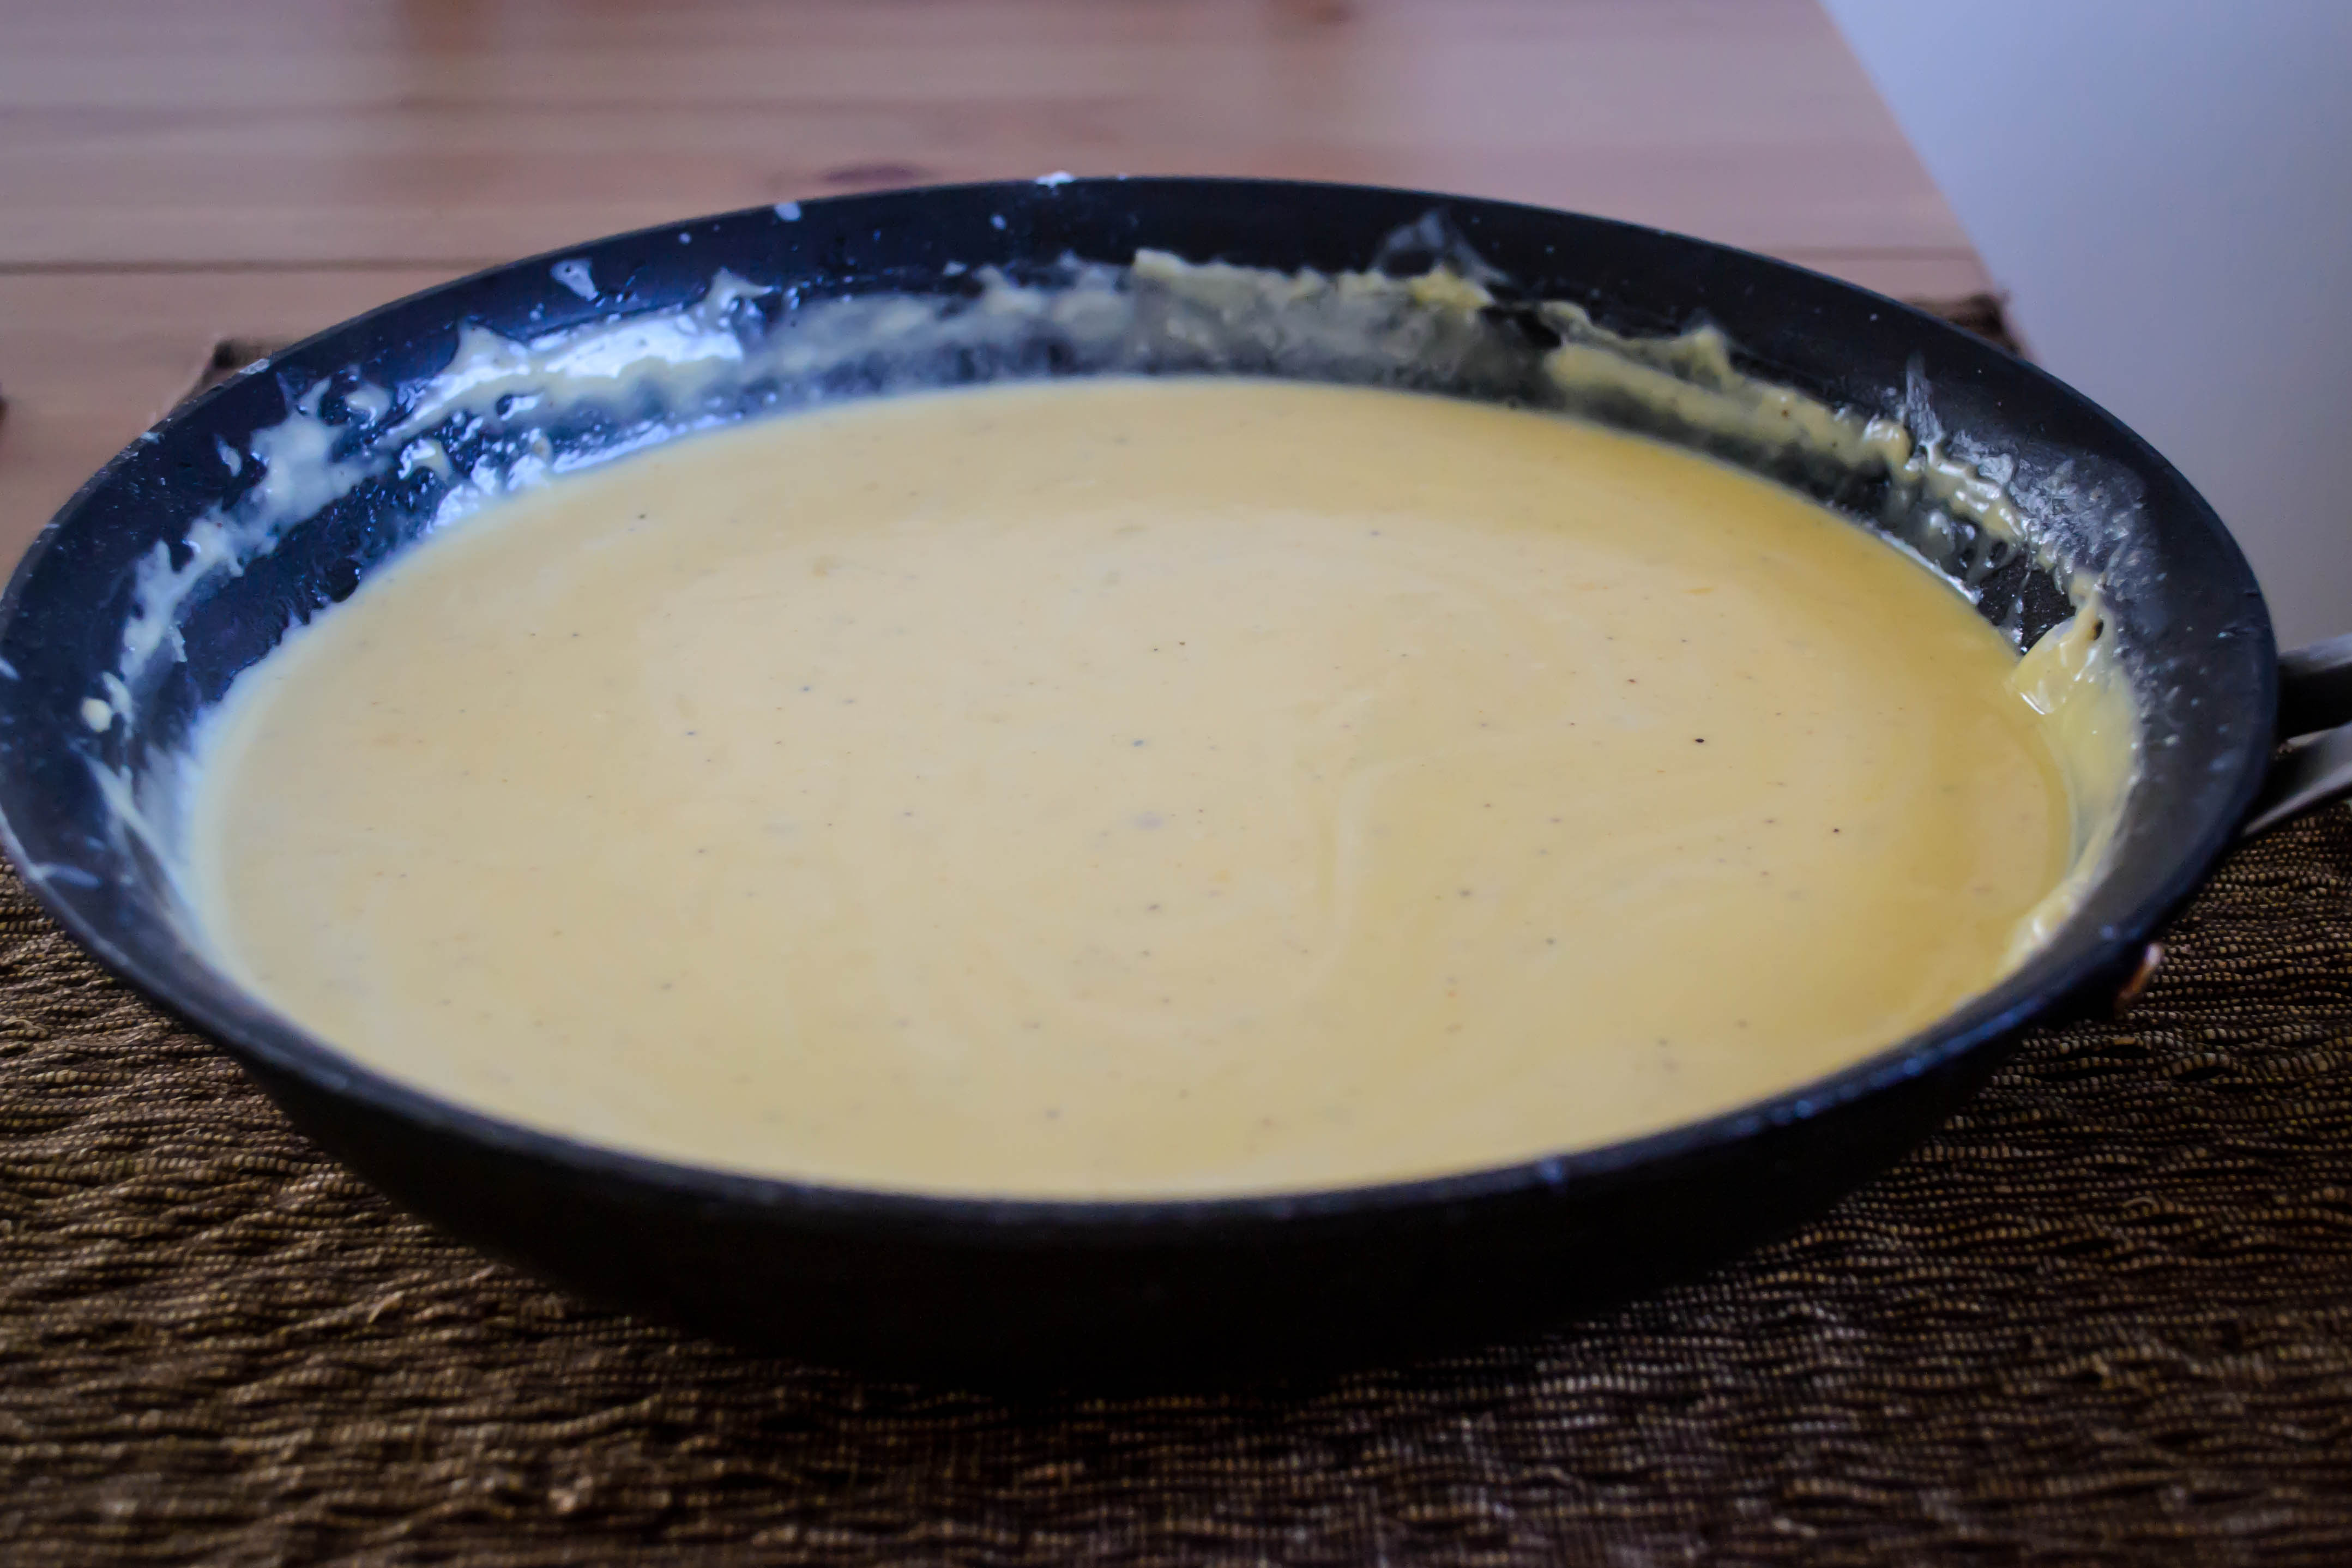
Traditionally, the cheese added to a mornay is a blend of parmesan and gruyere, a particularly nutty variety of Swiss cheese. I like extra sharp cheddar in mine, though, the sharper the better. My mornay sauce, it’s only fair to tell you, is thicker and has a much higher proportion of cheese in it than is strictly traditional. My reasons for this, as I’ve mentioned before, are largely that I like the taste of cheese more than I like the taste of the sauce it becomes. This seems a bit silly – why make the sauce if what you’re really after is the cheese? – but this creation is so velvety and thick and luxurious that it’s worth tinkering with until you get the consistency and cheese percentage you are happy with.

Food Blog February 2014-3290As for the rest of the dish, I can’t take ultimate credit. The inspiration for pan frying the gnocchi comes from Nigella Lawson, the (for me) true domestic goddess. Rather than boiling them and risking gumminess or spongy bits falling about, she sautés them until golden and crisp, as I’ve done here. They are then ready – anxious even – to suck up the lush cheddar velvet we’re going to douse them in. Adding the broccoli, blanched in salted water just until crisp-tender, is my attempt to make this a complete meal and dislodge some of the guilt you might feel about the amount of cheese you’re going to consume. Plus, who doesn’t love broccoli with cheese sauce? Again, classics, but jammed together in a fresh way that I hope will delight you.

Food Blog February 2014-3289
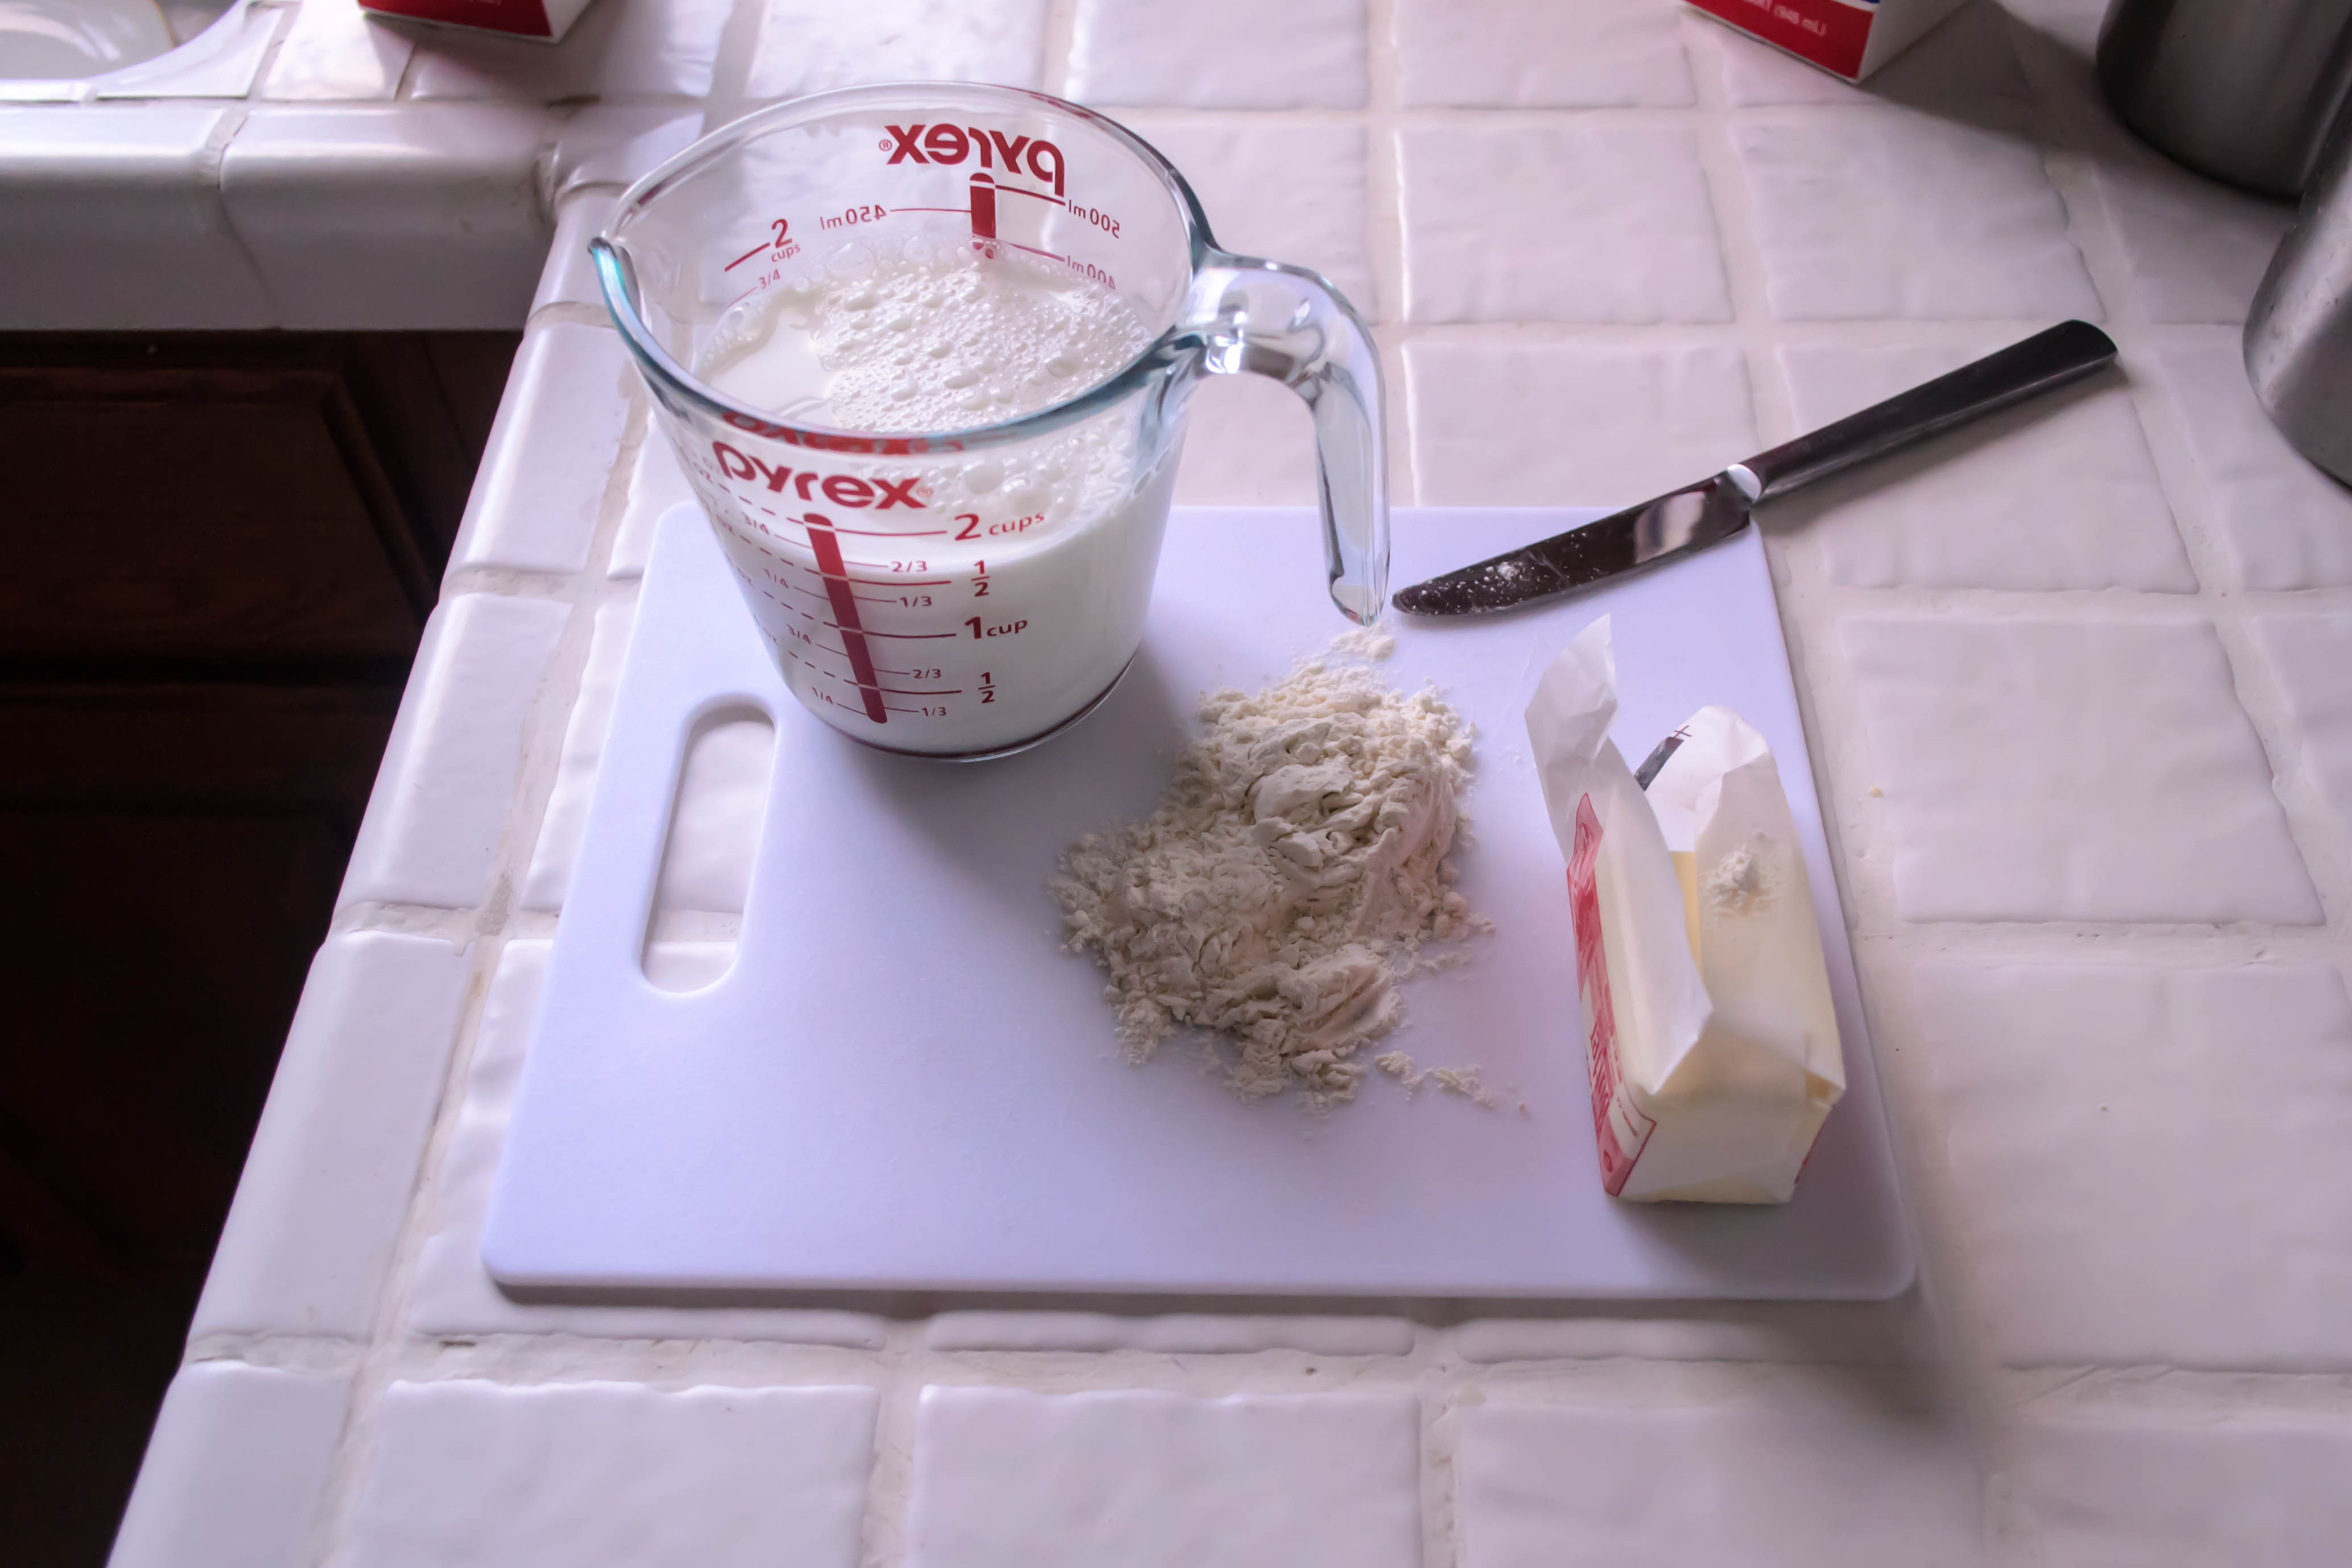
I’m giving you two versions of my sauce mornay recipe here – one quite pared down and basic, though, as I noted above, cheesier than what is typical (many mornays call for only a few tablespoons of cheese) – one “kicked up” with the integration of some more complex, exciting flavors. Use and play at your own discretion.

Food Blog February 2014-3295

Basic Mornay
Makes about 2½ cups
2 tablespoons butter
2 tablespoons flour
½ teaspoon salt
¼ teaspoon pepper
¼ teaspoon nutmeg
1 ½ cups milk, at room temperature, if possible, for easier integration
2-3 cups grated extra sharp cheddar cheese (or the cheese of your liking. I use a whopping 3 cups of extra sharp New York cheddar)
  • Key for this sort of sauce is having all of your ingredients ready to go from the beginning. You don’t want to get to the “whisk constantly” part and realize you haven’t grated your cheese yet. Do yourself a favor and have everything ready and waiting for you before you begin.
  • In a skillet over medium heat, melt the butter. When it is melted and bubbling, sprinkle in the flour and stir to combine with a whisk. The mixture will become thick and a bit crumbly.
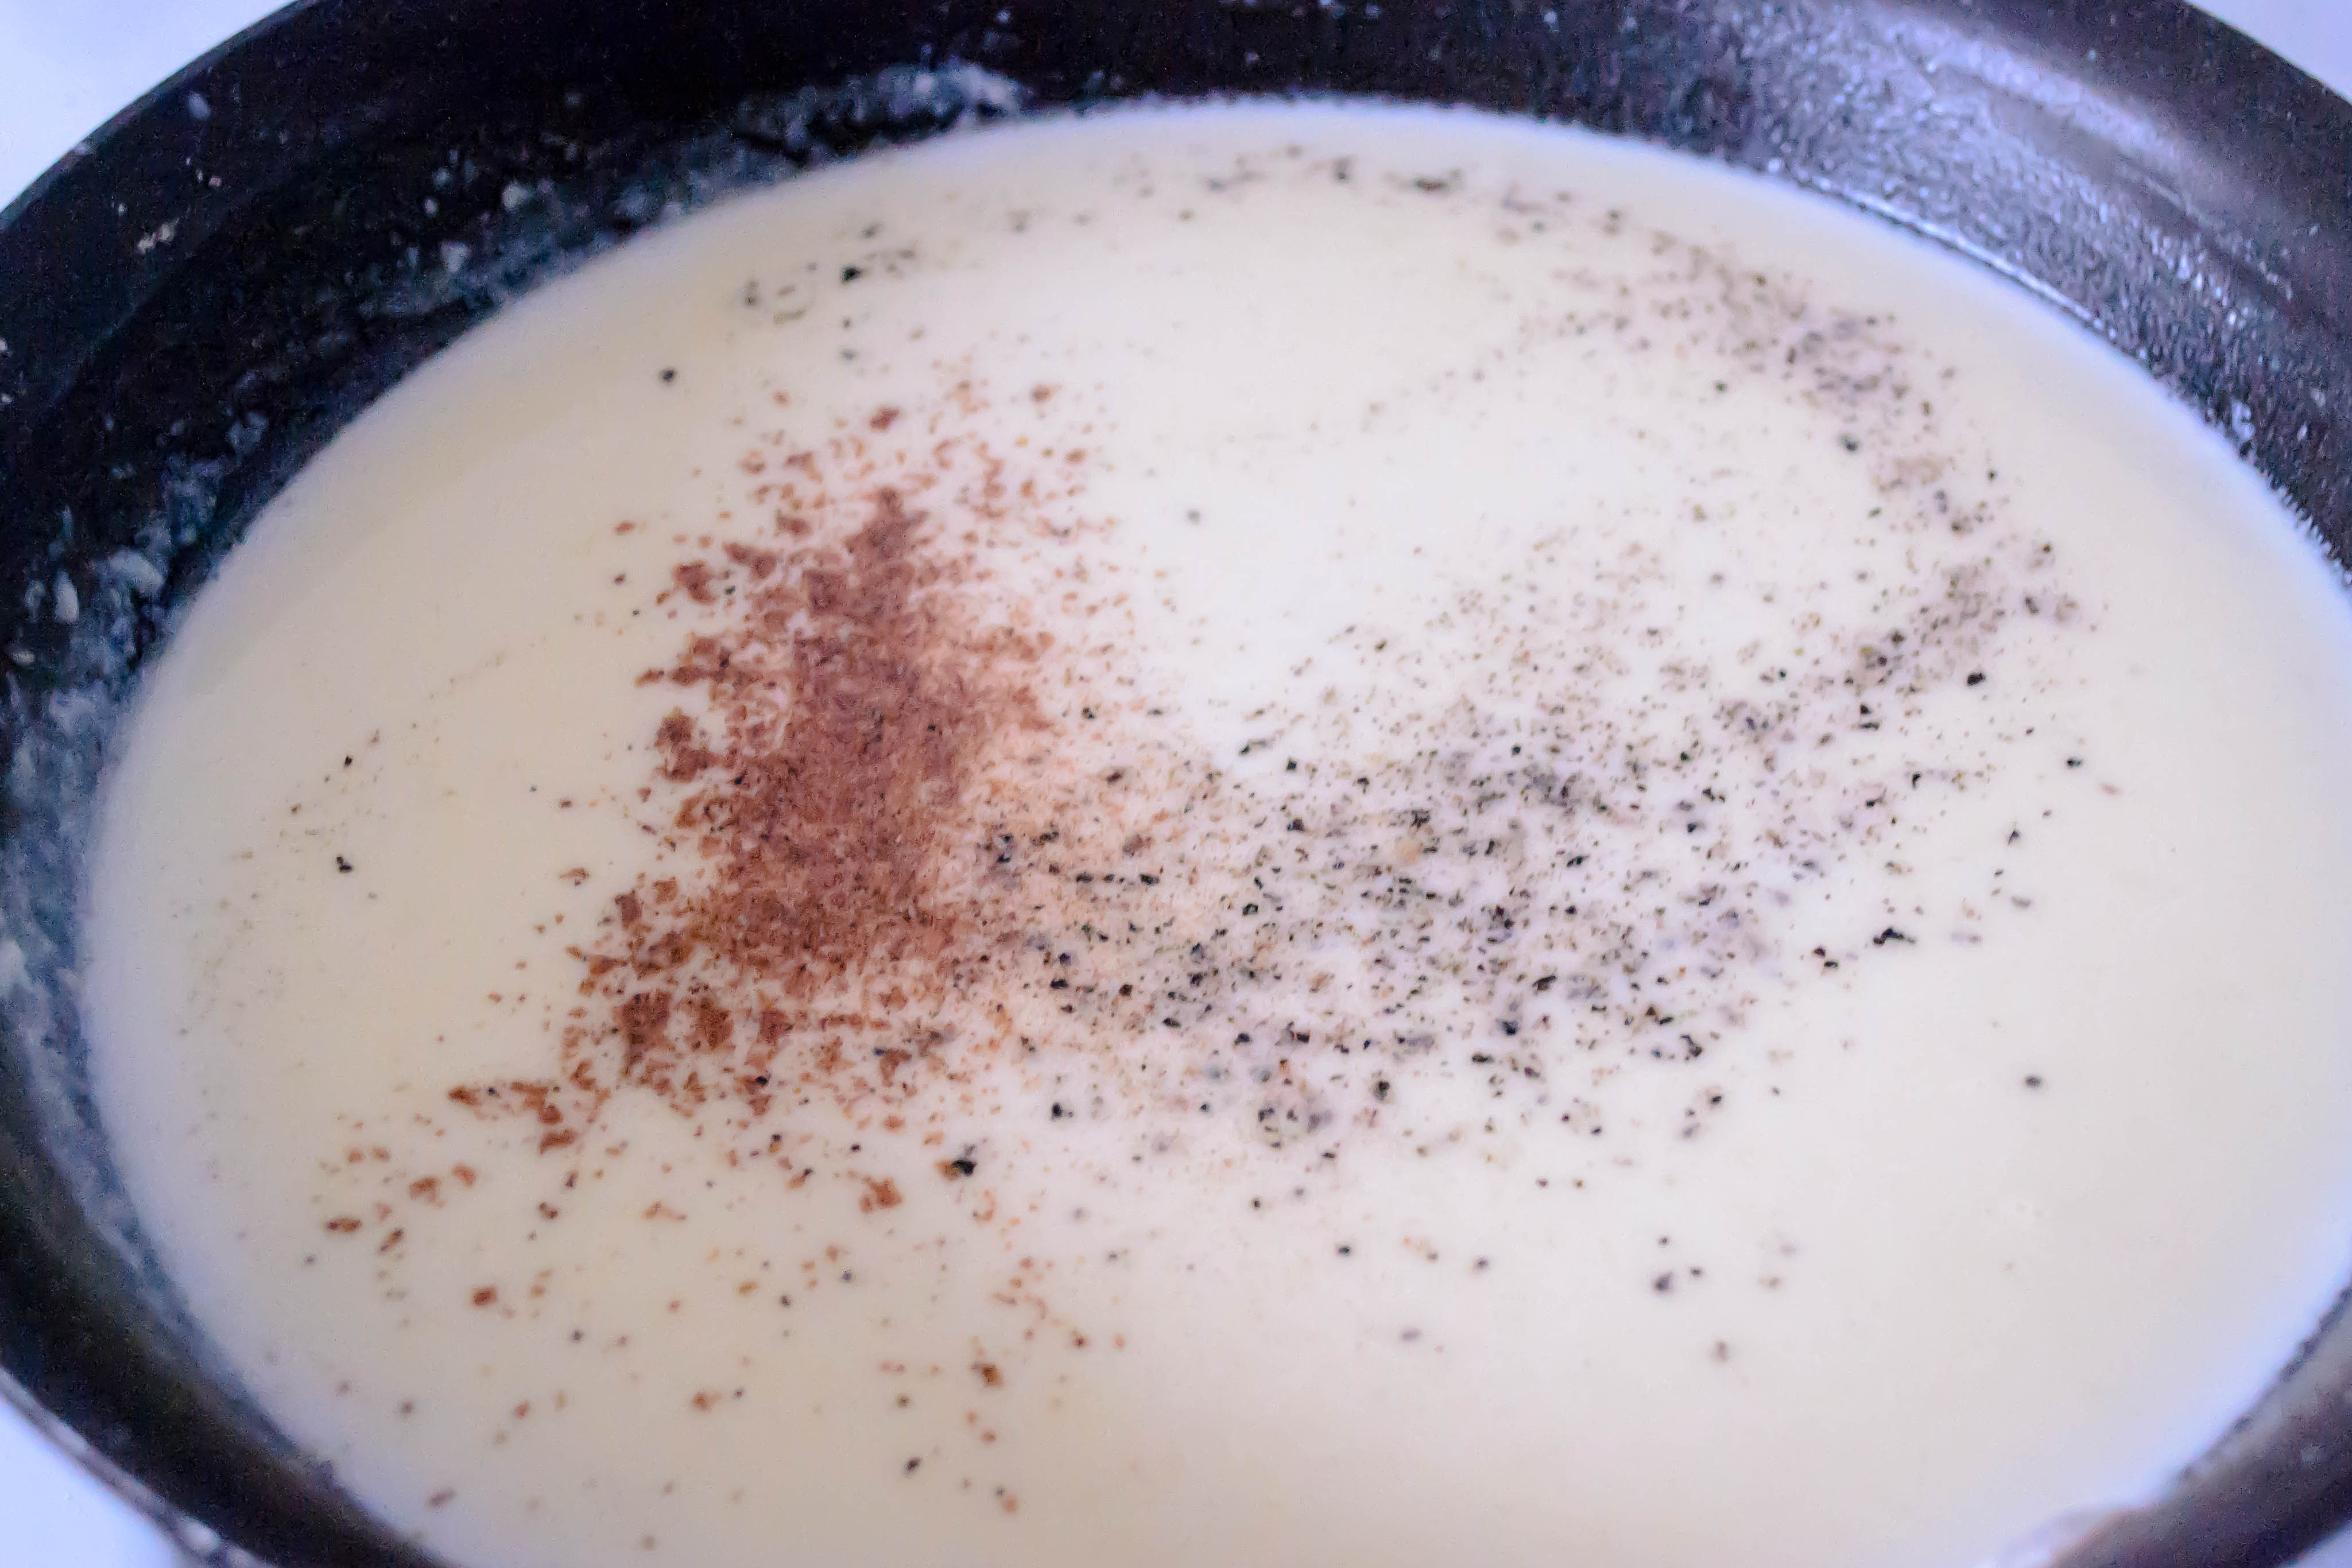
  • Add the salt, pepper, and nutmeg and stir to combine.
  • Add the milk slowly – no more than ½ cup at a time – whisking insistently and constantly as you add it. You want to combine it smoothly into the thick roux (butter and flour mixture) you’ve created, and avoid lumps. Adding 1½ cups of refrigerator cold milk all at once makes lumps much more likely.
  • Keep whisking your mixture gently as you pour in each addition of milk. When you have added all of the milk, turn the heat down to medium-low and continue to whisk gently and languidly (or more ferociously if you have ended up with some lumps… it happens…) until the sauce begins to bubble.
  • Once the sauce reaches a gentle simmer, whisk until it thickens slightly – something a bit thicker than melted ice cream, perhaps the viscosity of a soft porridge or cream of wheat (remember that stuff? God I loved it as a kid).
  • Now that your sauce is thick, turn the heat down to low and add the cheese a small handful at a time, whisking after each addition until it is completely melted and incorporated. After a few minutes, you will end up with a thick, rich, pale orange (if it’s cheddar) sauce. If you are using cheddar, you might notice that your sauce is just barely grainy. That’s okay. It will still work really well in whatever application you’re using it for. Cheddar is just such a crumbly cheese that it doesn’t melt as silky smooth as other, softer cheeses.
Kicked-up Mornay
Makes about 2½ cups
2 tablespoons butter
2 cloves garlic, finely minced
2 tablespoons flour
½ teaspoon salt
¼ teaspoon pepper
¼ teaspoon nutmeg
⅛ teaspoon cayenne pepper, or to taste
1 teaspoon Dijon mustard
1 ½ cups milk, at room temperature, if possible, for easier integration
2-3 cups grated extra sharp cheddar cheese (or the cheese of your liking. I use a whopping 3 cups of extra sharp New York cheddar)
  • See notes above about having all of your ingredients ready to go before you begin cooking this sauce.
  • Melt the butter in a skillet over medium heat. When it has melted completely, add the finely minced garlic and stir gently.
  • When the garlic is sizzling and has barely taken on color, add the flour and stir to combine with a whisk. The mixture will become thick and a bit crumbly.
  • Add the salt, pepper, nutmeg, cayenne, and mustard, and stir to combine.
  • With the spices and flavorings integrated, follow the remaining directions for the standard mornay sauce above.
Gnocchi and Broccoli with Blistered Sauce Mornay
Serves 3-4
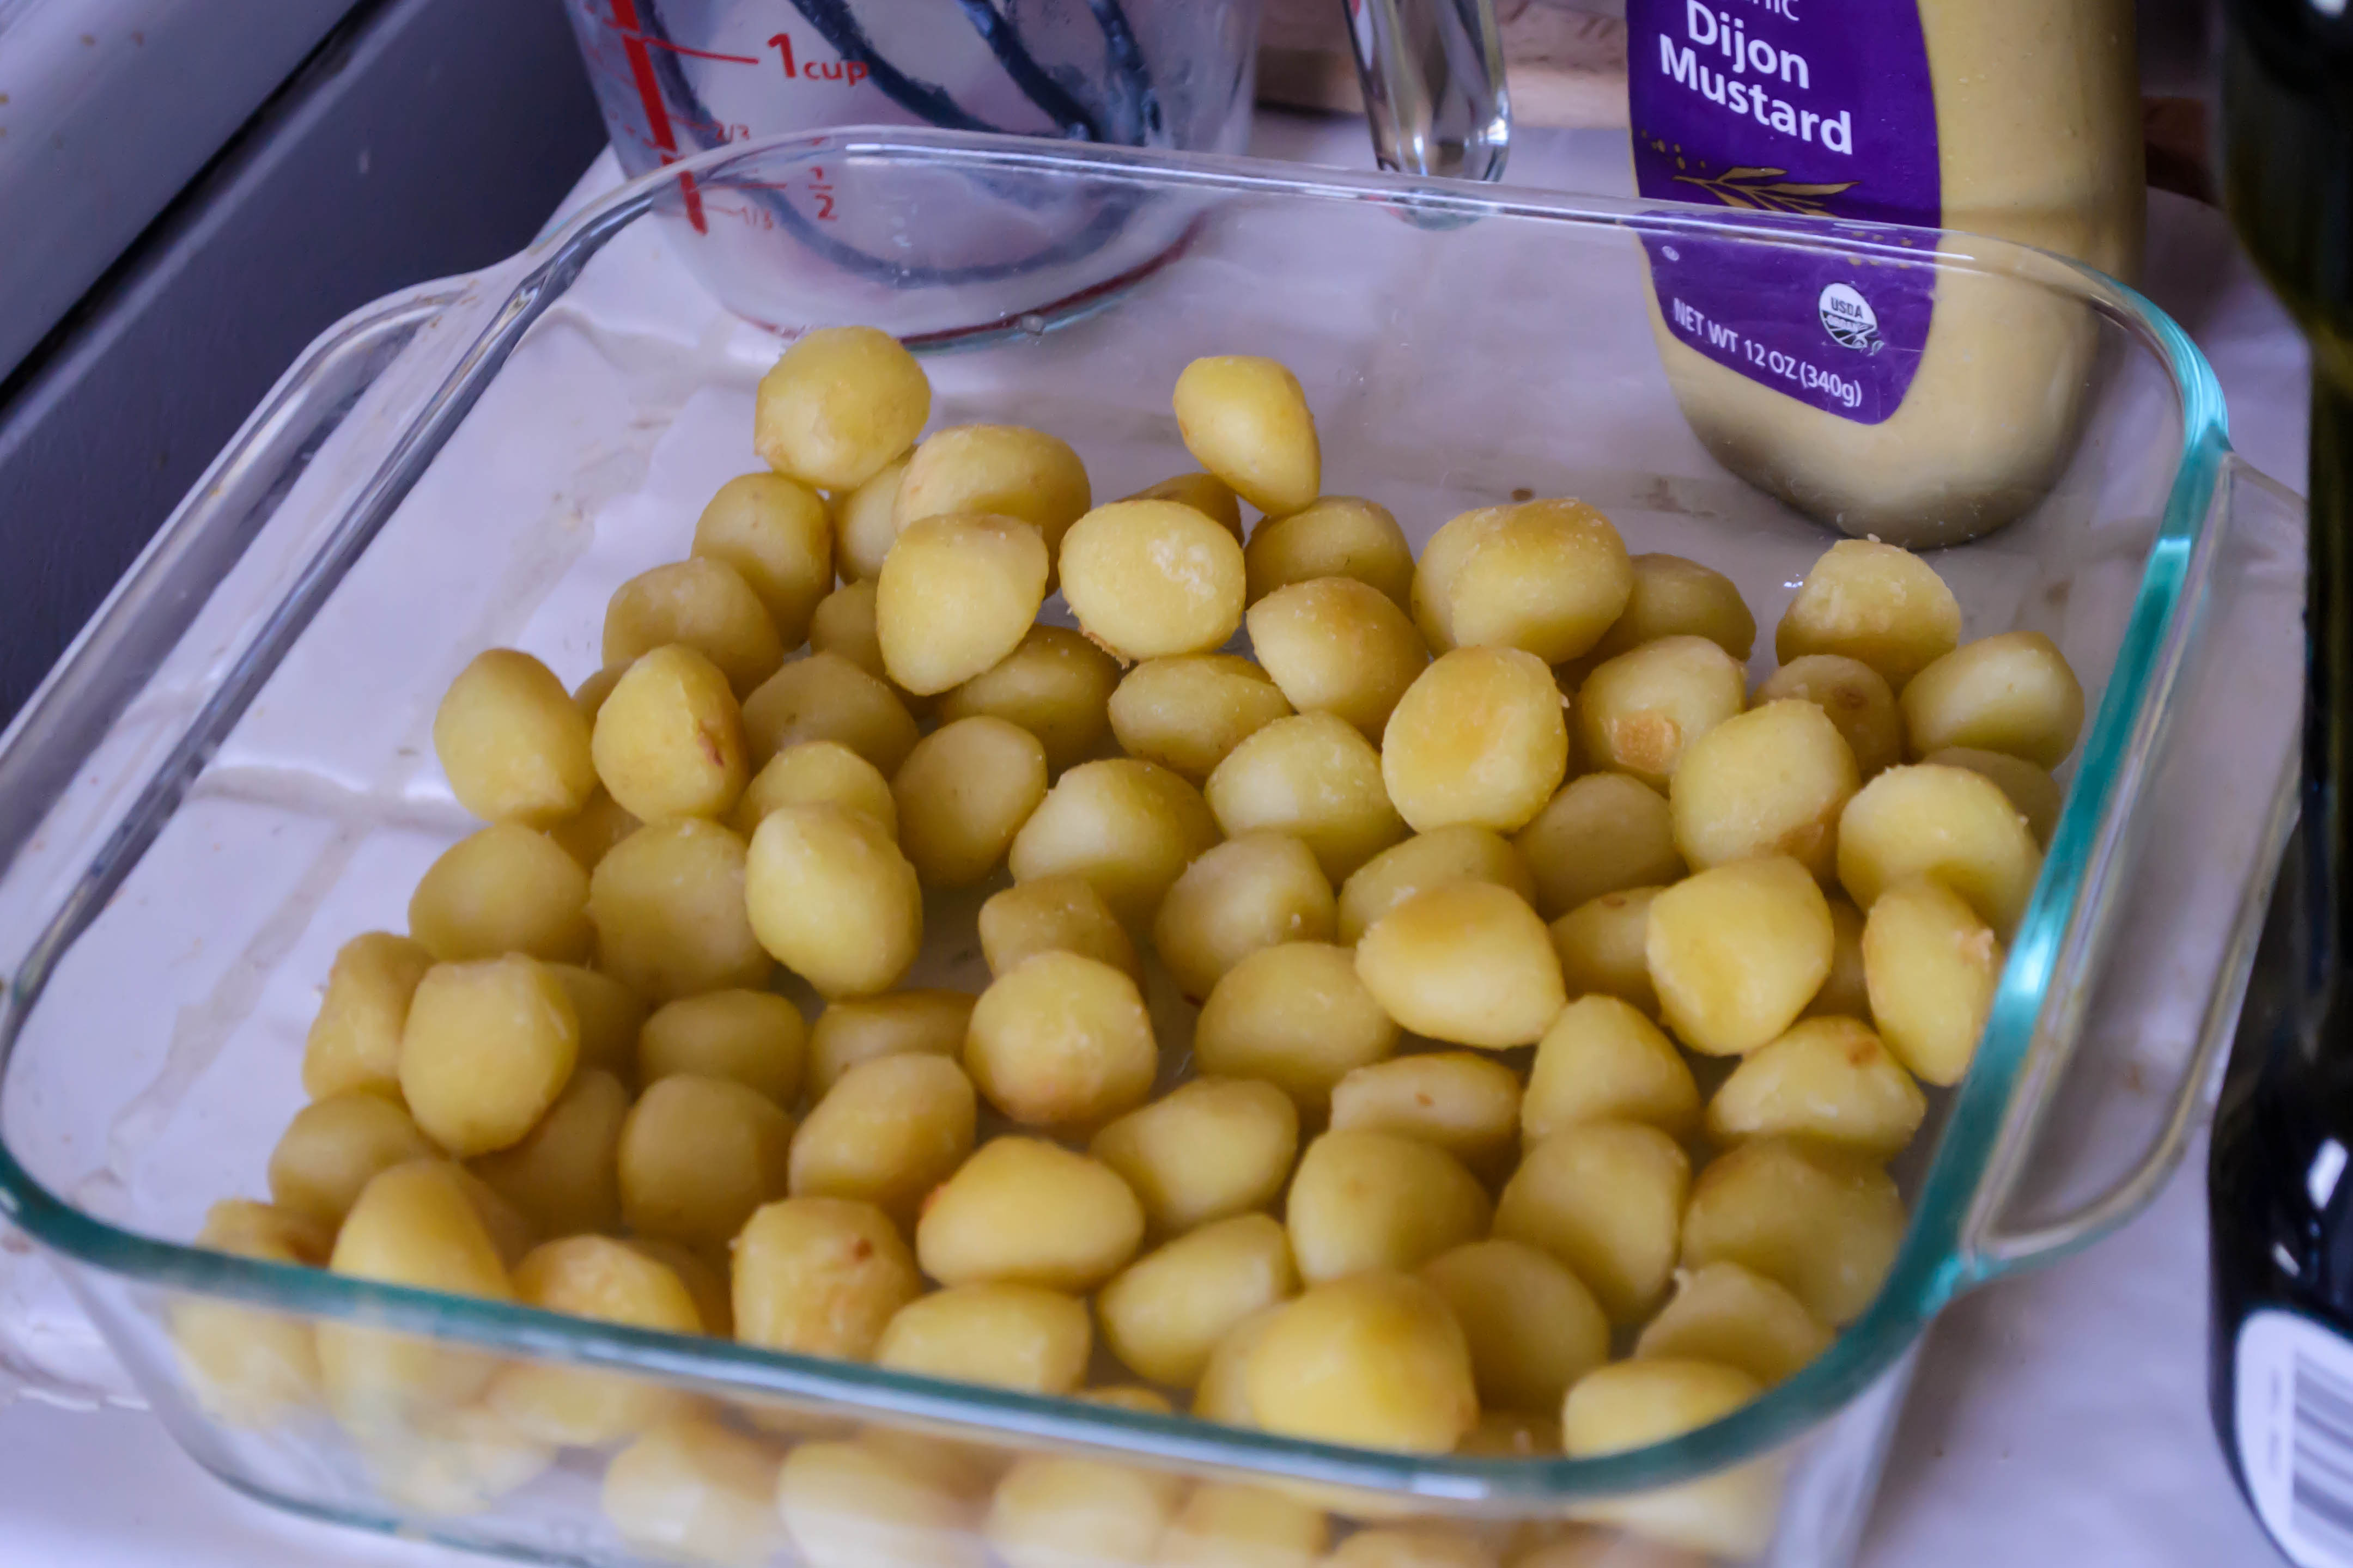
1 pound gnocchi (I use premade, go on, judge me…)
1-2 medium heads broccoli, cut into bite-sized florets
2 tablespoons olive oil
1 recipe kicked-up mornay
  • Heat a large pot of salted water to a boil, then (carefully!) drop in the broccoli florets. Return the water to a boil and cook for just a minute or two, until the broccoli reaches your desired state of crisp-tenderness. Drain well and set aside in an ovenproof dish. I used a 9×9 inch square pan, which worked well.
  • In the same skillet in which you intend to make your mornay, heat the 2 tablespoons olive oil over medium heat. When it glistens as you let it flow across the pan, add the gnocchi and toss lightly to get them all in contact with the oiled surface of the pan.
  • Cook the gnocchi, tossing occasionally, until all are golden and they have gained a dry, crisp crust. This should take approximately 8 minutes, depending on how hot your stove’s “medium” is. While you wait for the gnocchi, tossing them occasionally, turn on your broiler to preheat.
  • Once your gnocchi are golden and all have a crisp crust on at least one side, toss them with the broccoli you prepared earlier.
  • Now make the mornay sauce, following the directions above. When it is thick and rich and adequately cheese-laden for your tastes, pour it over the top of your gnocchi and broccoli, letting it sink down into the crevices in between, and settle in a substantial layer across the top. You may not want to use all of the sauce, but the quantity you apply is up to you.
  • Place your sauced dish in the broiler and let it rip for 5-10 minutes, checking frequently, until the cheese sauce across the top bubbles and blisters, and the exposed broccoli florets begin to get crusty and brown. Then all that’s left to do is serve yourself up a bowl and enjoy.

Chocolate Cherry Bread for #TwelveLoaves February

Food Blog February 2014-3250It’s a good thing I acknowledged and made fragile peace with my own status as an imperfect individual last week, because this week’s cookery was a series of thinly veiled almost-disasters, The sauce mornay I tested for February’s sauce entry was too thin (fix: more cheese!). The battery on my camera pooped out on me just as I was photographing the assembled components for the dish I was testing to go with the mornay (perhaps not a terrible thing after all: see above). I made hummus from scratch using Yotam Ottolenghi’s recipe (it was phenomenal) to add to another Ottolenghi recipe: a “mumbo-jumbo,” as he calls it, of fresh crisp salad, hard boiled eggs, and fried eggplant atop a warm toasty pita. The eggplant was brown and soft through the center. Not my fault, true, but still discouraging. It’s a week that has left me feeling more attracted to the idea of eating cheese and crackers for dinner than storming into the kitchen to whip up a grapefruit glaze for some unknowing salmon filets.

Food Blog February 2014-3225Even this recipe I’m about to share left me feeling challenged. To comply with this month’s entirely apropos Twelve Loaves theme of chocolate, I decided I wanted to make a chocolate cherry bread – a rich, moist loaf studded with halved juicy gems and redolent of cocoa, as I’d tried once at a Farmers’ Market in Eugene, Oregon. In text-chatting with my mom, I discovered she’d just made a marvelous chocolate rye bread that sounded like the perfect starting recipe for my February loaf.

Food Blog February 2014-3234Food Blog February 2014-3236Food Blog February 2014-3238Food Blog February 2014-3239Food Blog February 2014-3240Food Blog February 2014-3241Except.

I was out of rye flour.

The cherries I bought were less than spectacular (it’s not the season, I know. When will I learn?!).

Food Blog February 2014-3244I didn’t let the loaf rise long enough, or bake long enough, ending up with something a bit doughy in the center and dense (but moist!) besides. Oh, and it’s pretty funny-shaped, isn’t it? I know. And to add insult to injury, I couldn’t even get it together enough to post at my regular morning time.

Food Blog February 2014-3247And yet ten minutes after I’d finished eating my first piece, I found myself back in the kitchen slicing another. And when I got home from a warm, dusty walk with Lucy yesterday morning along a trail that runs just below the grounds of Loyola Marymount University (where other dog owners don’t understand what “all dogs must be leashed” means, apparently), all I wanted was a piece of this bread, toasted, slicked with a layer of cream cheese. And now, I’m thinking it probably won’t spoil my dinner if I saw off a thick slice…

Food Blog February 2014-3254This is not a sweet bread. It is bright with cherries and moist, but barely sweetened with a mere ¼ cup of molasses for that dark, treacle roastiness. The cocoa powder makes it a deep, dark brown and offers a strong flavor, but it doesn’t taste like dark chocolate (somewhat unfairly, I think, since it smells like nothing else!) because it isn’t highly sweetened.

It is, in fact, a good bread for February. It is hearty without being too filling or too rich. It’s a good vehicle for something creamy, to satisfy your need for comfort. It has a perky little reminder of springtime buried inside in little mines of sweetness. If you’re not a fan of the admitted heaviness of the whole wheat flour I’ve used here, you could use more (or even all) bread flour instead. If you don’t like cherries, I suppose you could use blueberries or cranberries or even strawberries, but I do think there is something special about the chocolate and cherry combination that I wouldn’t want to replace.

Food Blog February 2014-3255I think it only fair to tell you that am going to revisit this bread, because I think it deserves some fiddling. I am going to gift it with better cherries. I will try a higher ratio of bread flour to whole wheat, and maybe add some of that rye flour I was missing back in. I might up the sweetness quotient with additional molasses. But in any case, give it a swing through your kitchen and see what you think. Because there’s nothing wrong, when it comes to chocolate, with a little experimentation.


Chocolate Cherry Bread
Makes 1 medium round loaf
2 teaspoons active dry yeast
1 teaspoon sugar (optional)
1 cup warm water (just barely above body temperature)
2 cups whole wheat flour (makes a noticeably whole wheat-y loaf)
1 cup bread flour (exchange whole wheat flour and bread flour quantities for a slightly lighter loaf)
¼ cup unsweetened cocoa powder
1 ½ teaspoons salt
¼ cup molasses
1 tablespoon soft butter
1 cup halved, pitted cherries
  • Combine the yeast, warm water, and the teaspoon of sugar in a small bowl or a glass measuring cup and set aside for 5-10 minutes to activate. The sugar is not completely necessary, but it does help the yeast get to bubbling a bit faster.
  • While the yeast wakes up in its spa, whisk the flours with the cocoa powder and the salt in a large bowl (or the bowl of your stand mixer) to create a lovely, rich brown dust.
  • When the yeast is bubbling and frothy and smells like bread, add the molasses and the softened butter and stir together before tipping into the dry mixture.
  • If you are using a stand mixer, insert the paddle attachment and mix for a minute or two just until the dough comes together. If you don’t have a stand mixer, use a wooden spoon and some elbow grease to do the same.
  • Once the dough clings together in a shaggy ball, swap out the paddle attachment for the dough hook (or turn the dough out onto a floured board and use your hands). Knead for 6-8 minutes, until the dough becomes shiny and smooth.
  • Set your dough aside in an oiled bowl, covered with plastic wrap, to rise until doubled. Depending on your flour combinations, your yeast, and the temperature of your house, this could take anywhere from 45-90 minutes.
  • When the dough has puffed to double its previous size, punch it down by gently depressing your fist into its center to release collected gases. Let it rest to regain its breath for 5-10 minutes.
  • While your dough gasps, halve and pit the cherries, then lightly flour a bread board to prepare for rolling.
  • Dump your dough out onto a floured board and roll or pat it into roughly a 9×12 inch rectangle or oval. Spread the cherries in an even layer on top of the dough, then either roll or fold the dough up around the cherries. I folded it, as you can see in the photos above. Once the cherries are folded in, gently knead the dough for a few turns to distribute the fruit through it.
  • Shape the dough into a round (or stow it in a greased loaf pan) and let it rise again, covered with plastic wrap, for 1 hour.
  • During the last 30 minutes of rising, preheat your oven to 375F. If you will be baking your bread on a pizza stone, bread stone, or cast iron pan, preheat that along with the oven.
  • When the oven is preheated and the dough has risen again, gently relocate it to whatever baking surface you’ll be using (i.e. a bread stone or a baking tray). Bake for 30-35 minutes, or until the bottom feels hollow when thumped.
  • Cool at least ten minutes before slicing, to let the structure solidify a bit and be sure the center is cooked through. Then by all means, slice and eat warm, with or without a good healthy smear of cream cheese.

Coffee ice cream (and an unexpected love story)

Ah, expectations. They can be weasel-y little twerps, don’t you think? We organize our lives around them, constructing hope-castles, forts stabilized by plans that don’t pan out, two-story shambles resulting from too many taken-for-granted ideals. Expectations bolster us. And then they dissolve into crumbs, or explode, or sink, or flop around in directions we weren’t expecting.

Food Blog February 2014-3214In college, I had sky-straddling expectations. I expected to figure this life thing out in the first year or two. I would be at the top of my major. I would make decade-spanning friendships. I would collect acclaim, graduate with honors, make my parents proud, especially my dad. I expected to land a perfect career, garner financial success, all while also a perfect wife, mother, homemaker, lover, even though I didn’t know what that entailed yet. I expected to write a novel or two along the way.

Food Blog February 2014-3187I didn’t expect to fall in love with an older version of our language and want to study its literature forever, setting me up for a career path typically paved with loans and let-downs. I didn’t expect to struggle with roommates or friendships or classes. I didn’t expect to have my heart torn by the gentle trampling of a pair of shining sneakers, in snap-up track pants, driven by reasons that probably involved a raucous house full of boys, boredom, and possibly a brunette with glasses.

Food Blog February 2014-3186But after that, I tried to give up on expectations. I would stop thinking “everything would work out.” I would stop expecting him to realize he’d made a mistake. I would stop, oh please, I would stop, writing terrible mopey songs about this person who wasn’t even the same person anymore. I would just live. I would just try to be me. I wouldn’t ask someone else to repair the torn bits for me, because that would be expecting too much. And since I’ve never been much of a seamstress, my repairs were clumsy. I was patched, the stitches were irregular, and I felt worn and fragile but maybe whole, and maybe a little bit strong.

Food Blog February 2014-3178And then I met N. And because I was done with expectations, I didn’t expect anything at all. Not even a friendship. It would be a, well, a something. It might be fun, it might be sweet, but it would end. We were seniors. We were going somewhere. We didn’t know where yet, because we weren’t expecting anything, but we were sure of little, then. We spent phone calls trying to scare each other away by explaining our neuroses, and our cynicism, and what we considered our more unlovable attributes. I hate phone calls, but ours would last hours.

Food Blog February 2014-3179I’m not going to say, at this point, that because N. was worn and patched and had sewed his heart back together in an irregular shape too that these two odd shapes fit perfectly together and made one another complete – my ventricle, his aorta – because I don’t believe in that. We were both whole people before, and we are both whole people now. I’m not a half, and I wouldn’t want N. to be either. But because he was patched up too, and some of my stitches were snagged like his, he was better able to understand me. We weren’t what we expected. The thing about patches is, they hide but don’t erase the worn spot. Every stitch, meant to repair, could also re-harm. But when you are patched and stitched up, and you still feel raw from that needle of hope and trying and blistering independence loneliness solitude you weren’t sure you wanted, you know how to see that in someone else, and you know how gently you have to reach out. Or how hard. We weren’t what we expected, no. But ten years into a relationship, and seven years into a marriage, he defies and surmounts and explodes any expectations I could have had. And I wouldn’t have it any other way.

Food Blog February 2014-3182This, oddly enough, brings me around to Valentine’s Day, and to ice cream. This is, you may notice, a bit heavy, a bit confessional, for me. I wasn’t expecting to tell you all this. But we’re approaching that holiday that is supposed to be about love, and I’ve always felt a little torn and patchy about it (the day, not the love), so here we are.

Food Blog February 2014-3213I had big plans for our Valentine’s Day celebration. I’m not talking about me and N. He’s always hated Valentine’s Day, probably thanks to that whole expectations thing. I’m talking about us. You and me. We were going to have soufflé. And not just any soufflé; chocolate soufflé. I wanted to teach you a quick, easy, all-but-fool-proof version of the dessert, one that I’ve now made for several big-deal-must-impress events with zero problems, so you could defy someone’s expectations this Valentine’s Day. Maybe even yours!

Food Blog February 2014-3215I had never thought about serving soufflés with ice cream. A lovely sweet drizzle, yes. A liqueur infused caramel or cream, completely. But when I saw Lindsay’s chestnut soufflé with matching ice cream a few weeks ago, and when I watched a recorded episode of Nigella Lawson making a coffee ice cream that required no eggs and no churning, I knew this would be our Valentine’s Day pairing: deep, dark, rich chocolate soufflé, and an ice cream so easy, so deep, silky as satin lingerie and toasty with espresso (because hey, you might need that shot of caffeine on the evening of Valentine’s Day!), it would be perfect. I would be perfect. I even half-bragged in a comment on Lindsay’s post about how easy soufflé-making is, once you get the hang of it.

Food Blog February 2014-3216And so, expectations. Because I don’t know what happened – maybe my eggs were too small (they were of the homegrown variety, given to N. by a student), maybe I didn’t whip the whites enough, maybe I scrambled the yolks a little or the chocolate seized or the oven was too hot – but my soufflés were a disaster. They rose only a few reluctant centimeters. They were dark and rich, but dense, thick, almost crumbly where they should have been flat-topped trembling pillows.

I despaired. But then I remembered me, and my patchwork, and that I had this ice cream that was so so creamy, and so thick, and so tasty and light and dangerously easy, that in fact the soufflé was hardly necessary. It may even have muddied things. And so, I put expectations aside again, the better to embrace what I had.

Food Blog February 2014-3217Nigella’s ice cream does not start with a custard. It combines unlikely and few ingredients: sweetened condensed milk, double cream (a British institution we would do well to adopt), espresso powder, and a few tablespoons of coffee liqueur. I made a few changes, inspired by my own insufficiencies and a suggestion from a commenter on the original recipe. For a slightly lighter result, I replaced some of the double cream with whipping cream. For want of coffee liqueur, I replaced it with Irish cream. The liqueur serves two purposes. First, it deepens and enhances the flavor of the ice cream. Second, it offers a textural benefit: since alcohol doesn’t freeze (or at least it freezes at lower temperatures than water), the ice cream maintains a soft, scoopable consistency indefinitely (not that you’ll have long to find out – I suspect you’ll eat all of it before conclusive data can be gathered).

And so, I send you into the week of that dubious, expectation-laden lovers’ holiday with this: I hope you are happy, and that your version of love, whether it is patched and fragile, or hearty and unblemished, is at least in part directed back toward you. Because no matter what your expectations have told you, you are lovely and perfection is overrated. And I think ice cream is a perfectly suitable Valentine to send yourself. I recommend this one.

 Food Blog February 2014-3219

No-churn, no-egg Coffee Ice Cream
Adapted from Nigella Lawson
Makes a generous 1 pint
 
2/3 cups sweetened condensed milk
1 cup heavy whipping cream
6 ounce jar double cream (I found mine at Whole Foods)
2 tablespoons Irish cream or coffee liqueur
2 tablespoons instant espresso powder


  • Dump all ingredients as unceremoniously as you like into the bowl of a stand mixer. You could do this in a regular mixing bowl with a hand-held mixer too.
  • Using the whisk attachment (or regular beaters), whip on medium speed until soft peaks form. For me, this took only 3-4 minutes. It may take more or less time for you depending on the speed of your mixer.
  • Using a rubber spatula, scrape the fluffy, coffee-scented clouds into a freezer friendly container – I used a clean empty Greek yogurt tub – and freeze for at least 6 hours to let the mixture harden up.
  • Serve atop a soufflé, or with whipped cream, or in a cappuccino, or with fudge sauce, or just with you and a spoon and a spot against the refrigerator door.

Savory Greek “cheesecake” dip

Food Blog December 2013-2977Ricotta cheese and I have a strange (strained?) relationship. I want to love it. Dishes in which it features – lasagna, calzone, a certain breed of cheesecake – sound to me decadent and worthy. But when I do eat it, I feel torn. It’s a texture thing, isn’t it? It has this graininess – a kind of luscious roughness that doesn’t feel quite right. I want it to make up its mind. Either be feta, all craggy and crumbling and tang, or be mascarpone, relentlessly silken. But ricotta is neither. It resists singularity. It hovers in the middle there, taunting me with its bothness.

Food Blog December 2013-2967Just before our annual in-laws holiday shuffle, I needed to use up some of our perishables, and there was half a container of ricotta, lonely and renounced in the back corner of the fridge. With lemons coming in on my backyard tree, I suddenly thought of a feta dip flavored with lemon zest and oregano and garlic that I’ve made dozens of times, and wondered how it would fare with this creamy cousin as its star player. I’d also been itching to try baked ricotta, after hearing that it transforms in the oven into something airy and rich. With a block of cream cheese also wailing its abandonment and crackers to use up before the trip at the end of the week, hey presto, my lunch menu was suddenly all about a savory Greek inspired dip.

Food Blog December 2013-2972Unlike a standard baked ricotta, I didn’t add any eggs here. This omission, plus the addition of cream cheese, kept the dip quite thin – not the quasi-souffle texture you might be expecting. Were I to make this again, I might add an egg or two just to puff it up a bit more. If you try it that way, let me know how it turns out.

Food Blog December 2013-2973Thanks to these changes, what you’re getting here is essentially melted creaminess that, at least when it’s hot, won’t even need spreading, covered by a layer of golden-brown bubbles that are easily pierced with the persistent corner of a cracker. It’s soft, it’s hot, it’s herby and spicy and perversely fresh, thanks to the lemon zest, and while I had it with crackers, it could be easily compelled to drape itself over sticks of fresh vegetables or bread. Pita chips, too, would be particularly nice. I’d be clever and current and say it would make a superb addition to a Superbowl game day spread, but I’ve narrowly missed that opportunity which, for me, seems somehow fitting. Instead, bake yourself a batch of this to fend off the post-holiday cold of the next month or two, when winter always seems the longest. Food Blog December 2013-2975

Savory Greek “cheesecake”dip
Makes a generous 1 cup
4 ounces ricotta cheese, at room temperature
4 ounces cream cheese, at room temperature
2 cloves garlic, finely minced
Zest of one lemon
¼ teaspoon dried oregano, or ½ teaspoon fresh, finely chopped
3 pepperoncinis, finely minced
Salt to taste (start with ¼ teaspoon)


  • Preheat the oven to 400F and spray or oil a 16 ounce (2 cup) oven-safe dish. I used the smallest soldier in my Corningware collection.
  • In a small bowl, mix the cheeses thoroughly until they are quite smooth. Lumps are the enemy here, as they signal incomplete incorporation.
  • Add the remaining ingredients, mixing well to combine evenly. Taste for salt and add more if needed.
  • Using a rubber spatula, scrape into your prepared dish, smoothly the top a bit for even browning.
  • Bake for 25-30 minutes, or until the top is burbling and oil is sizzling around the edges.
  • If you want more browning, carefully place it under the broiler for a few minutes to let some of the bubbles turn deeply golden and barely crusty.
  • Remove from the oven and let sit for 5 minutes or so, just until it is cool enough to eat without scorching your throat. Serve with chips, thin slices of toast, crackers, or a crudités platter.

Simple Sourdough Boule, by weight #TwelveLoaves

Food Blog January 2014-3069Even though I’m getting sauced this year (is that joke already old?), I’m not abandoning my bread ambitions. I love the monthly challenge of Twelve Loaves, and I received a sourdough starter as a Christmas gift that, according to its bequeather, “needs some TLC.” Anxious to do it right, I scoured the internet for suggestions, of which there are no shortage, and in many cases, no consistency, which, delightfully and frustratingly, appears to be no problem at all! I distilled the various directions down into what felt like a successful (read: doable) routine for me. I fed it flour and water, it smells like San Francisco, and I’ve named it Bubblin’ Bertram. Is that weird? Probably.

Food Blog January 2014-3057

Bubblin’ Bertram bubblin’ away

This month’s Twelve Loaves challenge is “Keep it Simple.” As you know if you’ve spent any time on this blog, that tends to be difficult for me. I like a classic. I like a basic, fundamental recipe, but I like to twist it a little, to ask it to shimmy along with me into something fresh and bright and different. To make my predilection for complexity work with the challenge set, and to to celebrate both my new housemate (what? Yeast is alive!) and the kitchen scale Santa brought me (thanks, Mom and Dad!), I decided to face basics in a way I’ve never done before: by weight.

Food Blog January 2014-3058Baking by weight is hardly new. Shauna talks about it all the time, and it is just as true for baking with wheat flour as it is for using gluten-free flour mixes. Michael Ruhlman has written a whole book that relies on it. But it was new for me. There is something bizarrely scary about ignoring your measuring cups, though I’m not sure why, because working by ounces is admittedly so much more precise.

Food Blog January 2014-3059So I threw caution (and habit) to the wind and dove in, dipping up some of my burbling fed starter, glorying in the yeasty sour smell, and kneading it gently into flour, water, salt, and a breath each of butter and honey for a little extra flavor and moisture. It made a lovely soft dough, and I lovingly nestled it in an oiled bowl, covered it with plastic wrap, and set it aside to swell.


"Shaggy" dough

“Shaggy” dough

And then it sat. And I sat. And we sat. And I paced. And it did nothing. For hours. No rising. No bubbling. No noticeable change of any kind. I went back to the internet and searched for solace.

Food Blog January 2014-3061Three hours later, finally, my dough had almost doubled. In my warm home office, this usually takes a maximum of 90 minutes. But I had used no commercial yeast, only what was naturally in the starter. It takes those little guys a while to gulp down all the new food they’ve been handed, and to expel the gas that causes dough to puff and thicken.

Food Blog January 2014-3063Food Blog January 2014-3065Now that I knew time was the real challenge, everything else fell into place. I divided the ball of dough in two, lightly shuffled them around in some flour and shaped them into rounds, and let them rise again for an hour and a half. They didn’t puff very high, but they did expand into fat floppiness, like doll-sized beanbag chairs. But this didn’t seem to matter. Slashed artfully across the top to help gasses escape while baking, coerced into a steam-filled oven for half an hour, and we had a conjoined pair of soft, browned loaves, moist, warm, on the dense side of fluffy, and lightly but noticeably sour. Simple.

Food Blog January 2014-3066Food Blog January 2014-3067Simple Sourdough Boule, by weight
Makes 2 medium rounds
10 oz. sourdough starter, fed and bubbly (about 1 cup)
10 oz. warm water (body temperature or just above) (about 1 ¼ cups)
20 oz. bread flour (3 – 3 ½ fluffed, not packed, cups)
2 teaspoons salt
2 teaspoons honey
2 tablespoons melted butter


  • Place the bowl you’ll be combining your ingredients in onto your kitchen scale. A weight will appear on the display. Press the tare button to bring the display back to zero – you’ll do this every time you add a new ingredient, to make the additions easier to measure.
  • Add enough sourdough starter to bring the weight to 10 ounces, then press the tare button to return to zero.
  • Add enough water to bring the weight to 10 ounces, then press the tare button again: back to zero.
  • Add 20 ounces of bread flour, remembering that, depending on your scale’s settings, it might switch over to pounds when you hit 16 ounces. This caught me off guard. You’ll need, then, 1 pound, 4 ounces of flour.
  • Add the salt, the honey, and the melted butter. Since these are such small quantities, I haven’t given them in weights. Minor adjustments in one direction or the other will not hurt the bread or change the process.
  • With all your ingredients in, use the paddle attachment (for a stand mixer) or a wooden spoon (if you’re working without the machine) to combine the ingredients into a shaggy, rough dough – you’re looking just to incorporate everything. See “shaggy dough” photo above. At this point, if you’re using a stand mixer, switch from the paddle attachment to the dough hook. If you’re using a wooden spoon, now’s the time to dump the dough out onto a floured board and work with your hands.
  • Using your tool of choice, knead for about 8 minutes, or until the dough ceases to feel so sticky, and becomes elastic and smooth. Mine felt a bit lazy. I’m not sure how else to explain that – it moved sluggishly around the mixer, like a sleepy blob.
  • Lightly oil the inside of the bowl (you can use a new, clean bowl for this, but I just shimmy the blob of dough around to distribute oil underneath it), cover with plastic wrap, and set aside to rise in a warm place until doubled. For me, this took about 3 hours. Your sourdough yeasts are a bit sleepier than instant or active dry yeast, and need time to feast. It will happen eventually. You just can’t rush them.
  • When the dough has finally doubled, punch it down by pressing your knuckles into its center and letting the collected gases escape. Let it rest for 5-10 minutes to get its breath back.
  • Dump the dough out onto a floured board. Using a dough scraper, a pizza cutter, or a sharp knife, divide it in half. Shape each half into a round by holding the dough ball in your hands and stretching the top taut, tucking the excess underneath. Each time you stretch and tuck, turn the dough a quarter turn or so. You can also do this while the dough is resting on your board, turning it and tucking the excess, which will form something that looks like a balloon tie or a belly button underneath. Check out this series of photos from the kitchn for helpful illustrations.
  • Place your rounds on a baking sheet and let them rise for another 90 minutes, until they have puffed again (they won’t quite double this time, but you will see noticeable expansion).
  • About 45 minutes before you are ready to start baking, preheat your oven to 450F. Position the rack you’ll be placing the loaves on in the top third of the oven, and if you’re using a baking stone, place that on this top rack to preheat as well. Position the other rack in the bottom third of the oven and, if you have one, stick your cast iron skillet on this bottom rack, allowing it to preheat as well. You’ll see why in a moment.
  • When your bread has risen again and is ready to bake, slit the tops a few times with a razor or a very sharp knife. This helps the loaf swell and rise, since you’re breaking the taut skin you created while shaping. It also looks artful, and we like that.
  • Slide your loaves on their baking tray gently into the oven on the top rack (or, if you are using a baking stone, put the loaves directly on the stone, taking care not to jostle them too much. We worked so hard shaping them; we want to maintain that structure). Then, working quickly and carefully, fill a teacup with ice cubes and empty this into the preheated cast iron skillet you placed on the bottom oven rack. Close the oven door immediately. The purpose here is to collect steam. The ice, going immediately from solid to gas, will create a nice cloud of steam. This helps bread swell quickly and stay moist. You don’t want endless steam, because that would produce a soft crust, but a good blast right at the beginning of baking ensures a soft, nicely textured loaf of a good size, and a crisp crust, which forms as the oven dries out.
  • Bake for 30 minutes, or until the tops are pale gold and the bottoms feel hollow when thumped. These loaves will likely not brown as much as a standard loaf of bread. Here’s why: as it rises, the starches in flour are converted into sugar, which the yeasts eat. The anxious, hungry yeasts in sourdough consume these sugars much faster than standard yeast, so there is not much left to caramelize into that dark, browned surface we are accustomed to seeing on a loaf of homemade bread. No harm done, though, your loaves may just be a bit on the pale side.
  • Remove from the oven and let cool at least 10 minutes before slicing. I know, scorching-hot-just-from-the-oven bread is a glorious thing, but your loaves need a few minutes to set their internal structure. If you slice immediately, the whole loaf will crush and mash against your knife. Wait just a bit. Besides, this way you won’t burn your fingers.

Project Sauce: Bechamel

I think it’s a good idea to start with the basics. I don’t rush my students straight into composing multi-source research papers; starting a new project here seemed to hold to the same strictures. I’m not racing right into hollandaise. I’m not drenching your January palates with demi-glace, homemade mayonnaise, or even beurre blanc (though these are coming, have no fear). No, we’re going to start with something foundational, and at least for me, something familiar: bechamel.

Food Blog January 2014-3092Here’s the thing, though. As I’ve dipped my toe tentatively into the field of culinary history (side note: one of my new secret pretend-careers is culinary historian – fascinating!), what stands out more and more brightly to me is how rarely familiar actually is. Bechamel is an excellent example. It’s a white sauce. It’s one of the classic mother sauces. It forms a base for numerous other sauces: the luscious cheddar and beer laced concoction you drape over toast to make Welsh rarebit. The silky, creamy mess redolent of parmesan that becomes alfredo. Even the simple melting glory you toss with elbow noodles to make macaroni and cheese (can you tell we’ll be delving into cheese sauces?!). But its history is not without contradictions. Even the Medici family figure into it! According to some Catherine de Medici brought a retinue of Italian chefs with her into France when she married Henri, Duke of Orleans, and bechamel sauce flowed straight from their kitchens out into the rest of France. There are stories that it was invented by (though more likely named for) a steward called the Marquis Louise de Bechameil. The tradition of reducing cream sauces probably began in 18th century France, but the “mother sauces,” of which bechamel is one, were created in the 17th century. And boiling or simmering food items in milk, as some bechamels do, goes back to medieval cuisine.

Food Blog January 2014-3086National and temporal origins aside, there are even disputes about what goes into it. I’ve always made a bechamel sauce from three main ingredients: butter, flour, and milk. But there are thoughts about what kind of dairy should be used, and which flavoring agents are permissible, and some traditional recipes even call for sticking an onion with cloves and letting this flavor the milk as it heats.

Food Blog January 2014-3090Lest we get confused right out of the gate, however, I’m going to stick with what feels familiar and comfortable. Butter, flour, milk. A pinch of salt. A grind or two of pepper. French traditionalists would have me use white pepper, since it won’t disrupt the homogenous ivory color of the sauce, but I like seeing those little specks of flavor. Not to mention, I didn’t have any white pepper in my kitchen. A sauce made of butter, flour, and milk can only taste like so much, so I’ve also adopted the Italian addition of some nutmeg, freshly ground, to amp up the flavor. Now we have a lightly speckled pool of creaminess, like the slight freckles on a fresh egg.

Food Blog January 2014-3087Here’s how a bechamel works: you melt butter, add an equal portion of flour, and cook for a minute or two to allow the flour to dissolve and distribute. This combination – equal parts butter and flour – is called a roux, and it is the classic thickening agent. Everything from gumbo to cream gravy is thickened with roux.

Food Blog January 2014-3088To transform the roux into a sauce, then, you have to add liquid. For bechamel, that’s milk. So we add a quantity of milk, preferably warm, a little at a time, whisking and whisking until a velvet smooth sauce forms. The quantity of milk added depends on the desired thickness of the final end product. Being sure the milk is warm, and adding it slowly, guards against lumps. This sauce is about luscious smoothness and creamy thickness. Lumps won’t do.

Food Blog January 2014-3117The magic of bechamel is that you won’t know how thick it is going to be until it starts to simmer. It takes a bit of time for the flour granules to hydrate, and only once they are fully incorporated and warm enough to bubble will the true viscosity of the sauce reveal itself. The one we are going to produce here gets just a touch thicker than a pool of melted ice cream. It’s easily pourable, but it will also coat the back of a spoon, clinging in a smooth layer until you, say, run a finger through it to have a taste.

Food Blog January 2014-3119You can do a lot with a bechamel. As I noted earlier, it is the foundational component of a good cheese sauce. It’s also the classic white sauce component in a traditional lasagna. It can be draped over steamed vegetables, or make the base for a chowder or other cream soup, or even rest gently over a pounded, breaded, pan-fried chicken cutlet. But since I am working with classic and simple here, I wanted to go with a dish that really lets you experience the creamy loveliness of a bechamel: croque monsieur.

Food Blog January 2014-3122Now you’re raising your eyebrows. I know; croque monsieur is essentially a grilled ham and cheese sandwich. Ham and swiss, to be specific. It’s a name taken from the French verb croquer, which means “to crunch” or “to munch.” Thus the sandwich is, if I dare, a Mister Crunch. N. loved this. He’s been calling the sauce in question a “bleckmel” to make me laugh; he knows full well how to pronounce it (he did take French, after all), and he was so delighted by the literal translation of our dinner that he started to call it a “Crunchy Human” sandwich, eliminating the gendered title: a sandwich for everyone! (I should note, however, that there is a “female” version of this sandwich: a croque madame is the same grilled ham and swiss, with the addition of a gently fried egg on top.)

Food Blog January 2014-3127So let’s do this. A perfectly crunchy sandwich, laden with melting swiss and a thin layer of smoky, salty ham, topped with spoonfuls of perfectly creamy bechamel, sprinkled with more cheese, and broiled until golden bubbles swell on the surface. It’s a fork-and-knife sandwich, and it’s far from a light lunch, but it is, I think, a good way to start.

Food Blog January 2014-3130

Bechamel
Makes approximately 1 ½ cups
2 tablespoons unsalted butter
2 tablespoons all purpose flour
1 ½ cups whole milk, warmed slightly in a saucepan or in the microwave
a pinch each salt, pepper (white is traditional, but I used black), and nutmeg (freshly ground is preferable)
  • In a medium pan, melt the butter over medium to medium-low heat.
  • Add the flour, sprinkling it in around the pan rather than dumping it all in one spot; this will help it incorporate easily and quickly. Stir it around with a whisk, letting it mix with the butter to form golden clumps, which will slowly collapse into a pale yellow, lightly bubbling mass. This will take 1-2 minutes.
  • Once the flour and butter have cooked together for 1-2 minutes, begin adding the milk. Pour in only about ¼ cup at a time, whisking constantly during and after each addition. The butter and flour mixture will get quite thick and pasty with the first few additions of milk. That’s fine – just keep whisking, fully incorporating before each additional pour of liquid.
  • After a few additions, the mixture will begin to resemble a sauce, thinning out and liquifying. Keep whisking. Inattendance will result in unincorporated hunks of flour, and thus a lumpy sauce.
  • Once you have added all of the milk, you won’t have to whisk as vigorously. Just keep turning your whisk through the sauce in lazy figure eights, dreaming about your weekend or the tropics or the lecture you are planning on Anglo-Saxon England (that might be just me), as it heats through.
  • When your sauce is slightly thickened, approaching the texture of melted ice cream, add the salt, pepper, and nutmeg. You want just a nice little sprinkle of each, to add subtle flavor.
  • Continue your lazy whisking until the sauce barely begins to bubble. It will be just a touch thicker than melted ice cream now – something like a thick royal icing or even a powdered sugar glaze.
  • Lower or turn off the heat until you are ready to apply the sauce.
  • Bechamel behaves best when warm. As it cools, it clumps and forms a skin like you’d find on a pudding. It can be stored in the refrigerator, covered tightly, and reheated in a pan if needed, but will be best on the day it is made.
Croque Monsieur
Quantities are per sandwich. Make as many as you wish!
1 teaspoon dijon mustard
2 slices of bread (a french loaf would be traditional; I used sourdough, because I’m not)
2-3 thin slices of good ham
½ cup grated swiss cheese, divided (I like Gruyere. Emmantaler would also be lovely)
1 tablespoon unsalted butter
2 tablespoons grated parmesan cheese
2-3 tablespoons bechamel sauce
  • Spread the inside of each slice of bread with dijon mustard. You might want more than a teaspoon, but I tend to prefer my sandwiches light on the mustard.
  • On top of the mustard, mound all but 2 tablespoons of the grated swiss cheese, then spread it carefully and gently over the bread to form an even layer.
  • Add the slices of ham on top of the cheese, folding or manipulating their shape where necessary so they aren’t hanging over the sides. Top with the remaining piece of bread.
  • Spread the outsides of both pieces of bread with the butter. I like to do this by placing the sandwich in the cold skillet I’ll be toasting it in. That way, when I flip the sandwich over to butter the other side, I won’t make a mess or lose any of the butter – it will just be resting against the cooking surface.
  • With the sandwich in the skillet, heat it over medium heat. Don’t go any hotter than this! You’ll be tempted to crank the heat up. But it takes a while for the cheese to melt, and we don’t want the bread to burn in the meantime. Slow and steady.
  • Toast the sandwich until the bread is golden and crisp, and the cheese inside is well melted: 4-5 minutes per side over medium or even medium-low heat. Meanwhile, preheat your broiler.
  • When the sandwich is nicely toasted, turn off the stove. Spoon 2-3 tablespoons of warm bechamel over the top slice of bread. Use the back of the spoon to spread it out – you want an even layer, completely covering the slice. Corners and edges poking out will get too dark under the intense heat of the broiler.
  • Once you have an even layer of bechamel, sprinkle the remaining swiss cheese and all of the grated parmesan right over the top, again trying to create an even, complete layer.
  • Carefully place the skillet into your broiler (if you have handles on the skillet made of anything but metal, be sure to wrap them in aluminum foil first) and broil for 3-5 minutes, until the sauce and cheese on top melt, bubble, and attain a slightly crunchy bronzed layer on top.
  • Remove from the broiler (be careful – the handle of your skillet is now incredibly hot. Don’t ask me how I know this), plate, and serve bubbling hot! You can cut the sandwich in half if you like, but since you are probably going to be eating it with a fork and knife, pre-slicing might not be necessary.