Seared Scallops with Beurre Blanc and Parsnip Puree

Food Blog November 2014-0893It will come as no surprise to you that I am late with this post. I mean, here it is Monday and it’s up and all that, but a quick check of the calendar belies my appearance of timeliness. See, it’s December. It’s December and this is a sauce recipe I owe you from last month. By my twisted, grasping-for-an-apology way of thinking, though, I ate it in November… so that totally counts, right?

Food Blog November 2014-0872This time around, we’re back to butter. There are a lot of butter based sauces, friends. A lot. This one, a beurre blanc, is a sauce made by reducing white wine with aromatics and sometimes a bit of lemon juice or vinegar, then whisking in an unbelievable amount of butter until the sauce turns into this rich, fluffy, thick, pale yellow ambrosia that belongs draped over every kind of substance imaginable.

Food Blog November 2014-0875Food Blog November 2014-0879Most of these sauces have dubious origin stories. Who wouldn’t want to be responsible for a well-loved buttery emulsion as appropriate to green beans as to seared fish? Cooking lore holds, however, that beurre blanc was created by accident – an unintentional simplification of béarnaise sauce that caught on and became beloved. Julia Child writes about it with the affection you might expect for a sauce that is, in her words, essentially “warm flavored butter.”

Food Blog November 2014-0880Food Blog November 2014-0881This is not Julia Child’s recipe. For ease, and for clarity, I went with Alton Brown’s. Mine is a slight adaptation – I halved the recipe, and I didn’t have the traditional shallot so I simply omitted it. Alton’s sauce uses lemon juice instead of white wine vinegar, which suggests it was meant to go with fish or seafood, and this decided my pairings for me. Lemon and butter sauce? Pass the scallops.

Food Blog November 2014-0870
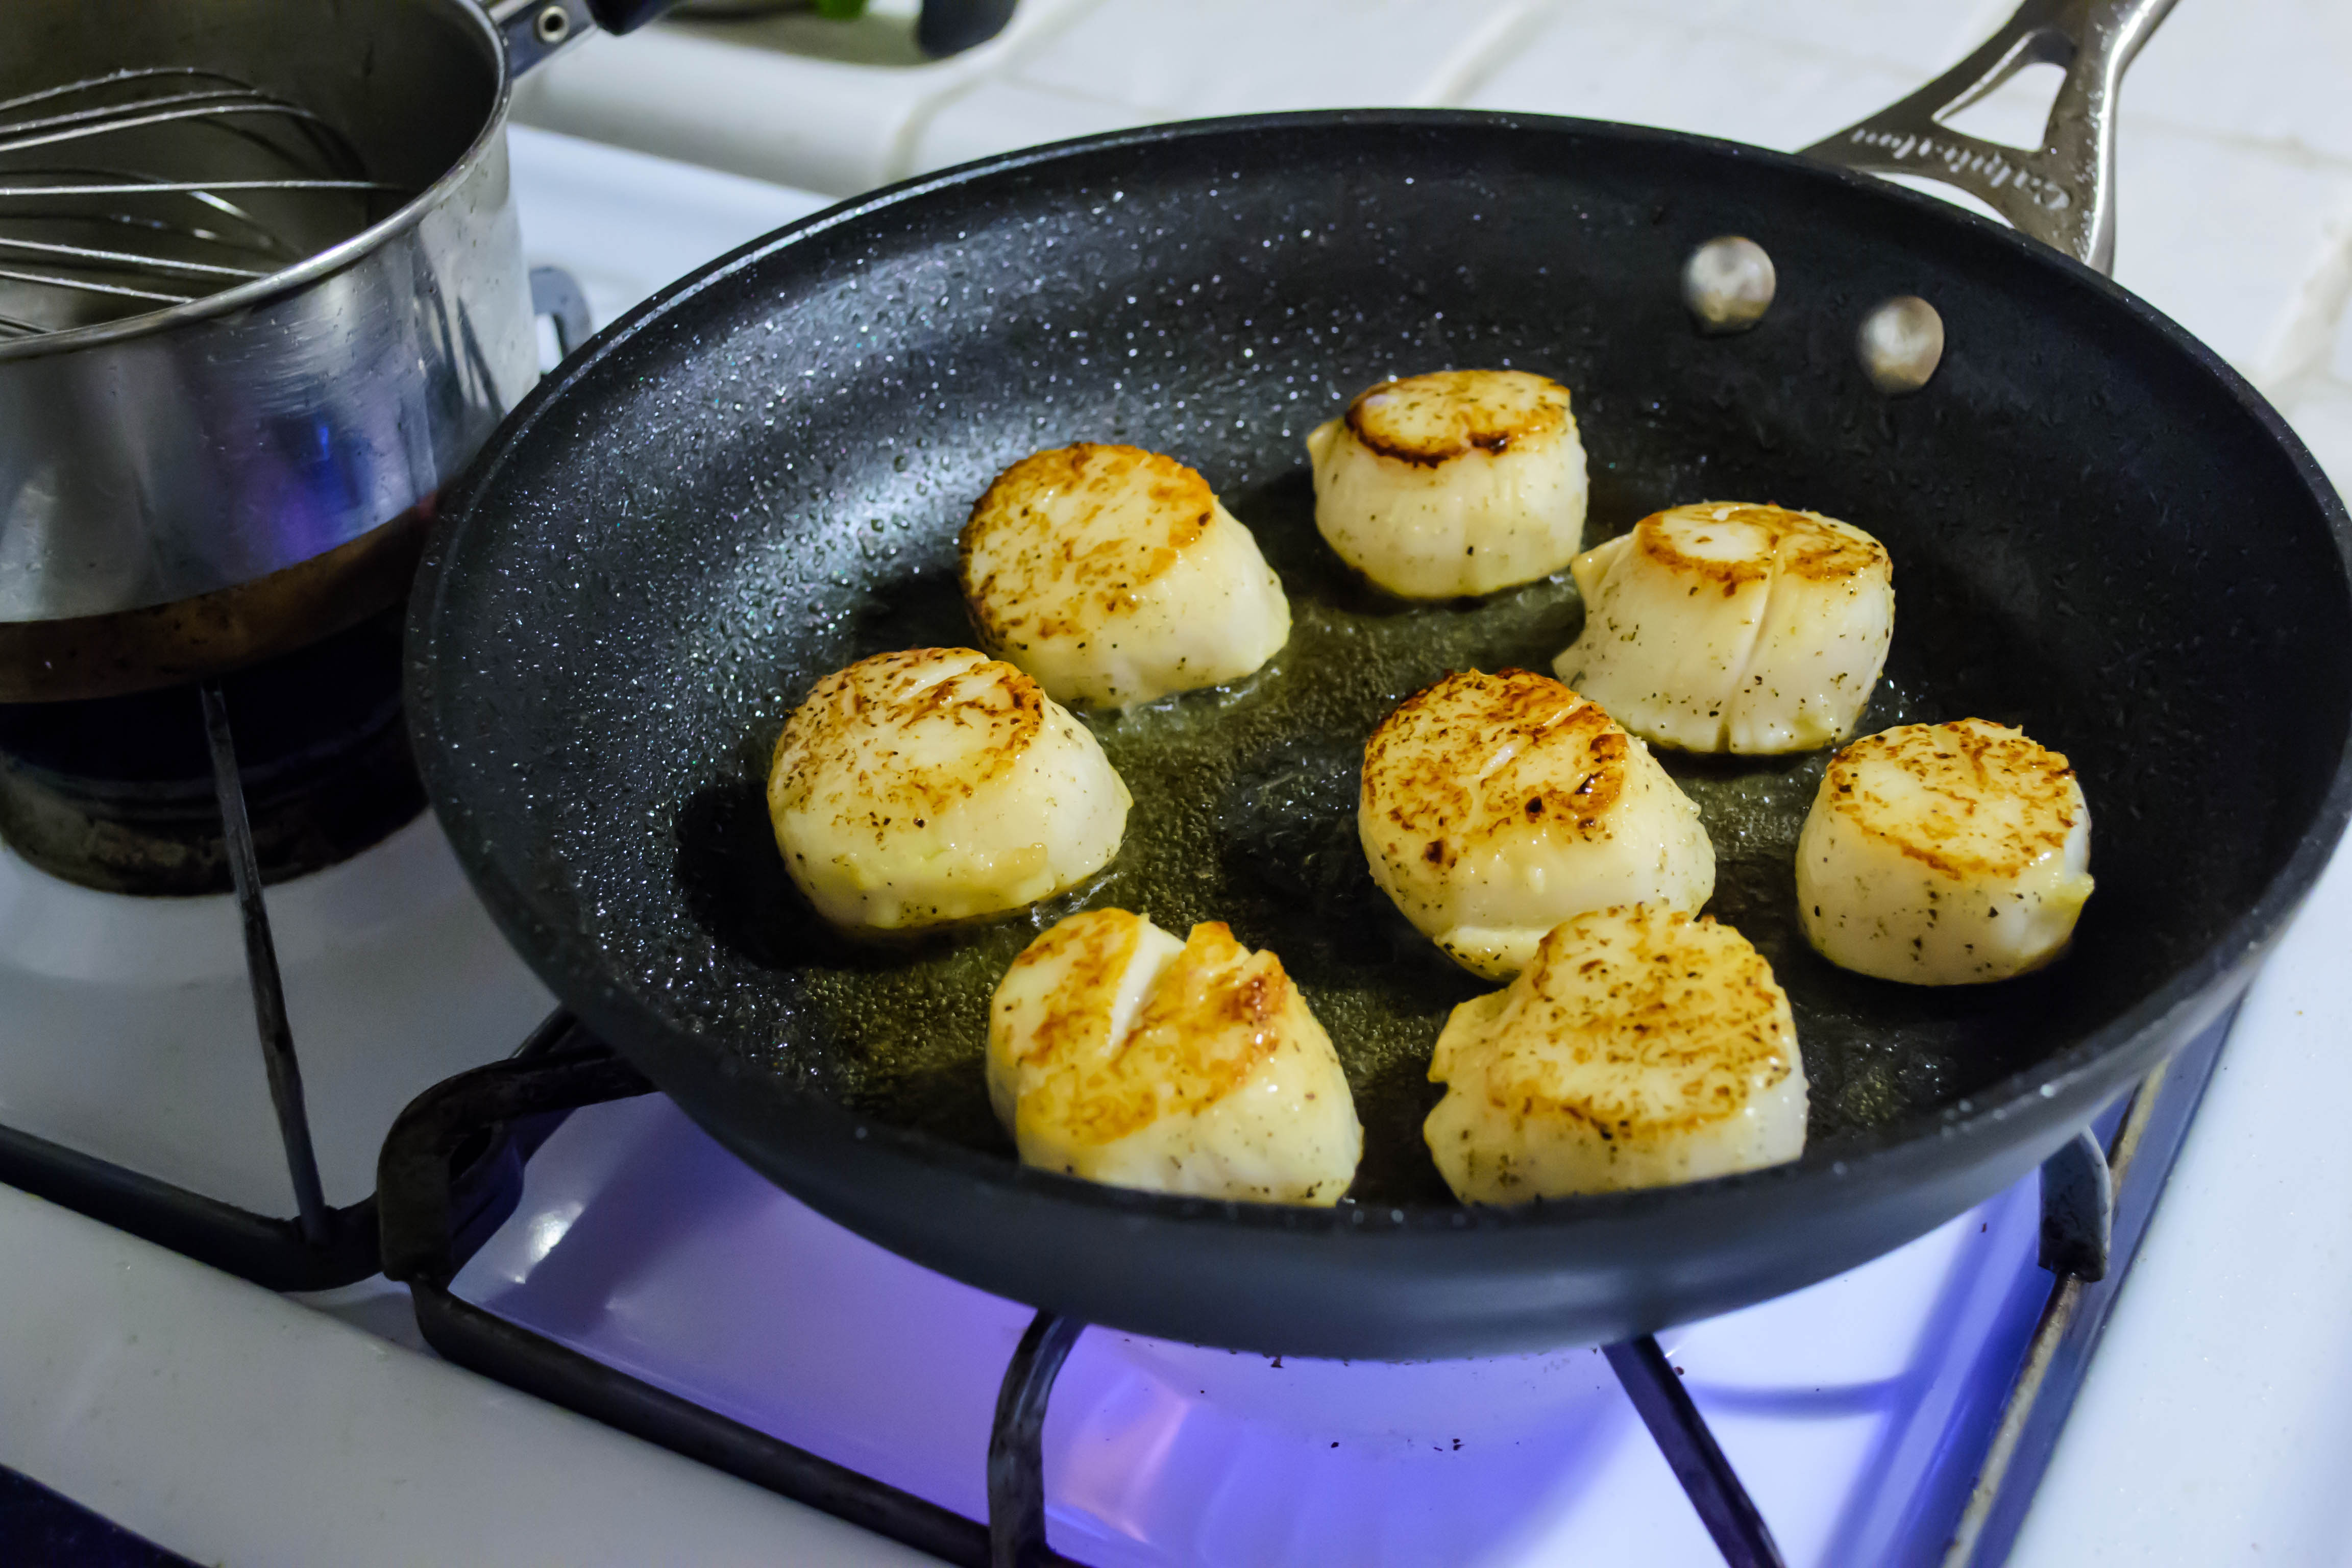
The silkiness of this sauce is perfect with shellfish. I can imagine dipping lush hunks of lobster into it. I can imagine a drizzle over soft-shell crab. I would be more than satisfied with a pool underneath a piece of halibut or cod. But scallops won the day for me. These perfect little cylinders, meaty and mild and almost sweet, develop a perfect crust when you pat them dry, season them aggressively, and sear them golden-brown on top and bottom. When you douse them with sauce, or float them in a puddle of it, the buttery smoothness somehow elevates them even more.

Food Blog November 2014-0882
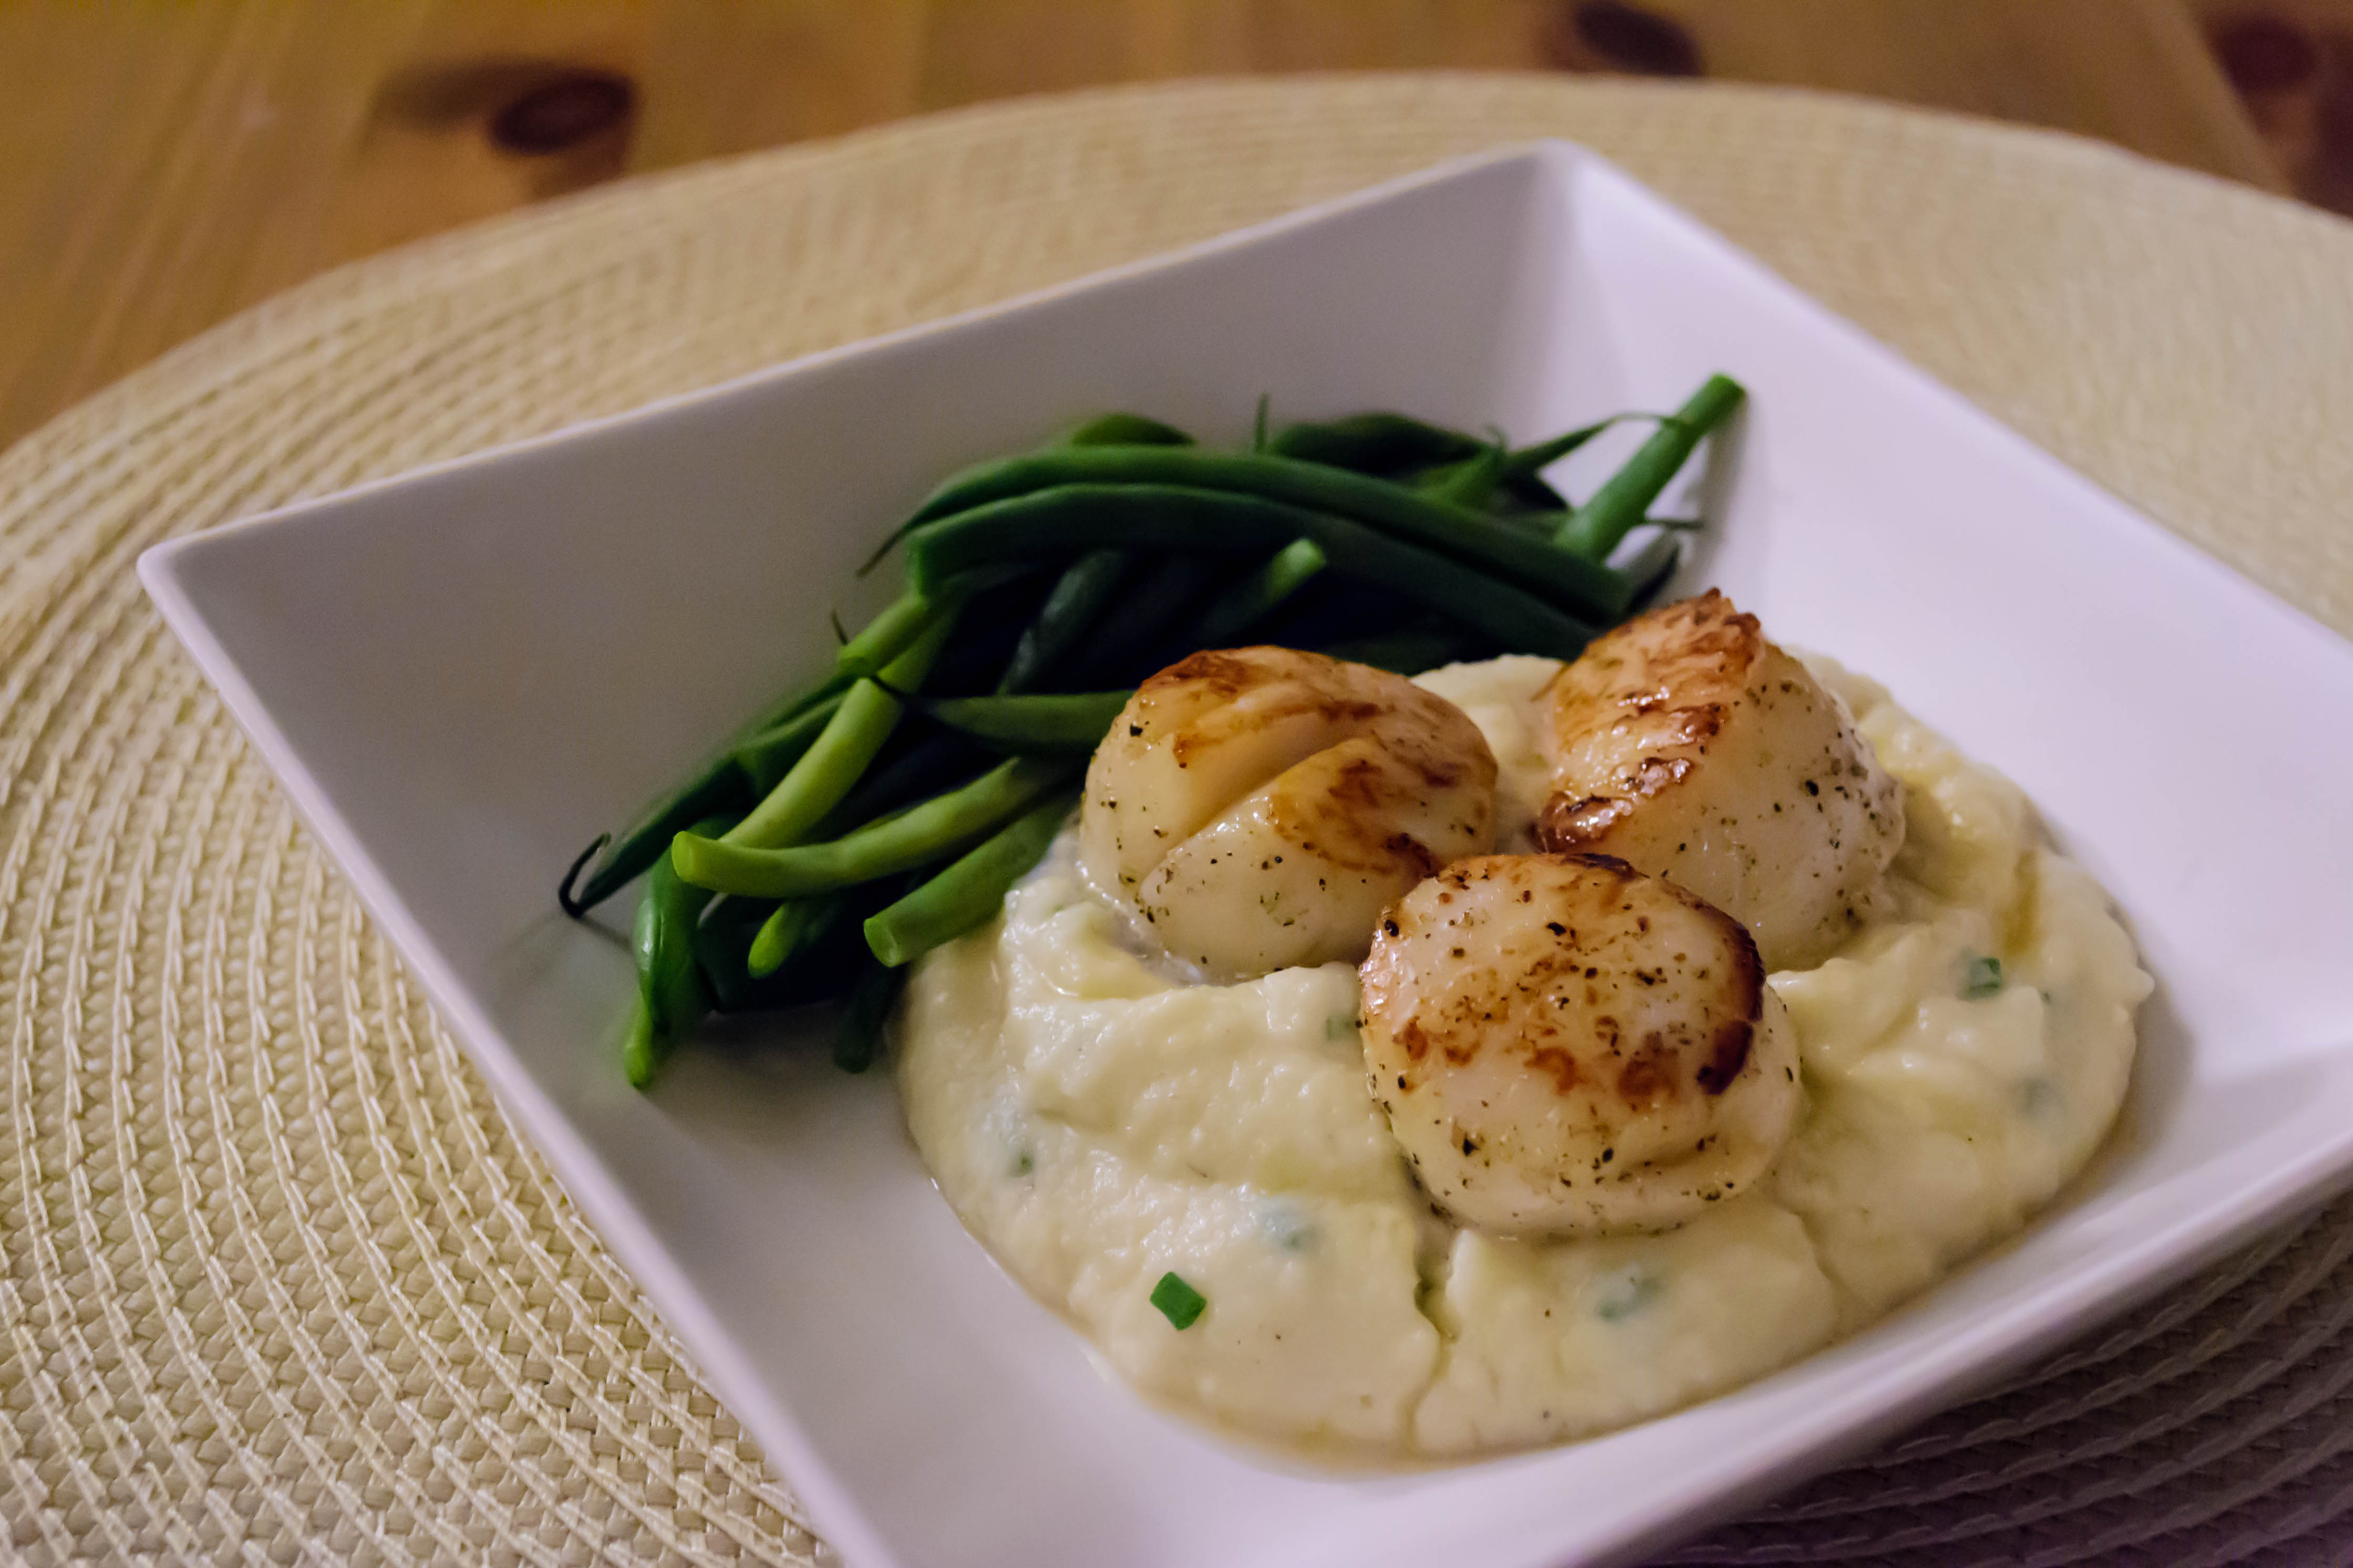
Because I was eating alone, I decided to play with plating a bit more than usual. As I see it, there are many ways to serve this dinner. I tried two options. First, and a bit more everyday, is a lovely heap of parsnip puree, a few scallops nestled atop it, and a small pile of steamed slender green beans alongside. A healthy drizzle of sauce, and you are ready to serve.

Food Blog November 2014-0883Food Blog November 2014-0884To amp up the presentation though, I grabbed a long rectangular dish. A few small bundles of green beans at intervals along the plate, small mounds of puree between them, and a tender scallop balanced on each spoonful of puree. Sauce can be applied to the top of each scallop, or poured around the edges of the plate just before serving.

Food Blog November 2014-0893

Seared Scallops with Beurre Blanc and Parsnip Puree
Serves 2

For the parsnip puree:

3-4 large parsnips, peeled and cut into 1-inch chunks
2-3 cloves garlic, smashed and peeled
1 cup milk
salt and pepper to taste
2 tablespoons butter
1 tablespoon chives, finely minced
For the beurre blanc:
4 ounces dry white wine
½ tablespoon lemon juice
½ tablespoon heavy cream
6 tablespoons cold, cubed butter
salt to taste
For the scallops:
2 tablespoons olive oil
salt and pepper to sprinkle
12 large sea scallops, at room temperature


  • Place the milk, garlic cloves, and parsnip chunks into a medium pot over medium heat. The moment the milk begins to bubble, reduce the heat to low and simmer until the parsnips are tender, 10-12 minutes.
  • Remove from heat and season to taste with salt and pepper. Stir in the butter until melted.
  • Blend until very smooth using an immersion blender, a regular blender, or a food processor. Just before serving, fold in the chives.
  • While the milk for the parsnips is heating up, make the beurre blanc.
  • In a small pot, heat the wine and lemon juice to a boil over medium high heat. Reduce the liquid to a bare tablespoon.
  • Turn the heat down to medium and add the half tablespoon of cream, which will help stabilize the mixture.
  • As soon as the liquid begins to bubble again, turn the heat down as low as it will go and begin adding the butter, one cube at a time, whisking until completely integrated into the liquid before adding the next cube.
  • Continue adding the butter, whisking constantly, until it is all integrated. Turn off the heat and continue whisking until the sauce is fully emulsified and has become a fluffy, pale yellow puddle slightly thicker than melted ice cream.
  • Stow the finished sauce in a thermos to stay warm while you cook the scallops.
  • Unwrap your scallops and pat them dry with a paper towel. If they are wet, they will not sear well. Sprinkle both sides of each scallop with salt and pepper.
  • In a large skillet, heat the olive oil over medium high heat. When it is shimmering in the pan, carefully add the scallops in a single layer, taking care not to let them touch one another. This seems fussy, but it is essential for getting a good sear.
  • Once you have placed each scallop, don’t touch them for 2 full minutes. Then, carefully lift one and check the bottom – it should have a deep bronzed crust. If this is the case, flip over each scallop and cook another 2 minutes. If it isn’t deeply bronzed yet, let it cook another 30 seconds before checking again.
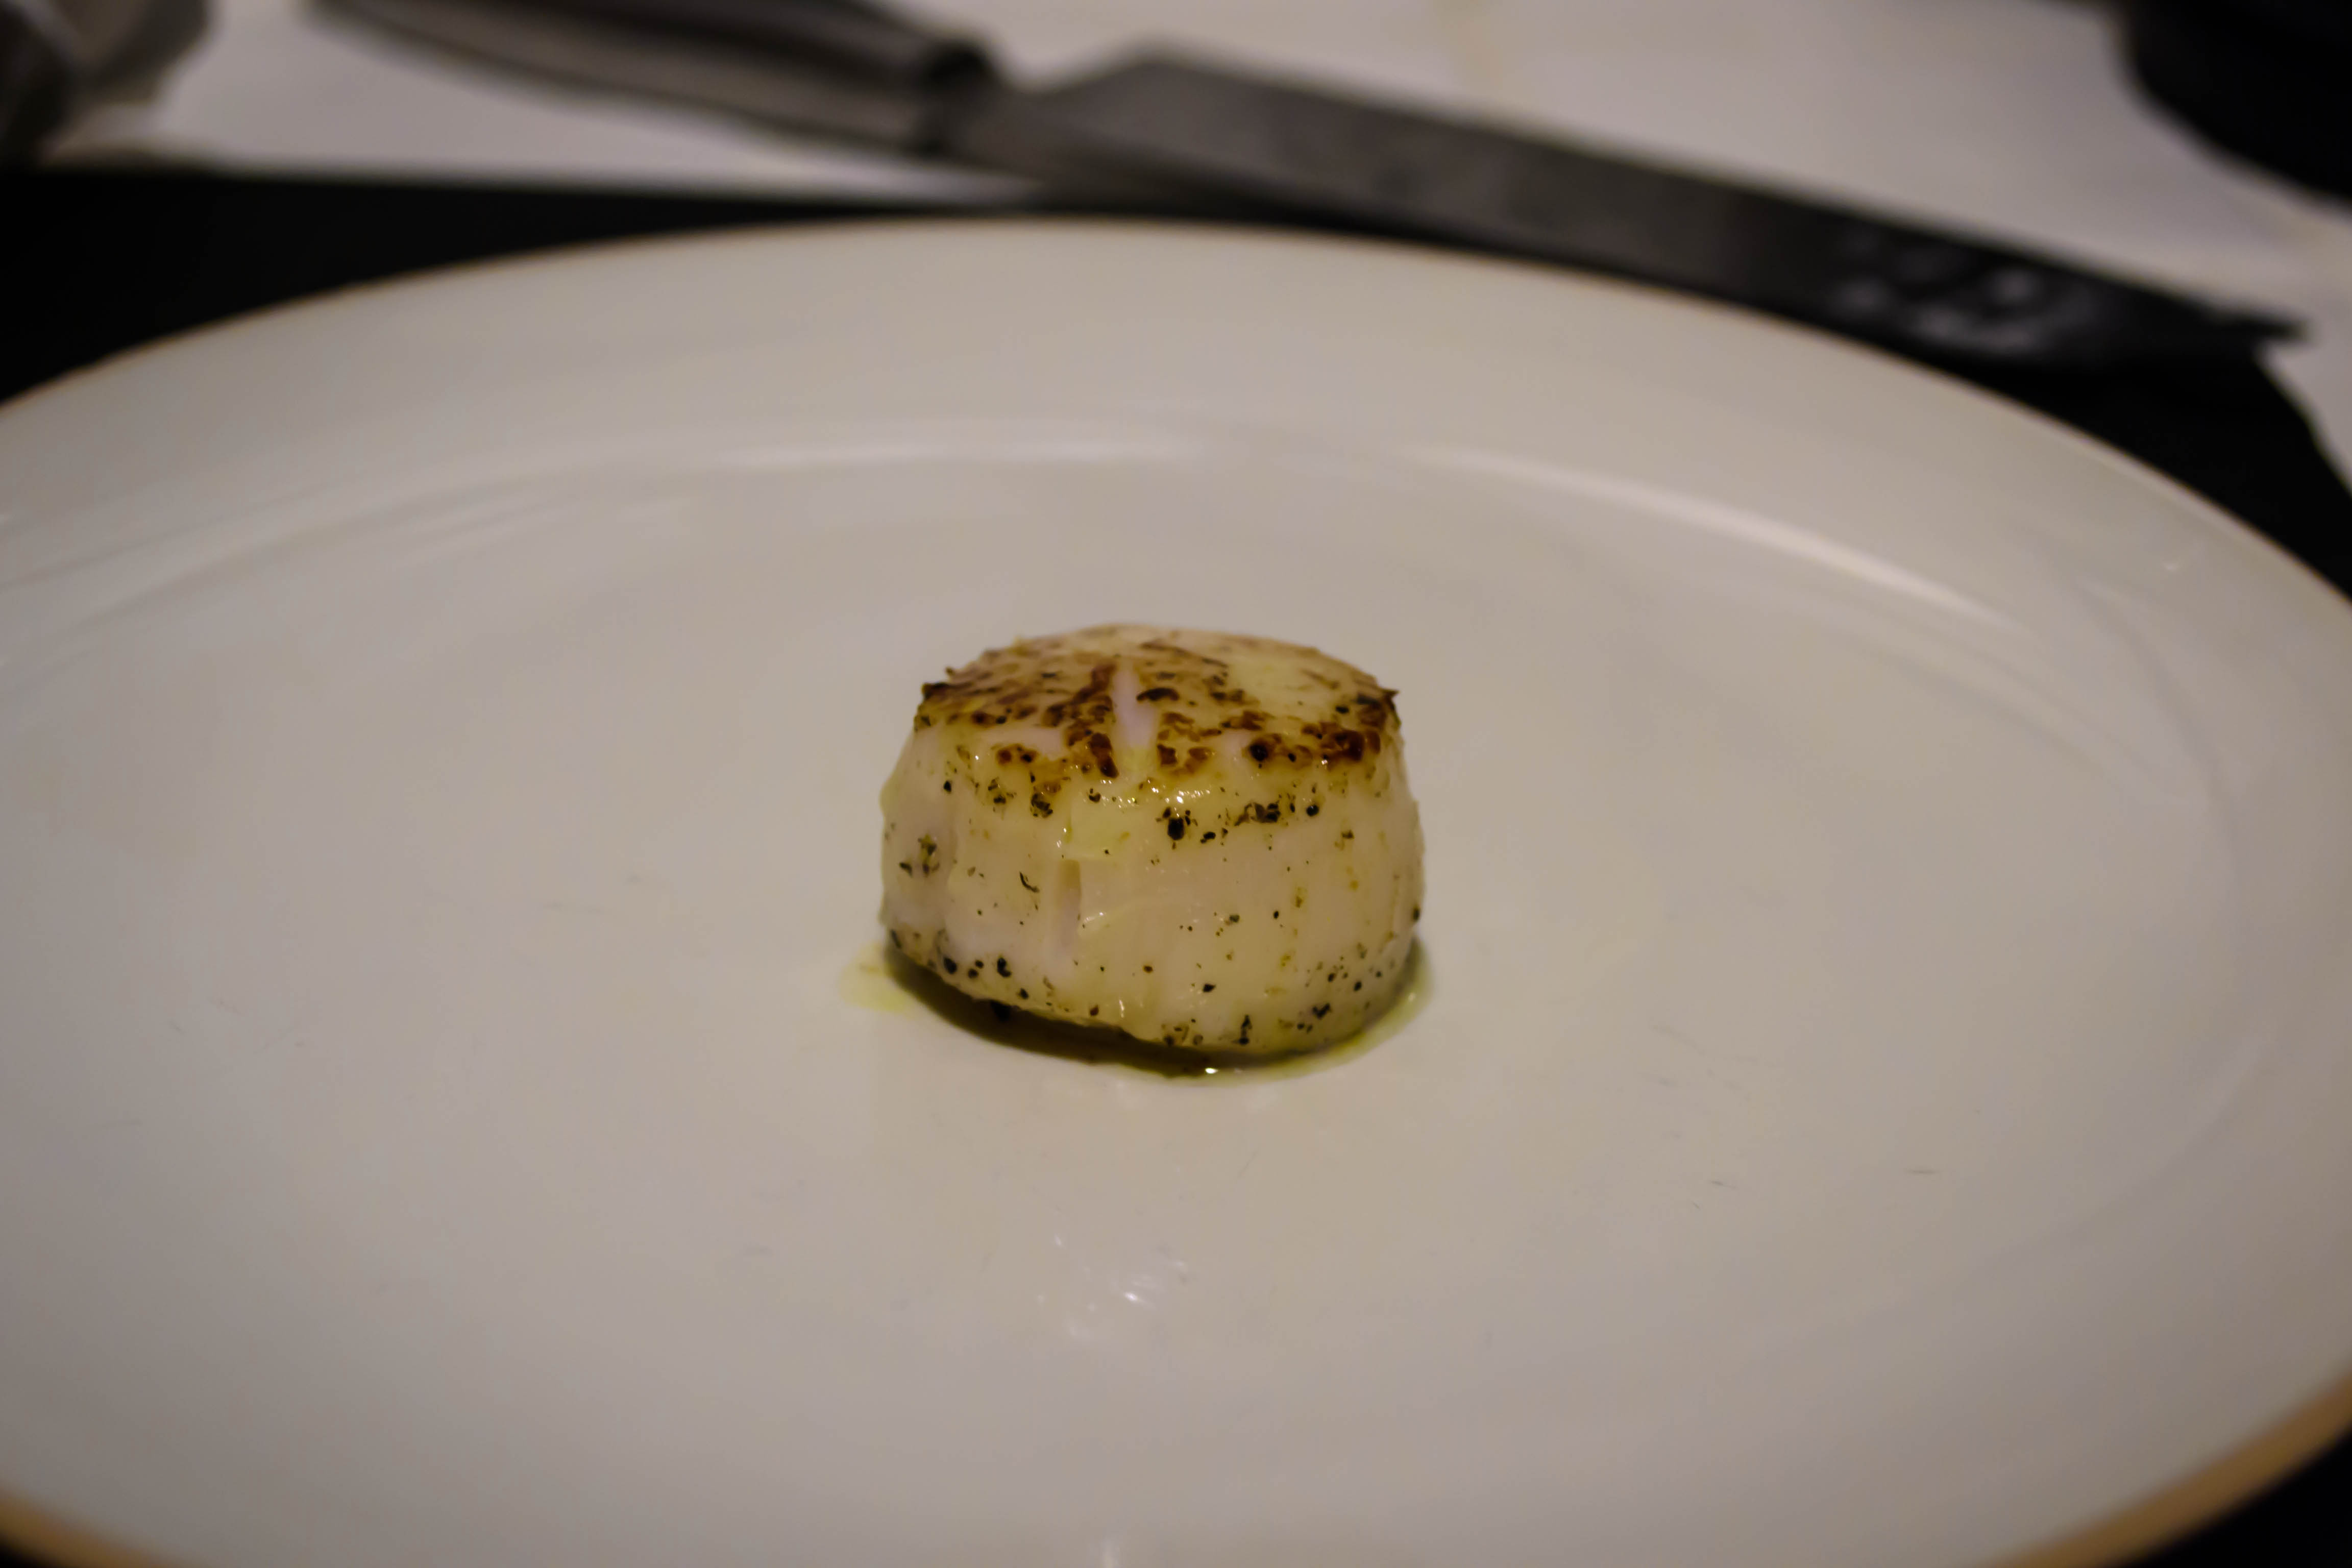
  • When the scallops are cooked, they should feel slightly springy but resistant, like a firm mattress. Ideally, they should be the palest, palest pink in the center as in my photo above – they will continue to cook while you plate the rest of the meal.
  • To serve, arrange as desired with scallops atop or beside the parsnip puree, and the beurre blanc sauce drizzle over the top or puddled on the side. Accompany the dish with steamed green beans or pencil asparagus, if desired.

Roots Latkes

Most kids, upon reviewing what they ate during college, will talk about late night burrito runs. There will be a fair share of ramen noodle stock-up stories, and an assessment of the school’s dining facilities. For a student who has moved off campus, such a topic is likely to provoke a discussion of microwaveable meals. I had my share of those as well, I’ll readily admit, particularly during the month after a stunningly disorienting and unexpected breakup during which I subsisted mainly on Coca-Cola, boxed stuffing mix, Godiva ice cream, and carne asada burritos to-go from a restaurant next door to the grocery store where I was buying the rest of my supplies.

Food Blog November 2014-0694Thankfully, that month or so was an exception. For much of my off-campus college career, I lived with one other girl in a duplex her mom rented to us, and we fed each other. Sometimes it was easy stuff: pancakes, omelets, pasta with jarred red sauce, sometimes something a bit junkier like Oreo milkshakes. But we definitely introduced each other to our classics. One of mine was a modification of an old Ghirardelli oatmeal chocolate chip cookie recipe. One of hers was a simple, lovely little roasted vegetable dish her family just called “roots.” Roots consisted of, well, roots. Russet potatoes, sweet potatoes, carrots, parsnips, rutabagas, turnips, and sometimes beets got peeled, cubed, and tossed with salt, pepper, and olive oil. The first time she made it for us, K. said that she wasn’t sure how much olive oil to use, but that her mom said it should be just enough that the raw cubes of vegetables “glistened.” Then we loaded them into large glass casserole dishes and roasted them until they were done.

Food Blog November 2014-0681Roots comprised whole meals for us during those years. Sometimes there would be some kind of green side, but mostly we just sat down (never at the table, always on the couch) with big bowls of autumnal cubes, toasty and brown on the outside, starchy and pillowy soft on the inside, and inhaled them. It was reasonably good for us, it was filling, it was delicious, and best of all, it was cheap. The biggest disadvantage to the whole endeavor was getting a cashier at the grocery store who didn’t recognize “weird” vegetables like rutabagas and parsnips, and would take a long time looking up the codes to ring them up.

Food Blog November 2014-0682Over the years, I’ve made roots more times than I can count. They are a lovely comfort food dish: simple to make, hot and forgiving, and easily changed up depending on what vegetables and herb combinations you like the best. Over time, I’ve eliminated beets from the equation, and opted to add plenty of chopped rosemary to the requisite salt, pepper, and olive oil.

But recently, I got thinking about roots again and wondered what it would be like to turn these simple cubed, roasted vegetables into a latke. This would increase the ratio of crisp edges to soft interior, always a good thing, and cut down a bit on preparation as well as cooking time – you can just shred everything in a food processor before frying it up, rather than cubing by hand before waiting out the hour or more the original takes in the oven.

Food Blog November 2014-0687This was, as it turned out, exactly the right thing to do. I opted for potato, carrot, parsnip, and rutabaga as my key players. They whiz into a tangle of starchy threads. Half an onion joins the party – it’s part of a standard latke, and it’s a root vegetable too. As a nod to the common practice of serving latkes with applesauce, I added a tart green apple to the vegetable combination and was pleased with the sweet sharpness it contributed. And I preserved my own love of rosemary with a hefty tablespoon in the mix.

A few eggs, a toss with some flour, and salt and pepper to season, and you carefully drop-pour dollops of the sticky mixture into hot vegetable oil, preferably in a nicely seasoned cast iron pan. It sizzles, it browns, you flip it, and within ten minutes from your first addition of batter, you are passing out hot roots latkes to your delighted diners. Or, if you want to serve everything together, you can stow each batch in the oven on a rack in a baking tray to keep them warm and crisp.

Food Blog November 2014-0690What you are left with is a reasonably quick, reasonably easy (both provided you have a food processor with a shredding disk) meal that doesn’t cost much but tastes exactly right for the approach of chillier weather. The flavors are more complex than your standard latke – there’s a mix of sweetness from the addition of the carrot and the apple. The parsnip and rutabaga have a spicy, earthy flavor that reminds me somehow of incense, a feeling pleasantly intensified by the rosemary.

Since I’d already captured the applesauce element by adding apple to the batter, I served these with a dollop of sour cream as a nod to another classic pairing.

Food Blog November 2014-0695

Roots latkes
Makes about a dozen  3-inch latkes
1 yukon gold potato
1 large carrot, peeled
1 large parsnip, peeled
1 medium rutabaga, peeled
1 large tart apple, cored
½ large white or yellow onion, ends and papery skin removed (either color is fine, so long as it’s not a sweet onion)
1 tablespoon minced rosemary
1-½ cups all-purpose flour
2 eggs, lightly beaten
1 teaspoon salt, or to taste
½ teaspoon pepper, or to taste
½-1 cup vegetable oil
Sour cream, for serving (optional)


  • Begin heating ½ cup of vegetable oil in a large cast iron skillet over medium heat – it will take a few minutes, but you are looking for it to just shimmer when swirled around the pan. If you plan to make the whole batch at once and need to keep them warm, preheat the oven to 300F and position a baking sheet with a wire rack on it inside the oven.
  • Fit a food processor with the shredding disk, or address the largest holes on a box grater with care for your knuckles. Cut the vegetables into the size needed to fit comfortably down the feeding chute of the food processor, and carefully feed the potato, carrot, parsnip, rutabaga, apple, and onion through the machine to create long, thin shreds of vegetable.
  • Dump the whole mess into a large bowl and mix them up a bit with your fingers to distribute evenly. You’ll be left with strands of vegetable confetti.
  • Add the rosemary and flour to the vegetable shreds and toss well with your fingers to combine. Then add the eggs and the salt and pepper, and mix well to combine. You could use a spoon or spatula for this, but I just use my fingers. They do a better job ensuring everything is evenly distributed.
  • When the oil is shimmering, plop ¼ – ⅓ cup dollops of the mixture into the oil. In my 10-inch skillet, I can fit three dollops of batter comfortably without touching – don’t crowd them. When they hit the oil, they should sizzle lightly. If the oil spits aggressively, it’s too hot. Turn the heat down or remove the pan from the heat for a minute to cool it down.
  • Sizzle the latkes for 4-5 minutes on the first side, until it is evenly golden-brown and crisp. Flip carefully (oil splatters) and cook for 2-3 minutes on the second side, until it too is brown and crisp. Move to the rack in the oven to keep warm, or directly to a plate for immediate consumption.
  • Repeat until batter is used up. If the oil level gets low or the latkes begin to brown unevenly, add additional vegetable oil to the skillet, giving it time to heat up before adding more batter.
  • Serve with sour cream, if desired, or applesauce, or just an anxious fork.

Happy New Year!

Food Blog 2011-2013-0362

Oh friends, it happened.  I made it.  Yesterday I made the last two Bittmans on my list and completed, albeit a year later than I’d originally intended, my project.  I have reflections to share, certainly, and I have changes and excitement and promises for the new year, but first, I think, let’s work with the program.  Two Bittmans.  Two reports:

“14. Steam or poach 2 cups of pumpkin cubes until tender. Meanwhile, sauté 1 cup sliced shiitake mushroom caps in vegetable oil with a few drops of sesame oil. Boil 4 cups water and whisk some of it with ⅓ to ½ cup of miso. Stir miso mixture, pumpkin and mushrooms into water and heat everything through, then serve, drizzled with more sesame oil.”

Because we were planning to reach midnight by eating as many snacks as possible eating our way to midnight snacking, I wanted a light dinner to precede the countdown.  This seemed to fit the bill.  And it had to, after all, since it was the only soup left and the calendar was screaming December 31st.

2 cups peeled, cubed butternut squash (I had some in the fridge, and suspected pumpkin would be hard to find)

1 1 oz. package dried shiitake mushrooms

1 TB vegetable oil

¼ tsp (or to taste) toasted sesame oil, plus some for drizzling

3 packets instant tofu miso soup mix (all I could find at my grocery store)

water

white wine

To reconstitute my shiitake mushrooms, I soaked them in a mixture of white wine and almost boiling water for 15-20 minutes, until they were plump and soft.

While the mushrooms soaked, I cubed up my butternut squash and submerged the pieces in a pan of salted water.  I brought this to a bare simmer and cooked it just until the squash pieces were tender – 10-15 minutes – then drained the pieces in a colander.  Don’t overcook them, because they will start to fall apart.  Set the squash pieces aside.

When the mushrooms were tender, I scooped them out of their bath and decided the remnants shouldn’t go to waste.  I poured the soaking broth into a little pot to bring to a boil, so I could use this already flavored liquid as the base for my soup.  While it heated, I stemmed and sliced the mushrooms.

Since the shiitakes were now basically cooked, I probably could have skipped Bittman’s sautéing step.  But honestly, I’m not one to pass up the opportunity to ingest sesame oil, so I dutifully dribbled vegetable oil with a few (or a few more than a few) drops of sesame oil in the (drained and dried) pan I’d used to simmer my squash and sautéed the mushroom slices over medium heat until they dried out a bit and started to take on some color.

While this colorization happened, slowly and so aromatically, I made the broth.  I poured all three miso soup seasoning packets – tofu and seaweed and all – into a small dish, then mixed in about ½ cup of my heated mushroom soaking liquid and whisked gently to dissolve the powdery soup mix.  This created a slightly thickened slurry, which I poured with the rest of the liquid and the butternut squash cubes into the mushroom pan.

Food Blog 2011-2013-0341

After a few moments of reheating, we dipped up bowlfuls and ate.

Food Blog 2011-2013-0343

N. wasn’t sure (he sometimes takes issue with the texture of reconstituted mushrooms), but I inhaled it with devotion.  I love the flavor of miso soup, and the mild sweetness of butternut squash against the salty umami and fleshy squish of the mushrooms was lovely.

Food Blog 2011-2013-0347

It was light but still satisfying, and the tofu and vegetables from the soup mix were so welcome that I’d advise you, if you are using straight miso rather than a pre-mixed, additive laden packet, to consider adding some tofu or seaweed or green onion just to contribute a little substance and contrast to the soup.

Food Blog 2011-2013-0348

Dinner done, we moved on to the second stage of the evening.

“89. Vegetable crackers: Slice beets, sweet potatoes, plantains or parsnips or all of the above into 1/8-inch disks (a mandoline is helpful) and toss lightly in olive oil. Spread the slices on baking sheets, sprinkle with salt, pepper and, if you like, other seasonings and bake at 400 degrees for 10 to 12 minutes. When browned, flip the chips over and bake for another 10 minutes or so.”

This sounded tasty, and I’d always intended to make it for a party.  With a dear friend coming over to ring in the new year with us, and since hunks of cheese alone might be deemed a slightly imbalanced offering (though so, so delicious…), this seemed like a perfect opportunity.  Beets were out of the question (N.’s nemeses since childhood), and I couldn’t find plantains in my grocery store’s produce section, so we were left with the nutty herbiness of parsnips and the always dependable earthy sweetness of sweet potato.

3 medium parsnips, peeled

½ large sweet potato, peeled

generous dose of olive oil (maybe ¼ cup?), plus more to grease the cookie sheets

1 tsp each (or to taste) salt, pepper, and garam masala

To prepare for roasting, preheat the oven to 400F and line two cookie sheets with aluminum foil.  Drizzle with olive oil and spread to cover the surface of the foil evenly.

While the oven preheats, tackle the vegetables.  I don’t have a mandoline, but I do have a ruler, and I must confess I did bring it to the kitchen to give myself a better idea of what 1/8 inch looks like.  My slices were not quite even, but they did verge on passable.  I tossed them – big coins of harvest orange and speckled white – in a glass bowl with the olive oil and the spices until they were evenly coated.

Food Blog 2011-2013-0339

Spread the vegetable coins across the cookie sheets in a single layer, not overlapping, not in piles.  If they cook in a stack, they will soften but not brown or crisp.  Stow them in the oven for 12-15 minutes, or until they are just beginning to brown.

This next step is a true exercise in patience.  Unless you are far more talented with a spatula than I, you will have to flip each piece over individually.  You have to, because otherwise one side will burn and the other side will flutter limply into cooked-but-not-crisp status.  Trust me on this one.  When you have laboriously flipped each coin, shove the tray back into the oven for another 10-12 minutes.

Food Blog 2011-2013-0342

At this point, you’ll have to use your judgment.  My offerings were, after this additional time, cooked through but not remotely cracker-like in texture.  Another five minutes in the oven might have done the trick.  Putting them back in, failing to set a timer, and heading to the couch to eat dinner (I was trying to multitask) is not advisable.  I didn’t remember them until I smelled the slightly spicy aroma of parsnips, and by then it was too late – many of the little coins had gone from crackers to briquets.

I decided to pick out the worst offenders – Lucy reports that she didn’t mind a bit of charred flavor – and eat the salvageable ones anyway.

Food Blog 2011-2013-0356

To make them a bit more exciting (and disguise any lingering burned taste) I made a little dipping sauce.  You’ll need:

juice from 1 lime

2 TB honey

1 tsp garam masala

½ – 1 cup Greek yogurt

Whisk the first three ingredients together with a fork until they are smooth.  In increments, add Greek yogurt until your sauce reaches the desired thickness.  Mine was about the consistency of ranch dressing, but much more interesting in flavor.

Food Blog 2011-2013-0349

These crackers (with and without the sauce) were – if you were able to overlook the overcooking – a nice alternative to crudites or store-bought crackers.  They weren’t quite as crispy (except the ones that were too crispy), but they had a lovely deep flavor and none of the powdery, processed taste some crackers can have.  They are also a gluten-free offering and, minus the yogurt and honey sauce, vegan as well.

Food Blog 2011-2013-0350

I served them alongside a cheese platter,

Food Blog 2011-2013-0353

Food Blog 2011-2013-0354

Joy the Baker’s chili spiced sharp cheddar cheese crackers,

Food Blog 2011-2013-0352

assorted sweets,

Food Blog 2011-2013-0355

and my appetizer version of Bittman’s “Marshmallow Topping for Adults” dish: thick discs of sweet potato roasted until tender, topped with a dollop of cream cheese and sprinkled with a pecan brown sugar blend before being broiled until the sugar bubbles and the cheese slackens toward melting.

Food Blog 2011-2013-0357

Food Blog 2011-2013-0359

And champagne, of course.

Food Blog 2011-2013-0361

Happy New Year.  I hope you celebrate your achievements, meet your goals, and find happiness in your own self.  I’ll be checking in again later this week with some reflections and announcements.  Welcome to 2013.

Roots!

This is not a Bittman recipe.  But it is something I made.  It’s hearty, it’s autumnal, it’s colorful, and it’s easy.  Oh, and it allows you to turn your oven on for around an hour and thereby heat up your house a bit!

Roasted Root Vegetables

3 carrots, peeled and cut into chunks

3 parsnips, peeled and cut into chunks

2 purple topped turnips, peeled and cut into chunks

2 rutabegas, peeled and cut into chunks (see a pattern here?)

1 sweet potato (or 1/2 of a mammoth yam), peeled and cut into chunks

1 tsp dried rosemary, or to taste

1 tsp sea salt

1/2 tsp freshly ground black pepper

olive oil to coat

Preheat your oven to 400F.  Peel and cut all vegetables into equal, bite-sized chunks.  Toss them with seasonings and olive oil in a 9×13 inch glass baking dish.  Use enough olive oil so that all chunks of root vegetable get an even coating and glisten slightly.  Depending on size of vegetables, this might range from between 1/2 – 1 cup of oil.

Roast until all vegetables are tender and begin to brown on the outside, 45 minutes to an hour, depending on size.

As you can see, this is almost ridiculously easy.  You can substitute for any of these vegetables you don’t like – easy additions or change-outs would be regular or fingerling potatoes, beets, even celery root.  Choose what you love, mix them well, and enjoy!