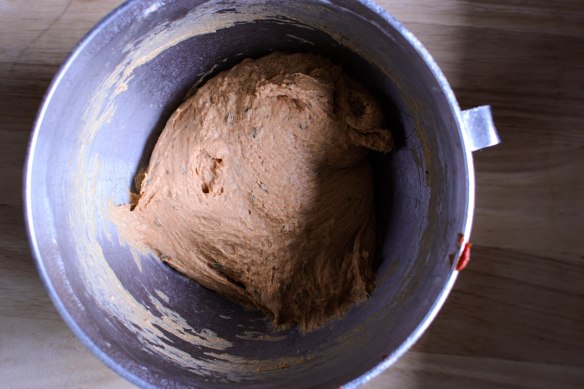
I can’t post this week’s entry until Tuesday, since it’s a Twelve Loaves triumph, but I can give you this little teaser trailer to keep your appetite whetted till tomorrow…


I can’t post this week’s entry until Tuesday, since it’s a Twelve Loaves triumph, but I can give you this little teaser trailer to keep your appetite whetted till tomorrow…
I ran out of time for new recipes this week,* the result of a stack of writing assignments from each of my four classes sitting on my desk in varying heights and stages of completion, and with the inevitable promise of more to come. So instead, here are a couple of recent shots to keep you entertained…
See you next week.


* if you’re looking at that latest Instagram photo and calling me a liar, then okay, you caught me. But that’s for Twelve Loaves, so you’ll have to hold out for next week. And trust me, it’s a good one.
 Whereas last month’s blog experiment entry left me stumped for a while, not only do I know which post led this searcher to my blog; the dish I wanted to create coalesced pretty quickly in my mind. The search term “parsley pie,” with its bright green focus, seemed appropriately spring-y for this first warm week in Southern California. Though I had my own ideas already, I did a quick image search to see what other sorts of “parsley pies” turned up, and the answer is: not many. Most of what I saw were meat pies, with the addition of parsley to lighten up the filling or, in one case, add fiber. Some of these concoctions were the classic British pork pie, with high, golden sides and, sometimes, a hard boiled egg or two cunningly tucked into the filling, while some were shepherds pies, with parsley added to the ground lamb or to the mashed potato topping.


 What I’d envisioned, quite contrary to these heavy options, was a pie where parsley dominated: something like a quiche Lorraine would be a neutral base, and allow for greater visibility for the heaping mounds of the freshly chopped herb in question. I suppose if I’m being absolutely honest I should call this a parsley quiche, but it does have a proper crust and a filling, and since that ultimate internet authority Wikipedia (hah!) classifies quiche as a “savoury pie,” I’m going to cross my fingers behind my back and declare that this counts.


 Because there are no bulky chunks in the filling to hold it up, this must of necessity be a shallow pie. Thus it was a perfect opportunity to use the tart pan I bought myself for Christmas (though a pie pan would work fine). Along with eggs, milk, and of course the eponymous parsley, I whisked in a combination of other herbs: basil, cilantro, dill, and a few chives, to add some variety to the flavor. And because I can’t help myself, I topped the green freckled custard with crumbles of feta cheese, which admittedly adds a pleasant brininess that the pie would suffer without.
 A few thoughts: if you’re going to make this, you have to like parsley. This seems a distressingly obvious revelation, but I mean it – this really, really tastes like parsley. If it’s too herbaceous for you, or you’re looking for a bit more to sink your teeth into, crumbled, crisp prosciutto, or lumps of crab, or slick slices of smoked salmon, would bulk it up nicely. Alternatively, a side salad with a thick wedge would make a perfect spring lunch. As for construction, if you use a tart pan you really have to be sure your crust forms an unbroken layer around the bottom edge of the pie. Cracks or very thin areas can lead to egg leakage in the oven. Don’t ask me how I know this.

 One of my favorite games to play with N. when we are out, about in the world, is a riff on my favorite television show: Chopped (another favorite is noting a couple and trying to determine the status of their relationship based on their clothing and body language, and sometimes, how we think their evening will conclude. We are, clearly, lovely people). Specifically, he will tell me whether I’m to build an appetizer, an entrée, or a dessert, and will then list four random ingredients. Unlike the show, where the contestants have a mere half hour to create a meal that incorporates all four, I simply have to describe the dish I would make.
 I love this game. Like this year’s blog project, it gives me a chance to stretch my imagination; it’s like a trivia game, except instead of just knowing the answer, I get to invent it. Last fall we were waiting in line somewhere and N. gave me the following as an entrée round basket of mystery ingredients: halibut, bacon ends, vodka, and kale. “Easy,” I said, and rattled off my entry: diced bits of bacon, rendered until crisp. Halibut cooked in the bacon fat with just a little bit of brown sugar. Bright kale sautéed until just wilted, then tossed with the crisp diced bacon, all balanced over a puddle of rich, creamy polenta and crowned with a few spoonfuls of some kind of vodka cream sauce.
 Typically, after the presentation of a meal idea, we discuss briefly and move on. This one, though, sounded so good that I decided I should actually make it. As this process usually goes, I then spent the next few months thinking about it, gradually adding layers and complications, and ultimately being influenced by the show itself for several of the components (notable the kale: in one episode a contestant slices kale across the grain into a fluffy pile of thin confetti before sautéing and salting so aggressively that judge Alex Guarnaschelli, on whom I have a relentless lady-crush, admiringly declares it somehow like a potato chip in addictive deliciousness).
 The dish I ended up making doesn’t deviate much from the original plan. I did indeed render the bacon, though I reserved some of the fat for the halibut and used most of it to cook the kale. In addition to bacon and salt, the kale also got a drink of vinegar to enhance the potato chip comparison. The halibut remained as envisioned: salt, pepper, a light sprinkle of brown sugar (at the suggestion of a bed and breakfast owner during a family vacation in Alaska when I was in high school), and a light sear until the center is just cooked, pearly and opaque. The polenta, which is fast joining mashed potatoes as a favorite starch option, ended up with some corn kernels thrown in, which is an easy but stupendous addition I insist you try. The vodka got flamed in some brown butter, then whisked with a bit of lemon juice and mustard to create a rich, barely emulsified sauce that tasted perfect on everything. I knew I was in love when, after only a few bites, I was already texting my sister to tell her about it.
 This is one of those dishes that is complicated only because it has multiple components, and you want them to be done at the same time. Therefore, though I’ve divided up the ingredient lists per element (polenta, kale, fish, sauce), in the procedure I’ve indicated when to switch back and forth between pans.
 N. and I first discovered Panera when we were living in Eugene. This seems a bit counterintuitive, since Eugene doesn’t have any Paneras. But on a visit or two with my parents, and N.’s parents, it became an easy place to pick up lunch, or a dinner for a sunset hike, and I was quickly sold on their vegetarian sandwich, not just because it came layered with pickled red peppers and fresh greens and spicy spread and crumbled feta, but because the bread it used – a fluffy tomato and basil flavored loaf with an intriguing, slightly sweet streusel across the top crust – was addicting. When we could, N. and I started buying a whole loaf of the bread on our last day in California, to take home to Eugene with us.
 Now that we are in Los Angeles, there are Paneras everywhere (in fact, I just checked: there are at least five within a 5 mile radius of our house). Despite that proximity, though, we don’t go there very often. There are several reasons for this, but mostly, if I’m going to spend my money on restaurant fare, I’m going to explore what Los Angeles has to offer rather than a national chain. Regardless, the tomato basil bread, with that intriguing streusel, remains a favorite of mine, and when “red” was declared as February’s Twelve Loaves theme, I decided this was the right time to try a little re-creation attempt.
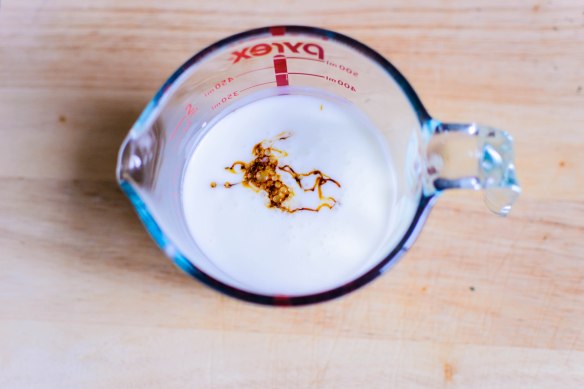
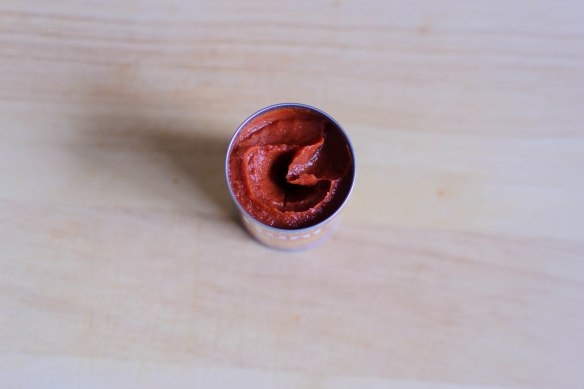 My bread combines lush, densely flavored scarlet tomato paste with a generous dusting of dried basil. The loaf itself is moistened and sweetened with buttermilk and molasses, and though it does bake up more orange than red, it makes perfect sandwich slices for cucumber and mozzarella, or pesto chicken, or just well-buttered toast.
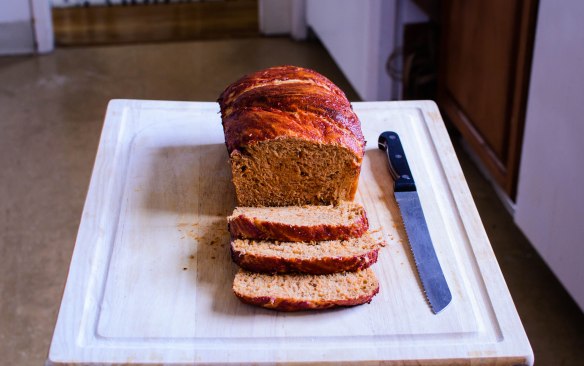
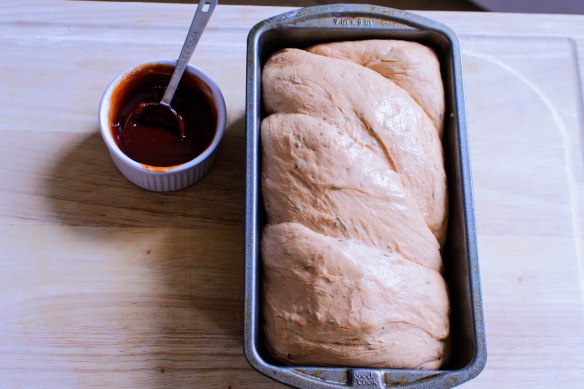
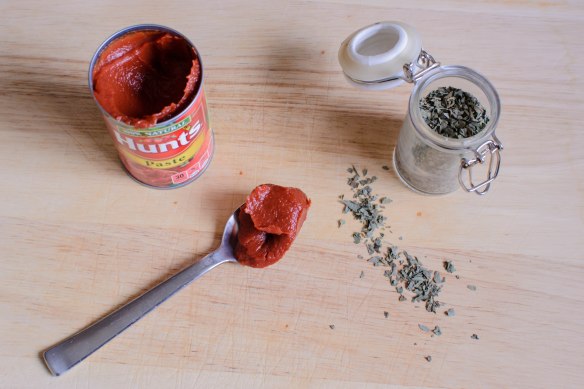 The challenge here was the streusel. There are a number of “copycat” recipes out there for Panera’s loaf, but few of them make any attempt at the dark, sweet, sticky crumble adorning the top crust. I finally found a suggestion for a glaze made from tomato paste and brown sugar, thinned with a little water, and brushed over the top of the loaf. Since my first attempt was a little heavy on the tomato paste in the dough itself, reserving some for the top seemed like a smart adjustment. It did look a bit distressingly like a meatloaf with the traditional ketchup coating when I first applied the glaze, but the flavor of the finished product was strikingly similar to my inspiration.

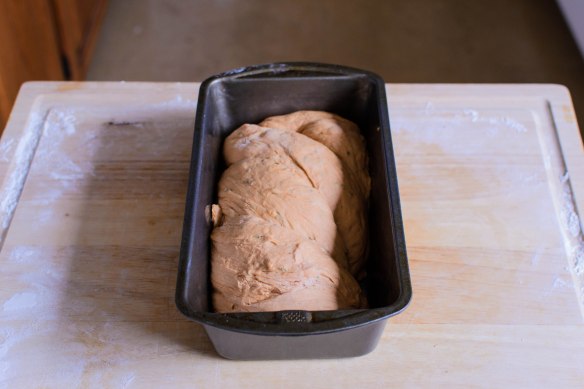 Panera’s loaf is scored straight down the center so that the top crust puffs and pulls away from itself in two fat rounds, leaving the top of a slice looking almost heart shaped. I decided I wanted to try something new, so I went for a twist instead, separating my dough into two sluggish, sticky logs and wrapping them around each other before depositing into a loaf pan.
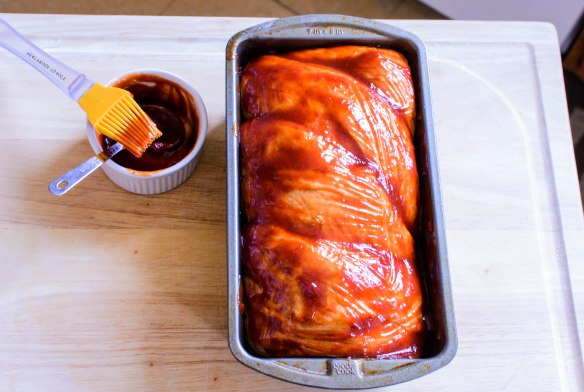 A second rise, a glaze, and a quick 40 minutes in the oven, and I was rewarded with a loaf that, despite not being truly red, may be as close to the original as I’ll ever get. The interior is tender and chewy and springy, and the glaze hardened into gleaming sticky shellac (though it loses its crustiness as it sits). The tomato and basil flavor are both easily discernible, and the combination of tomato paste and brown sugar burnishing the top crust is just the right toasty sweetness, since despite the molasses, the bread itself is fairly savory.
 Because the dough is pretty sticky, the loaf is moist and tender, which also means it’s a bit delicate. Take care when slicing into it, and be sure to give it at least half an hour to cool before attempting a slice at all. Conveniently, we found we liked the flavor better once the bread had cooled completely. As noted above, the glaze resorts to stickiness after a few hours, but it is still quite tasty, and will “crisp” up again just slightly after a trip through the toaster. Slicked with salted butter, it makes a perfect accompaniment to lesson-planning on a blustery afternoon.

#TwelveLoaves is a monthly bread baking party created by Lora from Cake Duchess and run with the help of Heather of All Roads Lead to the Kitchen, which runs smoothly with the help of our bakers.
This month we’ll be baking breads with a RED theme in honor of National Heart Month, Valentine’s Day, and the Oscars (red carpet) – any red ingredient goes! For more bread recipes, visit the #TwelveLoaves Pinterest board, or check out last month’s mouthwatering selection of #TwelveLoaves enter last month’s breads featuring a “new to you” type of flour!
If you’d like to bake along with us this month, share your “RED” themed bread using hashtag #TwelveLoaves!
Just a little teaser to whet your appetite for tomorrow’s Twelve Loaves post:
A fabled land of farmers, farm shares, fancy (and not so fancy) restaurants, family meals, food projects and more.
cooking my way through my dissertation, one egg at a time
Fearless cooking from a tiny NYC kitchen.
food, in so many words.
Recreating the famous dishes of famous writers. Part recipe blog, part historical discussion, entirely unabashed love of books.
Epicurean Adventures from Eugene, Oregon
Celebrating the Harvest
Modern Iranian aka Persian Food & Culture Blog - Cuisine, Recipes, Stories , Photos, Pictures, DIY tutorials
Exploring Culinary Traditions of Africa, African America and the African Diaspora
food, in so many words.
food, in so many words.
food, in so many words.
Food-Stories-Recipes-Love
WordPress.com is the best place for your personal blog or business site.
