Manhattan Beach Post’s Bacon Cheddar Biscuits (no recipe)

If you live near me, in the South Bay area of Los Angeles, I hope you have been to Manhattan Beach Post. Headed by Chef David LeFevre (notable a few years ago on food TV for falling one unfortunate battle short of being crowned the newest Iron Chef), it’s an upscale-but-casual spot near the beach, with inventive small plates designed to be shared. You and your dining partner order maybe 3 or 4 things, and they are served as they are ready, which means you might get your fish “main” before you get your pan fried spicy green beans, but that’s okay. It adds to the ability to play with flavor combinations as each new plate arrives at your table. Plus then you have more time to examine the cocktail list to see what to order next…

One of the highlights at MBP comes in the form of their bacon cheddar biscuits. Studded with chunks of cheese that ooze out into crisp, lacy patterns as they bake, they are served still steaming with a small pot of whipped, lightly salted maple butter. People order them by the dozens.

Since, given my penchant for wanting everything, MBP gets a little pricey for a weekly visit, the stretches in between those biscuits get to feeling long. I’m no amateur with biscuits myself, given that a quick word search on this very site turns up no less than eight successful variations and one small disaster, but MBP’s are achingly tender and flavorful and rich in ways mine fall slightly short of. They also have that inimitable quality of being made by someone else, which so often raises the deliciousness quotient a few notches.

I’d certainly be willing, though, given their place in my taste memories, to make them myself, so you can imagine my delight when a week or so ago I found this recipe for the very thing. Naturally this went immediately to the top of my “to make” list, only to be foiled by a series of “there’s no way we’re turning on the oven, nope, not a chance” days in a row.

But a week after the initial find, we had a cooler afternoon, and I collected myself, halved the recipe, and produced a tray of tender, lightly browned blobs oozing with cheese that we gobbled up alongside a salad to pretend we were being responsible. And then three days later we made them for breakfast, sans chives, cheddar, and bacon, splitting them gently and spreading them thickly with maple butter. And I have to say, both times they were just perfect: light, fluffy, tangy from buttermilk, just barely edging toward sweet and salty, and something I’d always be happy to have a half dozen of in the freezer, just for spur-of-the-moment biscuit cravings (what, you don’t have those?).


A few notes: I subbed out bacon for pancetta in my savory version because, for a weeknight, I couldn’t pass up the convenience factor of the pre-cubed packet I had only to shake into a frying pan. The dough itself, if you can call it that, just barely holds together, but try to resist the urge to add more liquid, which turns it into a sticky mess almost immediately. As with scones and other such beasties, the key is to mix and knead as little as possible to preserve tenderness; I didn’t even mess with my rolling pin, but just patted the mess into something like a rectangle with lightly floured hands, then sliced the whole thing into squares with a knife instead of bothering with a biscuit cutter. And don’t pass up the brush of butter and sea salt on the top (LeFevre calls for clarified butter; I just used my regular unsalted, melting a little in the warmth of the preheating oven). It promotes browning nicely and offers a little extra decadence, and the crunchy flakes of sea salt are a delight.

Roasted Apple and Onion Biscuits

I think it’s like this every year. I’m sure I’ve said that before. The first week of the semester goes by and I think “well, that was fun,” and then I think “oh, I have to do that fifteen times more in a row!” The second week goes by, and I’m exhausted, but grateful for the bonus day Labor Day provided.

Then week 3 hits. The add period is over, so my classes stabilize and become the “real” group that will soldier through the semester with me. The serious assignments begin. The bedtime and alarm start to feel like normal and not like torture.

But the work. At this point, yes, classes have stabilized, but in almost all cases they are still at their enrollment caps, which means the first paper I collect comes in a dose of sixty. And even when you parse that out in stacks of ten, boy does it feel like a lot. By the time the weekend following week 3 hits, I need comfort food.

Fortunately, our weather has cooled into something that feels surprisingly like fall. Mid September is usually stifling, but we are descending into temperatures in which it’s not suicidal to have the oven on for a half hour or so. When I saw that windfall on our weather forecast, I thought of biscuits.

I realize, of course, that there is no shortage of biscuit recipes here, and if I’m quite honest with you, almost every one has the same base. The magic, though, is in what extra flavoring agents you add. This time around, the fall combination of apples and onions hit me hard. I’ve done this before, in a meatball that was really just an excuse to eat more breakfast sausage, but in biscuits I wanted less tartness, less crisp-tender bite, and just melting sweetness with a touch of roasted flavor. Green apple and red onion get roasted in chunks for a half hour before they are tossed with the dry ingredients, then blended in with butter and buttermilk or soured cream. Roll, fold, and punch out rounds from the wet dough, and you are only fifteen minutes from hot, flaky biscuits.

As we chatted during our weekly viewing of Project Runway, my friend T. and I speculated additions to these biscuits. You could add plenty of black pepper, or amp up the savory with herbs: sage is quintessentially autumnal, and thyme also goes well with apple and onion. Where our minds went immediately, though, was blue cheese. Think about it: crumbles in the mix leaking out during baking to form little lacy puddles around the edges of the finished biscuit. Or, if you don’t want more busyness in the biscuit itself, T. suggested blue cheese butter to spread in the center.

These are not doctored, though, any further than the original pairing, and honestly, they don’t need to be. Even the tartest apple, as were the two tiny granny smiths I cubed up, mellows as it cooks, playing with and enhancing the sweetness of the onion. You could have them as we did: the “bread” of a breakfast-y sandwich (I mixed bulk sausage with maple syrup, red pepper flakes, and a squeeze of Dijon before frying in patties to put in the center), but I bet, especially if we are thinking seasonally, that they would be perfect cut a little smaller and swaddled in a basket to be served alongside a Thanksgiving turkey.

Roasted Apple and Onion Biscuits
About 60 minutes, including cooling time
Makes 14-15 2½ inch biscuits
2 small or 1 large tart green apple (I like granny smith), skin on, cut into small cubes
½ large red onion, skin, root, and stem ends removed, cut into large chunks
2 tablespoons olive oil
¼ teaspoon salt
¼ teaspoon pepper
2 cups all-purpose flour + more for sprinkling on your board
2 teaspoons sugar
1 teaspoon salt
2 tablespoons baking powder
6 tablespoons cold butter, cut into chunks
6 ounces buttermilk, or whole milk or cream soured with about a tablespoon of vinegar


  • Preheat the oven to 400F. On a baking tray lined with aluminum foil, toss the apple and onion chunks with the olive oil, the ¼ teaspoon salt, and the pepper. Roast for 15 minutes, toss gently with a spatula, then roast another 15 minutes, until just a few edges are taking on a toasty brown color. Remove from the oven and set aside to cool.
  • While the apples and onions cool, combine the flour, sugar, 1 teaspoon salt, and baking powder in a medium bowl. I like to use a whisk for this to keep it all light and well mixed.
  • Add in the cooled apple and onion pieces and toss to ensure they are well coated with flour – this will help them stay evenly distributed in the biscuits rather than sinking to the bottom. Dump in the cubes of cold butter and use a pastry blender or your fingers to work the fat into the flour mixture. You are looking for butter bits the size of small peas.
  • Pour in the buttermilk or soured cream and use a fork or your fingers to mix it through the flour and butter mixture and bring the whole thing together into a shaggy, soft ball of dough (if it seems too dry and is not coming together, just set it aside for a minute or three – this will give the flour time to absorb the wet ingredients a bit more).
  • Turn the dough out onto a well floured board, sprinkle some more flour on top, and knead with your hands two or three times just to catch any loose bits. With a rolling pin or your hands, press or roll the dough into a rough rectangular shape about ½ an inch thick. Fold the dough into thirds, then roll out again. Repeat, again folding the dough into thirds and then rolling it out; this creates more flaky layers. If the dough sticks to your board, use the flat blade of a butter knife or a pastry scraper to help you lift it free. This is a fairly wet dough, so you’ll need to be stern with it, and you may need to sprinkle on more flour as you go.
  • After you’ve rolled and folded, rolled and folded (so you’ll have done a total of six folds), roll out once more, this time to a thickness of 1 inch, and use a 2½-inch round cutter (or the floured lip of a glass) to punch out biscuits. Push the cutter straight down through the dough; don’t twist until you are all the way through to the board, or you’ll crush the flaky layers! Repeat until you can’t punch out any more rounds. Re-roll the dough scraps (no need to fold again unless you want to) and repeat – with a 2½-inch cutter, you should be able to make14-15 biscuits around an inch in thickness.
  • Replace the aluminum foil sheet on your baking tray with parchment paper, and arrange the biscuits on it, evenly spaced. I like to do about 8 at a time, but they don’t spread much, so you can crowd them a little. Bake 15 minutes (still at 400F), until they are puffed and the tops are golden and slightly dry. These won’t climb sky high because the apples and onions are wet and add extra weight, but they will still rise a bit.
  • Let cool for a minute or two, then serve warm (see suggestions above for accompaniments).

Ranch Biscuits

We are still awash in boxes (and the desktop computer that I use for photo editing is still sitting in a closet, so these are straight from the camera shots) in this new house that is our house (our house! That is ours! No more landlord! I’m just a little bit excited about this…), but it is starting to feel like home. This “like home” is a different kind of “like home” feeling, though – unlike any I’ve felt thus far in my adult life. Previously, “home” meant “a place I will live for a few years.” It meant “this space I occupy but will, at some point, move on from.” While there is certainly the possibility that at some point, some day, we will dislodge ourselves from this house, it won’t be for a while. This is a place to actually do all those “maybe someday” things we’ve put off: lining drawers. Acquiring “grown-up” bookshelves (read: shelves that actually cost more than $30 or so). Planning and planting a vegetable garden. Finally framing those diplomas. And as anxious and antsy as I am to have it “finished,” we don’t have to do those things immediately, because we’re going to live in this lovely, quirky little house for a long time.

None of that is a beautiful transition into these biscuits, though don’t they look nice against that backsplash? (I promise I’ll stop talking about the backsplash soon.) They’ve been hanging out at the back of my consciousness for a while now, poking at me, and now that it’s grilling season and all I want to do is sit out back with a very cold drink and watch N. manhandle well marinated beef on the grill, I thought these would make a nice accompaniment to anything barbecue related. The flavors of ranch dressing in a sky-high biscuit make sense. I mean, they already share buttermilk in common, and herbs like dill and chives are a lovely way of perking up your average biscuit and making it more interesting. The kick of garlic, of onion powder, and of a little dry mustard could do nothing but improve the whole situation.

Aided by my adaptation of Ruhlman’s folding and turning method for biscuits with well-puffed layers, these inflated gorgeously in the oven and found their way in multiples to our plates (the first set we tore through were still so warm it was hard to discern the individual flavors). We inhaled the batch in a day and a half, and while they were delicious – herby and kicky and tangy from the buttermilk – we realized while devouring our second helping that we weren’t sure precisely how closely their flavors mimicked ranch dressing, since it had been so long since either of us had tasted that childhood standby.

So here’s my thought for you, as the fourth of July, that ultimate of grill-based holidays, approaches: if you try these, as a side for your ribs or a mop for your baked beans or an ever-so-tolerant napkin for the drips of melted butter coursing from your corn (oh, or maybe even as a sandwich base for the leftovers, with a slick of mayonnaise on both split sides to add that final missing ranch-y ingredient), will you let me know, friends, if they remind you of ranch dressing?

Ranch Biscuits
Makes 9-10 3-inch biscuits
30-40 minutes
2 cups all-purpose flour
1 teaspoon sugar (I like turbinado, but any granulated sugar will do)
1 teaspoon salt
2 tablespoons baking powder
1 teaspoon onion powder
1 teaspoon dry mustard
¼ teaspoon paprika
¼ teaspoon ground black pepper
2 tablespoons finely chopped dill
2 tablespoons finely chopped chives
2 tablespoons finely chopped parsley
2 garlic cloves, finely minced
6 tablespoons cold butter, cut into chunks
6 ounces cold buttermilk (about ¾ cup)


  • Preheat your oven to 400F and line a baking sheet with parchment paper. In a medium bowl, whisk together the flour, sugar, salt, baking powder, onion powder, dry mustard, paprika, and black pepper. Add the finely chopped herbs and the garlic and whisk well to ensure even distribution (these wetter ingredients will want to clump together).
  • Plop in the cubes of cold butter and use a pastry cutter or your fingers to work the fat into the flour mixture. You are looking for butter bits the size of small peas. Pour in the buttermilk and use a fork or your fingers to mix it through the flour and butter mixture and bring the whole thing together into a shaggy, soft ball of dough (if it seems too dry and is not coming together, just set it aside for a minute or three – this will give the flour time to absorb the buttermilk a bit more).
  • Turn the dough out onto a well floured board, sprinkle some more flour on top, and knead with your hands two or three times just to catch any loose bits. With a rolling pin or your hands, press or roll the dough into a rough rectangular shape about ½ an inch thick. Fold the dough into thirds, then roll out again. Repeat, again folding the dough into thirds and then rolling it out; this creates more flaky layers. If the dough sticks to your board, use the flat blade of a butter knife or a pastry scraper to help you lift it free.
  • After you’ve rolled and folded, rolled and folded (so you’ll have done a total of six folds), roll out once more, this time to a thickness of 1 inch, and use a 3-inch round cutter (or the lip of a glass) to punch out biscuits. Push the cutter straight down through the dough; don’t twist until you are all the way through to the board, or you’ll crush the flaky layers! Repeat, placing the biscuit rounds on your parchment lined baking sheet, until you can’t punch out any more rounds. Re-roll the dough scraps (no need to fold again unless you want to) and repeat – with a 3-inch cutter, you should be able to make 9-10 biscuits about 1 inch thick.
  • Arrange the biscuits, evenly spaced, on the parchment lined baking sheet and bake for 18-20 minutes, until they are well puffed and the tops are pale golden and slightly dry.
  • Let cool for just a minute or two, then wrap up in a basket or stack on a tray, and watch them disappear.

Apricot Goat Cheese Biscuits

2016 Food Blog May-0756One of my first big Sandra Lee-type triumphs in the kitchen was with biscuits. At the time, I was using Bisquick, and after a number of successful productions, I decided there was no reason I shouldn’t make the fluffy little drop biscuits more interesting by adding herbs, or green onions, or cheese, and then that my creations would probably be better with buttermilk rather than skim milk, and then at some point, with contributions from Mark Bittman and Michael Ruhlman, the Bisquick box disappeared altogether and the biscuits got fluffier, and higher, and packed densely with all kinds of interesting additions.

2016 Food Blog May-07262016 Food Blog May-0728There are probably enough biscuit recipes on this site – adding another seems superfluous. But they are so tasty, and so comforting, and so simple, and they accept additions that drive them into the realms of sweet or savory so well, that they keep popping up on my list of food ideas. This time, with half a bag of dried apricots in my pantry and a partial log of goat cheese in my fridge, there were no excuses for a special weekend breakfast.

2016 Food Blog May-07332016 Food Blog May-07362016 Food Blog May-07382016 Food Blog May-0743Biscuits are a comforting baked item because they are easy. No yeast, so no long rise times or careful shaping or temperature concerns. No special flours or long ingredient list, and you don’t even have to have actual buttermilk to make buttermilk biscuits; you can just add a tablespoon of vinegar or lemon juice to regular milk, stir it up, and let it sit for two minutes, and you suddenly have perfectly serviceable “buttermilk” to work with. Mine are complicated just a tiny bit by a lazy-person’s adaptation of Michael Ruhlman’s method for lots of moist, fluffy layers, much like those beautifully sodden pillows from the can that you have to rap on the edge of the counter – you know what I mean – but this only entails a few extra folds and rolls of the dough before punching or cutting out your biscuit shapes.

2016 Food Blog May-07482016 Food Blog May-07532016 Food Blog May-0750Most magical of all, biscuits survive freezing spectacularly. Once mixed and rolled and cut, you can stow them in the freezer overnight, which means hot, fresh, flaky biscuits for breakfast can be yours in just over twenty labor-free minutes – time easily used to start the coffee, or find your slippers, or get some Lou Reed going to groove breakfast to.

2016 Food Blog May-0761

Apricot and Goat Cheese Biscuits
Makes 10-12 biscuits (2-3 inch diameter)
2 cups all-purpose flour
1 teaspoon salt
1 tablespoon raw sugar (I use turbinado)
2 tablespoons baking powder
¾ cup chopped dried apricots (chop to your desired size – I like a mix of rough and fine)
6 tablespoons cold butter, cut into chunks
½ cup crumbled goat cheese
6 ounces cold buttermilk (or faux buttermilk: stir one tablespoon white vinegar or lemon juice into the milk and let it sit for 2 minutes before using)


  • Line a baking tray with parchment paper. If you are cooking the biscuits immediately, preheat the oven to 400F. If you are cooking the biscuits the next day, clear some space in your freezer.
  • In a medium bowl, whisk together the flour, salt, sugar, baking powder, and dried apricots until well combined. Tumble in the butter and the goat cheese and, with a pastry blender, a fork, or two knives (I’ve never mastered this method, though), work in the chunks until well distributed in small pebbly bits throughout the mixture.
  • Now, pour in the buttermilk and, using a fork, turn and mix and work until a clumpy, wet dough forms. Dump this out onto a well-floured board and, with lightly floured hands, work it into a ball.
  • Use your hands or a floured rolling pin to flatten the dough ball you’ve formed into a rectangle or oval about 1 inch thick. Then, fold up the flattened shape into thirds, turn it 90 degrees, and flatten again. Repeat this process of folding, turning, and flattening twice more. When the biscuits bake, they will rise high with lots of fluffy layers.
  • With your folded and flattened dough back at about 1 inch thick, punch out biscuit rounds by pushing a biscuit cutter or the lip of a glass straight down through the dough. Don’t twist! Twisting disrupts all the layers you’ve just made and the biscuits won’t rise as high or as evenly.
  • When you have punched out all the biscuits you can, gather the dough back together into a ball, knead gently once or twice, and then flatten out again and punch remaining biscuits. You should be able to get 10-12 out of this amount, depending on the diameter of your cutting tool.
  • Space your punched-out biscuits at least half an inch apart on your prepared baking sheet. If you are baking immediately, place the loaded tray into your preheated oven and bake for 12-14 minutes, until the biscuits are just golden on top. If you are waiting, shove the tray straight into your freezer. The next morning (or whenever you need freshly baked biscuits), remove the tray from the freezer, preheat the oven to 400F, and bake for 18-20 minutes. There’s no need to defrost first – the extra time in the oven will do the job.
  • Either way, serve steaming. We like ours with butter and honey.

Los Feliz Biscuits and Gravy: poblano and white cheddar biscuits with chorizo gravy

Food blog July 2015-1117According to adage, breakfast is “the most important meal of the day,” and while the heavy, sweet or savory, sometimes grease-laden offerings that make up a truly excellent breakfast are some of my favorite meal options out there, if I eat them first thing in the morning I’m going to feel ill. Give me a bowl of bran flakes or a slice or two of toast in the morning, then move to the eggs, the bacon, the biscuits, the sausage, the waffles, as the day eases on. That’s why I get so excited, and wax eloquent so often here, about breakfast-for-dinner.

Food blog July 2015-1100But for a 30-something living in an urban area like Los Angeles, breakfast food of this ilk means something else: brunch. Food that is fatty and greasy in the best possible way washed down with a mimosa or three to compensate for the previous night’s revelry – this is the true calling of a large plate of breakfast meats, scrambles, and toasted, syrup-bearing stacks. And here, at least, walking into a restaurant for brunch entails working your way through a crowd of plaid and maxi skirts, tilted fedoras, gladiator sandals, and the occasional waxed mustache. So, you know, hipsters.

Food blog July 2015-1104A few months ago, N. and I wandered through a little enclave called Los Feliz just south of Griffith Park after a failed attempt to visit Griffith Observatory (on a temperate weekend, with clear skies, there’s zero chance of finding parking there more than half an hour after it opens. What fools, we). On our way to a local bookshop, we ran into one of his coworkers and her wife having brunch, and it suddenly seemed like exactly the right thing to do. We unofficially added “eat brunch at every restaurant in Los Feliz” to our LA-to-do list.

Food blog July 2015-1109Brunch in Los Feliz – like many places east of Hollywood as highway 101 cuts south toward downtown – means hipster paradise with a heavy dose of East LA flavor: huevos rancheros, chilaquiles, chorizo folded into a thick, fluffy omelet. The Mexican and Latin influence on that side of the city makes for a glorious contribution to any brunch (or, as my sister put it, a meal that is perfect for “a Sunday at 11AM or any night at 8PM or later”).

Food blog July 2015-1106
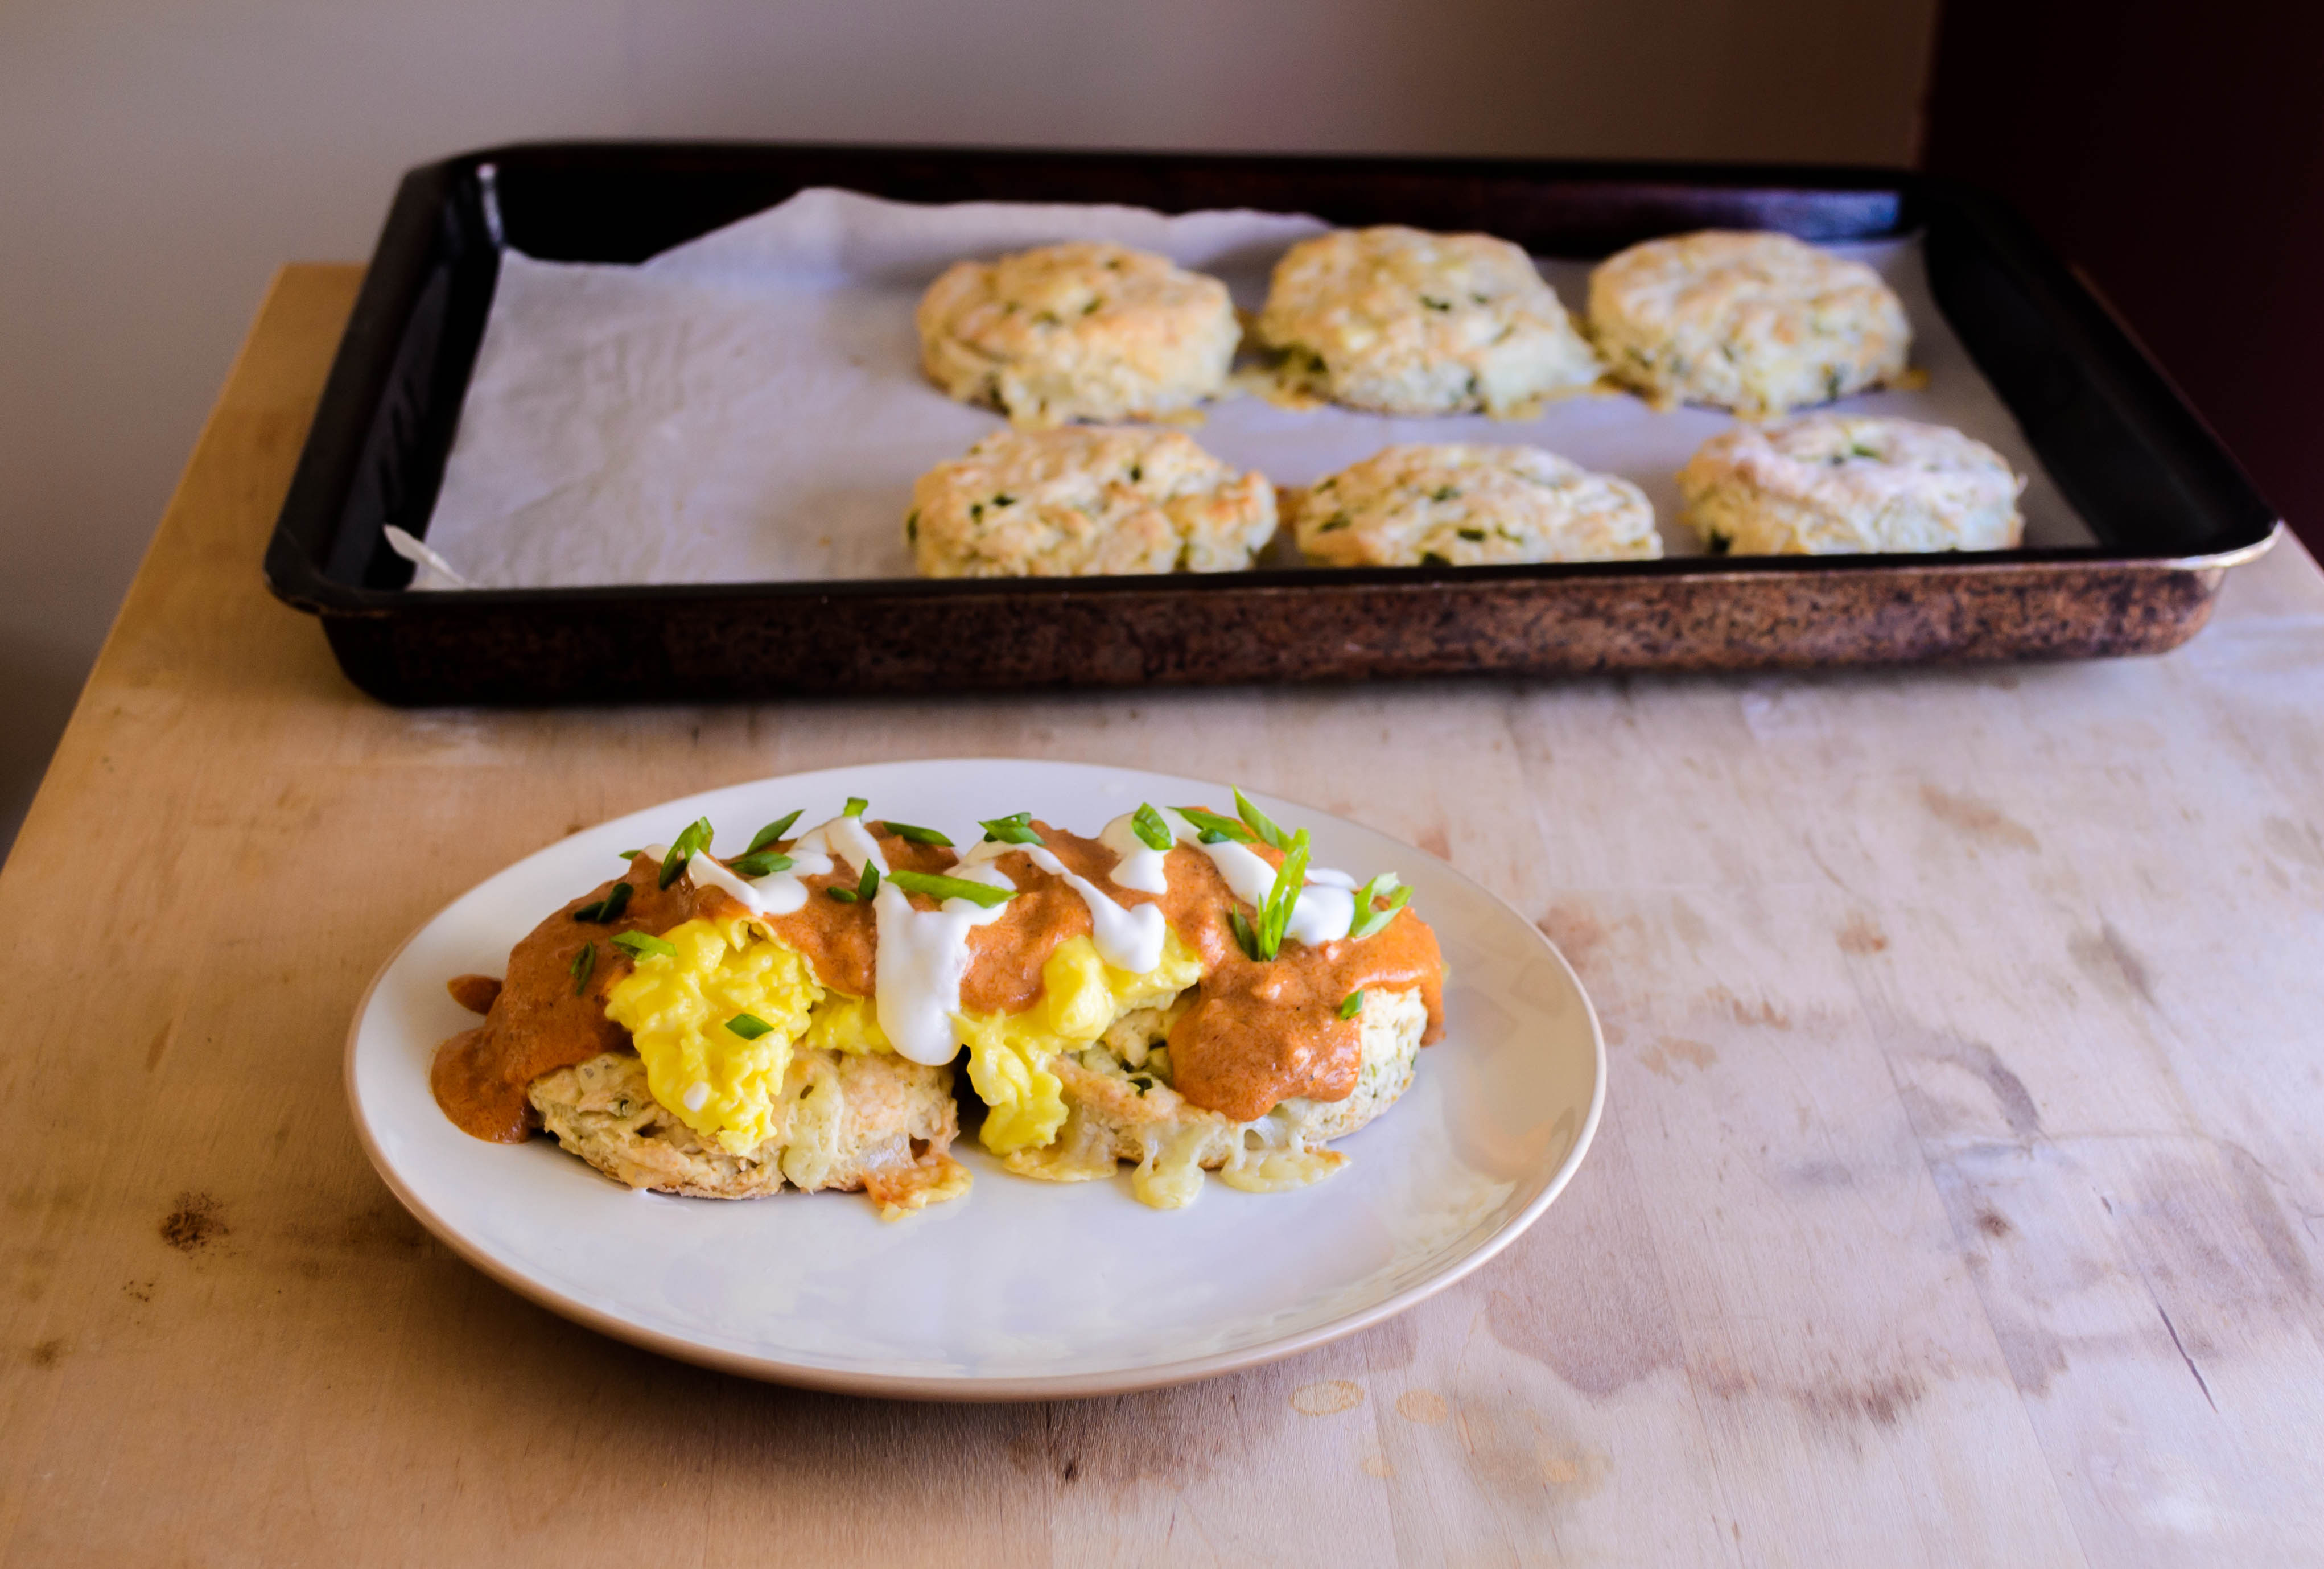
Our first entrée (haha) into the Los Feliz brunch scene was late on a Sunday morning, seated outside, as you always should be, so you can watch the show walk past: rompers and sundresses, stilettos surely too high and too spiky for church, bowties and converse all-stars worn un-ironically on the same person. Some passersby are accompanied by their pit bulls and chihuahuas, who often sport their own wardrobes, and pause to jangle their collars against the metal water bowls left outside for them by many of the businesses along the main drag. But once our food came, I don’t think we noticed another single pedestrian. N. had huevos rancheros, and we agreed they were a good representation – the black beans were meaty and savory and well-seasoned, and the fresh salsa was good – but my dish was the real star: poblano and white cheddar biscuits with scrambled eggs and a chorizo gravy. Flaky, cheesy mounds draped in a bright orange, lightly spicy sauce that, even though we’d promised to share, made me reluctant to relinquish my plate. Think classic biscuits and sausage gravy, but with neighborhood flavor.

Food blog July 2015-1107
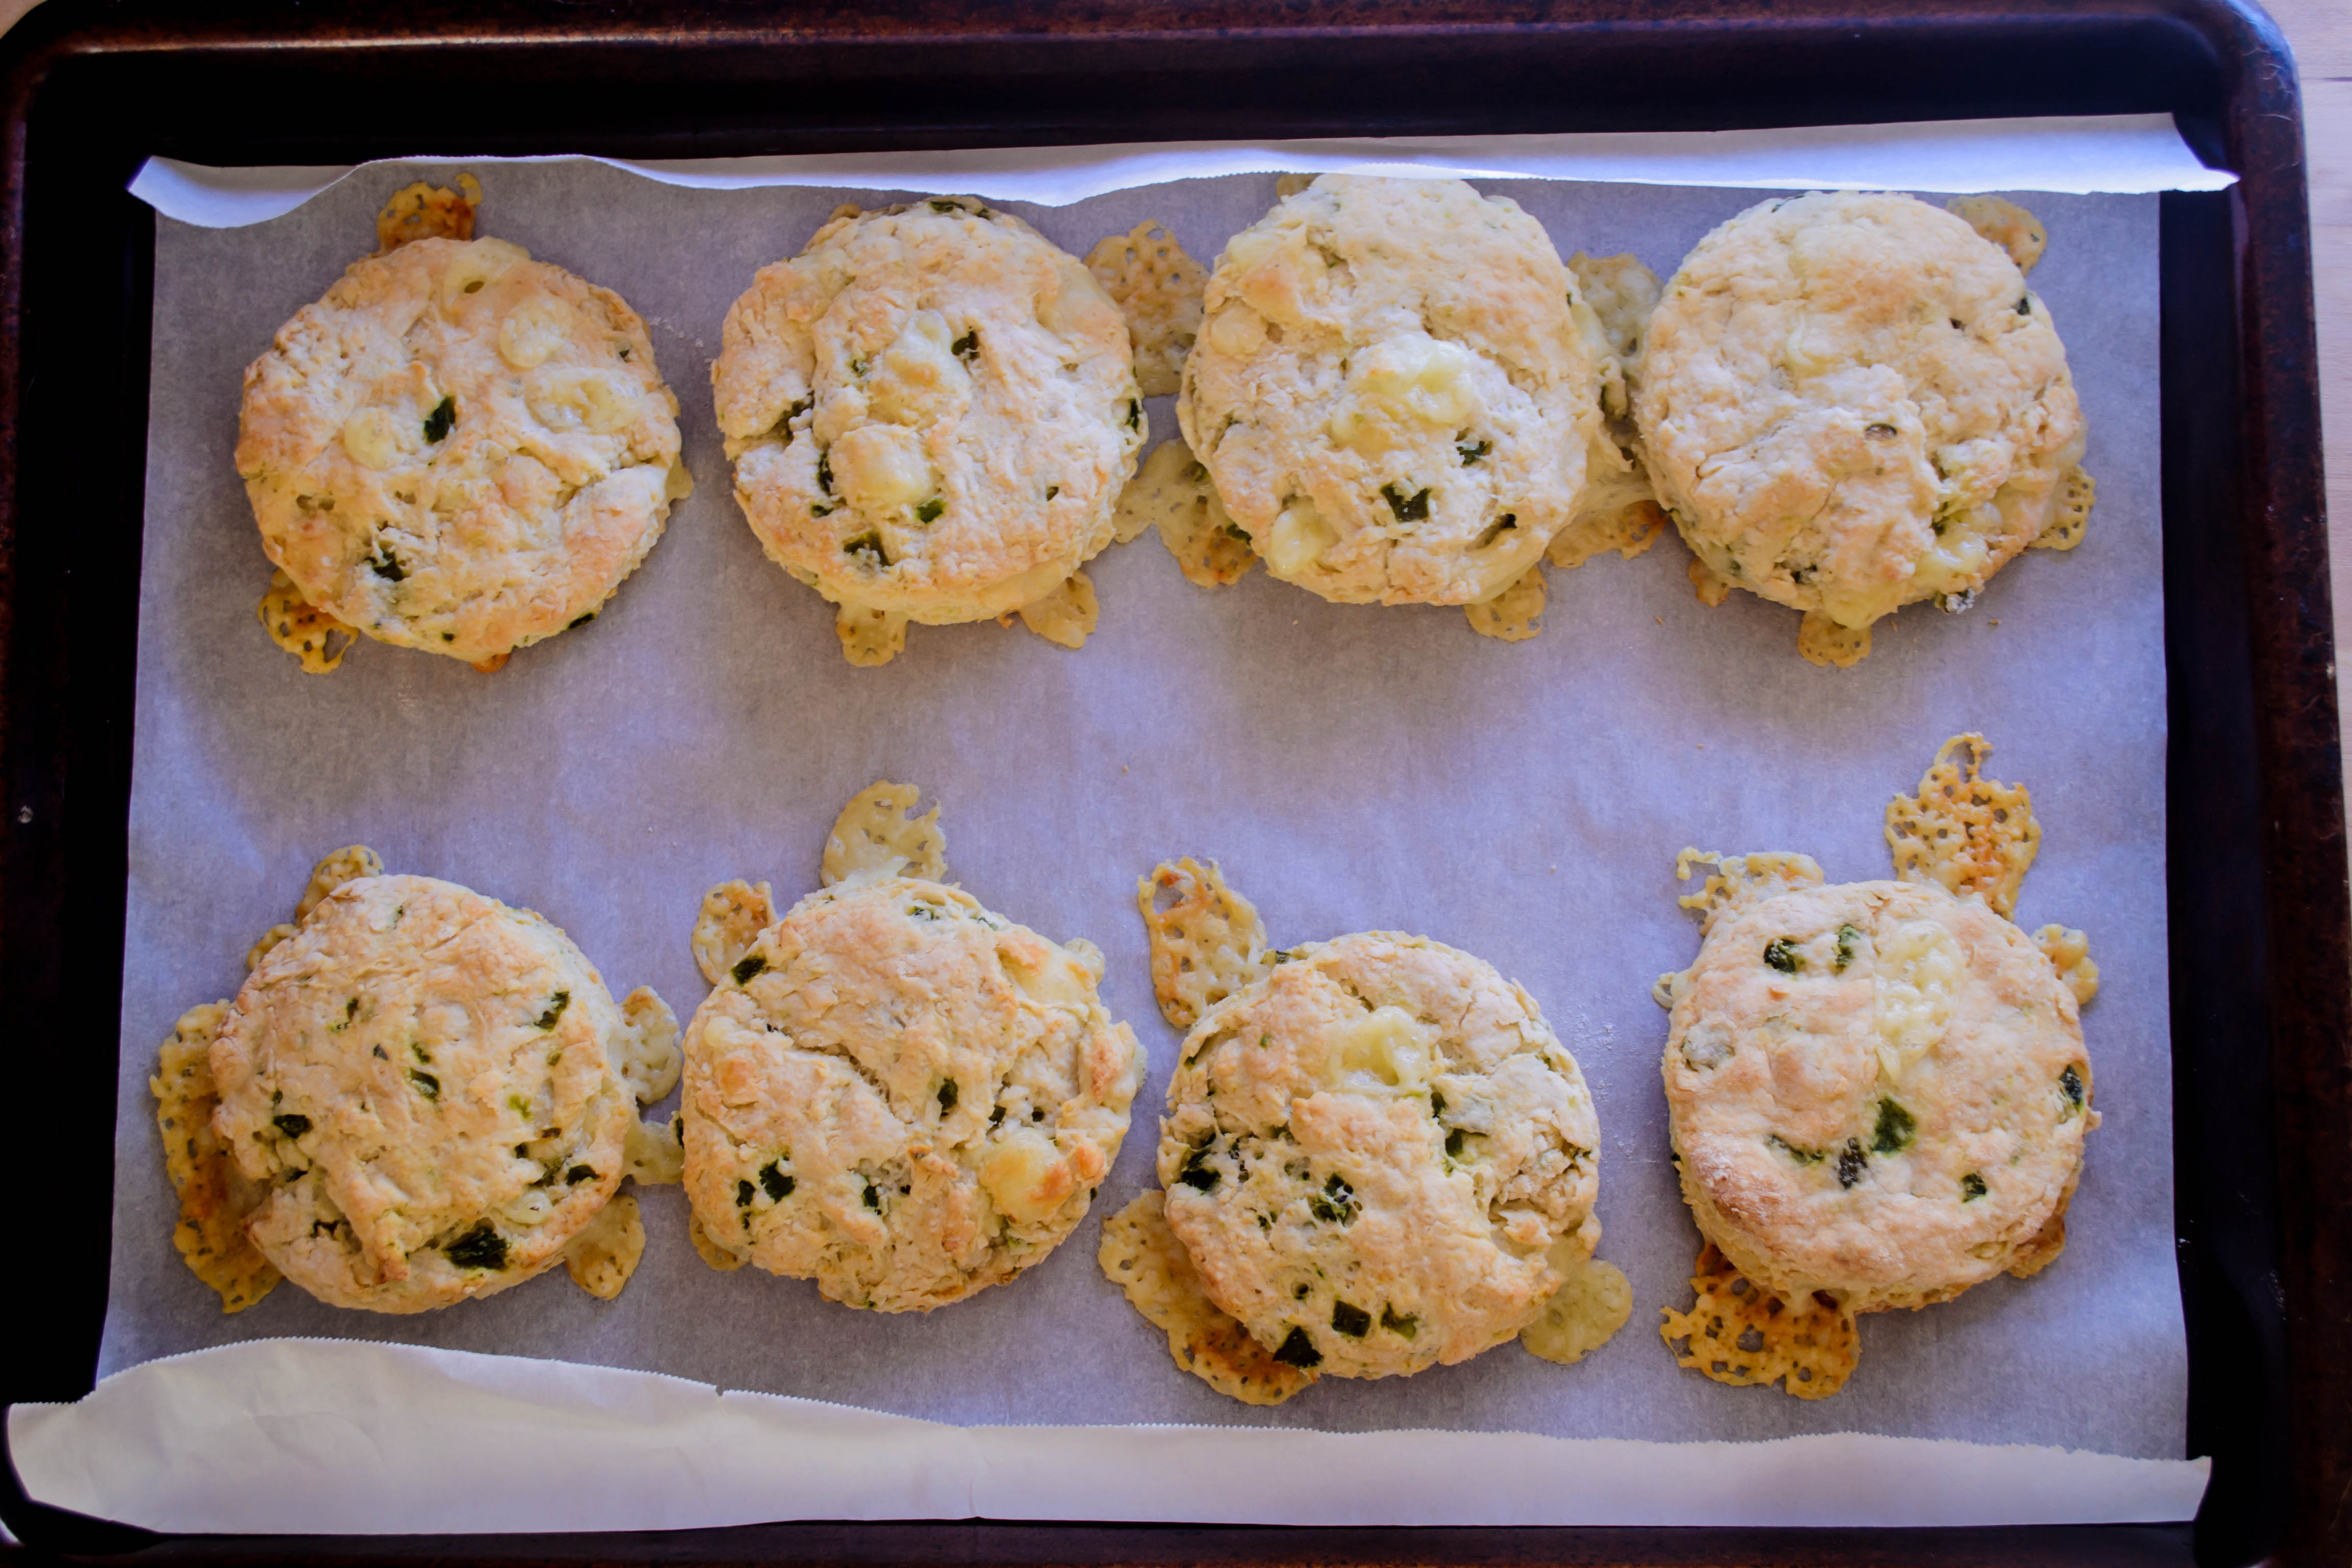
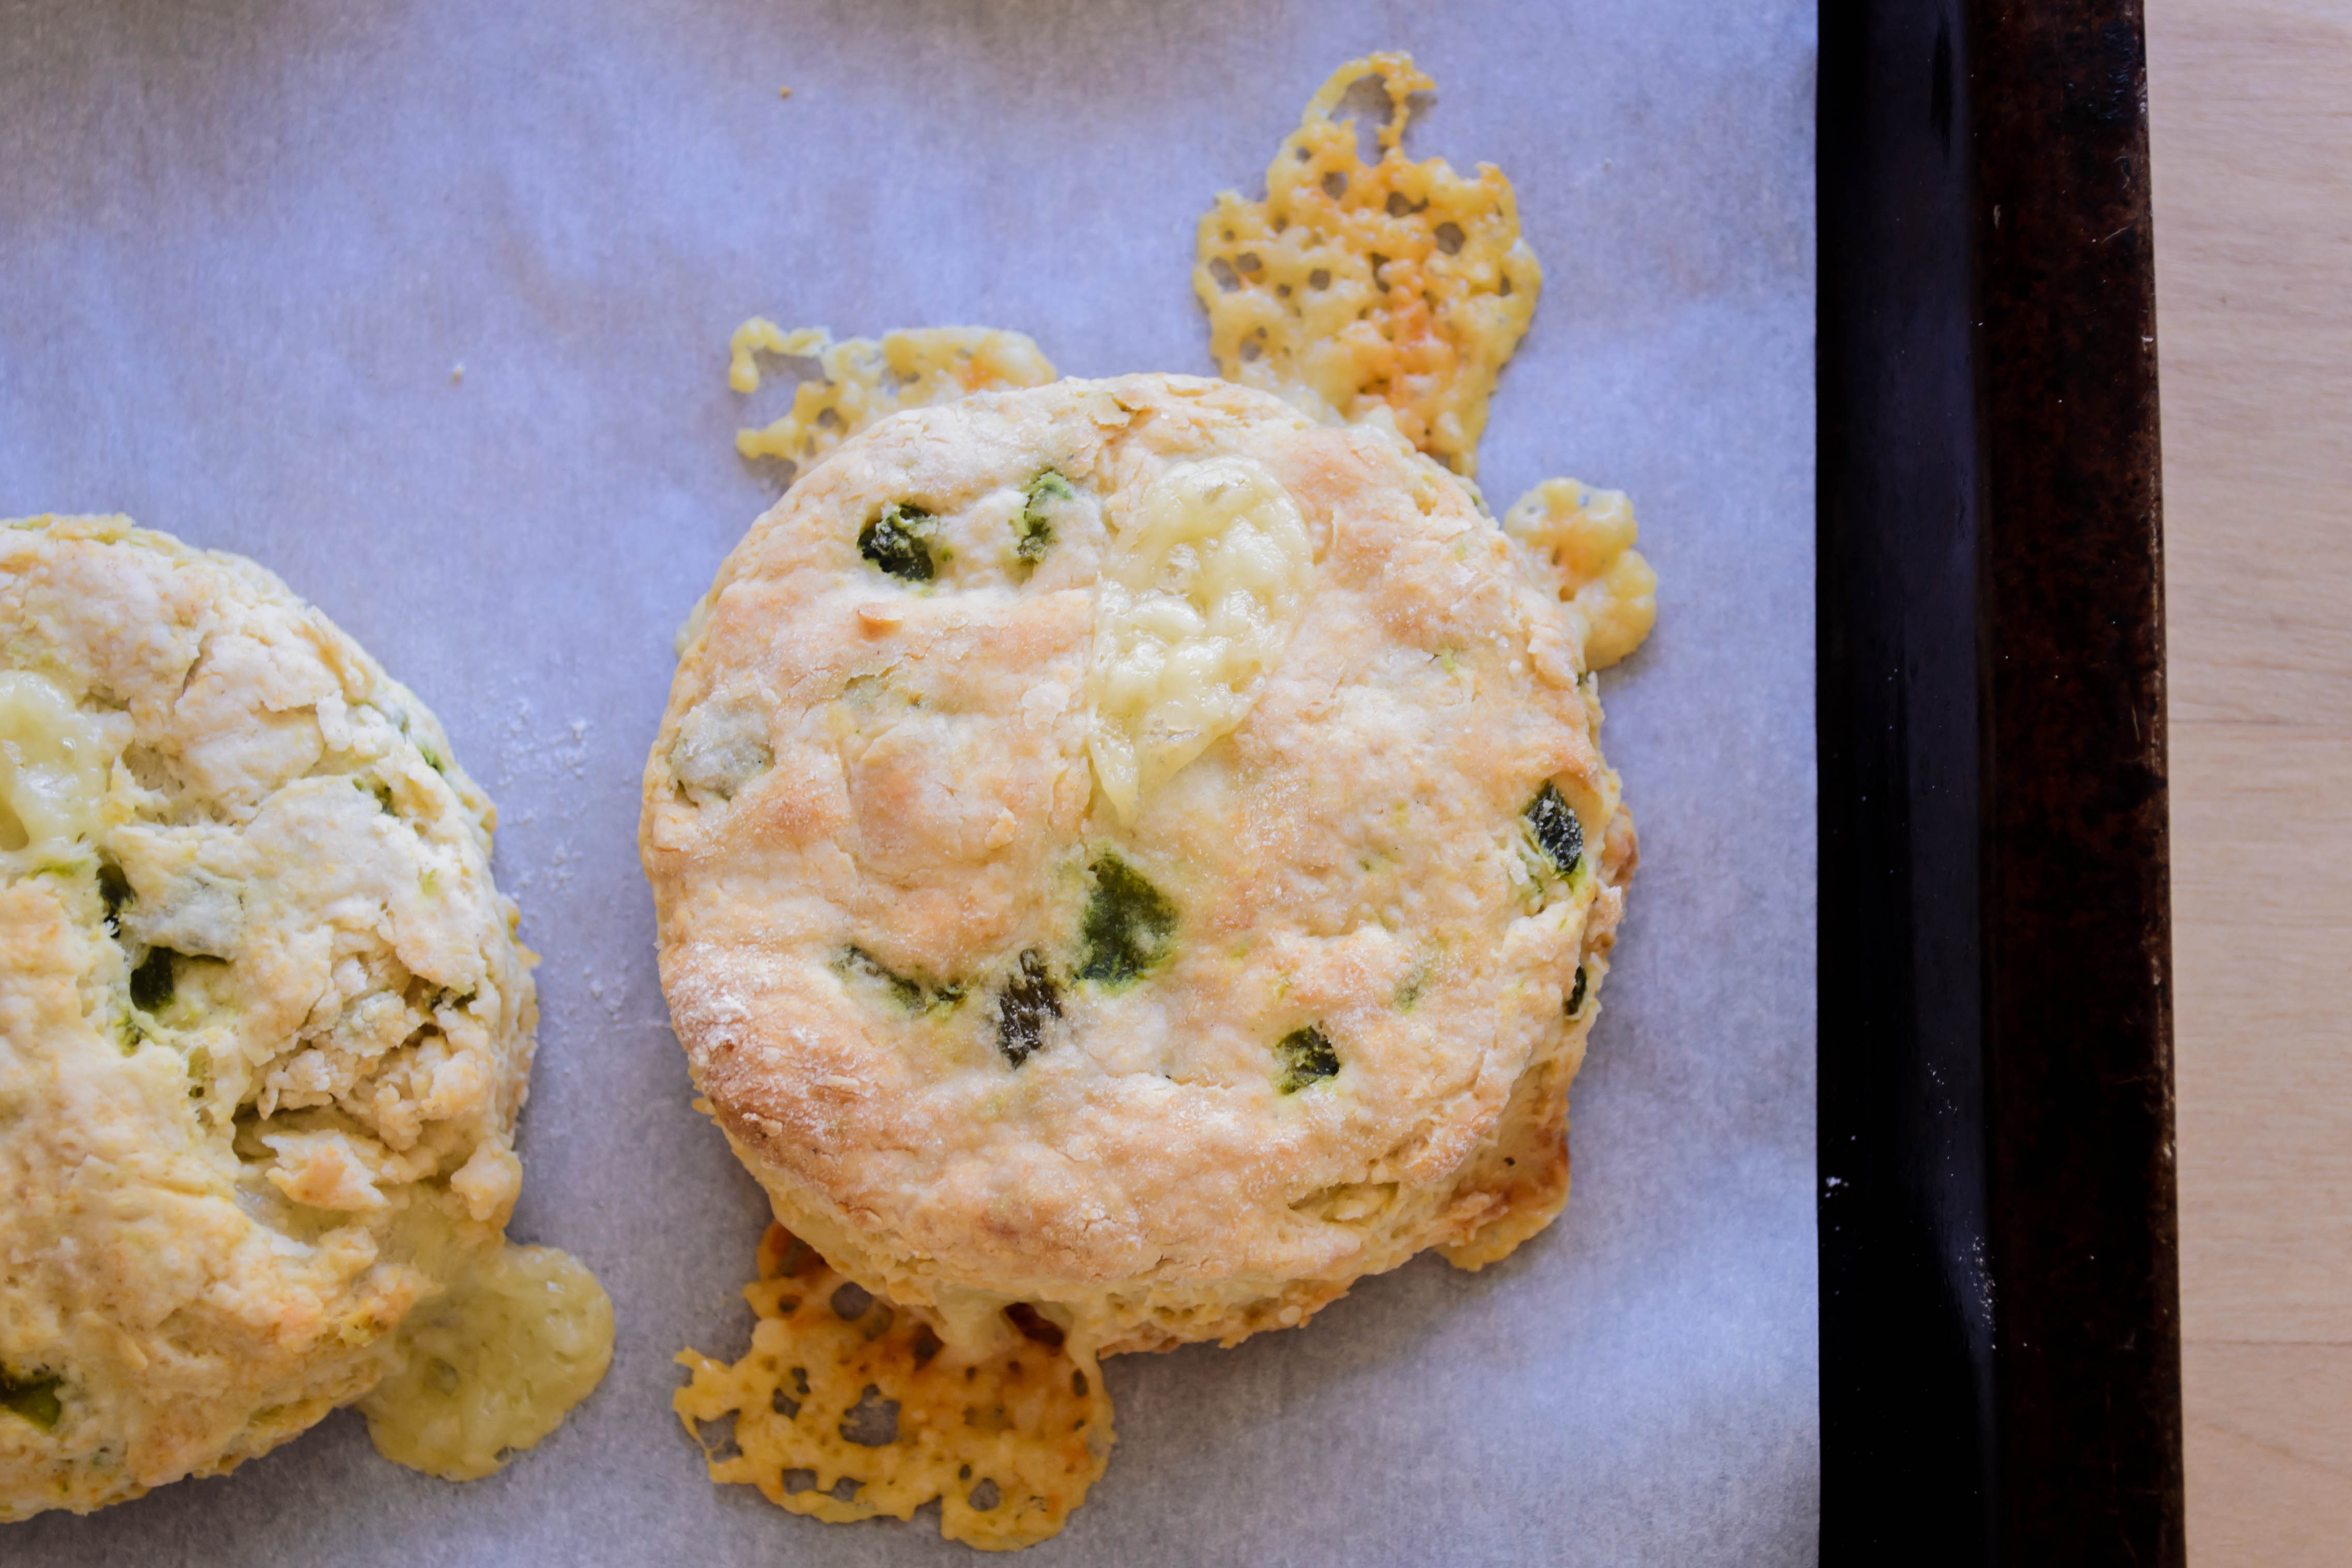
A dish like that only means one thing: restaurant recreation. Even as we asked for the check, I was already considering how I would make this at home. I wanted cheesier biscuits, more roasted poblano, and a stronger chorizo presence in the gravy. This resulted, in my version, in a gravy stronger in flavor but a bit less rich, and biscuits to rejoice over – flaky, crisp and golden on top, aggressively cheese-laden with obvious hits of smoky poblano inside. Plus, once punched out the biscuits freeze perfectly, so it makes sense to bake just what you need and save the rest for another lazy morning. It’s a brunch (or lunch, or dinner) option that will remain permanently on our rotation.

Food blog July 2015-1112Brunch in Los Feliz was, then, a successful voyage in many ways, and clearly our real challenge will not be exploring the area for its brunch options, but convincing ourselves to order something different every time, because once you’ve found an option as fulfilling as this, trying something new is a gamble I’m sometimes unwilling to take.

Food blog July 2015-1113Serving suggestions: because the restaurant’s offering was pretty perfect as it was, I copied their addition of scrambled eggs between the biscuit and the gravy, but the eggs are really just an extra luxury. You could also easily pair this with a pile of crispy hash browns or homefried potatoes, which would be an excellent match for the gravy. Though I don’t have much experience with soy-based sausages, a good soyrizo or chipotle field roast sausage would likely make an excellent vegetarian sub for the chorizo, if you want to go meatless. You might have to add a little extra fat to the pan, though, when you cook them.

Food blog July 2015-1114This dish is best, of course, the first day. The biscuits are never as crunchy and warm after that, and the gravy does tend to do that thing gravy does where it gets thicker but also separates overnight in the fridge. But I think, with four diners round the table and ten biscuits to share between you, the last drippings of gravy won’t be long for this world.

Food blog July 2015-1124

Los Feliz biscuits and gravy
Serves 4
For biscuits:
1 poblano pepper (¼ – ⅓ cup, when chopped)
2 cups all-purpose flour
2 teaspoons sugar
1 teaspoon salt
2 tablespoons baking powder
6 tablespoons cold butter, cut into chunks
6 ounces buttermilk (about ¾ cup)
1 cup extra sharp white cheddar cheese, grated or in small cubes
For chorizo gravy:
9 ounces chorizo
2 tablespoons flour
2 cups whole milk, warm or at room temperature
salt and pepper to taste (depends on your chorizo – mine didn’t need any)
To serve:
softly scrambled eggs: 2 per person
2 tablespoons sour cream
1-2 teaspoons milk or cream
1-2 tablespoons thinly sliced chives or green onions, dark green part only


  • Roast poblano pepper over a grill or gas flame – about 10 minutes, turning when needed – until the skin is almost entirely blistered and black. Place in a glass bowl, cover tightly with plastic wrap, and let it steam for 20 minutes to loosen the skin and soften the flesh. After 20 minutes, remove the pepper from the bowl and use a paper towel, knife blade, or your hands to scrape off the skin (some illustrative photos here, if you need them). Remove stem and seeds as well, then dice finely for ¼ – ⅓ cup of roasted pepper bits. The pepper pieces should be room temperature when added to biscuit dough – plan accordingly.
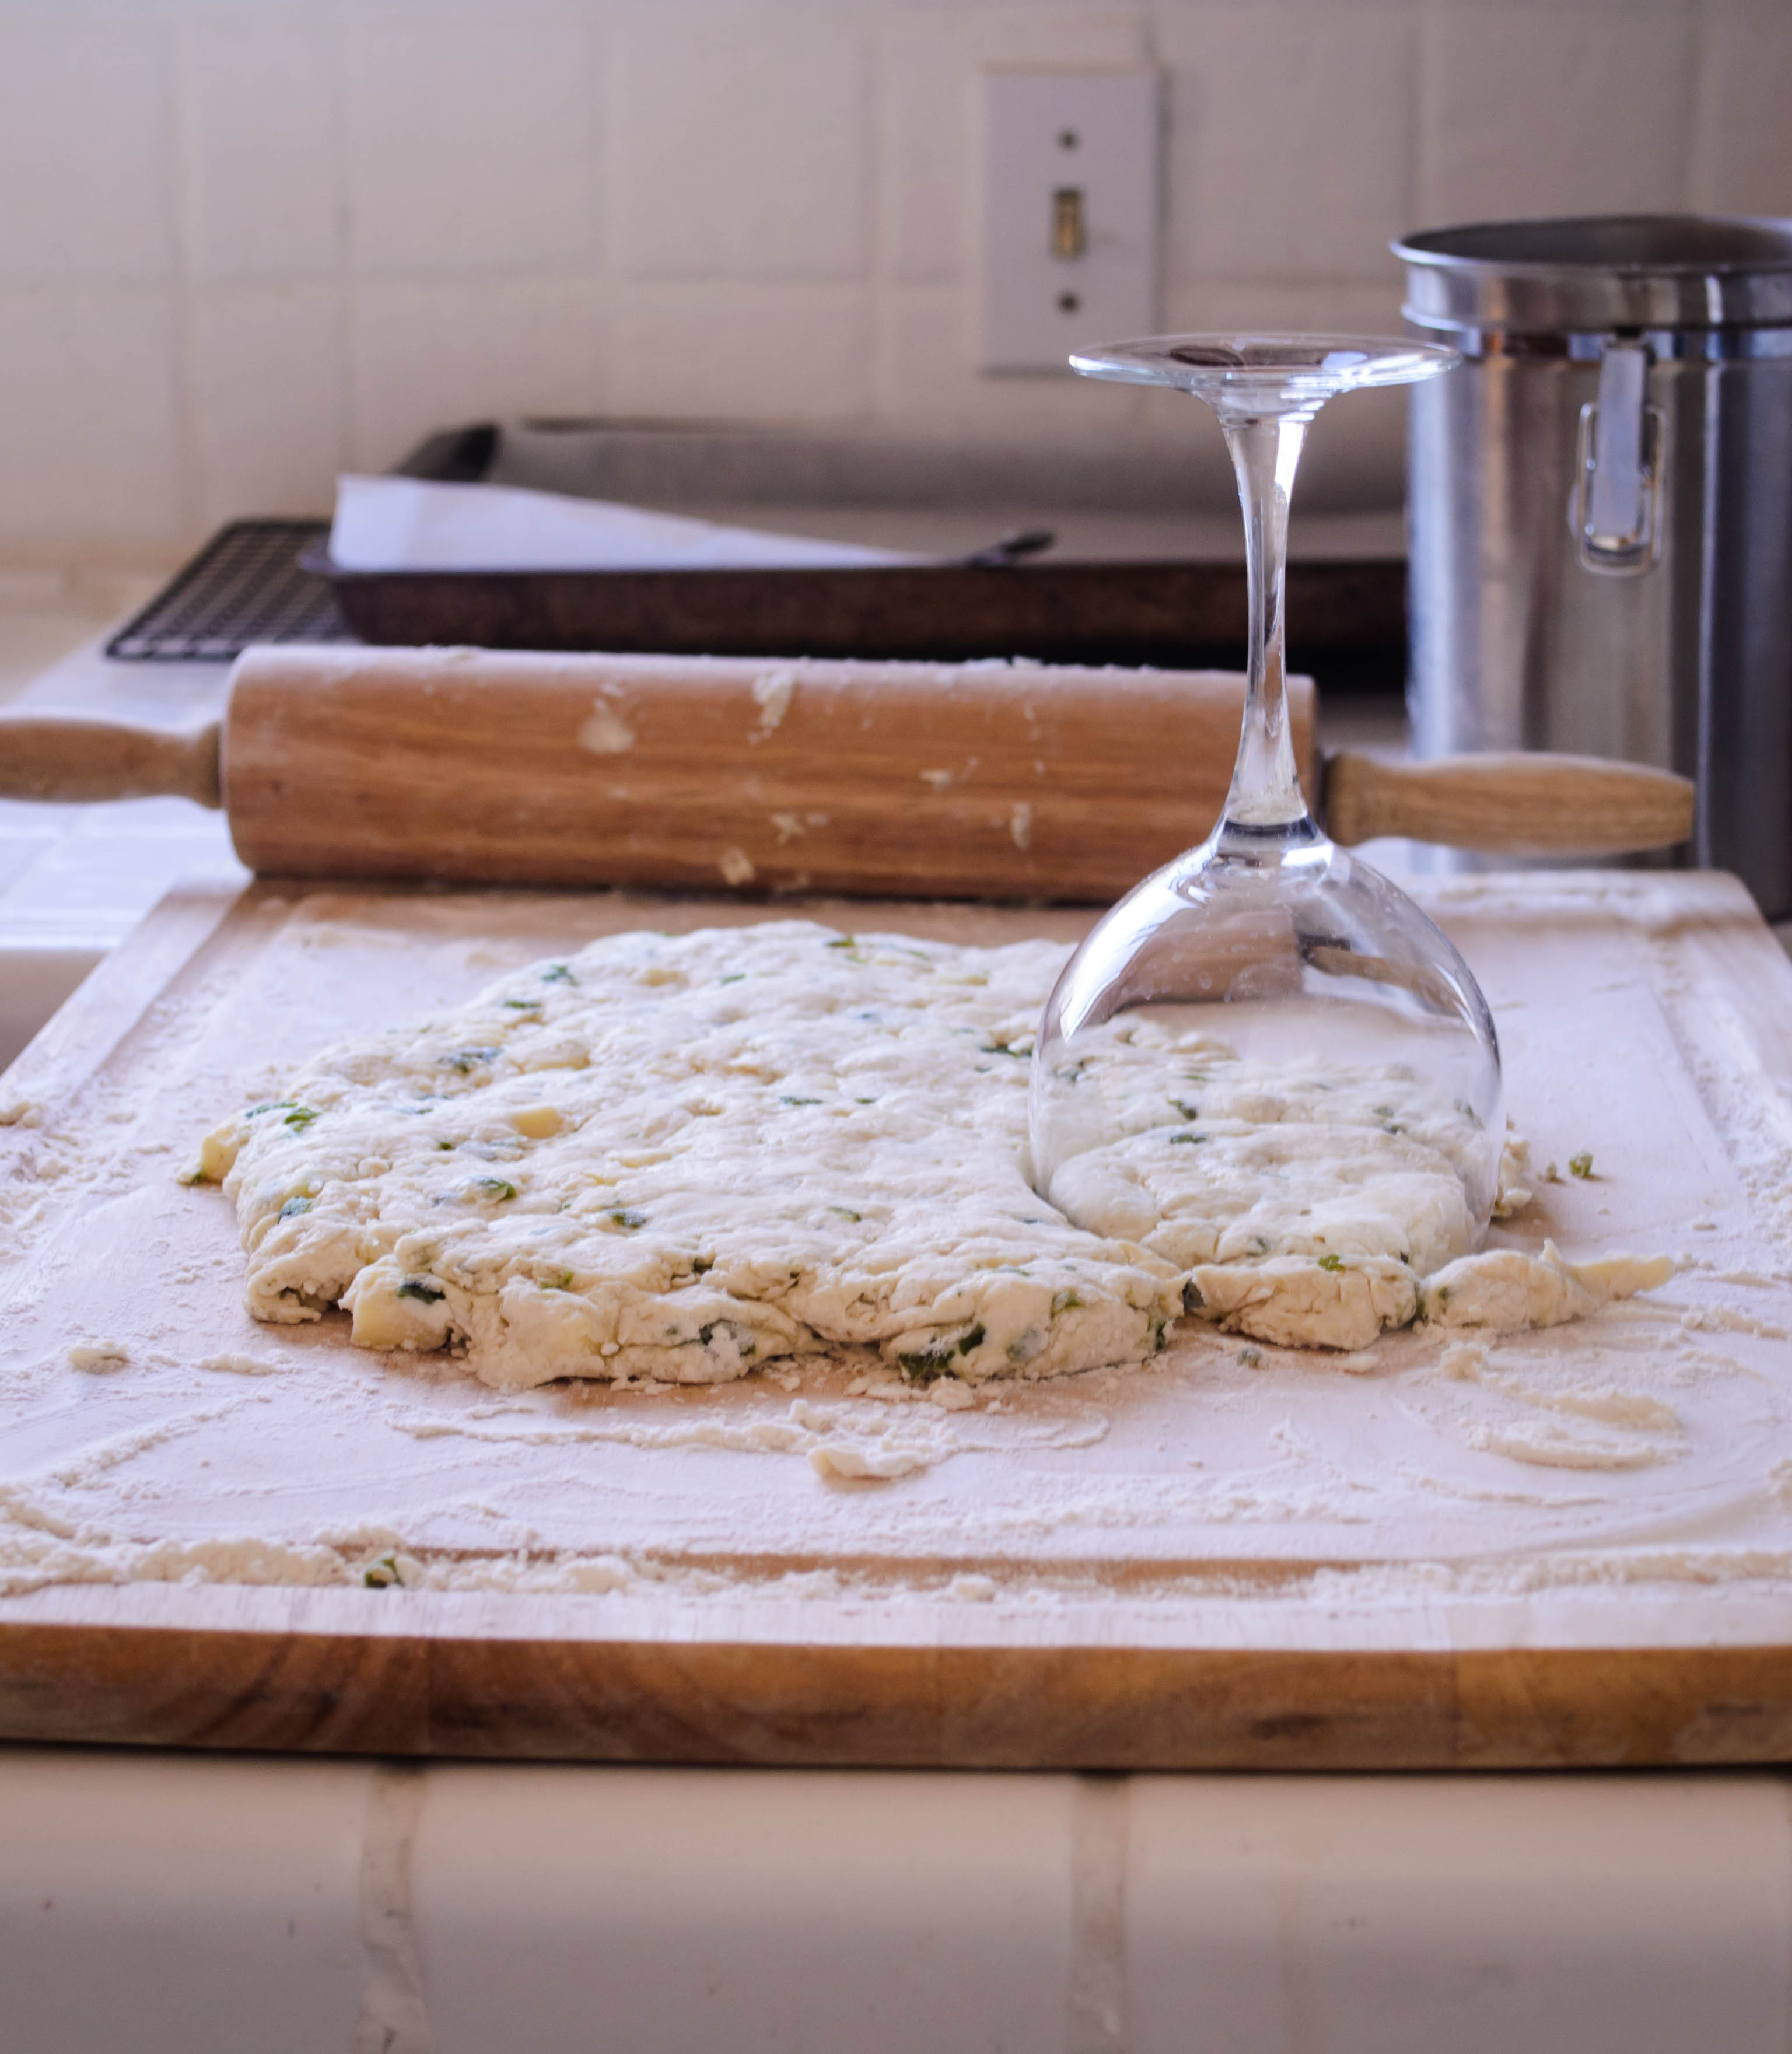
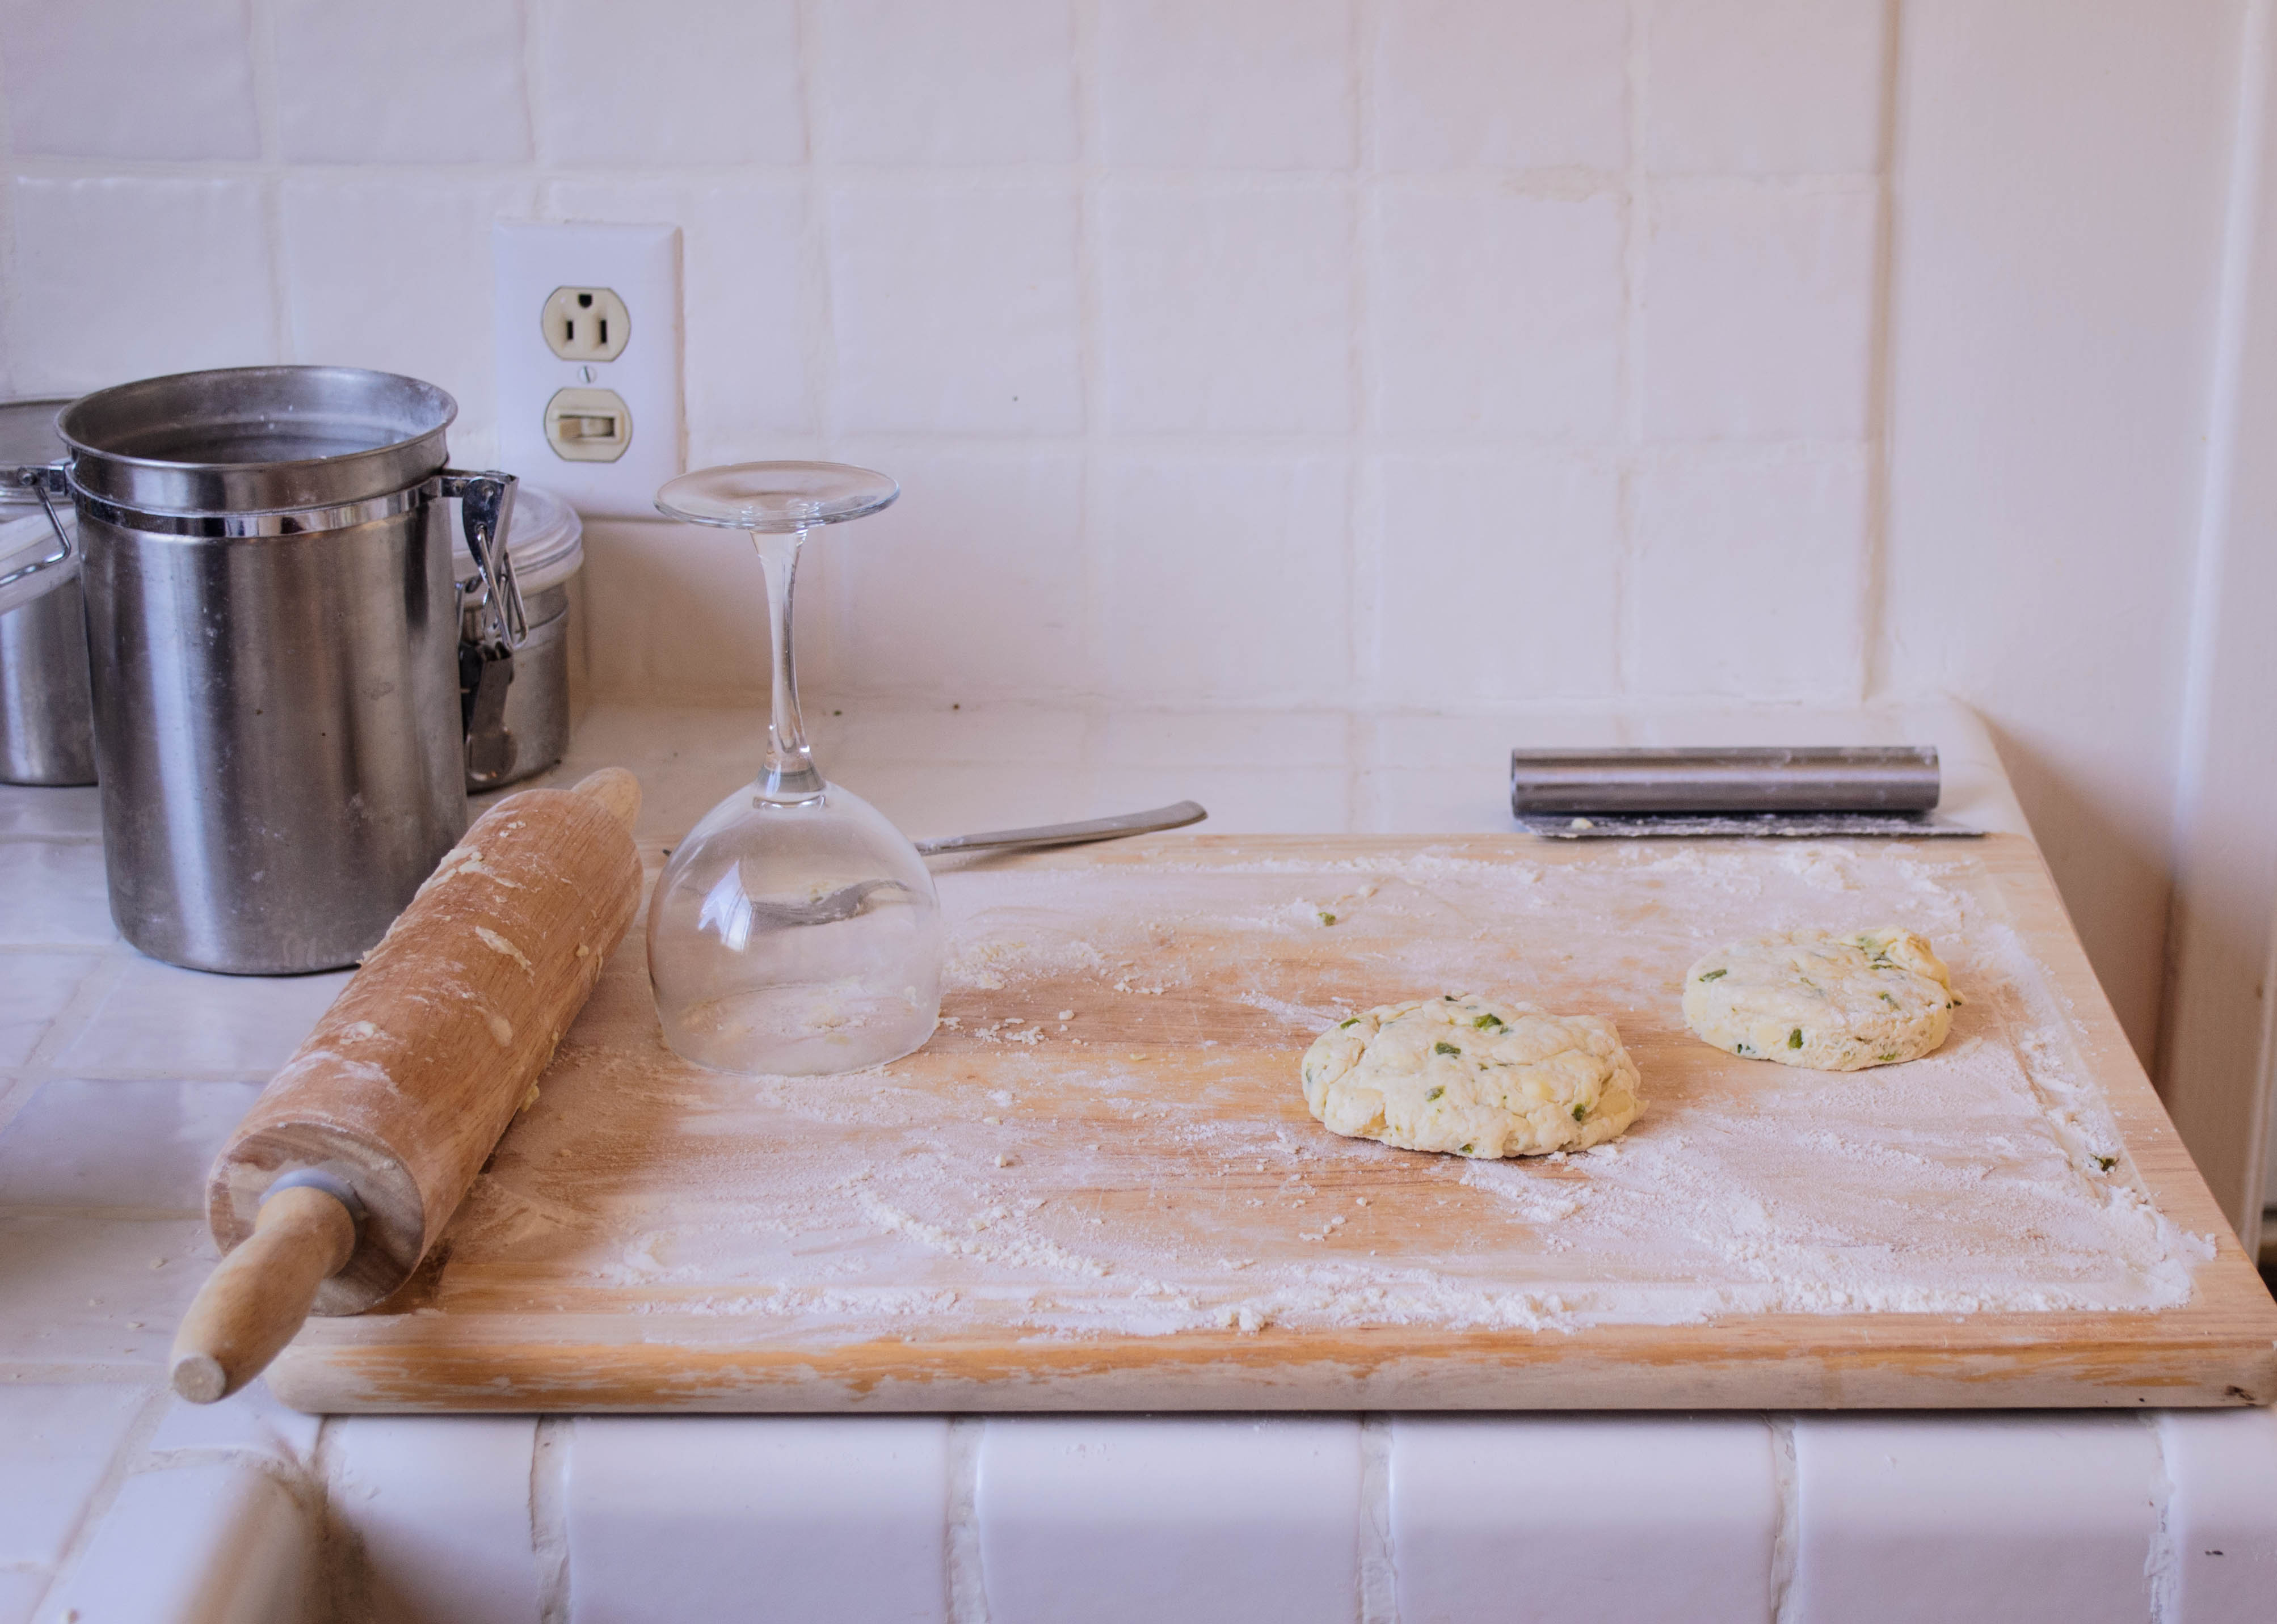
  • Preheat the oven to 400F and line a baking sheet with parchment paper. To make the biscuits, whisk together the flour, salt, sugar, and baking powder in a medium bowl. Blend in the cubes of cold butter using a pastry cutter or your fingertips. Butter bits should be the size of small peas. Add the cooled diced poblano and the cheese and use a fork to integrate, then pour in the buttermilk and, using a fork or your fingers, bring together into a ball of soft dough.
  • Turn the dough out onto a well-floured board and use a floured rolling pin or the palms of your hands to roll or press the dough into a rectangle about ½ an inch thick. Fold the dough into thirds, then roll out again. Repeat, again folding the dough into thirds and then rolling it out; this creates more flaky layers. If the dough sticks to your board, use the flat blade of a butter knife or a pastry scraper to help you lift it free.
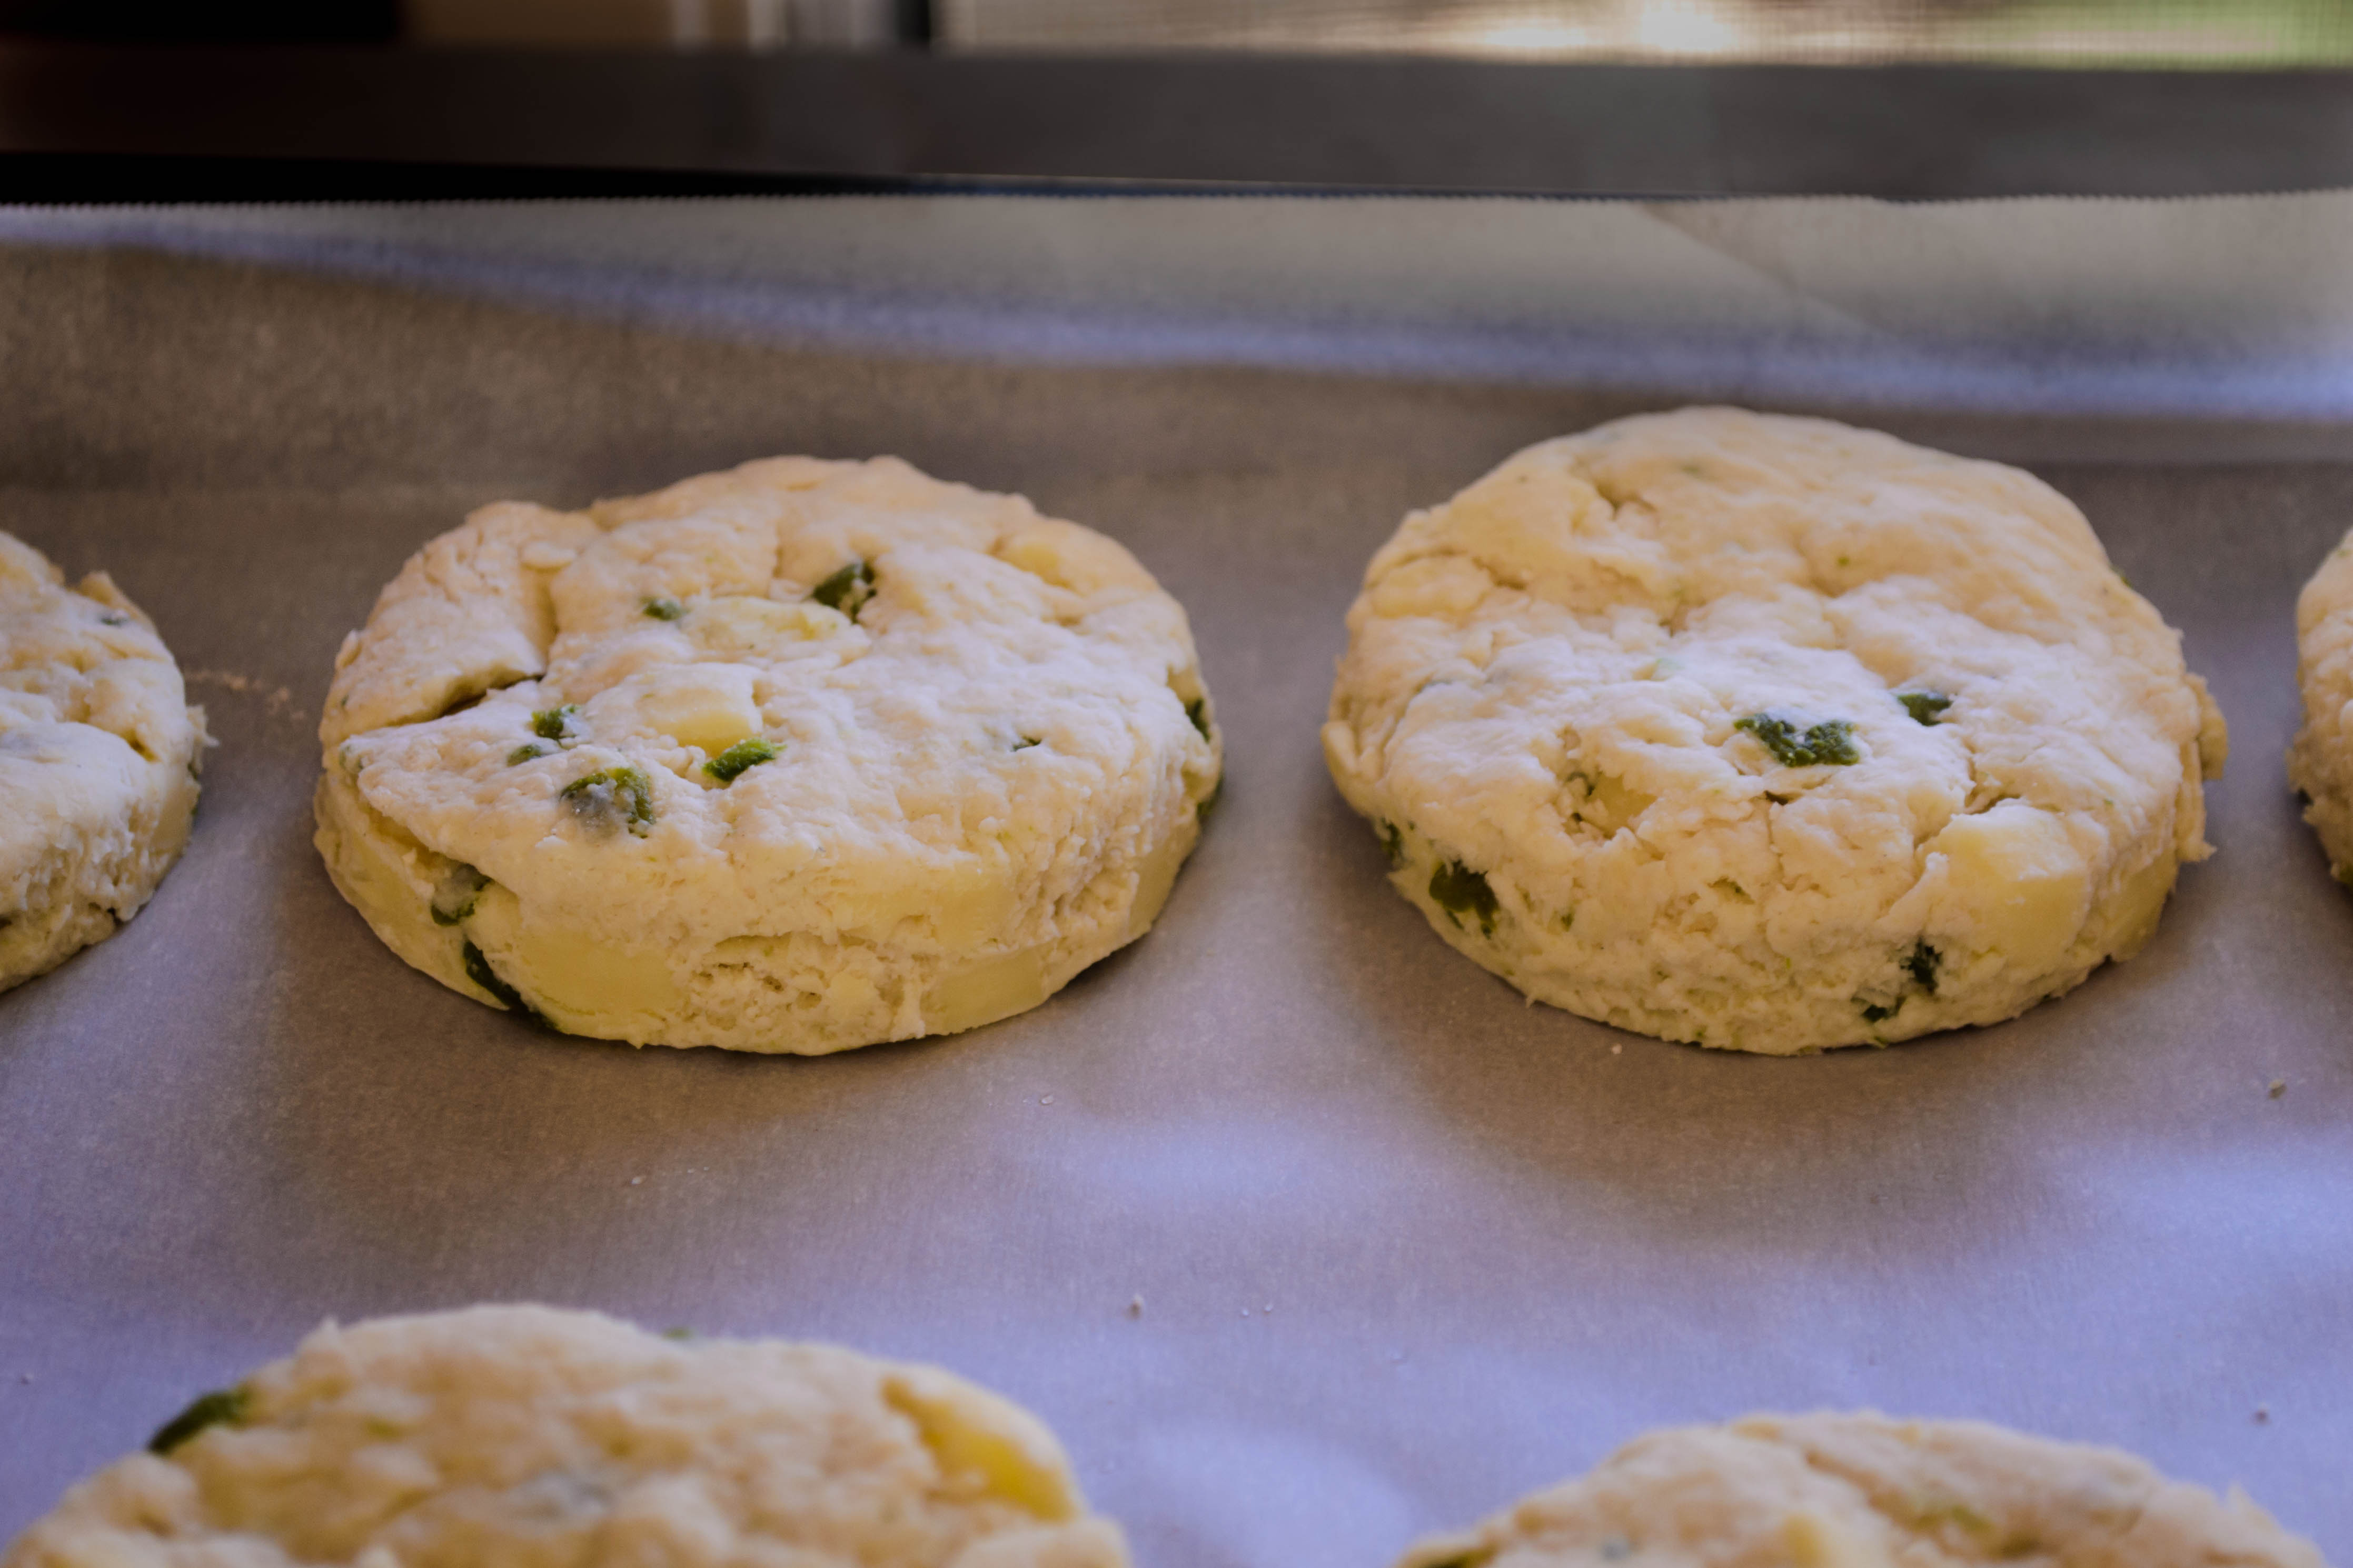
  • After you’ve rolled and folded, rolled and folded, and rolled once more (so you’ll have done a total of six folds), use a round cutter (or the lip of a glass) to punch out biscuits. Push the cutter straight down through the dough; don’t twist until you are all the way through the dough, or you’ll crush the flaky layers! Repeat, placing the biscuit rounds on your parchment lined baking sheet, until you can’t punch out any more rounds. Re-roll the dough scraps and repeat – with ½ inch thick dough, using a 3-inch cutter, you should be able to make about 10 biscuits.
  • Bake biscuits at 400F for 20 minutes, until their tops are golden and some cheese has oozed out to make lacey crisps around their edges.
  • While the biscuits bake, make the chorizo gravy: in a medium skillet, cook the chorizo over medium heat, stirring occasionally, until it is cooked through and nicely browned. This is difficult to see on some chorizos, because they are quite wet and reddish orange in color; look for a textural difference to determine that it is cooked.
  • When the chorizo is cooked through with brown bits and lightly crusty, chewy bits, sprinkle the flour over it and stir through to combine. Cook the flour with the chorizo for 1-2 minutes, then slowly begin adding the milk, whisking constantly as you do so. I like to pour in about ¼ cup at a time, whisk until the mixture is homogenous again, then add the next installment of milk.
  • With all the milk added, continue to whisk slowly until the mixture comes to a simmer. You will notice it thicken as it warms, but it won’t reach its final viscosity until it comes to a boil. At that point, lower the heat to a simmer, taste for seasoning, and add additional salt and pepper if your taste buds require it.
  • To serve, combine 2 tablespoons sour cream and 1-2 teaspoons milk or cream in a small dish or in a squeeze bottle. Place two biscuits on each plate, top with scrambled eggs, ladle on some gravy, and squirt or drizzle the sour cream sauce on top. Sprinkle with chopped chives or green onion, and serve immediately.

Photo Friday

I’m now feeling secure enough about myself, almost a month later, to share a few shots from my strawberries-and-goat-cheese biscuit disaster… They were pretty, and I love how ethereal the kitchen lighting is, but they were just so. damn. flat. Lesson learned. Jamming a full pint of strawberries into an innocent batch of dough does not fluffy biscuits make.

Food Blog Photo Friday 2014-3371 Food Blog Photo Friday 2014-3375 Food Blog Photo Friday 2014-3424 Food Blog Photo Friday 2014-3429