Thyme and Black Pepper Crackers

2015 Blog September-0498
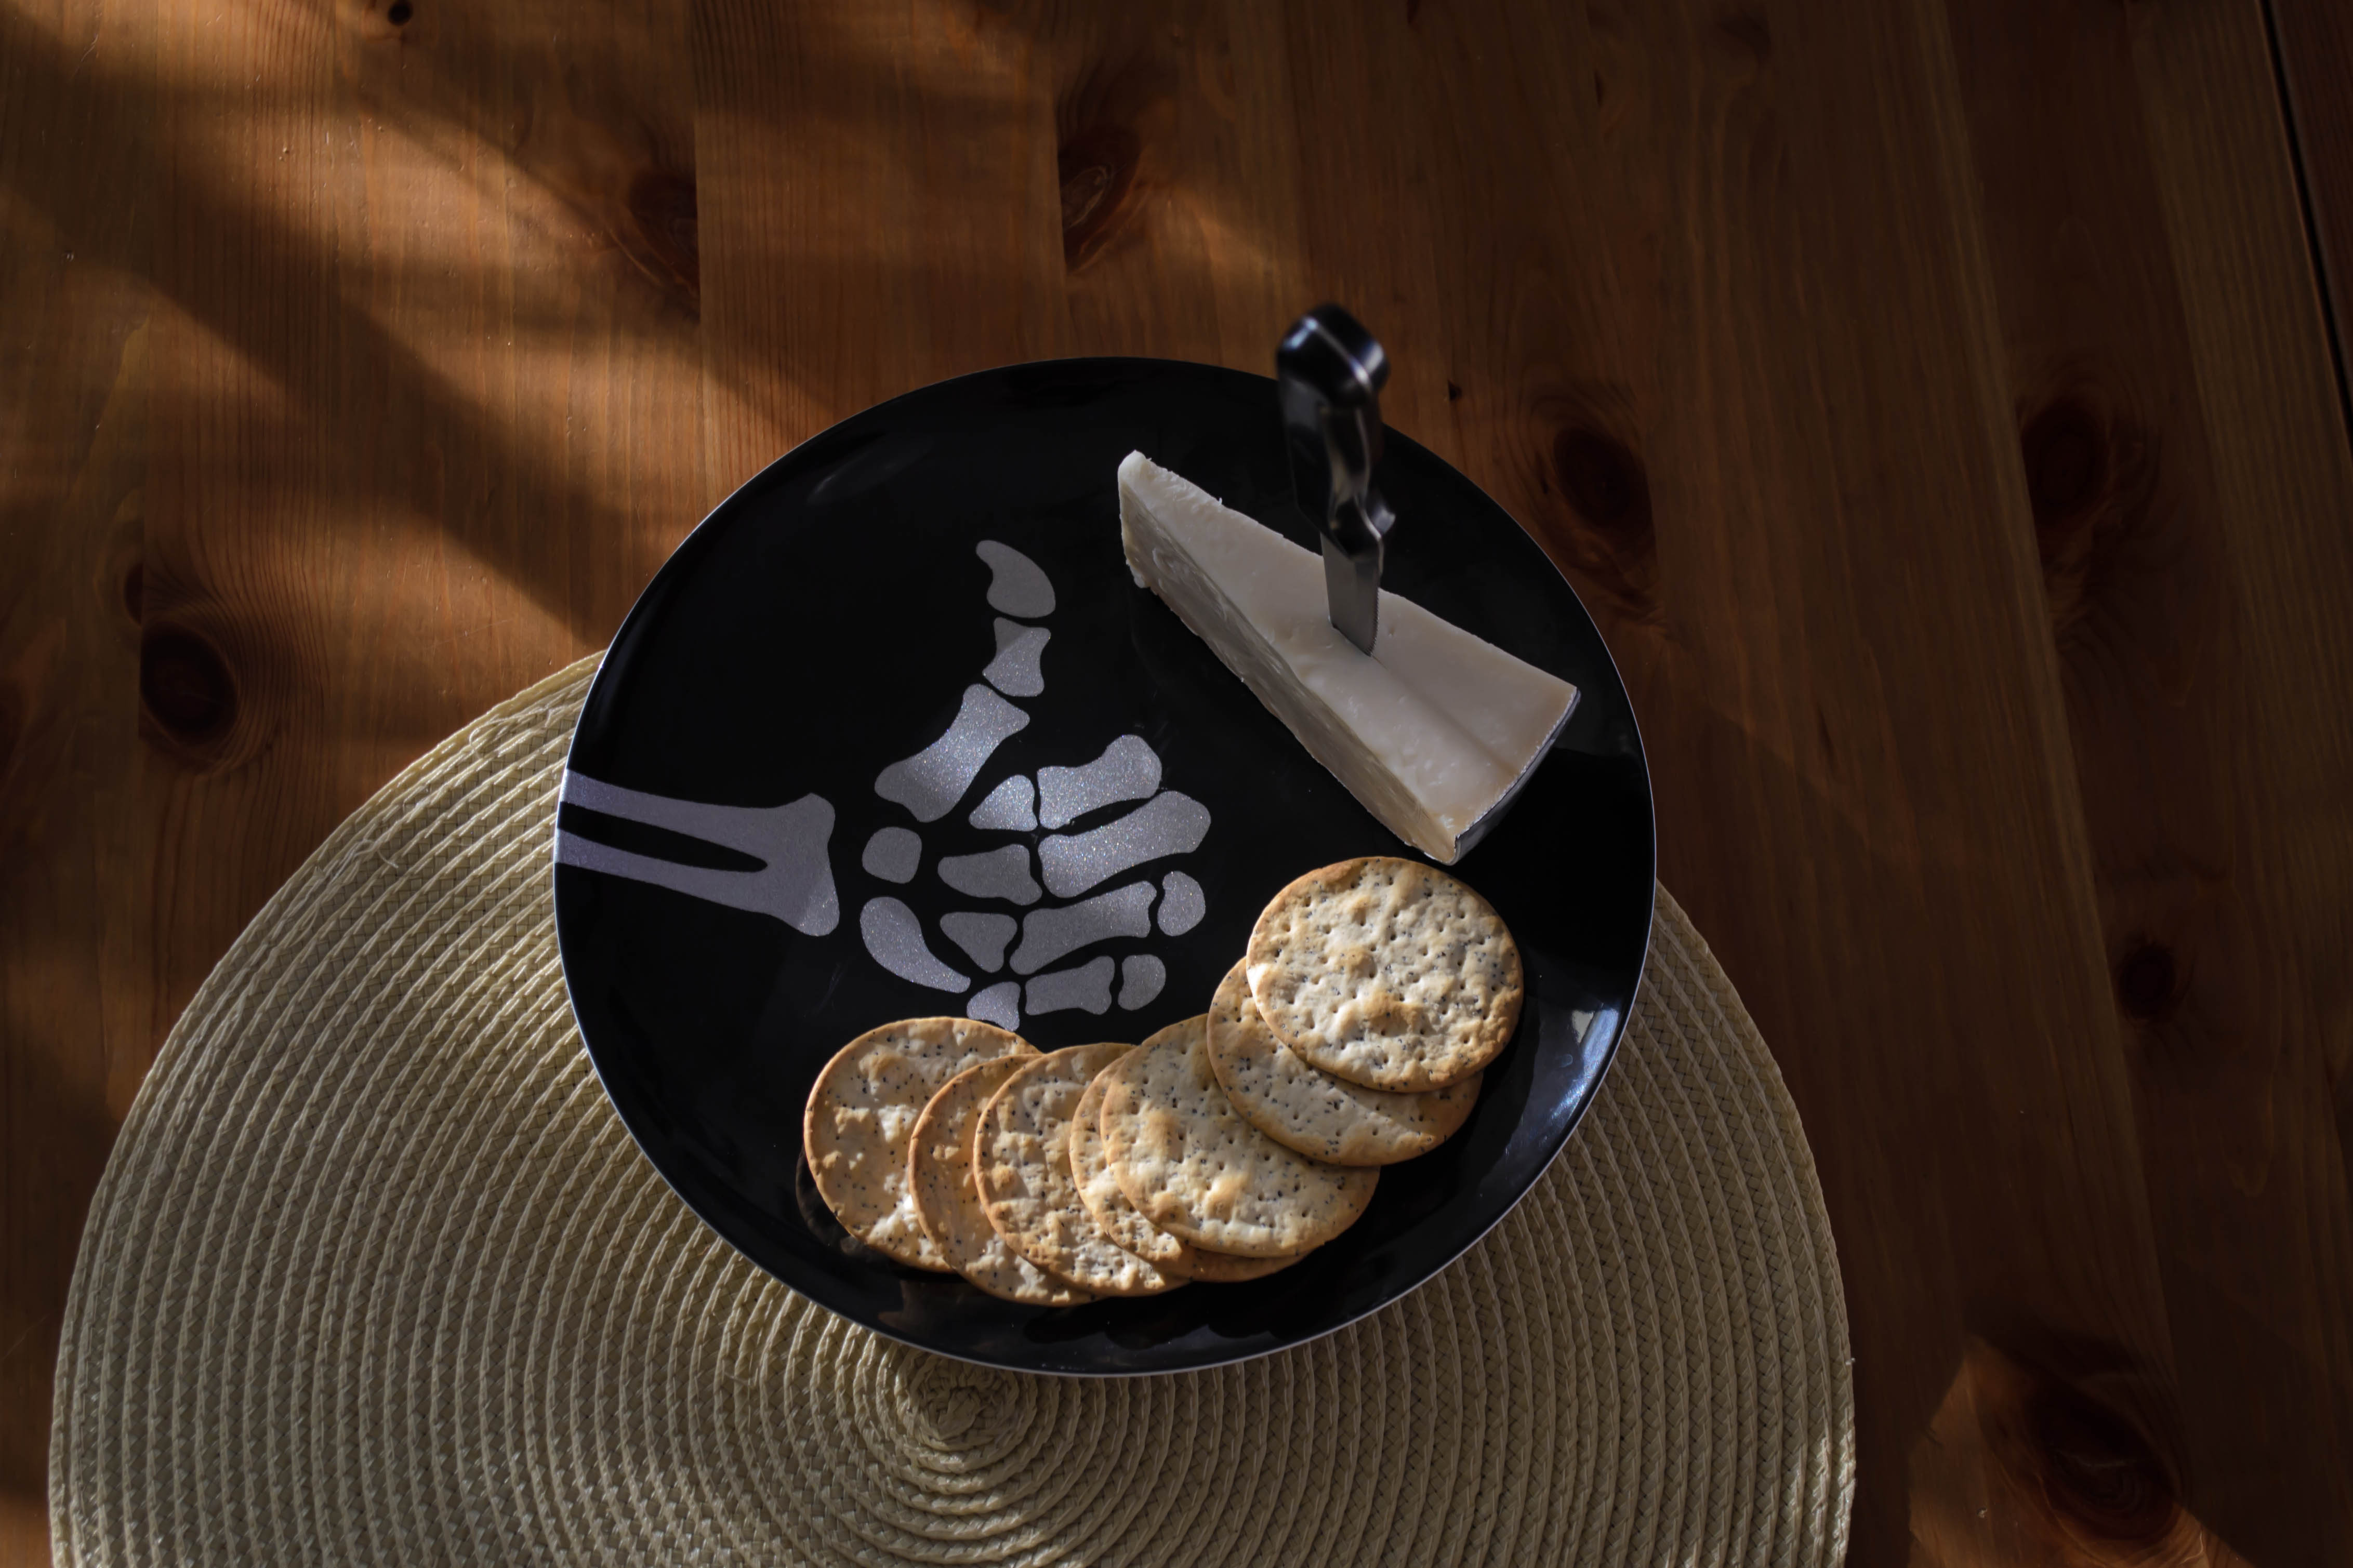
Over the past few years, N. and I have made it our business to conclude the week with a happy hour – we load some cheeses and crackers on a plate, sometimes some sliced cured meat, sometimes a few dried figs – and pour something cold and alcoholic into a frosty glass. Through this process, I’ve learned that N. loves black pepper. We bought a wedge of cheese crusted in black pepper once as an experiment, and I think since then it has been on every shopping list, every week, for about the last two years. More recently, we started picking up variety packs of crackers – the crushed wheat rounds, the chalky water crackers, the rectangles spiked with vegetable bits – and in one variety-pack, a black pepper water cracker. This sleeve always, always disappears first. N. doubles up on the pepper – peppered cheese on peppered cracker. And should there be peppered salami? The kid is in paradise.

2015 Blog September-04712015 Blog September-0475Because we always run out of the black pepper cracker first, I knew when I saw this month’s Twelve Loaves theme of crackers, crisps, or flatbreads that I wanted to recreate them. I poked around and considered, decided to add some fresh thyme for a little more interest, and ended up with these. At first I called them water crackers, but decided to amend for the sake of accuracy. A real water cracker, traditionally speaking, contains only flour and water (and sometimes some salt or leavening agent). No fat. Yet fat is what, so often, imparts flavor. Here, a few glugs of oil result in a cracker that crackles in thin, flaked layers, almost like a very crisp pastry crust.

2015 Blog September-04762015 Blog September-04782015 Blog September-04792015 Blog September-0482A few notes: first, these are not for the weak-of-tongue. The black pepper flavor is quite aggressive, and though a smear of creamy cheese will certainly cool things down, it can’t disguise the sharp spice of the bits of cracked pepper. Second, as with most crackers, the greatest trick here is getting them thin enough. I’ve recommended ⅛ inch at the thickest, but even thinner than that is better. They swell up only slightly as they bake, and a thick cracker is, alas, a decidedly not-crisp cracker. Those that I didn’t get quite thin enough tasted stale already barely cooled from the oven, simply because they didn’t snap and crumble adequately between the teeth. For us, the thinnest, most golden specimens stayed crisp and fresh tasting for a mere two days afterward, even stored in a firmly flattened zip-top bag. That means, unless you have a pepper fiend around your house, you are best served by making these for a gathering (the spice suggests a Halloween party might be a good venue), or throwing together a half recipe, or maybe even freezing half the dough until you need another batch. I haven’t tried that with this particular cracker, but I have done so with great success with Joy the Baker’s Sharp Cheddar Cheese Crackers, so I have every confidence these will be equally suited for the deep freeze.

2015 Blog September-0488Serving recommendations: topped with any sort of cheese, of course. But they would be equally good with cured meat of some sort, or a scoop of egg salad, or maybe even some hummus. While they were hot, I found myself compulsively snatching one and then another from the cooling rack, suggesting they are even acceptable bare. I do think, though, that a glass of something sparkling to wash them down is not to be discounted.

2015 Blog September-0497

Thyme and Black Pepper Crackers
Adapted from Chowhound
Makes 4-5 dozen 2½ inch crackers
Time needed: about an hour
2 cups all-purpose flour
1 teaspoon baking powder
½ teaspoon salt
1 tablespoon black peppercorns
1 tablespoon fresh thyme leaves
⅔ cup warm water
⅓ cup olive oil


  • Preheat the oven to 400F and line two cookie sheets with parchment paper.
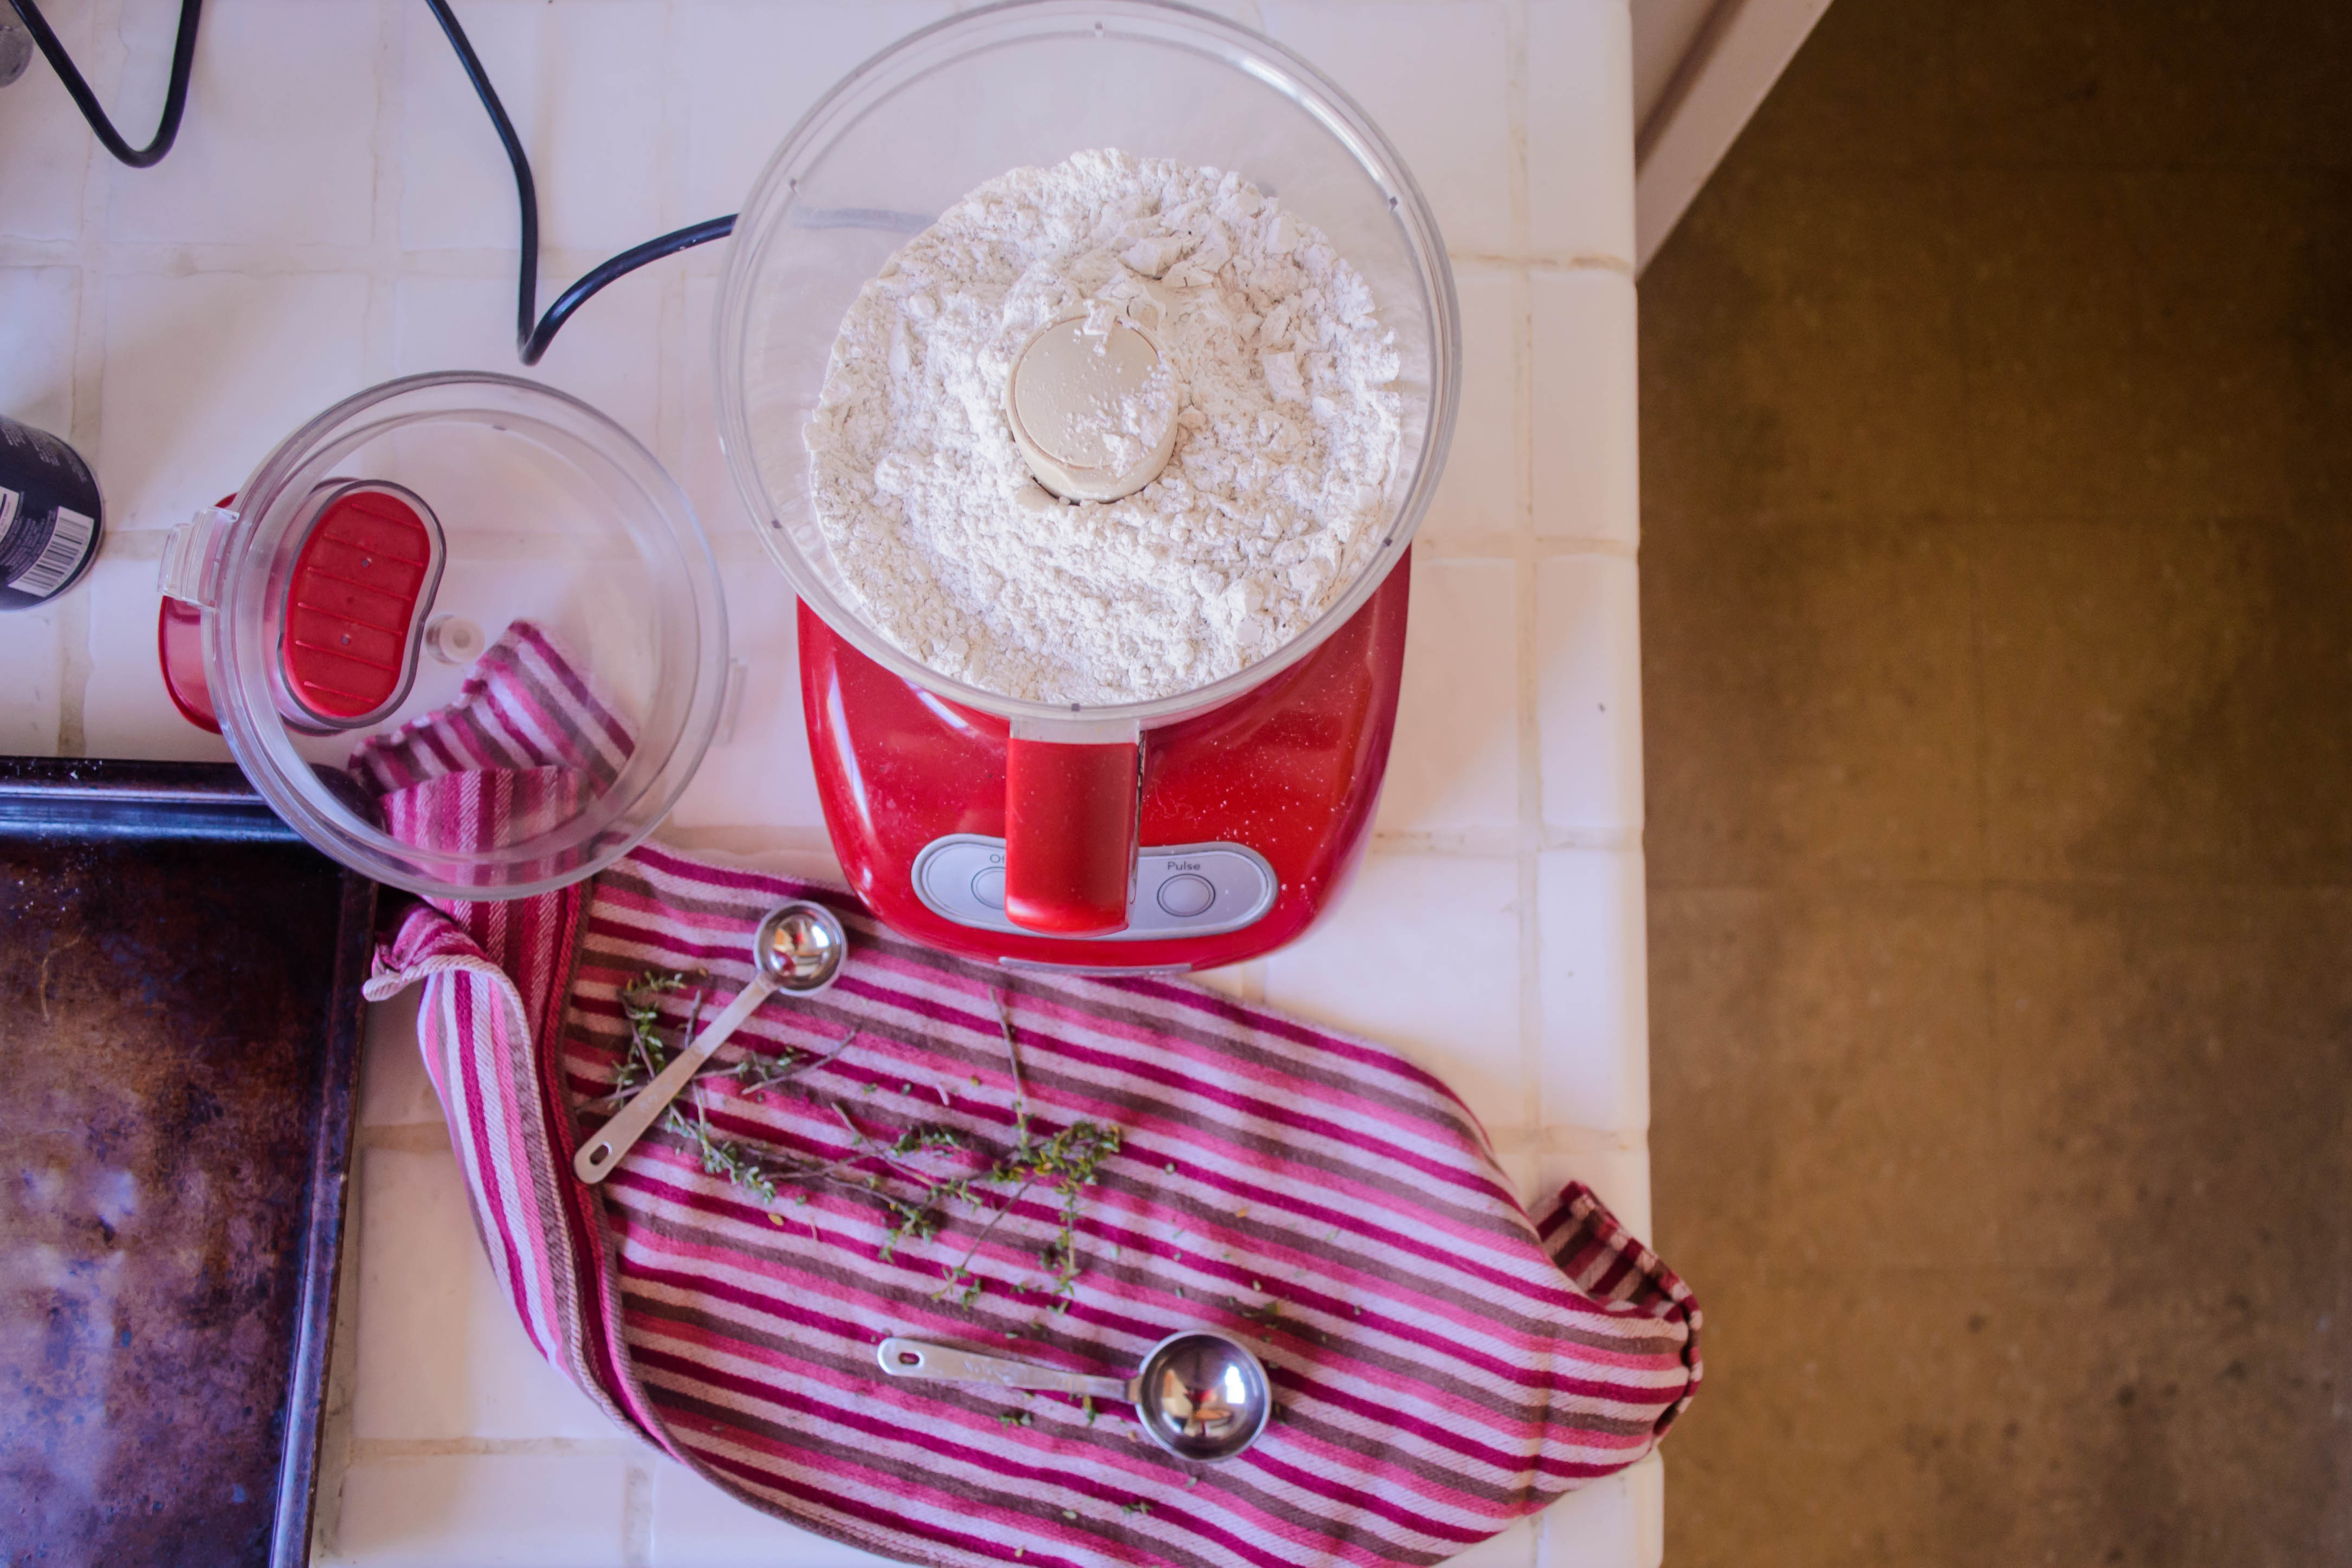
  • In a food processor, pulse the flour, baking powder, salt, and thyme until combined. Use a spice grinder or similar small bladed tool to crush up the peppercorns until some are coarsely chopped and some are a fine powder. Add this pebbly pepper dust into the food processor and run until the pepper is evenly distributed through the flour mixture.
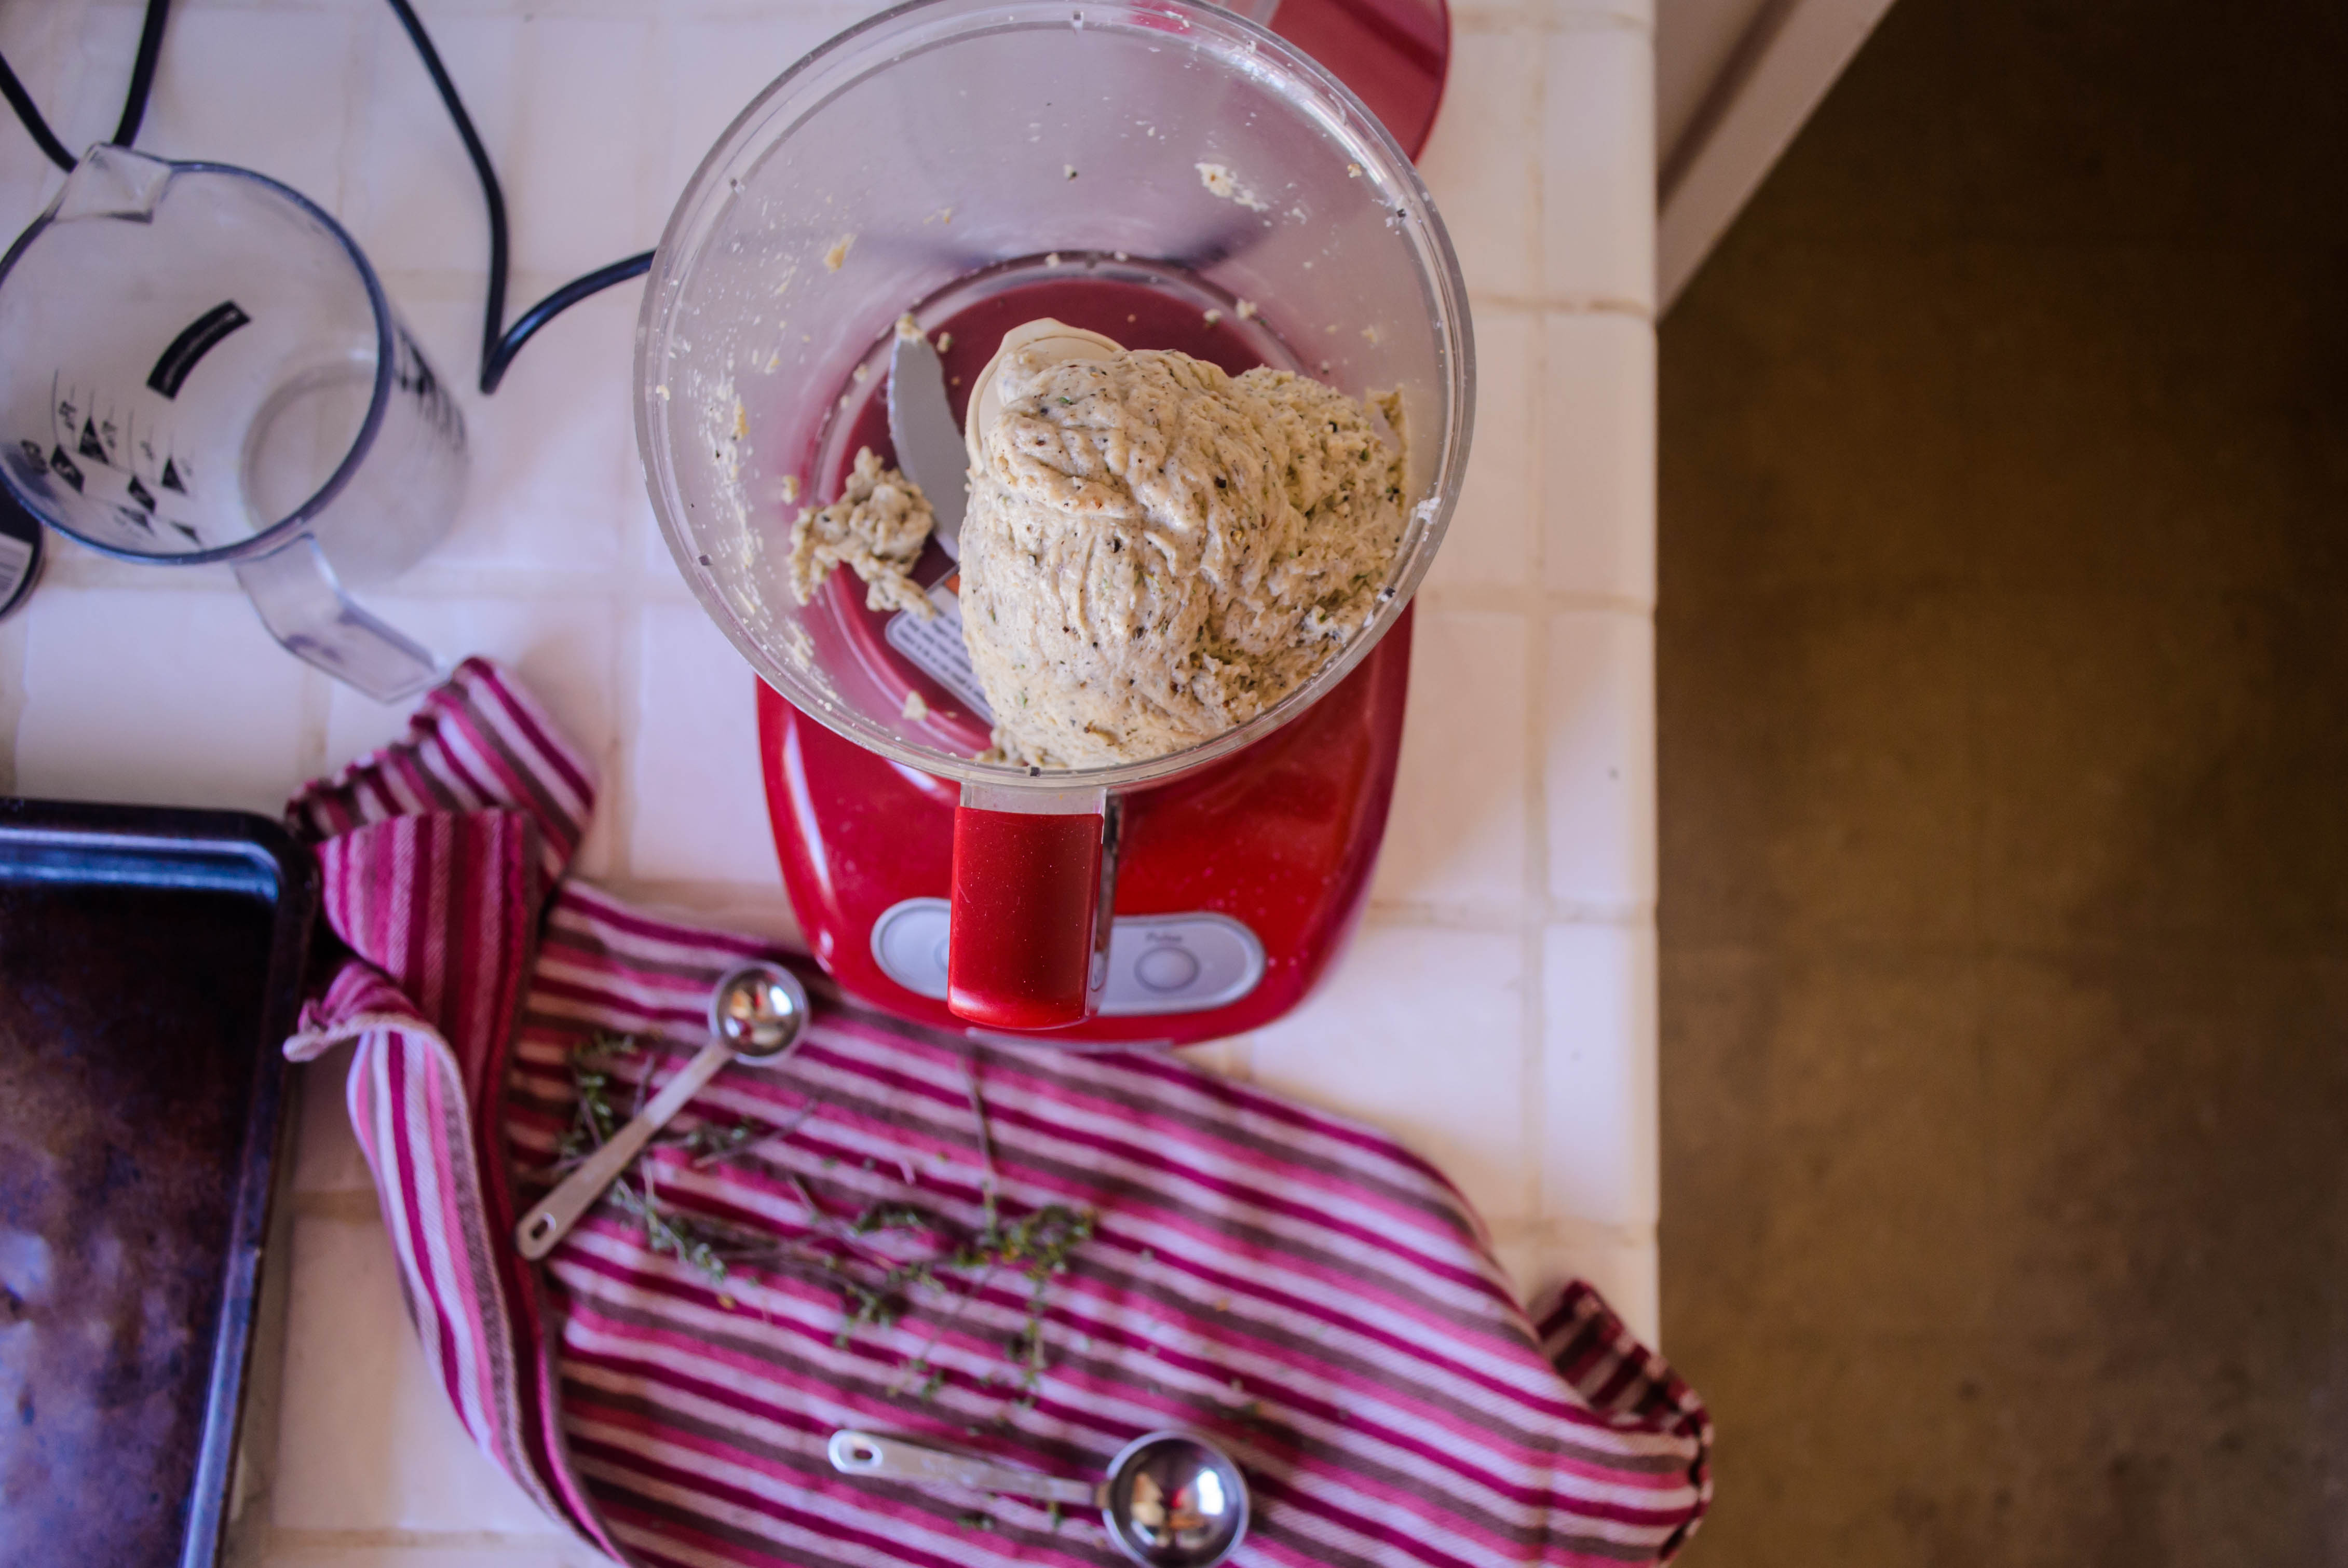
  • Measure out the warm water and the oil into the same vessel. With the food processor still on, drizzle in the water and oil and let the machine run until the ingredients form a smooth, slightly sticky dough. First small hunks will clump together, then quite suddenly a mass will form and run in circles around the belly of the processor.
  • Lightly flour a board and a rolling pin, and turn out half the dough. Sprinkle a little flour atop the dough as well. Roll out until very thin – at maximum ⅛ inch, but 1/16 inch is better for crisp crackers. Be sure to get the edges as thin as the middle. If you fear the dough is getting sticky, flip it over and turn it 180 degrees, then sprinkle with a little flour and roll again.
  • Cut the thin, even layer of dough into shapes of your choosing. We like rounds, and I used a glass with a diameter of 2½ inches. Prick rounds with a fork three or four times, then transport dough rounds to the prepared cookie sheets. Place them in a single layer, but they can sit very close together because they will not spread out. I easily fit 2 dozen on a single cookie sheet. Repeat for the remaining half of the dough.
  • Bake 12-14 minutes, until golden on top and quite dry. Cool completely before topping with cheese, salami, hummus, or whatever’s your favorite.
  • These can be stored in an airtight container or zip-top bag for a few days, but because they are freshly made and contain no preservatives, they will get stale faster than the average boxed cracker.


#TwelveLoaves is a monthly bread baking party created by Lora from Cake Duchess and runs smoothly with the help of Heather of All Roads Lead to the Kitchen, and the rest of our fabulous bakers.

Our host this month is Camilla from Culinary Aventures with Camilla, and our theme is Crackers, Crisps, and Flatbreads. For more bread recipes, visit the #TwelveLoaves Pinterest board, or check out last month’s mouthwatering selection of #TwelveLoaves enter last month’s #TwelveLoaves Seeded Breads!

If you’d like to bake along with us this month, share your Crackers, Crisps, and Flatbreads using hashtag #TwelveLoaves!

Giving thanks

The house feels empty.  Wednesday through Saturday, my family visited for Thanksgiving.  This morning, with them on the road home, fog hovering sticky in the sky, the cheery burgundy tablecloth in the washing machine, and a stack of lingering dishes I’m trying to ignore proclaiming themselves from the sink, our little home was stark and cold.  I could say that the memories of the holiday will keep me warm, but that would only be true in a metaphorical sense.  What I really want is another baked apple.

90. Baked Apples: Combine chopped pecans and chopped dried fruit (raisins, dates, figs, cranberries all work) and toss with maple syrup and a sprinkle of cinnamon, allspice or nutmeg or all three. Fill the cavities of cored apples with the fruits and nuts, dot each with butter, put into a baking dish and roast about 30 minutes, until tender. Better with vanilla ice cream.”

We had a few small apples from our local Farmers’ Market waiting for attention in the fruit bowl, so I set about collecting partners for them to make a dessert for two.

2 small apples

¼ cup chopped pecans

¼ tsp pumpkin pie spice (I agree with Joy the Baker that we should probably just make our own, but if you, like me, purchased some in a moment of confused weakness, this seems a harmless way to put it to use)

1-2 TB each:

chopped dried figs (I used black Mission, my current favorite)

craisins

golden raisins

3 TB maple syrup

Preheat the oven to 350F.

Core the apples, keeping the bottoms intact if you can.  If you can’t, just wrap the bottom quarter or so in aluminum foil and set them in a baking dish.  This will keep the filling from escaping.

In a small bowl, combine the nuts, fruit, and spice(s).  Drizzle in the maple syrup and stir gently to combine – you want even stickiness throughout.

Using a small spoon, or your fingers, insert as much filling as you can into the cored apples.  You will notice that this quantity makes about twice as much as you need for 2 small apples.  That’s okay.  The leftovers are a fantastic topping for oatmeal the next morning.

Once full, stow your apples in the oven for 30 minutes, or until they are tender when pierced with a knife.  Liberate, evacuate to a dessert plate, and pair with vanilla ice cream.

These were a lovely dessert.  They felt light, because they were primarily fruit, but were still sweet enough to satisfy that after-dinner craving.  The apples still had some resistance, but were warmed through and starting to collapse into themselves.  The ice cream was a perfect accompaniment – I wouldn’t want this dessert without it.  I might ideally have chosen an apple with more tartness to contrast against the sweetness of the syrup and dried fruit, but in such a case, especially if the apple were on the large size, I would advocate a longer baking time.  If the fruit and nuts protruding from the top of the apple start to brown too much, give them a tinfoil hat to hide beneath.


“84. Sage Crackers: Pulse 1 cup flour, 1 teaspoon salt, ½ cup Parmesan and 4 tablespoons cold butter in a food processor. Add ¼ cup cream and 1 tablespoon finely chopped sage.  When just combined, roll as thinly as possible, score into squares, sprinkle with salt and bake at 400 degrees until golden.  Let cool, then break into pieces.”

I’ve always liked a nice cheese-and-crackers platter as an appetizer option, and these seemed like a good option to lead into the big Thanksgiving meal: relatively easy to make, but impressive – who wouldn’t be staggered by the effort of making homemade crackers even with a homemade feast to produce as well?

Bittman’s directions and quantities here are pretty specific, so I just followed his directions.  I omitted the salt, because Parmesan carries so much of its own tangy hit, and my parents are not big salt eaters.  It should also be noted that pulsing this mixture until just combined does not create a rollable dough, unless my idea of “just combined” is different from Bittman’s.  However, turning out the just-clinging crumbs onto a floured board and kneading for only a minute or two does produce a nice textured ball of dough that can be rolled out with minimal sticking.

I’d recommend aiming for a shape as close to a rectangle as possible.  Further, roll that rectangle to the size of your biggest cookie sheet.  That way you can carefully transport onto the greased or parchment-lined sheet tray by draping the dough loosely over the rolling pin.  Score it very gently into rectangles or squares of your chosen size (cut halfway through the dough with a knife, not all the way through), and into the oven with it!

When I checked these 20 minutes later, they were a little more golden than I wanted.  They were, in fact, heading toward a burnished bronze (is that not the kindest way ever of saying they were all-but-burned?).

After the cracker sheet had cooled for a few minutes, I broke it along the scored lines into neat (mostly) rectangles and we passed around a few samples.  The outside edges, which were thinner, had a slightly over-toasted flavor we didn’t love.  The inside rectangles, though, were crisp and flavorful, with a flaky – almost chalky – texture reminiscent at once of pie crust and shortbread.  My dad in particular, who enjoys this texture, thought they were great.

And now the confession: my final Bittman for this week is a bit of a cheat.  But I’m okay with that, because I also think it was a bit of a cheat for him, though in the best and most useful way.

“101. Buy some cheese. Unwrap it and put it on a plate with some walnuts and fruit; let come to room temperature. Serve with good bread.”

This is the final numerical entry of the list, and that means it’s in the dessert category.  While I accept that some people prefer a cheese course to dessert, I’m not sure I consider this an acceptable option for Thanksgiving.  It is, however, acceptable as an appetizer idea, as I mentioned above.  So that’s what I did.  In addition to the sage parmesan crackers above, I made my favorite craisin rosemary biscotti-style crackers with white bean and almond dip, and set them all out with some creamy Stilton, a nice rich chevre, and a wedge of Manchego obtained from a stand at the Farmers’ Market where we finally decided we’d had too many samples to feel right about not purchasing.  Surrounding these, I added dried apple rings, black Mission figs, and a fresh Granny Smith cut into slim slices.  The walnuts, which I was ready to add as well after a brief toasting, were subjected instead to accidental scorching, and had to be sacrificed.  We will speak of them no further.

What can you say about a cheese platter, besides that it was delicious?  We adored the Manchego, and soft crumbles of Stilton paired well with the fresh apples.  I tried fig and goat cheese together, and now I think chevre-stuffed-figs sounds like an amazing experiment.  We decimated the platter in little over ten minutes, but thankfully were not too stuffed to take full advantage of the turkey dinner that followed.

With Thanksgiving handled, that leaves only five weeks of 2012, and only twelve Bittman selections to go!  New Year’s Eve is on a Monday, but that still counts as this year if I need to jam in a few final selections, right?

I think I can, I think I can, I think I can…

Emptying the Fridge III: Crack(er)ing the Code

Last week I told you about my favorite new dip.  White beans, toasted almonds, the piney sharpness of rosemary, the heady perfume of orange zest… and promised to provide a vessel on which to deliver this deliciousness to your eager taste buds.  N. and I discovered shortly after my first foray into this creamy blend of balanced spice that the ideal vehicle for consumption was not in fact a spoon, but the best crackers ever: Trader Joe’s Raisin Rosemary Crisps.  In fact, these are good not just as a vehicle, but a snack in their own right.  Every time I went to the pantry to retrieve a few for dip spreading, I’d find them gone, thanks to N.’s voracious nibbling.

I wondered at one point, as I broke down yet another cracker box for recycling, how difficult they would be to make myself.  I’ve never made crackers before, but looking at the list of ingredients – sunflower seeds, millet, raisins, baking soda – it seemed doable, and further, thanks to the kind of collection that happens in established kitchens, when you don’t remember why you have something like toasted millet or roasted ground flaxseed but you just do, I had every single dry ingredient in my pantry, waiting to be used up so they didn’t have to make the move to California.  On that door dividing me from opportunity, he was pounding with a brass knocker.

So I set about experimenting, and today I can offer you not one, but two ways of making these crackers yourself.  They aren’t perfect replicas.  They will always be discernable as imitations.  But they are delicious, and they are pretty darn close.  Only a thinner knife, a bit of whole wheat flour, and patience, I suspect, separates them…

Here’s what you need:

1 ½ cups all-purpose flour

½ cup whole wheat flour (the first time I made these, I used equal parts AP and WW flour, and the result was a bit heavy.  Using 2 cups AP instead of adding the WW would probably make the crackers even lighter, and the TJ’s ingredient list doesn’t contain WW flour at all)

1 tsp baking soda

¾ tsp coarse sea salt (I used Maldon, with which I have a deep love affair)

2 TB roasted, ground flax (if you have whole flaxseeds, use them!  Just toast them in a dry pan until fragrant and beginning to darken, and whiz them in a spice grinder, or your husband’s coffee grinder, if that’s the machinery you happen to have)

1/3 cup millet

½ cup sunflower seeds, toasted or not, salted or not, just use what you can find

¼ cup brown sugar

1 TB finely chopped dried rosemary (again the spice grinder works really well for this – chopping dried rosemary with a knife is an exercise in absurdity: it flies everywhere)

½ cup craisins

¾ cup buttermilk

Whisk together all ingredients except buttermilk until seeds, nuts, and fruit are evenly distributed.

Add buttermilk and cut in with a fork or pastry blender until dough starts to lump together.  It will be roughly the consistency of biscuit or Irish soda bread dough.  At this point, switch to your hands (the best tools, really, aren’t they?) and knead the dough for three minutes or so, until it all comes together and becomes a bit less shaggy.  You can either dump the mixture onto a lightly floured board to knead it, or you can be lazy like me and knead it in the bowl.

At this point, you have a choice.  If you want flat, rectangular crackers like Ry-Krisp or Stone Ground Wheat, roll out your dough into a big thin rectangle (1/8 inch thick or even less, if you can) and cut gridlines along your dough with a pizza cutter.  Create whatever size squares, rectangles, trapezoids, or polyhedrons you desire, then place them close (but not quite touching) together on a baking sheet lined with parchment paper or sprayed with non-stick spray.  Slide them into a preheated 300F oven for 45 minutes.  You’ll end up with crunchy crackers with the slightest bit of give in the center, evenly colored with a dense crumb.  They are a little like miniature flatbreads. 

If you want slightly lighter crisps with a darker “crust” perimeter and a sprightly, Panko-like crunch, there is only one inspiration to which you can look: biscotti.  I liked the flat crackers.  I did.  They were tasty, they were good with the dip, and they were relatively quick: roll, cut, bake, done.  But they weren’t the ephemeral cracker experience I was after.

If you’re going the biscotti route, once the dough is kneaded together well, divide it in thirds.  Instead of rolling it out on a board, roll it into a long, thin “worm” of dough on some plastic wrap.  Press, squeeze, and moosh it into a log of even thickness, using the plastic wrap to help you.  Wrap up securely in the plastic, then pop it into the fridge.  Repeat with the other sections of dough, each in their own piece of plastic wrap.  Refrigerate for at least three hours (my trusty biscotti recipe from which I estimated times and temperatures says you can leave them in the fridge for up to three days). 

When you are ready to bake, take the worm/logs out of the fridge and unwrap.  Leaving them sitting on the open plastic wrap, paint them lightly with buttermilk to encourage browning.  You could probably paint them with egg wash too, but the TJ’s box doesn’t list egg as one of its ingredients… Carefully move the buttermilked logs to a baking sheet, then place in a preheated 325F oven for 30-40 minutes, or until the tops have swelled and are lightly golden.  Let them cool completely. 

You will find when you move your logs that the bottoms are browner than the tops.  I am toying with the idea of slowly rolling these logs as they bake so that each side comes in contact with the metal of the baking sheet for ten minutes or so during the baking.  This might make the finished logs a bit more rectangular (and hence capable of producing square crackers), and it might make each edge evenly brown.  Let me know if you try it out, and I’ll do likewise.

When the logs are cool, carefully cut them into thin slices with a serrated knife.  Some of mine crumbled a bit, especially when there were craisins at the edges of the log, but that just meant more sample scraps.  My ideal would be 1/8 inch thick or even thinner, if you can manage it.  But really, what you want here are crackers of the thickness you want to bite into.

Position your slices on a baking tray in a single layer (it’s fine if they touch each other, as long as they aren’t in layers) and bake in a preheated 300F oven for about 20 minutes.  The edges will bronze a bit deeper, and the centers will flush golden brown.  They won’t feel quite crunchy yet, but take them out anyway: much of the crisping happens as the crackers cool.

In an hour or so, when they are cool and crisp, I recommend you slather them with my almond white bean dip, or maybe a thick slice of rich brie, or some sharp, tangy goat cheese, and consume.  They are deep and toasty in flavor, the nuts and seeds lend appealing texture and different kinds of crunch, and they are just barely sweet from the brown sugar and the craisins.  I like the switch to cranberries as the fruit source, because they pair so nicely with the orange zest in my dip, but also because their uncompromising tartness makes these crackers interesting enough to eat all on their own.  Enjoy!