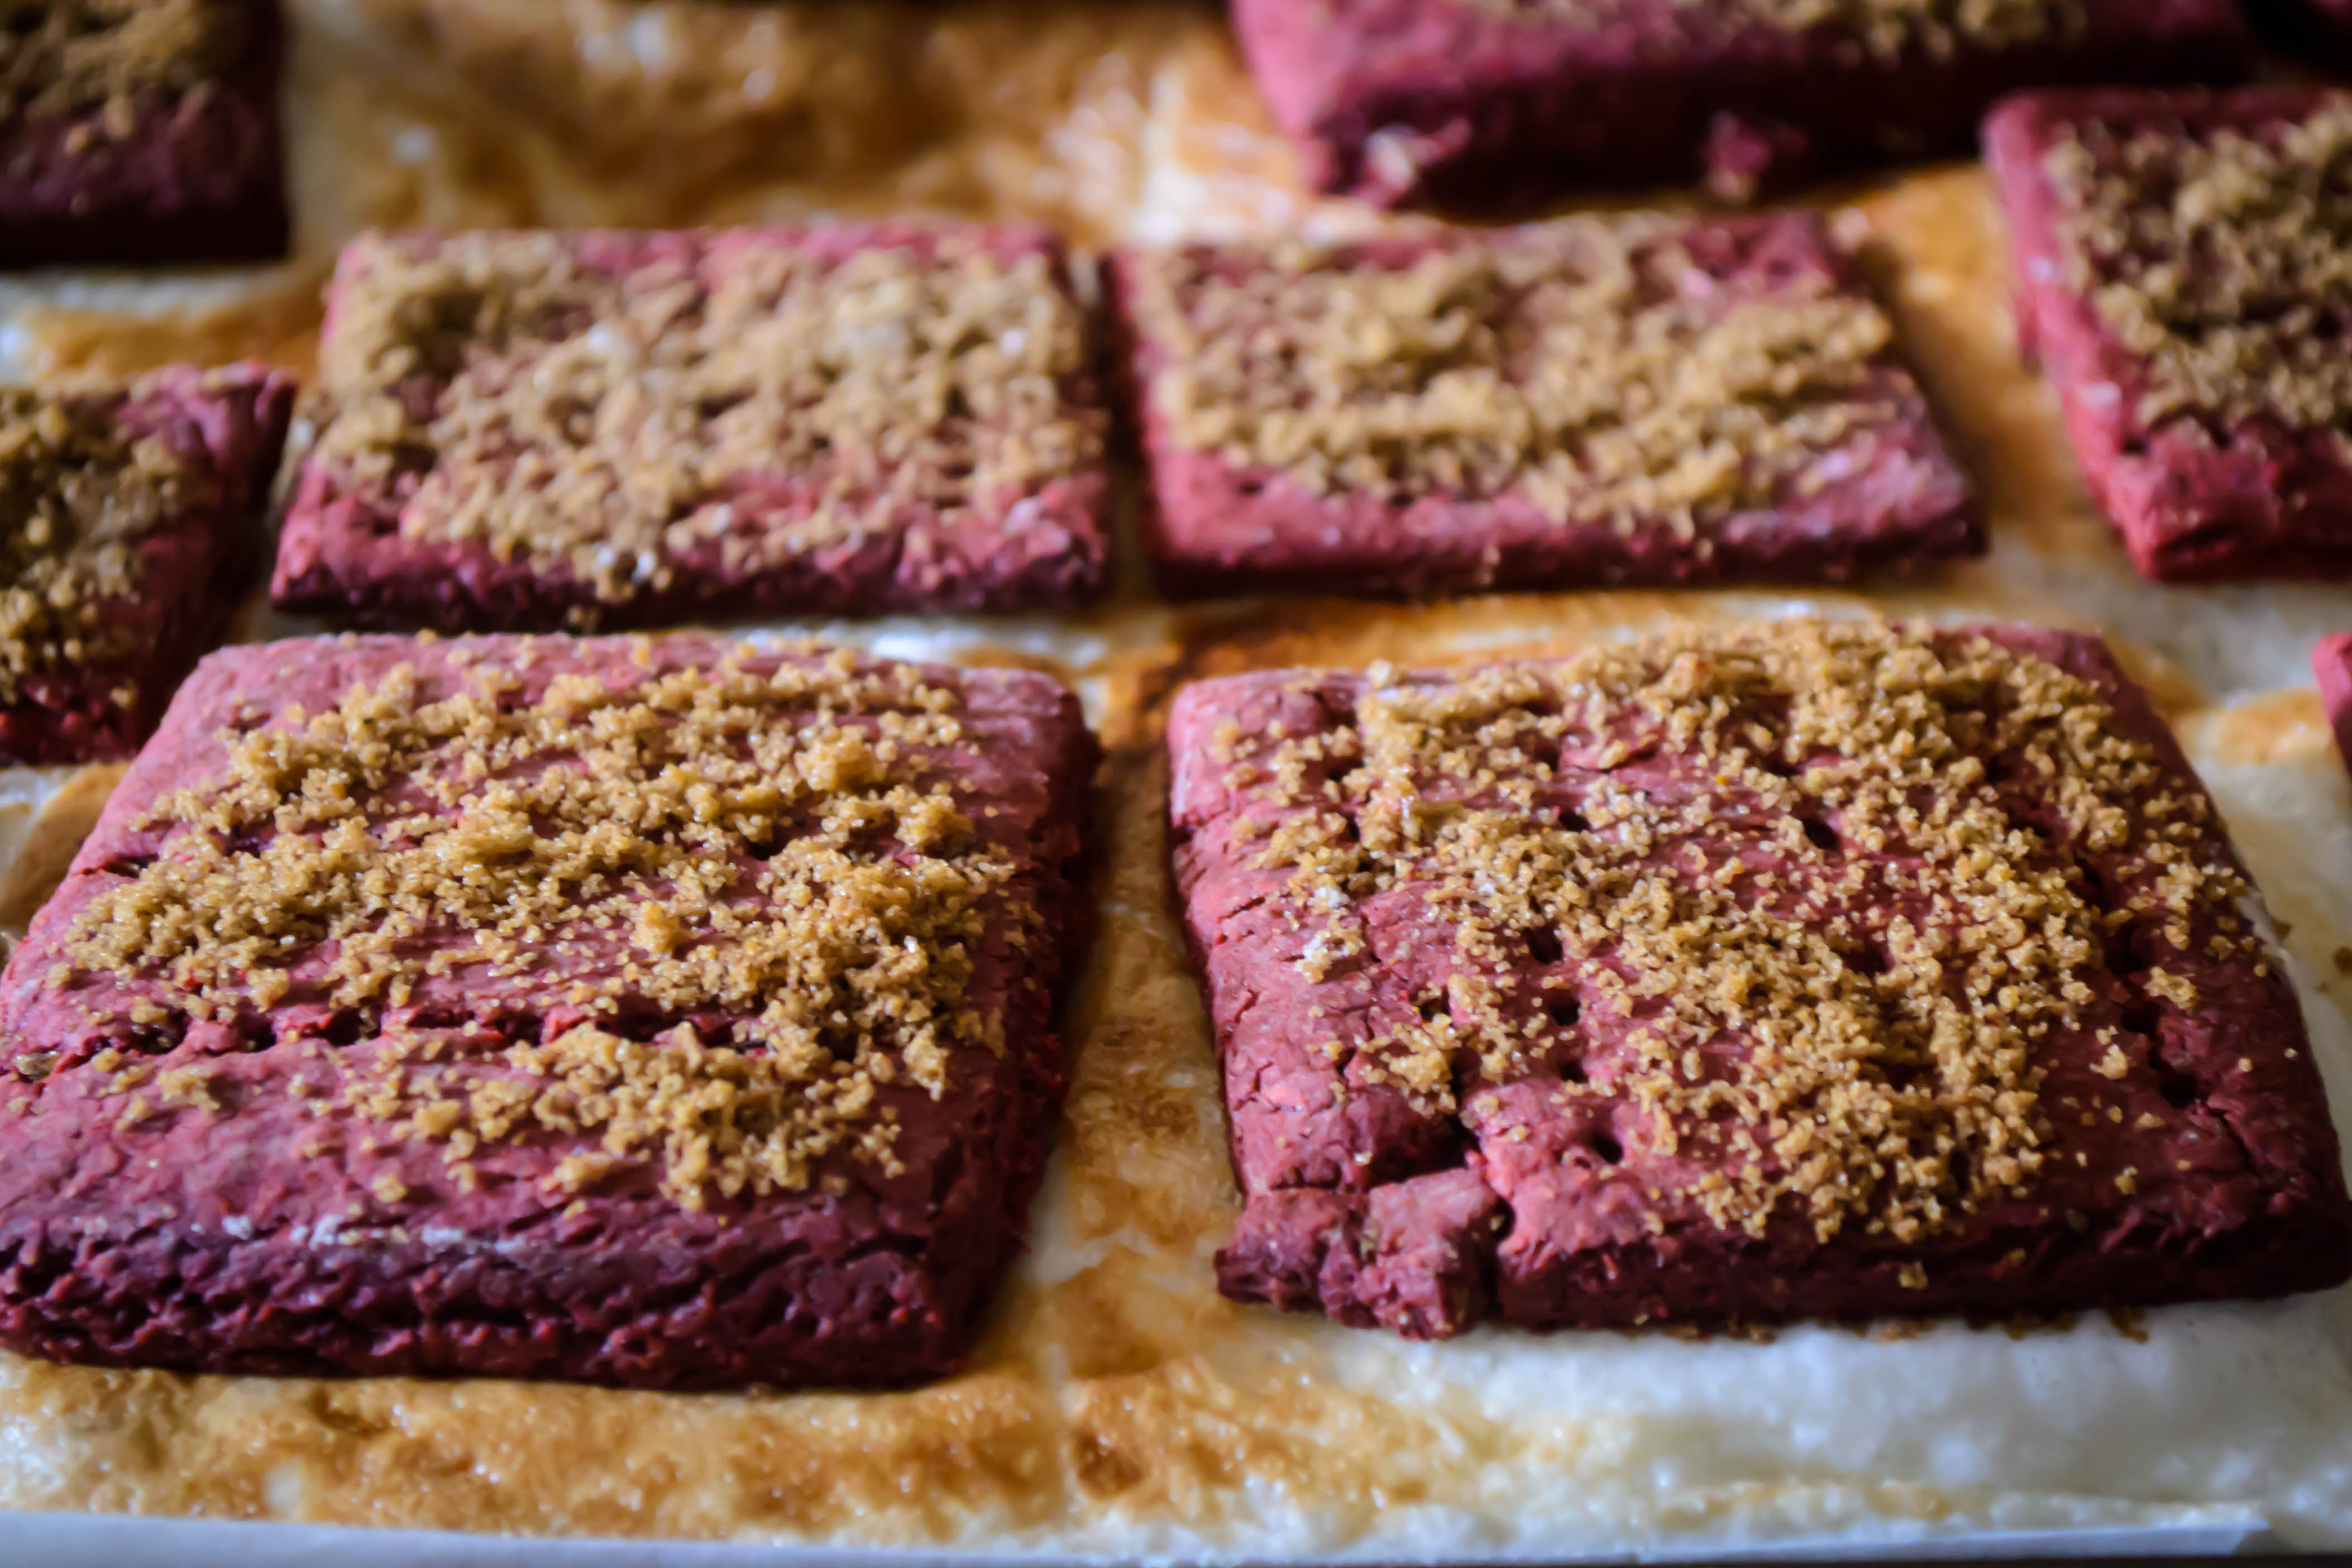
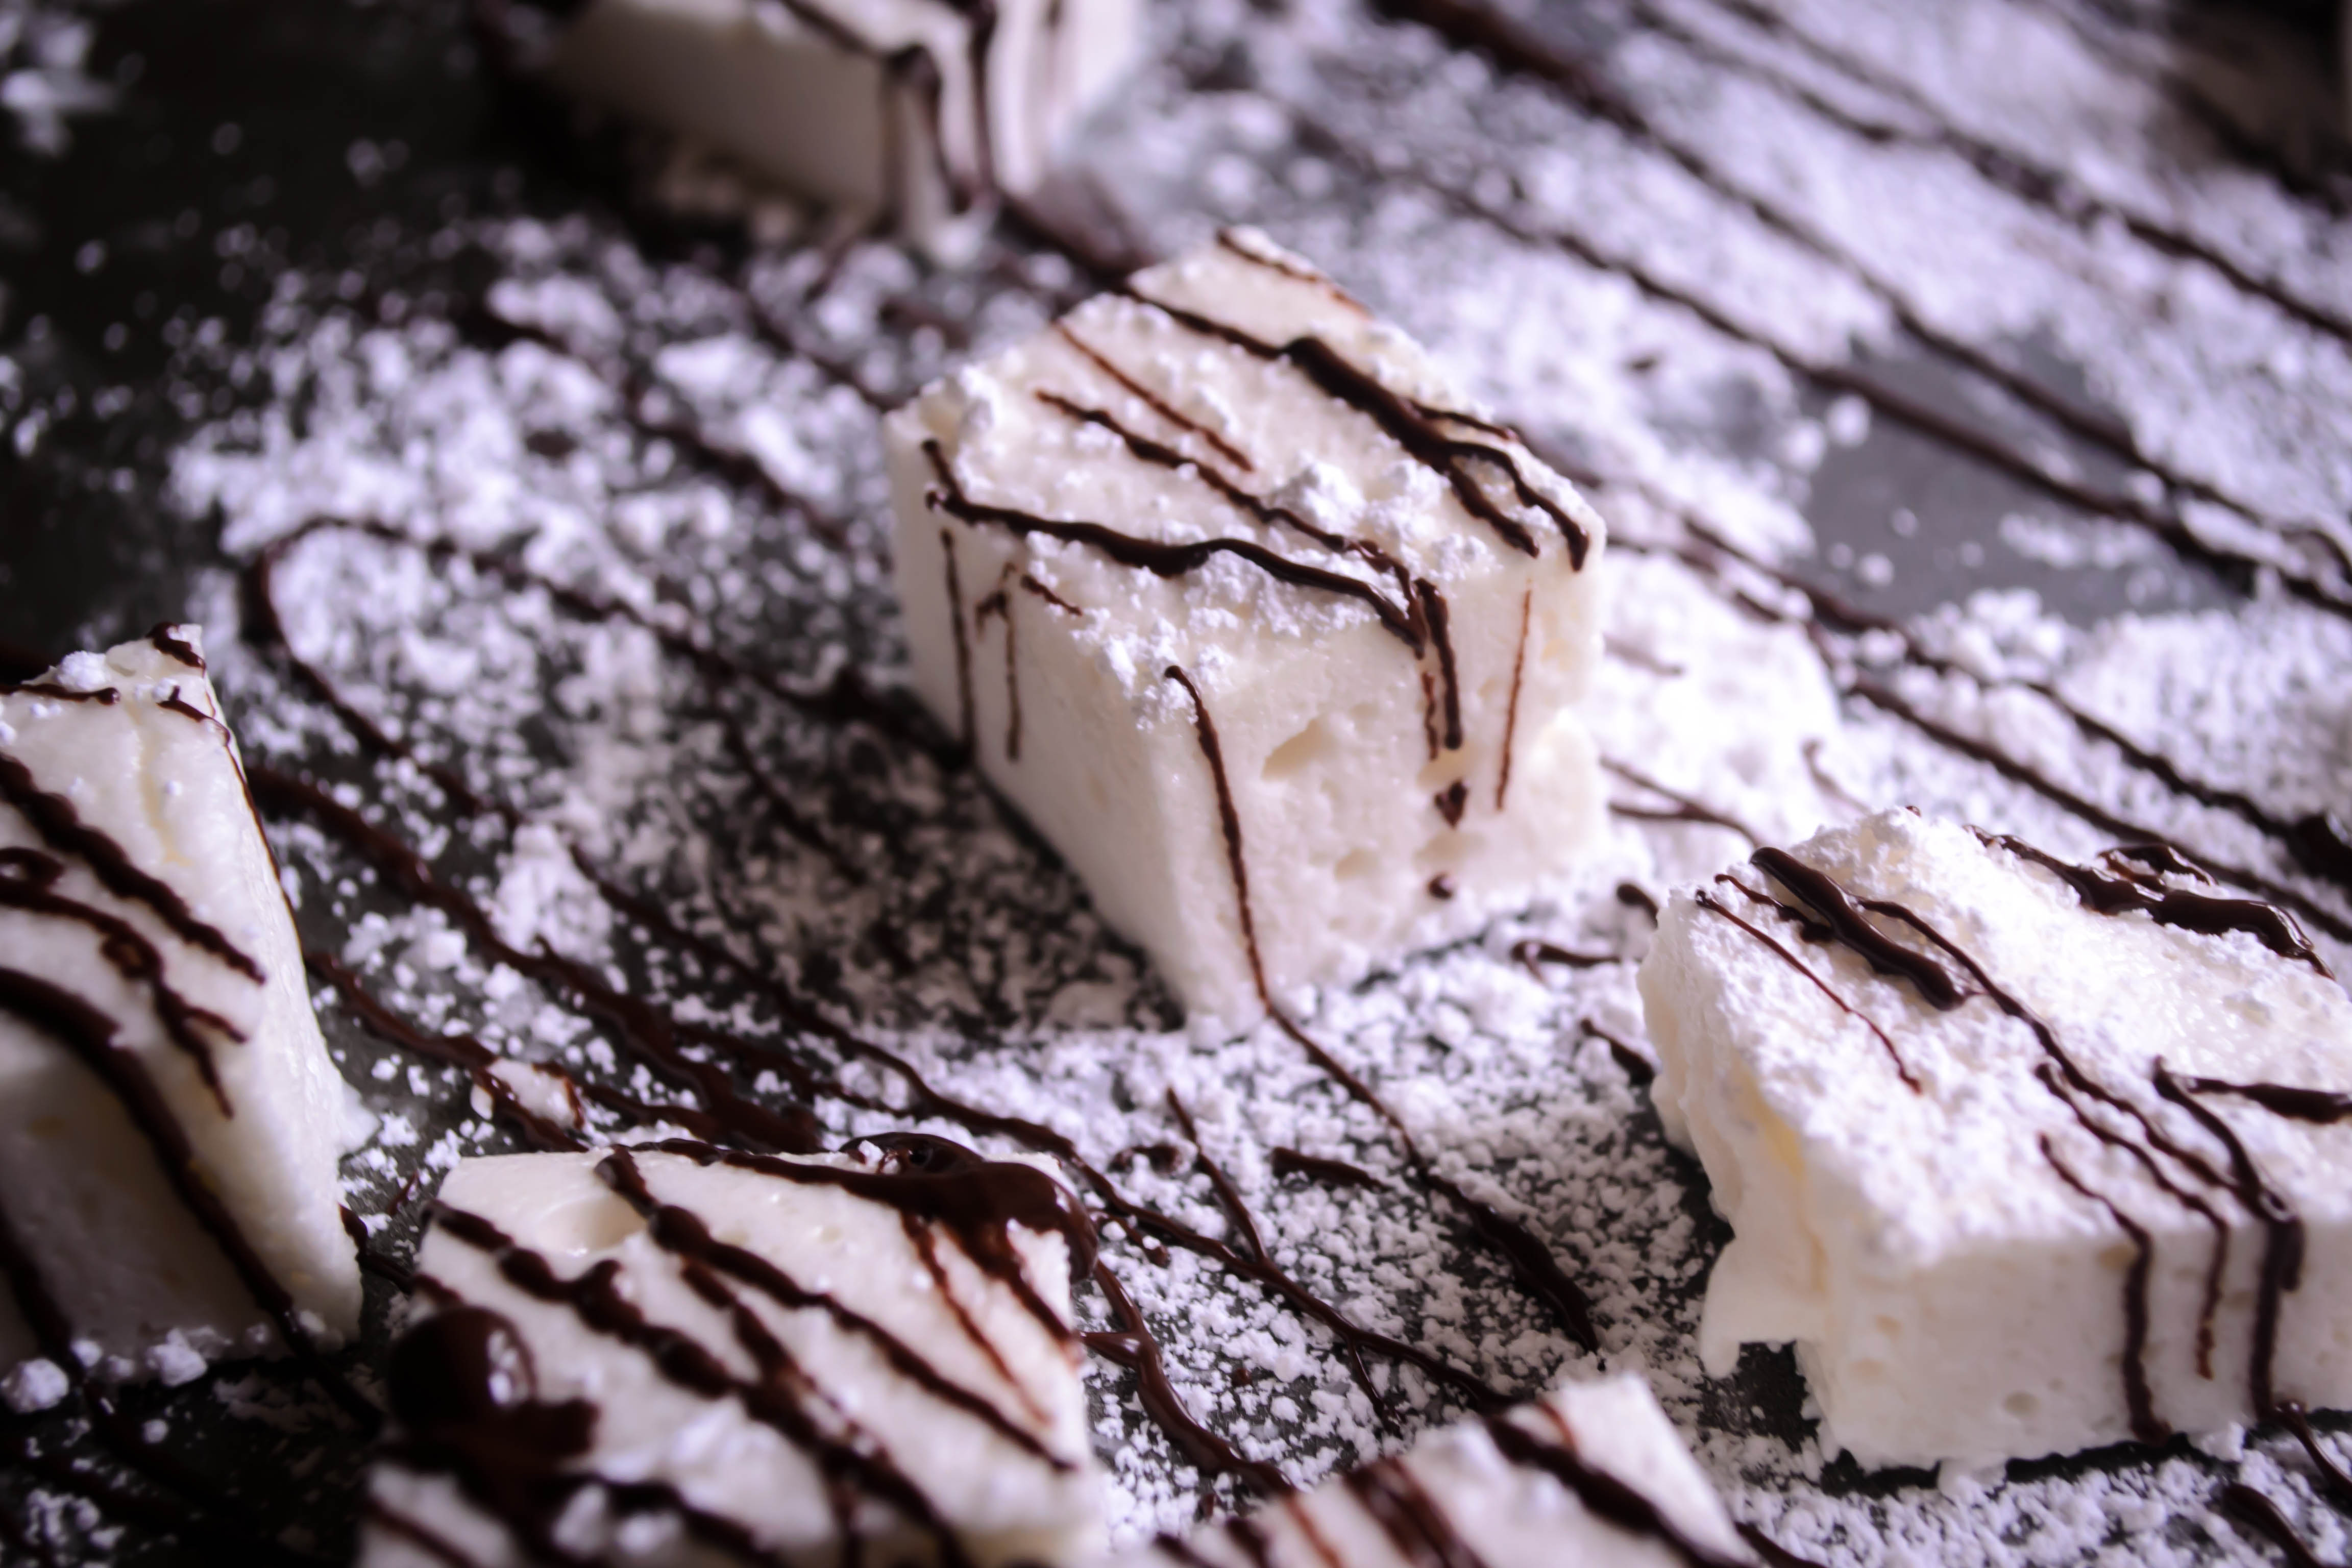
Making Eat the Love‘s Red Velvet S’mores with Cream Cheese Marshmallows.


As I continue to write this blog, I think a lot about the kind of person I am, and the kind of person I seem to be becoming. I don’t mean this necessarily in a deep, philosophical or metaphysical way (although sometimes those things collide in the expanding corner of brain-space I use to think about food), but in a “what sort of food person am I?” kind of way.
 Example: probably about five years ago, I wanted to make fried rice but didn’t have one of those seasoning packets, not even when I dug all the way to the back of my pantry (I can hear you gasping in horror that I ever had one in the first place. What can I say? We all have guilty secrets about one thing or another), so I tossed a few things together and ended up with a sauce we really liked. I haven’t bought one of those seasoning packets since. From there, I added different spices, different quantities, different ratios of garlic and ginger… and suddenly the bags of frozen stir-fry vegetables we were tossing in weren’t good enough anymore. Fresh vegetables were now a mandate. Fried rice used to be a quick and easy dinner! Now it’s a totally from scratch undertaking. And that’s the kind of (food) person I am becoming.
 Example two: I used to subscribe to a number of cooking magazines. Though I let my subscriptions run out (their cost made them an unjustifiable luxury during graduate school), I continued to use the collection I’d amassed, restricting myself to cooking recipes only from the current month’s issue: no August recipes in April. This was an attempt to keep myself seasonal and inspired. Well, this year it stopped working. As each new month began, I’d eagerly flip through the appropriate month’s issue looking for something to excite me and drive me into the kitchen. I’d close each issue with a sigh and toss it to the side. There were many, many recipes I hadn’t tried before, but there just wasn’t anything in there that felt inspiring anymore. Well, almost. Once in a while, I’d find a recipe that I’d consider for a moment and then turn to N. and say something like, “this might be good, if you made it into a pasta dish instead of a sandwich and added some sundried tomatoes and herbed goat cheese.” And I’d do it, and we’d be pleased with the result.
After a few months of this sort of thing, interspersed with a probably indecent amount of complaining about how I was bored by these recipes, N. finally turned back and said, “I think you’ve leveled up.” Translation: your imagination has moved beyond what these magazines offer and you are now on to bigger and (we hope, for the sake of our taste buds) even better dishes. And that’s the kind of (food) person I am becoming.
 Example three: since I’ve started baking bread, I’ve been trying to plan meals around a yeasty undertaking once a week or so, to keep myself in practice and find “the best” versions of each type of baked good I undertake. This has resulted in a development I’m not sure I’m entirely comfortable with: though I have continued to buy a weekly loaf of bread (I really like, oddly enough, the plain old sourdough loaf the bakery department at my grocery store produces) when I go shopping, I haven’t bought hamburger buns, or pie dough, or pizza dough, since beginning this little dough experiment. Am I really the kind of person who no longer considers store-bought burger buns acceptable? I’m not sure I’m ready for that kind of commitment, but that seems to be the kind of (food) person I am becoming.
 Does that make me a snob? Maybe. It certainly makes me one of those “oh, I just made it by hand” kind of people you sometimes feel inclined to secretly snarl at. But no one in the direct friendly fire of these developments is complaining, so maybe it’s not entirely a bad thing.
 But it does make things more complicated, and more difficult to achieve, sometimes. Like when I decided I really wanted cinnamon-raisin bread for breakfast, but instead of picking up a pre-packaged loaf as we shopped, I was determined to make it myself.
And then I forgot to buy raisins.
What’s a girl to do, with the plan in her head and the taste already in her brain and the soft chew of homemade bread aching in her teeth?
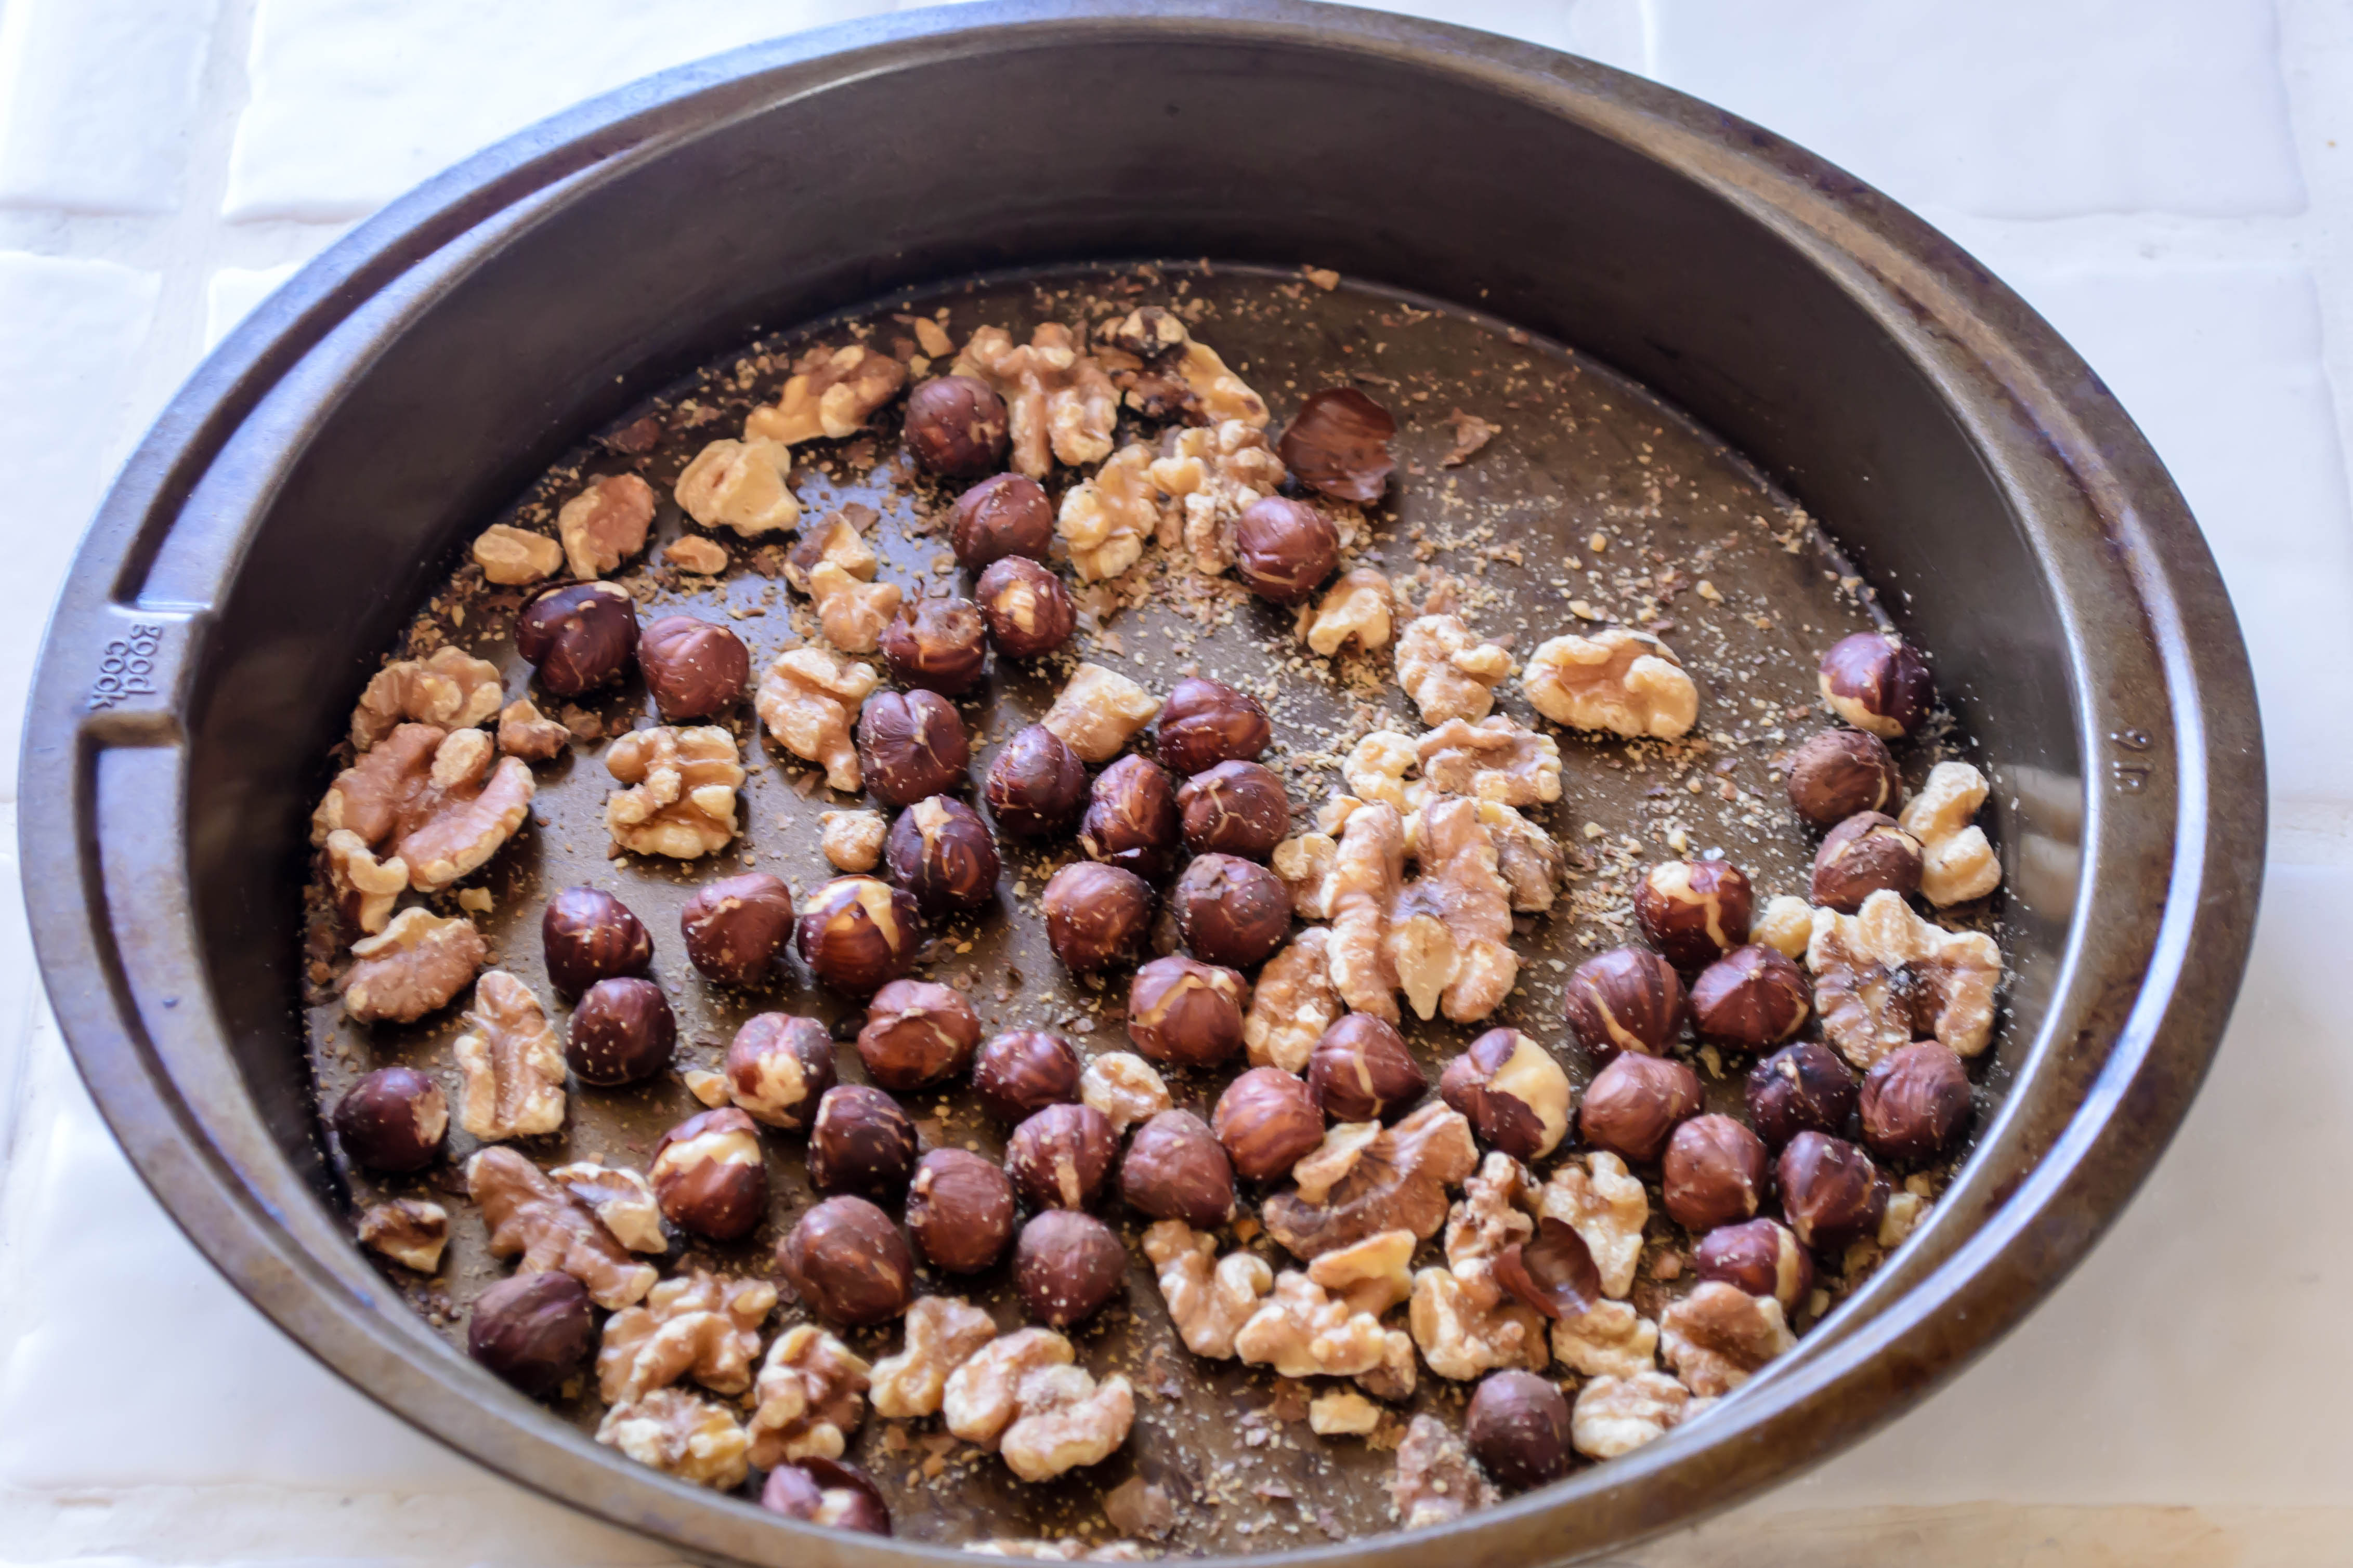
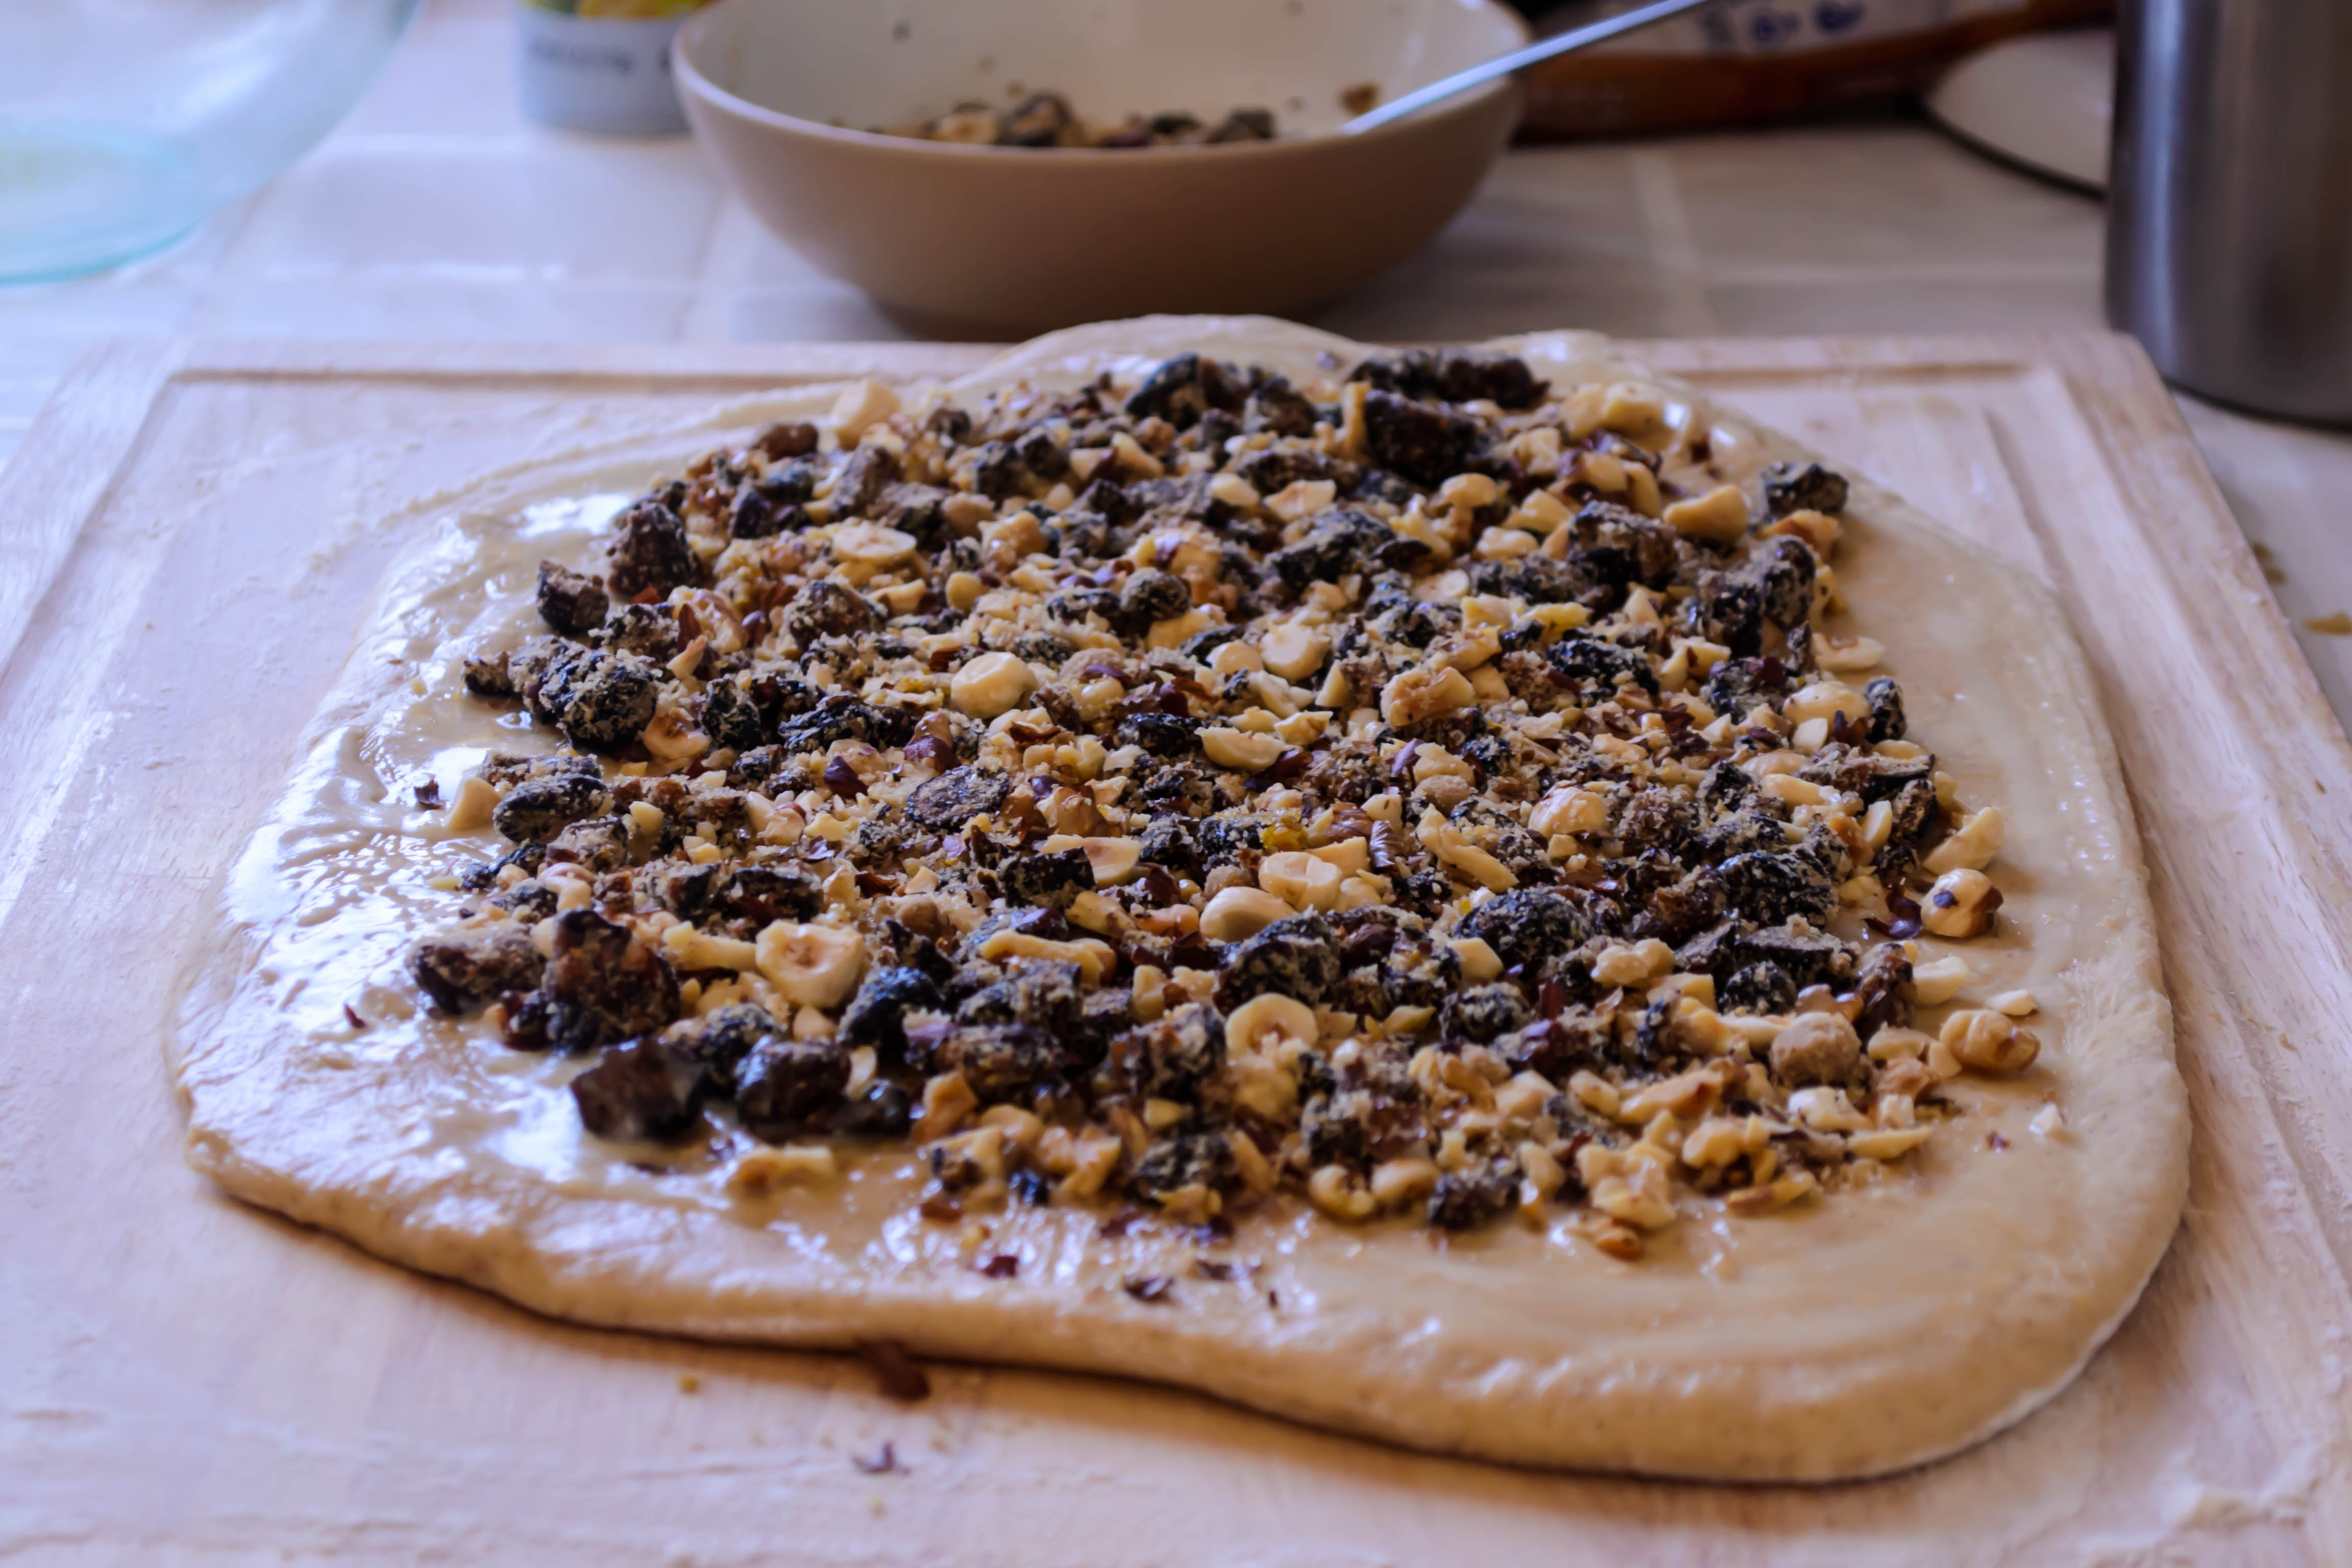
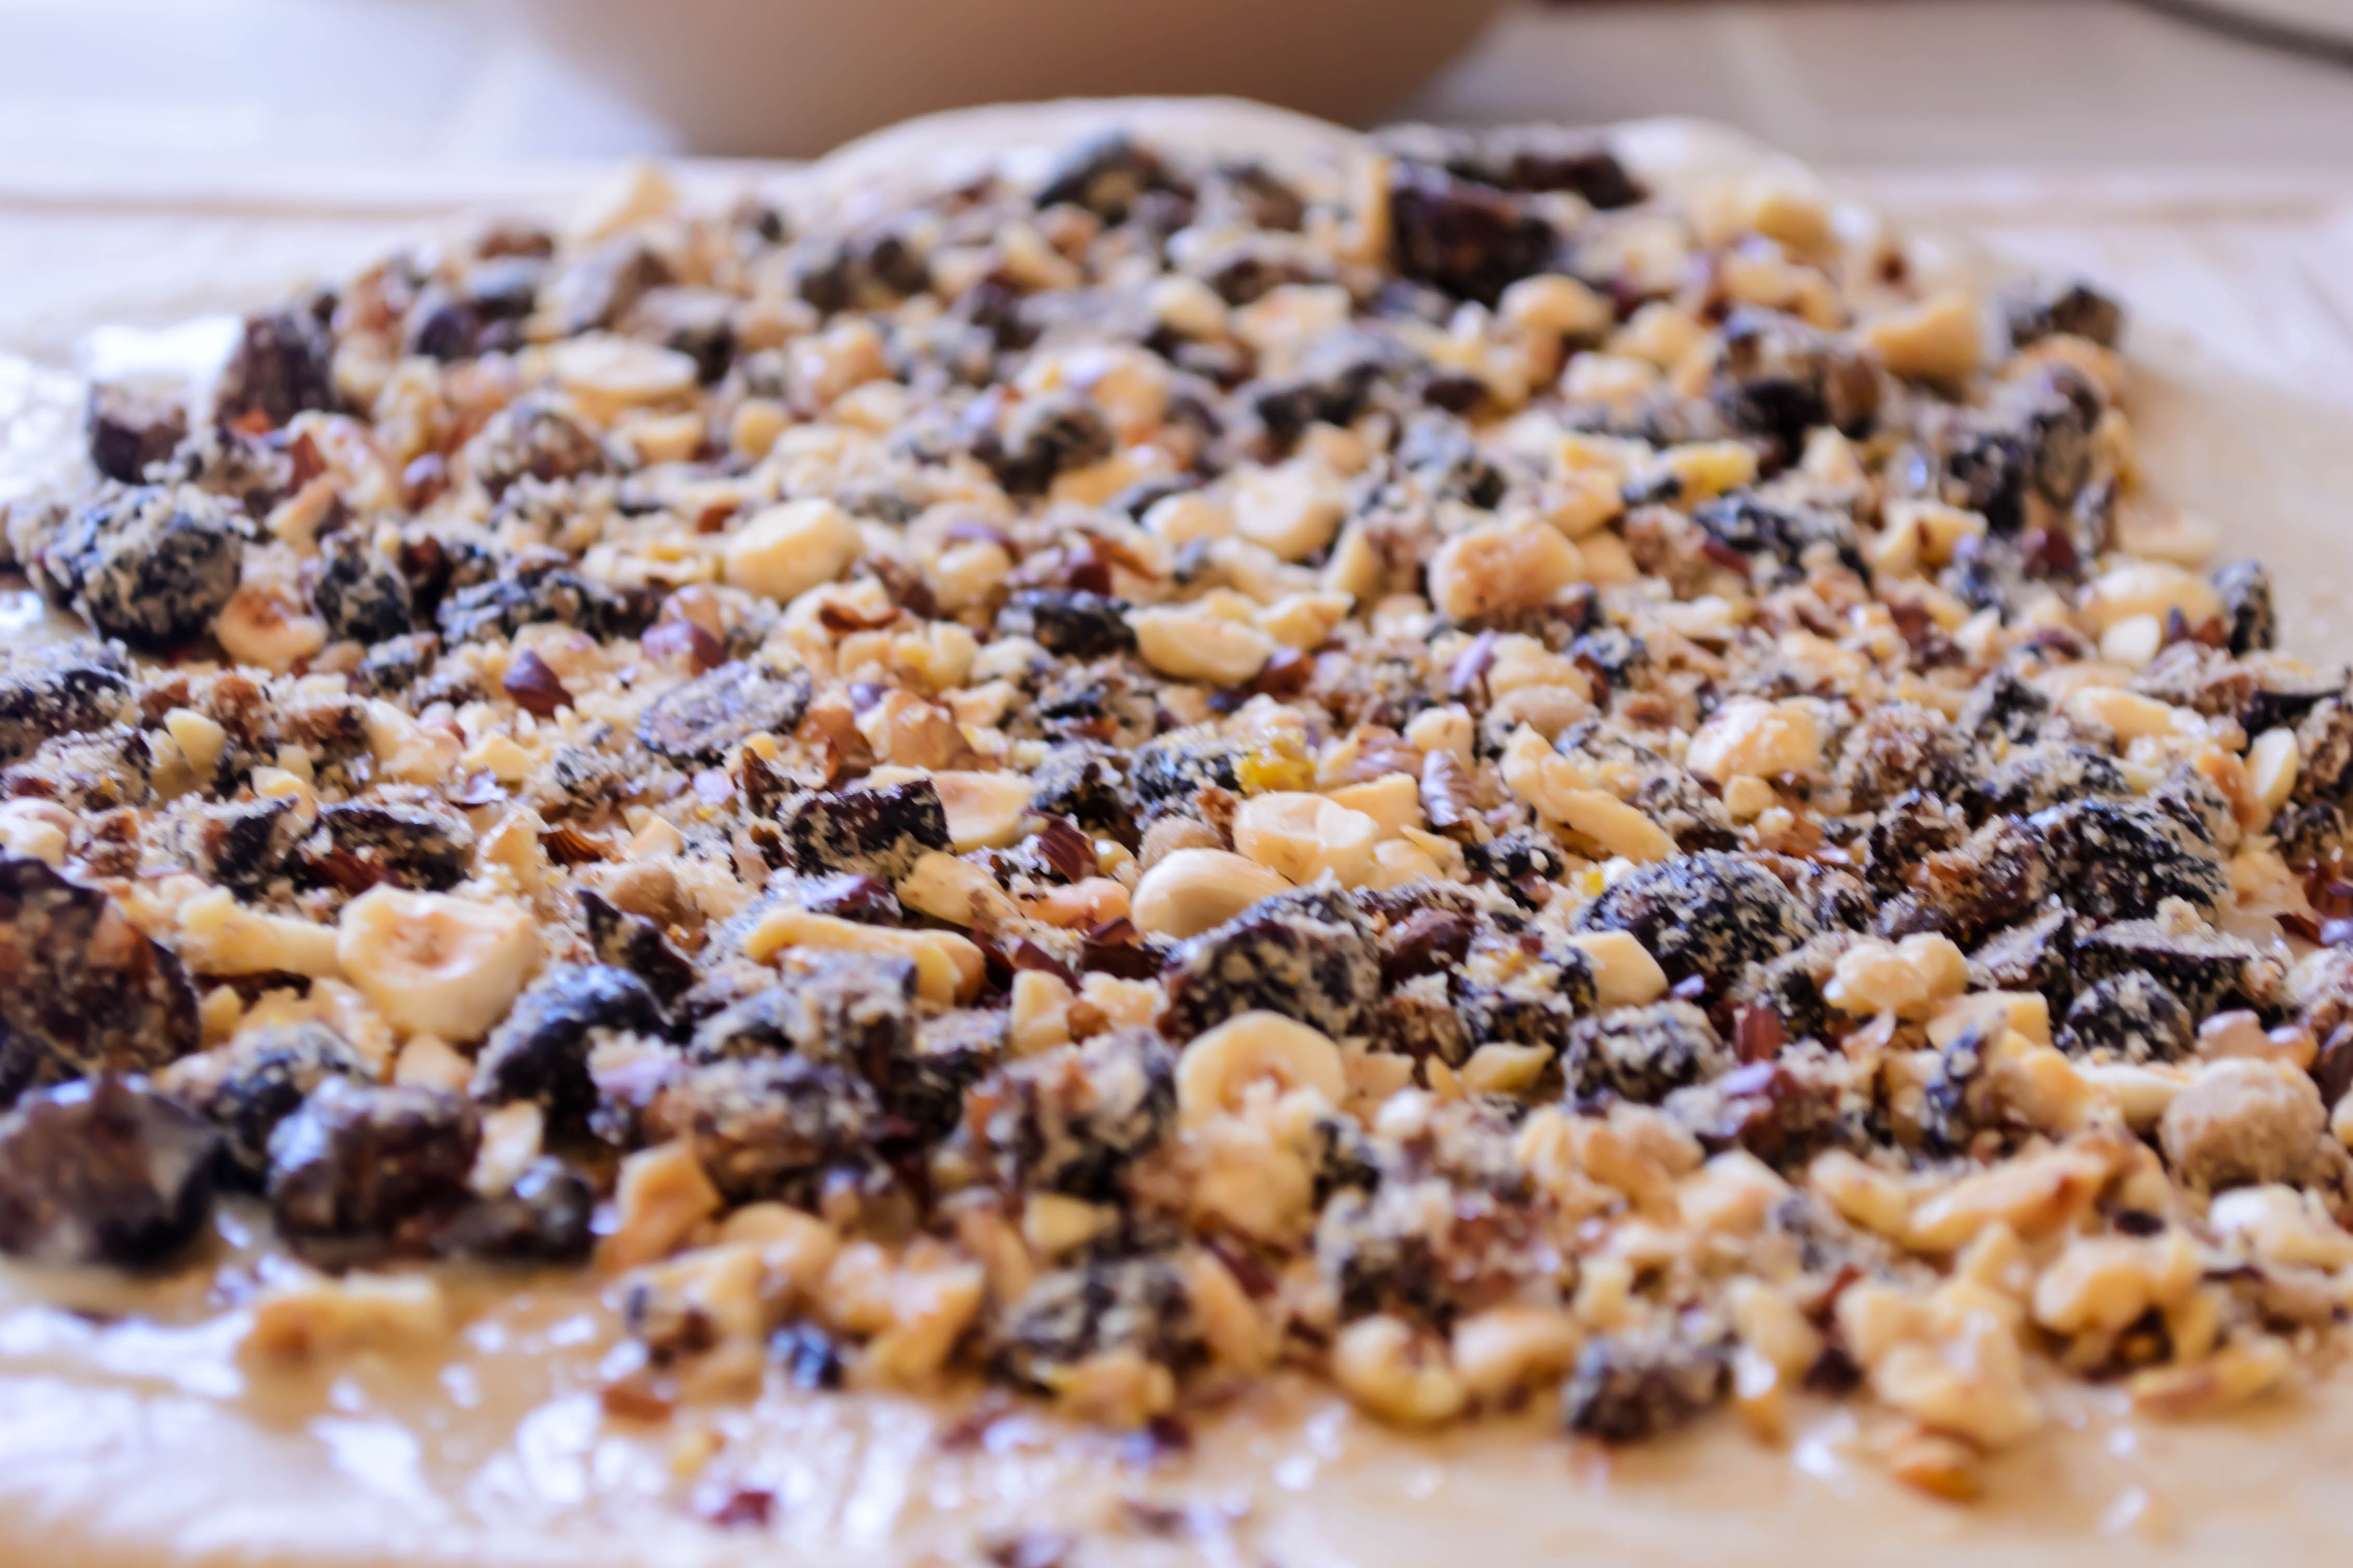
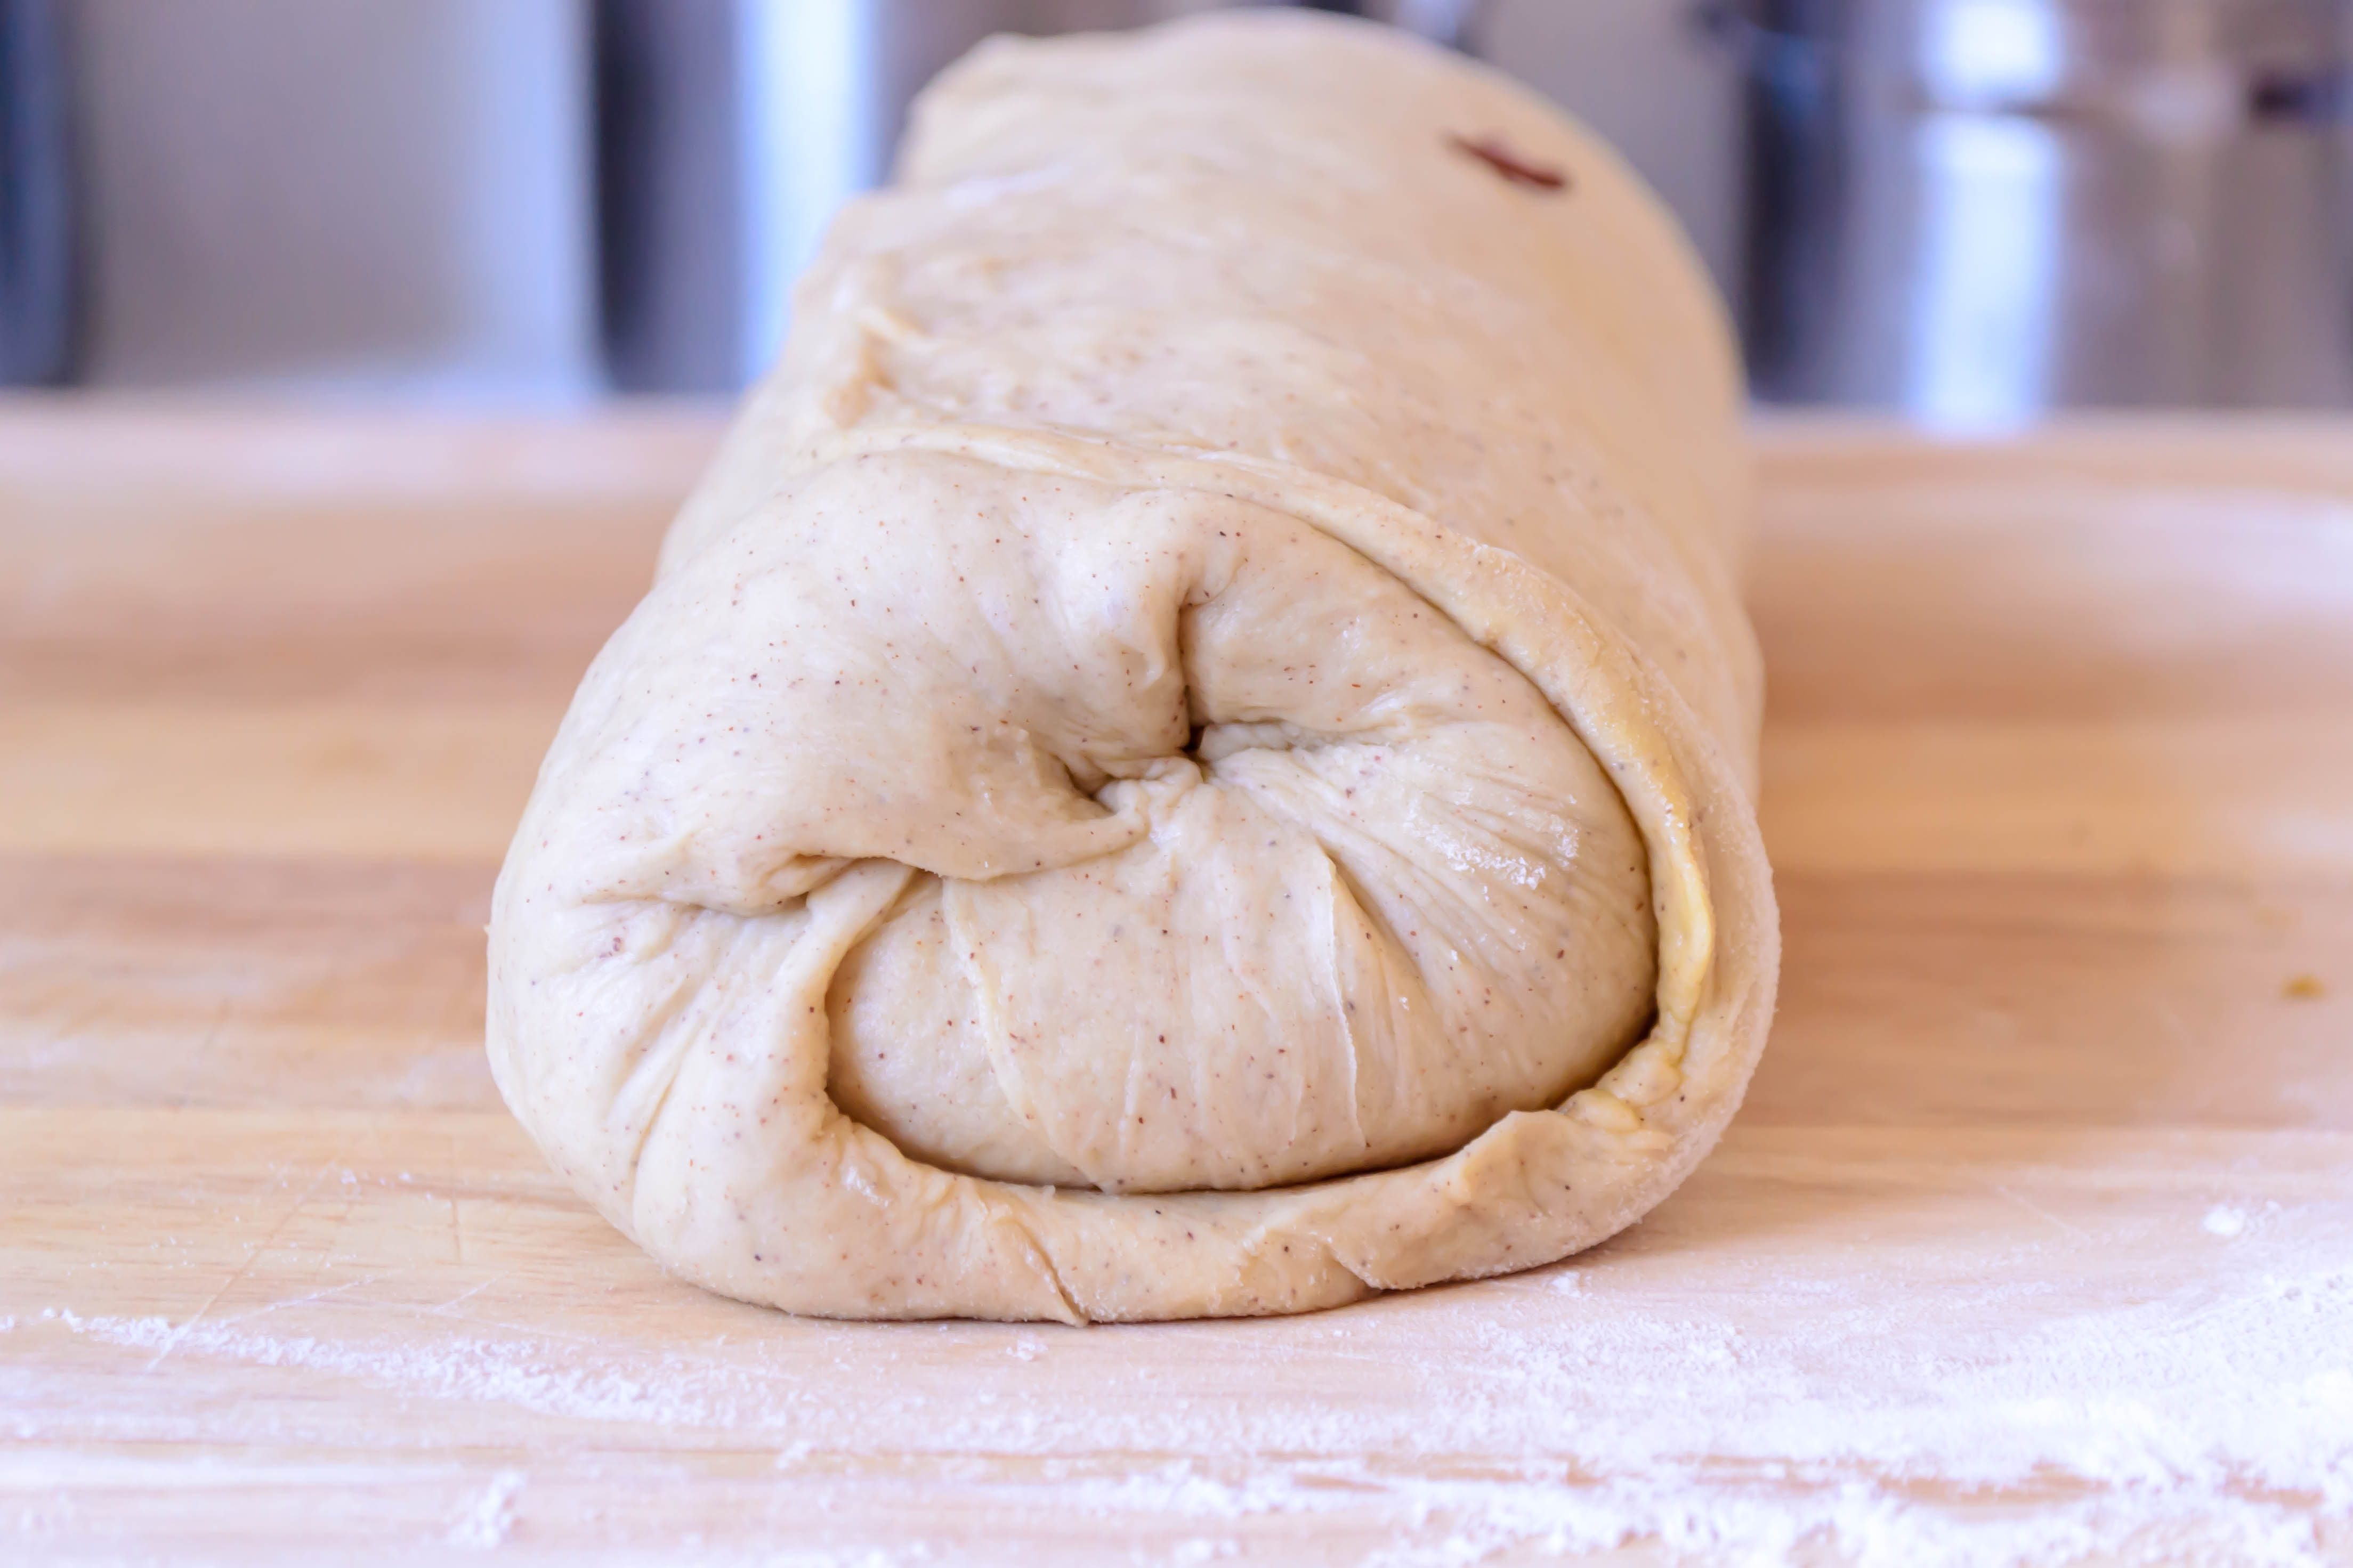
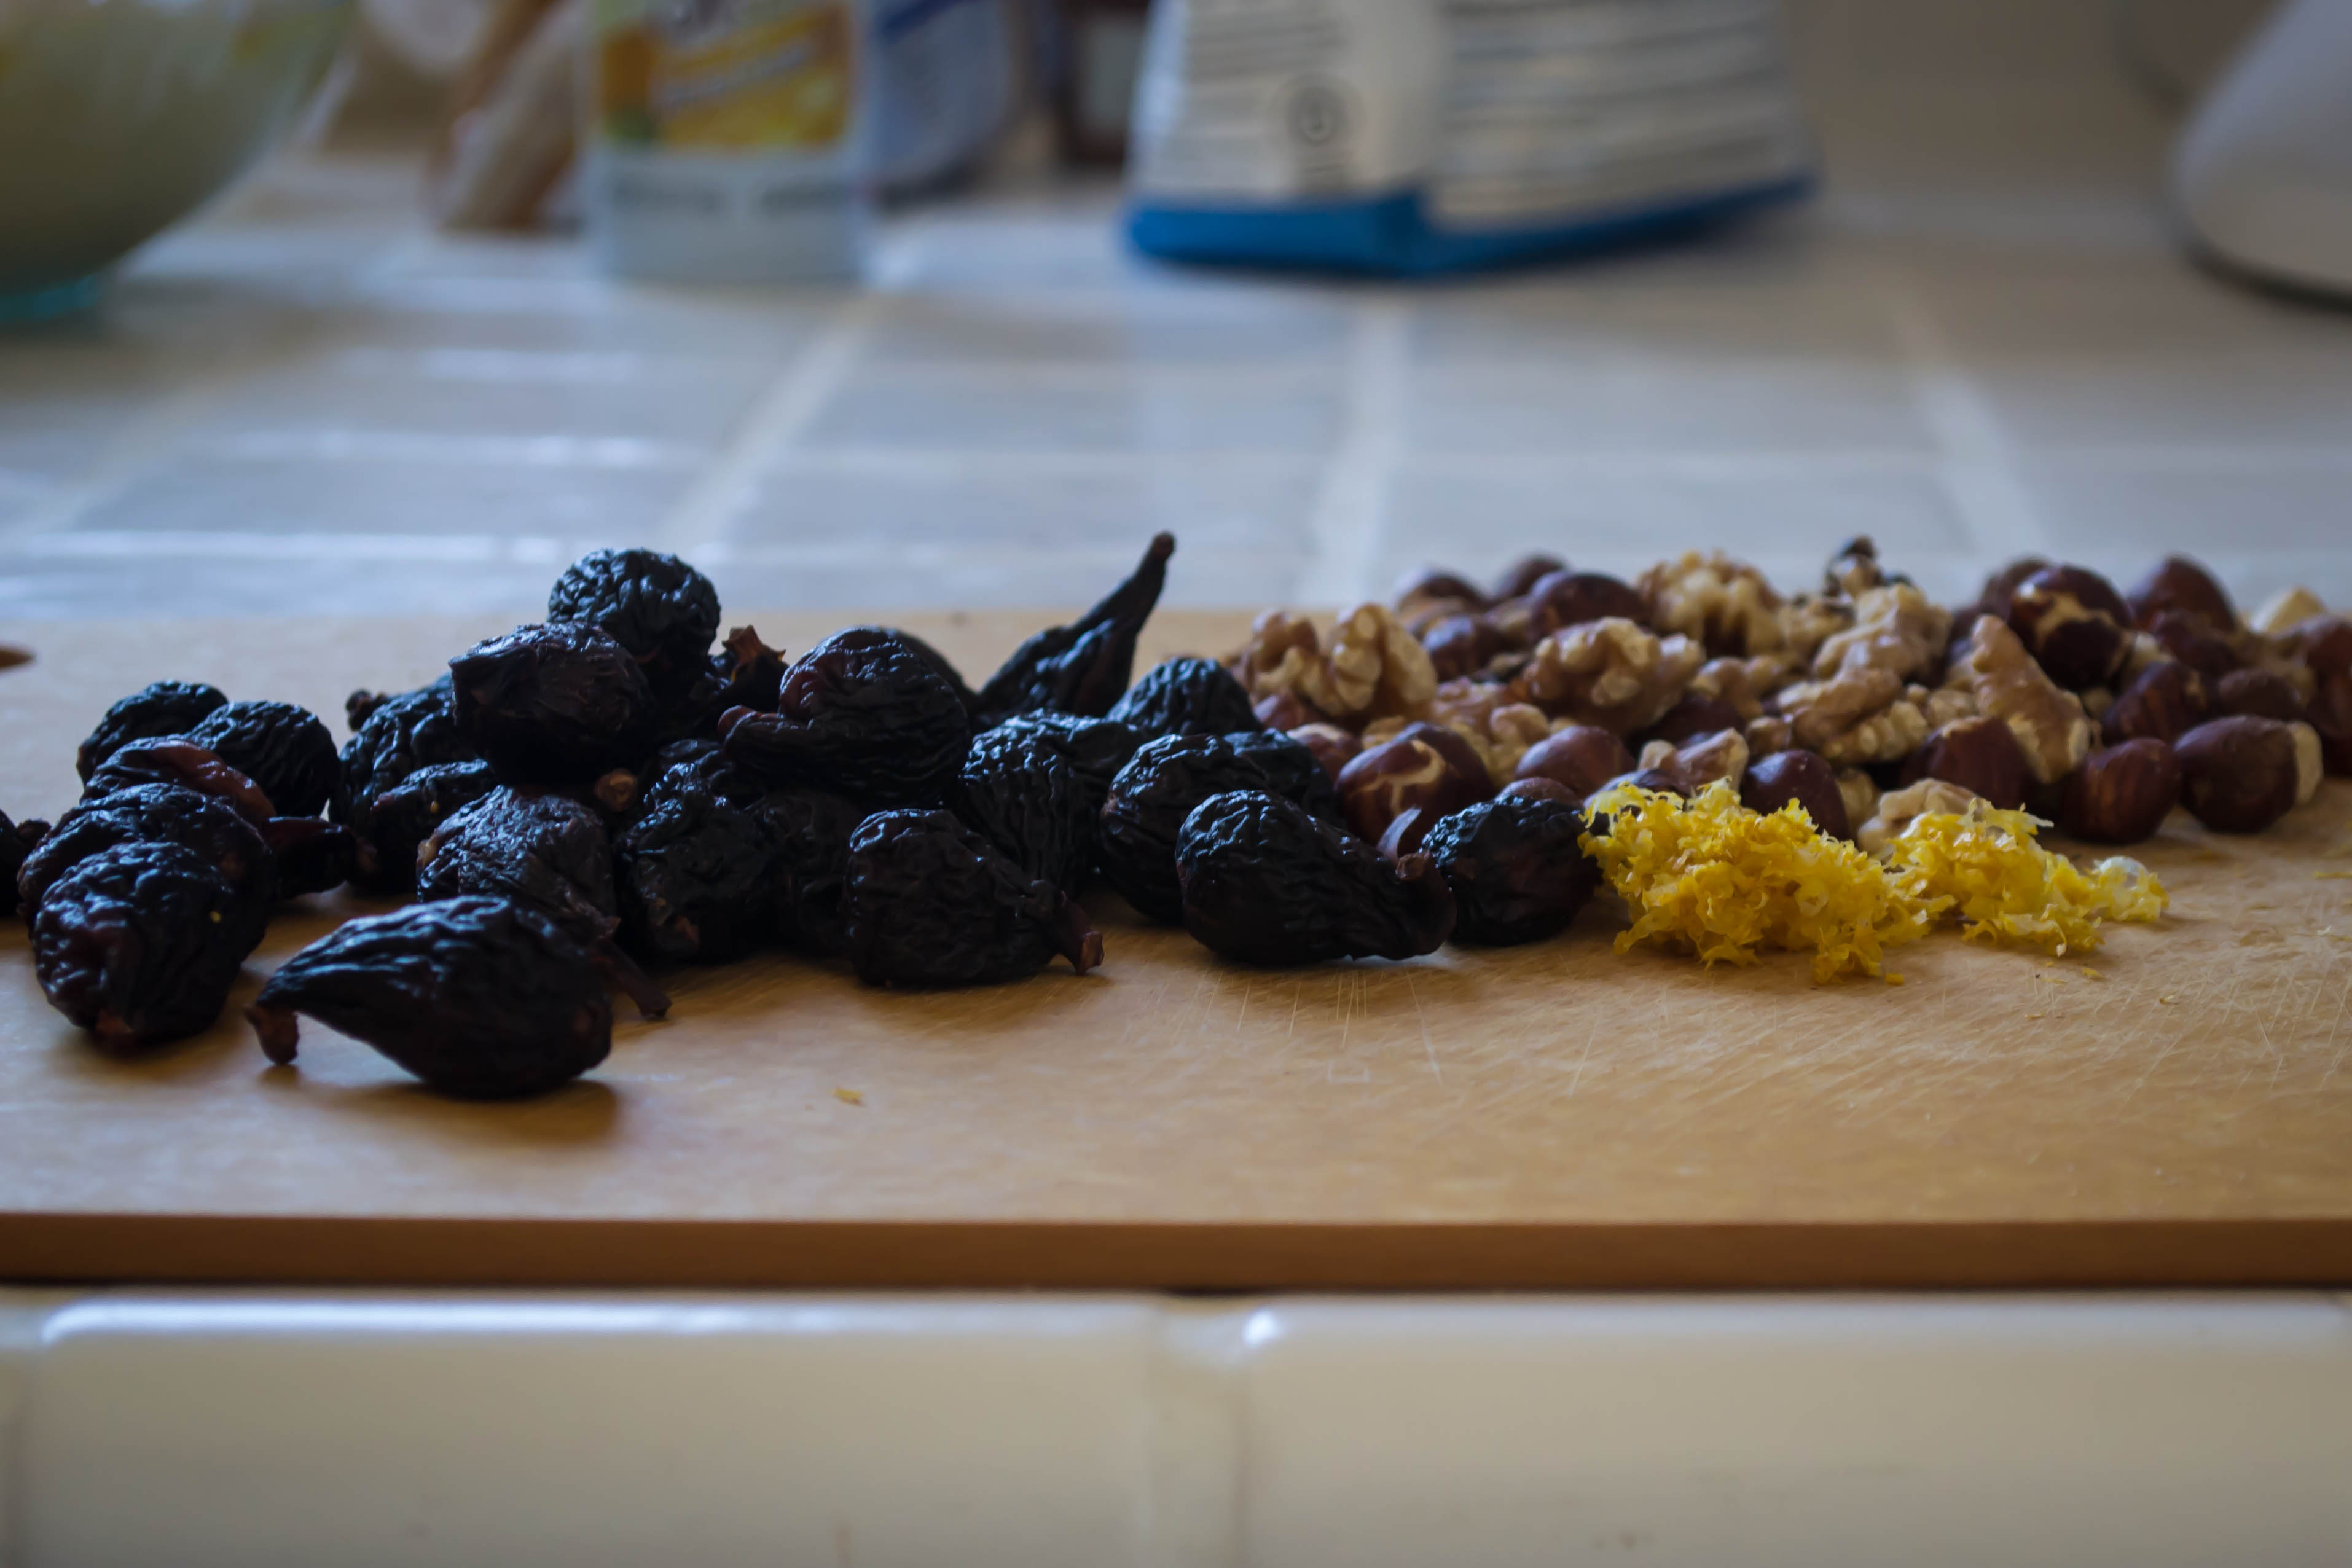 Well, she chops up some figs, and some well-toasted walnuts, and some hazelnuts for good measure, because she was almost out of walnuts. She whirls together a soft, supple dough laced with brown sugar, cinnamon, and sour cream. Nutmeg and lemon zest find their way in. And she rolls up a crunchy crumbly sweet layer of fruit and nuts inside the dough, twists it to dispense the swirl, and lets it rise into a triumphant bulging loaf.

 And what results, after it’s been rubbed with butter and cinnamon sugar for good measure and baked until golden and puffy, is something that drives standard cinnamon-raisin bread straight out of her mind.
 The sour cream adds a beguiling richness to this loaf, making it almost unnecessary to add a slick of butter or cream cheese to a breakfast slice. The figs and walnuts are a pleasingly earthy combination, and though I wasn’t crazy about the lemon zest I added at the spur of the moment, you might like the brightness it brings to the filling.
 So. Food snob? Maybe. But really, when you’re sitting down to breakfast with a loaf of homemade, fig-filled bread, your mouth is probably too full to complain.
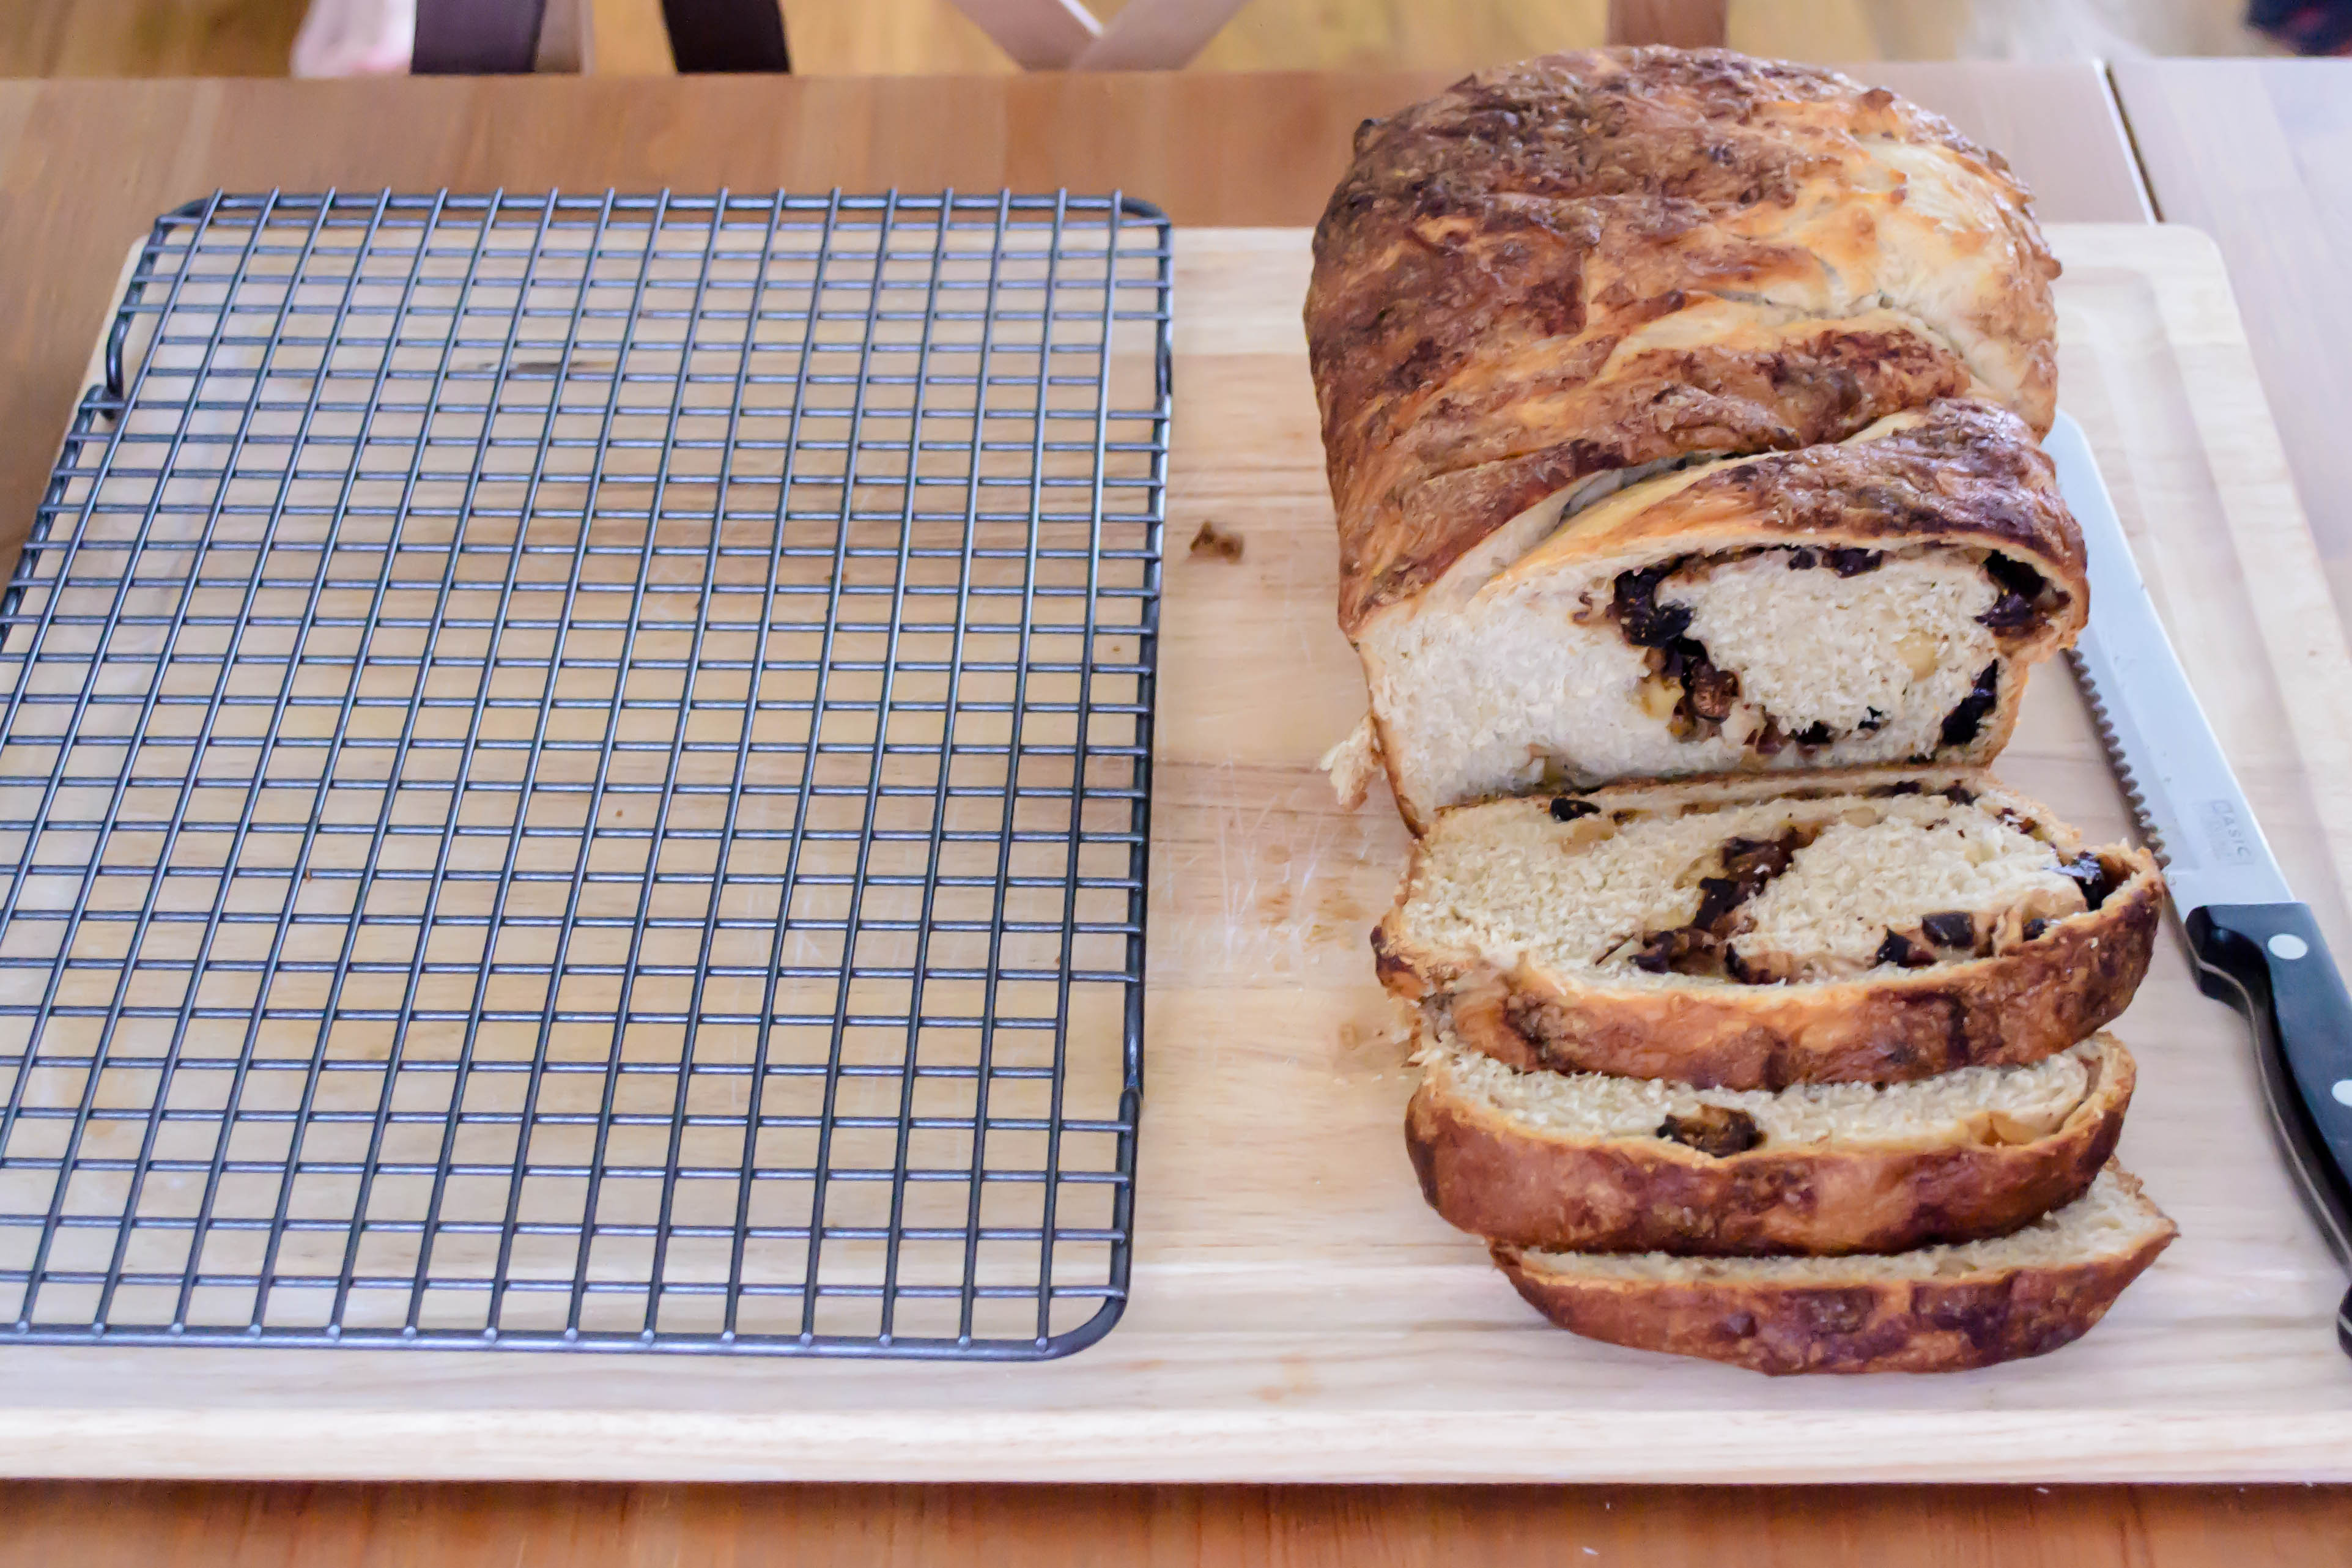 Fig and Walnut Swirl Bread
Blogs have birthdays. Who would have imagined, a mere decade ago, that the little space we write in daily, or weekly, or monthly, or whenever we can, would become so important in our lives that we would want to celebrate its anniversary?
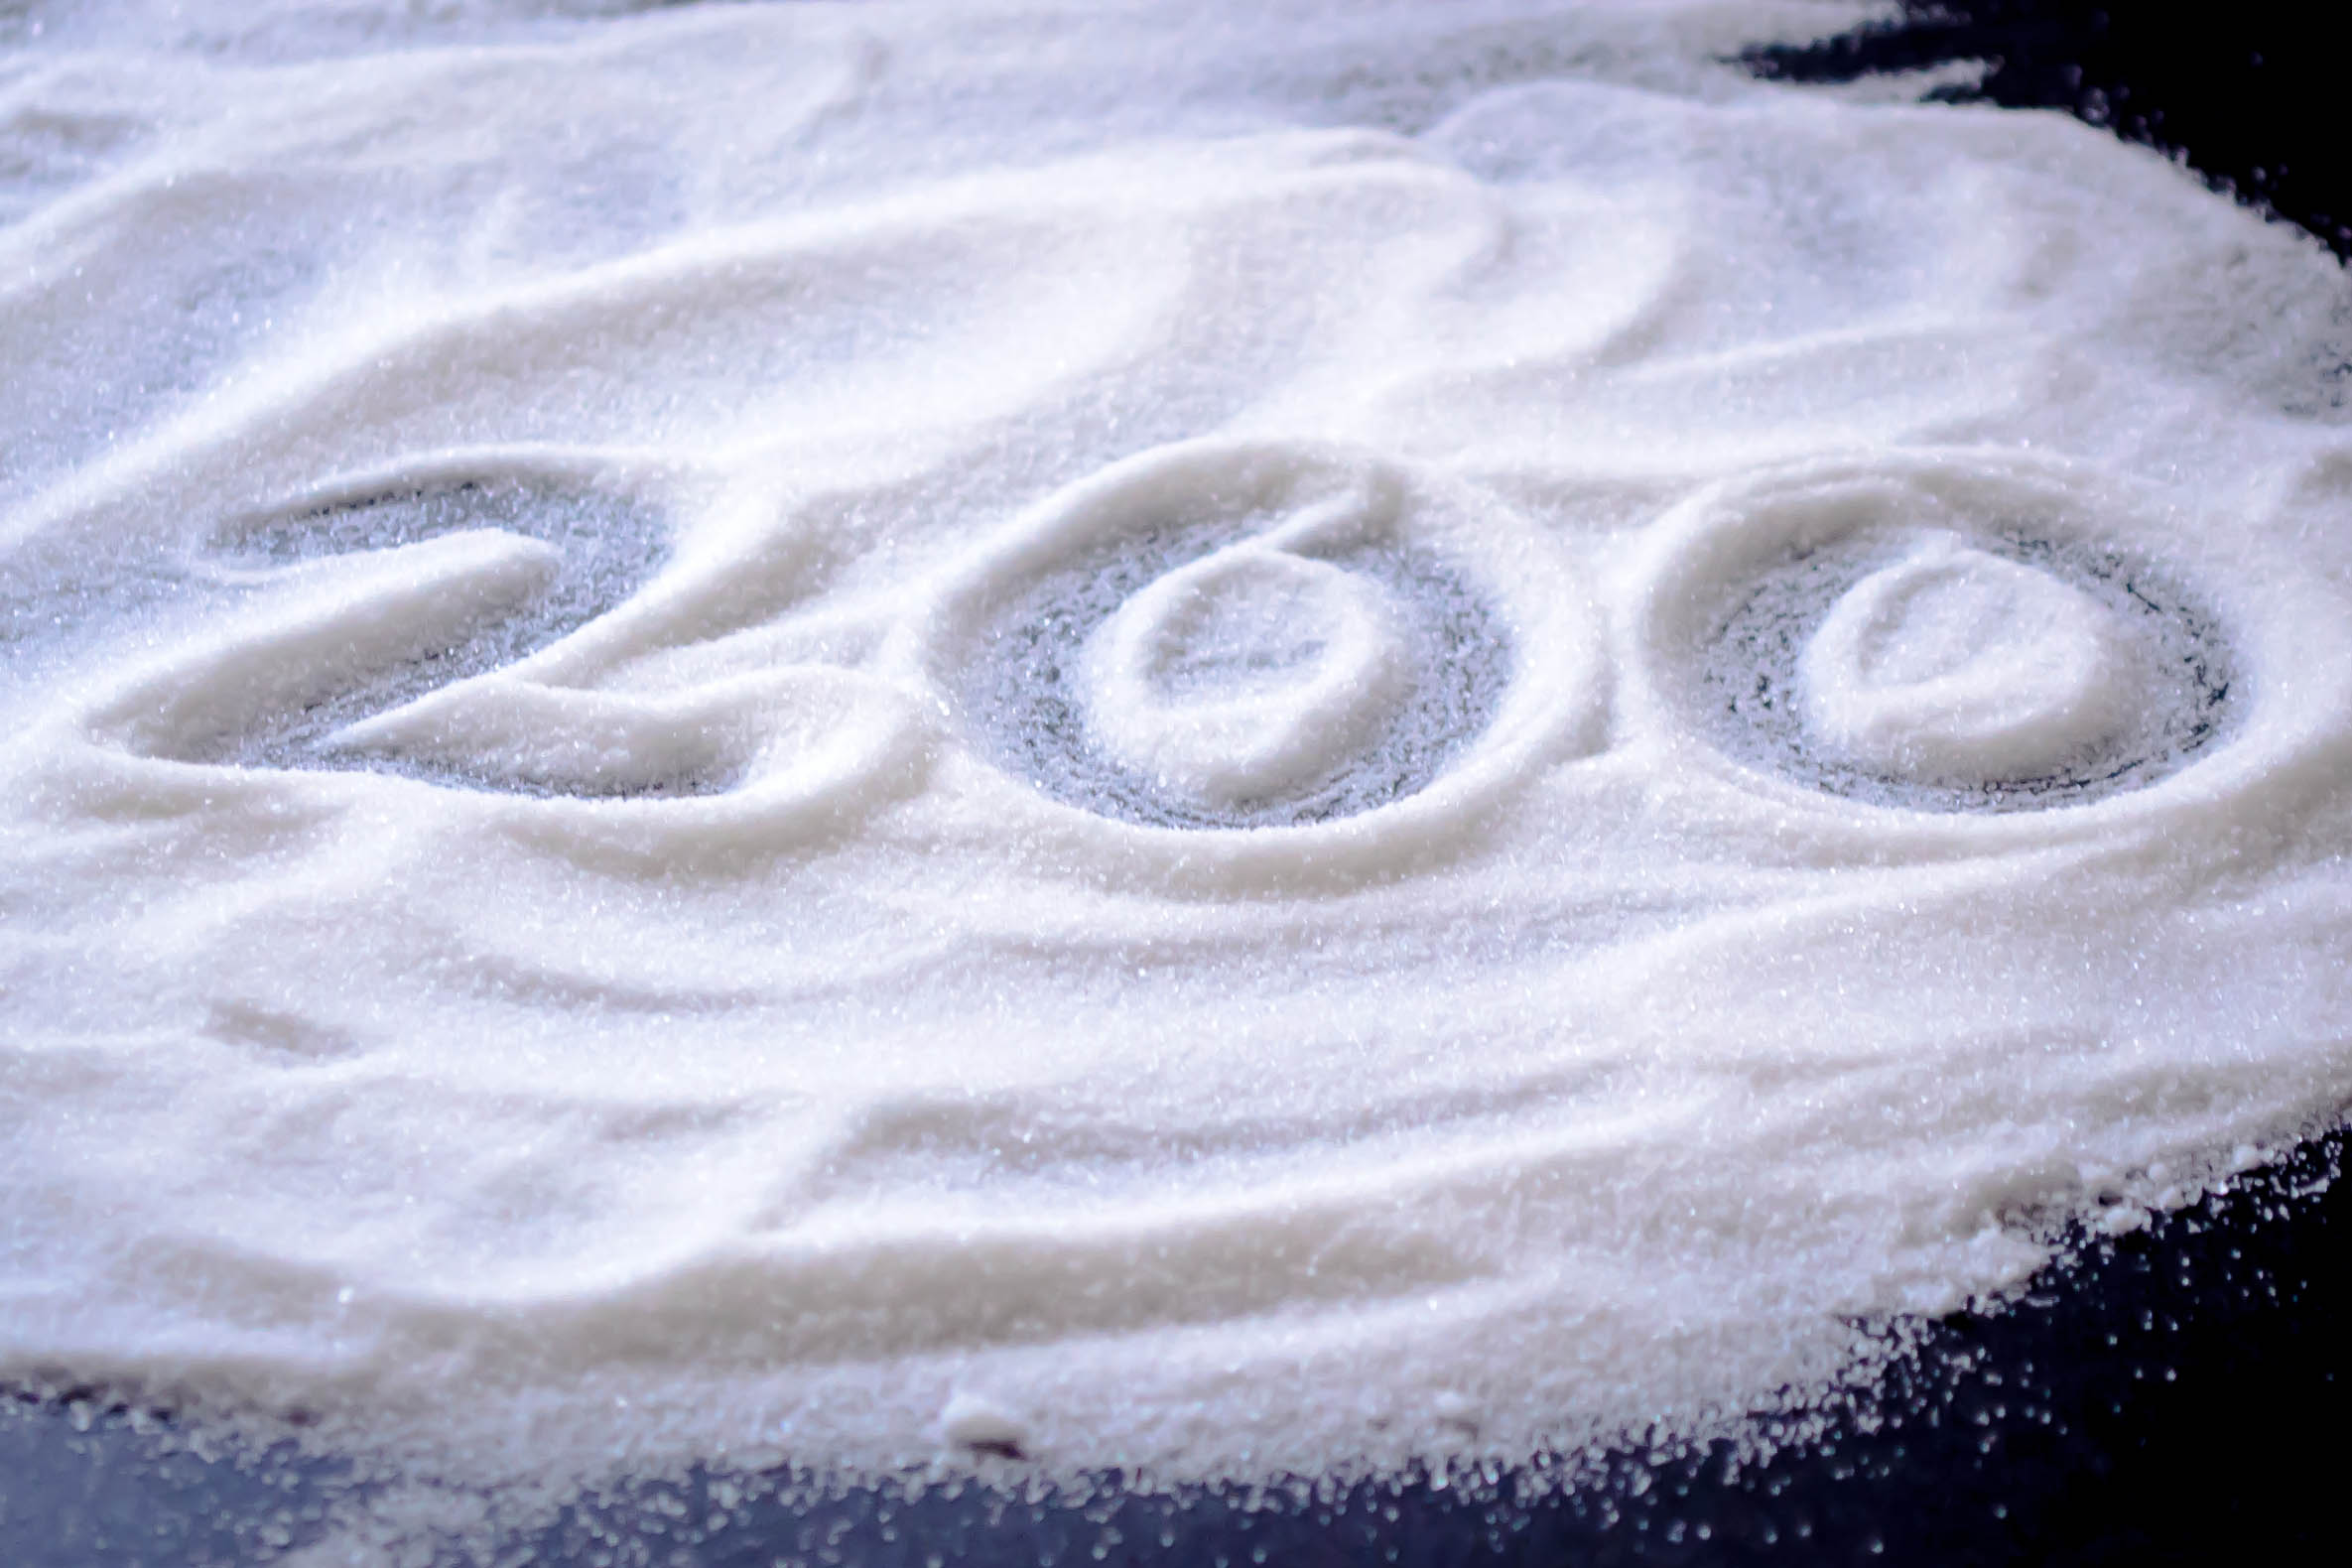 As I look back, it turns out that I started writing in my own little space almost five years ago. But I haven’t celebrated its bloggy birthday, nor will I when I do roll over the half-decade mark, because my schedule of blogging was, at least near the beginning, so sporadic. It doesn’t seem like I’ve really been writing here for five years when for three of those five, you were lucky to get a post a month. The nice thing about WordPress, though (which I’ve been using quite happily for all of those almost-five-years), is that it tells you how many posts you’ve actually made. And this, friends, against all belief, is number 200. Two hundred! That, to me, calls for a bit of celebration. Let’s have cake!
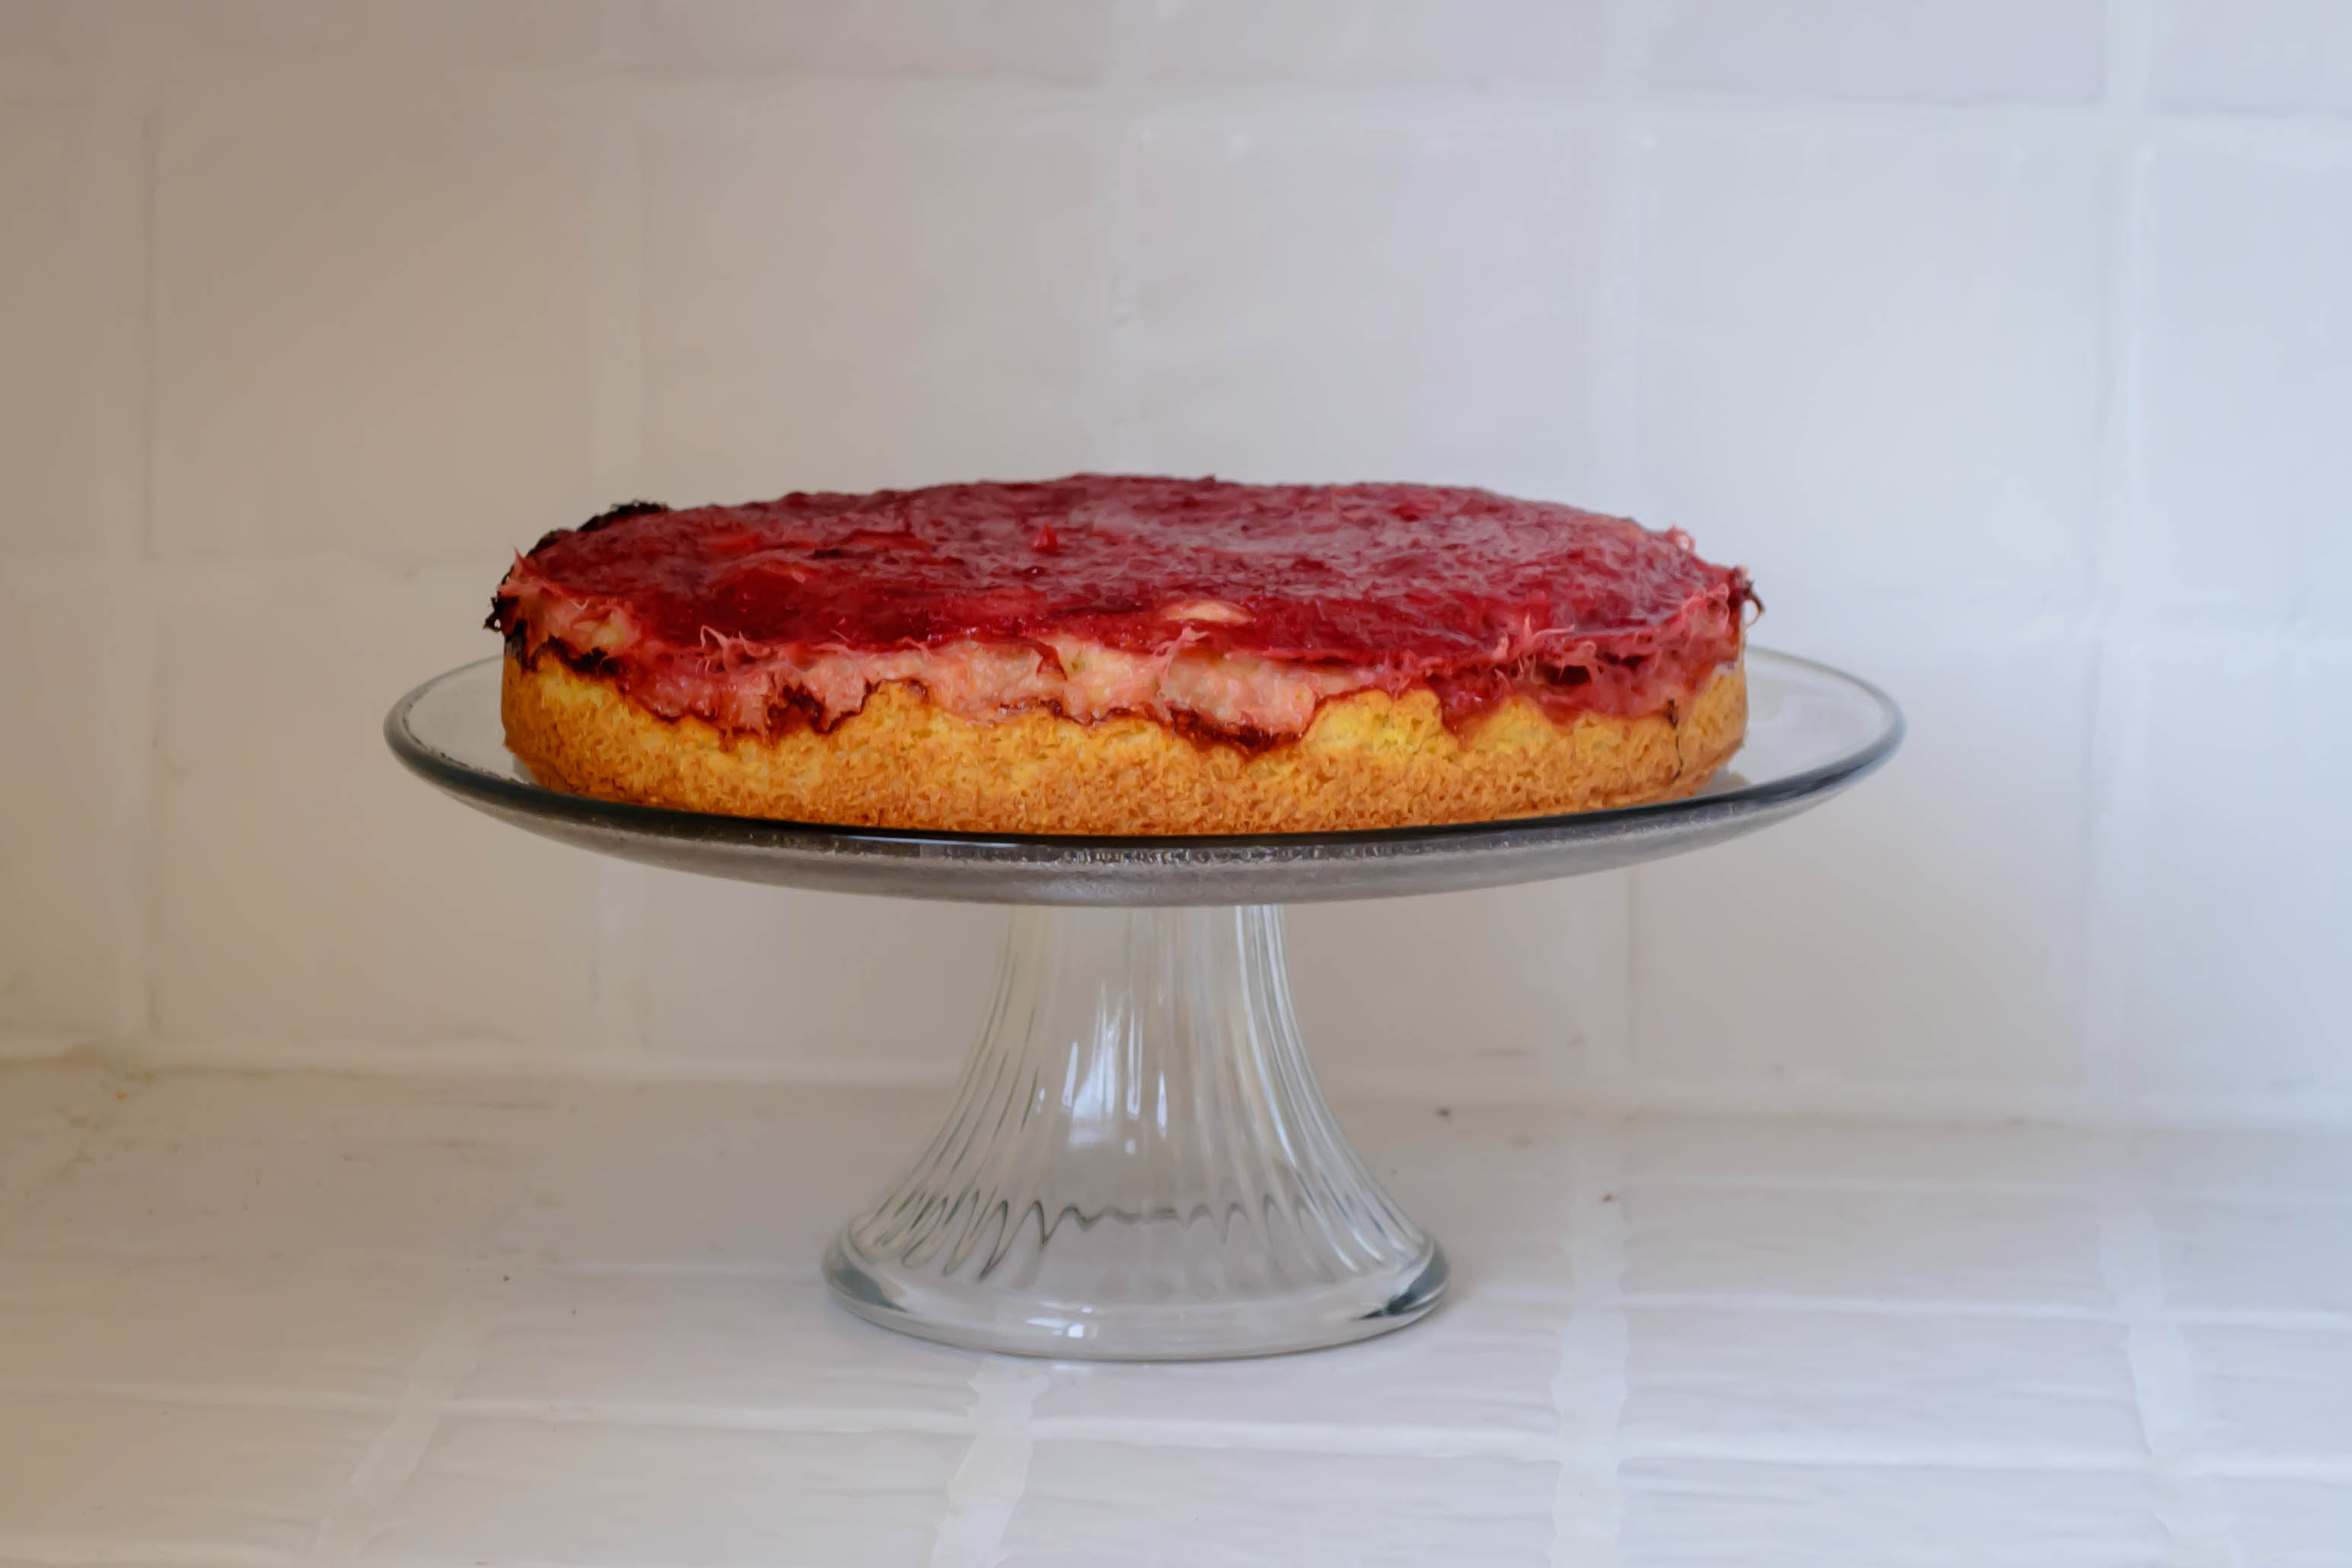
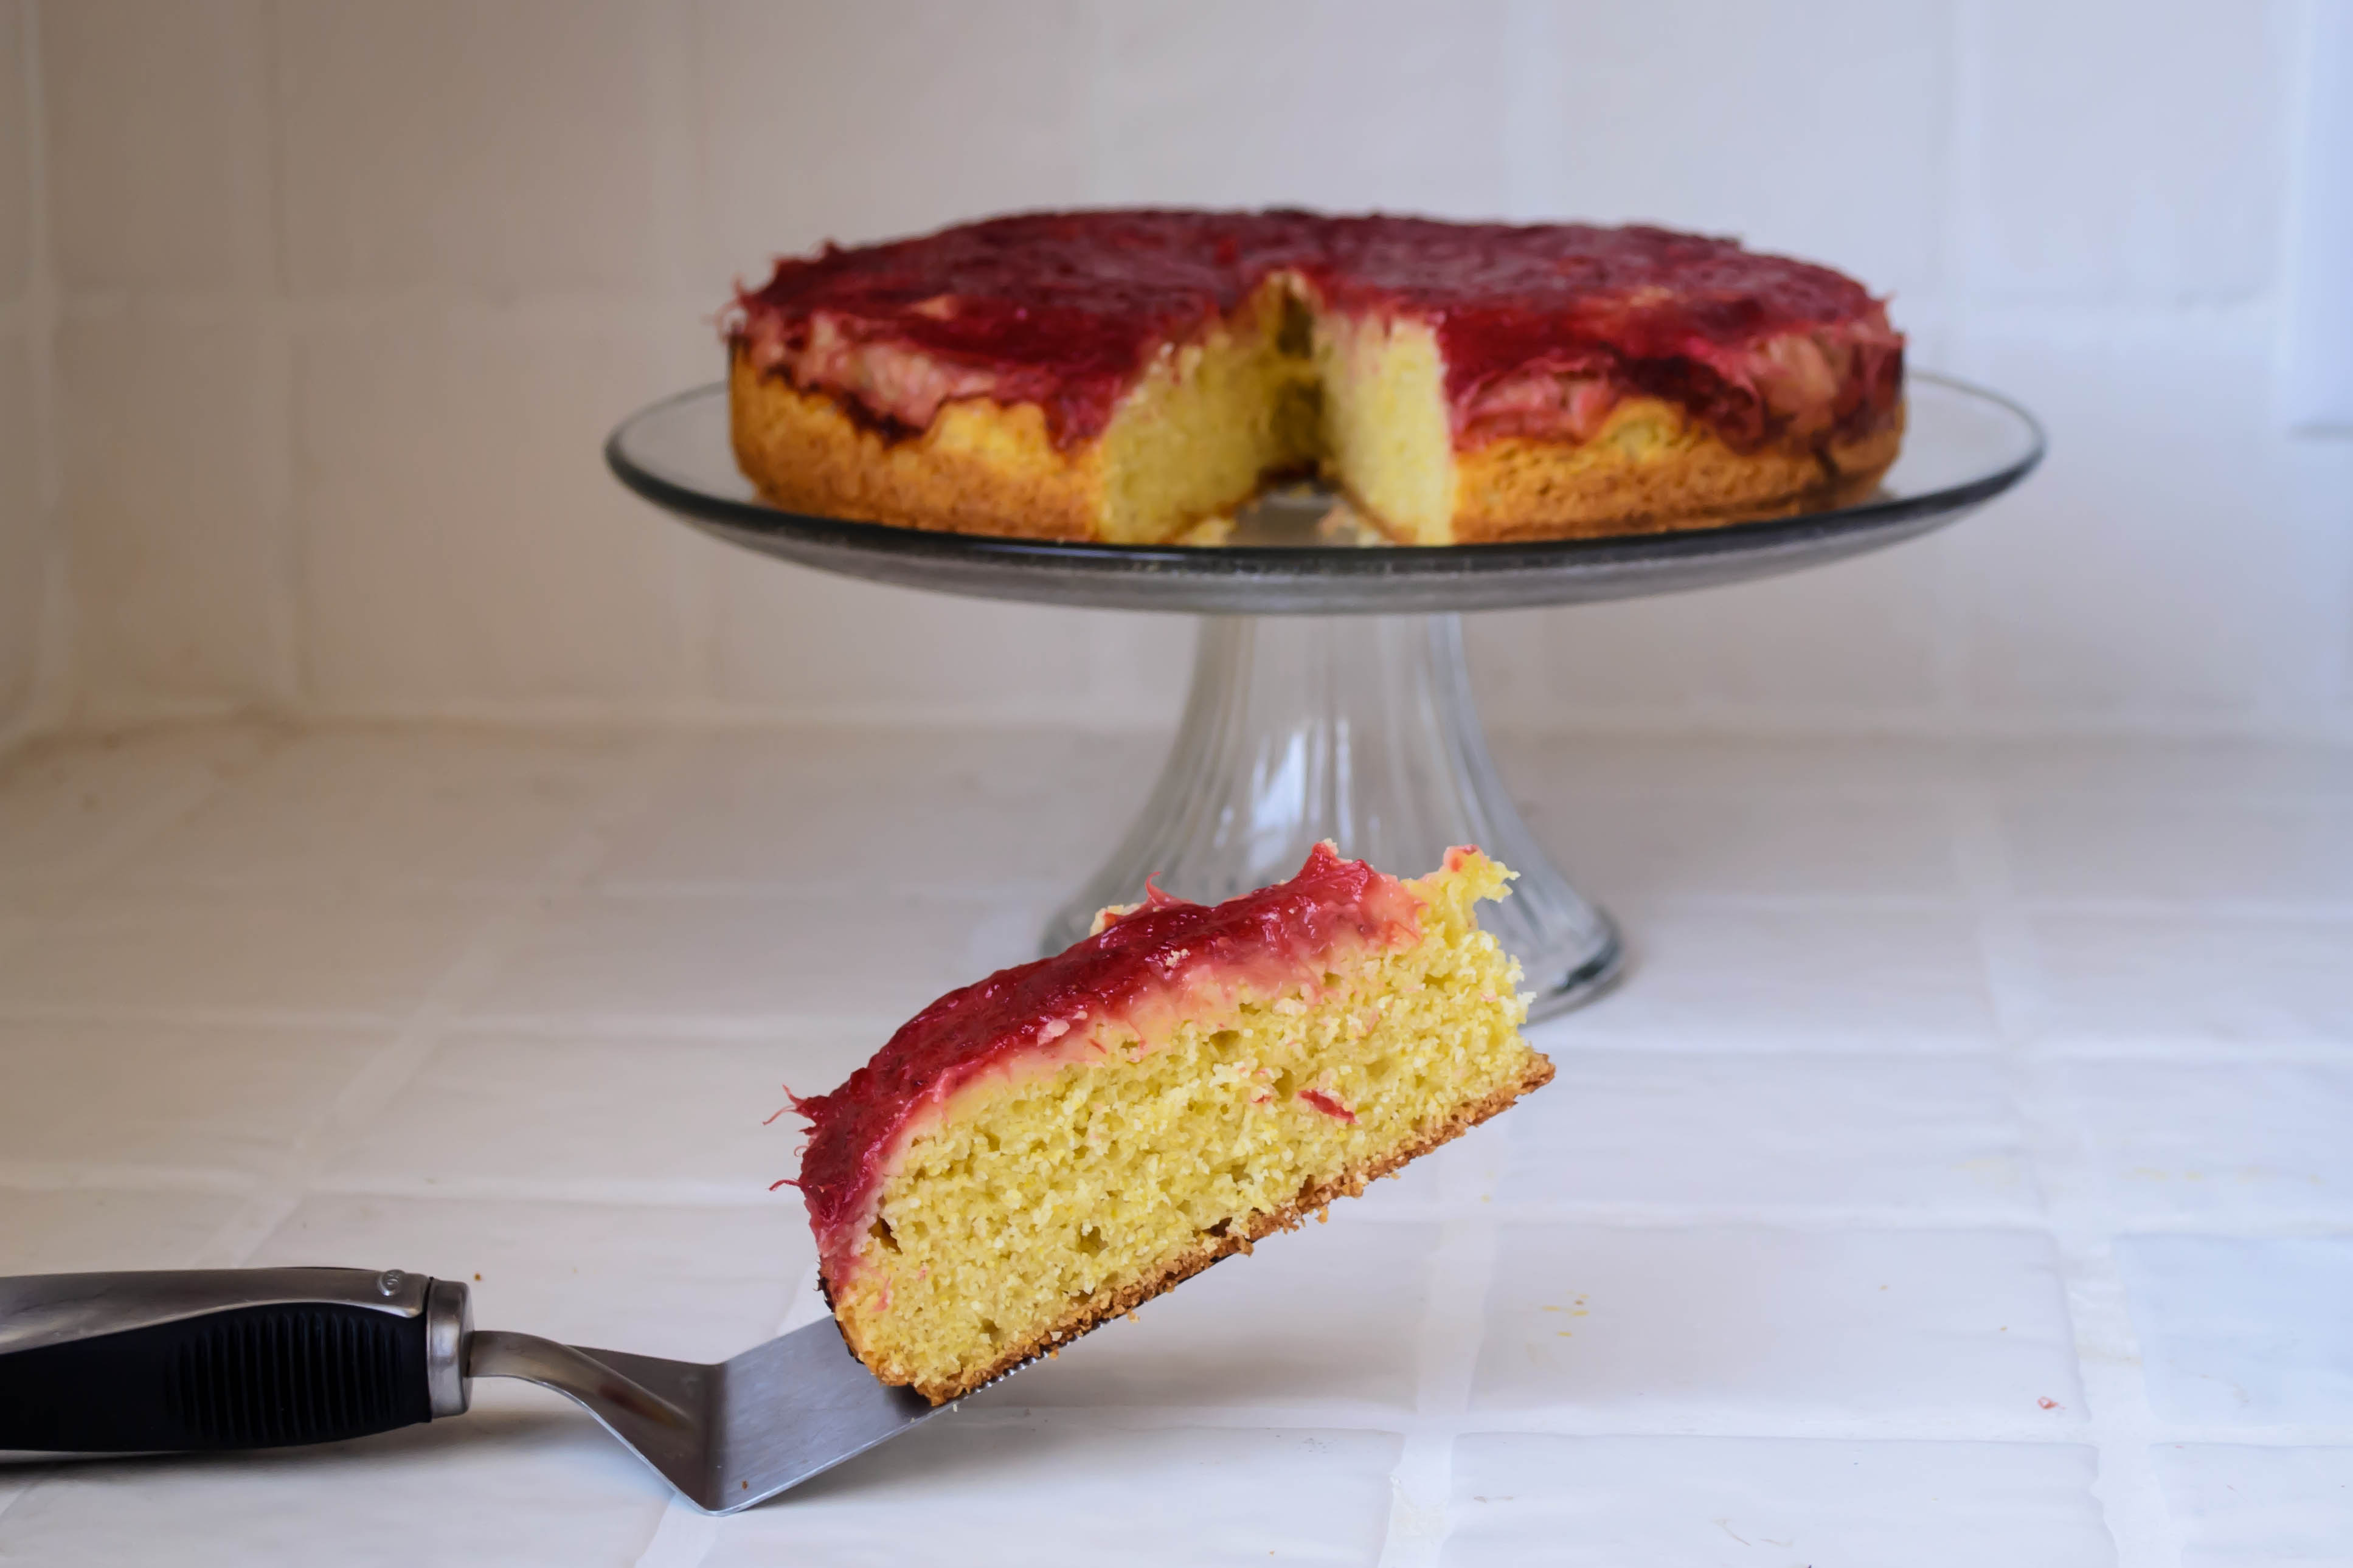 This cake needs to be about the edging warmth of late spring, and freshness. It needs to be something I could never have imagined making 200, or 150, or even 100 posts ago. It needs to be original and tart-sweet and humble but delicious. It’s not a show-off cake, but it stands up for itself. It’s simple and tasty and equally good as afternoon snack, as dessert, and as a bit of a naughty breakfast. It also, as it turns out, needs to be dairy-free. Let me explain.
A few months ago, my aunt asked me to make something sweet. But her granddaughter, Miss Elsie, can’t have dairy products. No milk, no cheese, no butter. No whipped cream. No gelato! I’ve met Elsie once. We went on a glorious, sunshiney, beachy, too-much-food-and-certainly-too-much-wine family reunion trip. The twelve of us – sisters, cousins, uncles, husbands, nieces – shouted and guffawed and flip-flopped our way up and down the three stories of a pool-bearing beach house in North Carolina for the better part of a week, and in the middle of this trip, Elsie tasted her first ice cream. It was dark chocolate, made entirely with coconut milk, and her first taste, once the chill evaporated, was the purest expression of joy I’ve ever seen. The kid was hooked. The shirt she was wearing – white and pink with docile little flowers – was never the same.
Would I come up with something sweet, my aunt asked, that she could make for Elsie? You got it. This is an easy little cake, with just a bit of cornmeal for texture. Butter and milk are replaced by applesauce for moisture and olive oil for deep, rich flavor.
But it couldn’t be just a cake. If it was already going to be about family, I decided, I needed to go whole hog. Our reunion trip was, in part, a joyous memorial for my grandparents, who used to vacation in North Carolina many, many years ago. Transported by this connection, I was pulled back into their old backyard, and I could see Nana’s rhubarb bush at the back corner of the house.
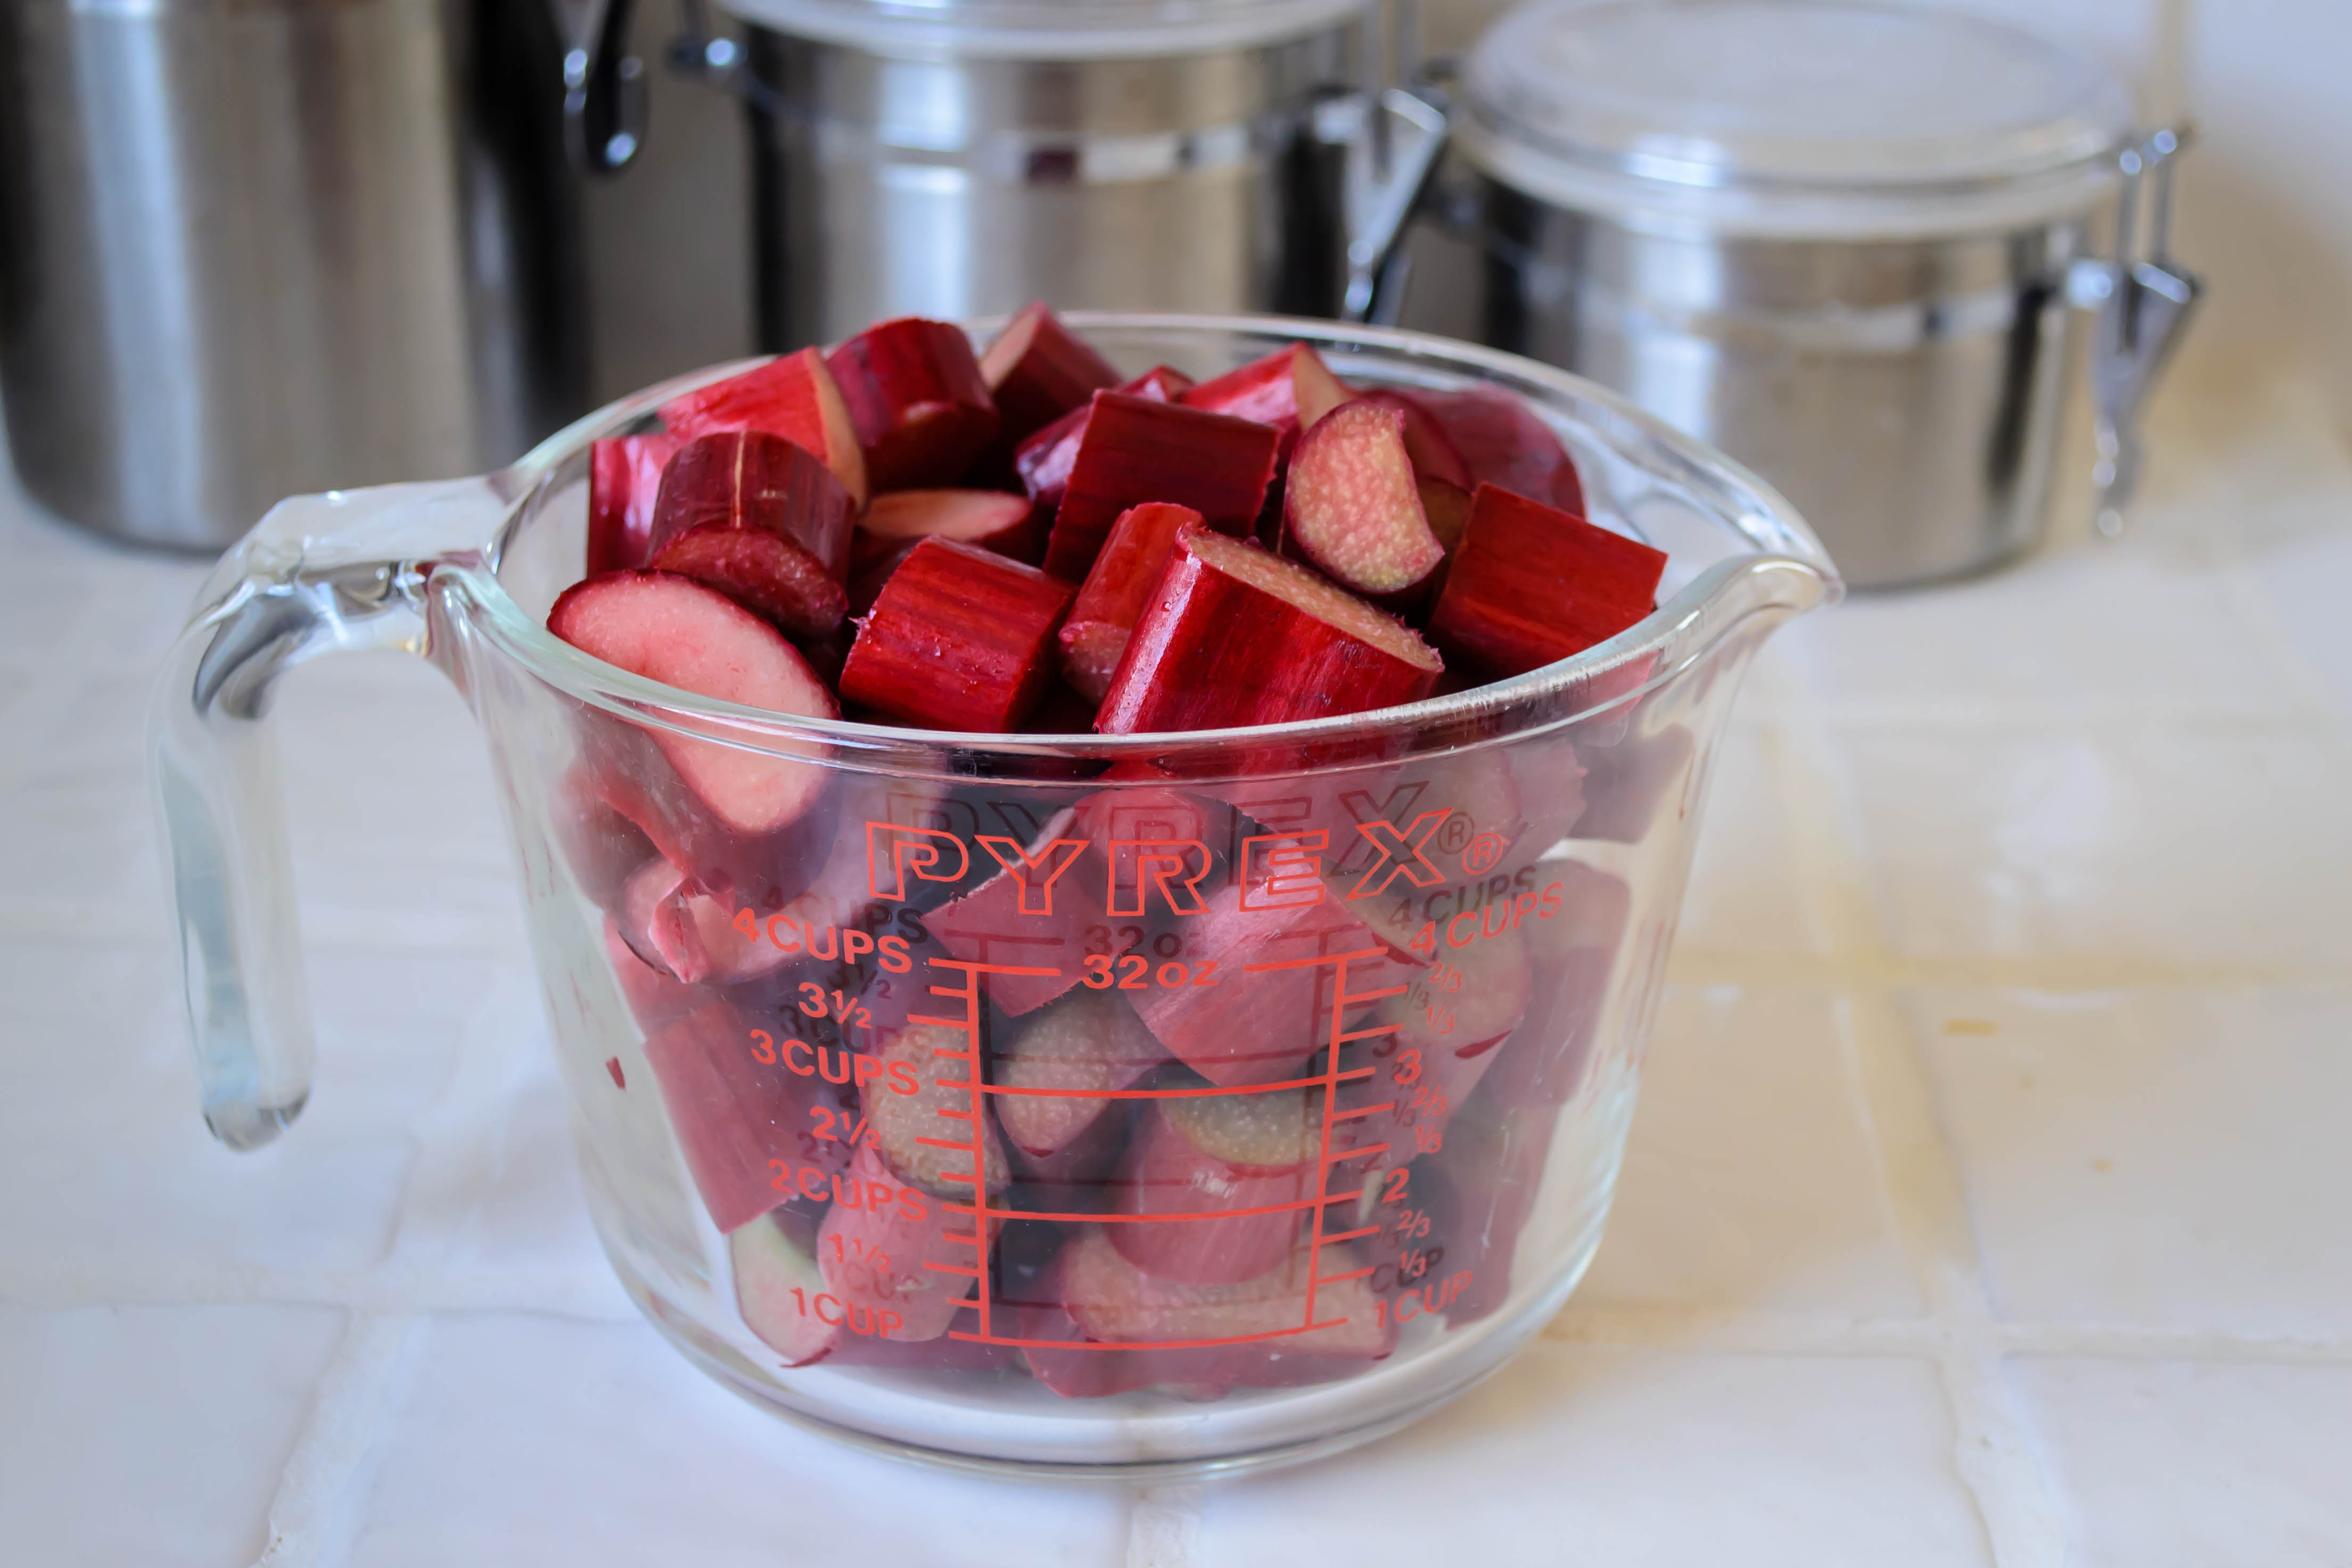
 I don’t know whether Elsie likes rhubarb, but from that moment on, rhubarb was it. I chopped and simmered down a heap of the strange, red stalks, with some quartered strawberries for a different kind of sweetness, and a shower of sugar until it collapsed into a thick, stringy jam. Think rhubarb floss, but in the most delicious possible way.

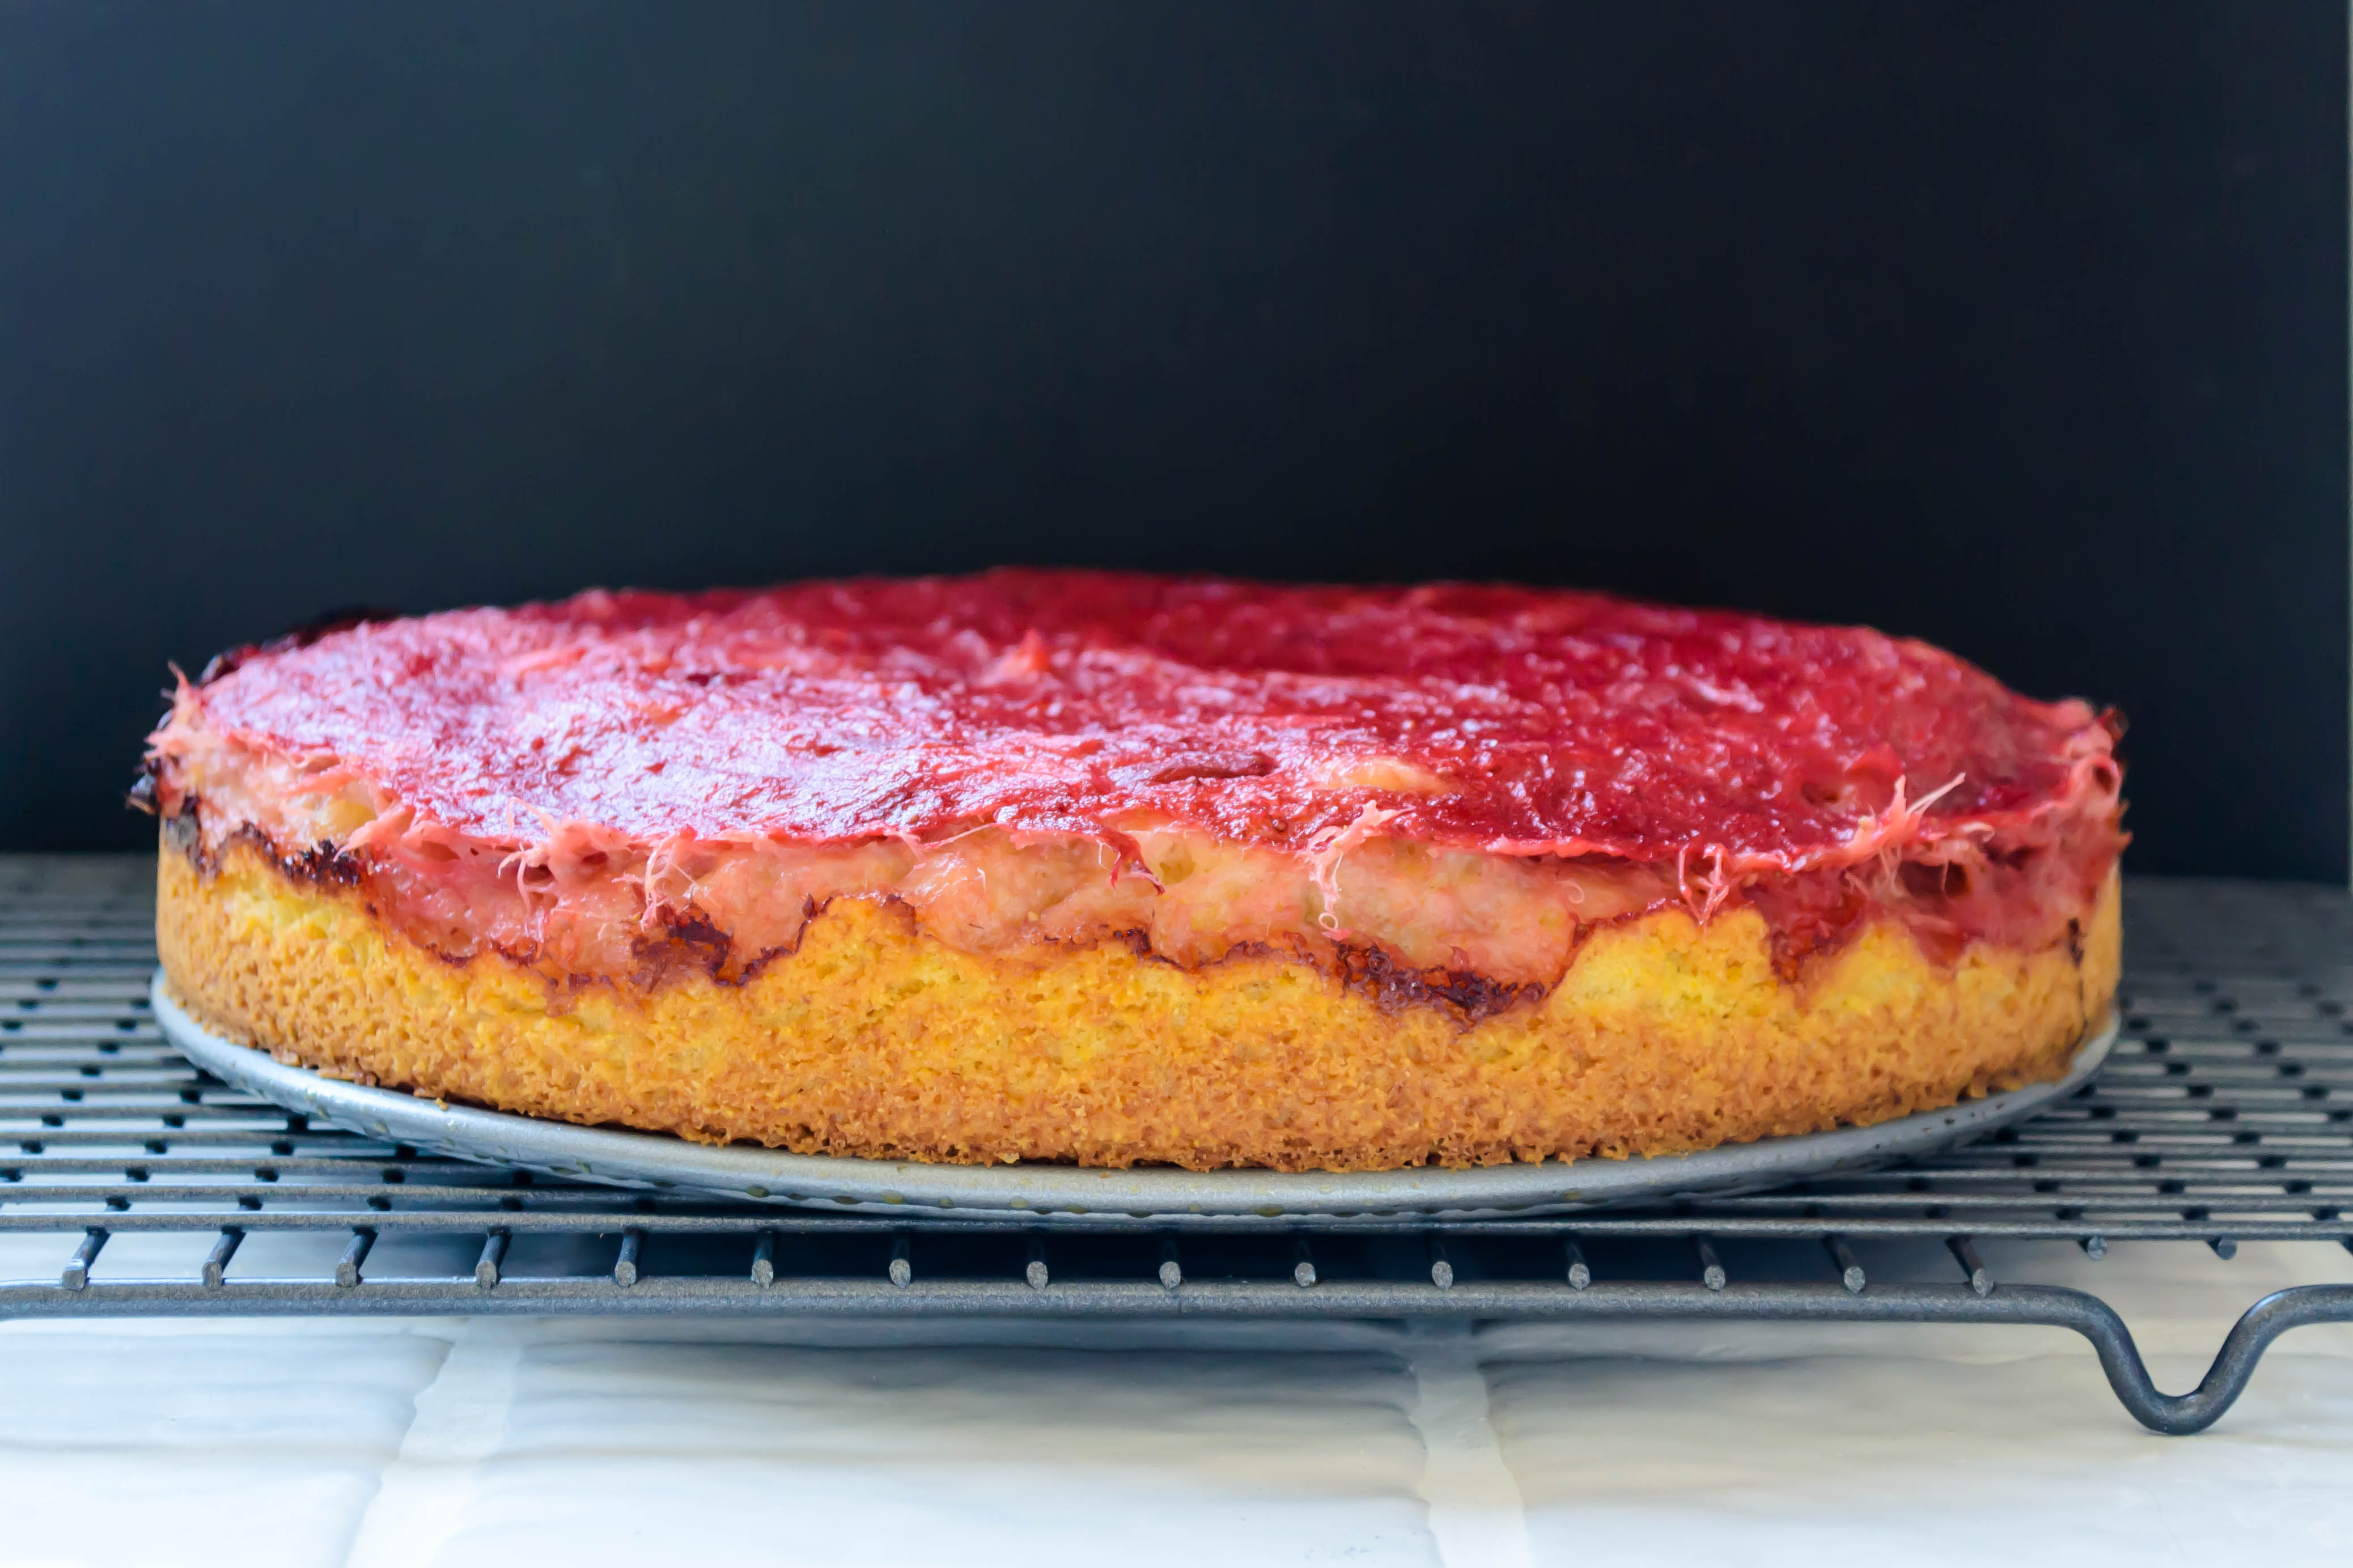
 Once cooled slightly, a respectable layer of the strawberry rhubarb compote gets smoothed over the top of the bright golden cake, and then baked.

 In the oven, the cake puffs and firms, but the rhubarb layer keeps it moist. The fruit itself, exposed fully to the heat, gets sticky and slightly caramelized, and the edges turn almost molasses-dark. This is a great, easy cake for a simple dinner party, in part because it is gorgeous – the dark pink top layer looks glossy and impressive – but just as importantly because this cake actually tastes better on the second day. The compote cools and mellows, and the hit of vanilla in the cake is so right against the rhubarb.
 I know rhubarb season is ending, but if you find some in your grocery store and can’t decide what to do with it, make this cake. It’s easy and pretty and delicious, and it looks as at home, I think, on a simple plate as it does on a cake platter. And if you miss the rhubarb, try straight simmered strawberries, or slices of plum, or maybe even peach jam, and take this cake directly from spring to summer.
Here’s to 200 more. I hope you come along for the ride.
 Elsie’s Rhubarb Cornmeal Cake
Makes one 9” cake
*Word of warning: it is easy to overbake this cake, because the semi-liquid layer of rhubarb means the top of the cake will not brown. Thus, it will seem like it’s still underdone. Remember, though, this cake is better after it has spent the night in the fridge. As it sits on your counter, cooling off for its sleepover, it will continue cooking for a while. So even if your toothpick seems to be telling you that all is awry, chances are things are going to be okay. Try a cautious prod closer to the edges if you need some reassurance.
 Last week I presented you with something both vegan and gluten-free. Dietary allergen-buster, that’s me! This week, to prove that I’m a
 fickle equal opportunist flexible sort of cook, I’m giving you something that is neither. But really, this is the kind of food person I am, and I’ve been thinking about this lately, especially given this post from Shauna at Gluten-Free Girl. I’ve thought, over this past year as I finished my Bittman Project and moved on to my exploration of dough, what kind of food blog this is, anyway. I don’t follow a specific dietary regimen. I don’t cook – or eat – specifically one type of food. So what am I? As I wrote to Shauna, what drove me to her blog, and what drove me to one of my own, was the expression of joy through food. I want food that tastes good and brings joy. And then, because it has given joy to the tongues and teeth and bellies of the people I made it for, I want to pass that on to people who weren’t in our little house with us. That’s you, people. So I guess what it comes down to is: this is a blog about food that brings you joy. At least, that’s what I hope you feel when you read, and when you eat, if you end up using the recipes here (and if you do, will you tell me? I’d love to know what you guys think).
These little rolls brought us considerable joy. They are cheddar infused, jalapeño studded puffs somewhere in between a rich, buttery brioche and a stern, crusty, segmented Kaiser roll. They are also, given this month’s Twelve Loaves assignment of buns, the perfect choice to slice equatorially, layer with mayonnaise or hot sauce or pickles or onion rings or dripping fresh tomato slices and then cram with a burger of your favorite juicy variety.
 I started with my Nana’s sweet roll dough, replacing the sugar with a smaller amount of honey, opting for the tang of buttermilk rather than the roundness of whole milk, and injecting wafer-thin slices of jalapeno and cheddar cheese so sharp it made me – let’s not lie – basically drool when I sampled some.

 Though you could just divide your dough into equal sections and let these rise into sweet, uncomplicated burger buns, I decided to take on the familiar lobed shape of a Kaiser roll. This is, as you might expect, not the most straightforward approach, mostly because there are numerous methods for achieving that instantly recognizable shape. You can score the dough as it rises, you can use a special press that creates the petal shape, can follow a complex procedure of folds, or, as I learned and executed to my delight, you can roll the dough into ropes, tie them in a simple overhand knot, and then tuck up the ends. I’ve attempted instructions and accompanying pictures below, but if you are lost, try this recipe, which explains the knotting and tucking process pretty clearly.

 Sprinkled with more sharp cheddar and topped with a few more, probably gratuitous slices of pepper (you have to know what you’re in for, I think), these bake into all but perfect imitations of the jalapeño cheese rolls N. and I used to buy from Market of Choice as the occasional treat after a perfect sunny afternoon trip to the dog park in Eugene. We never put burgers on those, because they never made it through the whole ride home. But these little Kaiser-roll-buns of mine, burnished with cheddar and lip-tingling with heat, will carry anything you load them with.

 Summer’s coming. That should bring you joy. If you can stand more, make these for your next barbeque. This recipe can easily be doubled, and once baked, these will keep in the fridge for a few days or, securely wrapped in airtight packaging, in the freezer for much longer.
 Jalapeño Cheese Rolls

Picture 1: dough rope

Picture 2: overhand knot
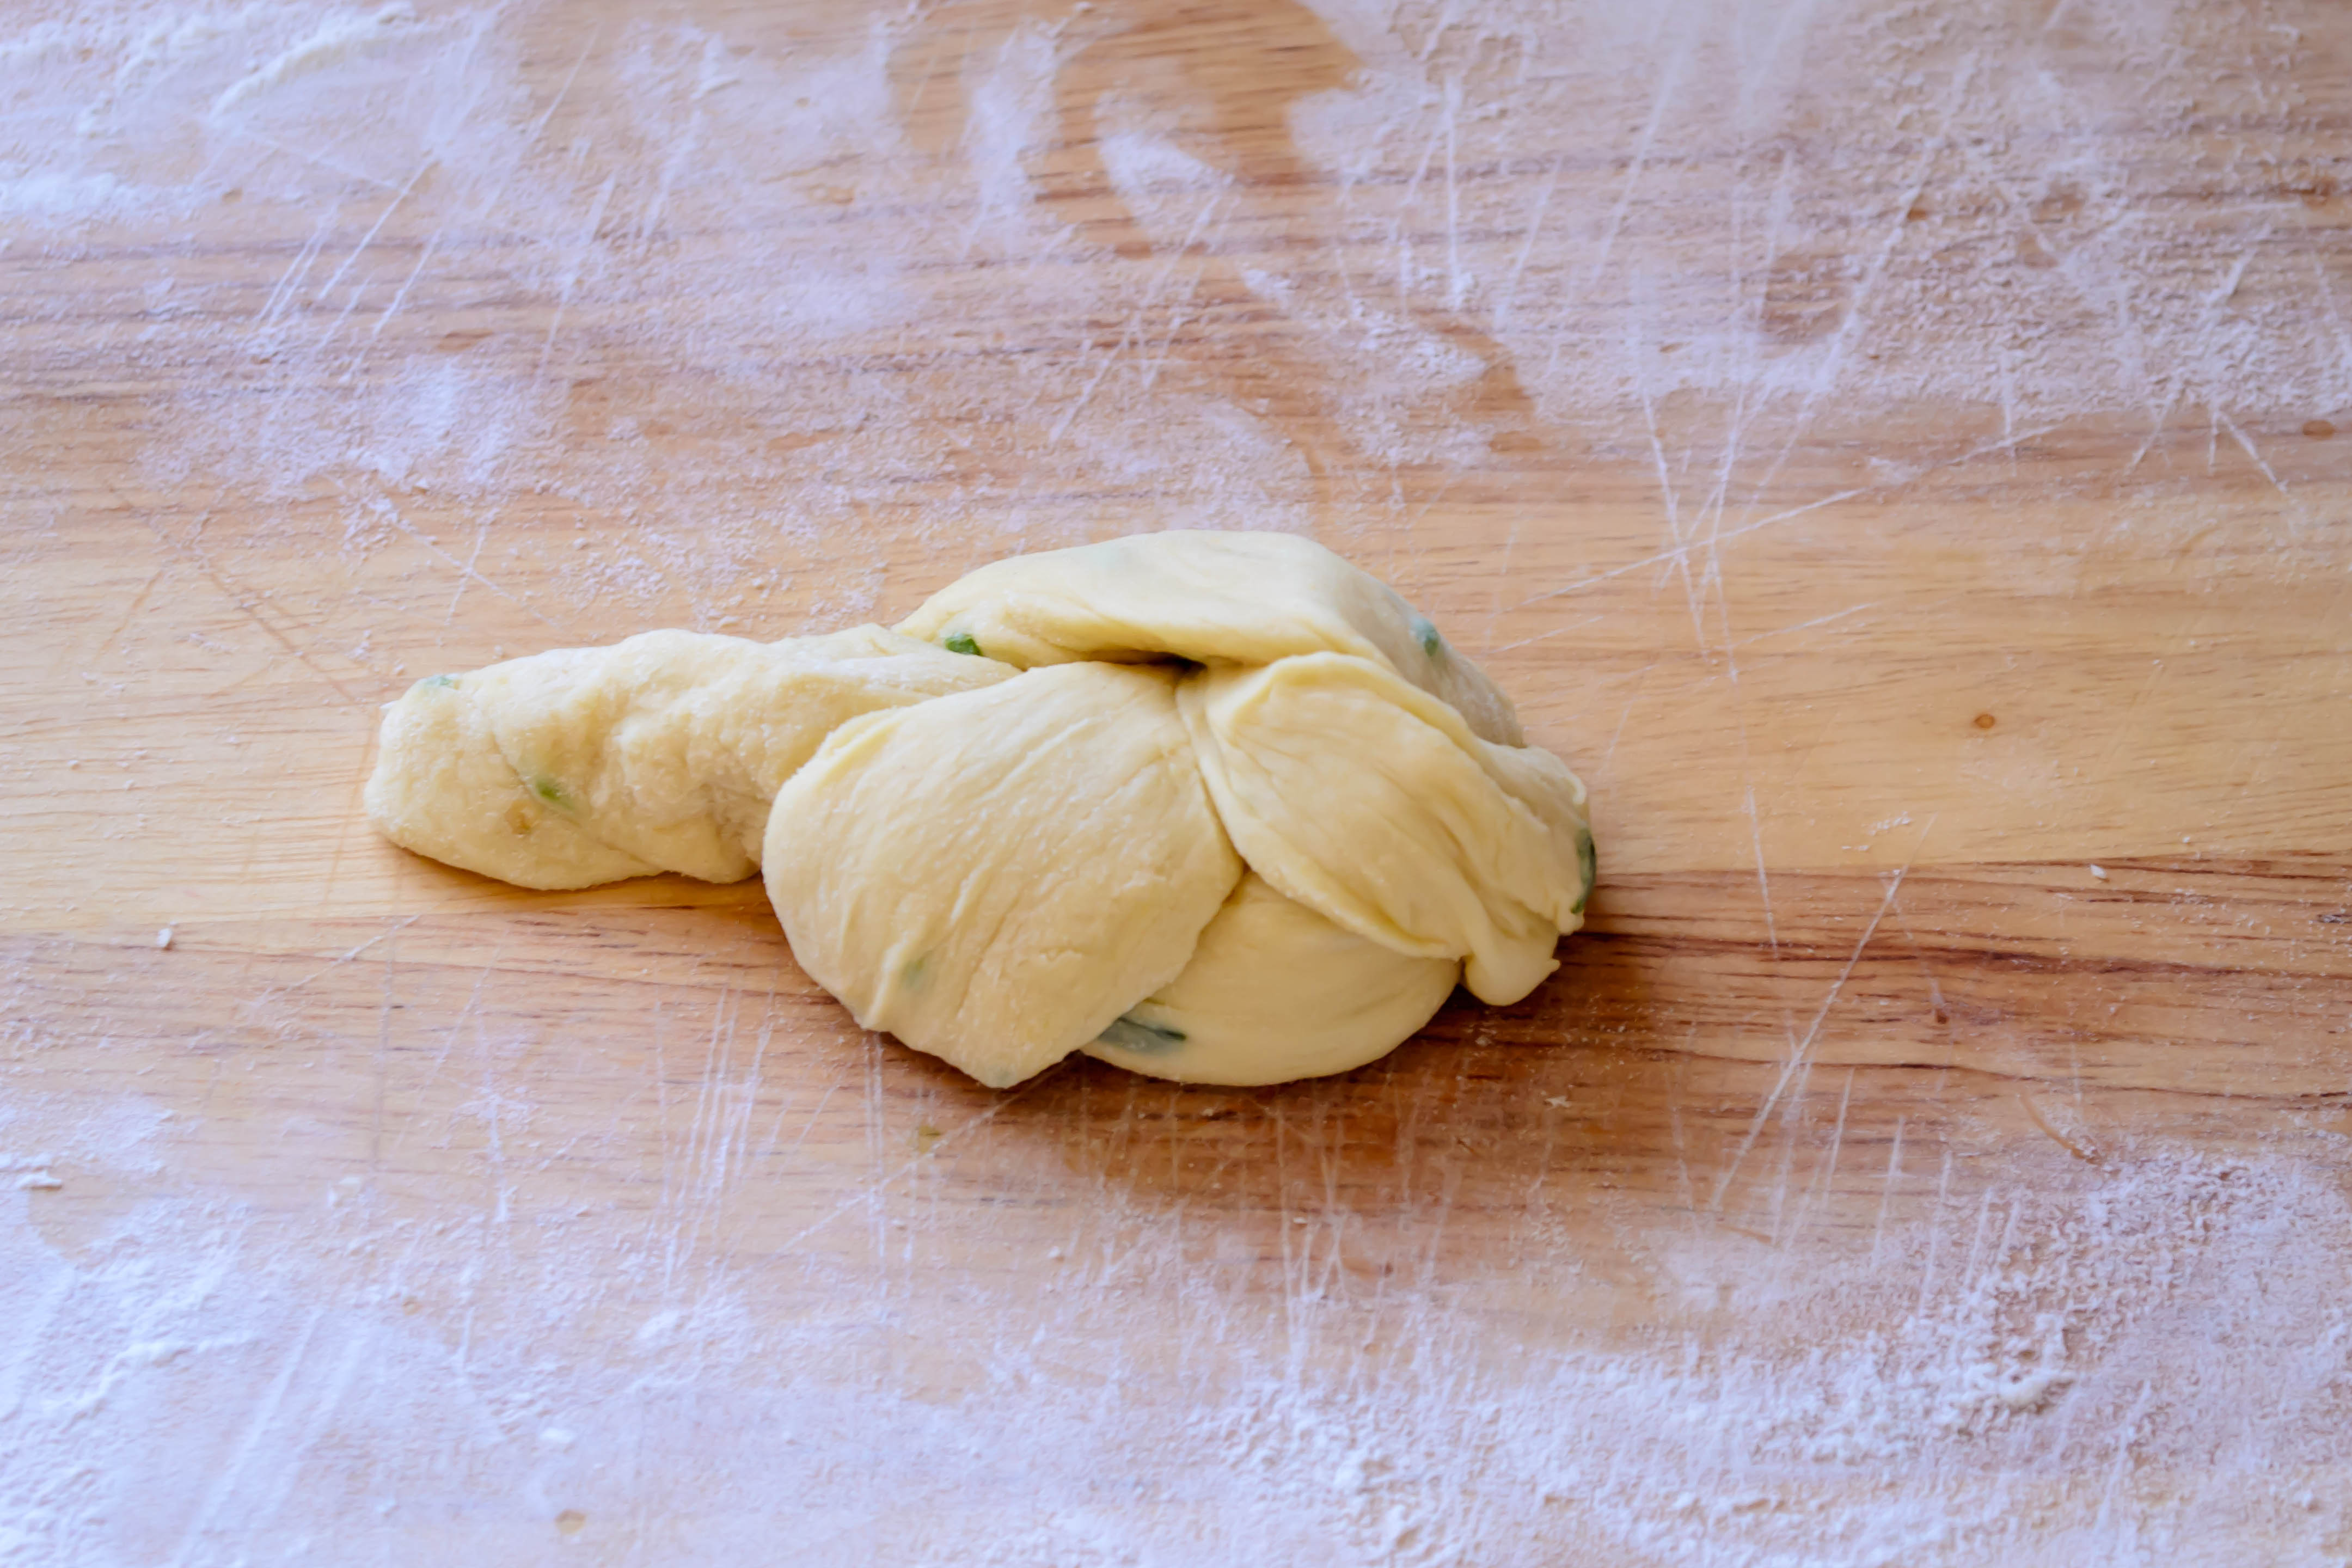
Picture 3: tuck right side into top middle of knot

Picture 4: tuck left side under and into bottom middle of knot
When it comes to cooking, I don’t mind a little complexity. You can call it fuss if you want. I’m not put off by a picky technique or an extra step. Separate the eggs? Okay. Toast the nuts first? Sure thing. If it adds to the flavor of the finished dish, I’m on board. But when it comes to eating, I like things simple. I love appetizers because your gratification arrives in a single bite. I dig pizza because the toppings all come at you together. A drumette of roasted chicken sitting precariously atop a mound of braised greens in a puddle of puree? I’m sure it’s delicious, but it’s a little fancy for me. At the point that it comes off the heat, I’m ready to put it in my mouth, plating-be-damned (obligatory self-deprecating note: it’s clear, given this, why I haven’t yet managed to squirm my way onto Tastespotting or Foodgawker).
 So this week, faced with this month’s Twelve Loaves challenge of baking a loaf of my choosing, I started thinking about the humble sandwich. Now, I know, a sandwich isn’t exactly challenging to put together. But I’m a little anal-retentive about some things, and one of them is the old classic pb&j. Here’s the issue: I like my peanut butter on both sides. That means you have to put it on first. But then, you can’t just dunk that peanut-buttery knife into your jam jar! Cross-contamination! So you have to decide: do I get a different knife? Or do I take an extra few seconds and rinse off the peanut butter knife (and peanut butter doesn’t just rinse off like that, you know)? I know, this is a silly non-problem to have. But it led to a delicious idea: what if the bread itself were already infused with peanut butter and jelly, making spreading, smearing, and layering all unnecessary?

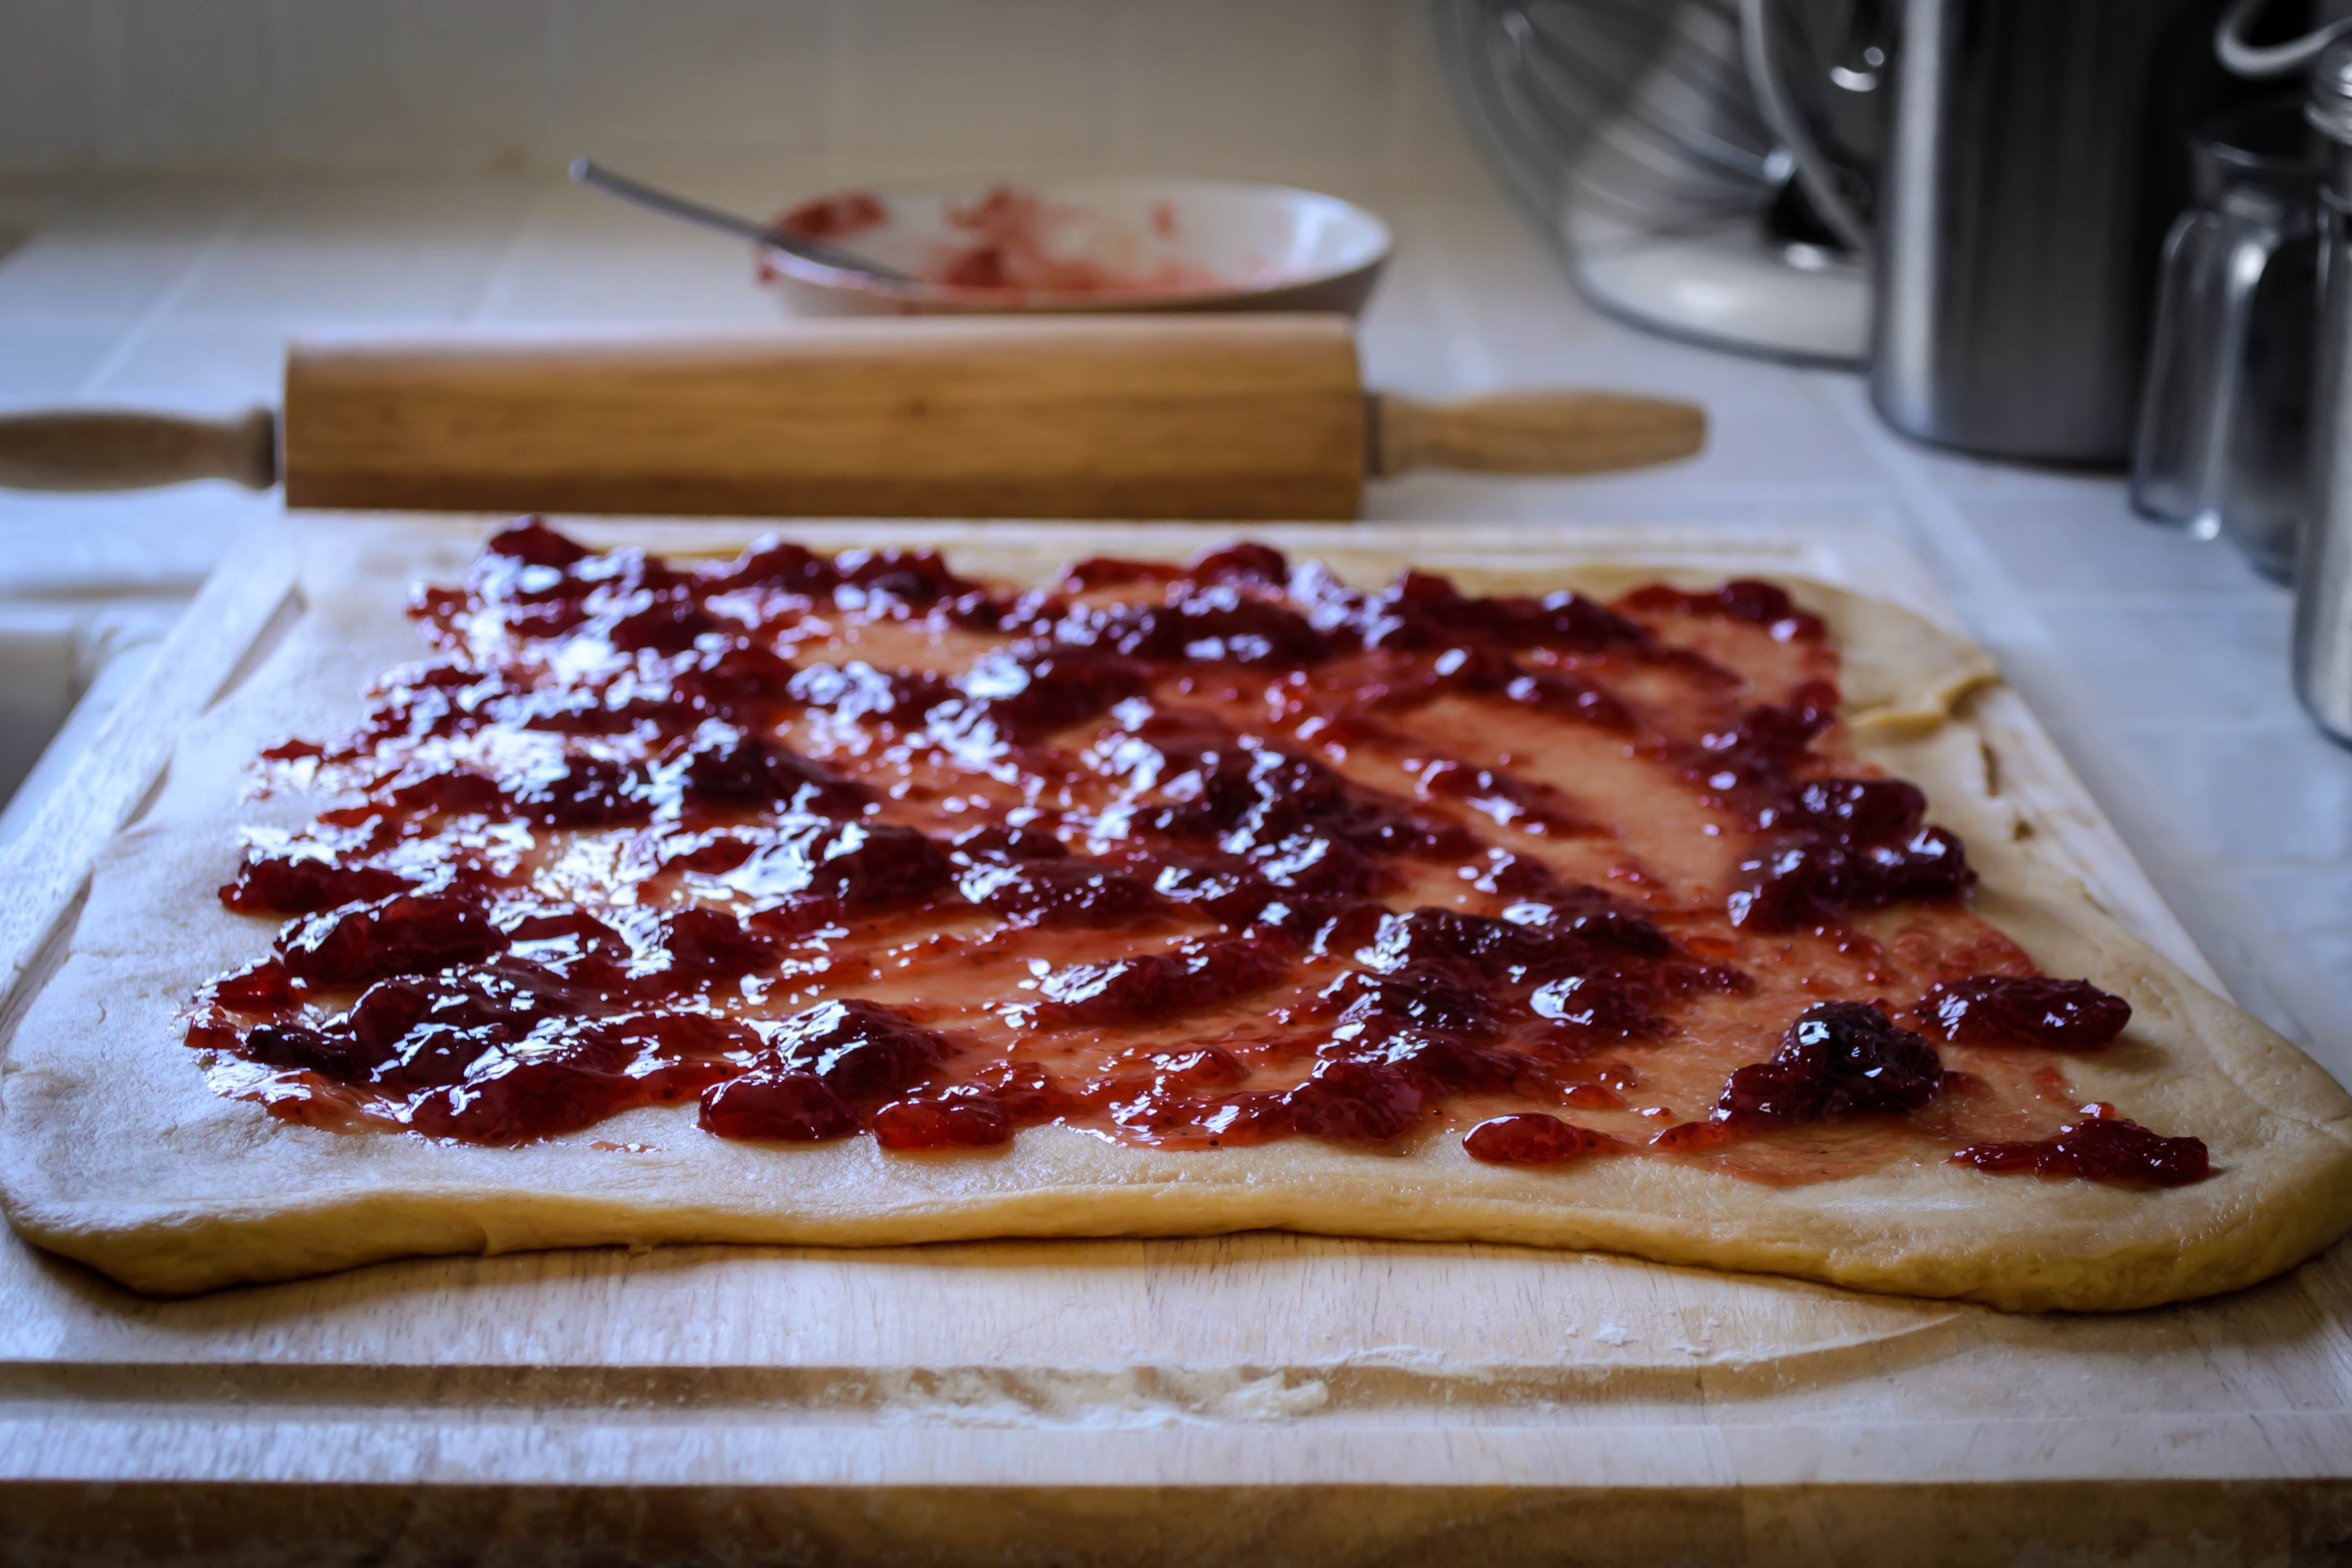
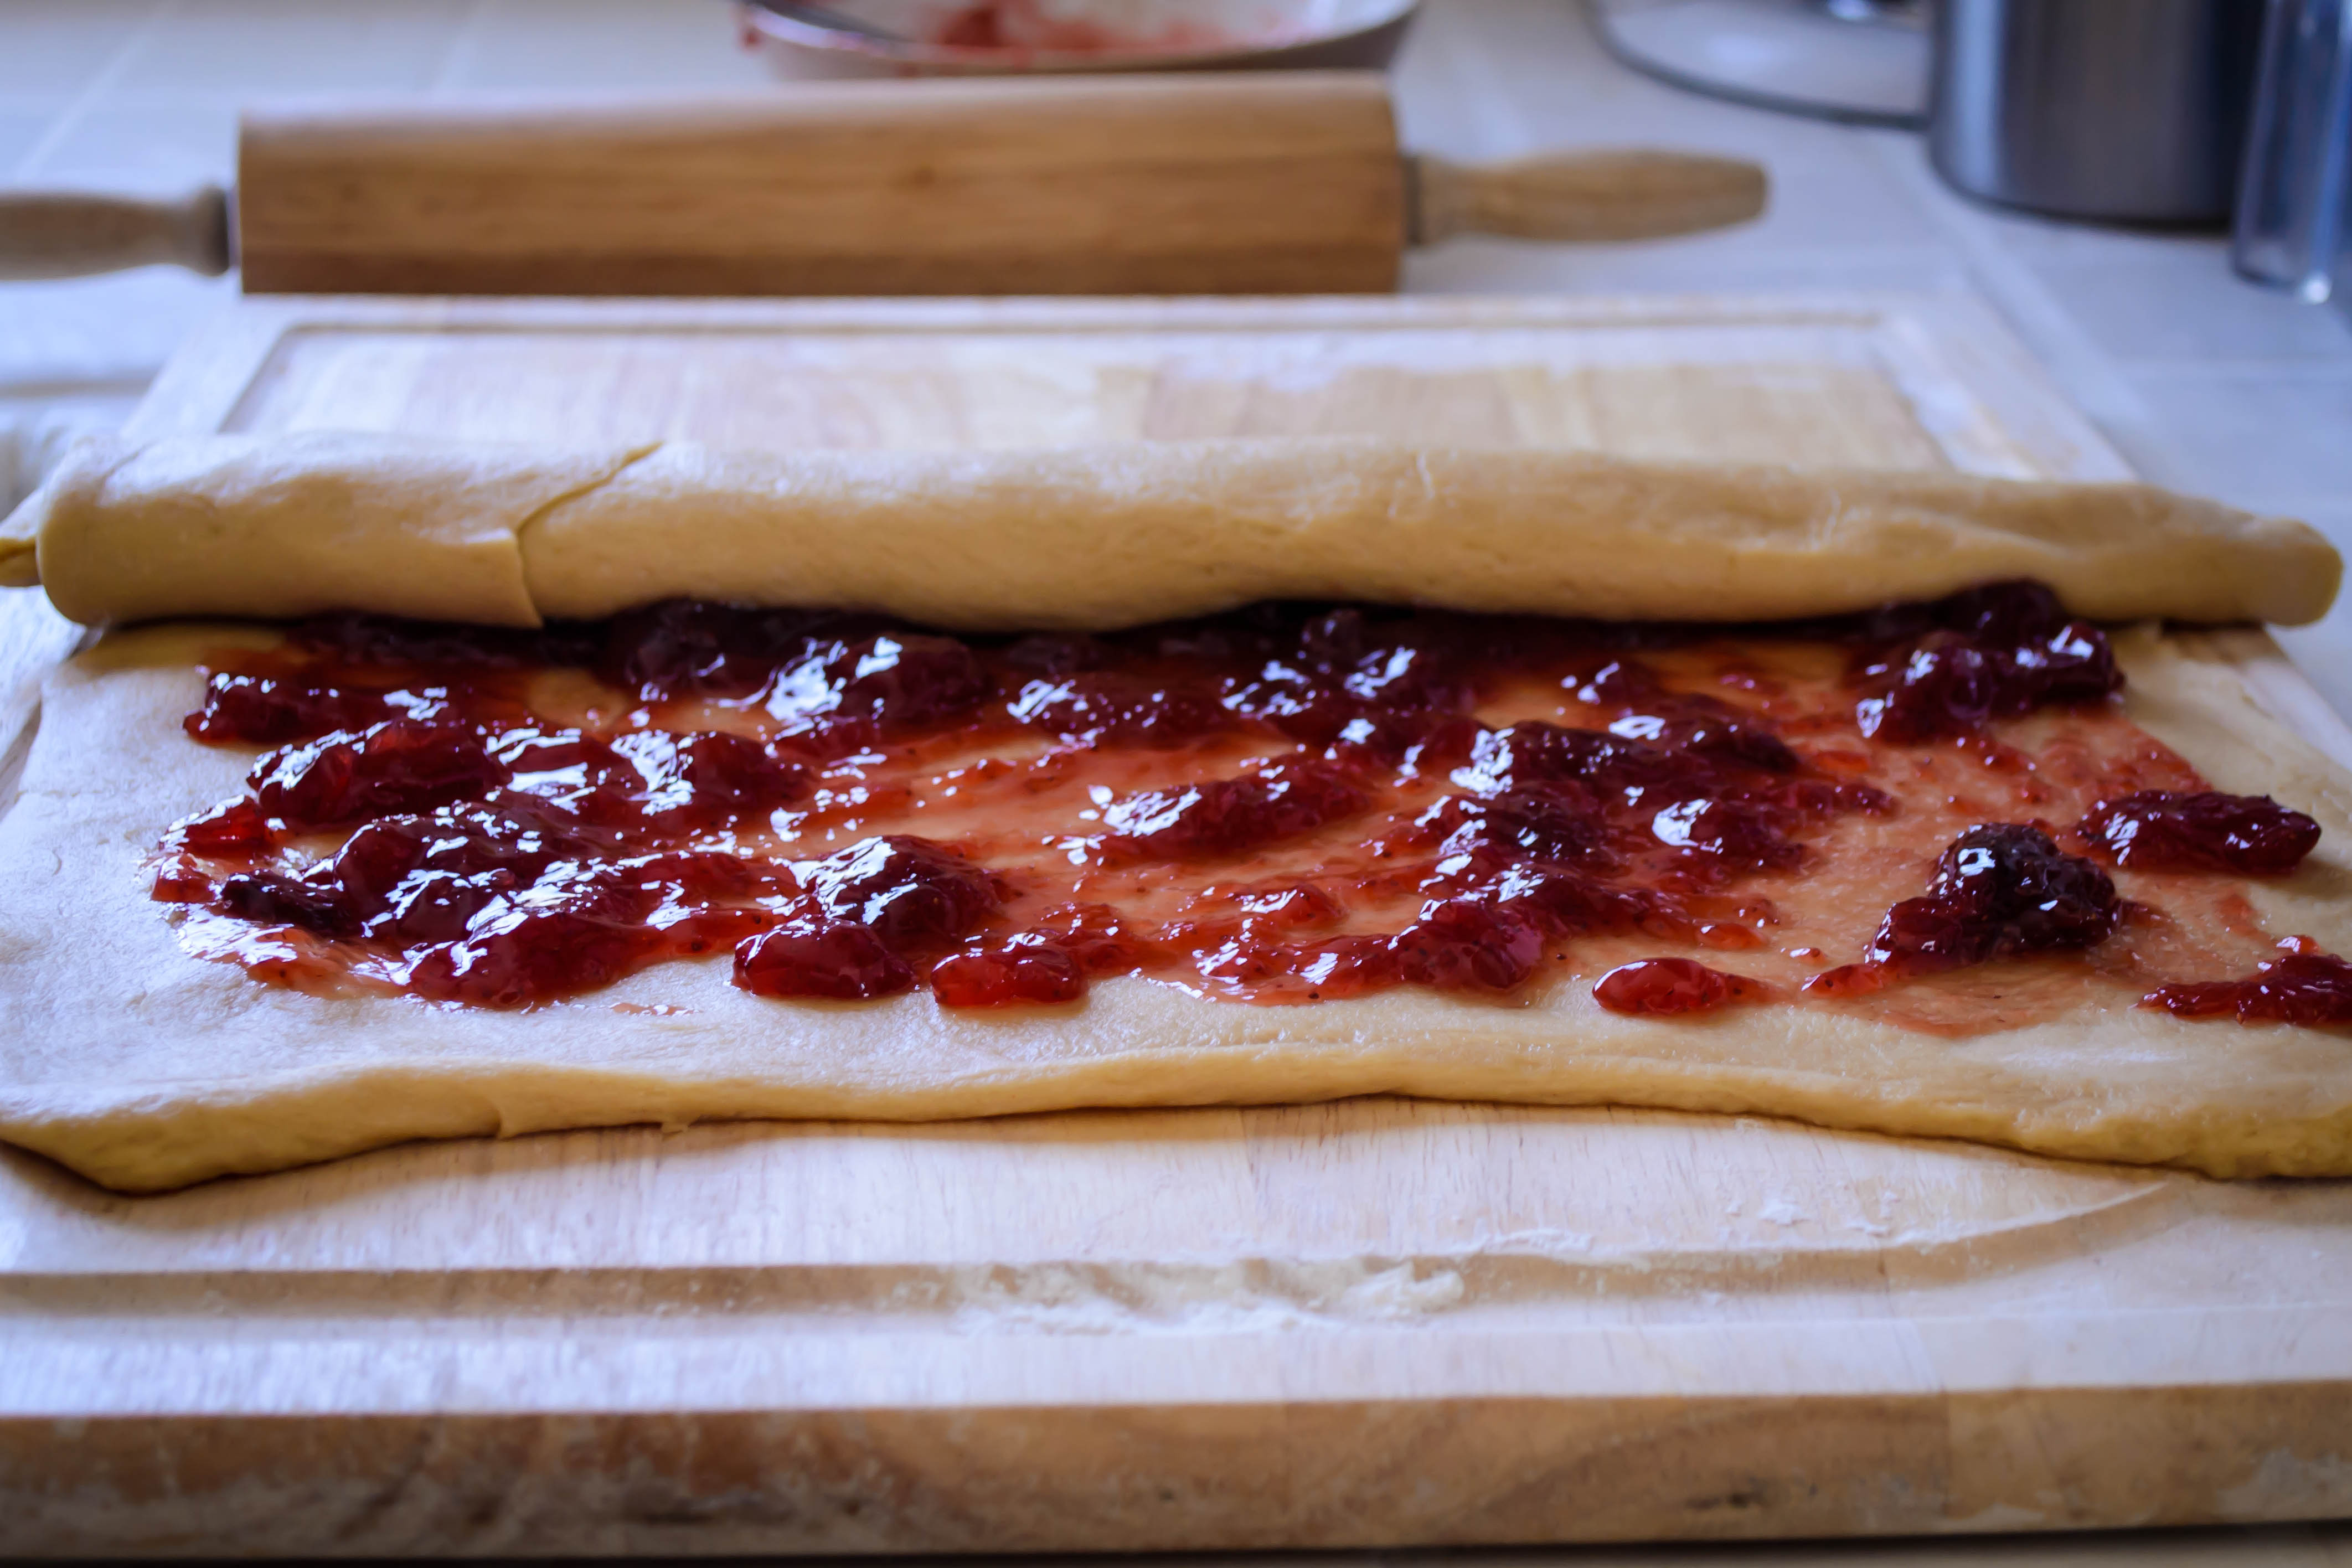
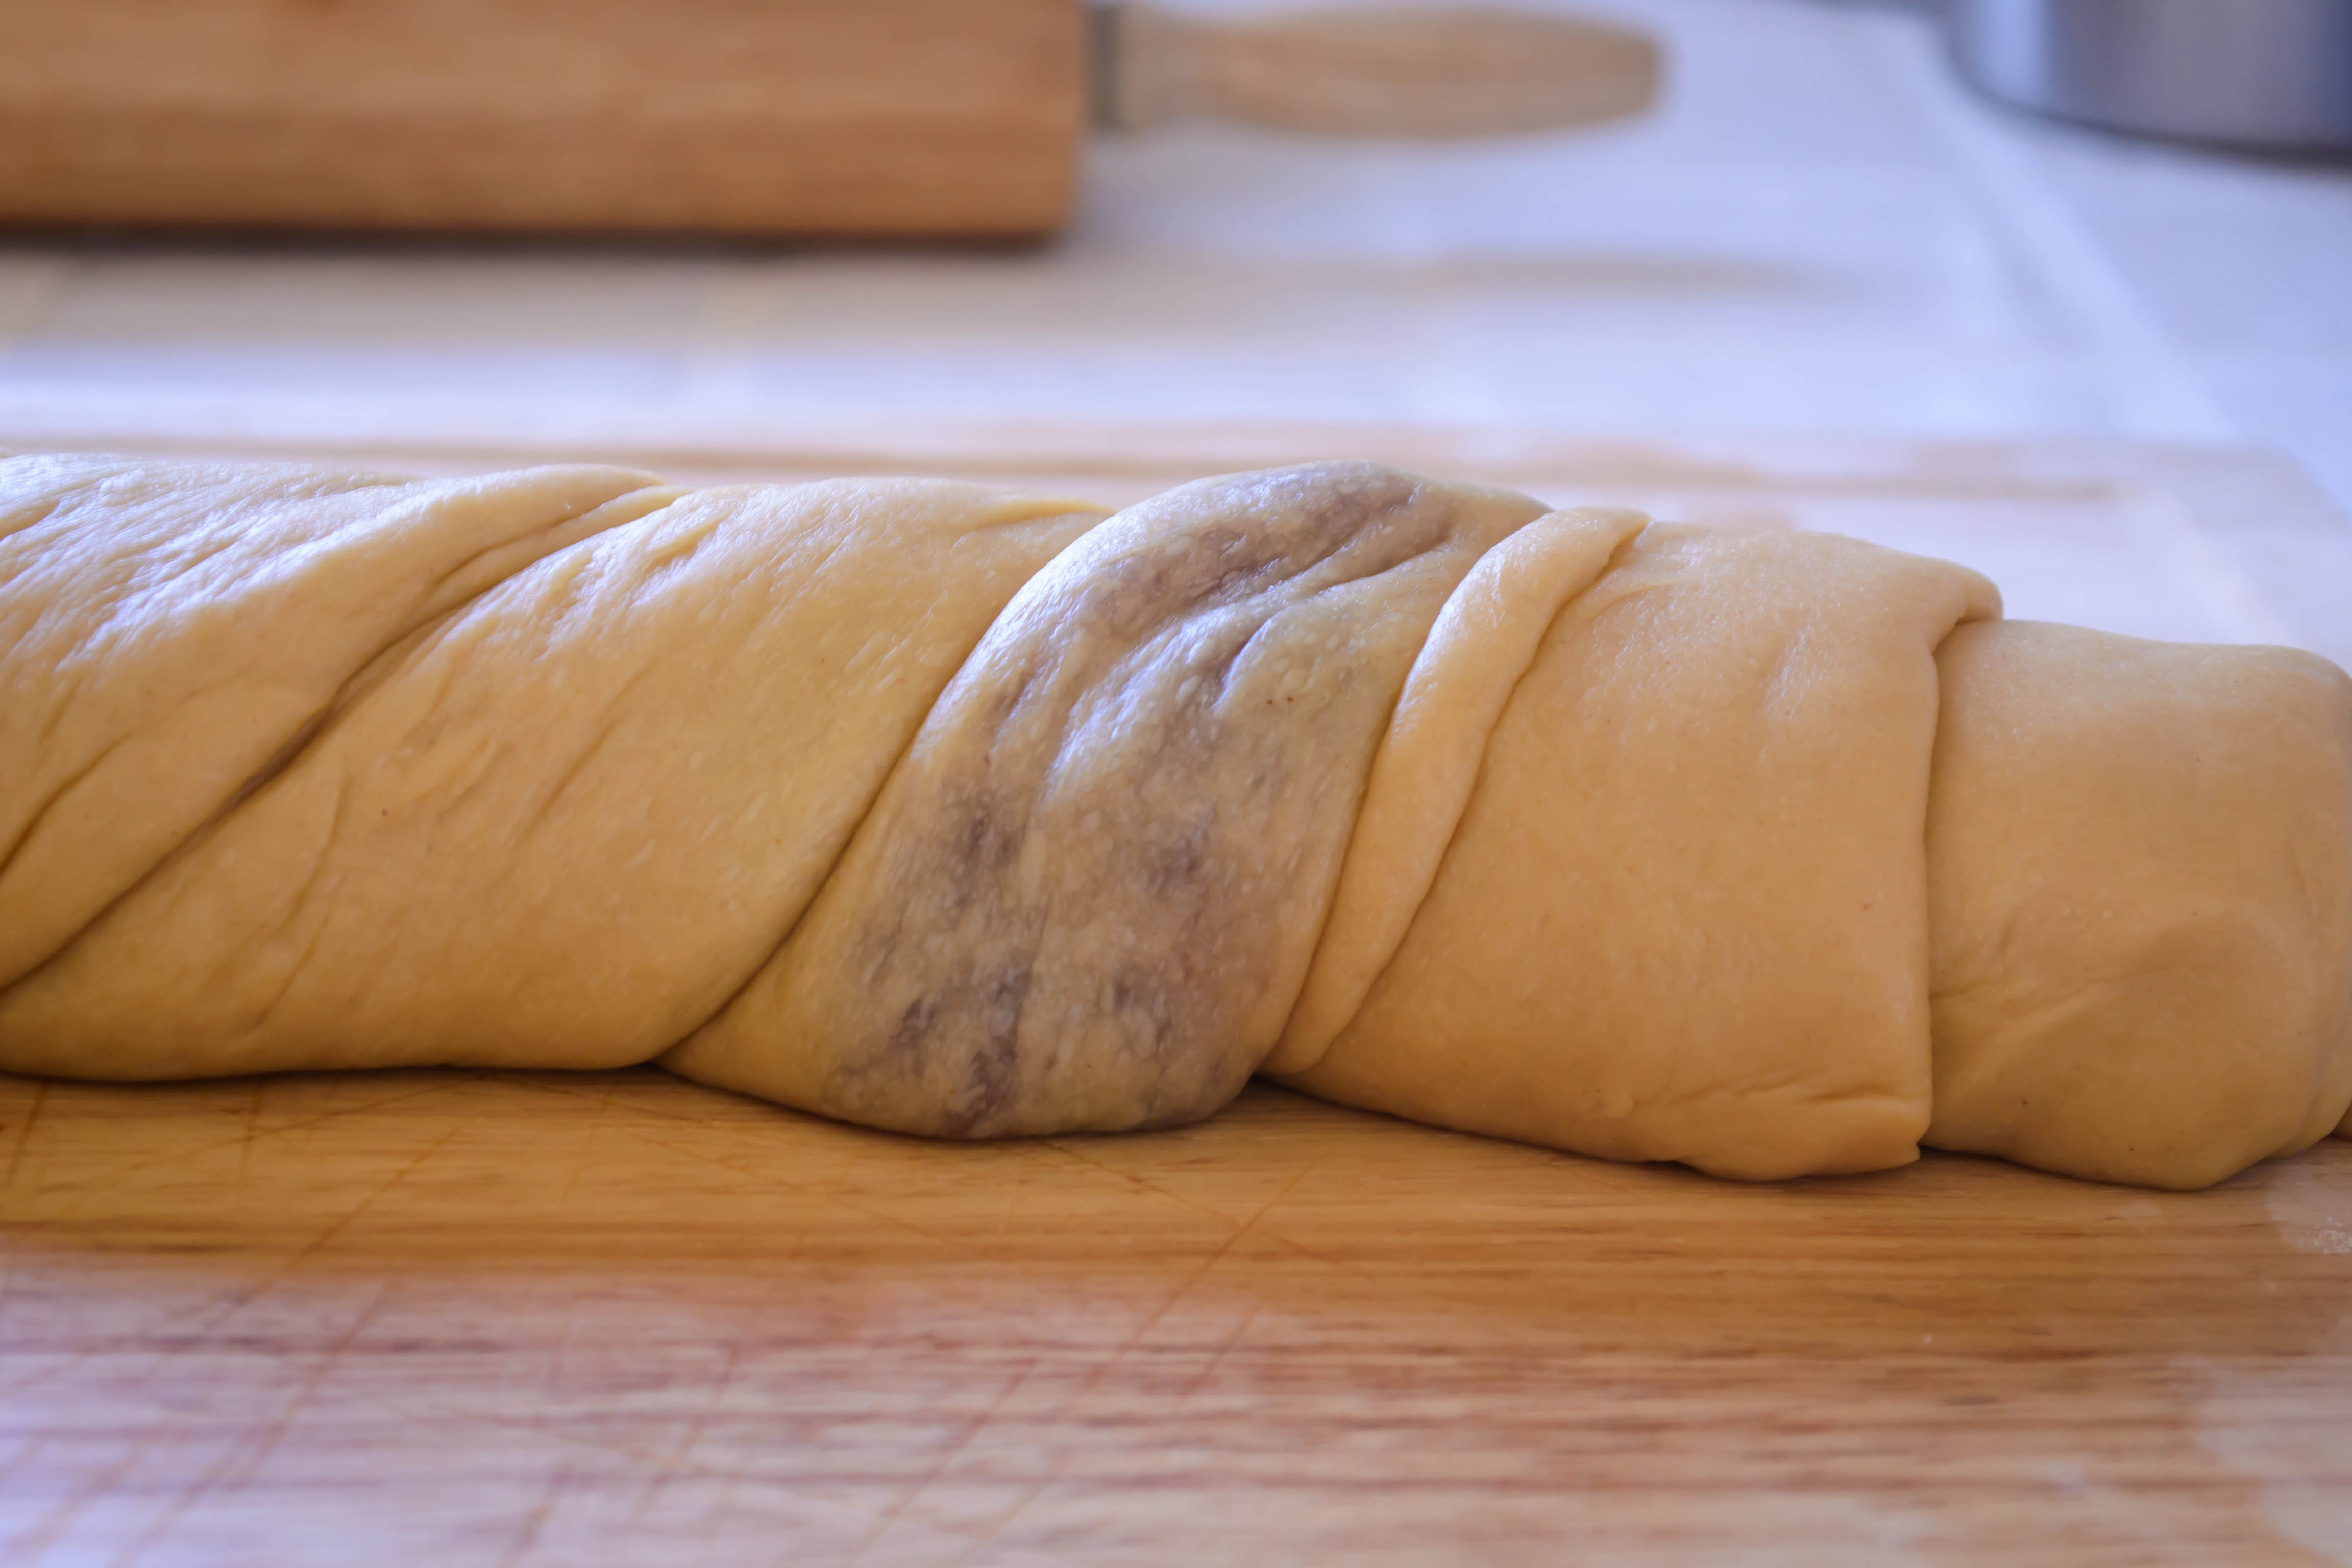
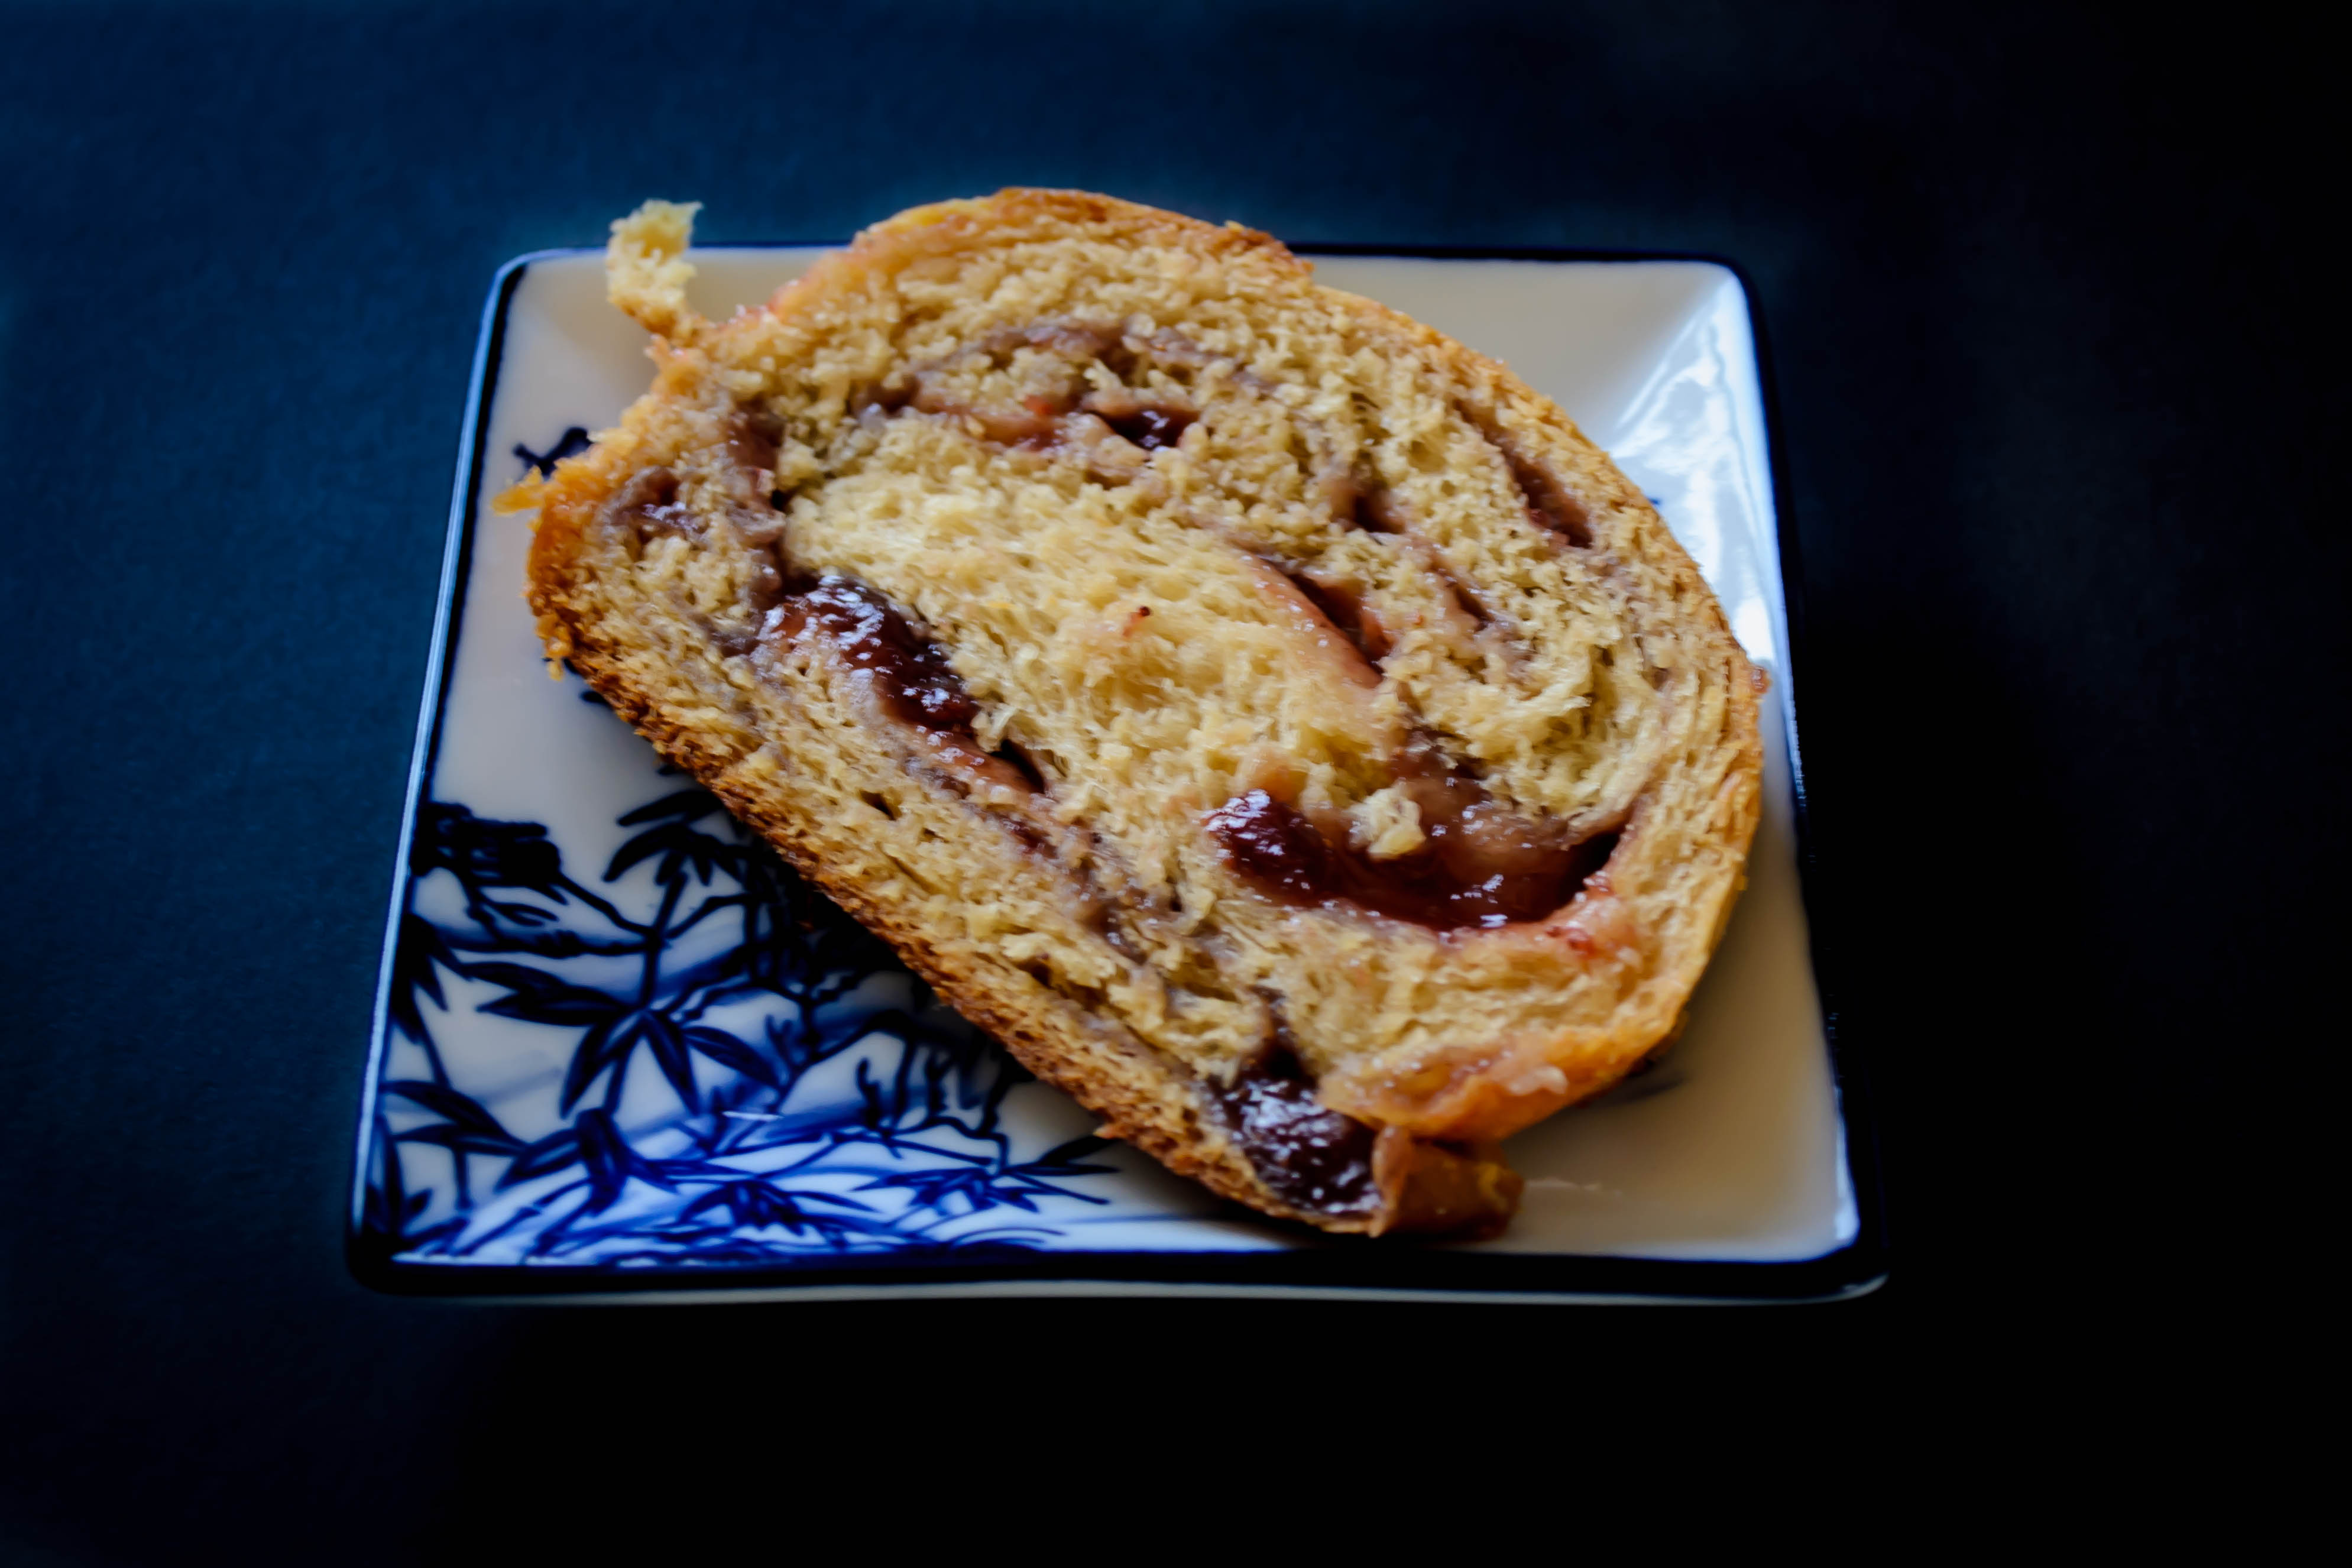
 What arose from this self-indulgent, first-world-problems sort of pondering was a moist, deeply tawny loaf, dense in the best kind of way, with a mild but definite peanut flavor. I flattened it into a rectangle and spread it thickly with jam before rolling it up and twisting it to create a swirl: a thick artery of gloppy, sticky strawberry so pervasive it cracked the crust and oozed forth into barest caramelization. The borders of the jam swirl maintained just a little doughiness from the extra moisture, echoing the effect the jam would have on the bread after sitting in your lunchbox all morning, and at these doughy, almost under-baked pockets, the peanut butter taste was most pronounced. With butter, peanut butter, an egg, and milk in the dough, this is a rich bread, though not as indulgent as brioche. It’s a perfect mid-morning or mid-afternoon snack, and the best news of all is: it’s instant gratification – a sandwich in one step! No spreading required; all you have to do is cut a slice.
Note: I do not like, nor have I ever liked, crunchy peanut butter. I don’t even really care for peanuts in their original form (I know, the fact that I like peanut butter despite this makes me a bit odd. On the flip side, I could go the rest of my life without tomato sauce but I can’t wait for the first big brandywine or sweet Cherokee purple heirloom of the summer. Go figure). However, if you wanted to ramp up the peanut flavor in this bread, I’d advise you to do one of two things: 1.) instead of smearing the top of the loaf with butter just before baking, smear it with chunky peanut butter you’ve heated in the microwave for a few seconds (heating it will help it spread better). 2.) if the idea of smearing melty, sticky peanut butter doesn’t appeal to you, use regular butter, but drizzle on a few tablespoons of finely chopped peanuts. This will give you a crunchy peanut-y hit every time you take a bite of crust. 
 Peanut Butter and Jelly bread


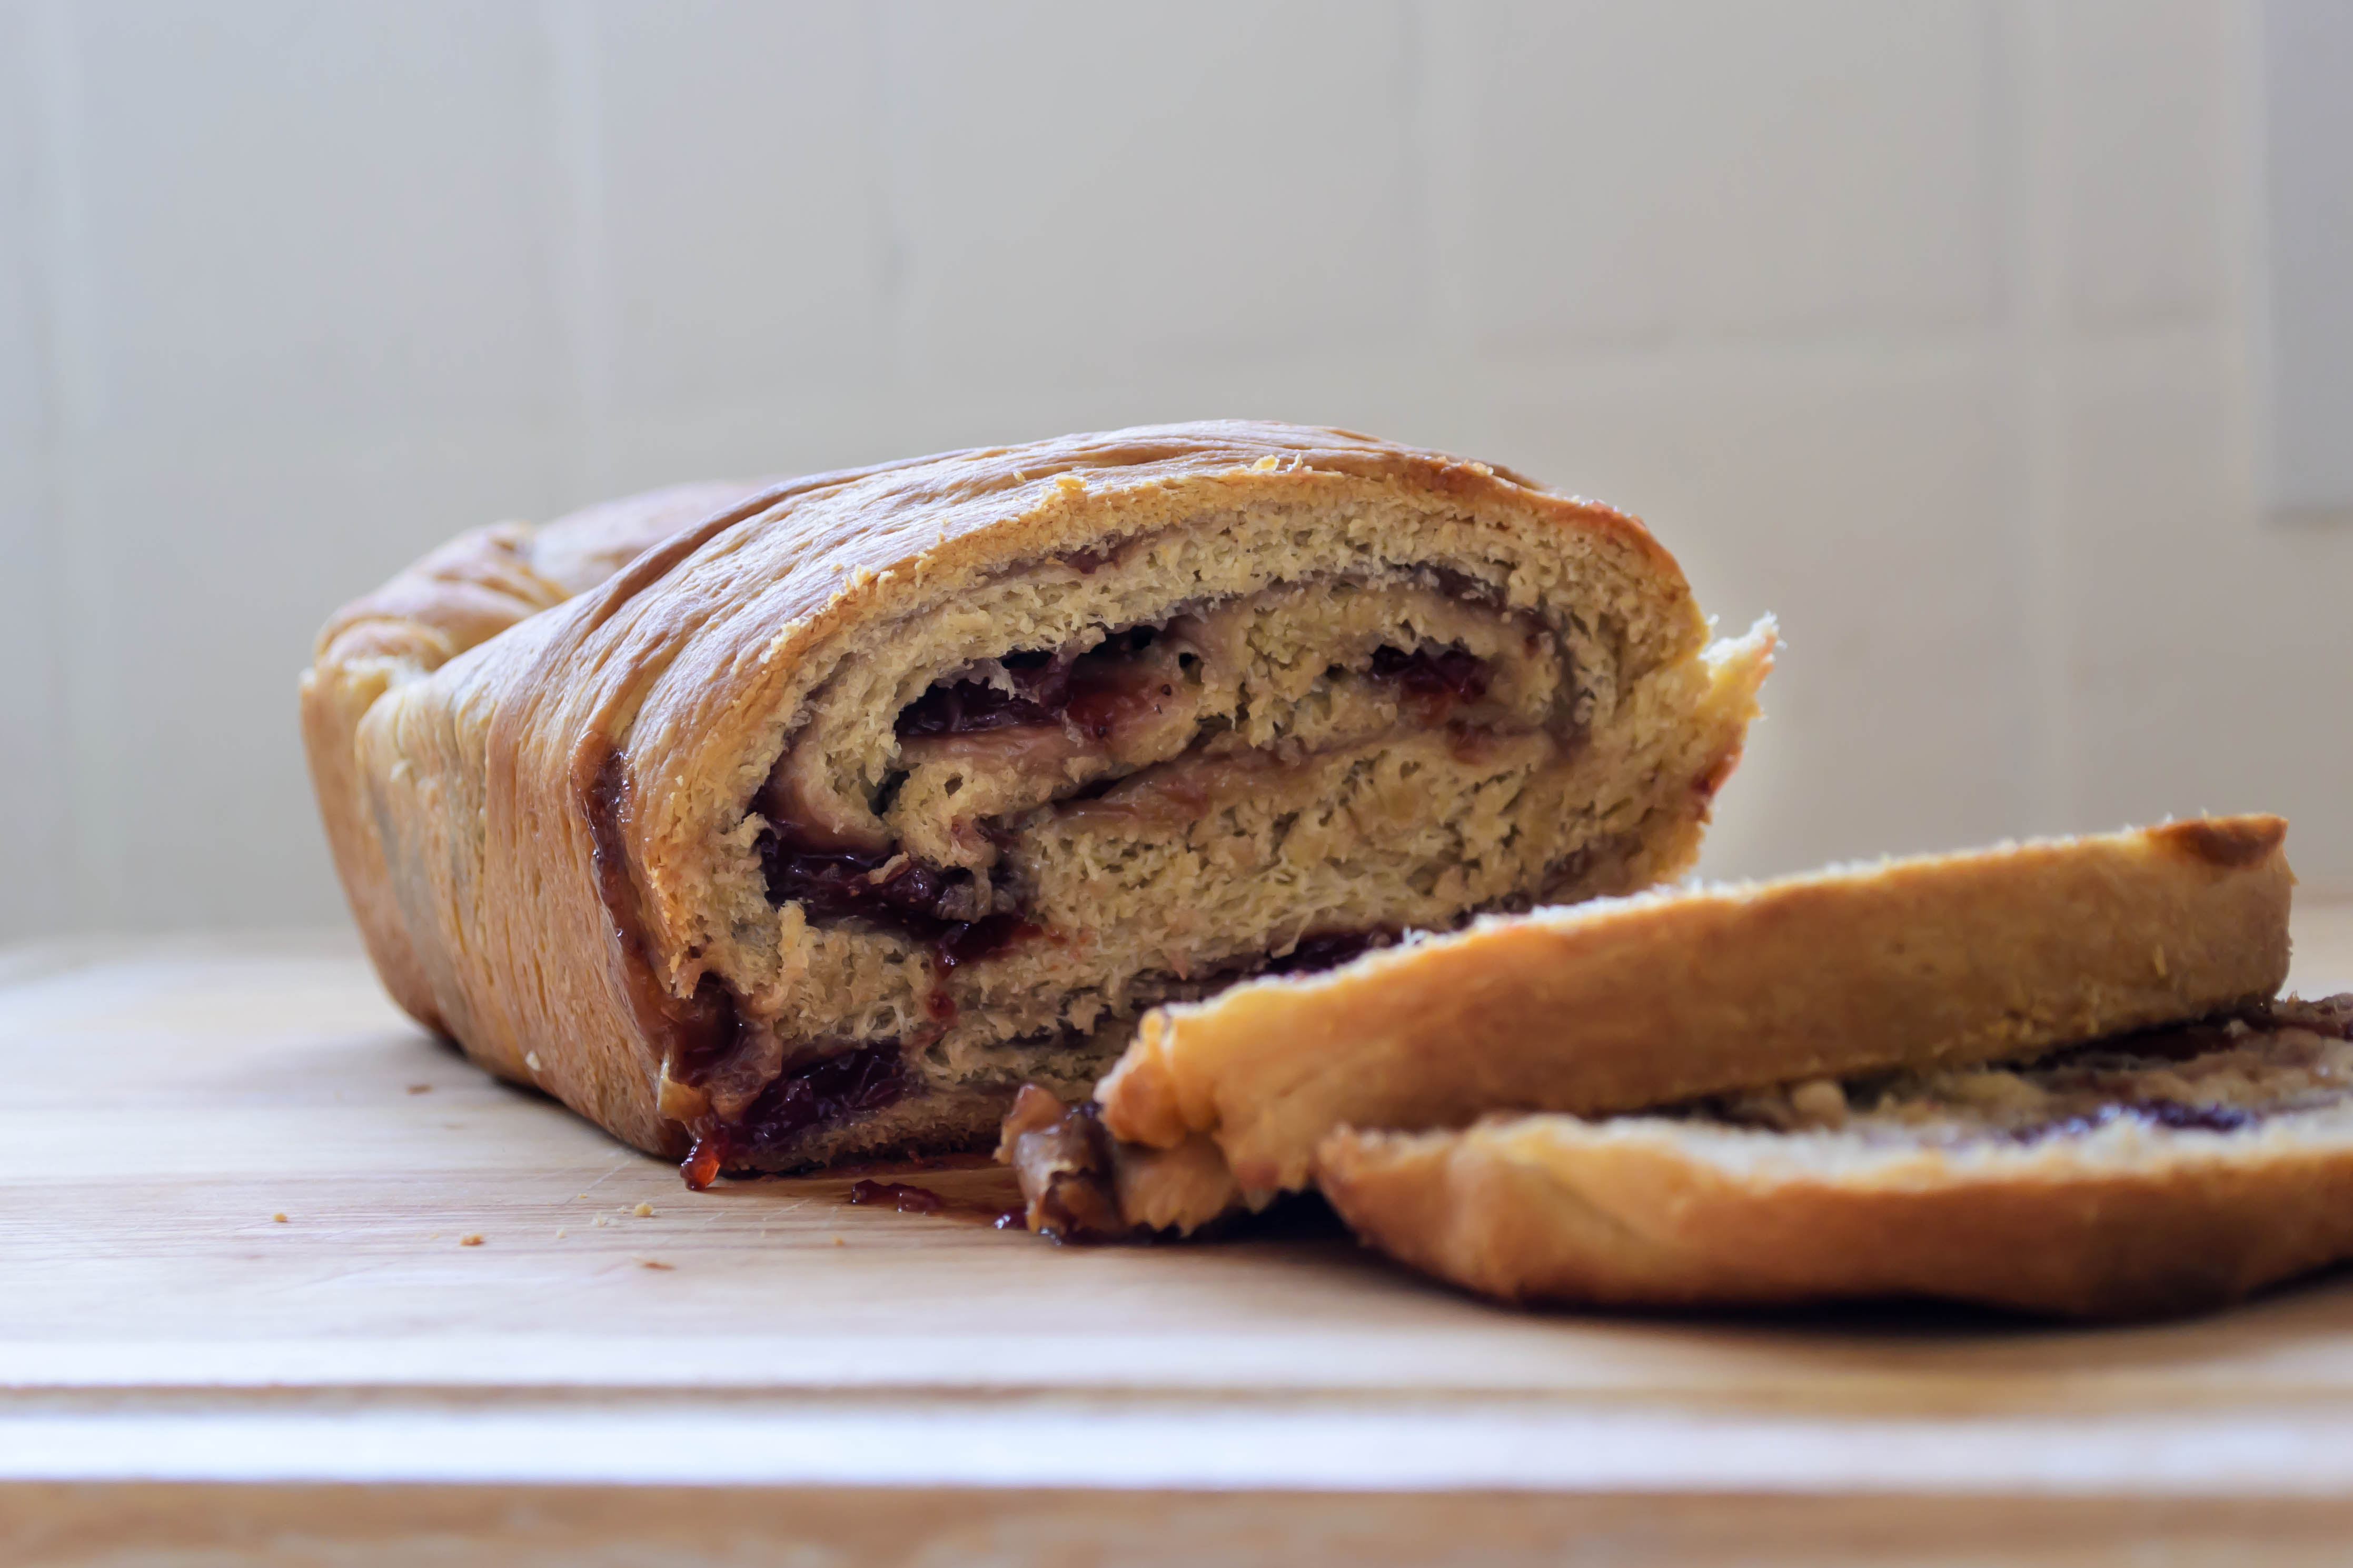
Note: this bread’s doneness is difficult to test. Because the jam is interspersed throughout, the finished loaf can seem a bit doughy. If you have an instant read thermometer, try to insert it in an area that is just bread, not jam. (I had some difficulty doing this, as you can see from the small holes on the top of the loaf in some of the photos above.) You are aiming for a temperature of between 190-200F. I must admit, though, I don’t mind this loaf a bit underdone – I think it captures the softness and almost-soggy glory of a simple pb&j from childhood. And really, that’s what this bread should be about.
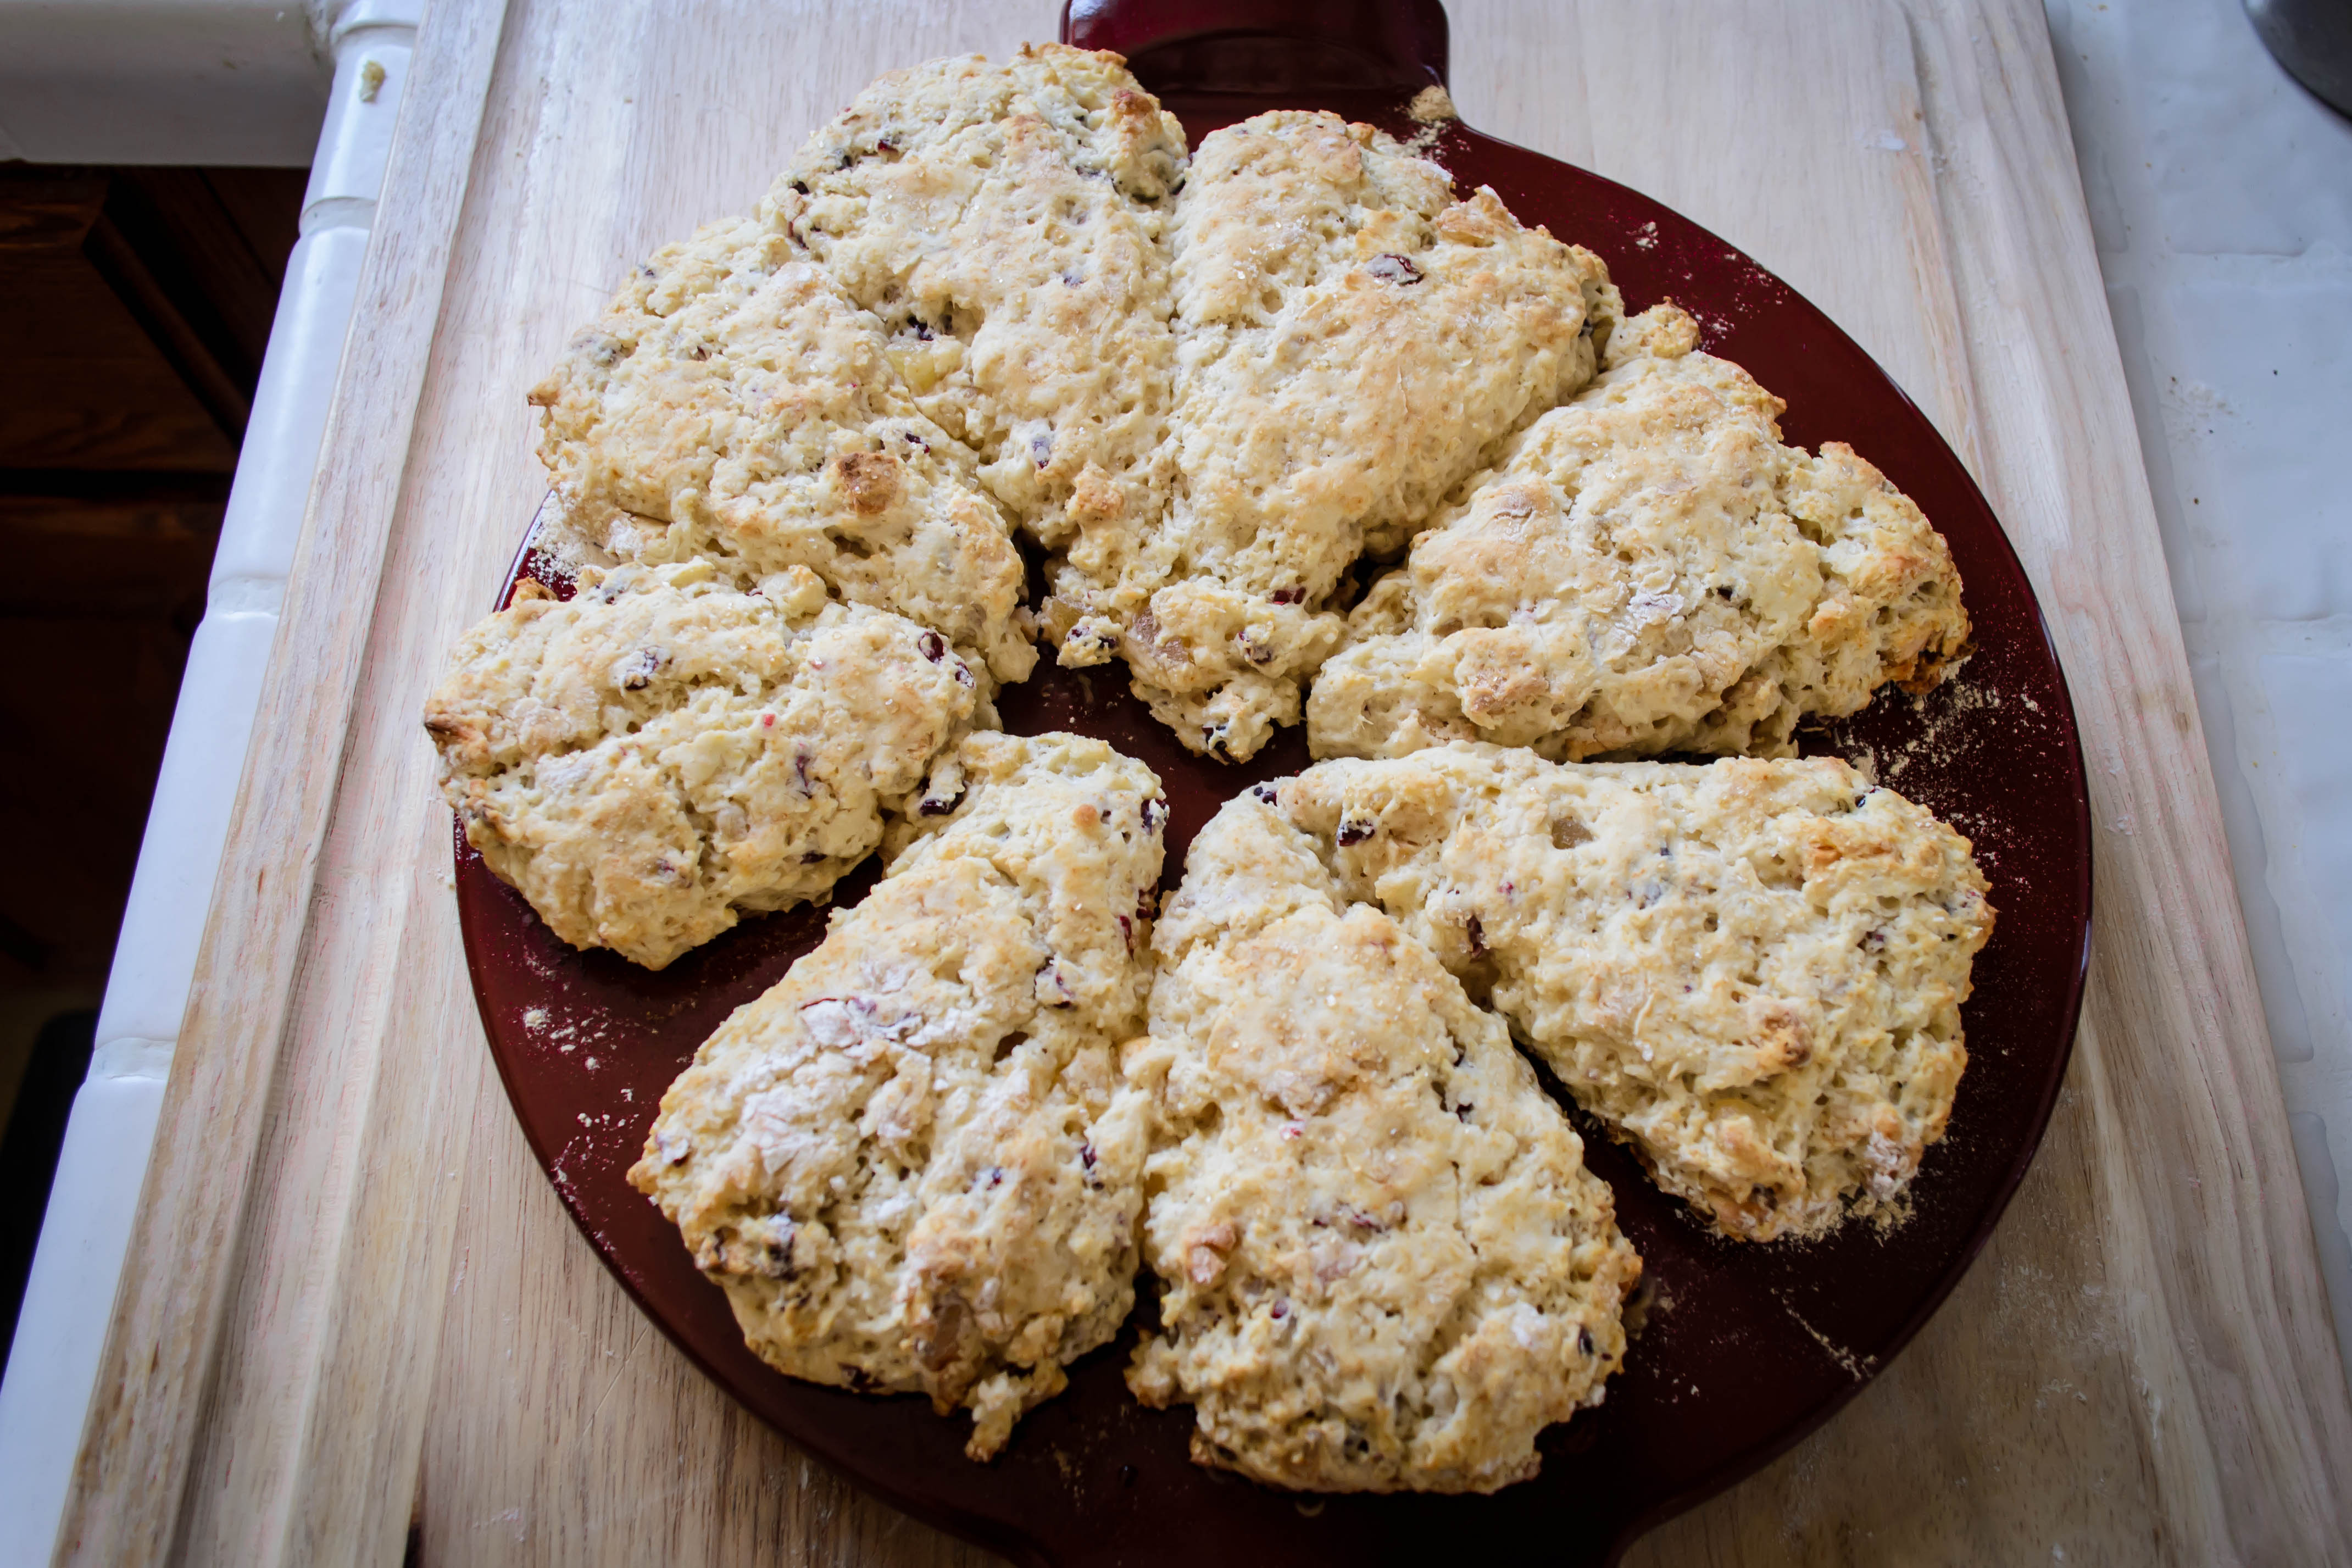
This month’s archive makes it look like I’m harboring a bit of a sweet tooth. Nothing wrong with that, necessarily, but I should tell you this week’s entry is actually at N.’s (indirect) request. A month or two ago, my beloved aunt sent me some specialty King Arthur flour, and along with the packages of semolina and European style AP blend came a catalog. Naturally, this has become my bedtime reading (what, you don’t read cookbooks and kitchen magazines in bed?), and on Monday night as I dawdled longingly over a blurb about Double Devon Cream, N. surfaced from internet-land and glanced at the facing page. “That,” he said, and pointed at a photograph of some cranberry orange scones. “You want scones?” A silly question, apparently. “That.” So here they are.
I did some research (i.e. food blogs and recipe comparisons from the other cookbooks stacked on my nightstand) and found, as usual, that Deb has all the answers. Seriously, is there anything the woman hasn’t made? I adore you, Deb, but really – a person can only repress the green-eyed monster for so long… This adapts her recipe for “Creamy, Dreamy Scones,” which she got from the America’s Test Kitchen Cookbook. I’ve used a combination of cake flour and all purpose flour for a lighter texture, allowed turbinado sugar to stand in for the regular sugar, and replaced some (okay, most) of the cream with whole milk, because I lost my mind this week and, forgetting the intended use of that little container, dumped most of it into an unholy-but-oh-so-heavenly conglomeration of chard, bacon, and bourbon.
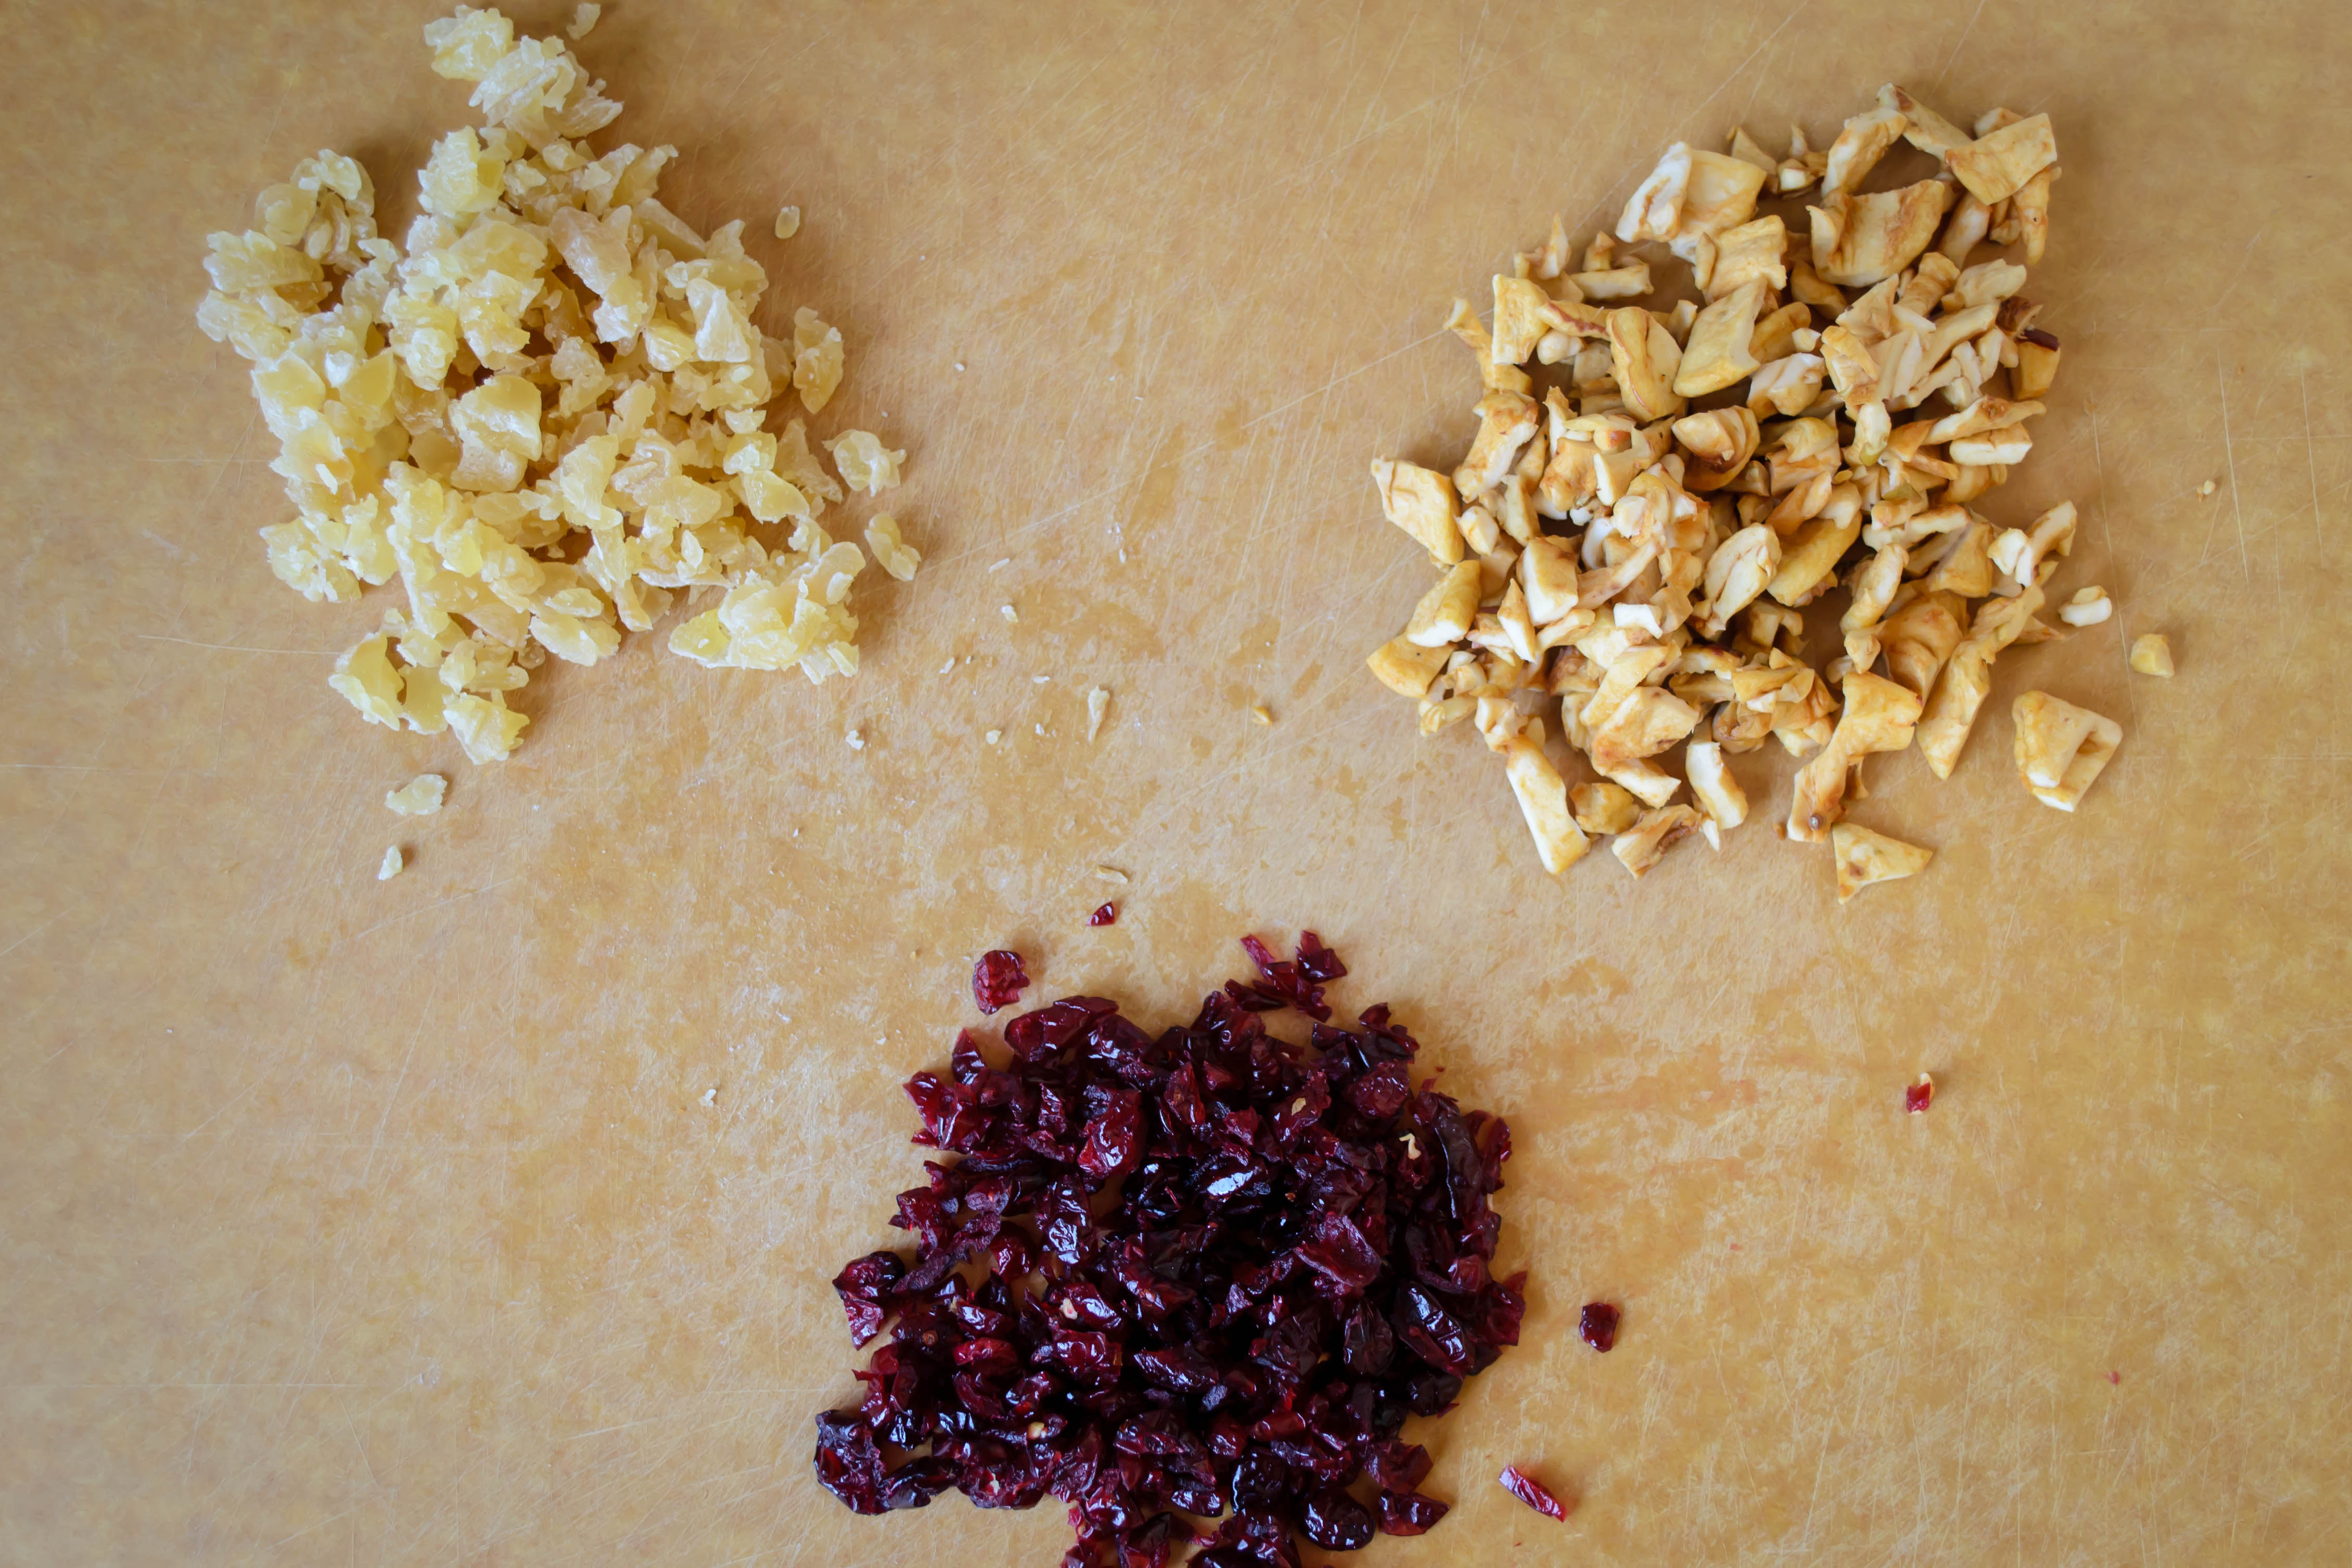
These scones take advantage of the bags and bags of dried fruit that inevitably collect in my pantry. You could probably add other flavors as well, but I thought apples and cranberries, and the candied ginger I’ve been obsessed with for at least a year now, would play well together. Apricots would probably be beautiful too (unless you are, like one of my family members who shall remain nameless to protect familial harmony, freaked out by dried apricots because they apparently bear an uncomfortable resemblance to mouse ears).
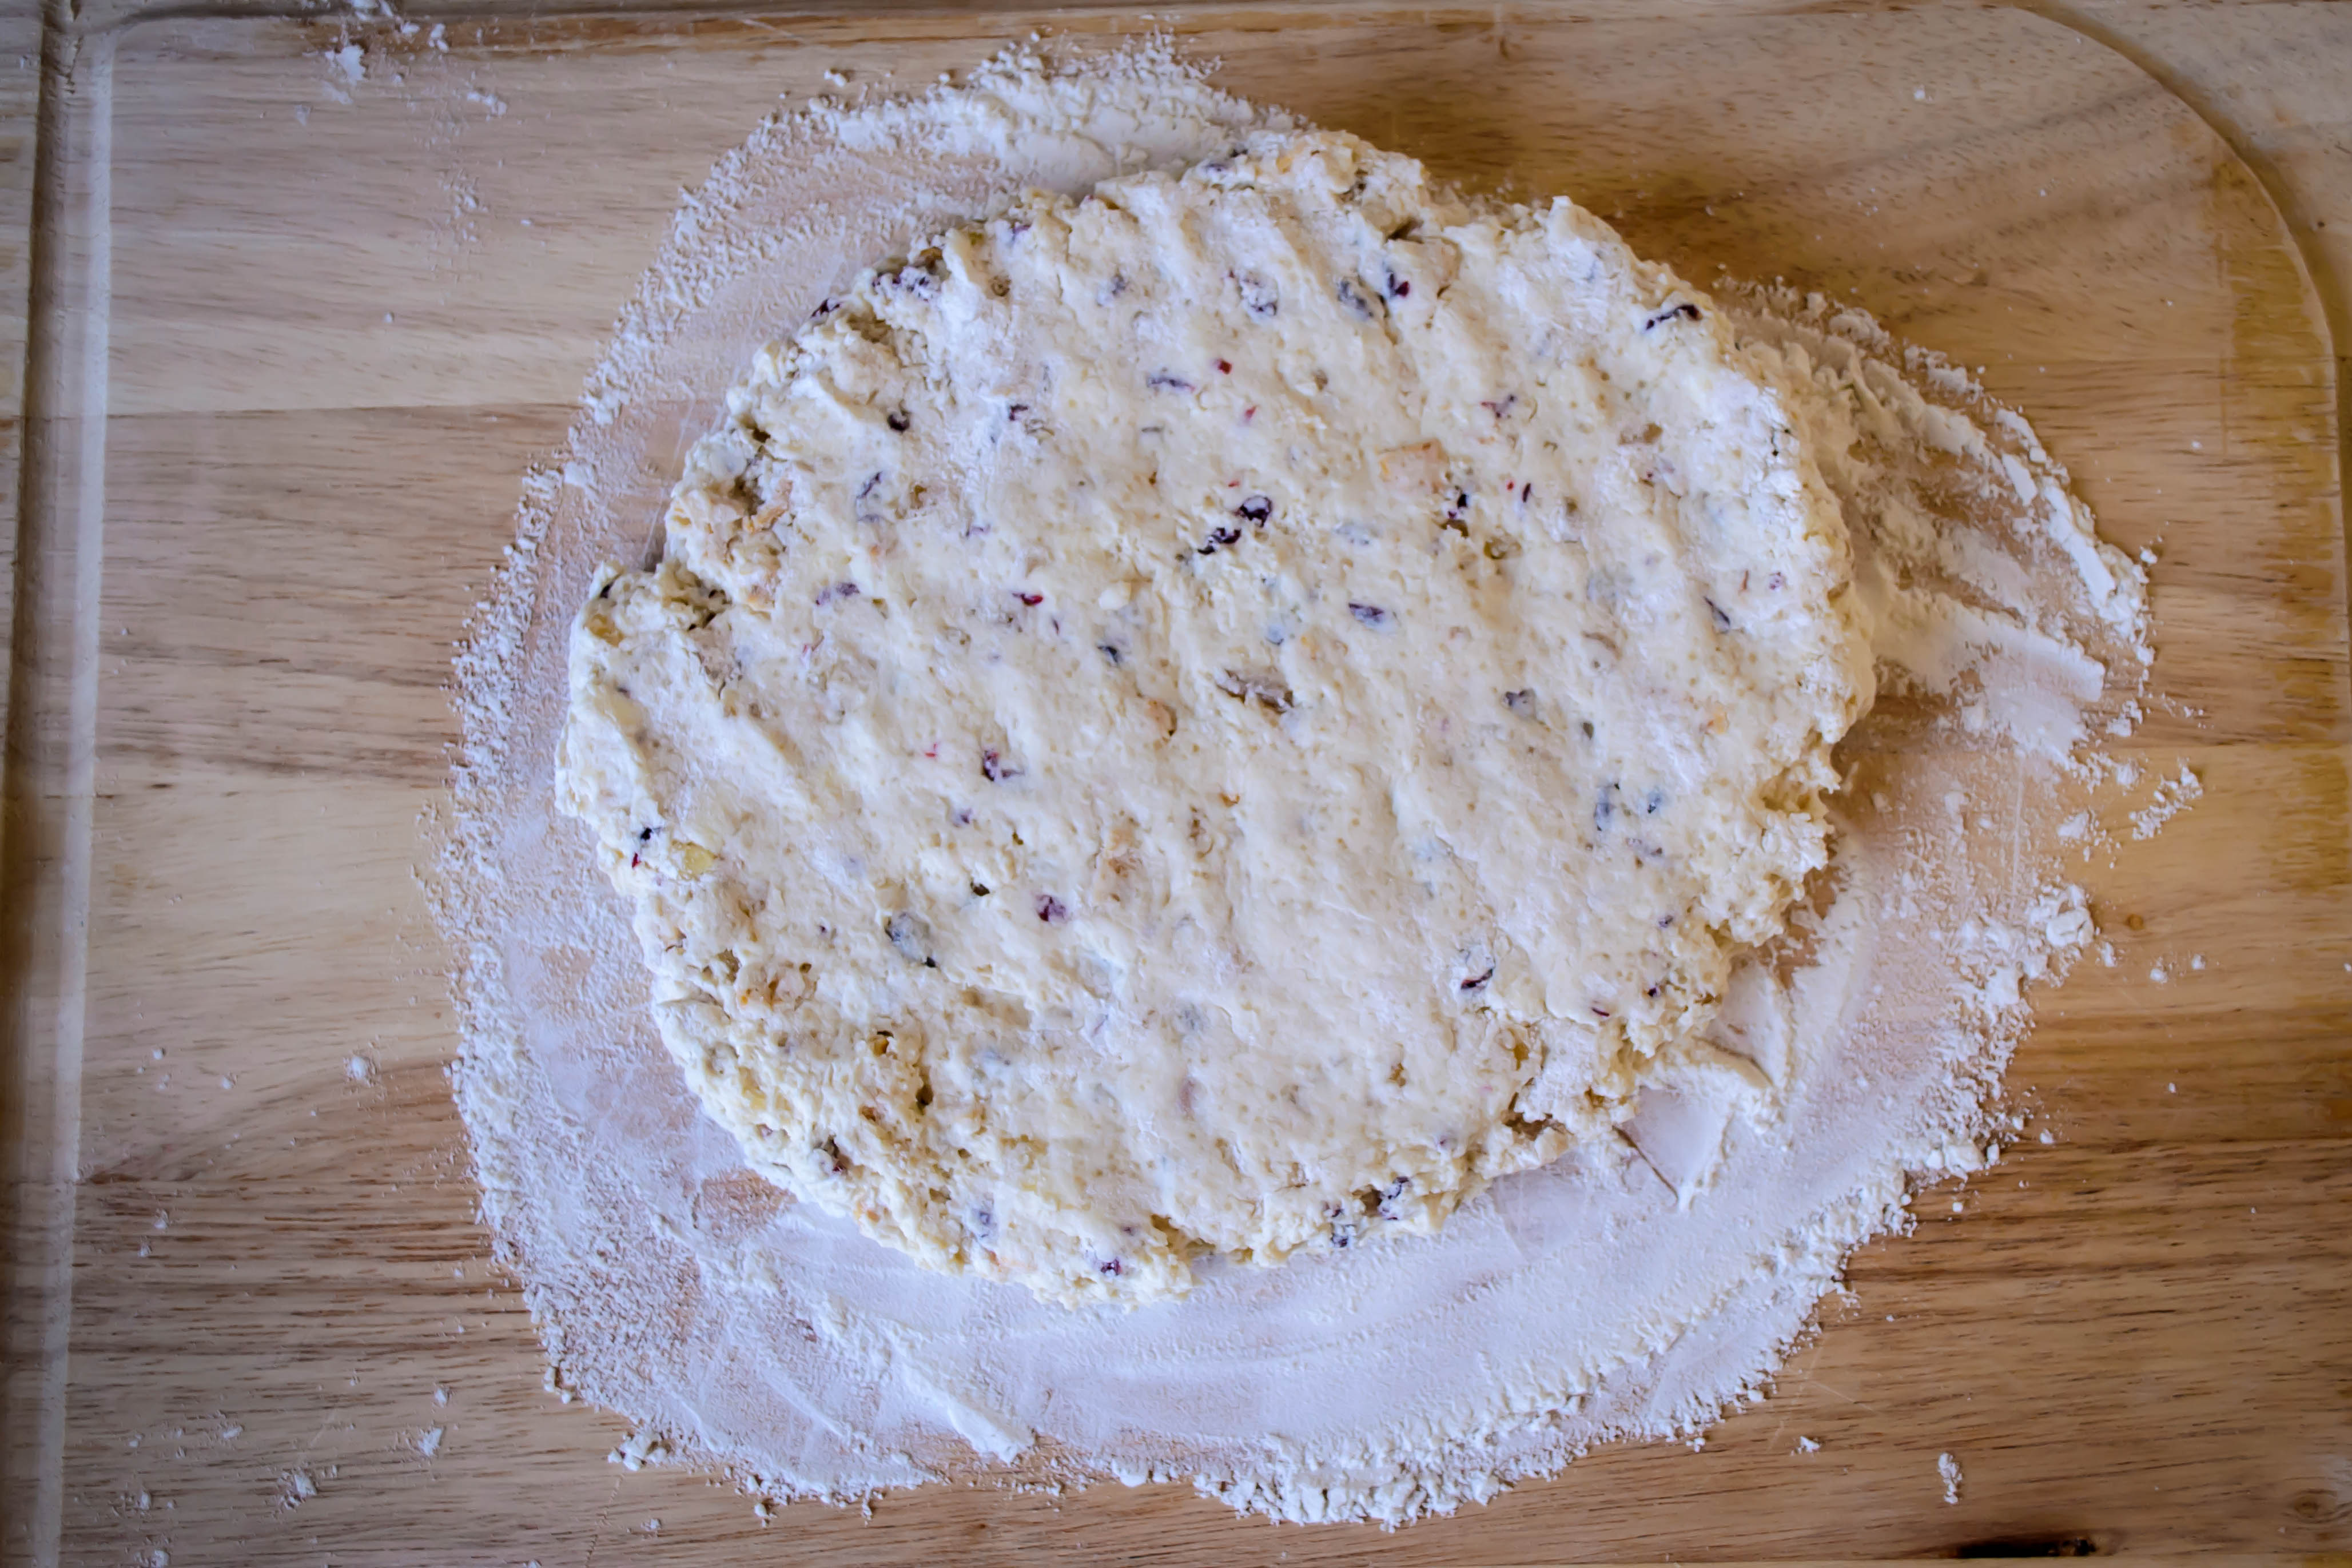
Scones come together much like biscuits: whisk the dry ingredients, cut in the butter, stir the milk/cream/buttermilk and flavor additions in with a fork. But then, and this is where things can go awry, you have to pat it into a circle and either punch out rounds with a biscuit cutter, or slice the whole thing into triangles. I chose the latter.


This dough is, if we’re honest with each other, an almost unmanageably sticky mess. Resist the temptation to mix more flour into the dough, because the more flour you add, the less tender the finished scones will be. But do be prepared to sprinkle flour over everything it will come in contact with. I used a floured pizza cutter to slice it into eight pieces, which tore up edges and corners even while the dough clung fiercely to the board below.


A bench scraper tool is really helpful for transferring your scones to their cooking vessel – a parchment lined baking sheet would be fine, but I used my brand new enameled pizza stone because I’m so jazzed about it. This, because I preheated it along with the oven, made the scones sizzle as I levered each one onto its surface, and rather than sticking (which I was dreading, since I realized only after they’d been in the oven for five minutes that I hadn’t greased or floured the cooking surface AT ALL), produced a crisp bottom crust.
I left my offering on the pizza stone to cool while I took the dog for a walk, and returned to find it had been accepted.

An hour or so later, it had been accepted again.
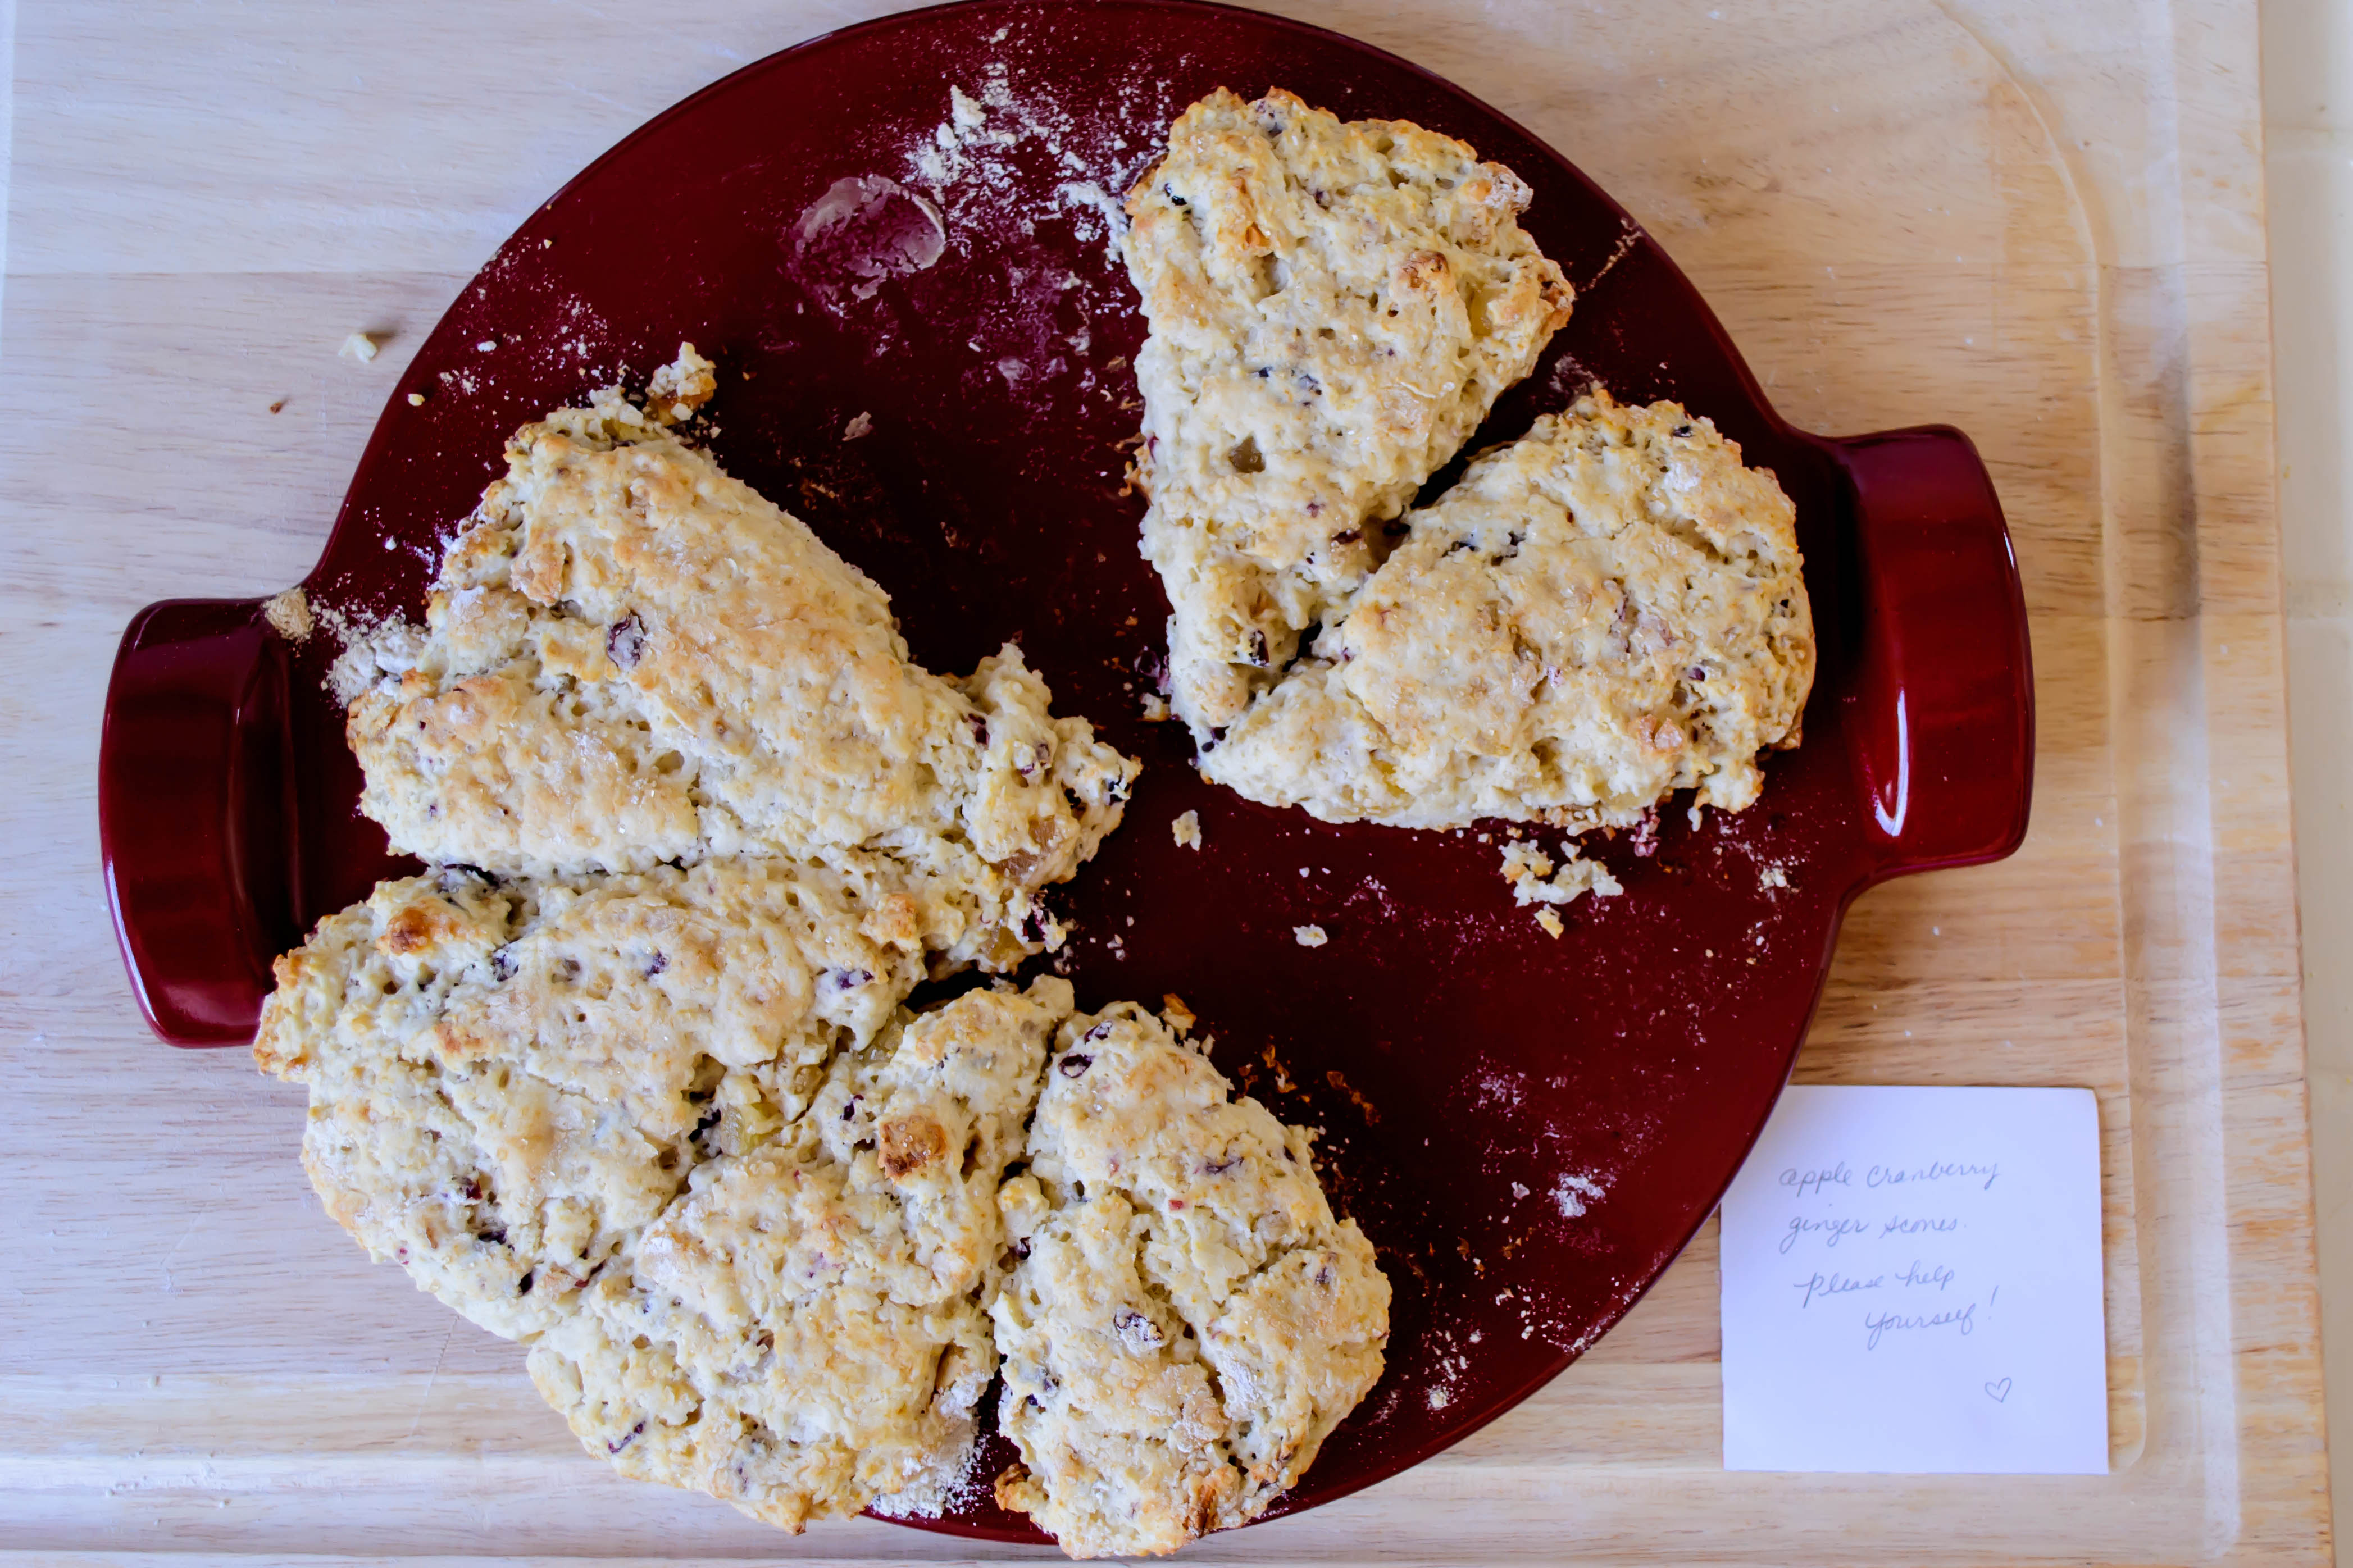
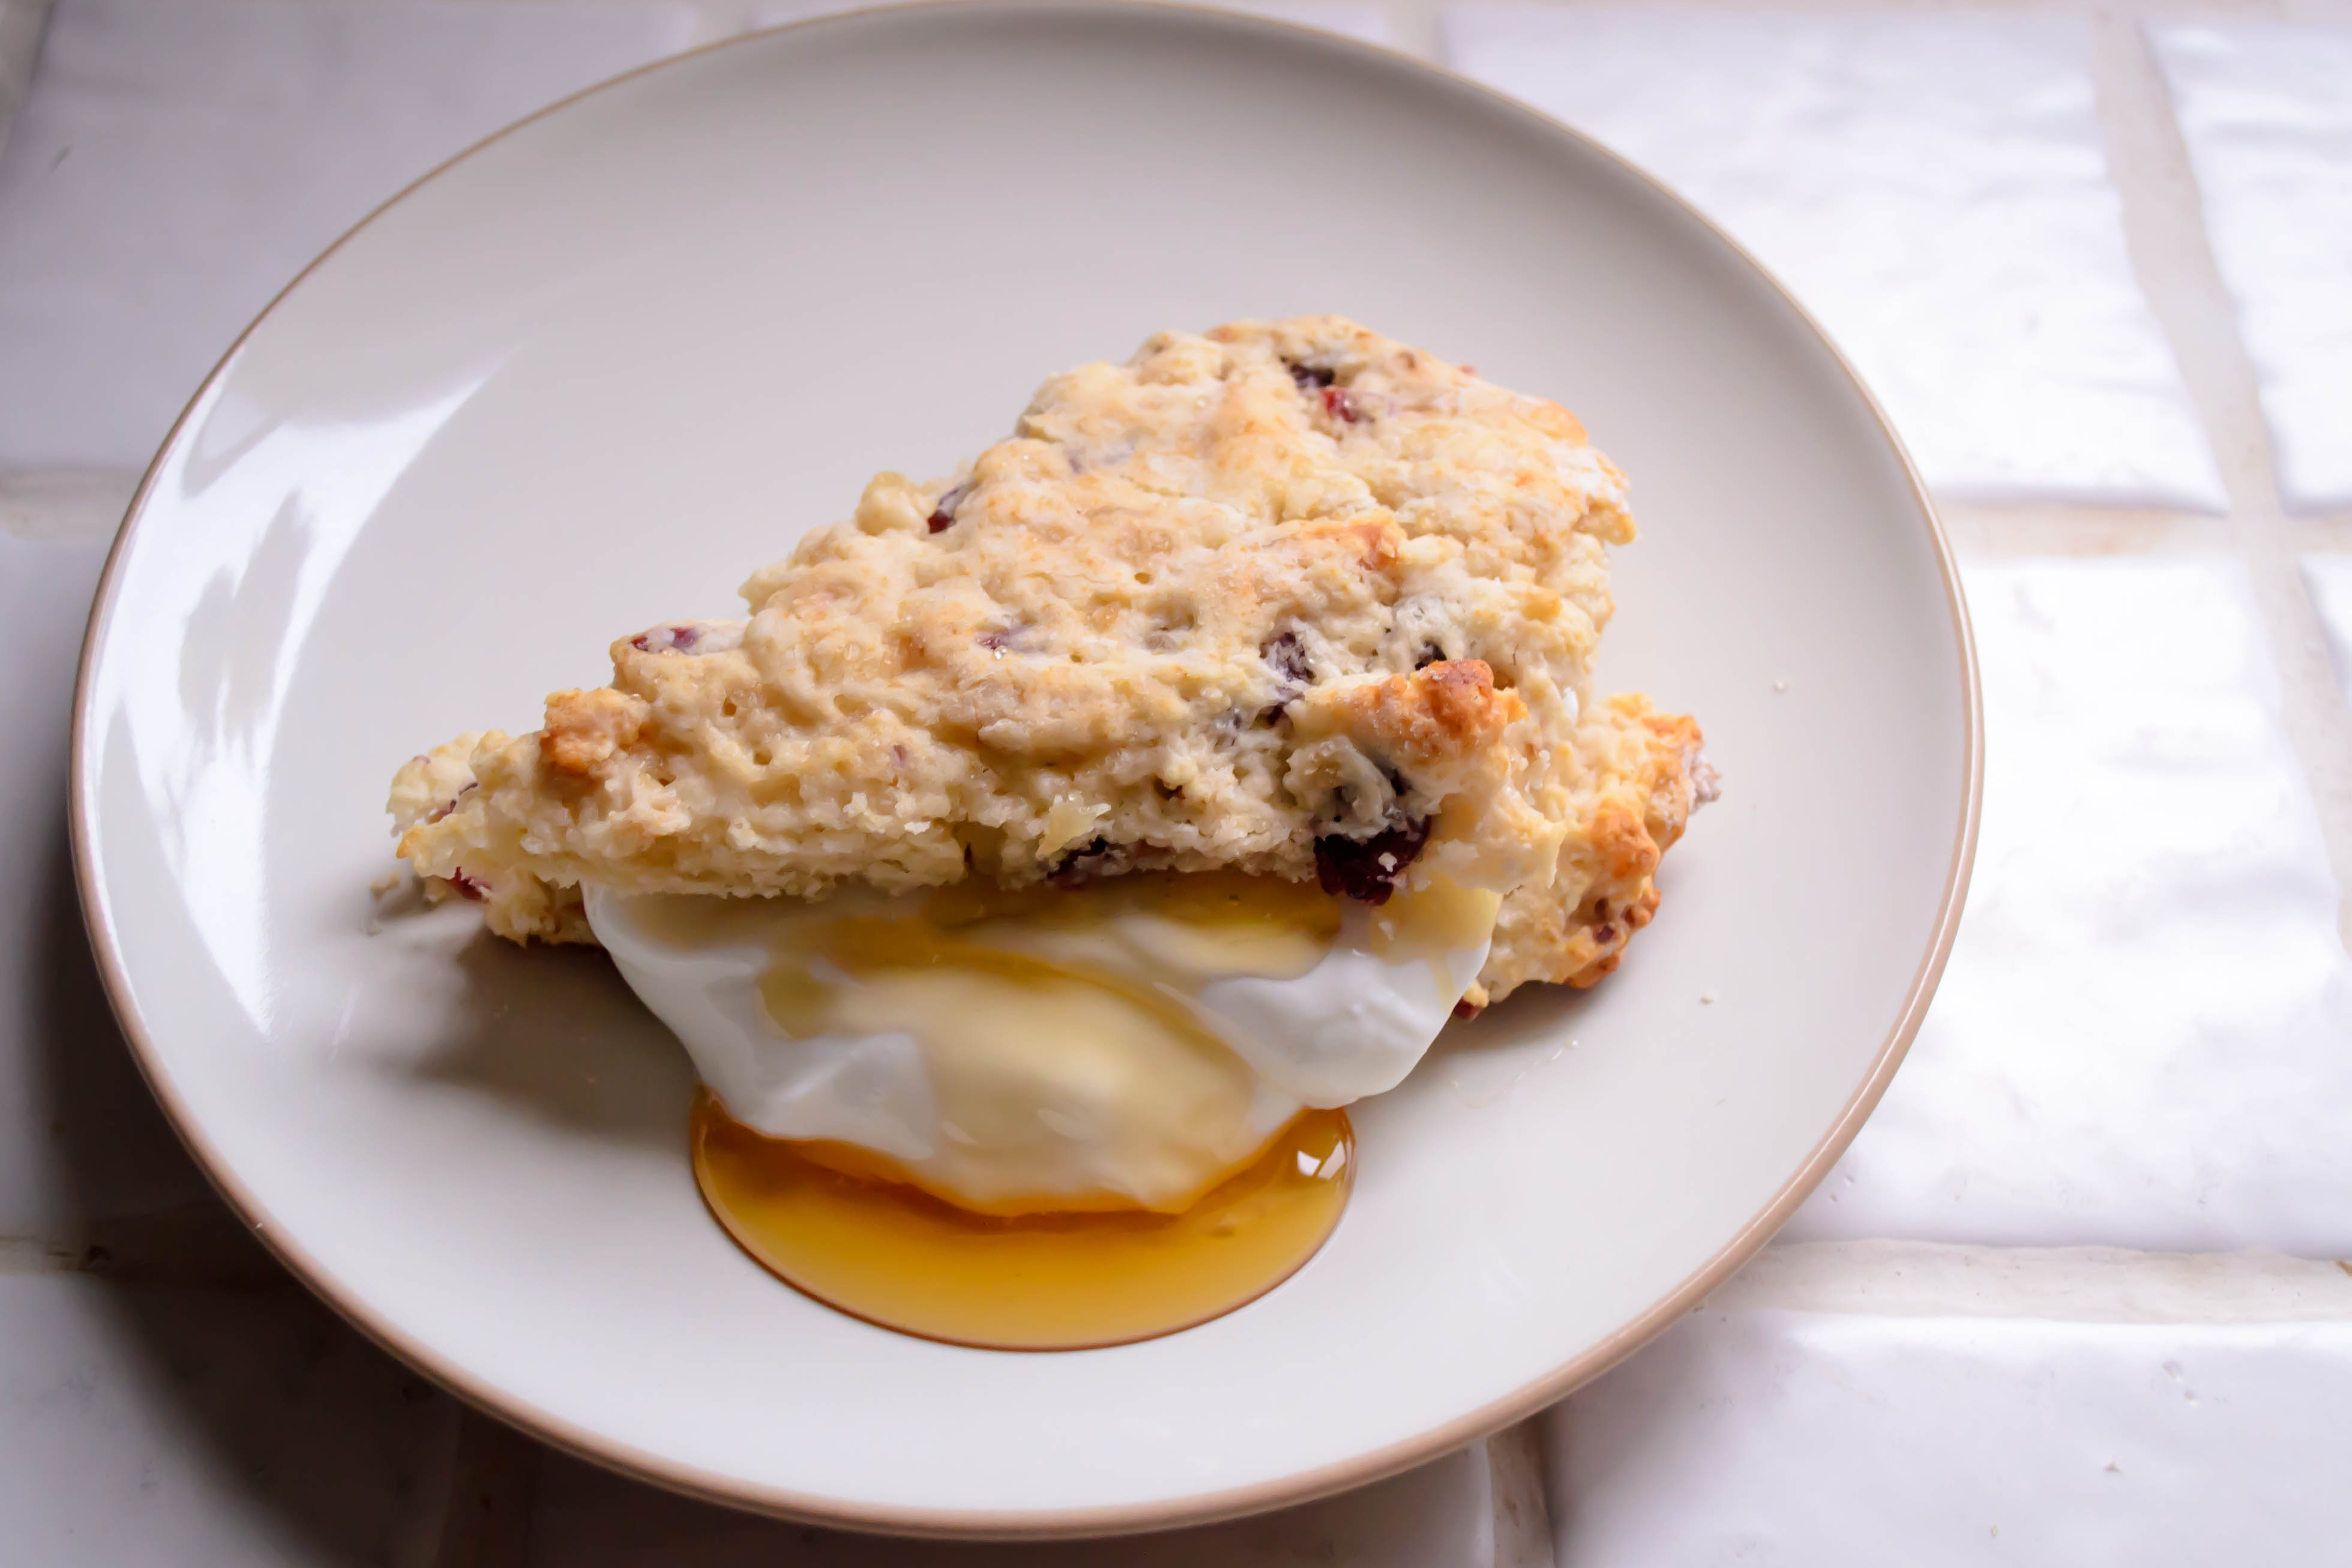
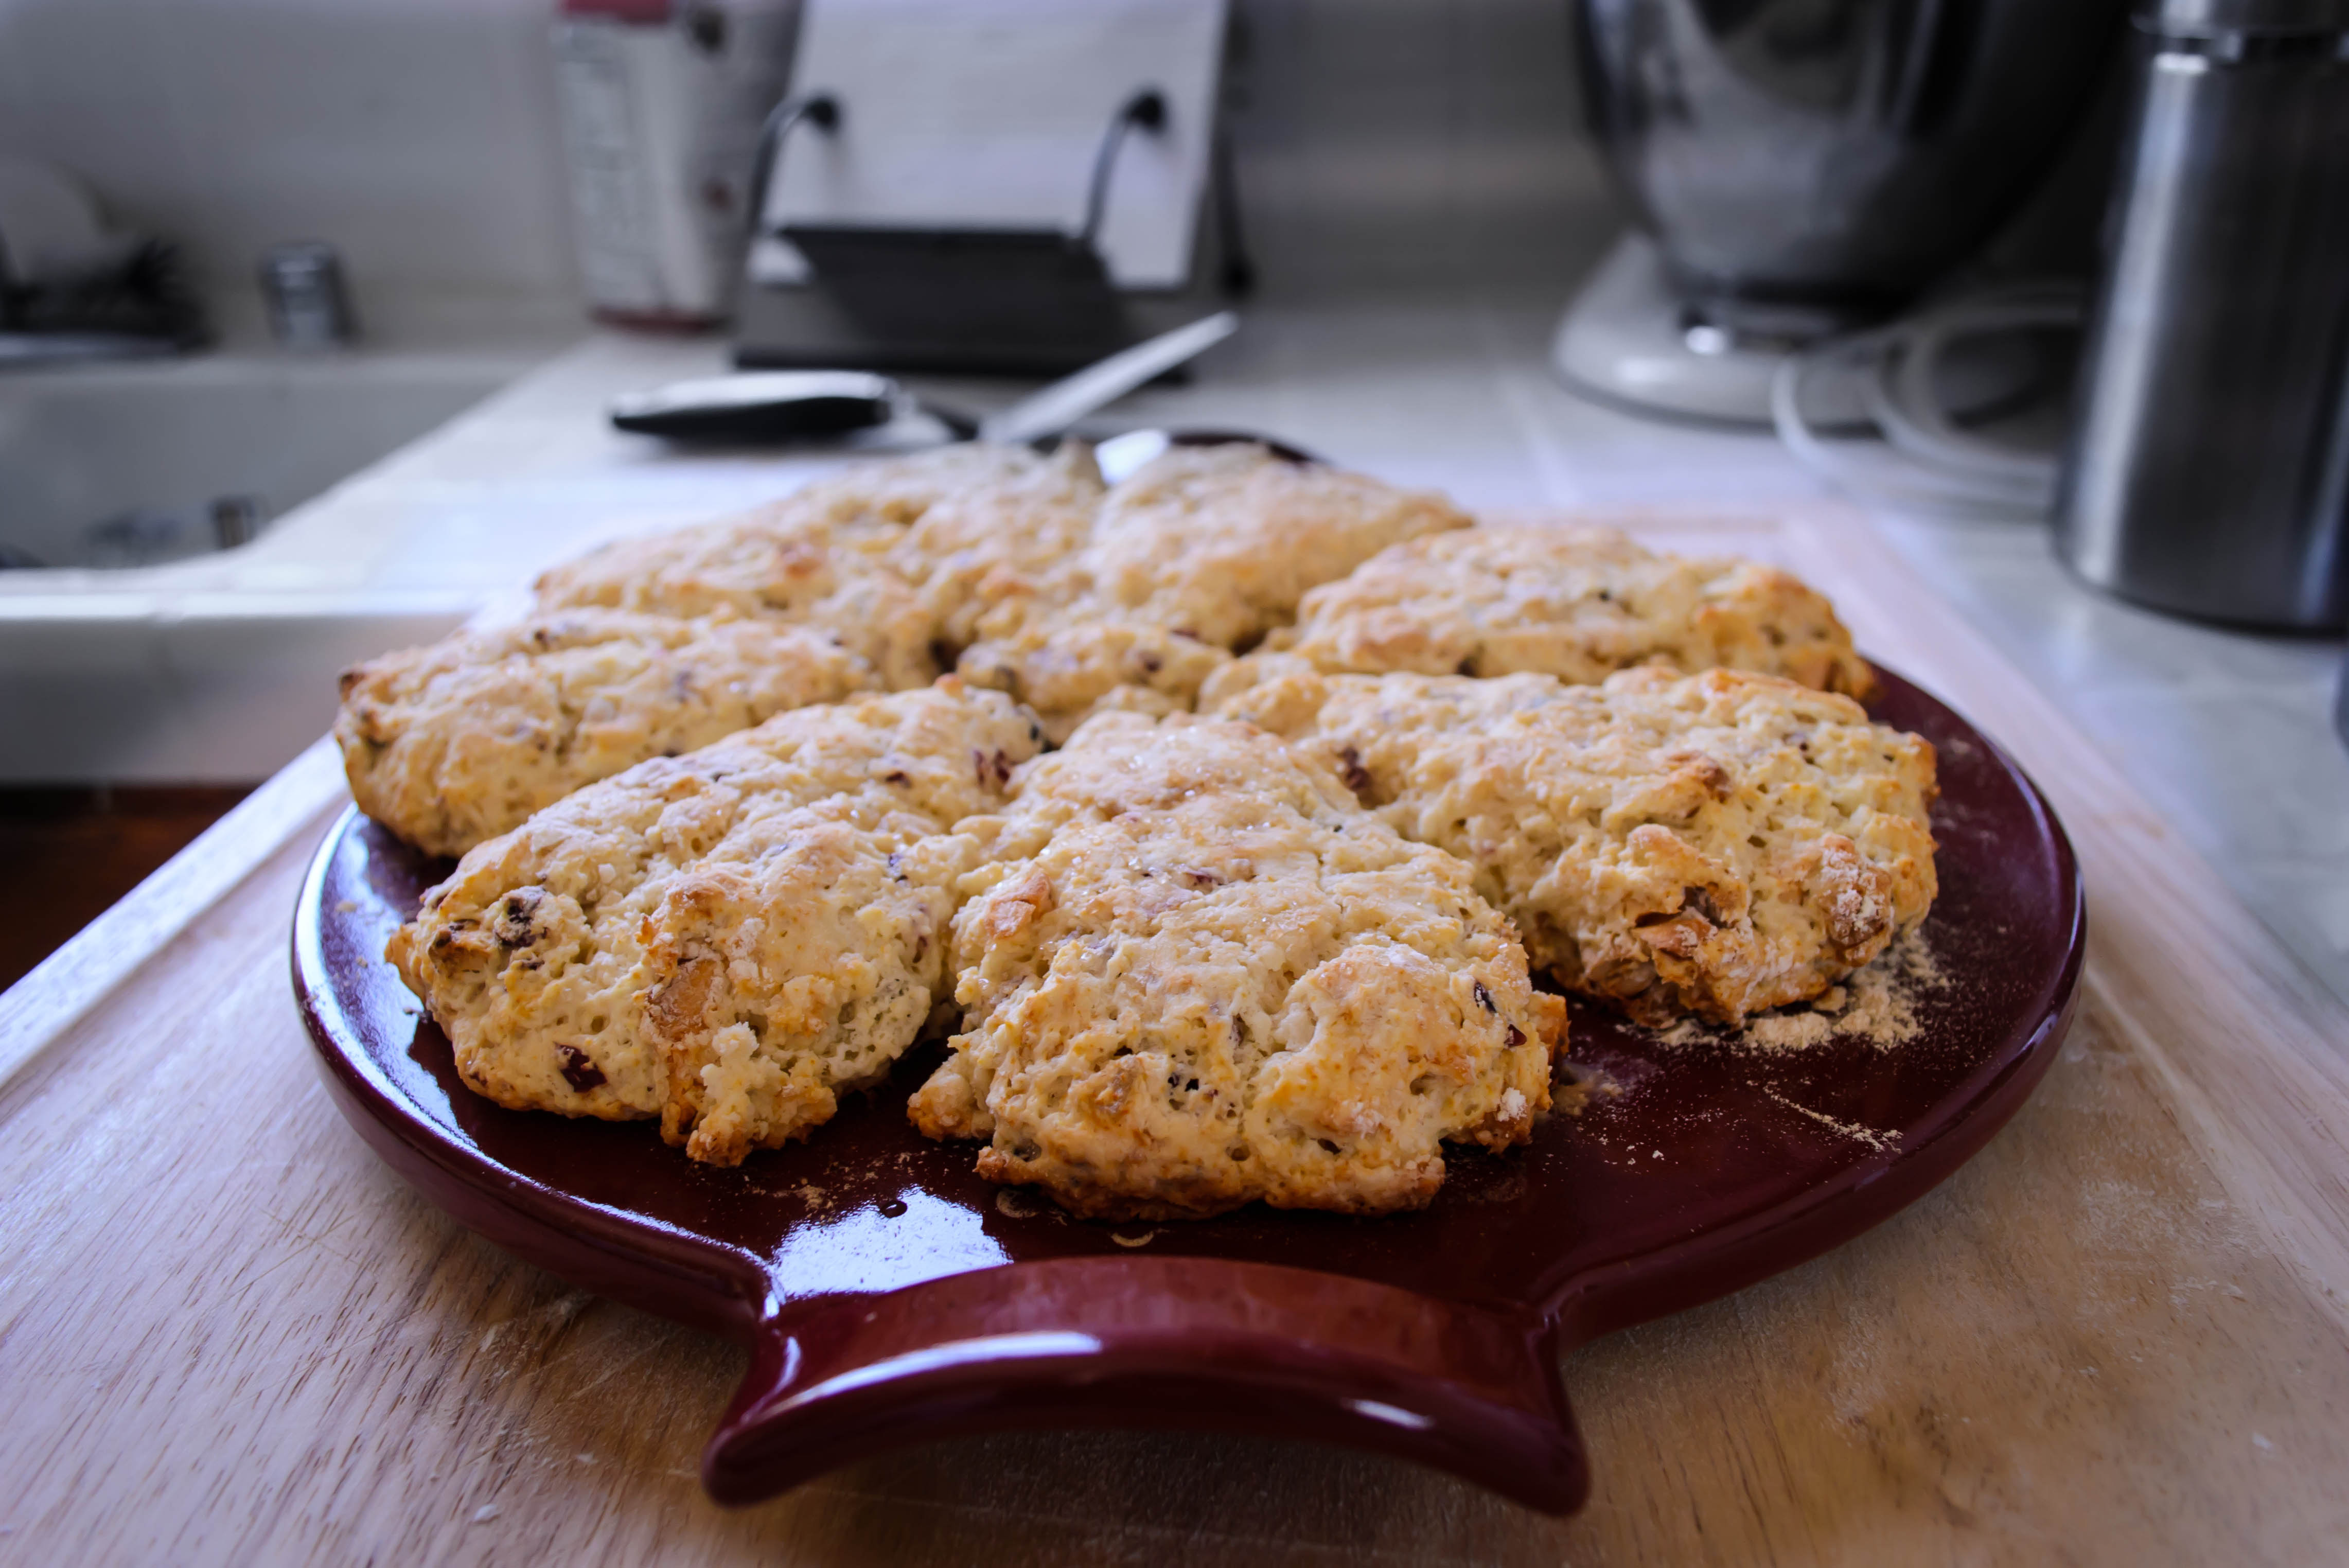
These are best on the first day, but will keep acceptably for two or three days if they are well wrapped in aluminum foil and stored at room temperature. Chances are – if your family is anything like mine – this short storage period won’t be an issue. Still warm, these make perfect hand-held afternoon pick-me-ups (the ginger really zings you out of the 3 o’clock slump), but if you want to go the extra mile, I recommend slicing them in half so you have two triangles, stuffing them with Greek yogurt and a decadent ooze of local honey, and attacking with a fork for breakfast.
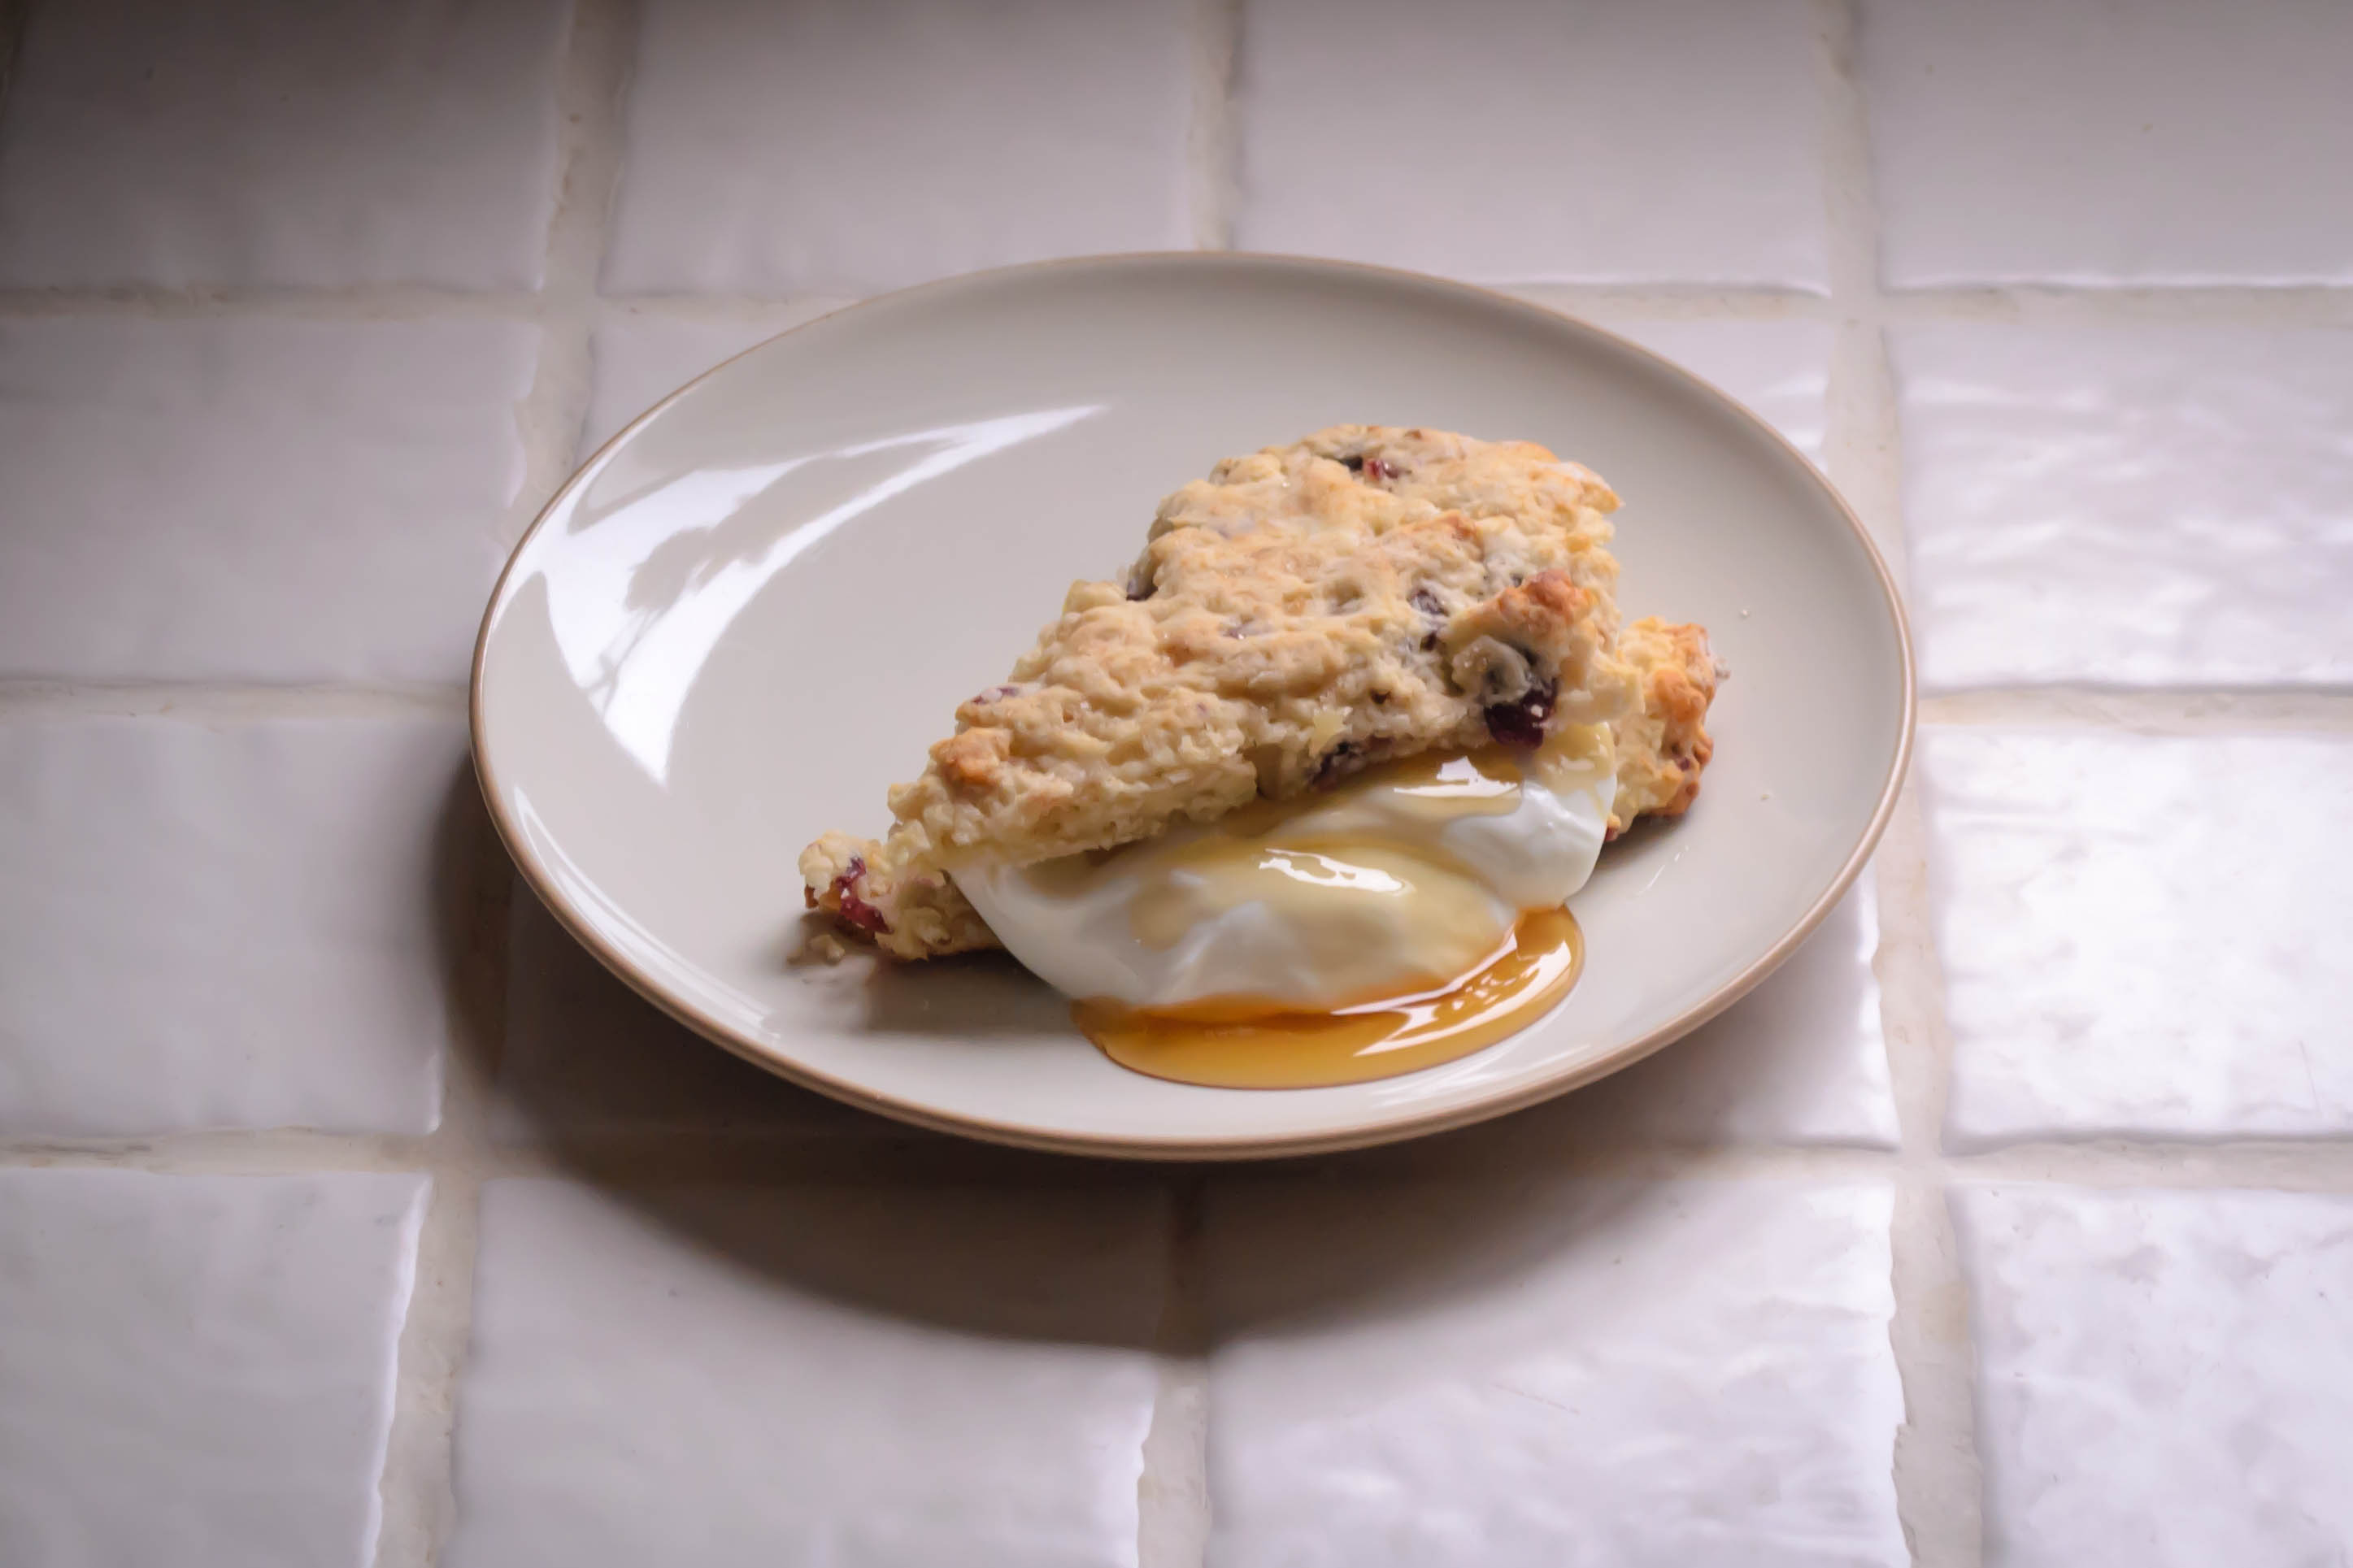
Apple Cranberry Ginger Scones
Adapted from Smitten Kitchen, who used America’s Test Kitchen Cookbook.
1 cup all-purpose flour
1 cup cake flour
1 TB baking powder
4 TB coarse sugar, divided (I used turbinado because that’s what was in my baking cupboard)
½ tsp salt
5 TB butter, cut into cubes
¼ each chopped dried apples, chopped dried cranberries, and chopped candied ginger
¼ cup heavy cream
¾ cup whole milk
A fabled land of farmers, farm shares, fancy (and not so fancy) restaurants, family meals, food projects and more.
cooking my way through my dissertation, one egg at a time
Fearless cooking from a tiny NYC kitchen.
food, in so many words.
Recreating the famous dishes of famous writers. Part recipe blog, part historical discussion, entirely unabashed love of books.
Epicurean Adventures from Eugene, Oregon
Celebrating the Harvest
Modern Iranian aka Persian Food & Culture Blog - Cuisine, Recipes, Stories , Photos, Pictures, DIY tutorials
Exploring Culinary Traditions of Africa, African America and the African Diaspora
food, in so many words.
food, in so many words.
food, in so many words.
Food-Stories-Recipes-Love
WordPress.com is the best place for your personal blog or business site.
