Simple Sourdough Boule, by weight #TwelveLoaves

Food Blog January 2014-3069Even though I’m getting sauced this year (is that joke already old?), I’m not abandoning my bread ambitions. I love the monthly challenge of Twelve Loaves, and I received a sourdough starter as a Christmas gift that, according to its bequeather, “needs some TLC.” Anxious to do it right, I scoured the internet for suggestions, of which there are no shortage, and in many cases, no consistency, which, delightfully and frustratingly, appears to be no problem at all! I distilled the various directions down into what felt like a successful (read: doable) routine for me. I fed it flour and water, it smells like San Francisco, and I’ve named it Bubblin’ Bertram. Is that weird? Probably.

Food Blog January 2014-3057

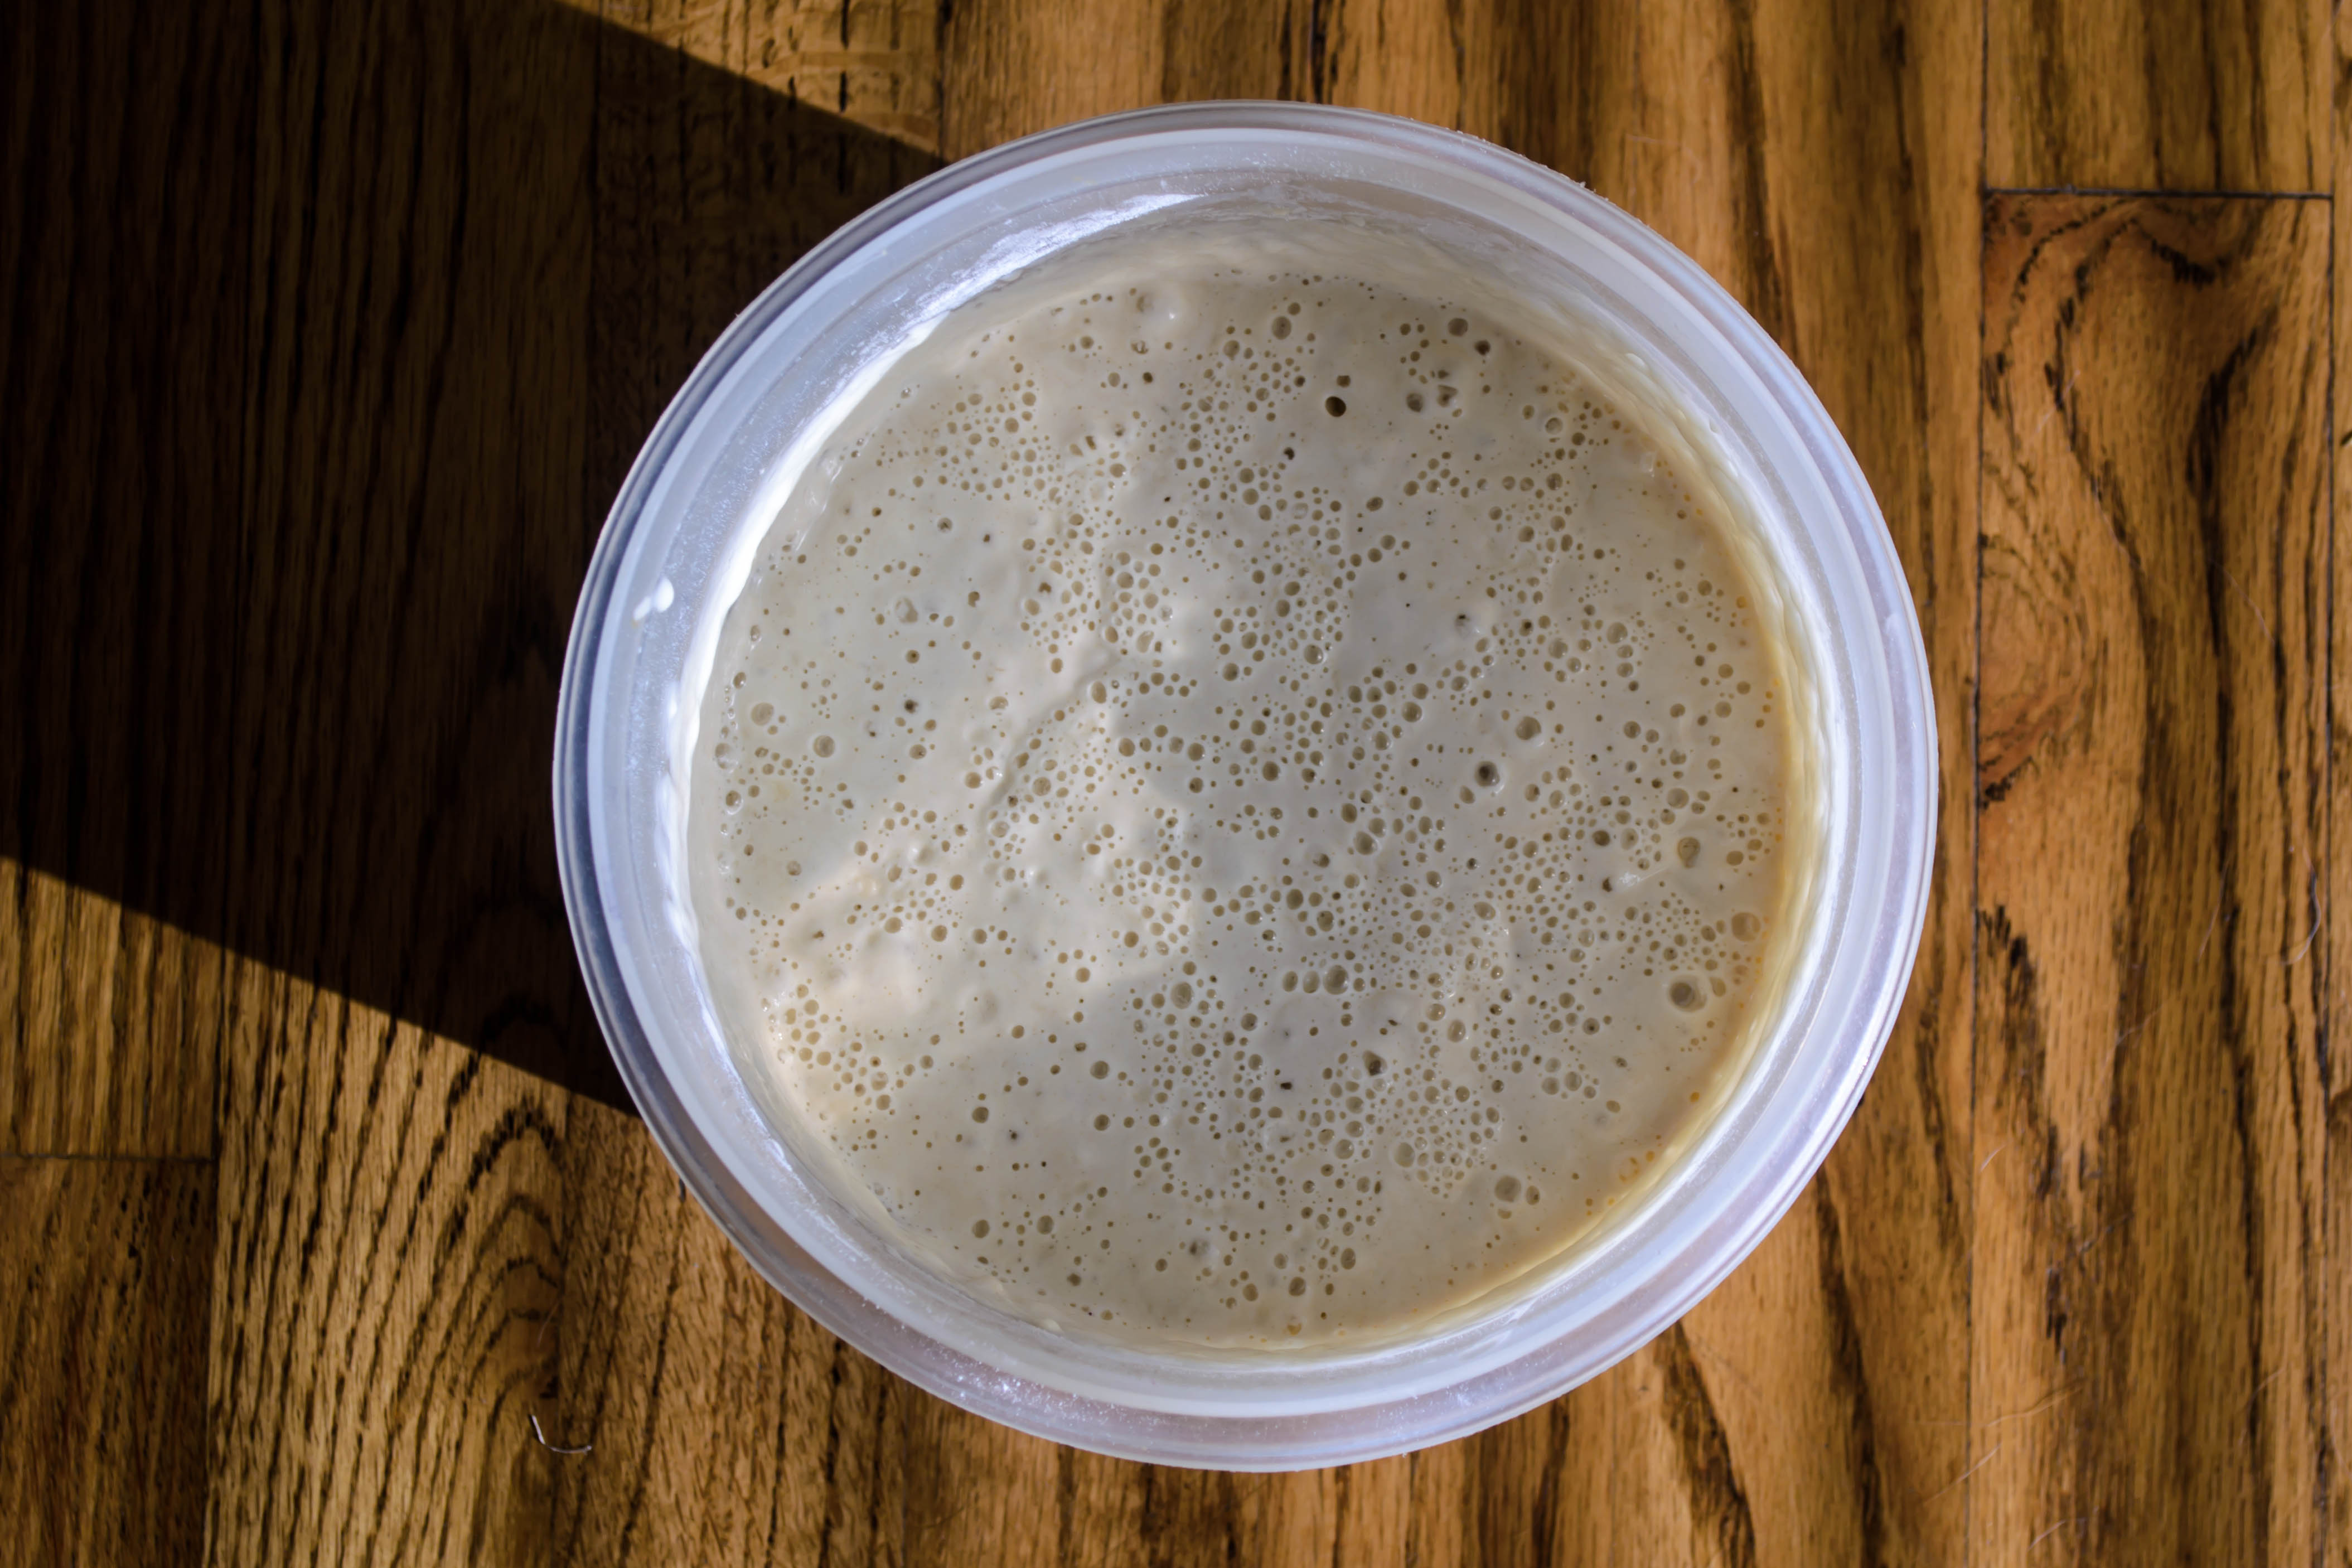
Bubblin’ Bertram bubblin’ away

This month’s Twelve Loaves challenge is “Keep it Simple.” As you know if you’ve spent any time on this blog, that tends to be difficult for me. I like a classic. I like a basic, fundamental recipe, but I like to twist it a little, to ask it to shimmy along with me into something fresh and bright and different. To make my predilection for complexity work with the challenge set, and to to celebrate both my new housemate (what? Yeast is alive!) and the kitchen scale Santa brought me (thanks, Mom and Dad!), I decided to face basics in a way I’ve never done before: by weight.

Food Blog January 2014-3058
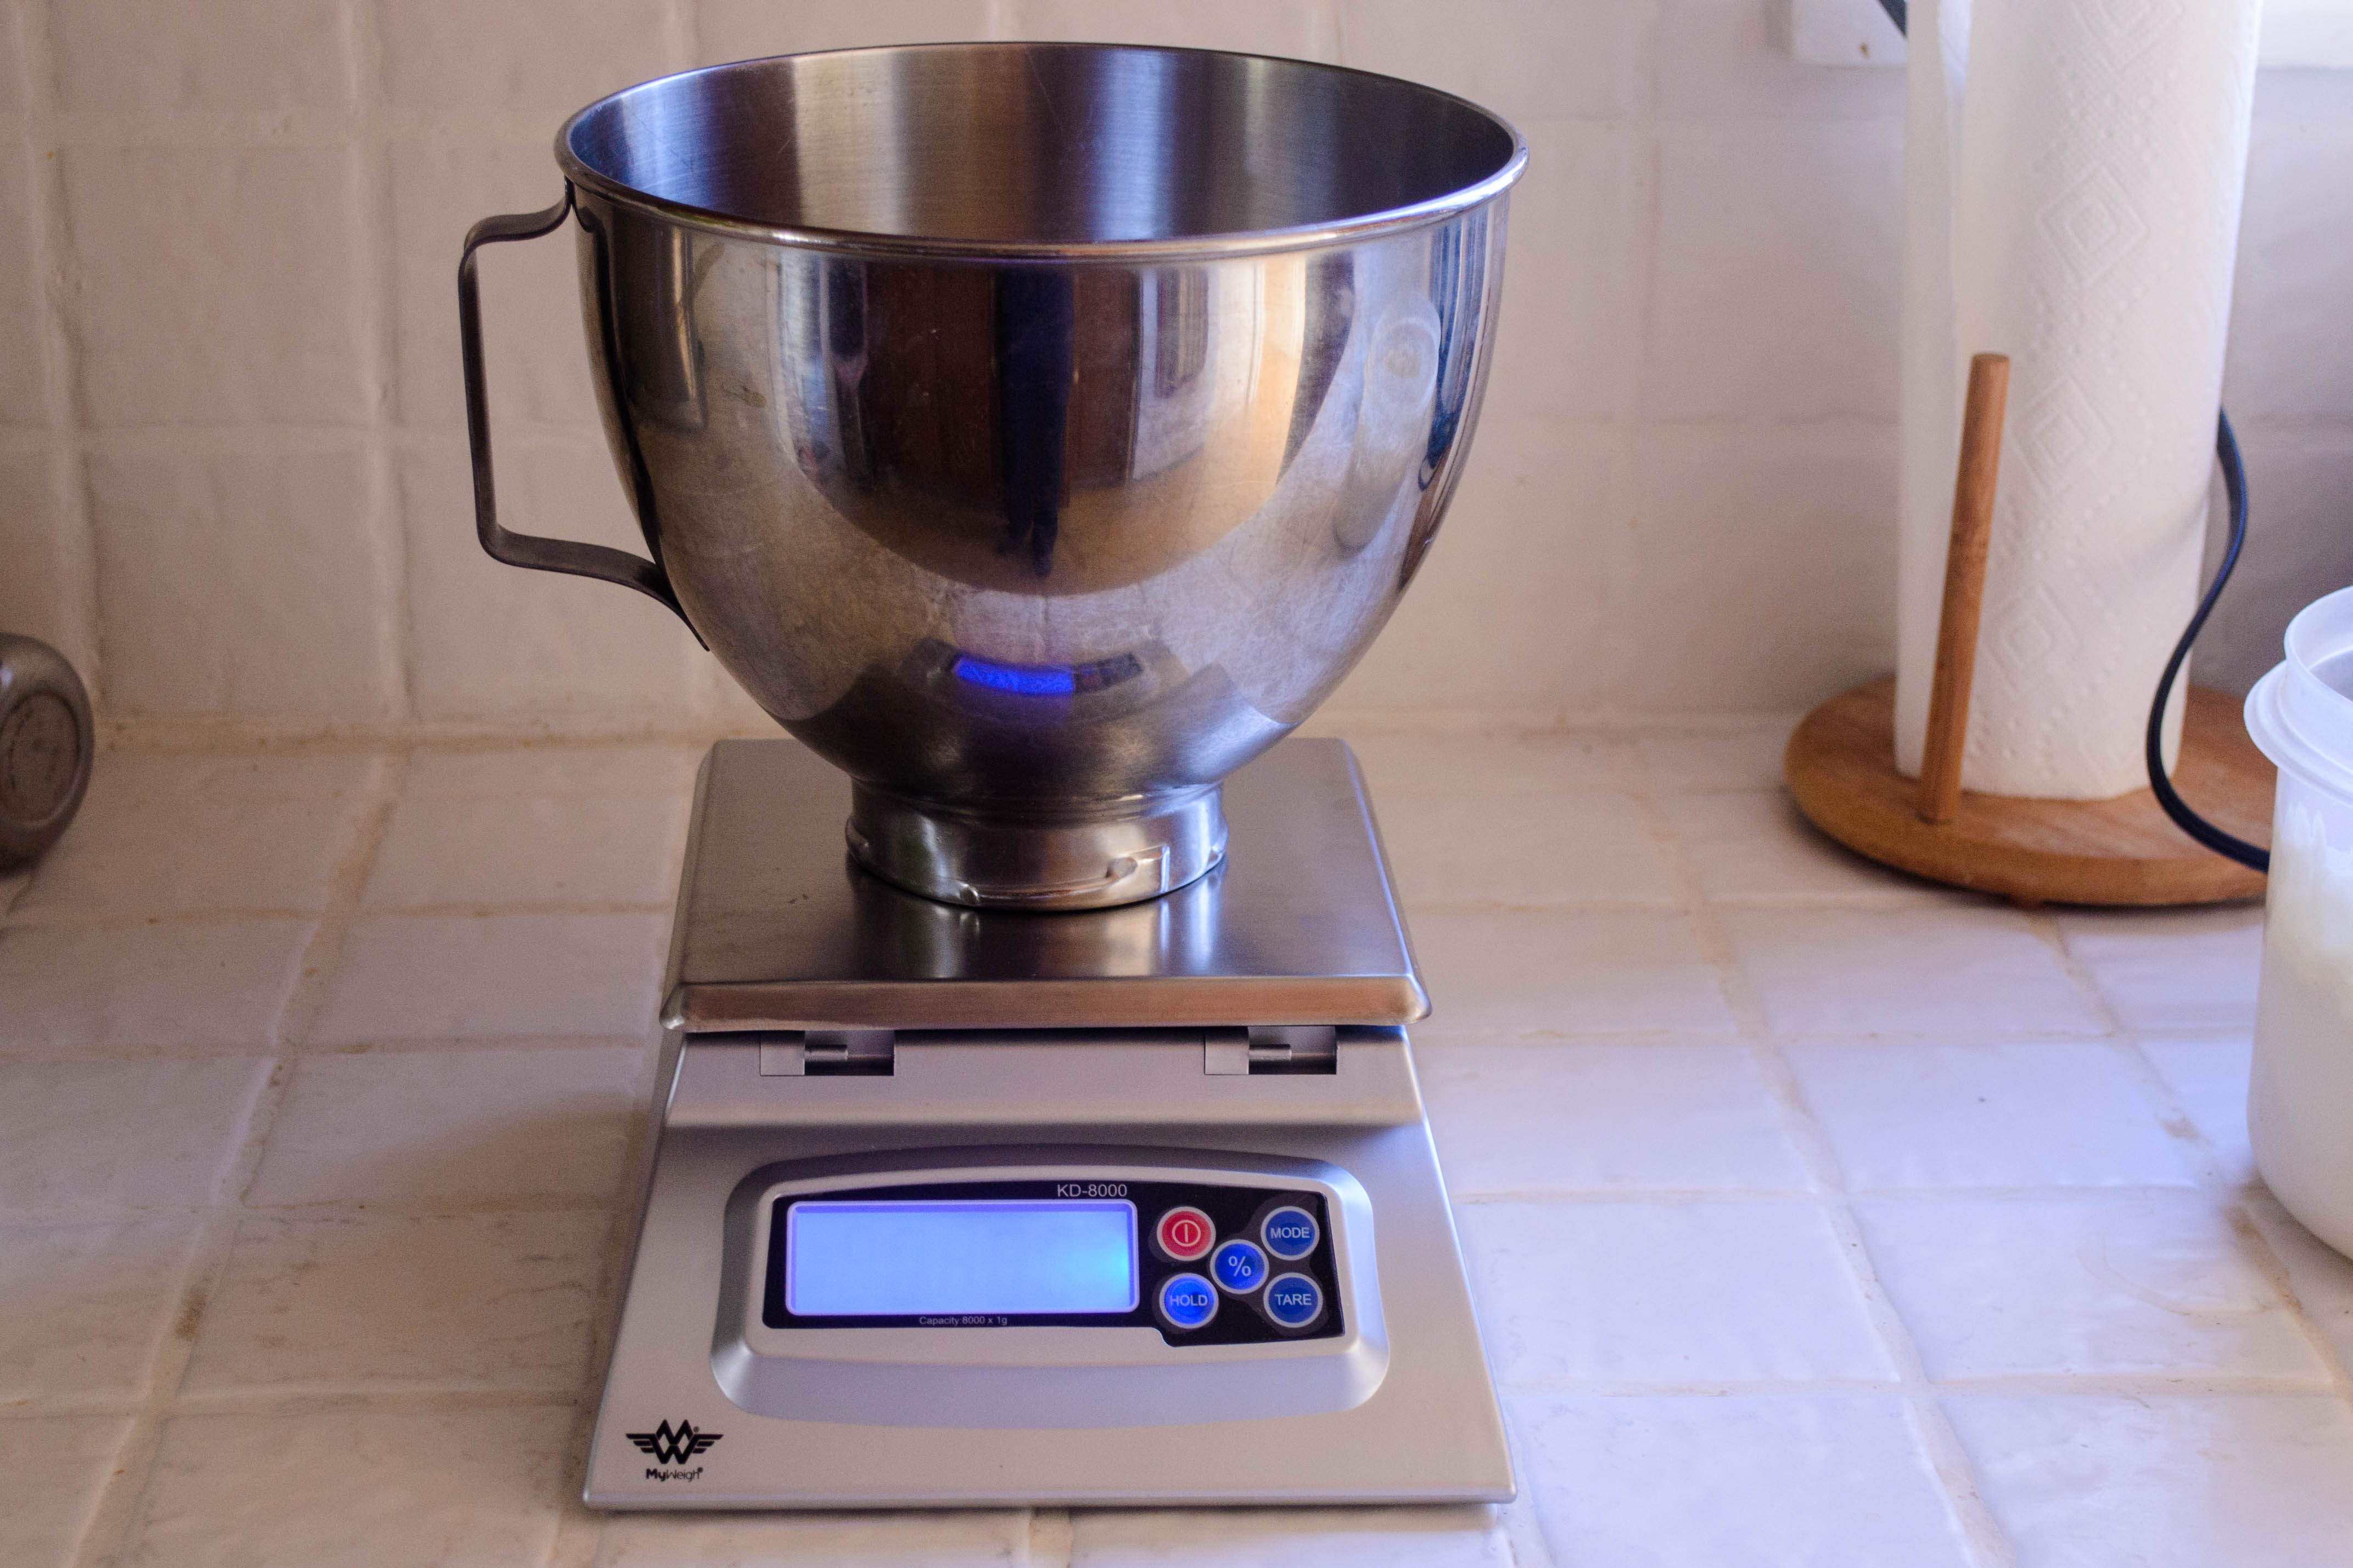
Baking by weight is hardly new. Shauna talks about it all the time, and it is just as true for baking with wheat flour as it is for using gluten-free flour mixes. Michael Ruhlman has written a whole book that relies on it. But it was new for me. There is something bizarrely scary about ignoring your measuring cups, though I’m not sure why, because working by ounces is admittedly so much more precise.

Food Blog January 2014-3059So I threw caution (and habit) to the wind and dove in, dipping up some of my burbling fed starter, glorying in the yeasty sour smell, and kneading it gently into flour, water, salt, and a breath each of butter and honey for a little extra flavor and moisture. It made a lovely soft dough, and I lovingly nestled it in an oiled bowl, covered it with plastic wrap, and set it aside to swell.
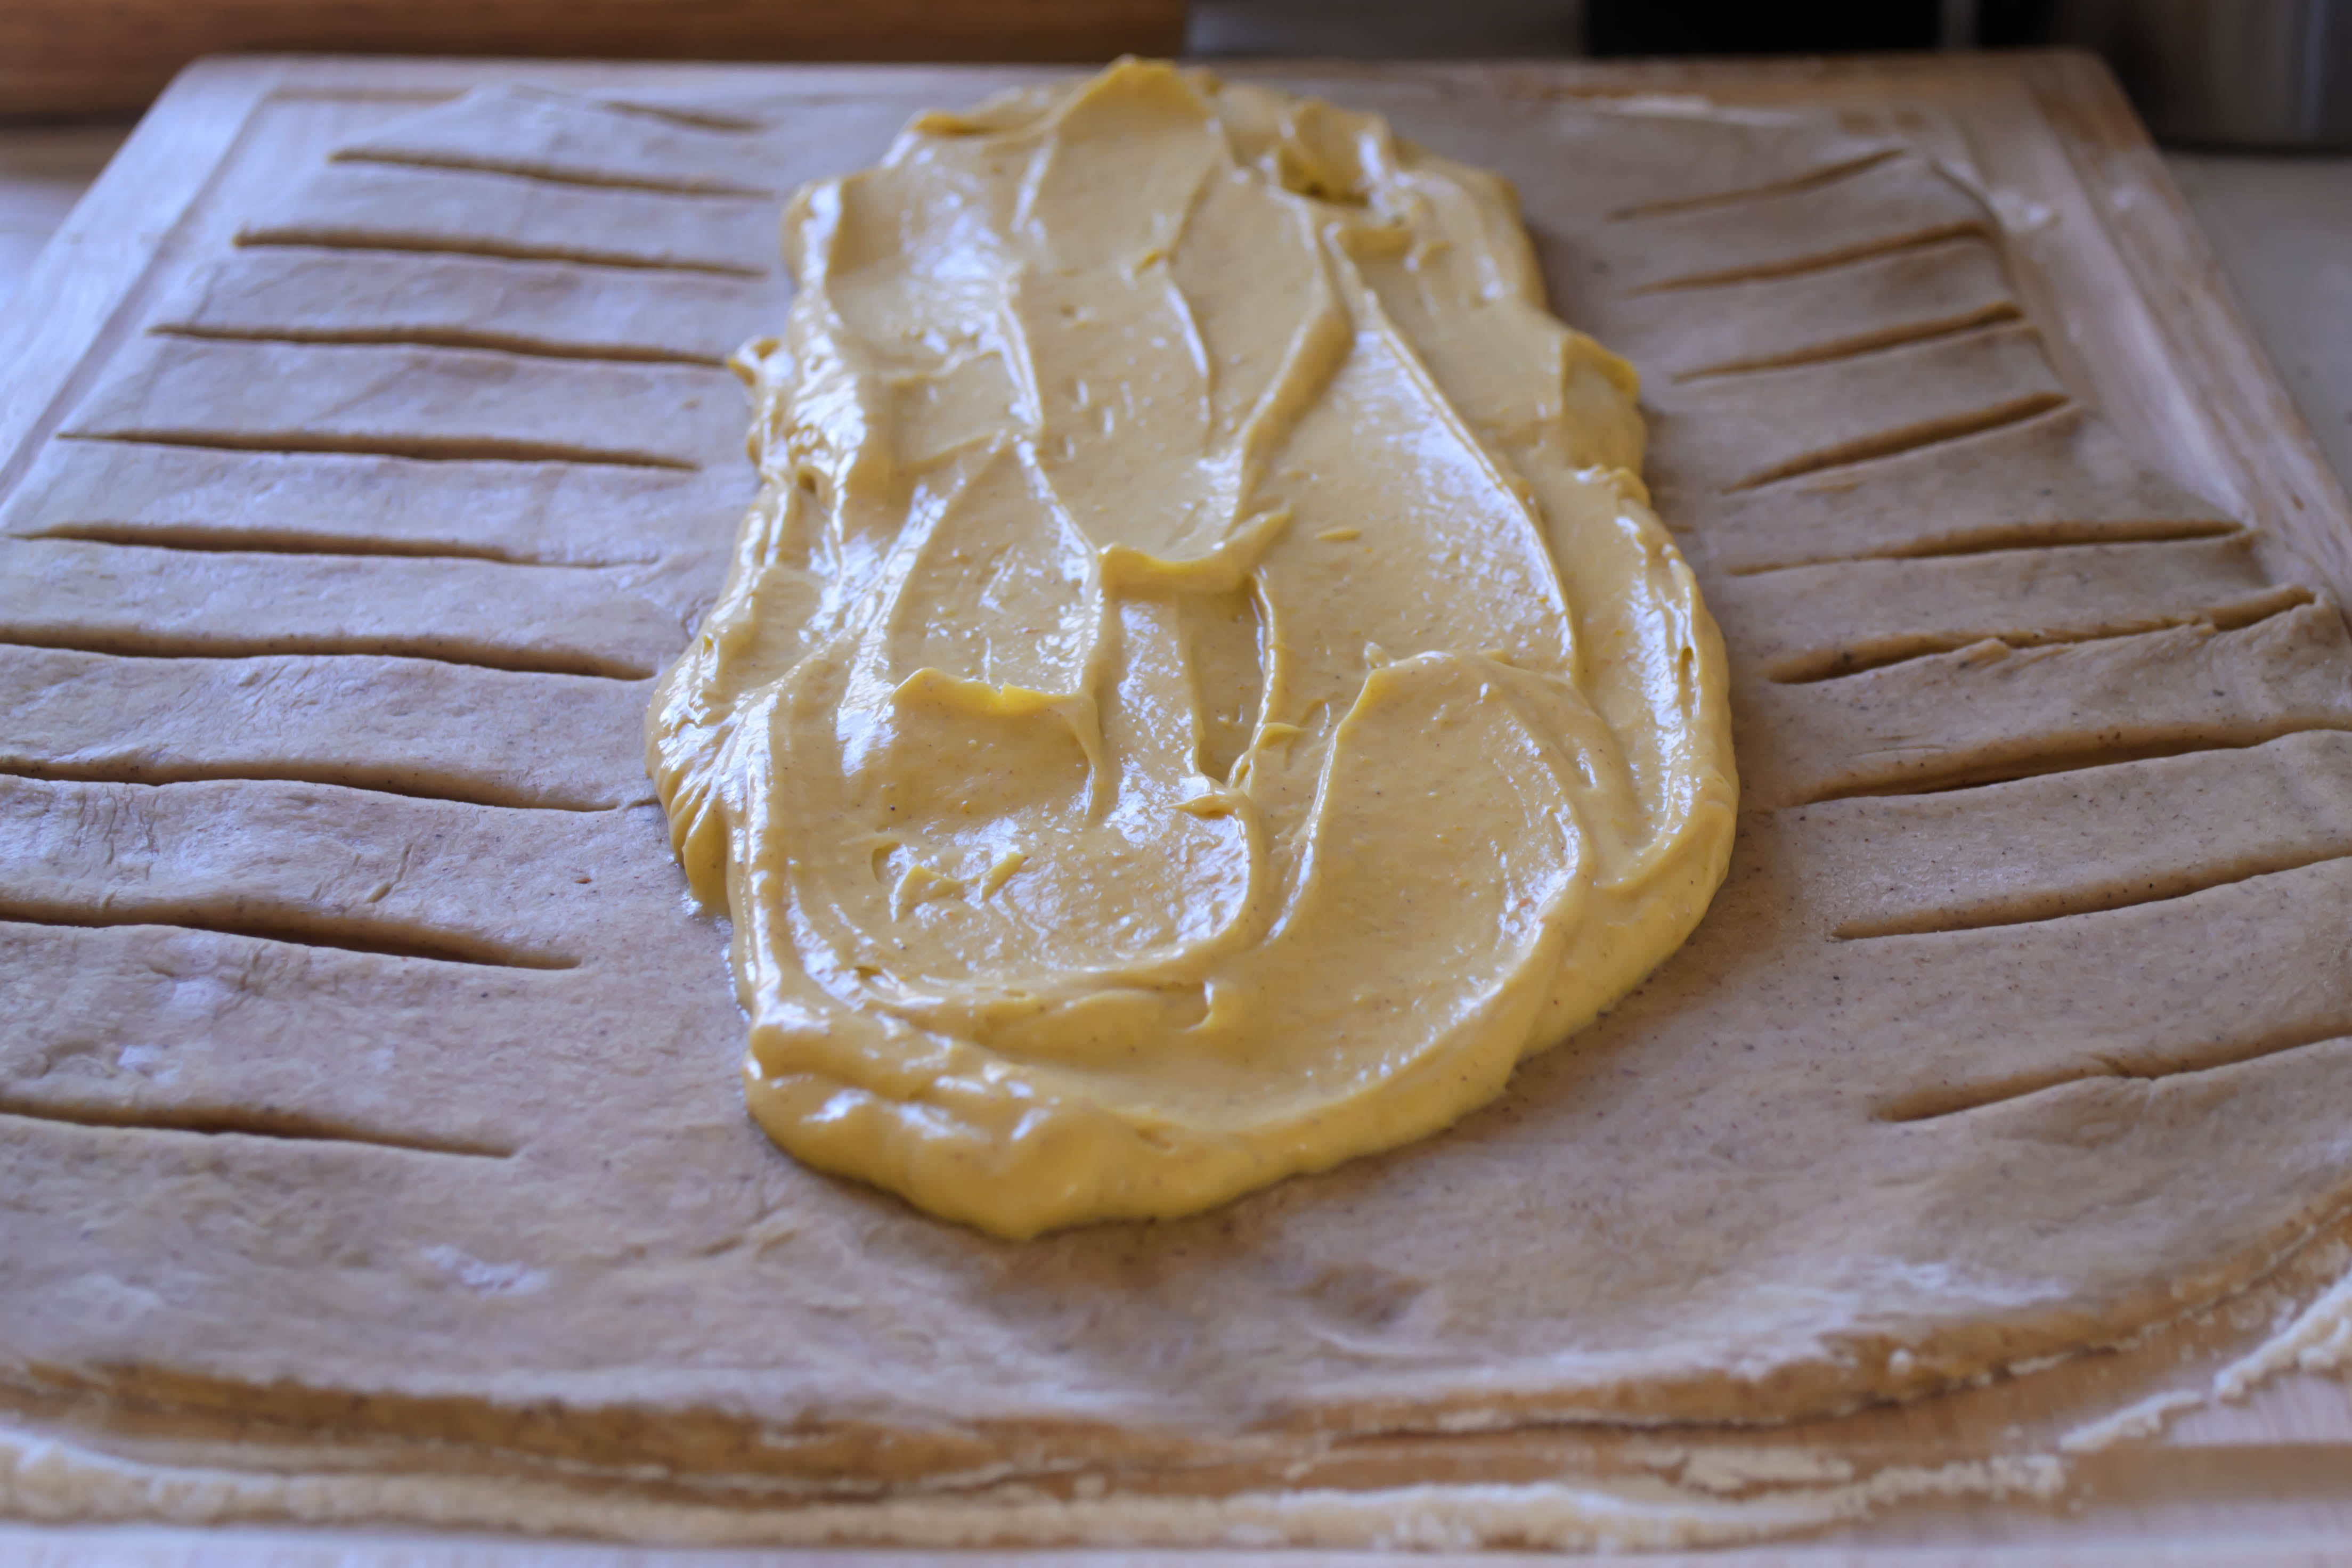
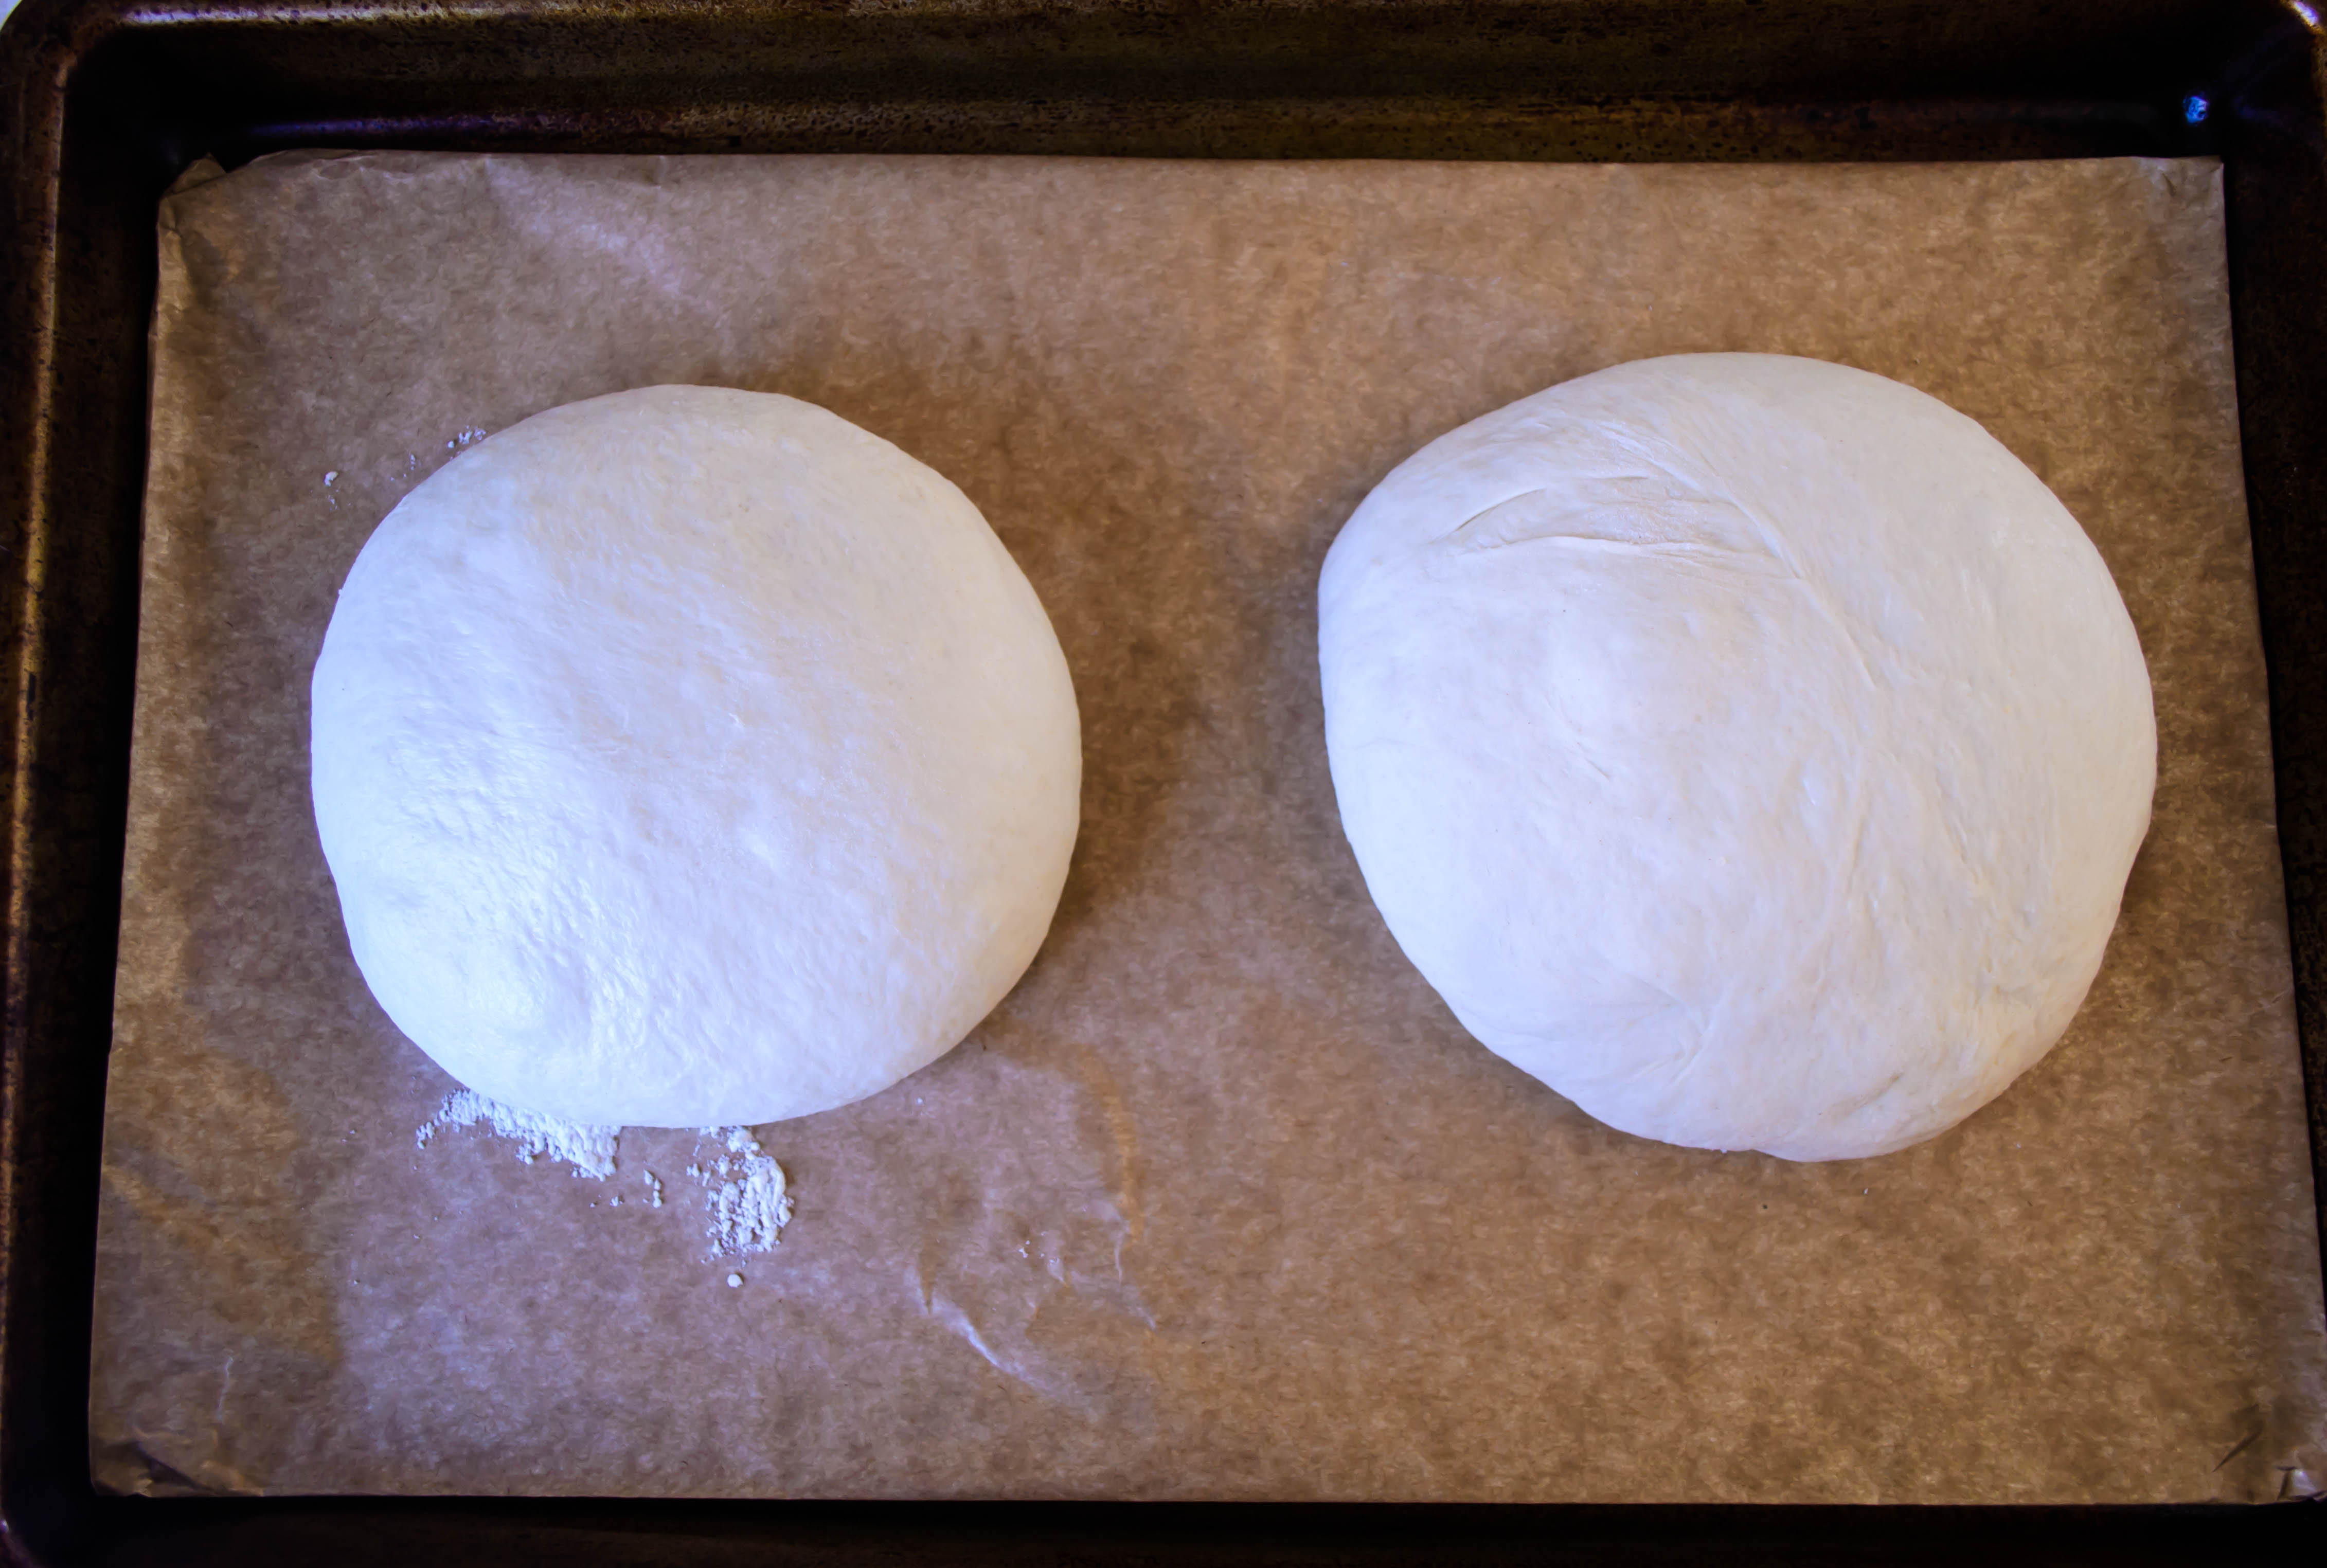
 

"Shaggy" dough

“Shaggy” dough

And then it sat. And I sat. And we sat. And I paced. And it did nothing. For hours. No rising. No bubbling. No noticeable change of any kind. I went back to the internet and searched for solace.

Food Blog January 2014-3061Three hours later, finally, my dough had almost doubled. In my warm home office, this usually takes a maximum of 90 minutes. But I had used no commercial yeast, only what was naturally in the starter. It takes those little guys a while to gulp down all the new food they’ve been handed, and to expel the gas that causes dough to puff and thicken.

Food Blog January 2014-3063Food Blog January 2014-3065Now that I knew time was the real challenge, everything else fell into place. I divided the ball of dough in two, lightly shuffled them around in some flour and shaped them into rounds, and let them rise again for an hour and a half. They didn’t puff very high, but they did expand into fat floppiness, like doll-sized beanbag chairs. But this didn’t seem to matter. Slashed artfully across the top to help gasses escape while baking, coerced into a steam-filled oven for half an hour, and we had a conjoined pair of soft, browned loaves, moist, warm, on the dense side of fluffy, and lightly but noticeably sour. Simple.

Food Blog January 2014-3066Food Blog January 2014-3067Simple Sourdough Boule, by weight
Makes 2 medium rounds
10 oz. sourdough starter, fed and bubbly (about 1 cup)
10 oz. warm water (body temperature or just above) (about 1 ¼ cups)
20 oz. bread flour (3 – 3 ½ fluffed, not packed, cups)
2 teaspoons salt
2 teaspoons honey
2 tablespoons melted butter


  • Place the bowl you’ll be combining your ingredients in onto your kitchen scale. A weight will appear on the display. Press the tare button to bring the display back to zero – you’ll do this every time you add a new ingredient, to make the additions easier to measure.
  • Add enough sourdough starter to bring the weight to 10 ounces, then press the tare button to return to zero.
  • Add enough water to bring the weight to 10 ounces, then press the tare button again: back to zero.
  • Add 20 ounces of bread flour, remembering that, depending on your scale’s settings, it might switch over to pounds when you hit 16 ounces. This caught me off guard. You’ll need, then, 1 pound, 4 ounces of flour.
  • Add the salt, the honey, and the melted butter. Since these are such small quantities, I haven’t given them in weights. Minor adjustments in one direction or the other will not hurt the bread or change the process.
  • With all your ingredients in, use the paddle attachment (for a stand mixer) or a wooden spoon (if you’re working without the machine) to combine the ingredients into a shaggy, rough dough – you’re looking just to incorporate everything. See “shaggy dough” photo above. At this point, if you’re using a stand mixer, switch from the paddle attachment to the dough hook. If you’re using a wooden spoon, now’s the time to dump the dough out onto a floured board and work with your hands.
  • Using your tool of choice, knead for about 8 minutes, or until the dough ceases to feel so sticky, and becomes elastic and smooth. Mine felt a bit lazy. I’m not sure how else to explain that – it moved sluggishly around the mixer, like a sleepy blob.
  • Lightly oil the inside of the bowl (you can use a new, clean bowl for this, but I just shimmy the blob of dough around to distribute oil underneath it), cover with plastic wrap, and set aside to rise in a warm place until doubled. For me, this took about 3 hours. Your sourdough yeasts are a bit sleepier than instant or active dry yeast, and need time to feast. It will happen eventually. You just can’t rush them.
  • When the dough has finally doubled, punch it down by pressing your knuckles into its center and letting the collected gases escape. Let it rest for 5-10 minutes to get its breath back.
  • Dump the dough out onto a floured board. Using a dough scraper, a pizza cutter, or a sharp knife, divide it in half. Shape each half into a round by holding the dough ball in your hands and stretching the top taut, tucking the excess underneath. Each time you stretch and tuck, turn the dough a quarter turn or so. You can also do this while the dough is resting on your board, turning it and tucking the excess, which will form something that looks like a balloon tie or a belly button underneath. Check out this series of photos from the kitchn for helpful illustrations.
  • Place your rounds on a baking sheet and let them rise for another 90 minutes, until they have puffed again (they won’t quite double this time, but you will see noticeable expansion).
  • About 45 minutes before you are ready to start baking, preheat your oven to 450F. Position the rack you’ll be placing the loaves on in the top third of the oven, and if you’re using a baking stone, place that on this top rack to preheat as well. Position the other rack in the bottom third of the oven and, if you have one, stick your cast iron skillet on this bottom rack, allowing it to preheat as well. You’ll see why in a moment.
  • When your bread has risen again and is ready to bake, slit the tops a few times with a razor or a very sharp knife. This helps the loaf swell and rise, since you’re breaking the taut skin you created while shaping. It also looks artful, and we like that.
  • Slide your loaves on their baking tray gently into the oven on the top rack (or, if you are using a baking stone, put the loaves directly on the stone, taking care not to jostle them too much. We worked so hard shaping them; we want to maintain that structure). Then, working quickly and carefully, fill a teacup with ice cubes and empty this into the preheated cast iron skillet you placed on the bottom oven rack. Close the oven door immediately. The purpose here is to collect steam. The ice, going immediately from solid to gas, will create a nice cloud of steam. This helps bread swell quickly and stay moist. You don’t want endless steam, because that would produce a soft crust, but a good blast right at the beginning of baking ensures a soft, nicely textured loaf of a good size, and a crisp crust, which forms as the oven dries out.
  • Bake for 30 minutes, or until the tops are pale gold and the bottoms feel hollow when thumped. These loaves will likely not brown as much as a standard loaf of bread. Here’s why: as it rises, the starches in flour are converted into sugar, which the yeasts eat. The anxious, hungry yeasts in sourdough consume these sugars much faster than standard yeast, so there is not much left to caramelize into that dark, browned surface we are accustomed to seeing on a loaf of homemade bread. No harm done, though, your loaves may just be a bit on the pale side.
  • Remove from the oven and let cool at least 10 minutes before slicing. I know, scorching-hot-just-from-the-oven bread is a glorious thing, but your loaves need a few minutes to set their internal structure. If you slice immediately, the whole loaf will crush and mash against your knife. Wait just a bit. Besides, this way you won’t burn your fingers.

Cranberry and White Chocolate Sweet Rolls

When I read this month’s Twelve Loaves premise of holiday breads, I was stumped for a few days. To me, and to my family, holiday bread means challah, and not only have I done that one here, but I’ve done it for another Twelve Loaves challenge! I certainly couldn’t reprise it. “Holiday” would have to mean “in the spirit of,” and not “in my own traditions.” I’d been kicking around the idea of pairing fresh cranberries and hunks of white chocolate in a cookie for some time, and somehow* this flavor combination morphed into the conception for a sweet roll. Softly sweet, chewy and rich, embracing a sweet tart filling, and drizzled all over with a white chocolate and cream cheese glaze, and the holidays are basically accounted for.

Food Blog December 2013-2912I used my Nana’s sweet dough again – it is proving to be such a reliable and user friendly recipe that I see no reason to change it. The dough comes together into an almost play-dough consistency when it’s been kneaded enough, and it rises, slow and steady, tender but elastic, easily rollable, and neutral enough in flavor to accept any filling you throw at it. I opted to dress it up for the season with a touch of vanilla. A grating of orange peel would probably be lovely as well.

Food Blog December 2013-2886Food Blog December 2013-2891Food Blog December 2013-2894Food Blog December 2013-2900These take two rises – one to let the dough expand and form gluten chains, and one after rolling out, filling, and slicing, to redistribute the yeast and develop the flavor a bit more – before a quick 20 minutes in the oven. I went for mini sized rolls, so I could have more of them, which entailed dividing my dough in two.

Food Blog December 2013-2898Food Blog December 2013-2899Food Blog December 2013-2902You could certainly also do full-sized rolls, which might require a slightly longer baking time. While they are still hot, golden and just crusty on top, but bubbling around the sides with the escaped gush of cranberries, you tip a smooth, ivory stream of melted cream cheese and white chocolate over them, and let them cool as long as you can stand it before serving. The brightness of the cranberries peeking out from under the frosting makes a nice contrast that does reference the Christmas holiday, especially if you really go for the obvious and serve it on a green plate. Not that I would ever do such a thing.

Food Blog December 2013-2901Food Blog December 2013-2904We thought these were quite tasty, and a refreshing twist; certainly worthy of ending up in my department mailroom as a last-week-of-school treat, but if I’m honest, they are not the “match made it heaven” combination I had thought they would be. Cranberries and white chocolate are a holiday fling – experimenting, having fun, but they know it won’t last. They will probably break up come January, and cranberry might skitter home to orange to make amends. White chocolate, on the other hand, stimulated by cranberry’s tartness, might shack up with raspberries for a while, and you guys, what about tender raspberries and shards of white chocolate all wrapped up in a soft, champagne cake roulade? I think I just made you a come-summer promise…

Food Blog December 2013-2907* “Somehow” probably means Deb, whose recent post on cranberry sweet rolls could just possibly have kicked my brain into this direction.

Food Blog December 2013-2916

Cranberry and white chocolate sweet rolls
Makes 18 mini sweet rolls
For the dough:
2 teaspoons yeast
½ cup warm milk
1 egg
1 teaspoon vanilla
¼ cup softened butter
1 teaspoon salt
¼ cup sugar
2 ¼ cups bread flour
For the filling:
12 ounces fresh cranberries
½ cup sugar
8 ounces white chocolate, broken into small pieces (or you can use white chocolate chips)
¼ cup melted butter
For the icing:
4 ounces cream cheese
4 ounces white chocolate, broken into small pieces (don’t use chips here – they contain a stabilizer that prevents them from melting silky smooth)
1 tablespoon milk or cream


  • In the bowl of a stand mixer, combine the warm milk and the yeast and let them stand for five minutes while the yeast wakes up. It will begin to smell bready and bubble slightly.
  • Add the ¼ cup softened butter, the egg, and the vanilla to the yeast and milk combination and mix with the paddle attachment just until combined.
  • Add the sugar, salt and two cups of the flour to the wet ingredients and mix with the paddle attachment just until a wet, softly shaggy dough forms. Switch to the dough hook attachment and knead for 6-8 minutes or until the dough comes together into a firm ball and is somewhere around the consistency of play-dough. If the dough is extremely sticky, add the additional ¼ cup of flour, 2 tablespoons at a time, just until the dough is workable again.
  • After 6-8 minutes of kneading, place your ball of dough in a buttered or oiled bowl (I just lift it out of the stand mixer bowl, spray it with non-stick spray, and put the dough back in), cover with plastic wrap, and let it rise until doubled – usually about 90 minutes. My house was on the chilly side on the day I made this, so it took me more like two hours.
  • While the dough rises, make the filling components: place the cranberries and the ½ cup of sugar in a food processor and pulse three times for three seconds each. This sounds fussily precise, but you don’t want to decimate the cranberries; just break them up a bit so they will cook faster. Chop the white chocolate and melt the butter, and you are ready to go.
  • Punch down the dough by depressing your fist gently into the center of it to release the trapped gasses. Let it sit for five minutes to get its breath back.
  • If you are making mini rolls, divide the dough in half. Place the half you are going to work with on a floured board, and reserve the other half in the bowl you let it rise in.
  • Using a floured rolling pin, roll out the dough into a rectangle of about 9×12 inches, or as close as you can get. It will be quite thin, but that’s okay. It’s going to expand when it rises again on the counter and in the oven.
  • Brush the rectangle of dough with the melted butter, leaving at least a ½ inch margin on all sides. Then, respecting the same margin, sprinkle on half of your cranberry mixture and half of your chopped white chocolate.
  • Now roll up the dough: starting with the long edge closest to you, begin rolling in the middle, then moving out evenly to each side, to create a long log. Crimp the long edge on the other side firmly to the roll itself to prevent deconstruction later. A few cranberry bits may fall out as you do this; that’s okay. Just stuff them back in.
  • Slice the log into 1-inch slices with a sharp serrated knife, moving the knife back and forth across the surface but applying very little pressure. This will produce truly round sweet rolls, rather than smashed, oddly-shaped ones.
  • Place the slices cut side up, so the red-spiked spiral shows, in each of two greased 9-inch cake pans. They should be spaced evenly, and don’t worry if there is room in between them, since they are going to rise again.
  • Cover each pan with plastic wrap and let rise again in a warm place for 30-45 minutes. Meanwhile, preheat the oven to 375F.
  • Once the rolls have puffed again, jostling and pressing against each other in the pan, stow them in the preheated oven for 18-20 minutes, or until lightly browned on top and cooked through. Remove from oven and set on wire racks to cool.
  • While the rolls bake, you can make the icing. In a small pot, combine the cream cheese, white chocolate chunks, and milk or cream. Over low heat, stir constantly until everything has melted together into a velvety, smooth sauce (I mean it – if you step away, this is almost guaranteed to seize, getting grainy and unsalvageable). Once you have liberated the sweet rolls from the oven, pour the sauce liberally over them, using a spatula to spread it around evenly, if needed. Let everything cool before serving, so the sauce can solidify into icing, and the rolls themselves can firm up and stay together better.
  • These taste just as good straight out of the refrigerator as they do warm in the pan. Store them in the fridge covered with foil or in an airtight container for two to three days.

Chipotle and Cinnamon Sweet Potato Soufflés

I realize it might be a bit late for me to convince you, at this point, to make significant changes to your Thanksgiving menu.  If you are anything like me, you’ve had the whole meal planned out for several weeks now, including possibly which serving dishes you’ll be using for which dish (speaking of which, have you seen this?).

But if you are undecided, or if you still aren’t sure what you are doing with sweet potatoes, may I make a humble suggestion?  Put down the marshmallows.  Okay, give them one final squeeze and then put them down.  You don’t need that stuff.  Instead, may I offer you the promise of spiced velvet? Puffy, smooth, decadent-but-light velvet, spicy and sweet, rising up from its dish like some gravity-defying magic trick.

Food Blog November 2013-2841Yes, I’m talking about soufflé

Food Blog November 2013-2843I know, I know. Just want you want to worry about on one of the biggest food days of the year is the notoriously fussy, egg white driven glorious strangeness that is soufflé. You don’t want to worry about whisking, or folding, or, heaven forbid, fallen puffs that are competing with the turkey for oven space anyway.

Food Blog November 2013-2818But as it turns out, at least in my experience, soufflé isn’t really that hard if you are a tiny bit patient and a tiny bit brave. And this one, with the beautiful pumpkin color of the sweet potatoes mellowed and enriched with heavy cream, brown sugar, and cinnamon, and lent a bit of extra pizzazz from a sparing dose of chipotle pepper and a fizz of lime juice, is a delightful choice. The base, lightened with three egg whites, climbs determinedly into large mushrooming domes, and the mixture conveniently uses three egg yolks as well, so you aren’t left with any extra yolks hanging around (though if you are, this is a great resource).

Food Blog November 2013-2819Food Blog November 2013-2821The thing about soufflés is, they depend on the expansion power of aerated egg whites. That’s what you are doing when you beat them to soft or even medium peaks: filling them with air. Bubbles form and stabilize, and so long as you aren’t too rough with them, they continue to expand in the oven, creating that otherwordly dome of perfect, velvety lightness. This is why soufflé recipes are so fussy about being sure you fold the whites into the flavor base: you don’t want to deflate them. This tutorial gives some helpful suggestions about this process, if you need a refresher or you’ve never been sure. And even that thing about not opening the oven door lest they collapse mid-bake is an exaggeration; though you don’t want to be swinging open and slamming shut the door every five minutes, I tentatively peeked inside once during my baking process, and no holiday-destroying collapse resulted.

Food Blog November 2013-2825When you dig tentatively into these delicate, reality-bending puffs, they sigh and fold inward just a touch, the dry, slightly meringue toasted tops crease slightly, and you are free to dig out piping hot, fluffy forkfuls and jam them into your mouth with no further ceremony. Or, if you feel fancy (or if you have more than one gravy boat and you’re dying to take multiples for a spin), make some cinnamon cream to drizzle over the top: whisk about ½ teaspoon of cinnamon into a ½ cup or so of heavy cream (estimate 2 tablespoons of cream per diner), and you’ve got a simple and luscious sauce to add to your fluffy masterpieces. This also cools the heat, if you have diners with delicate tongues or you’ve gone a little heavy on the chipotle.

Food Blog November 2013-2827Soufflés may sound scary, and you may think Thanksgiving is no time to experiment, but I’ve got faith. I think you can do it. And when your mother-in-law, or your best friend, or your fussy aunt looks impressed, you can lie and say it was really hard but you’re so glad it came together as beautifully as it did. I won’t tell a soul. You can save the marshmallows for some hot cocoa, where they belong.

Food Blog November 2013-2839* Alternatives: if you don’t like spicy, take out the chipotle and add a few generous grinds of black pepper instead.  If you want this for dessert, add an extra 2 tablespoons of sugar to the souffle base itself, and maybe a teaspoon of vanilla, and top the baked soufflés with a sweeter version of the cinnamon cream referenced above: 1/2 cup heavy cream (estimate about 2 tablespoons per person), 1/2 tsp cinnamon, 2 teaspoons sugar, lightly, lightly whipped until only just barely thickened. If you want to booze it up, add a tablespoon or two of rum or bourbon.

If soufflé is just not going to happen but you still want marshmallow-free sweet potatoes, may I humbly suggest this as another option?

Food Blog November 2013-2831

Cinnamon and Chipotle Sweet Potato Soufflé
Hugely adapted from Cooking Light
Makes 6 servings
2 tablespoons butter, for ramekins
2 tablespoons brown sugar, for ramekins
2 cups sweet potato cubes, from 1 large peeled, orange-fleshed sweet potato
½ cup heavy cream
¼ cup brown sugar
2 teaspoons lime juice
½ a chipotle pepper from a can of chipotles in adobo (or more, if you like it spicy)
½ teaspoon salt
½ teaspoon cinnamon
3 egg yolks
3 egg whites
¼ teaspoon cream of tartar


  • Preheat the oven to 375F.
  • Butter and sugar six single-serving ramekins (mine fit a little more than ½ a cup), then stow in the freezer. The sugar sanding creates texture to help the soufflé climb the walls of the container, and freezing it makes it take longer to dissolve in the heat of the oven, so you’re giving your puff a head start.
  • Drop your peeled sweet potato cubes in boiling salted water and cook until they are very tender but not yet falling apart. Drain and set aside to cool.
  • In a large bowl (or the same pot you used to cook the sweet potatoes), combine the heavy cream, ¼ cup brown sugar, lime juice, chipotle pepper, salt, and cinnamon. Add the sweet potato cubes and mash, whisk, or otherwise blend into a smooth, thick soup. I used my immersion blender, which worked very well. You could also use a regular blender or a food processor. The key here is that you want a scrupulously smooth mixture.
  • Separate the three eggs, dropping the whites into a clean, dry, medium mixing bowl and the yolks into the sweet potato mixture. Take care not to get even a trace of yolk into the whites, or they will not whip into peaks. Whisk or blend the yolks into the sweet potato mixture until no streaks of yellow remain.
  • Add the cream of tartar to the egg whites. Using a handheld electric mixture (or a whisk, if you need to work on your arms), beat the whites at first over medium, then high speed until medium peaks form. The whites will foam, and then become pure white, and finally begin to stiffen like a good whipped cream. To determine the stiffness of your peaks, turn off the beaters and lift them straight out of the whites. If you get little hills that collapse back into the mixture, you have soft peaks. If you get little tips that fold over just a bit when you pull the beaters away, you are looking at medium to stiff peaks, which is what we want.
  • Using a rubber spatula, deposit ⅓ of your whites into the sweet potato and egg yolk mixture and stir until no white streaks remain. No need to be careful with this part – full integration is just fine.
  • Now, slide the other 2/3 of the whites into the sweet potato mixture and fold in gently until just combined – some white streaks may remain and that’s fine. I like to fold by drawing my spatula around the edge of the bowl in a horseshoe shape, then pulling it back toward me in a straight line.
  • Retrieve your frozen ramekins and fill each with the soufflé mixture, being careful not to let it plop from too high (in case of deflation). When each cup is full, smooth off the top – this seems fussy, but it will aid in even rising.
  • Bake in a preheated 375F oven for 25-30 minutes, until the soufflés have puffed up at least an inch or two above the top rim of the ramekins. Nearly half an hour seems like a long time, and indeed, I was worried mine were overcooked because some of the edges took on a toasty golden color, but I found this contributed a delightful flavor, and was reminiscent of a perfect campfire marshmallow.
  • Serve immediately, plain or topped with cinnamon cream.

Gingerbread spiced sweet bread with pumpkin pastry cream

Sometimes I agonize over what I’m going to cook. I leaf listlessly through cookbooks and batter my keyboard with demands of something new and fresh and better and, dare I say it? Original. But this month, faced with the Twelve Loaves challenge of baking bread with spices, I knew almost immediately what I wanted to do. I don’t know where the idea came from, but I knew it was going to be a variation on my Nana’s sweet roll dough, stuffed with luscious swirls of pumpkin pastry cream and baked into a decadent loaf.

Food Blog November 2013-2810The problem with this idea, as I started to do some research, turned out to be that no one had done it. I’m not saying this is a bad thing; it’s tough to think you’ve invented something, and then Google it, only to find dozens hundreds probably billions of results that are either more amazing-sounding than you’d imagined, or more beautifully photographed than you have the ability to do.

Food Blog November 2013-2781This one came up with nothing. I started wondering: can you bake pastry cream? If you can, why has no one done this? I tried multiple searches, I leafed through my cookbook collection again, feverishly this time; I even polled friends to see whether this was a thing. One foodie friend speculated unpleasant melting would result. Baking forums promised curdling. Every recipe I located for something remotely similar advocated baking the dough and then piping chilled pastry cream into it. I was contemplating using Nana’s old cream horn molds to wrap little crescents of bread and then shoot pumpkin pastry cream into them, and then I found this. It’s a recipe for something called Torta Della Nonna, which translates to “grandmother’s cake,” and consists of a lovely tender dough, filled sometimes with sweetened ricotta, sometimes with mascarpone, but sometimes with a layer of vanilla or lemon pastry cream!

Food Blog November 2013-2785Victory, if not ensured, at least not a total shot in the dark, I got to work. Pastry cream, if you’ve never made it, is one of those projects that sounds terrifying – hot milk, egg yolks sure to curdle, frantic whisking with scalding and scrambling around every corner – but isn’t really that tricky. It’s another one of those “read ALL the directions first and have your ingredients prepped” kinds of recipes, and suddenly the milk and eggs you were whisking away at thicken into this magical, glossy, extravagant slosh of something an éclair would beg to be filled with. And when you finish eating half of it tasting it to make sure it’s edible, you have only to strain it (in case of accidental scrambled bits), refrigerate it, and then decide what to do with it.

Food Blog November 2013-2790I opted, to be sure the Italian grandmothers I was never lucky enough to have knew what they were doing, to bake up just a little custard cup of it. If it was going to melt all over the place, I’d take a new direction. It didn’t. The top layer formed a thin skin, like custard or pudding left to set without a layer of plastic wrap pressed over it, but below that exposed skin (which, if I’m honest, I don’t really mind) was a tiny vat of this stuff, rich, creamy, better-than-pudding, and I knew we were on our way to great things.

Food Blog November 2013-2783From there, it was a matter of making up a batch of dough, a little more decadent than usual thanks to the addition of an extra egg and a few extra tablespoons of butter (hey, if you’re going to pack it with pastry cream anyway, you might as well go whole hog), and spicing the whole thing with the flavors of the winter holidays: cinnamon, ginger, nutmeg, cloves.

Food Blog November 2013-2788Food Blog November 2013-2791I decided to make a lattice-top loaf, which entailed rolling, slicing strips along both edges of the dough, spreading the glossy, velvet perfect orange cream inside, and weaving the whole thing together. However, I did this on my bread board (it made sense at the time), not considering that the dough, flexible and buttery already, was about to double or triple in weight thanks to the addition of the cream, and be unwilling to transfer to my baking sheet. Thus, after considerable hand-wringing and fancy spatula work, I ended up with something like a horseshoe, only slightly structurally compromised. I suggest filling and finalizing your loaf on the greased baking tray you’ll be putting into the oven.

Food Blog November 2013-2793Food Blog November 2013-2794Food Blog November 2013-2795Food Blog November 2013-2797My god, this was good. The pastry cream oozed out of the caverns and crevices left by inexperienced and impatient lattice-work, and these parts gained the same skin as my experiment. This is, if we’re going to be picky, perhaps of a slightly compromised texture – it gets slightly grainy and thick – but it’s not enough to be a bother. Because once you get beneath the outer layer and your teeth sink into the delicately sweetened, pumpkin lushness below, you won’t ever want to eat anything again. And the dough itself is no slouch either. It bakes up warm with spices and beautifully textured. The combination is like… well… it’s like nothing I can really think of. The bread is like a sweet roll or a yeasted coffeecake; not as light as a doughnut, but not as heavy as your standard loaf of bread. The cream inside makes it (almost) too decadent to be a breakfast, but it’s a more than suitable dessert or afternoon pick-me-up. To make it even better, this bread actually tastes better the second or third day after you bake it (or even the seventh… I’ve kept our leftovers wrapped in plastic wrap and in the fridge, and a week later it is still moist and perfect).

Food Blog November 2013-2798Food Blog November 2013-2808

Gingerbread spiced sweet bread with pumpkin pastry cream
Makes one 14-16 inch lattice-top loaf (and about 2 ½ cups pastry cream to fill)
For pumpkin pastry cream:
2 cups half and half (or, if you’re me, nearly 1 cup heavy cream and a little over 1 cup whole milk)
½ cup sugar, divided
Pinch salt
4 egg yolks
3 tablespoons cornstarch
½ cup pumpkin puree (not pumpkin pie filling)
½ teaspoon cinnamon
1 teaspoon vanilla
2 tablespoons cold butter
  • In a medium saucepan, heat the half and half, 6 tablespoons of the sugar, and the salt to a bare simmer over medium heat. Separate the eggs and mix the yolks with 2 tablespoons of the sugar, beating until you can only feel a slight graininess from the sugar in the mixture. Whisk in the cornstarch until combined. The mixture will become pale yellow in color and thicken noticeably.
  • Dribble about two tablespoons of the simmering half and half mixture into the egg yolks, whisking quickly as you go. This tempers the yolks, warming them up just enough to prevent them from scrambling when they hit the heat of the milk.
  • Add the yolk mixture to the half and half in the saucepan, whisking constantly as it returns to a simmer over medium heat. The whole mixture will become thick and glossy, and a few reluctant bubbles may sputter to the surface.
  • Turn off the heat and add the pumpkin, cinnamon, vanilla, and butter. Whisk until incorporated and smooth.
  • Position a wire or mesh sieve over a medium glass bowl and dump in the hot pastry cream. Using a spatula, stir and push the cream through the sieve down into the bowl. If there are any scrambled bits or undissolved material, this will catch it and prevent anything from marring the divinely perfect texture.
  • Place a layer of plastic wrap flat against the pastry cream and refrigerate until cold. This thickens the cream and lets it achieve its most glorious texture.
  • While it chills, make the bread dough.
For dough:
2 teaspoons yeast
½ cup warm milk
Pinch sugar
¼ cup brown sugar
½ teaspoon salt
2 eggs
6 tablespoons room temperature butter
2 teaspoons cinnamon
1 teaspoon ginger
1 teaspoon nutmeg
½ teaspoon cloves
3 – 4 cups flour (all-purpose or bread flour both work well)
  • Combine the yeast, ½ cup warm milk, and a pinch of granulated sugar in a small bowl. Let sit for 5 minutes while the yeast wakes up a bit.
  • Meanwhile, add the brown sugar, salt, and eggs to the bowl of a stand mixer and beat with the paddle attachment into a sludgy homogenous mixture. Add the yeast mixture and the butter and mix again until mostly combined.
  • Add the spices and 3 cups of the flour, and mix with the paddle attachment just until a wet dough comes together.
  • Switch from the paddle to the whisk attachment and knead 6 – 8 minutes, adding more flour, if needed, in ¼ cup increments. Try not to add too much flour, as with each addition the dough becomes a bit denser and tougher.
  • After 6 – 8 minutes of kneading, the dough will still be sticky and loose. Cover it with plastic wrap and let it sit in a warm place for 90 minutes, or until it has doubled in volume.
  • Punch down the dough by depressing your knuckles gently into its center to release the accumulated gases.
  • Turn out the dough onto a well floured board (I did this by just inverting my mixer bowl and letting it sit until the dough flopped out). Flour the dough lightly as well, and roll with a rolling pin into a 12 x 16 inch rectangle. If the dough springs back on itself immediately, let it sit for 5 minutes and then try again.
  • To create the lattice-top look, use a sharp knife to cut slits at a slight angle in the outer edges of dough at 1 inch intervals. Each slit should only be about 2 inches in – you need plenty of room in the center for the pastry cream, and the dough will stretch as you weave it. See photo above for a visual.
  • Transfer your dough to a lightly greased cookie sheet so you can shape it without having to move it again. Spread about 2 cups of the pastry cream onto the uncut center panel of dough, leaving about a ½ inch margin on all sides (what you do with the remaining cream is up to you. I won’t tell anyone). Then, fold up one of the end pieces over the top of the pastry cream and start weaving: fold up one dough strip at a time, taking one from one side and one from the other in turns, the way you would lace a shoe. Fold over the center gently – if you push down too much, pastry cream will go everywhere.
  • When you get to the end of the latticework, fold up the remaining edge and pinch it with the final set of folded strips to seal it. Cover it with plastic wrap and let it rise for 30 minutes.
  • During this final rise, preheat the oven to 350F.  Now, here’s where I must be honest. In the excitement of how firmly I believed this was going to be the best loaf of sweet bread ever, I failed to write down how long I baked this for. But I’m going to say you should start with 20 minutes, and see how things look. The top should get dusty and browned and feel slightly hollow when you knock against it. If it isn’t browned at all or still looks conspicuously raw, give it another ten minutes.
  • When done, remove from oven and cool completely before slicing. To store, wrap in plastic wrap and keep in the refrigerator. To snack, I preferred my slices straight out of the fridge, where the cream was cold and glossy and the bread was chewy and thick.