
 buttermilk pancakes in morning light.
Photo Friday
Reply

buttermilk pancakes in morning light.
I have to admit, this meatball is a bit of a cheat. I mean, when it comes right down to it, this is a breakfast sausage patty, spiked with small chunks of apple and onion sautéed in butter, slivers of sage, and a generous glug or two of maple syrup. And plenty of black pepper, of course. I know, what’s to complain about there? But essentially, it’s just that, rolled into a meatball form instead of flattened into a patty. I’ve made this a number of times already as a sausage patty, and the simple change feels a bit dishonest – a bit like a masquerade. But the thing is, it allows me to tell you about an event for which I feel a great deal of fondness. So consider this a cheat with good intentions. An excuse, let’s say, to tell you about a time of warmth which, as the winter rolls on, might be something you need.
(Additionally, as I’ve recently noticed, sorry about the lousy photo quality on the in-post photos. I’m thinking this is largely due to artificial lighting, which makes maybe one good thing about that whole Daylight Saving Time curse that has fallen upon us, but also might be a WordPress thing, because if you click on the image for a larger version, it looks clearer and higher quality – more like the original shot.)
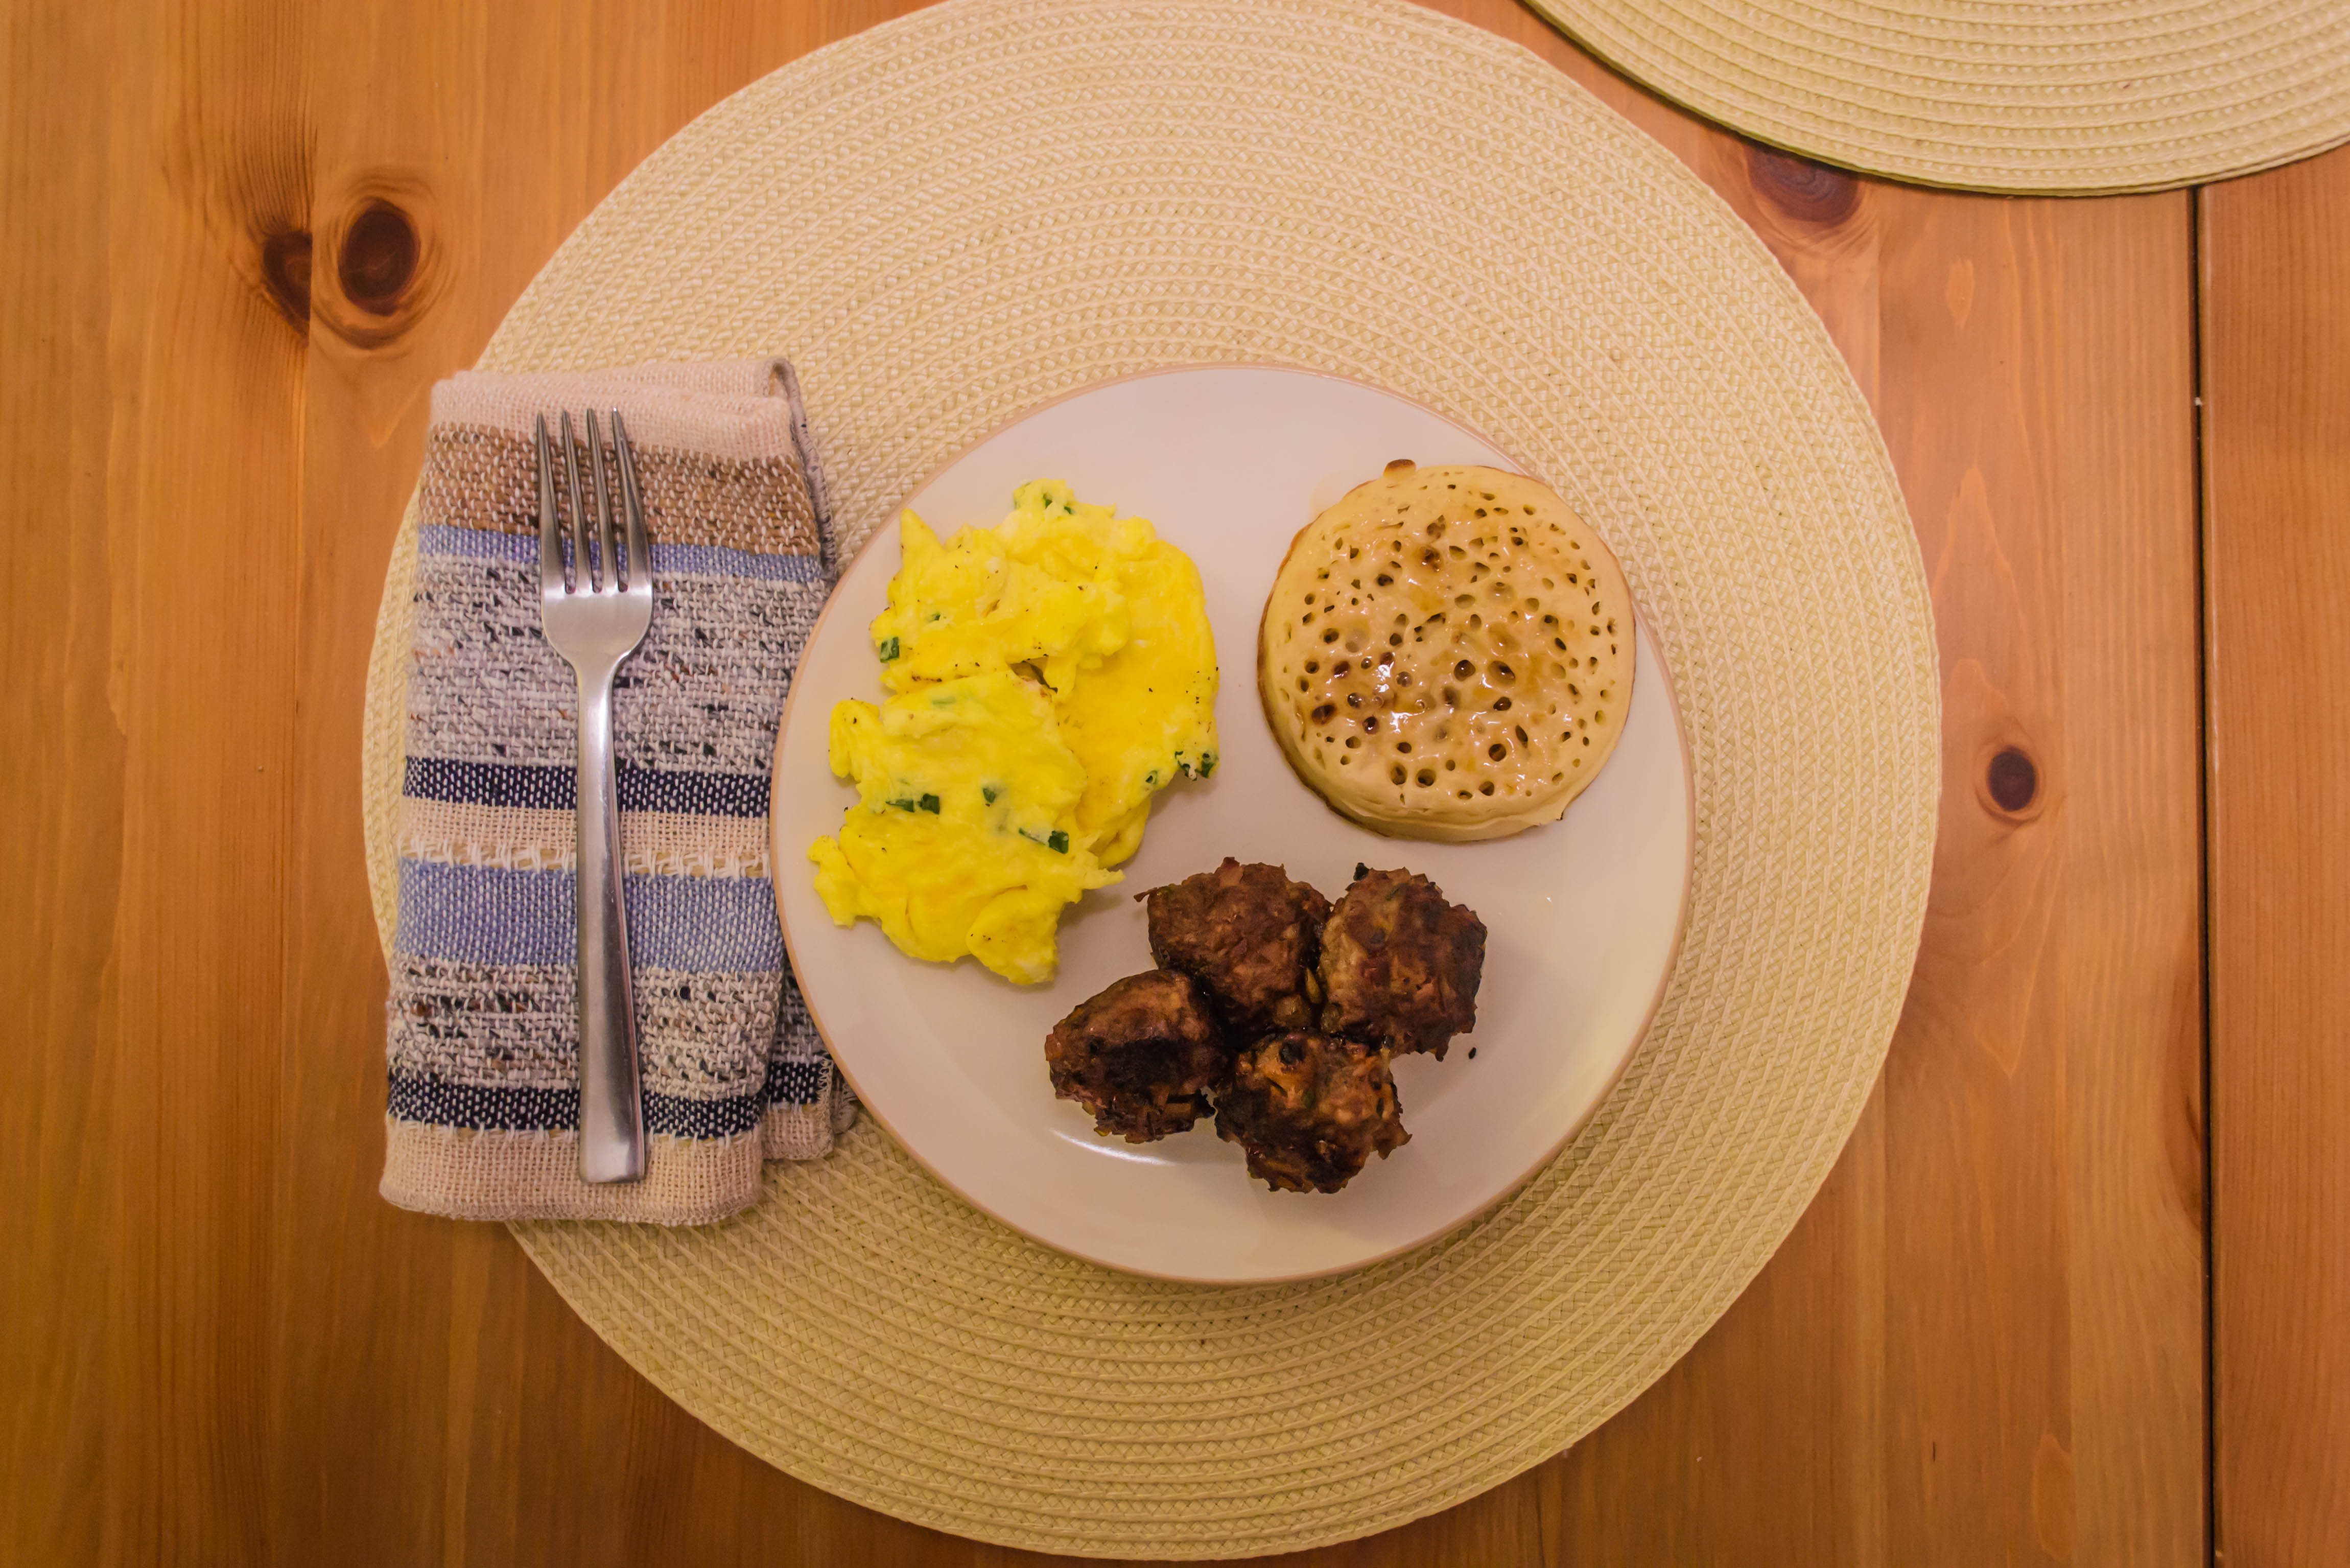 The apple and onion in these meatballs (or patties) play very well with the sage and the fatty pork, and the maple syrup results in stellar caramelization, while giving a nod to the “breakfast” idea. This combination was so successful at home in some trial runs and at a summer gathering last July that I broke it out again this January. One of my dearest family friends, a young woman I’ve known so long it feels strange to acknowledge that she is, in fact, a young woman rather than a kid, got married in November, in Chile. She and her now-husband’s Southern Hemisphere nuptials meant that only a small handful of her American friends and family were able to attend. In January, then, while many of us were still off work for the holiday, they had a “stateside celebration” in northern California, which N. and I thankfully were able to attend.
 The bride’s mother, whose capacity for party planning is unparalleled, rented a house for the weekend for the “kids” to stay in, and as the oldest members of that no-longer-accurate category, N. and I somehow got in under the age wire and hung out with the “young people” at the party house. This allowed for opportunities like feeding (fat, greedy, possibly possessed) miniature ponies who happen to live on the grounds, wandering an impressive, decked-out-for-Christmas back garden, exclaiming over the proliferation of strange decor choices in the house (lots of religious imagery, a fully decorated Christmas tree in every room of the house, a large rocking horse at the foot of our bed, Victorian and Rococo linens and bathroom paintings, modern art pieces contributed by grateful former guests, a fur stole my sister briefly considered wearing to the party), and riding to and from the event itself in an aesthetically impressive but poorly stocked limousine, my first limo ride ever. (Really, this house was amazing. A Secret Garden/Windsor Mystery House of a place, and we were so lucky to get to experience it).
 To offer my thanks, of course I turned to food, offering to cook breakfast for all of the “kids” on the morning of the marriage blessing ceremony. This offer was met with enthusiastic approval, and so my sister and I got up early(ish) and set about finding the least battered tools in the kitchen (it contained an astounding variety of dishes and utensils, but as you might expect of a rental property, many were not well maintained) to make breakfast-for-eight. Among the offerings were these same sausage patties, which were met with considerable acclaim. There were no leftovers.
 I realize this is not much about meatballs, but for me, food is so tied to the people I’m feeding and the events surrounding its production that they become part of the taste. These people we were celebrating are so dear to me, and became so with such haste, that I can’t remember a time I didn’t think of them as an extension of my family. She was my bridesmaid when I married, and now at the celebration of her own marriage, it felt so tied to my own declarations of love and familial belonging. As I said when I offered my toast at their reception – while remarking on the tendency my eyes suddenly had at trying, on their own, to alleviate California’s massive drought – there has never been a time when I was not so, so happy to see them. This has been true from the very first time we met (it was raining then, too, relieving this poor parched state once again, as the now-bride’s father welcomed us in with the shout “We’re having a rain party!”), till that evening, surrounded by others they love, who love them.
 This is all a bit tumbling and confessional and warm, but I know you’re really here for the meatballs, so let’s get to it. All I’ve done is taken the same ingredients from my sausage patties and rolled them into a meatball, rather than flattening them for the pan. But really, they are perfect either way. They are one of those offerings that, even if they get a little dark on the bottoms from the sugars in the maple syrup (and they may, so don’t despair), they are gobbled up willingly. And even if they stay in the pan a bit too long because you are taking the time to catch up with family who re friends who are family, they stay moist thanks to the apple and onion threaded through them. They are a standby indulgence. I hope they become that for you as well.
Serving suggestions: as you can see, we had ours alongside a fluffy pile of scrambled eggs and some well toasted crumpets. They would also be perfect stuffed inside a pillowy buttermilk biscuit as a fancy little breakfast sandwich bite, and I certainly wouldn’t say no to a pyramid of them gracing a belgian waffle or two. In short, pick your breakfast favorite, and add these.
 It’s always interesting to see what the Twelve Loaves baking group decides on as a January theme. This is a time of renewal, of fresh beginnings, of starting again or trying again or reestablishing. Last year they asked for simplicity, prompting me to try my hand at sourdough, made by weight rather than volume measurements. This year, they asked for something a little more poetic but just as abstract: bake a loaf inspired by a New Year’s resolution.
 I knew immediately I would make brioche. One of my New Year’s resolutions for 2015 is to be more patient. While this would be a good goal in any area of life (or perhaps all of them), for me, it’s very specific. I want to be more patient with Lucy when we take our daily walk. My dog-daughter will be twelve years old in the spring, and though she’s still very energetic and quite healthy, she has slowed down over the years. Some of this is age, but some is insistence on getting what she wants. For her, our outing is not a walk. It’s an extended sniff. She wants to stop at every bush, at every bench, at every blade of grass, it sometimes seems. This can easily push a two mile walk into an hour-long endeavor.
 Like most of us, though, I’m a busy person. At least I feel like I am. When I get home from work, after a brief decompression (read: Facebook and a snack), I want to walk Lucy, do a final check of my email inbox, and get on with cooking dinner. Ultimately, I want to get these things done so I can changed into pajamas and deposit myself on the couch. Sniffing every blade of grass impinges on this plan, so over the past year or so I found myself getting frustrated, and even quite angry when Lucy stopped, and stopped, and stopped again.

 In November I was getting ready to snap at her about such a stop, and instead I stopped. Chelsea, she’s a dog. This is her daily chance to get outside and experience the world. She doesn’t understand what I’m even asking, let alone why I’m asking, and all my impatience is doing is making us both feel bad. And really, what’s the damage to my schedule if I do let her have an extended nasal examination of the things she’s most interested in? All told, three, maybe five minutes.
 I can handle that.
So I am trying to be more patient with her, gently encouraging her to hustle along rather than snapping at her. I’m delivering commands in a calmer voice, and letting the sniff session go on an extra few seconds before delivering that command at all. I’m not at total karmic peace with the extra time spent yet, but I’m working on it.
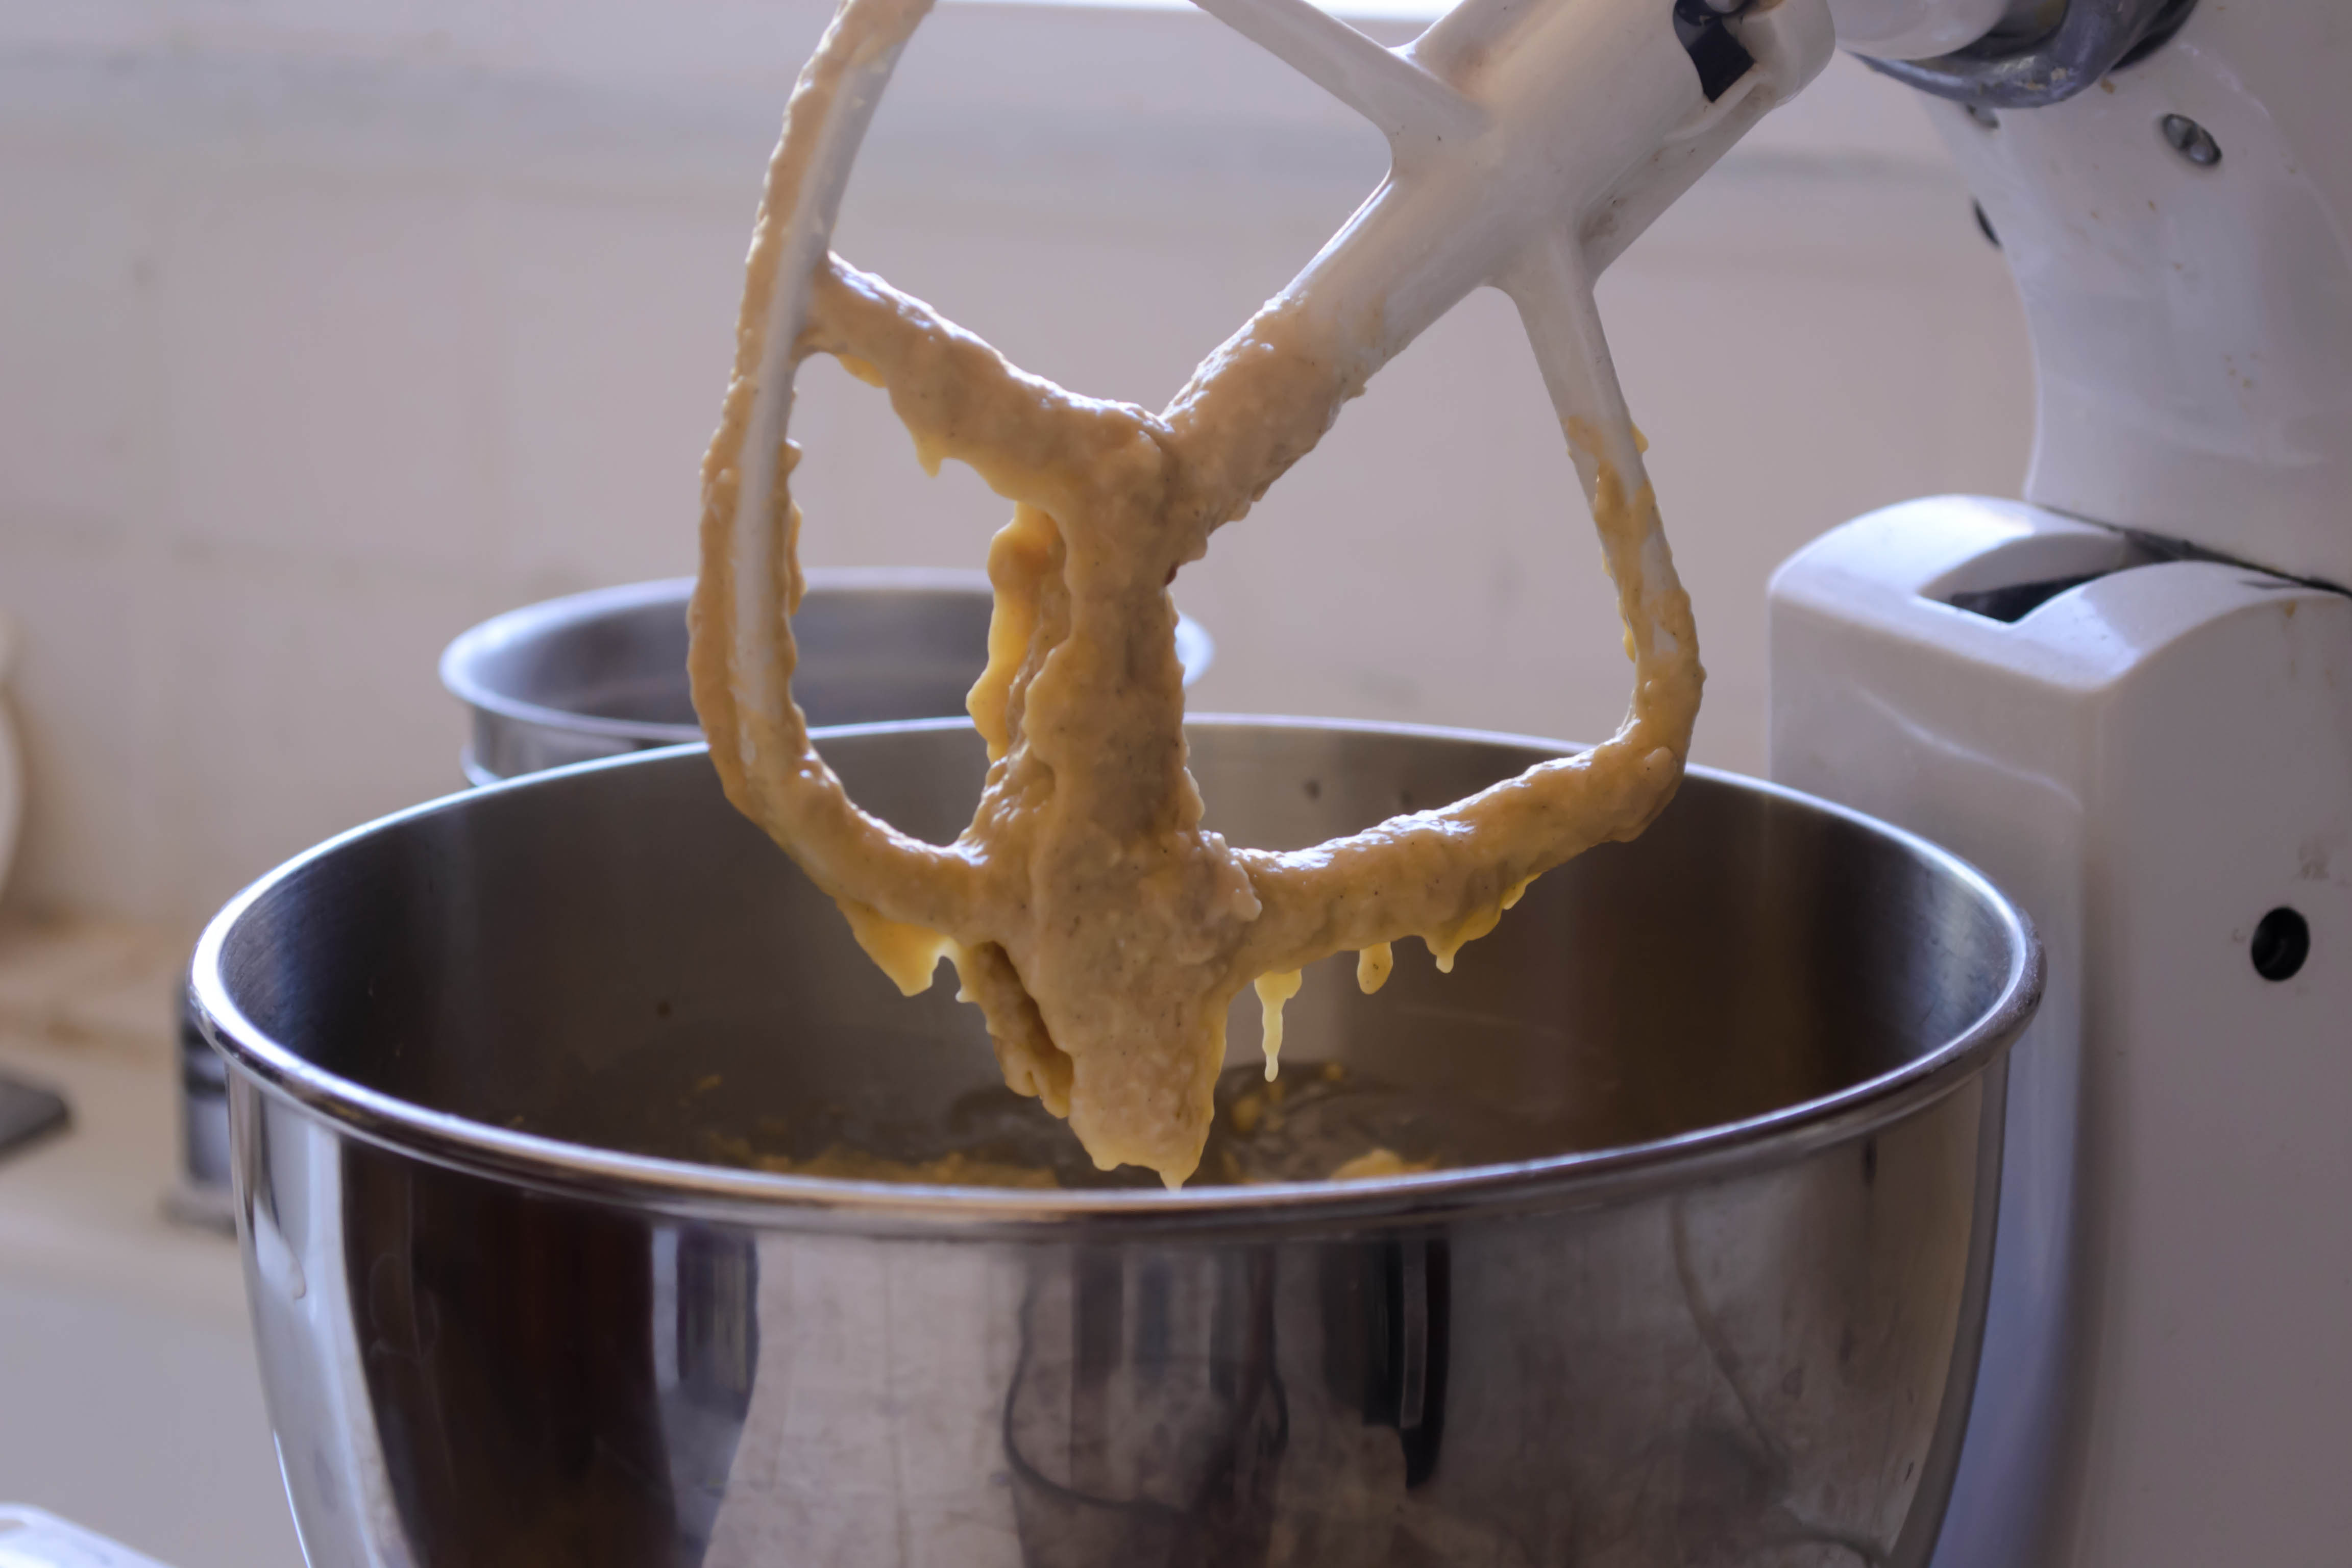
 Brioche is my bread project, then, because it’s a loaf that requires patience. Rich with eggs and loaded with butter, brioche is the “cake” from the famous quote misattributed to Marie Antoinette. To integrate the massive quantities of butter the loaf requires, most recipes detail a process of bringing the fat to just the right temperature and incorporating it into the dough a maddening single tablespoon at a time. Too cold, and the butter won’t mix in. Too warm, and it will collapse the dough into a soupy mess. Too much at once, and the dough will get greasy and separate unpleasantly. It takes, typically, a 20-30 minute knead time to get the gluten chains in the flour tangling nicely and then incorporate all of that butter. After this, a long, slow, cool rise time is required, in part to build flavor, in part to develop structure, and in part just to make it easier to handle – that butter has to chill down before the dough can be manipulated successfully.


 By the time you are finally ready to bake the thing, a brioche has usually been under construction for the better part of a day, if not two (sponges and overnight refrigerated rises are common). But the result – a spongy tender, light-as-air crumb inside a deeply browned crunchy crust – is remarkable. It reminds me of challah, another egg-laden loaf requiring multiple rises, but is more finely textured and even a bit richer. If your gourmet burger arrives on a deeply, perfectly rounded bun so shiny it looks lacquered and leaves a sheen of fat on your fingertips when you set it back down on the plate with a sigh, you’ve had brioche. It’s a frequent choice for a truly decadent french toast, and I was prepared, with a cringe, to sink myself into making it.
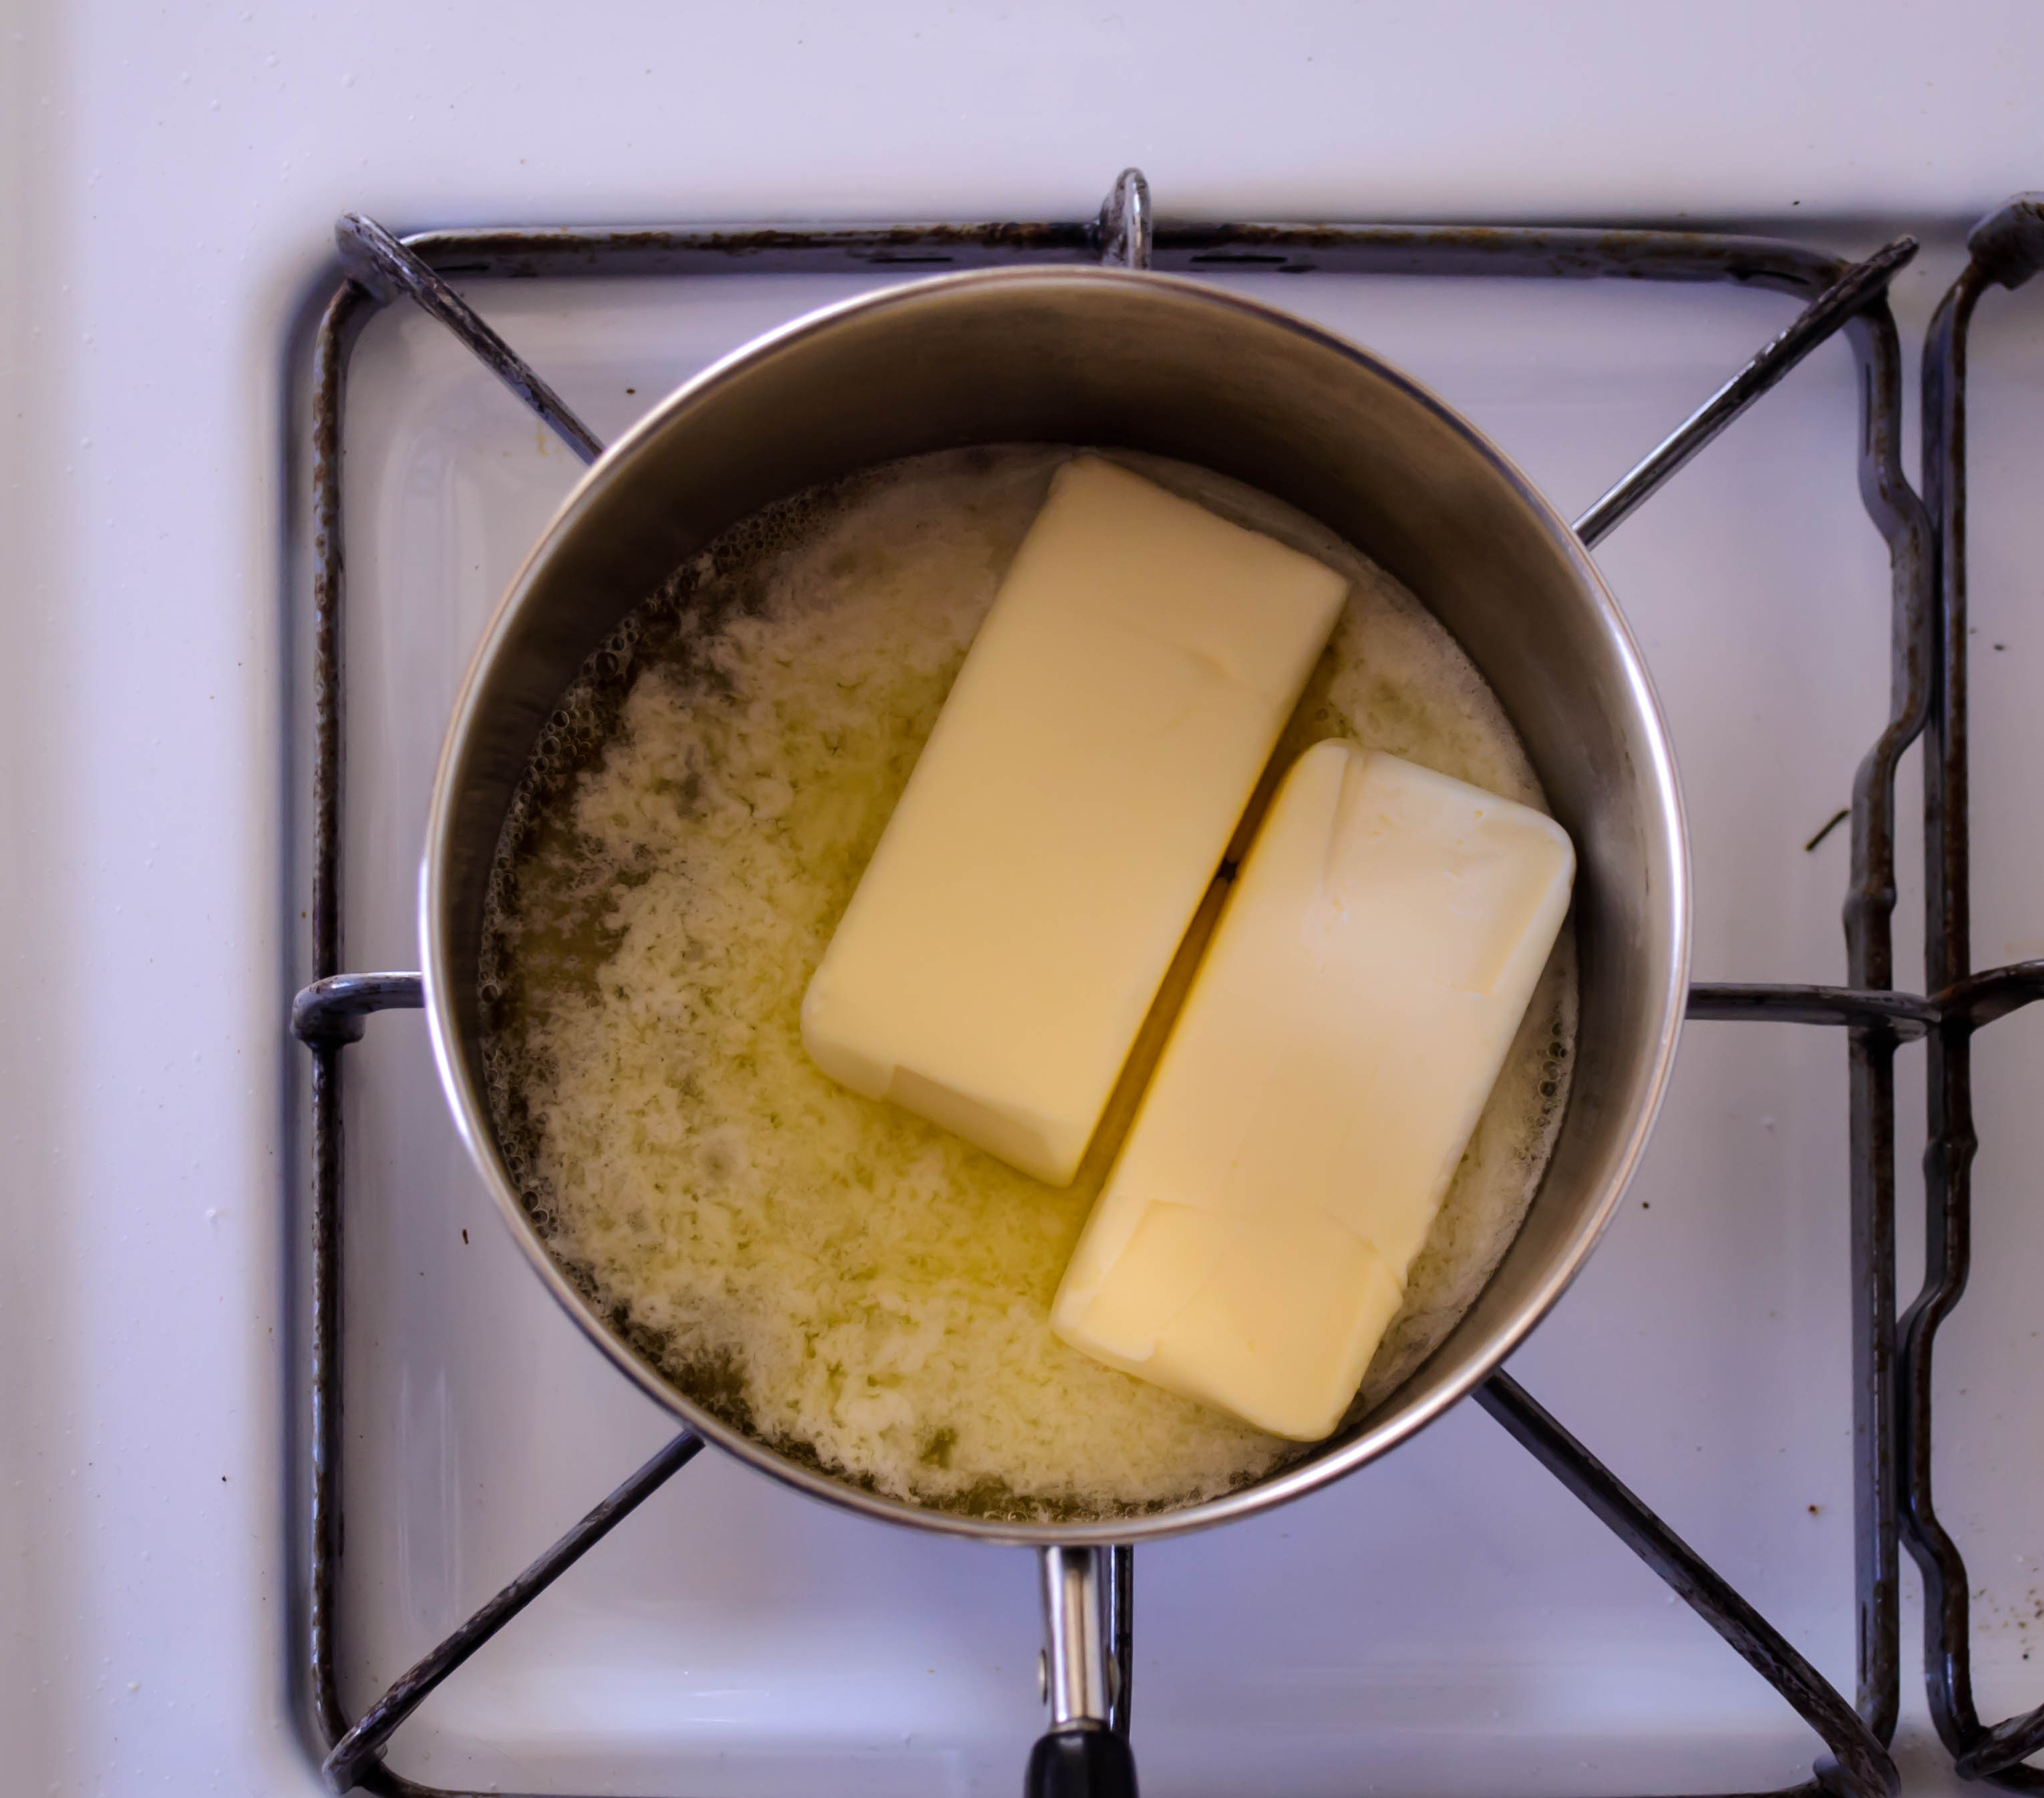
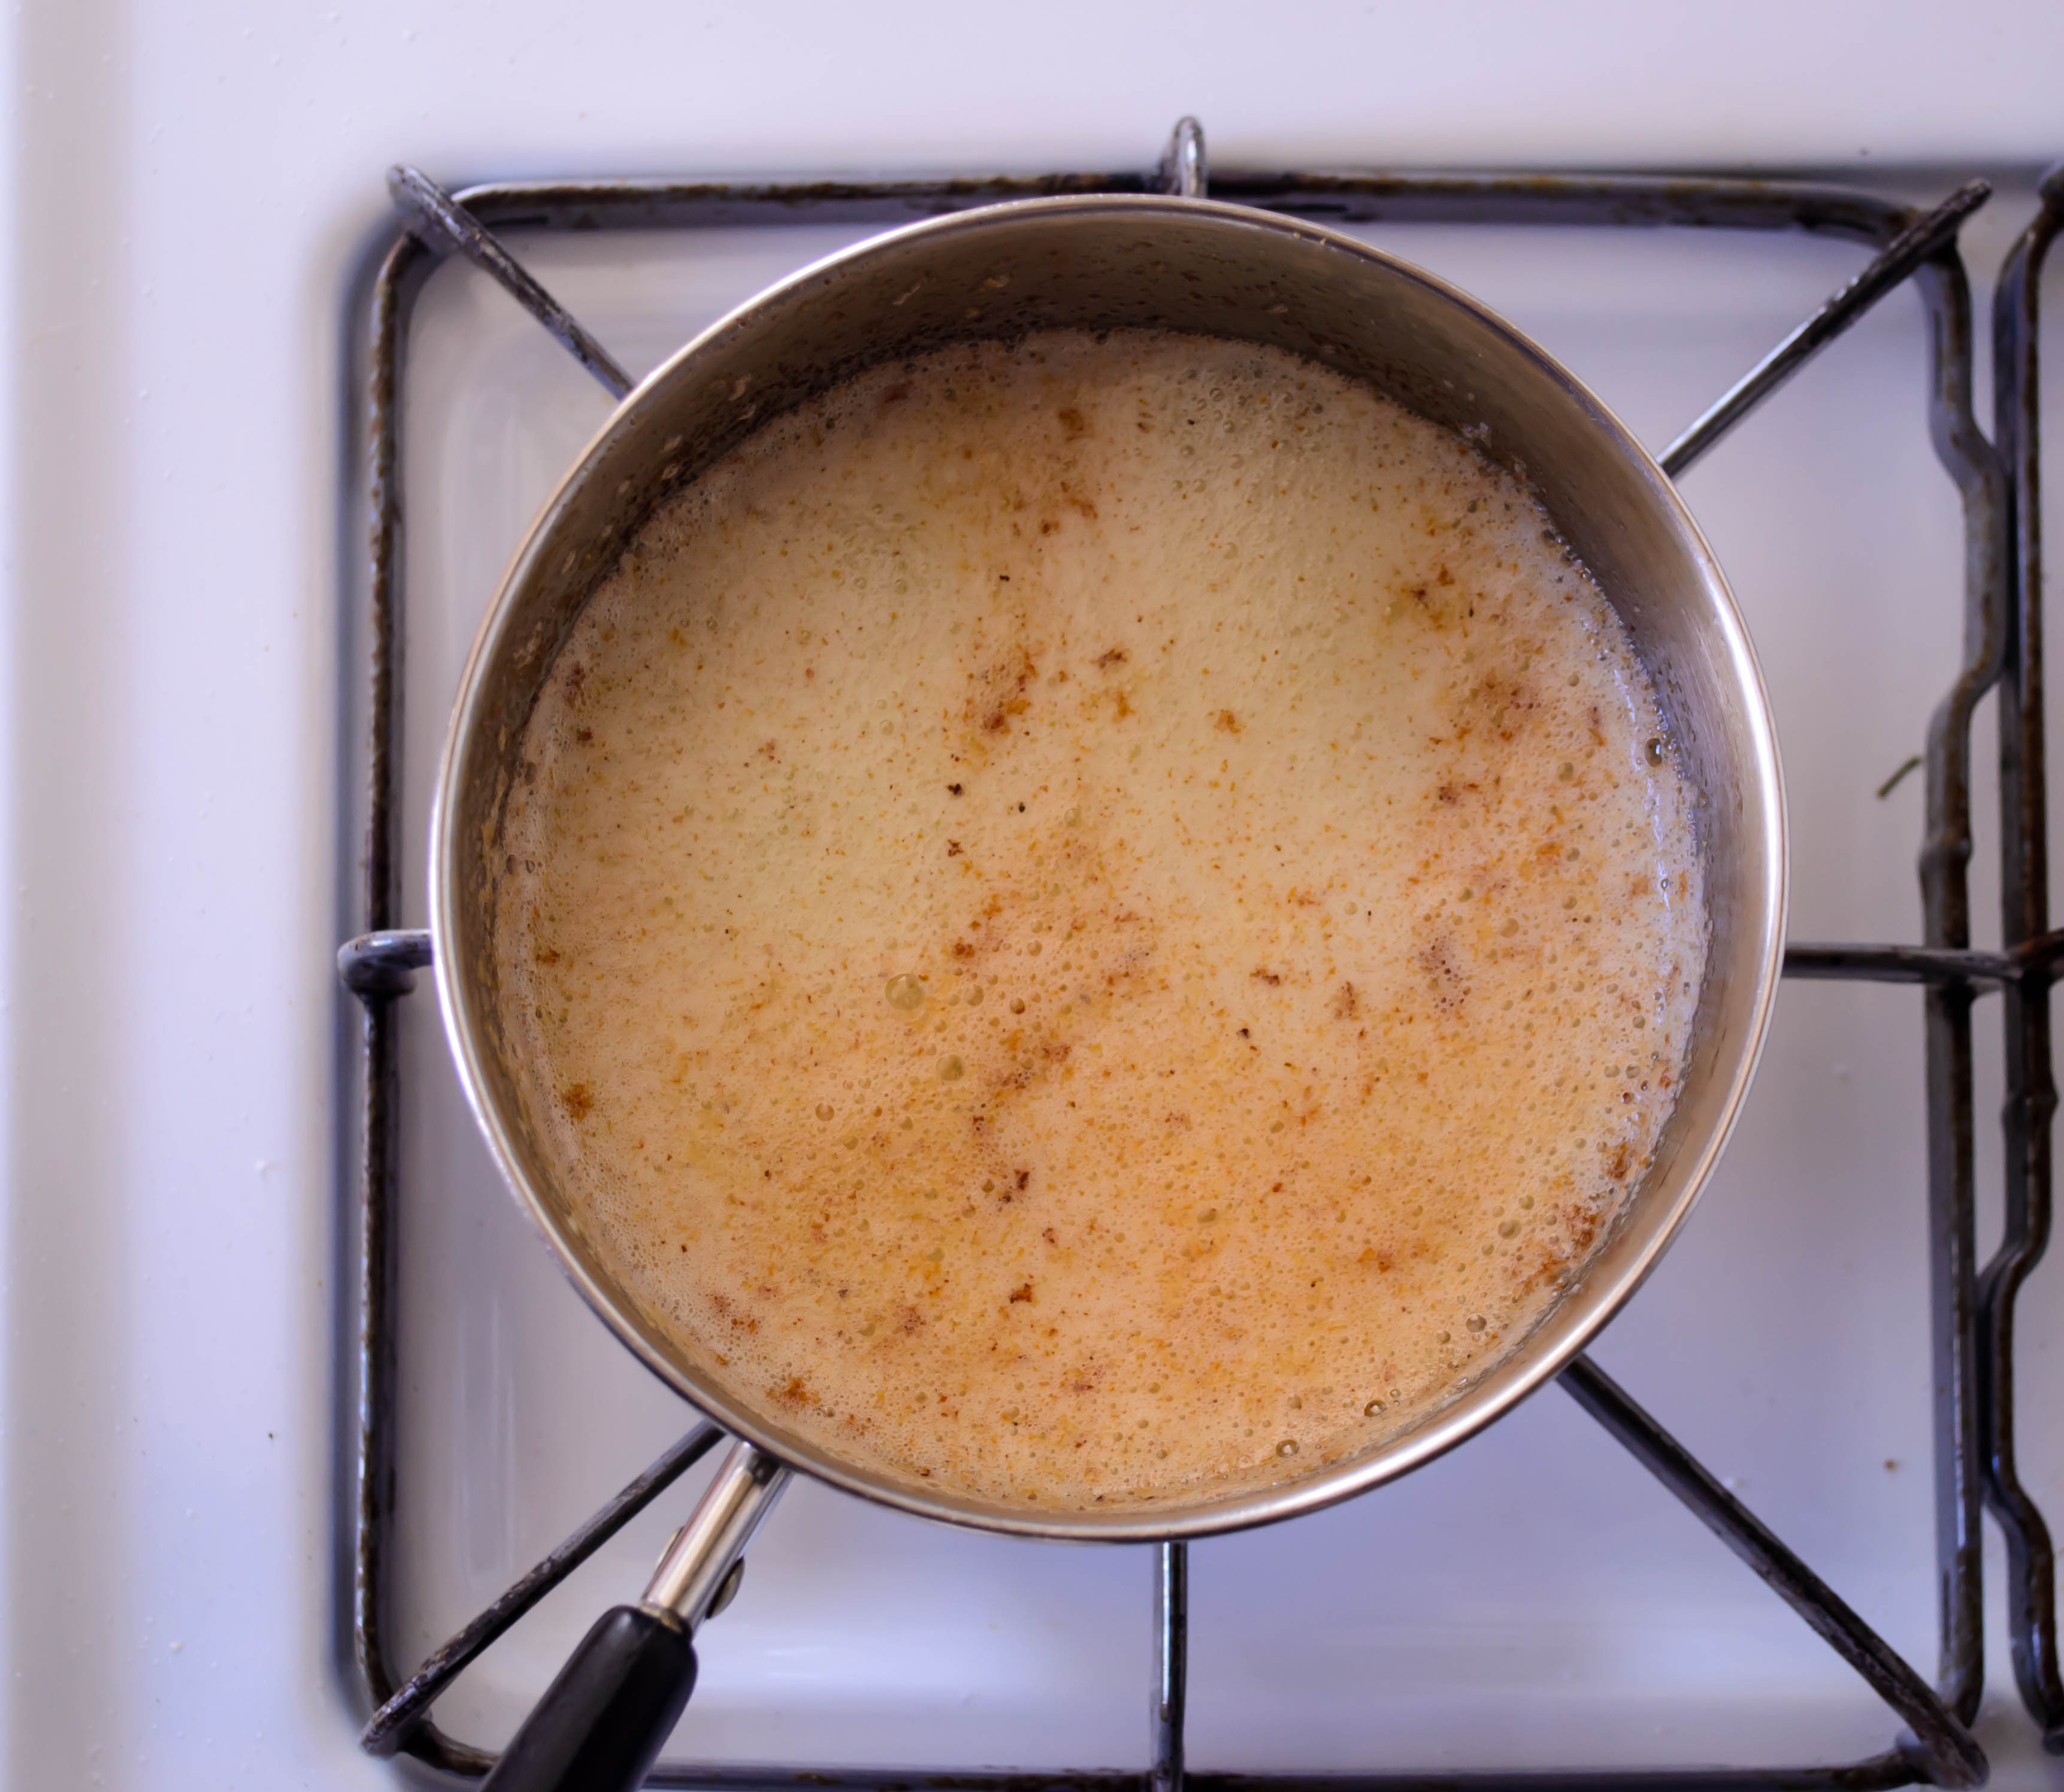
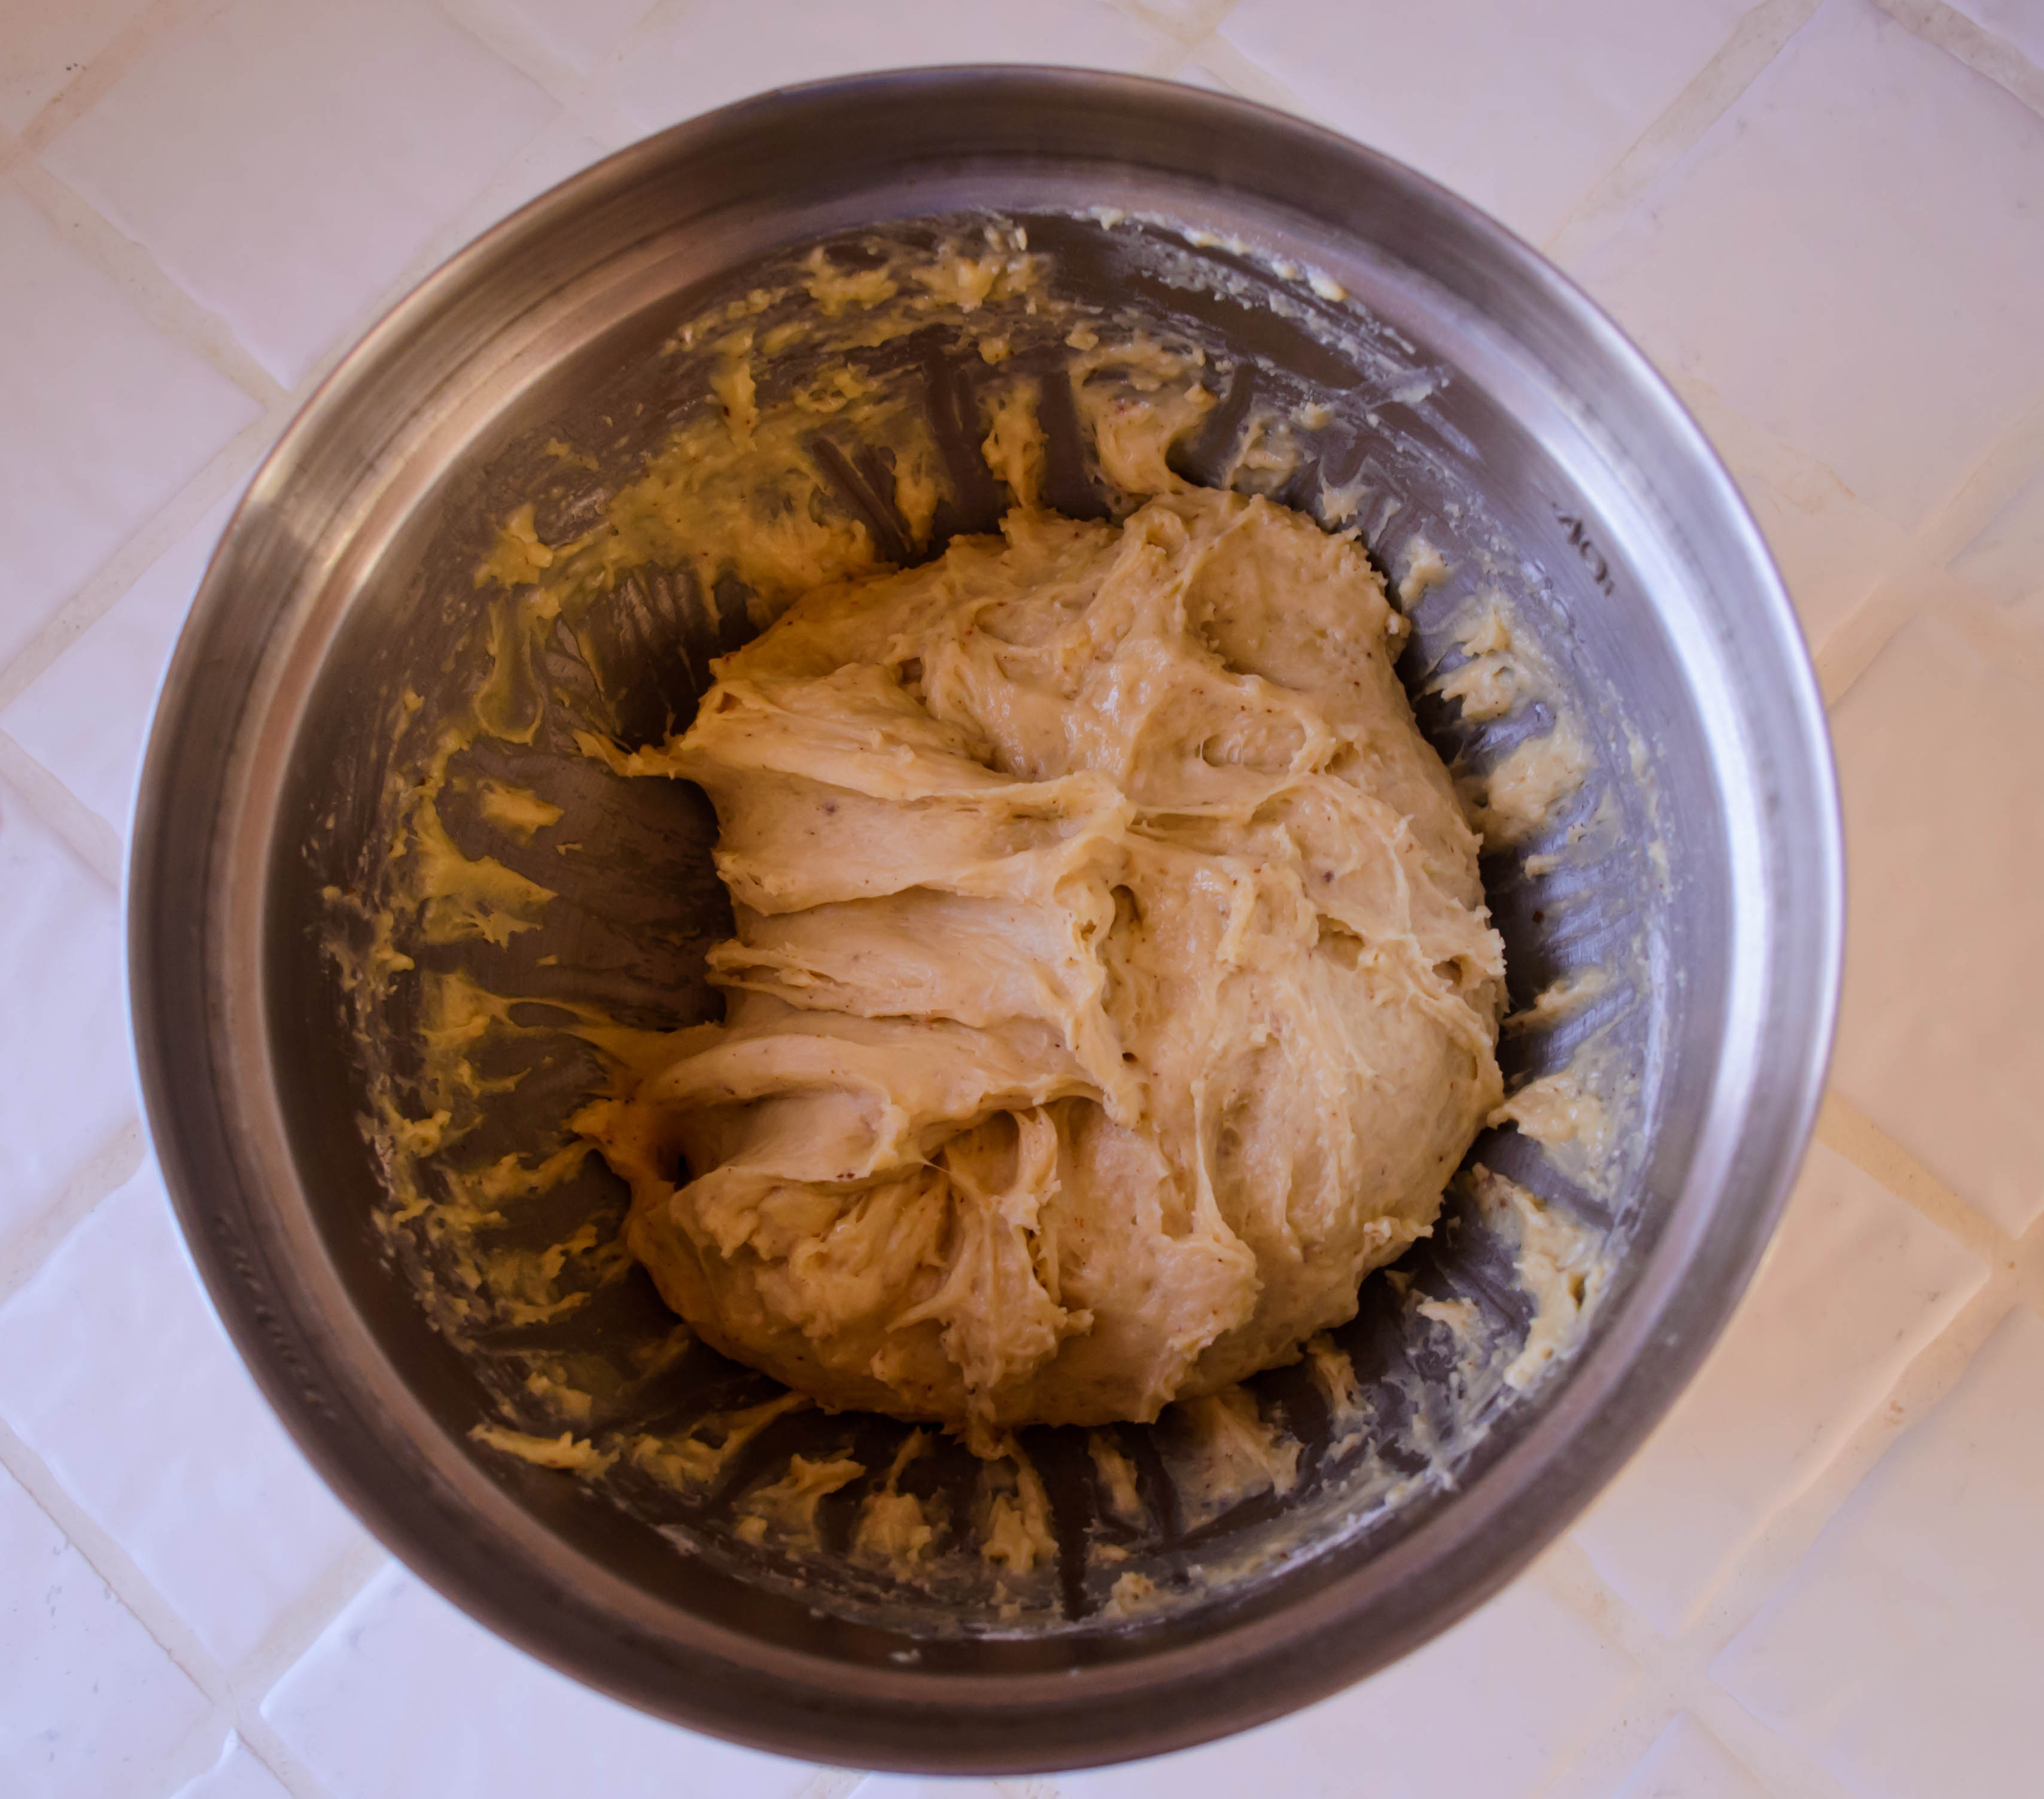
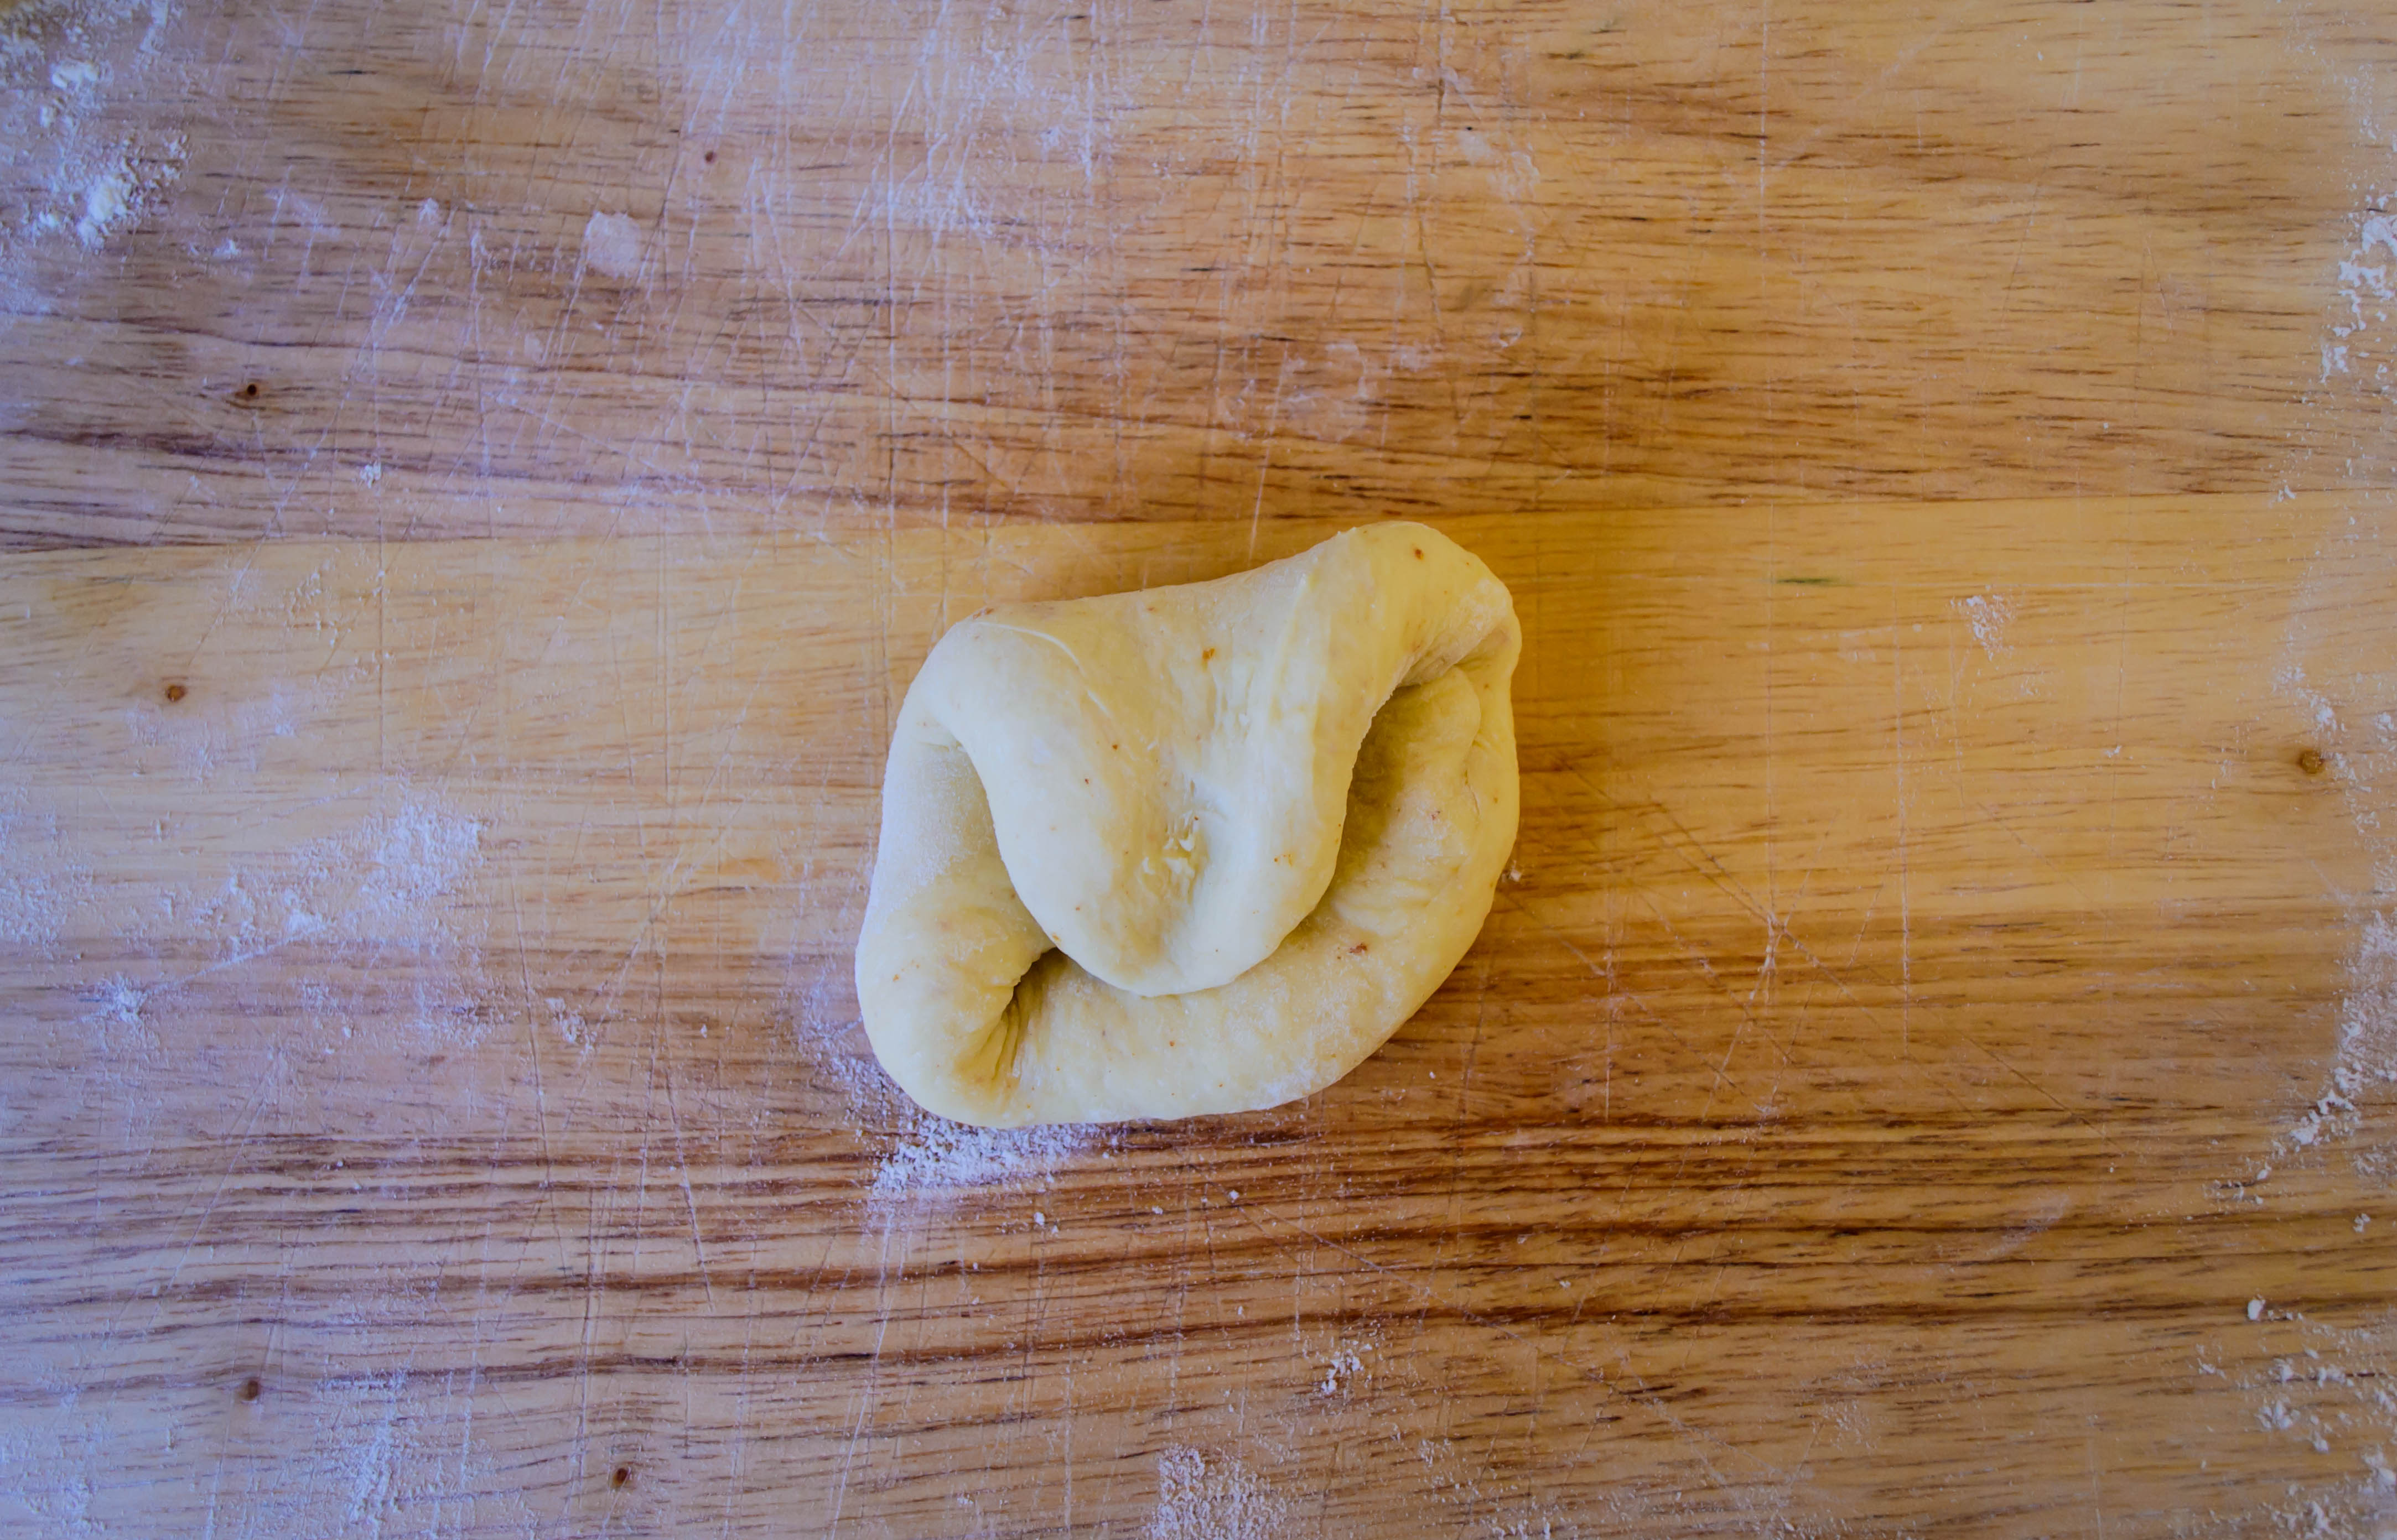
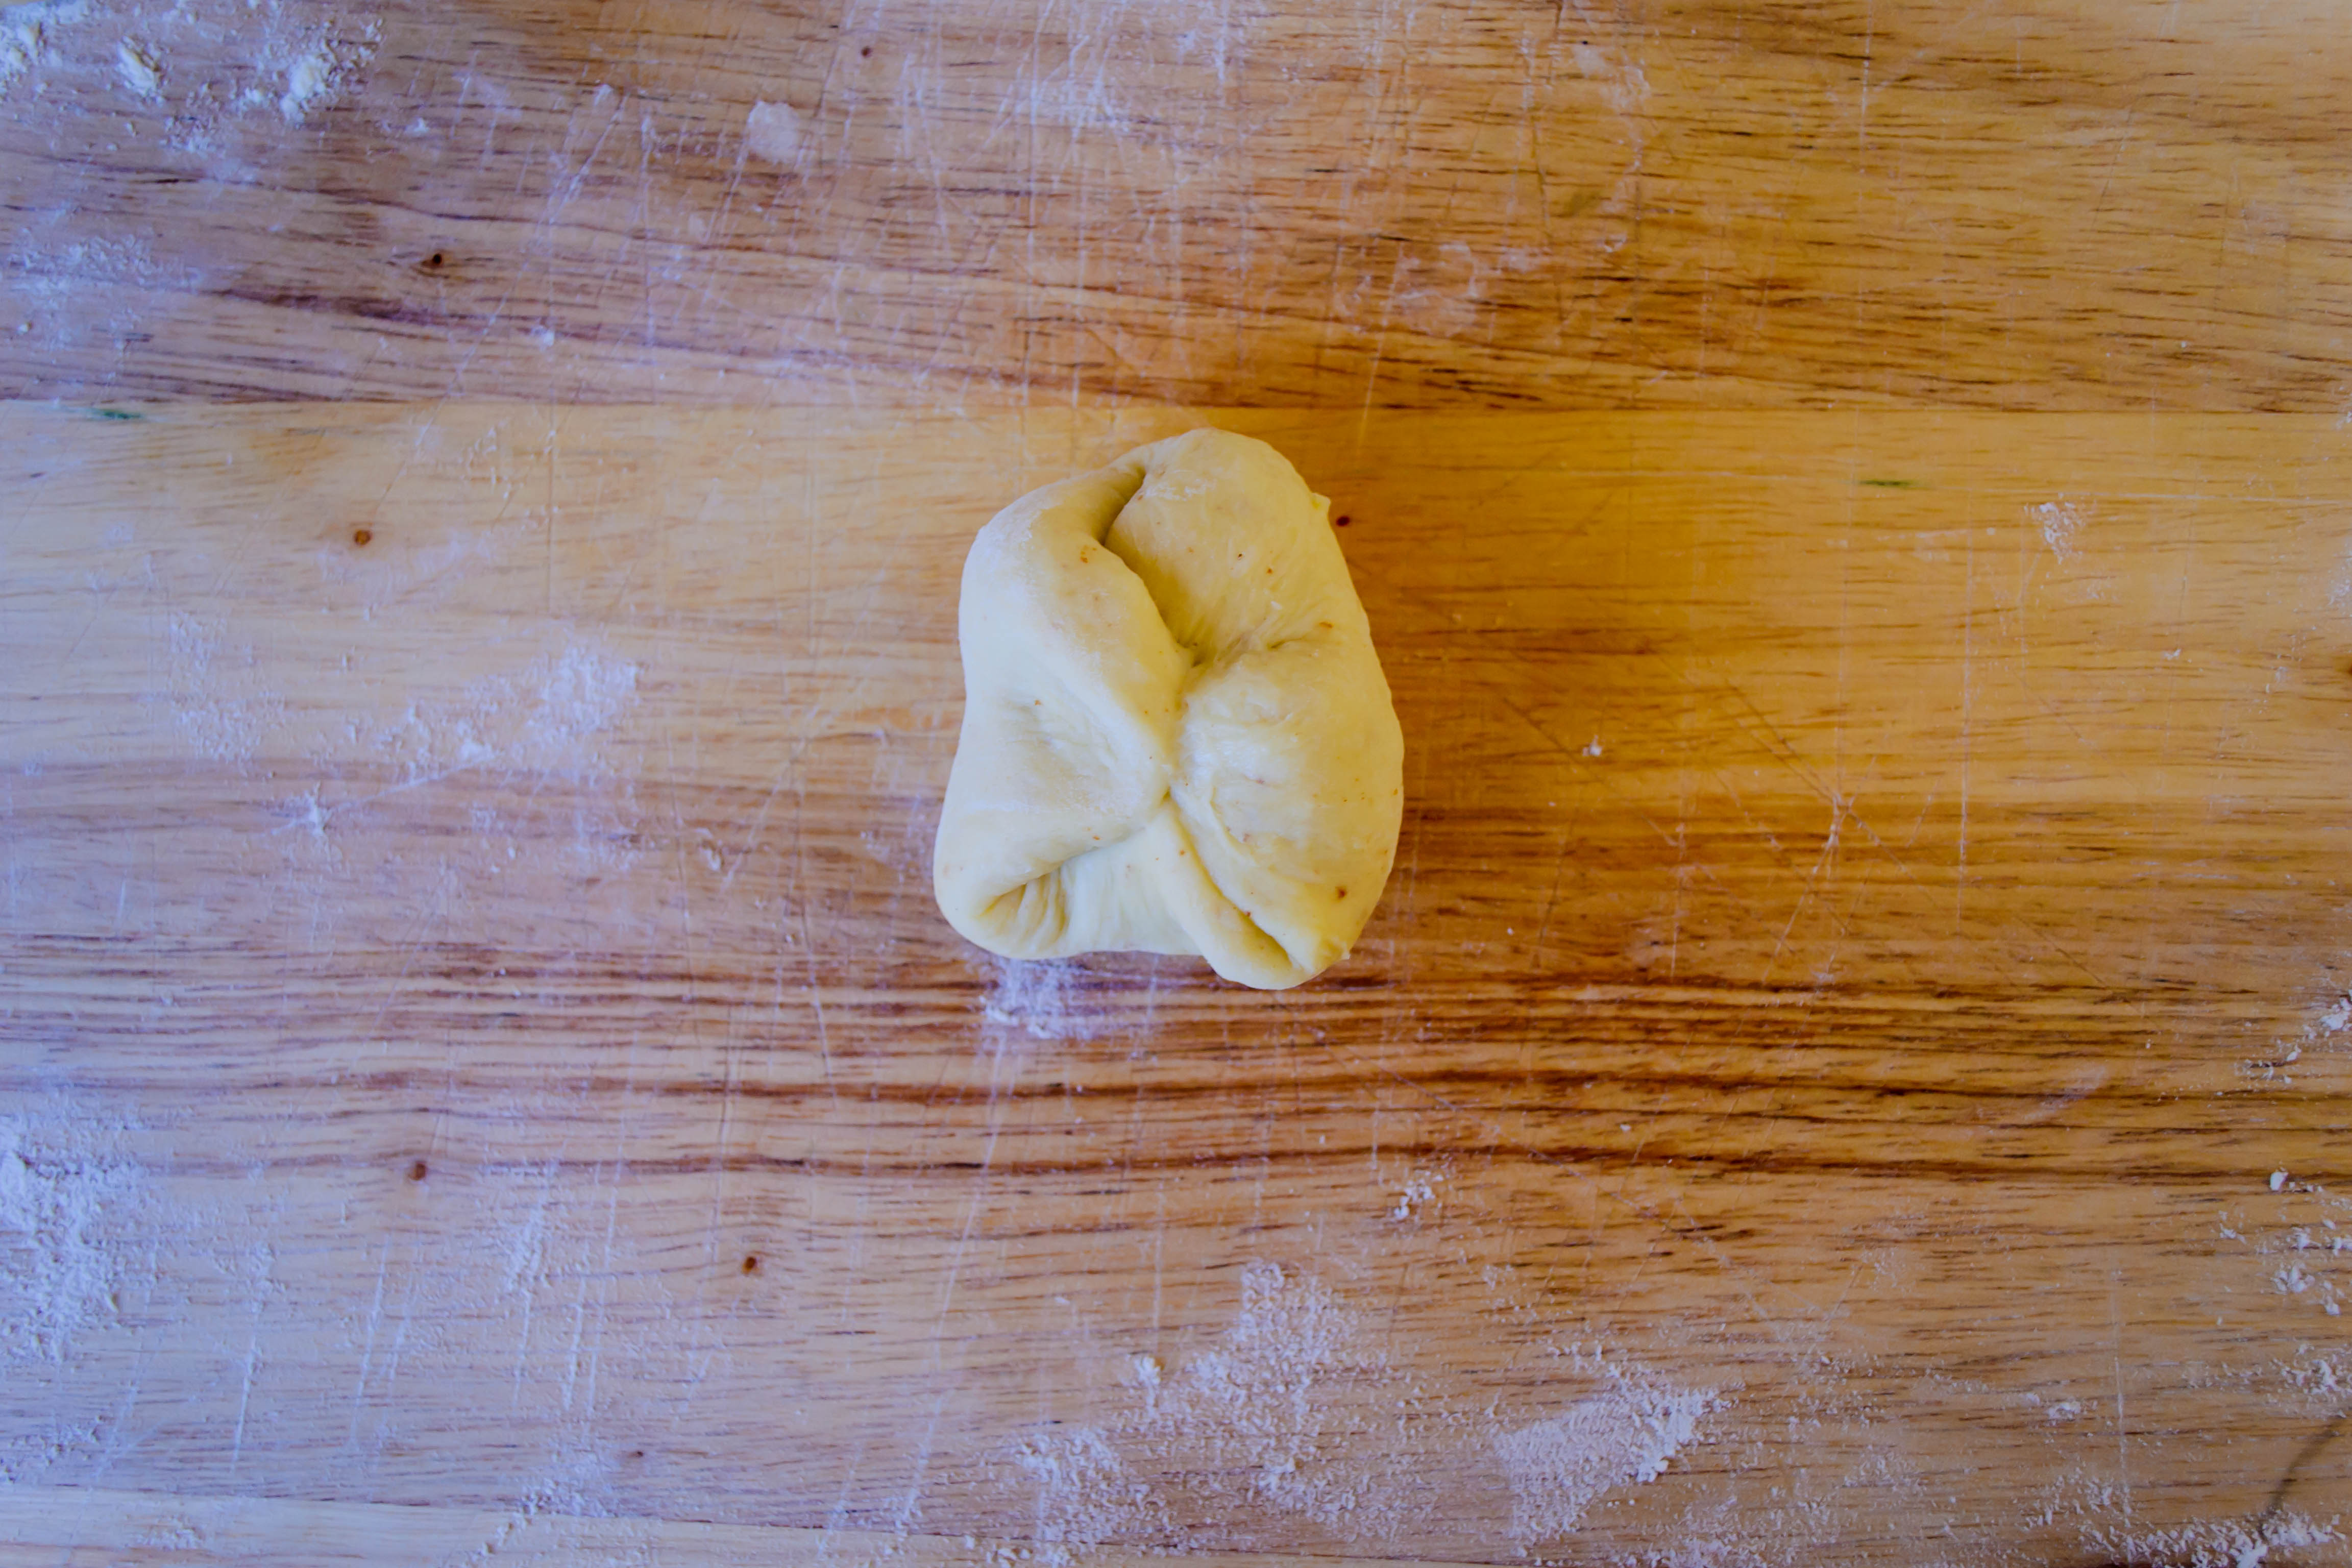
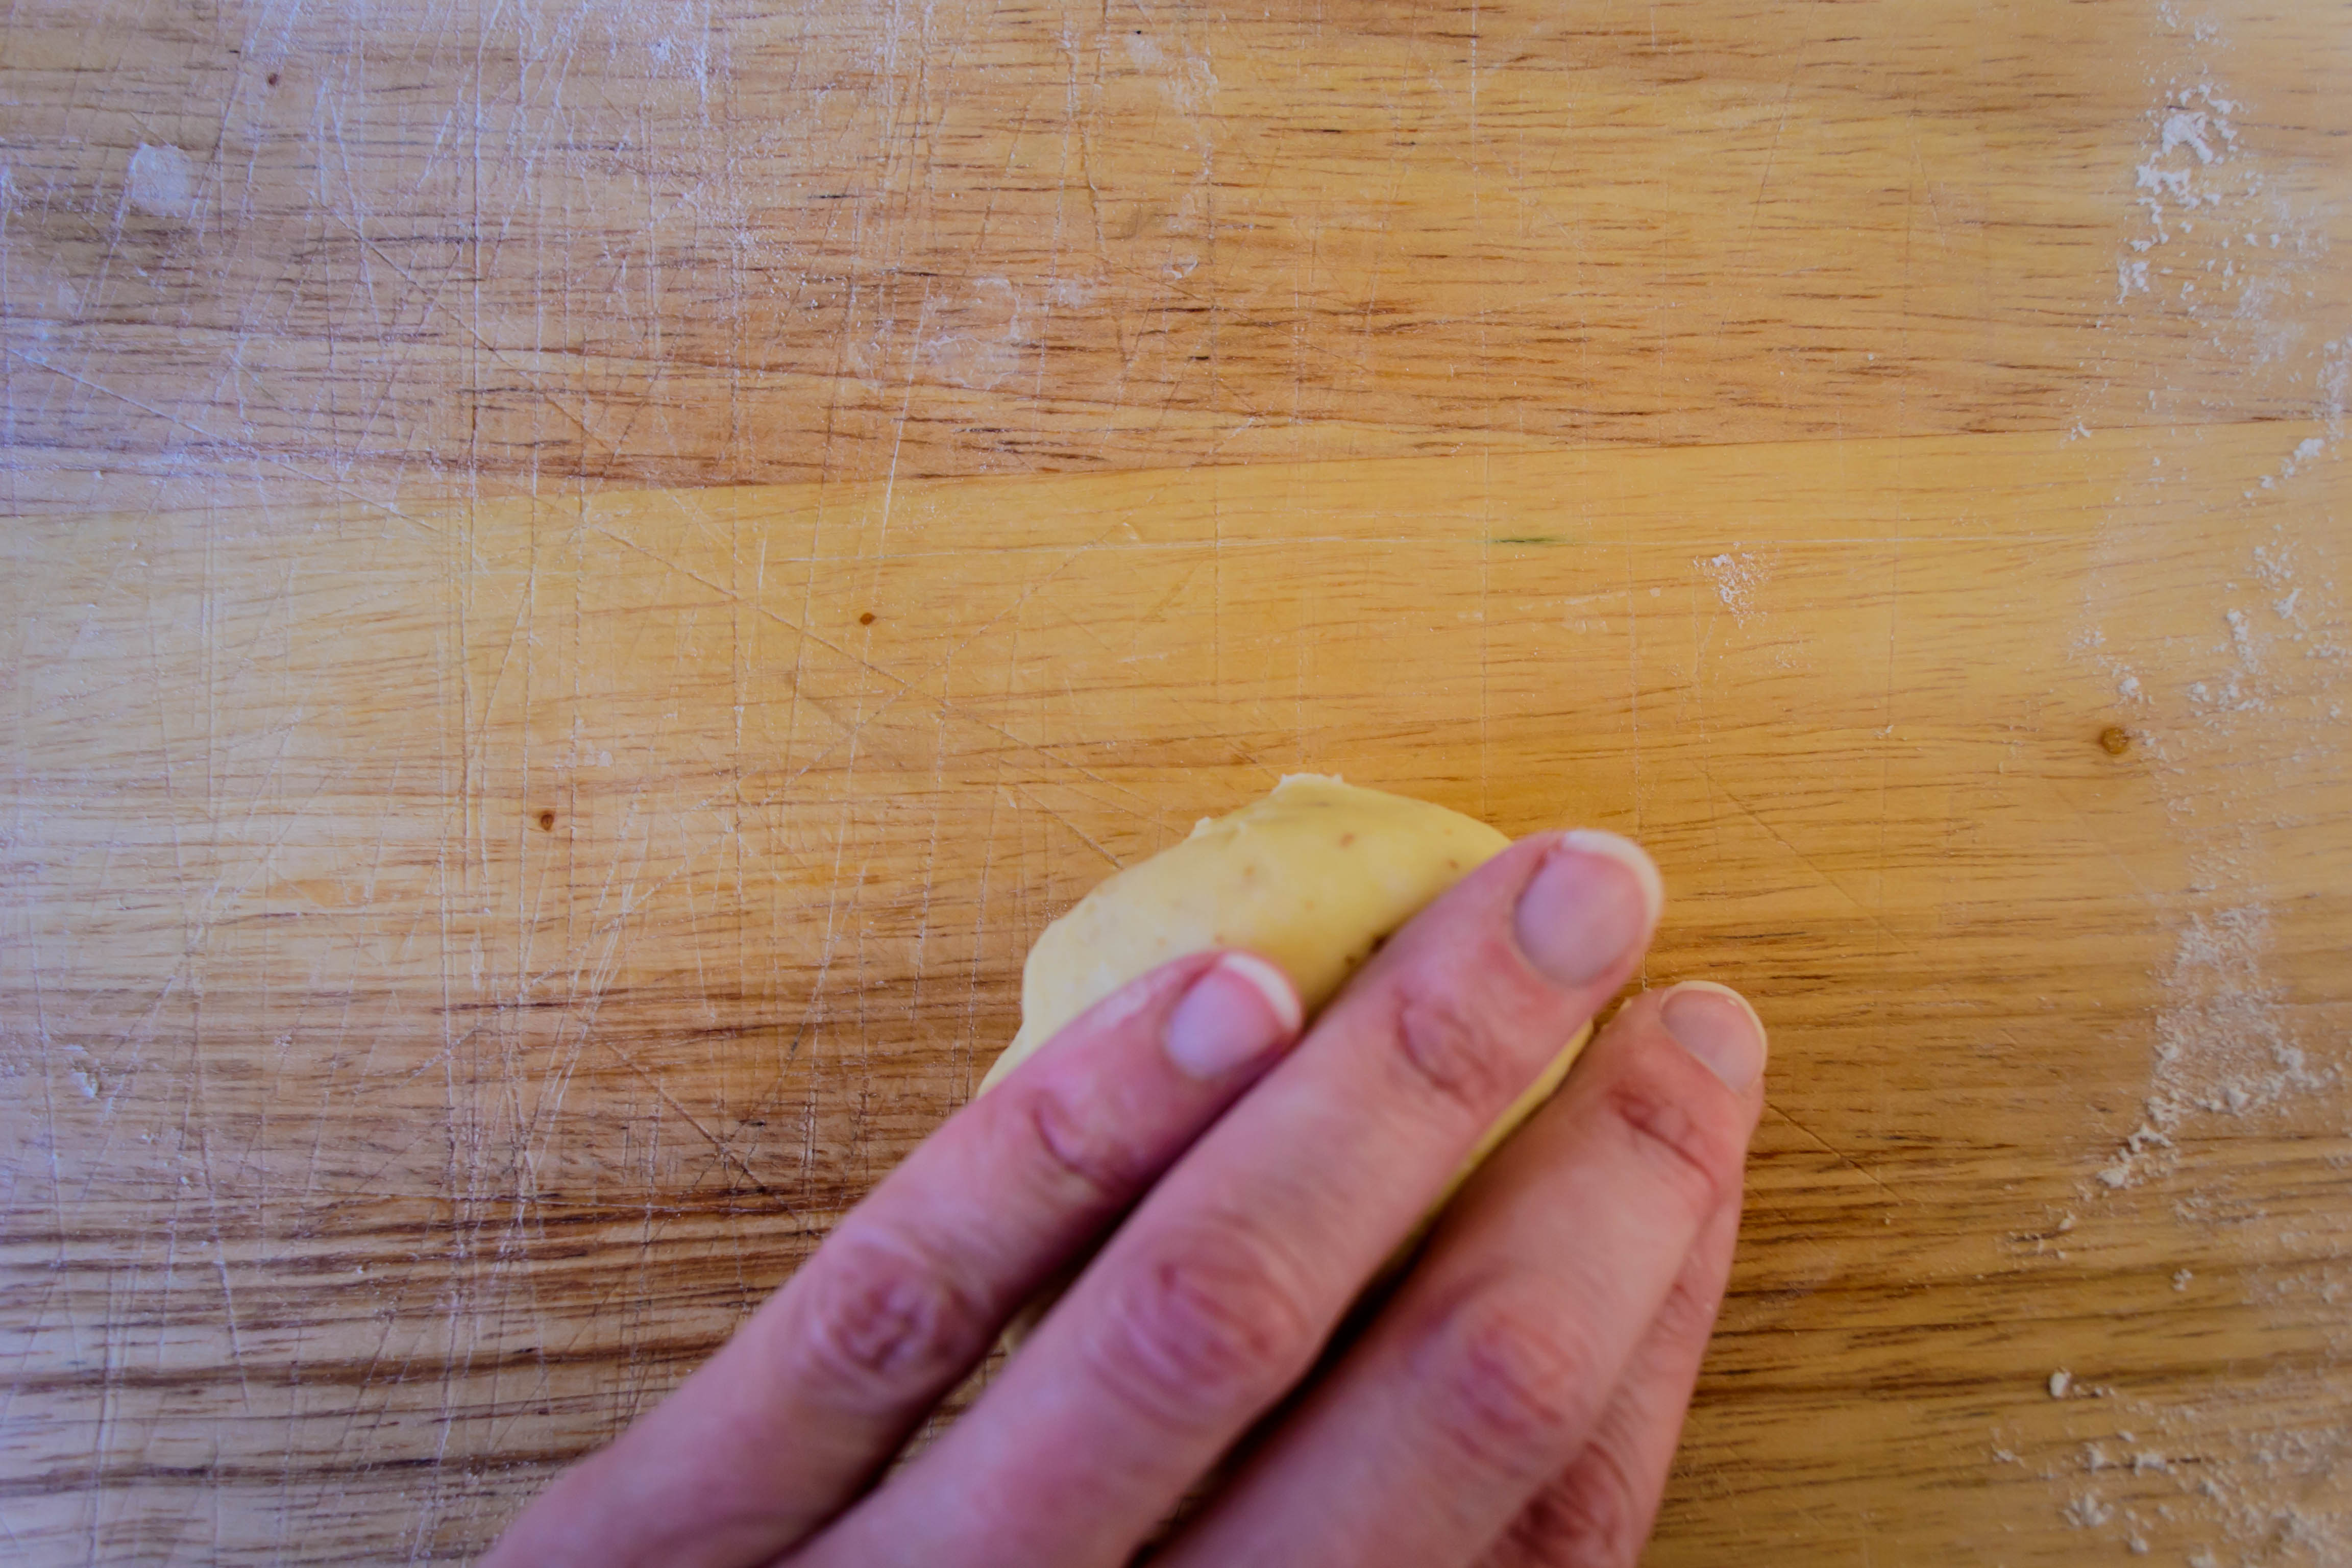
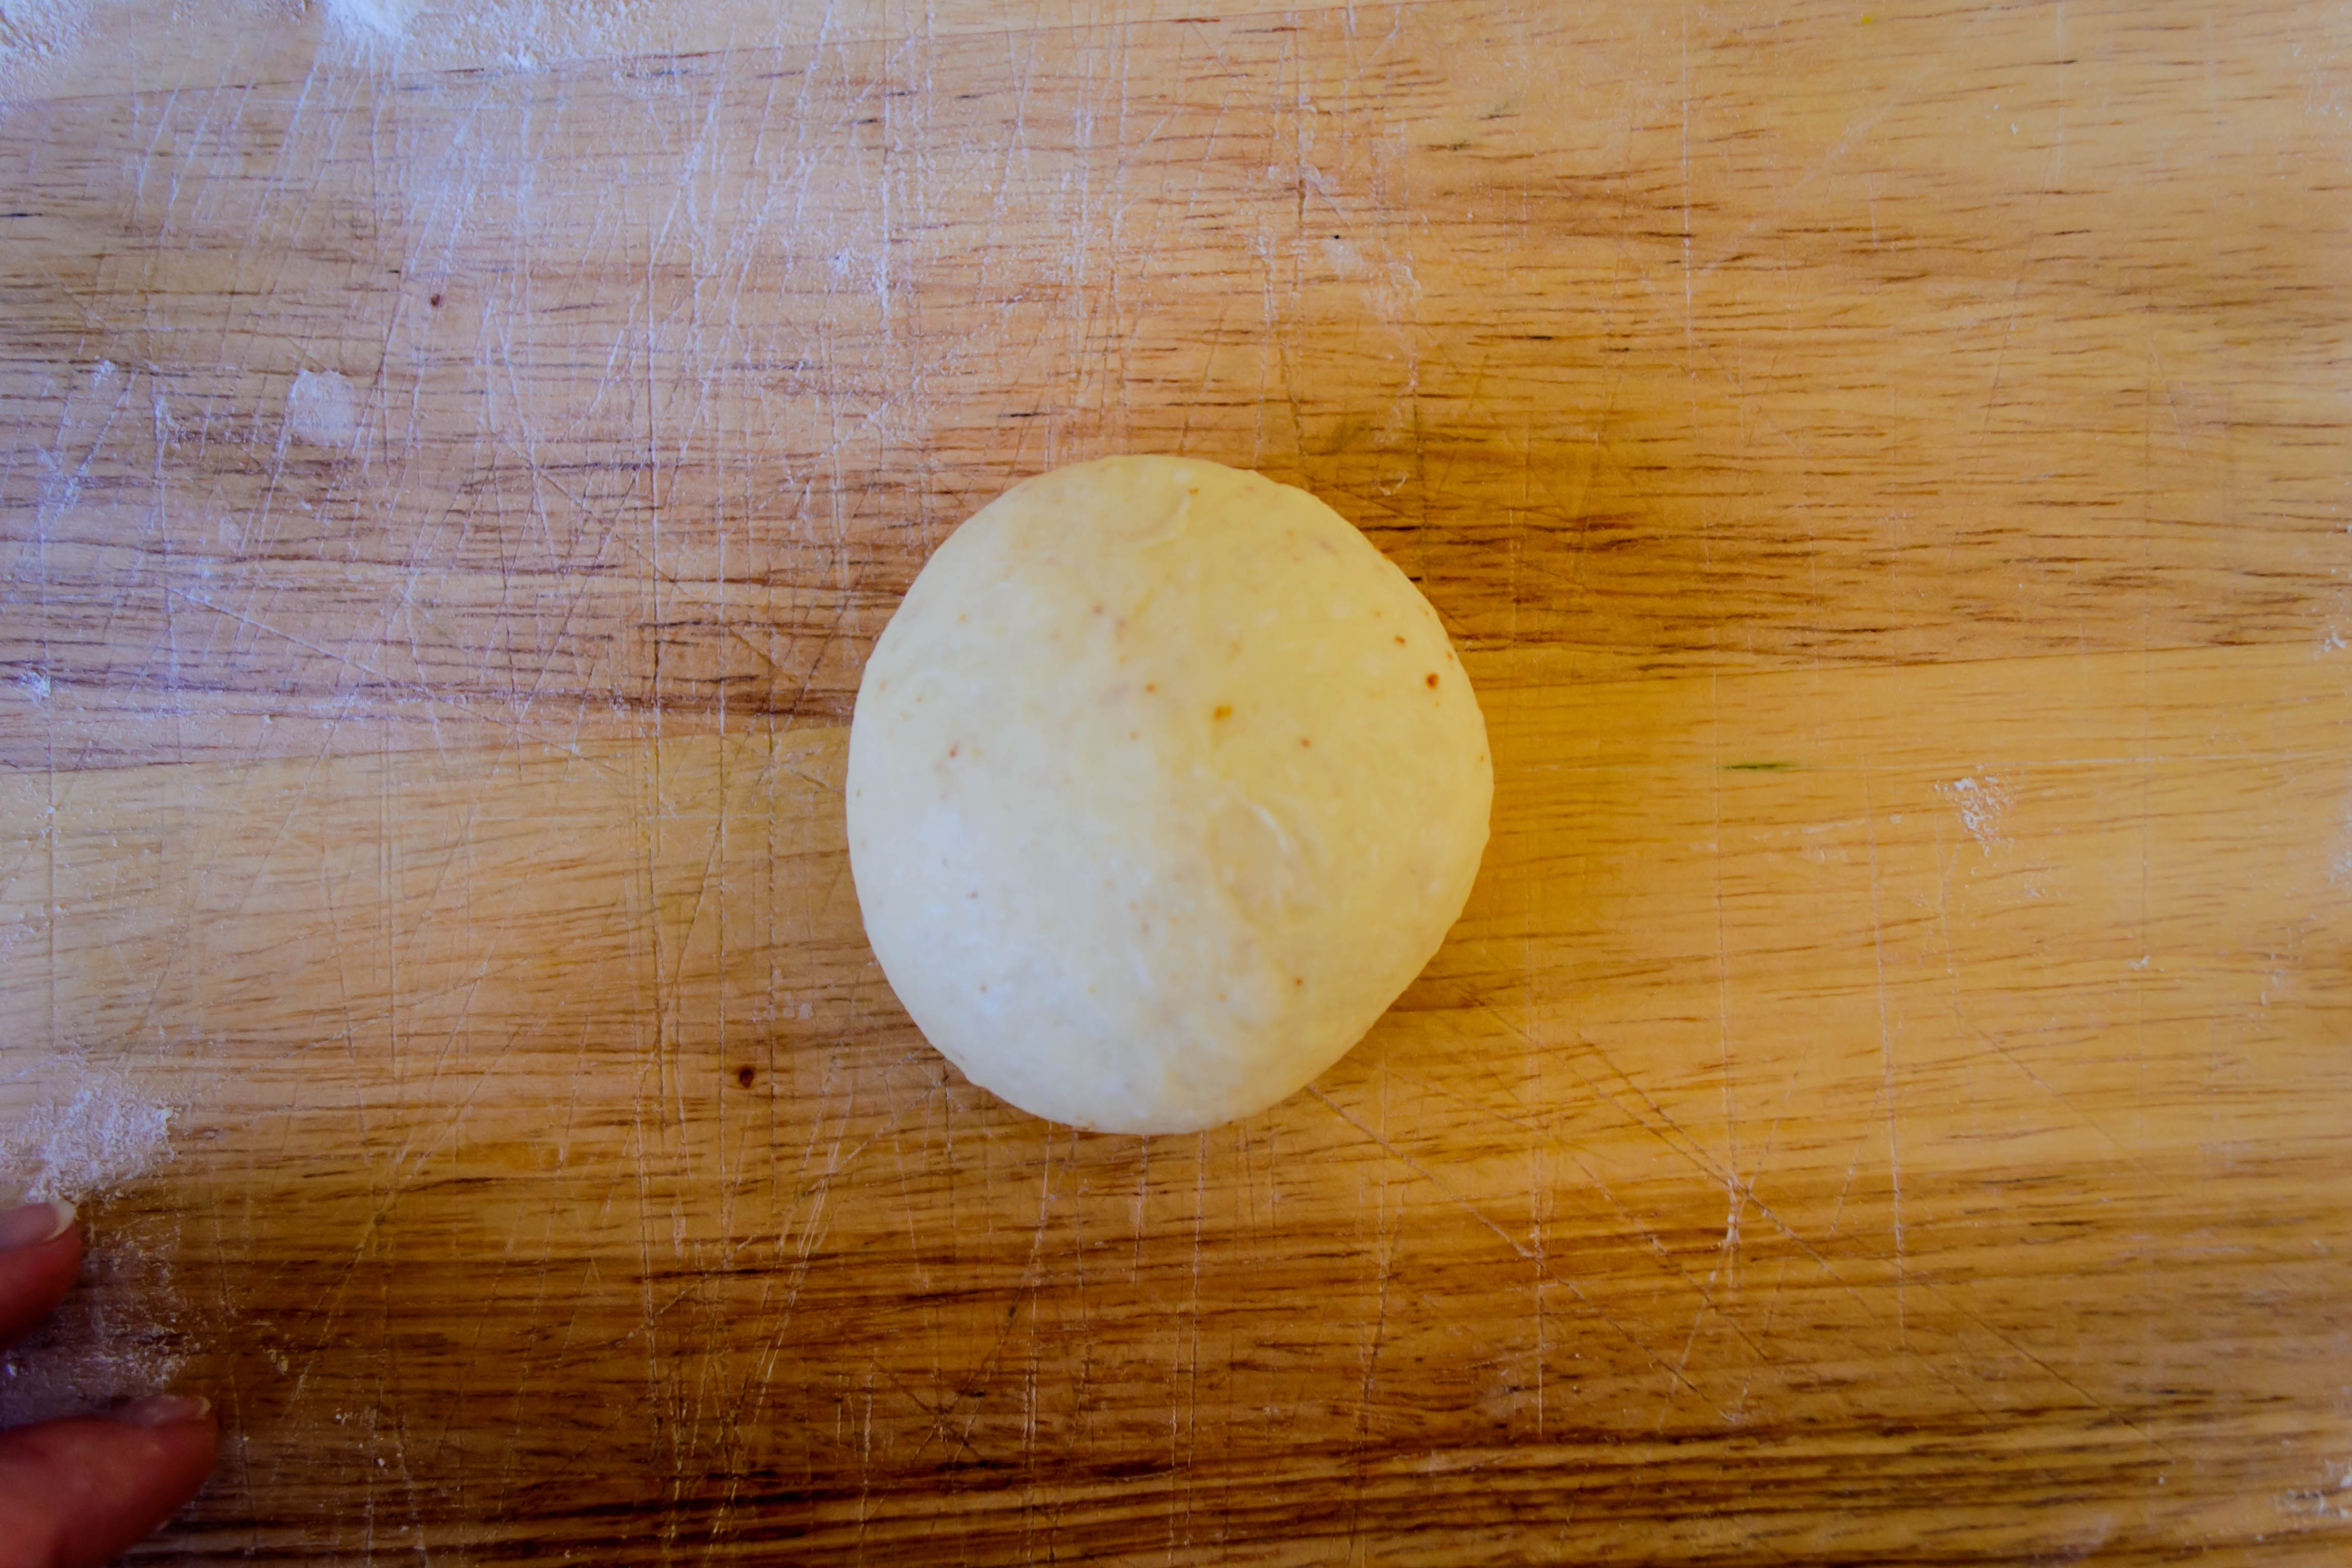
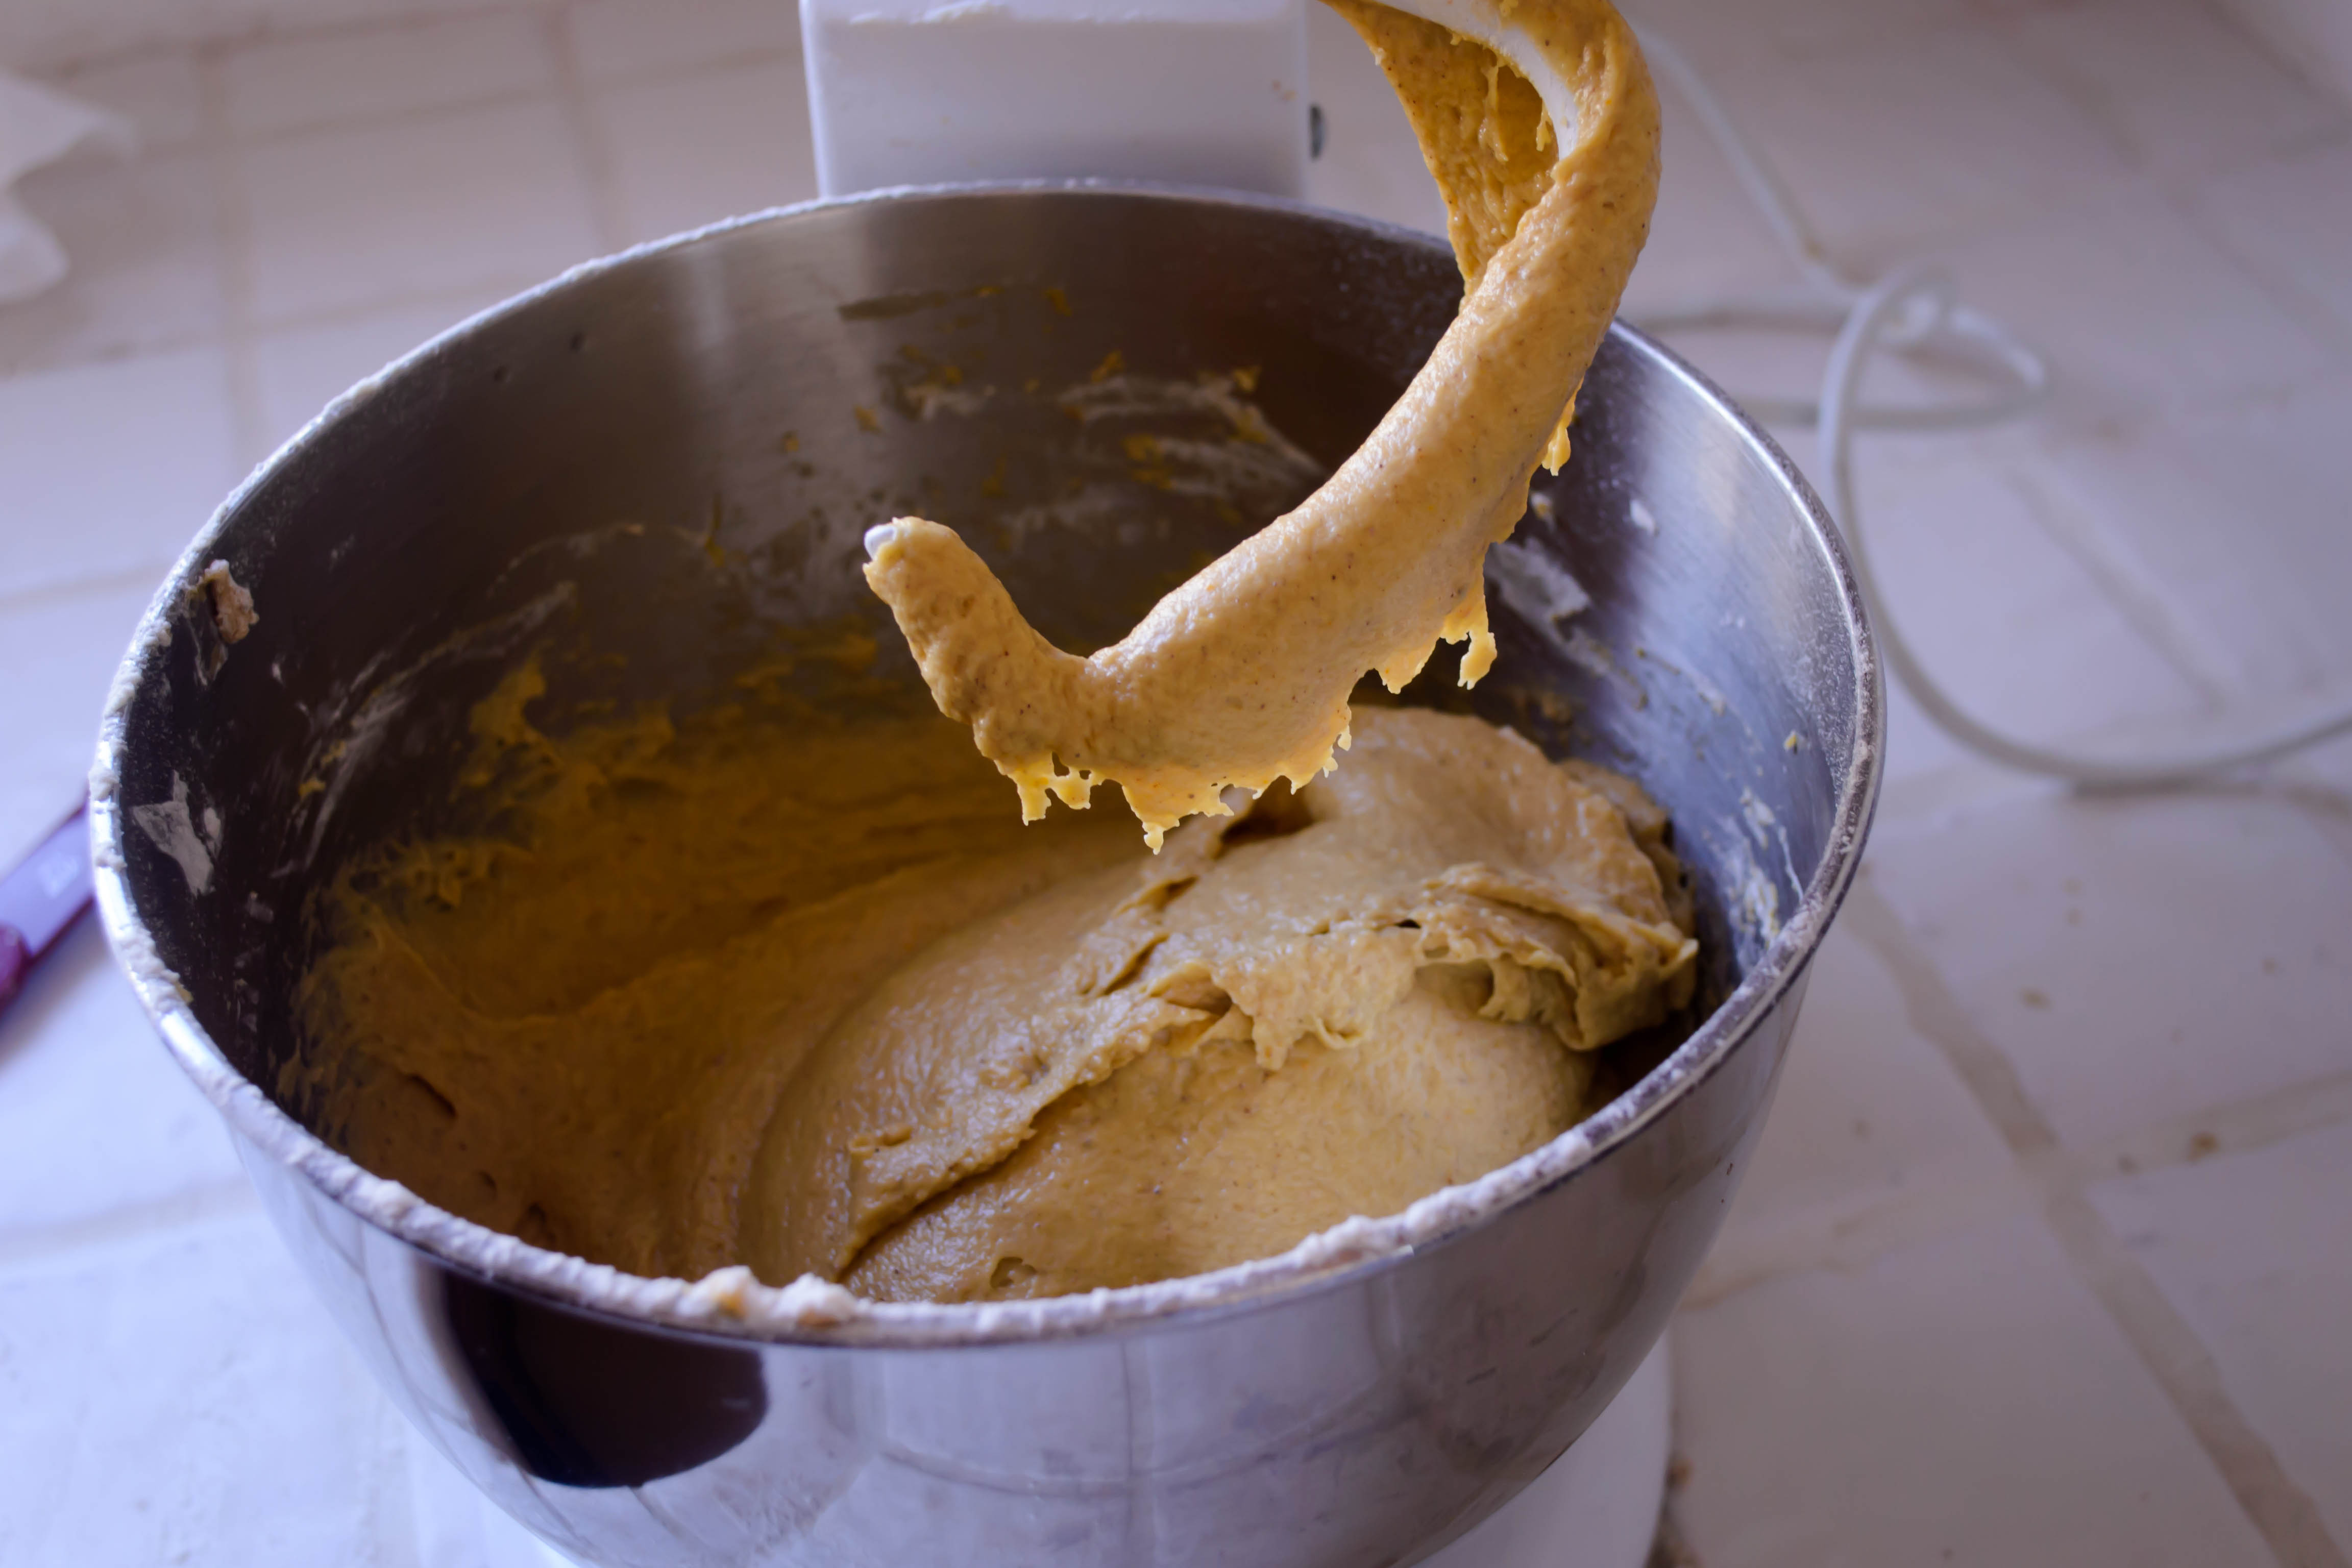
 When I looked around at recipes for points of comparison, I came back, as I often do, to Cooks Illustrated, which featured a practically fool-proof take on brioche. To combat the frequent problems associated with the quantity and temperature of the butter, recipe developer Andrew Janjigian opts for a no-knead approach, relying on a combination of gentle folding of the dough (see photo series above), and time, to stimulate gluten production. The very wet dough brioche requires works well for this method, because the moister the dough, the better the enzymes in there activate the gluten. Janjigian explains that this no-knead method leads to another benefit: since we aren’t kneading the dough, we can’t spend 20 minutes mixing in all the butter. Melting it and stirring it in all at once works just fine.
 As I read his explanation of the changes he’d made from the original and recognized the ease involved compared to the traditional procedure, I was almost sold. A small part of me protested that this might be cheating – that if I was really making something to represent the resolve to be more patient, I should go with the typical long knead, slow-and-steady incorporation of butter, and force myself to avoid shortcuts. But in reading the recipe again, I realized this was still going to be a long process. Even before chilling the dough overnight, I would need to perform a series of folds on the sticky, wet mass I’d created to help activate the gluten. Using large chunks of my Friday and Saturday to put this together, attend to timers, coordinate myself through the rising and proofing process, and get through the agonizing final two hours of waiting for the baked loaves to cool enough for slicing, was going to take plenty of patience. I’m only human, and it’s only January. If I’m going to be successful in this resolution, baby steps might be the way to go.


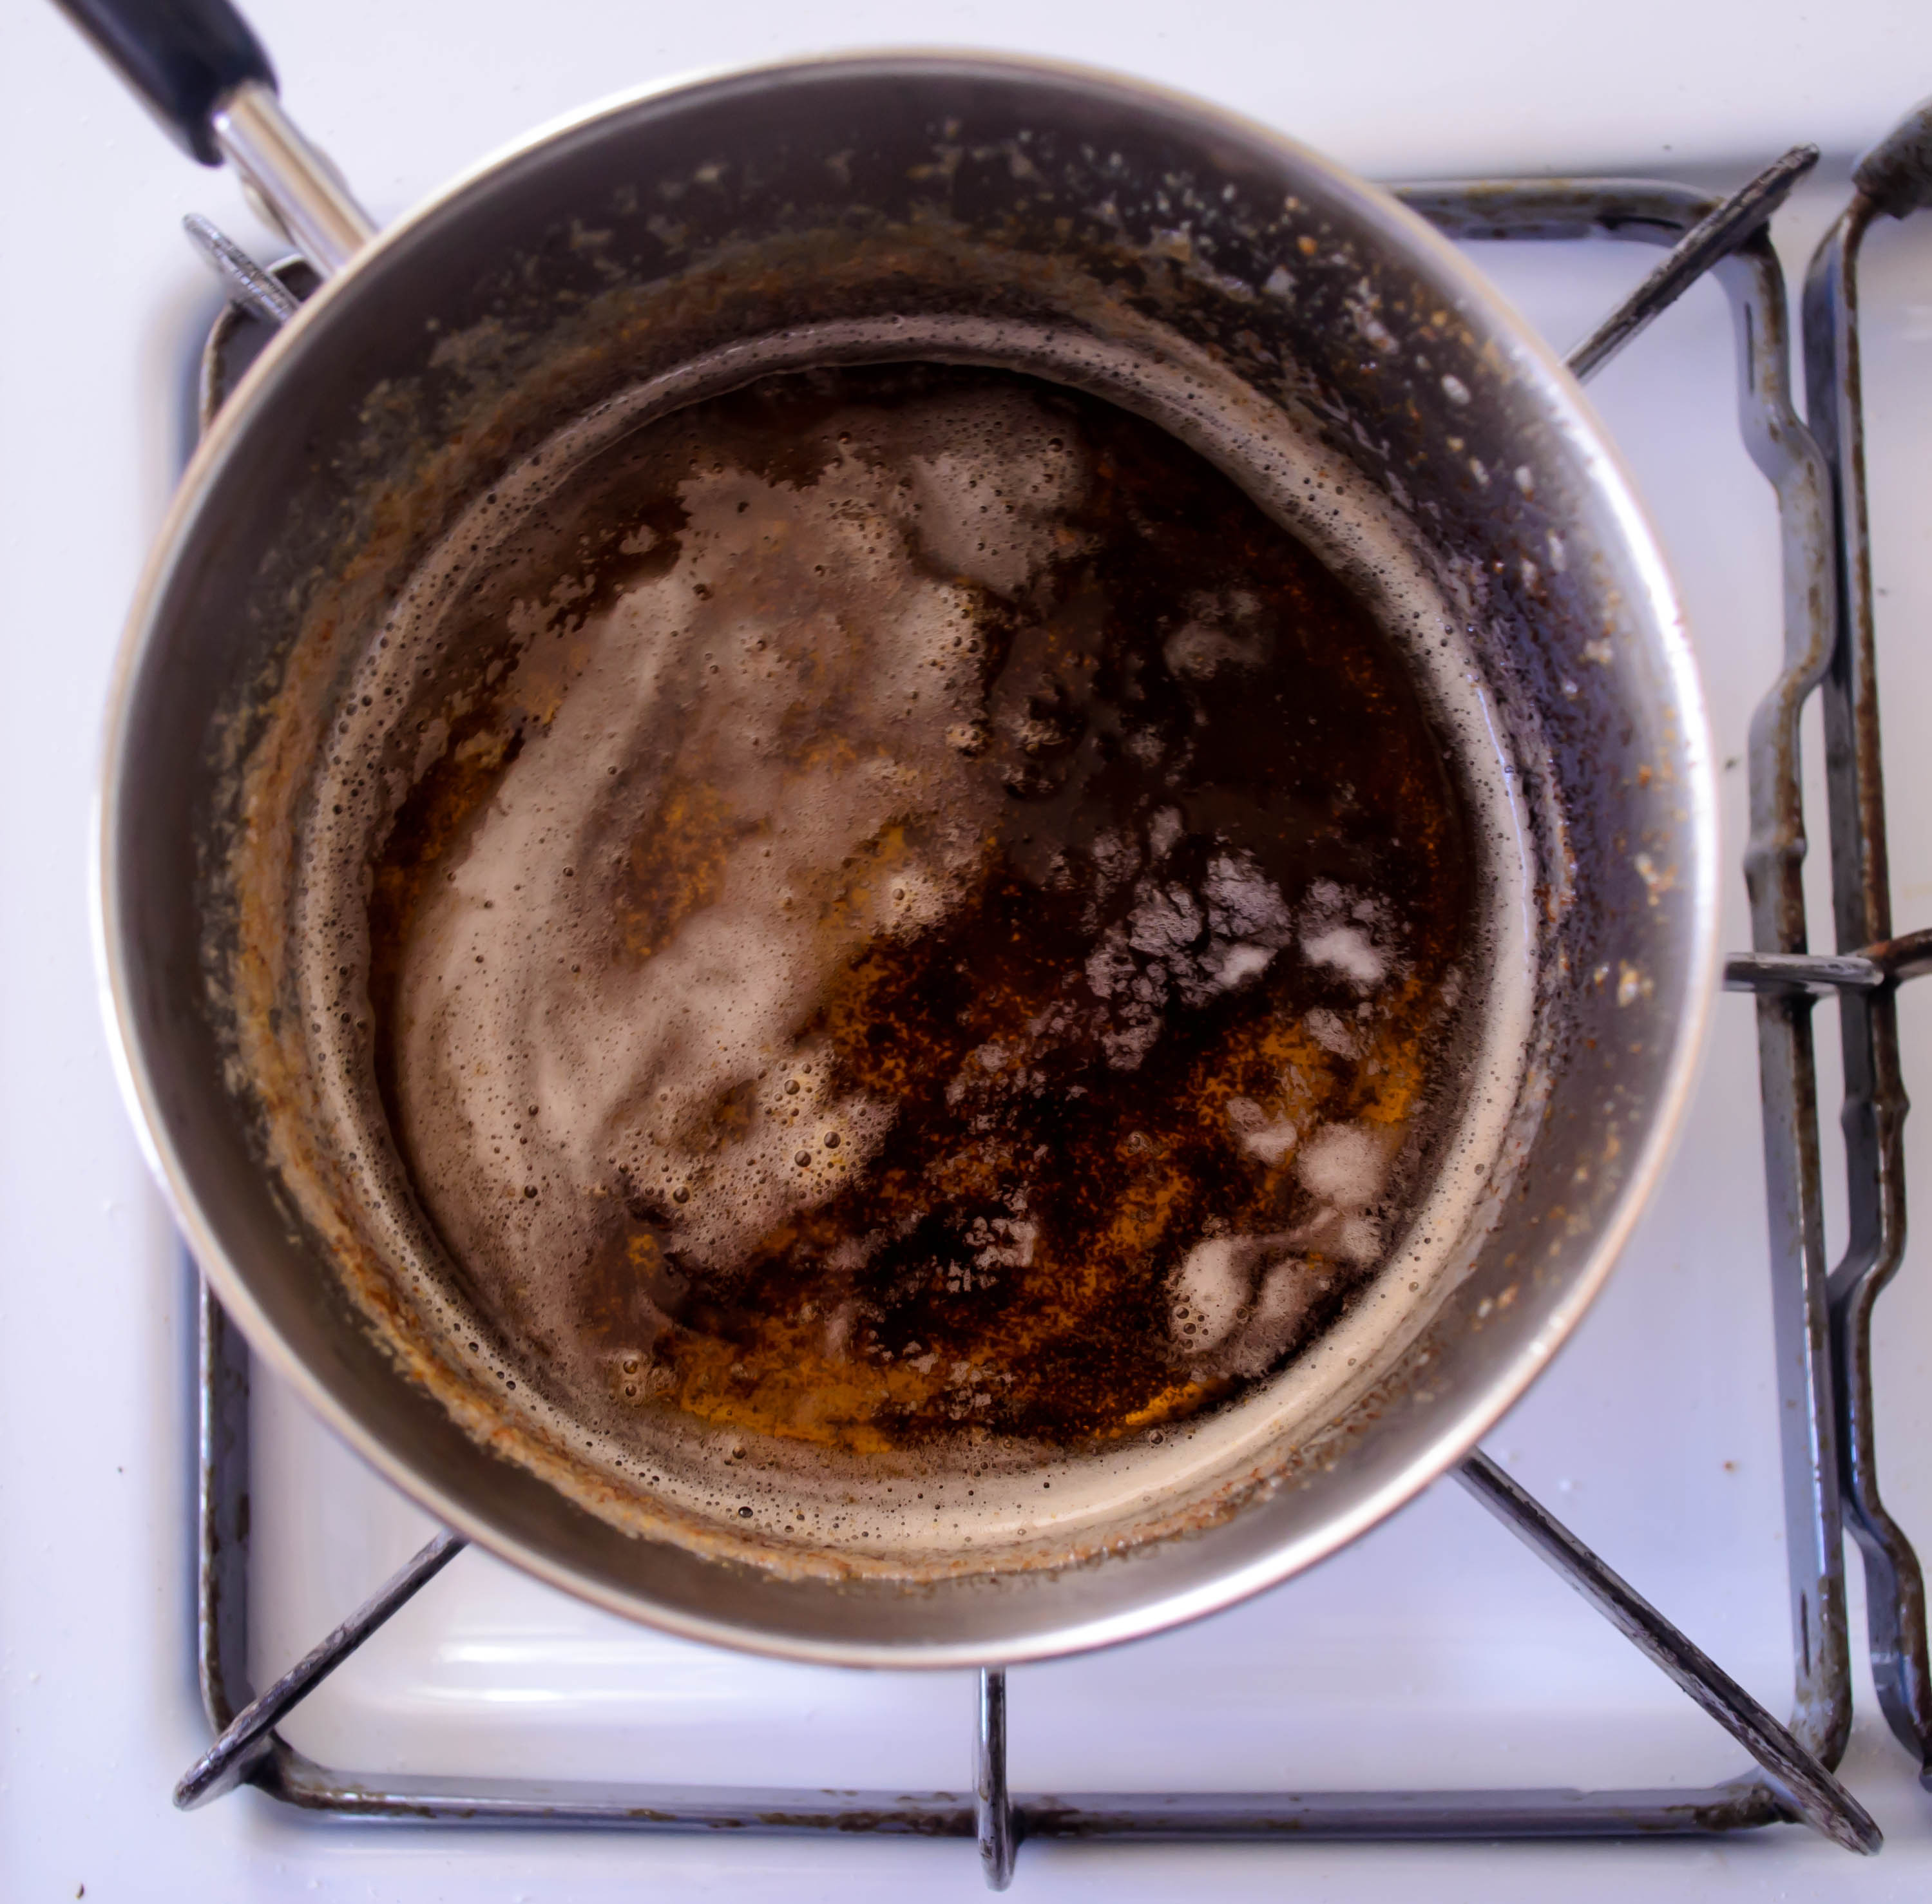
 The nail in the coffin, though, was when I checked Joe Pastry’s version of brioche. He suggests pumping up the flavor by using brown butter. Since I was already going to be melting the butter, this was clearly the right thing to do. Tiny speckles of toasted nuttiness running through my dough? Yes, thanks. Now, please.


 Well, not now. Two long, patient days from now. But at the conclusion of those days, slicing through a softly shattering crust into a pillowy yellow interior laced with bits of brown butter, it was all I could do to eat each slice in more than one bite. Because, you know, patience.

 Serving suggestions: there’s not much you shouldn’t do with brioche. It can be a bit soft for a sandwich, but makes glorious toast and french toast. My recipe is for one regular loaf and 8 small or 6 large buns, and we used the bun shape for veggie burgers. Because they are more compact, the buns hold up to rough handling a bit better than the slices, so feel free to load them with pulled pork, or crab cakes, or egg salad, or whatever moves your taste buds most deeply.

 The time of peace is coming. I can feel it. I need it. This is week 14 of a 16 week semester, and though I had a brief respite from grading this weekend, this week papers begin pouring in again. And this is not to say that my weekend wasn’t busy. It was crammed, jammed, packed, precariously scheduled. It was just busy with other things. But I felt, for just a moment, the peace I’m craving. I caught myself, about five minutes into dusting the living room, enjoying it.
I’ll wait while that sinks in.
I was enjoying. dusting.

 Before you think me a complete freak, let me say this is a highly irregular occurrence. I don’t enjoy dusting. In fact, within ten minutes of noticing this odd feeling of pleasure, I was tired of the activity again. But for those few minutes, there was something so calming, so reassuring, so soft and easy about running a cloth over the bookshelves and the side table and the TV stand. It was a moment that was easy to escape from. It was mentally effortless. I thought, “I need this.” I need this peace, this feeling of being brainless with no guilt.

 Fortunately, this time is approaching like a freight train (it would be nicer if it were approaching like fog, or frosting, or some other delicate F word, but we must be honest…). The commercials I try not to pay attention to when I watch television loudly broadcast how many shopping days are left until Christmas. Within my family, texts about gifts have started flying. I may or may not already know exactly what I’m wearing for my family’s Christmas dinner.


 But that’s getting ahead of things. That’s the full stop. We do get a funny little moment of pause first, which is what the dusting was for. My parents arrive on Wednesday to celebrate Thanksgiving. It will be the first year my sister doesn’t join us. This is, when I think about it, a stab of selfish sadness. But that only lasts a moment, because instead of winging her way all the way across the country to be with us for one short weekend, she’ll be with her partner and her dog, with his family. This is a joyful thing. She sent me a photo of a batch of pumpkin bread cake pops she made to take along. She said something about “impressing purposes.” She won’t need cake pops to do that.

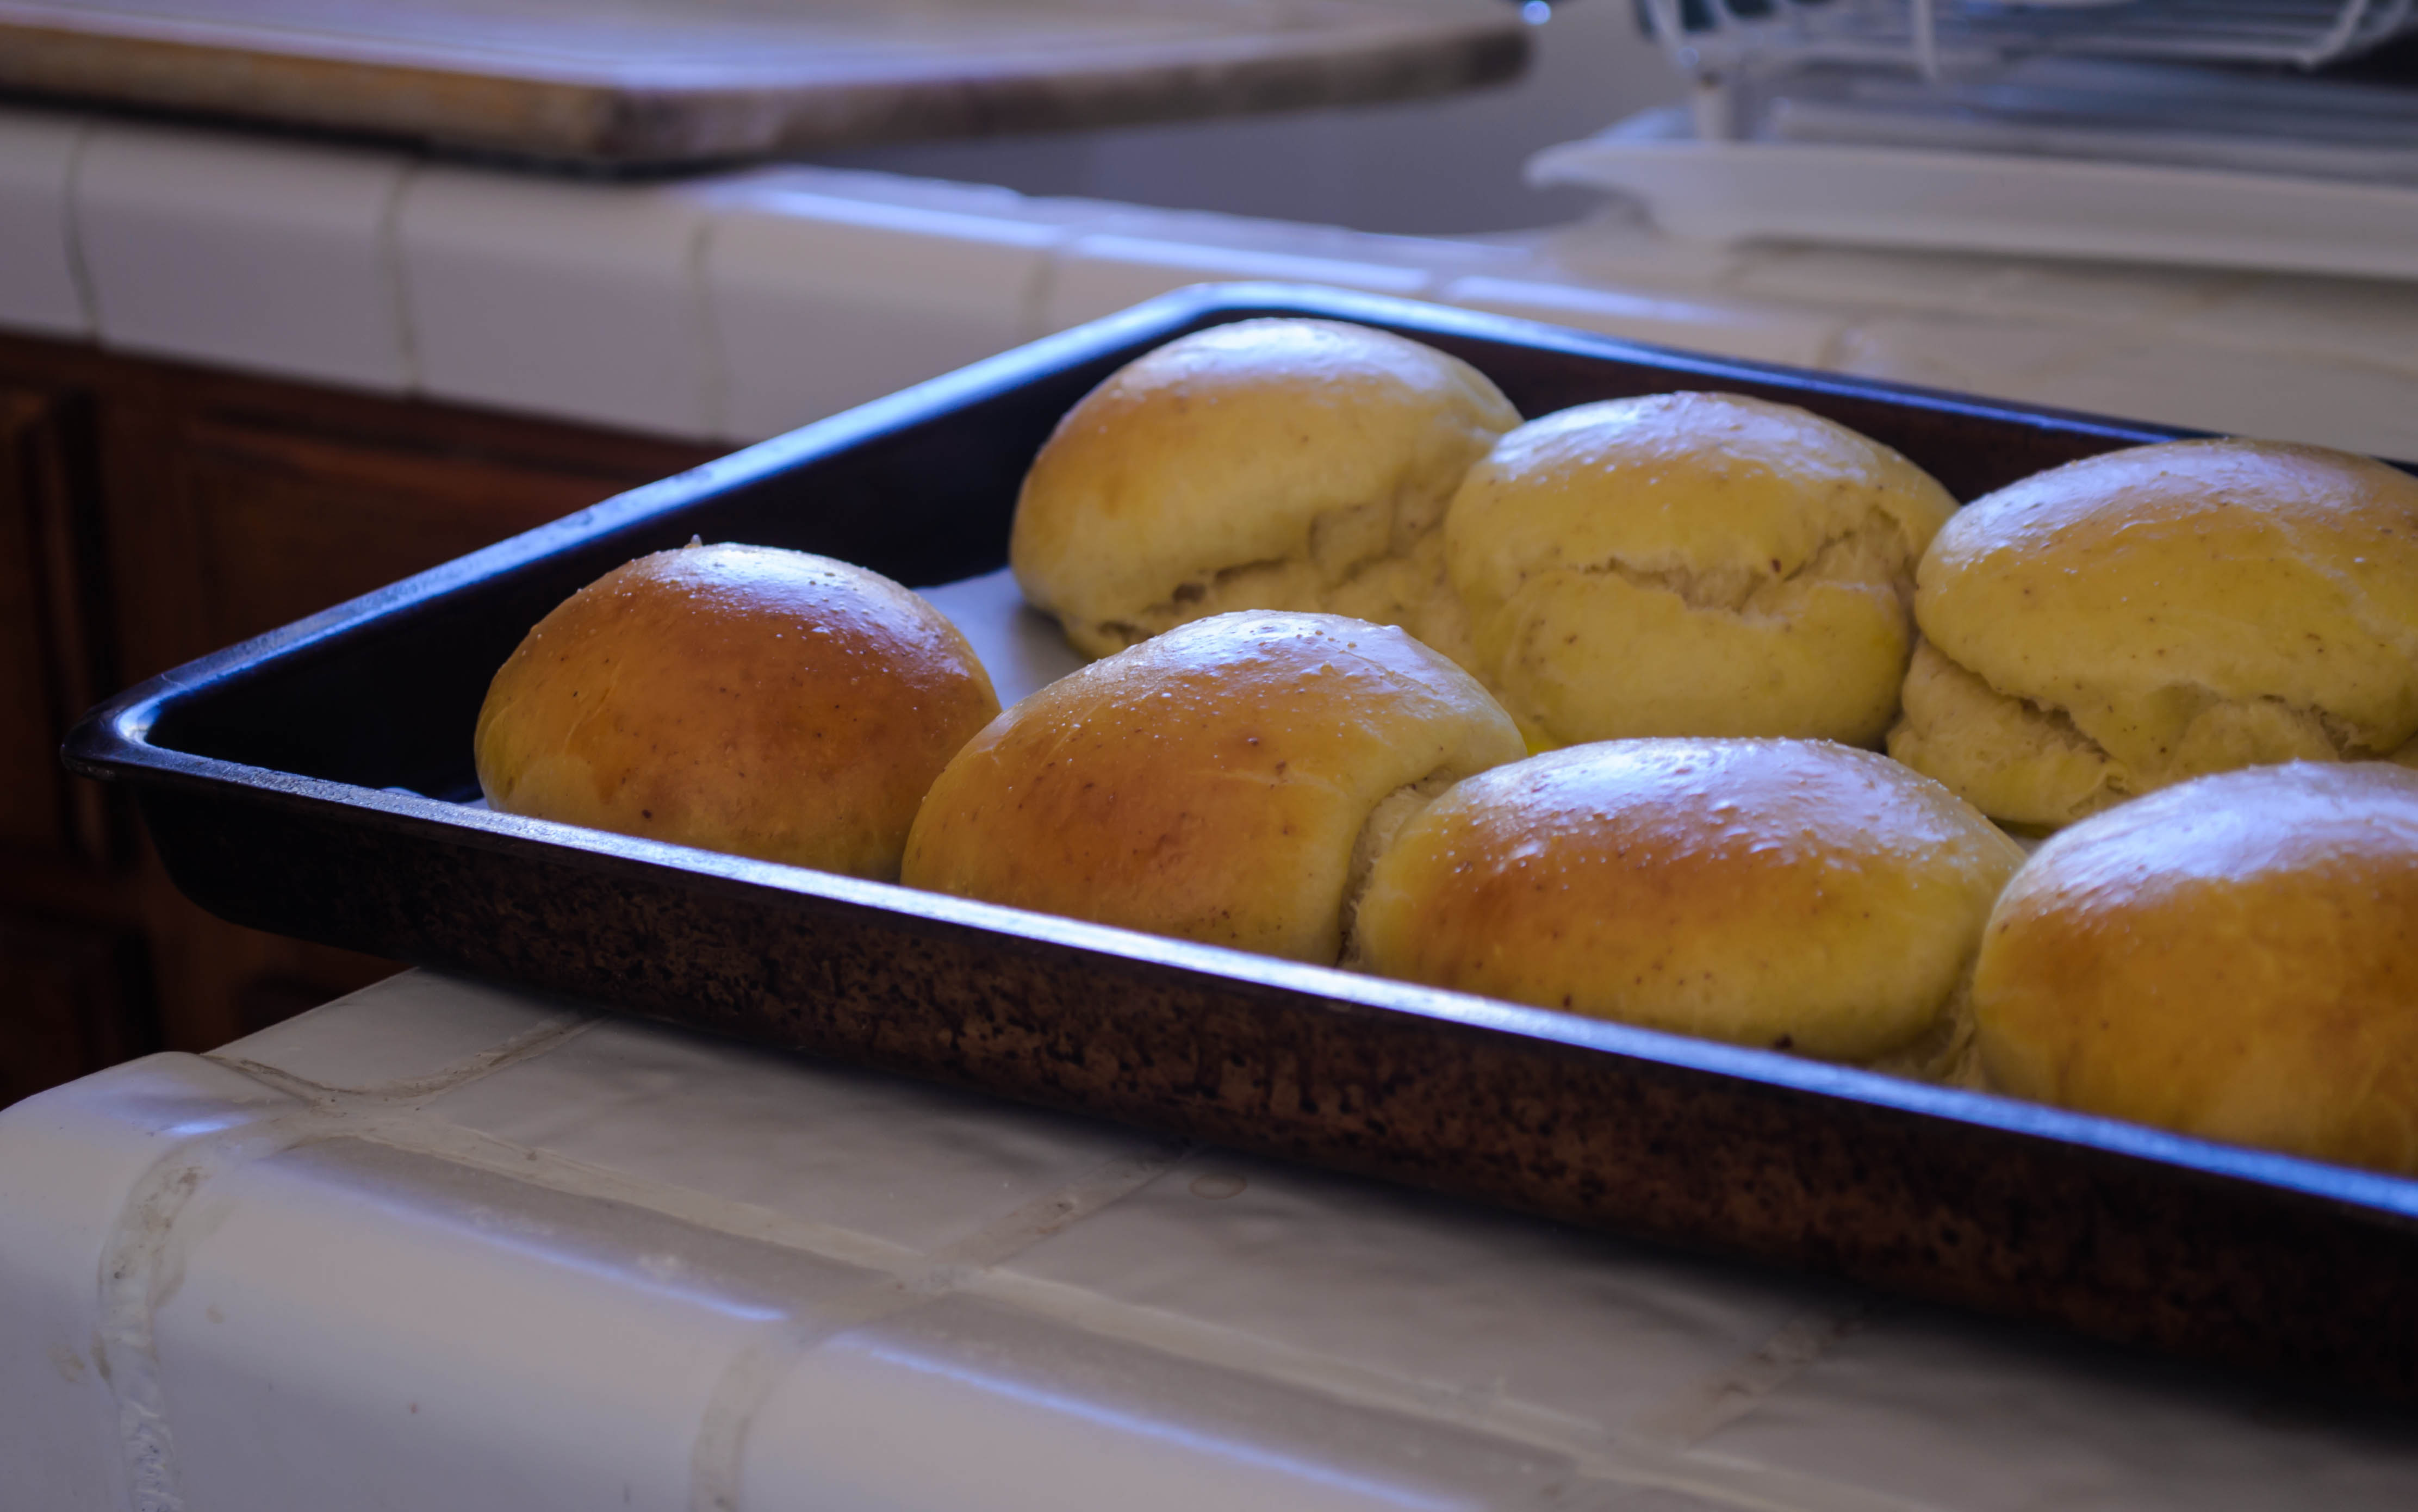
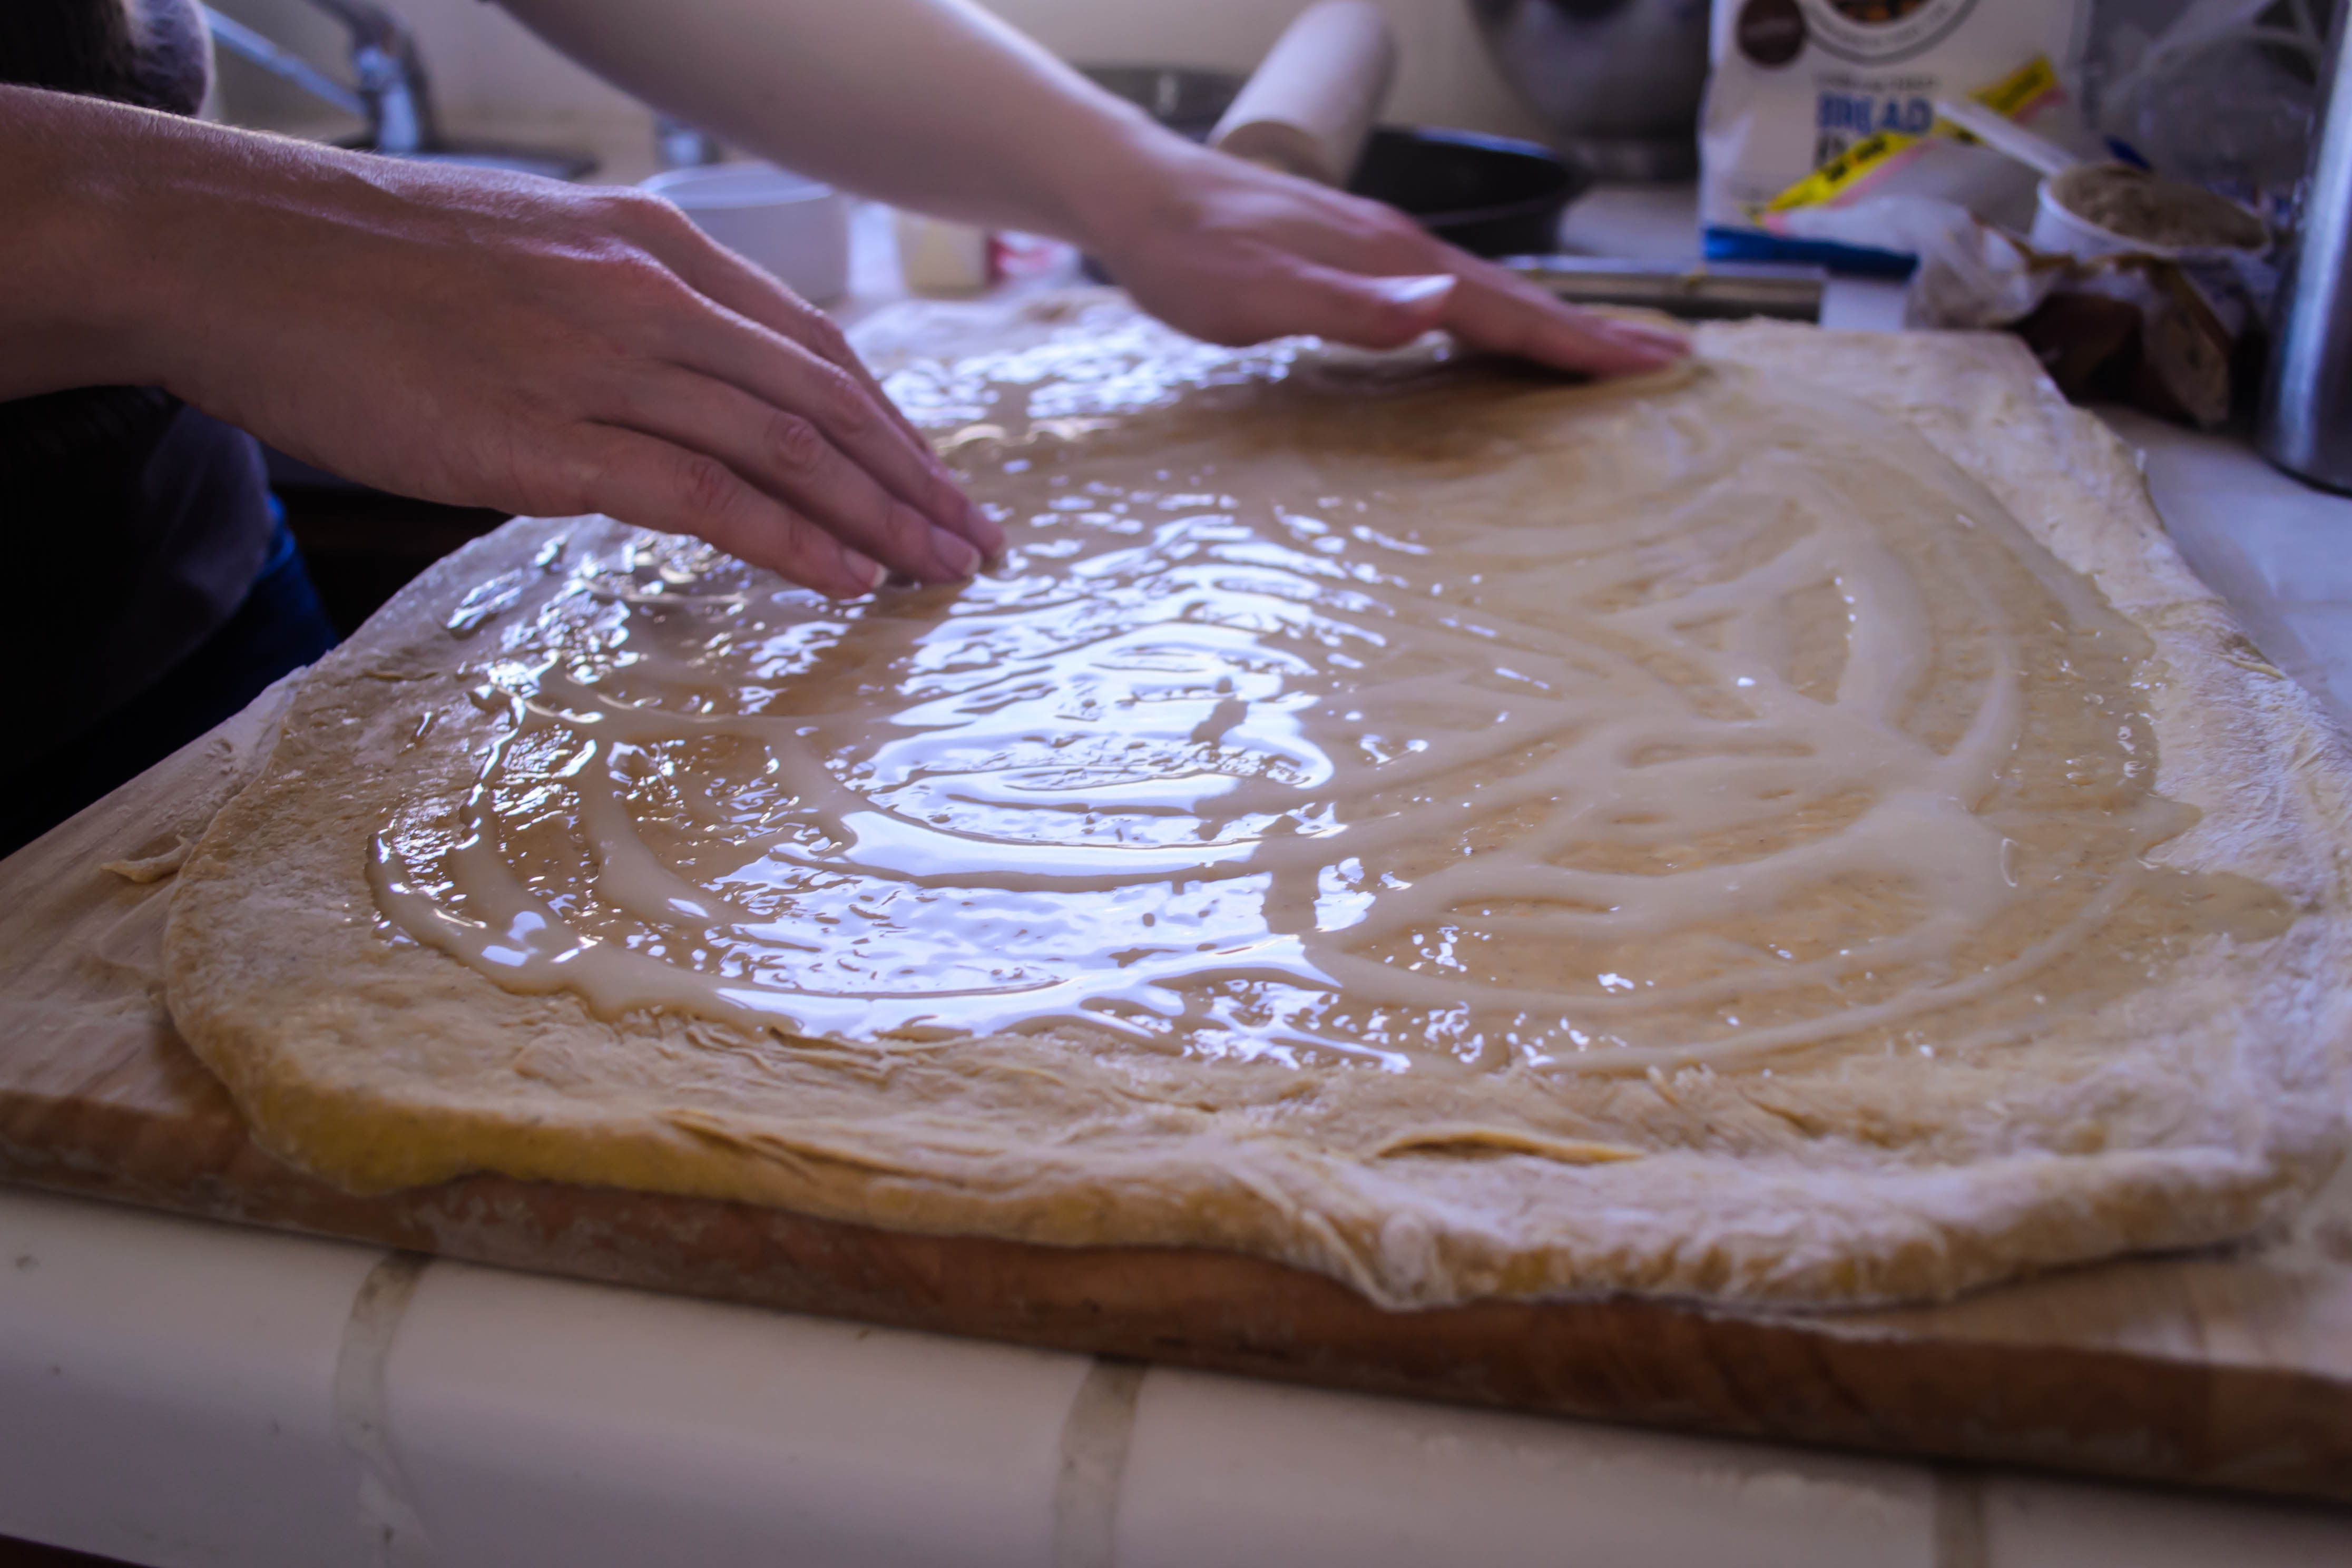
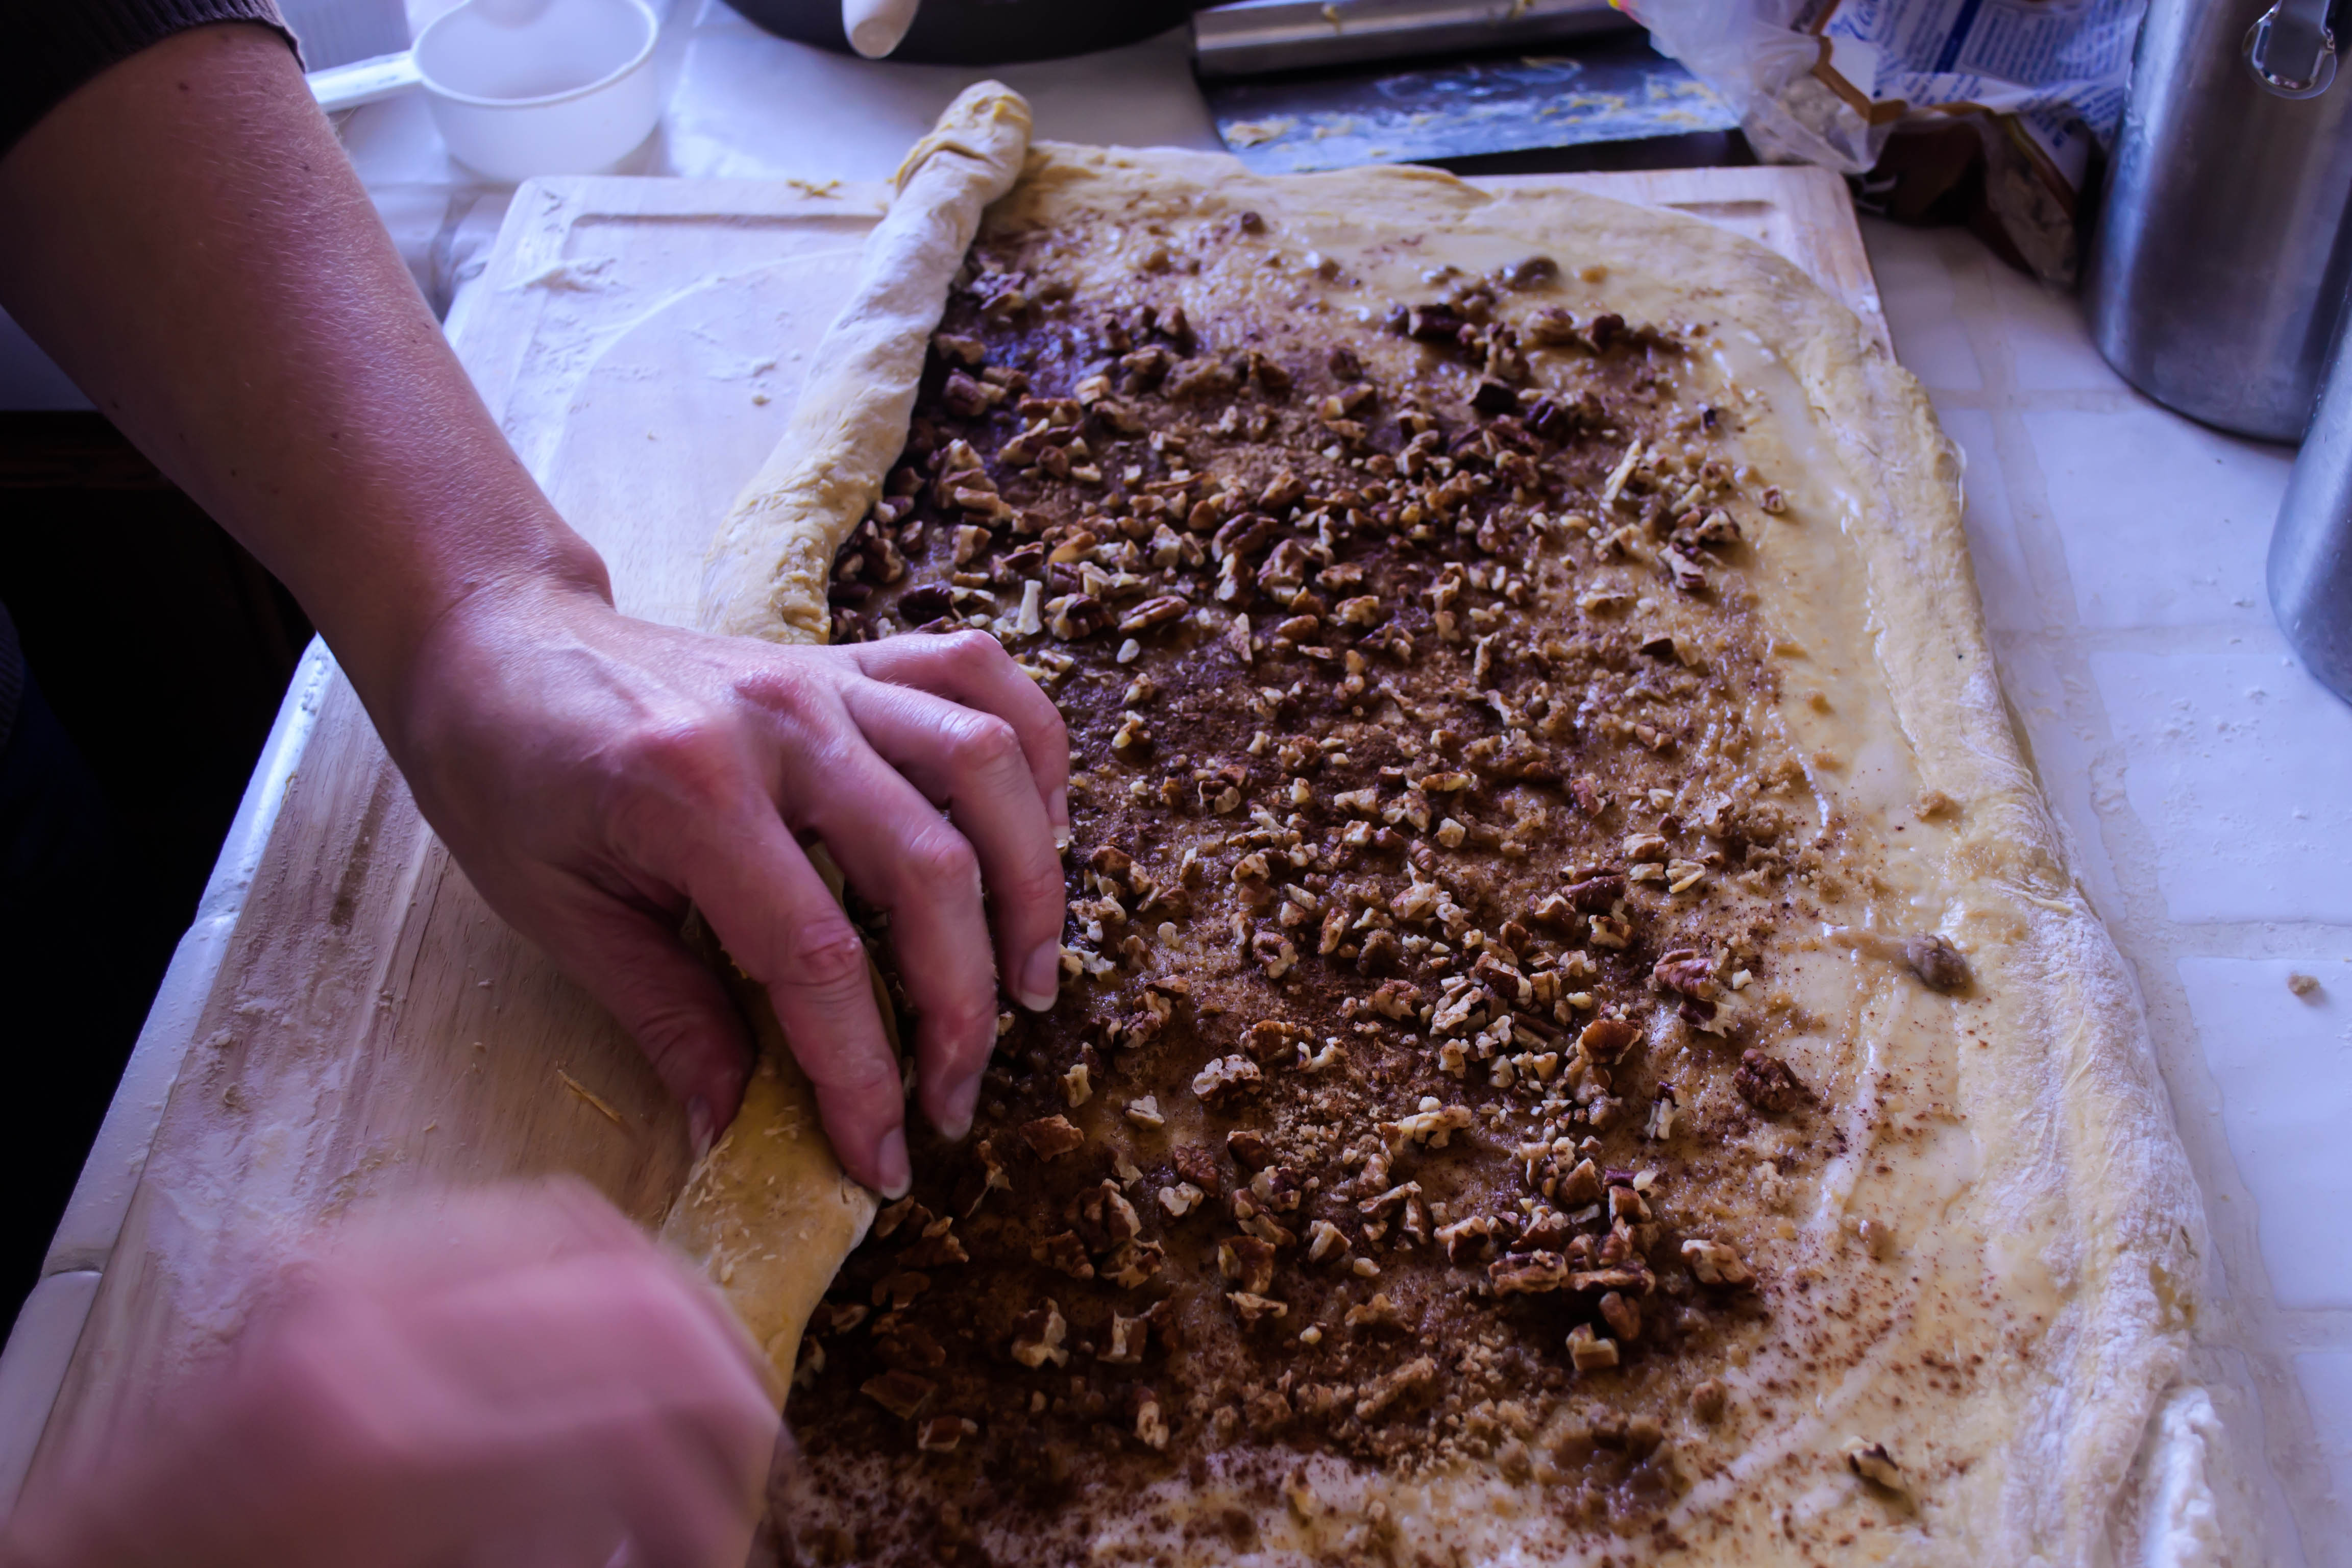 It does seem like pumpkin is the thing to do these days. I was unsurprised that this month’s Twelve Loaves project calls for that most celebrated of squashes. I typically try to imagine something no one else will have made for the Twelve Loaves challenge, but this month I decided to loosen up. The fact was, I wanted pumpkin sweet rolls. So no matter how many other people chose this too (two so far), I was making them. Originality be damned. Sometimes you just have to make what you’re craving.
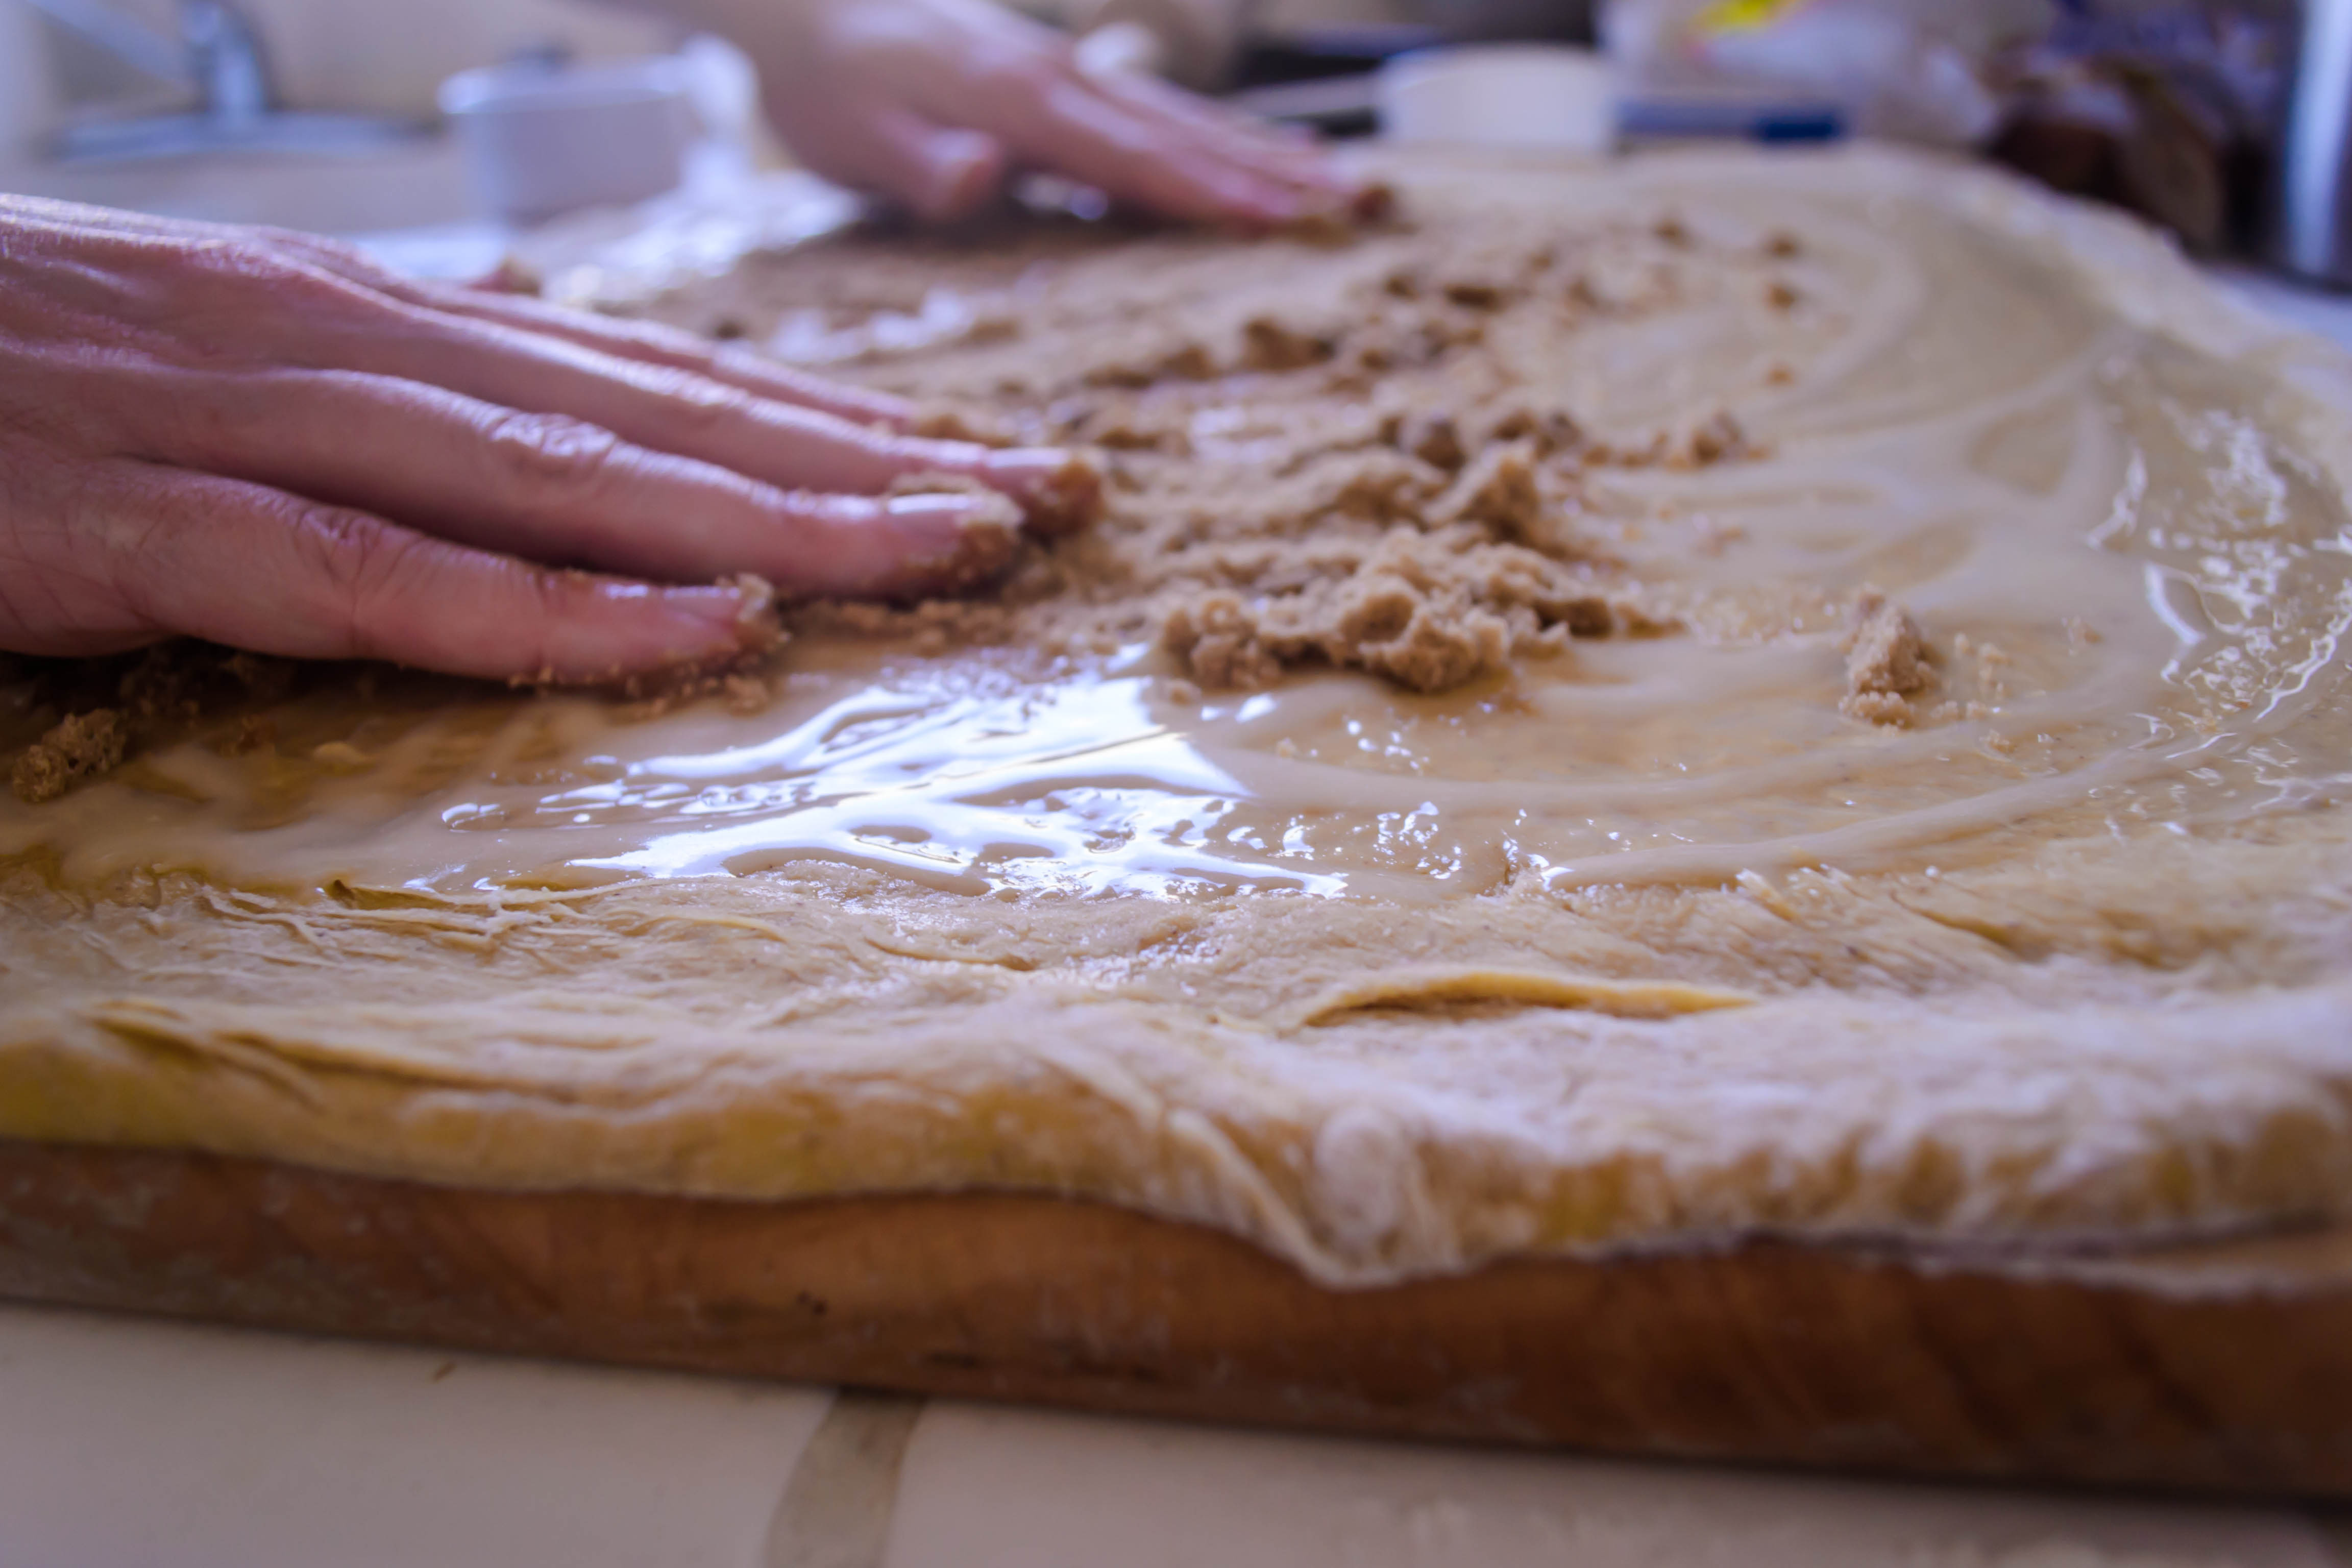
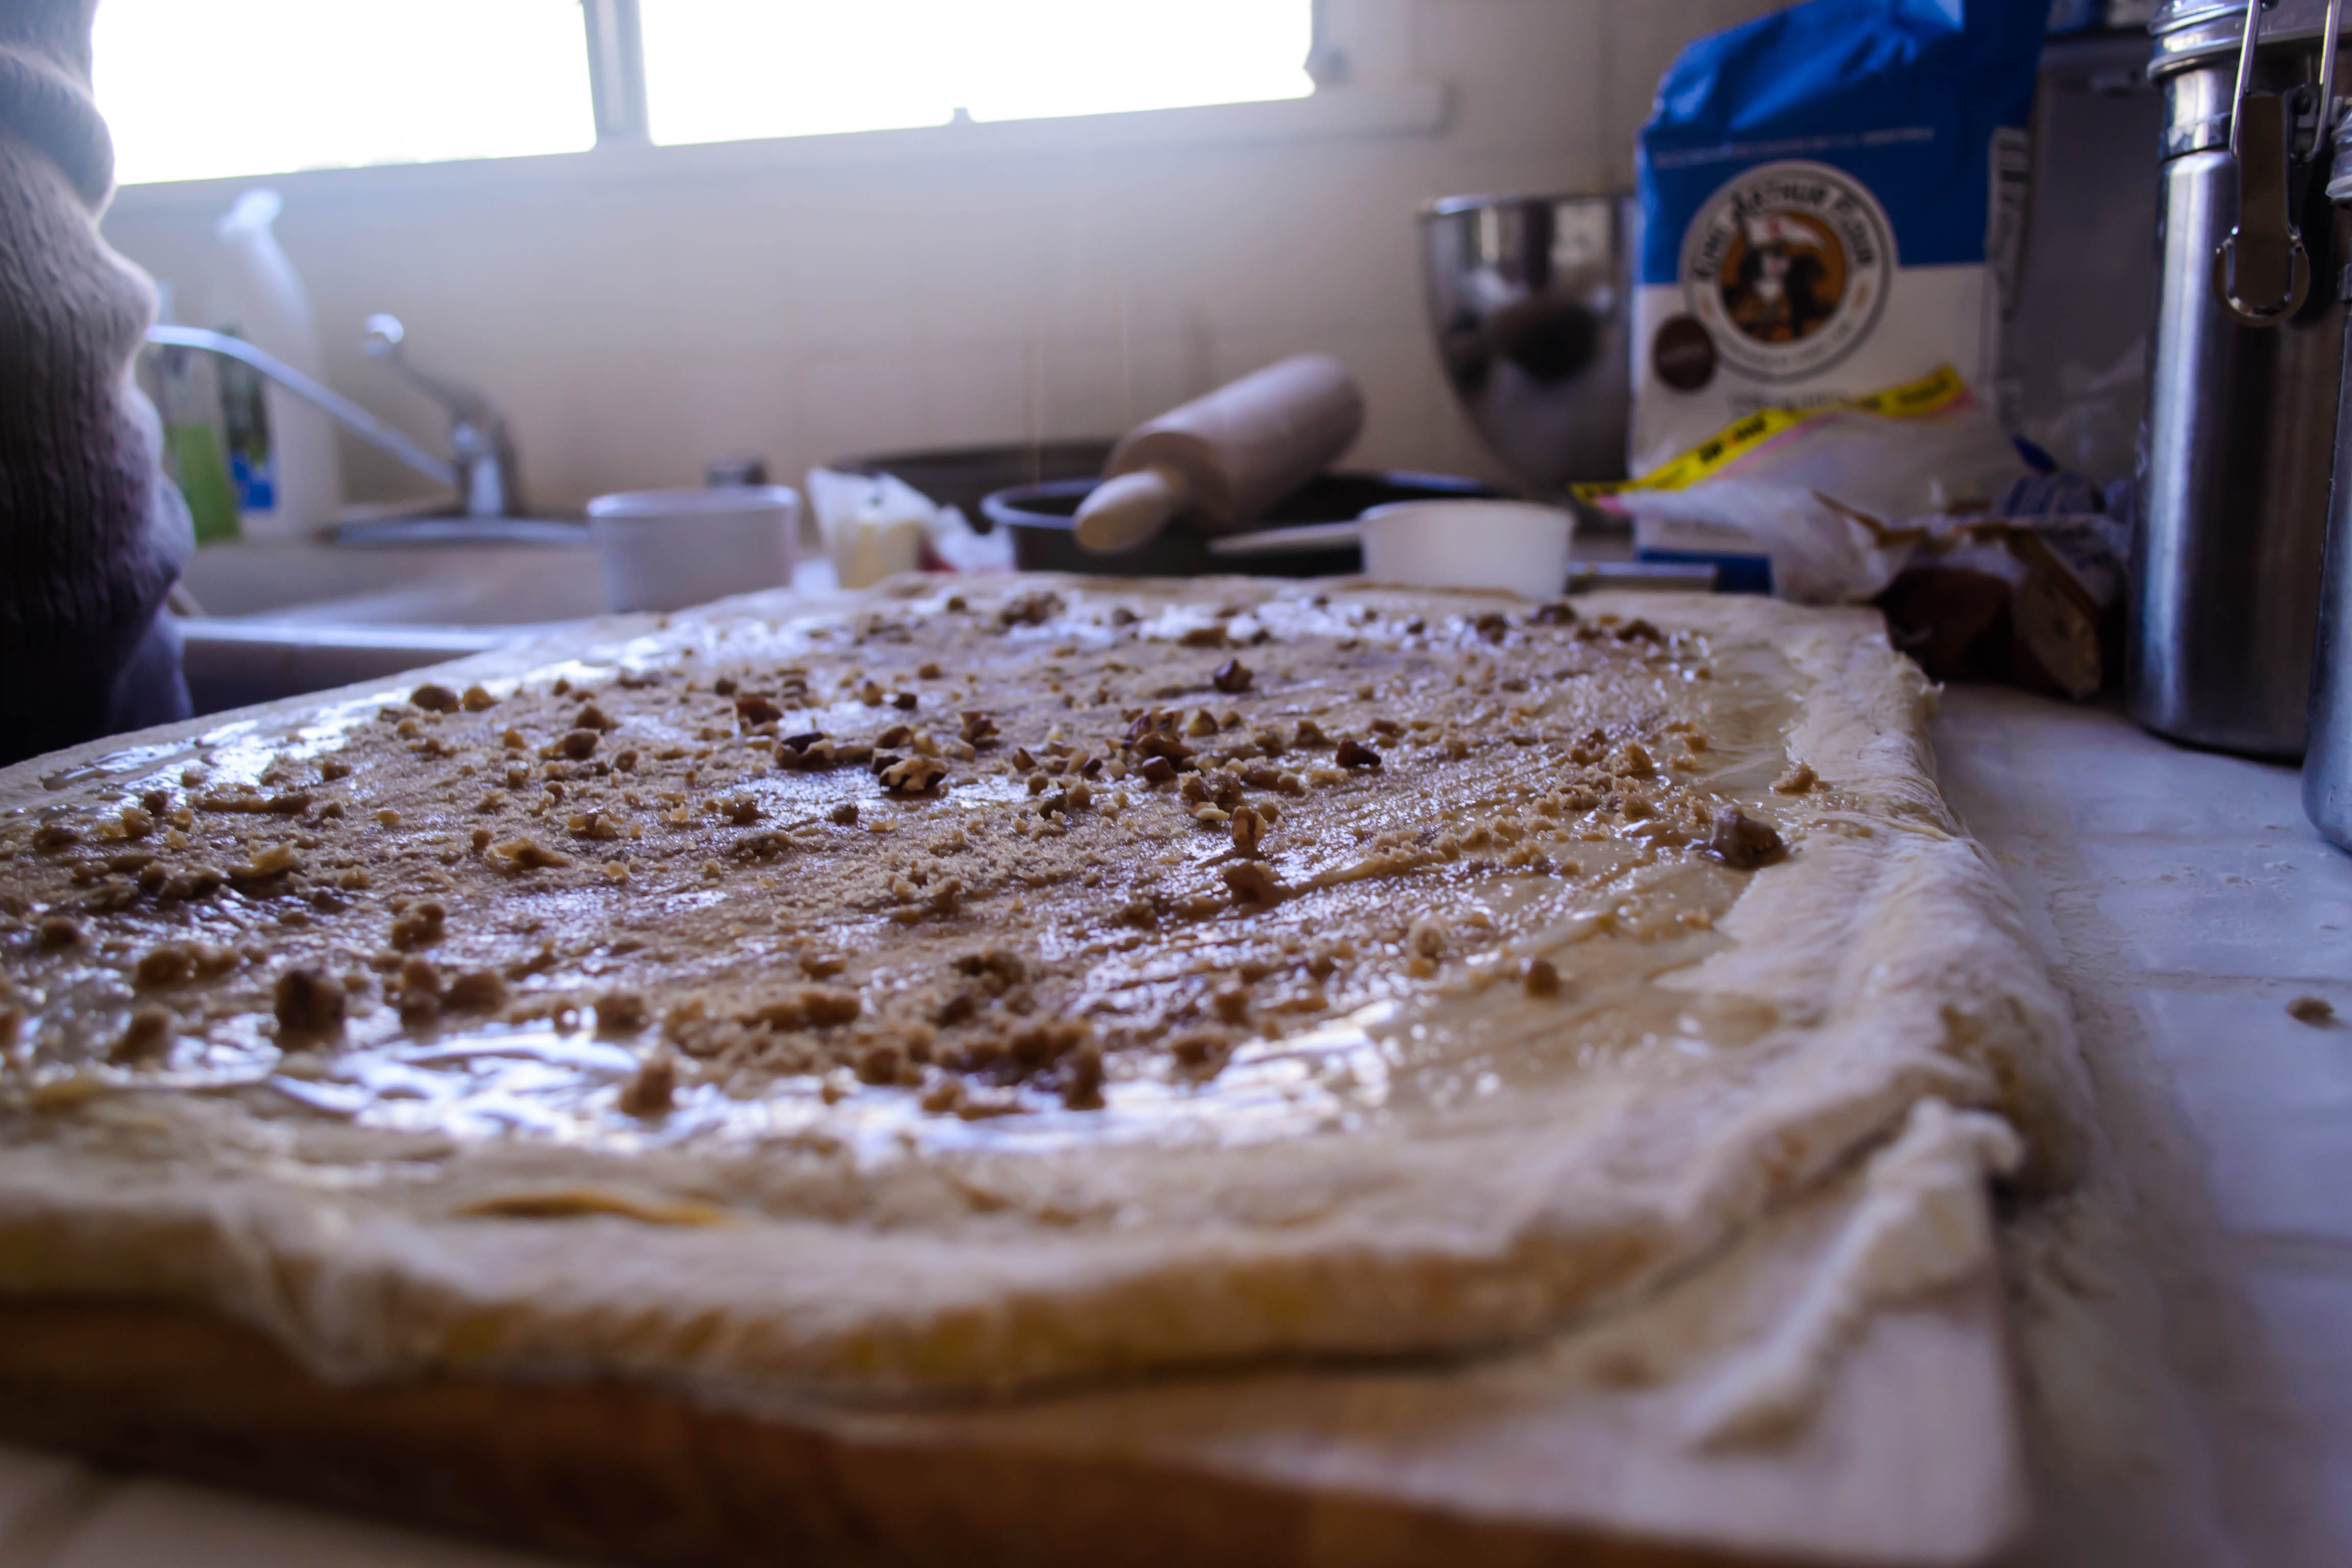
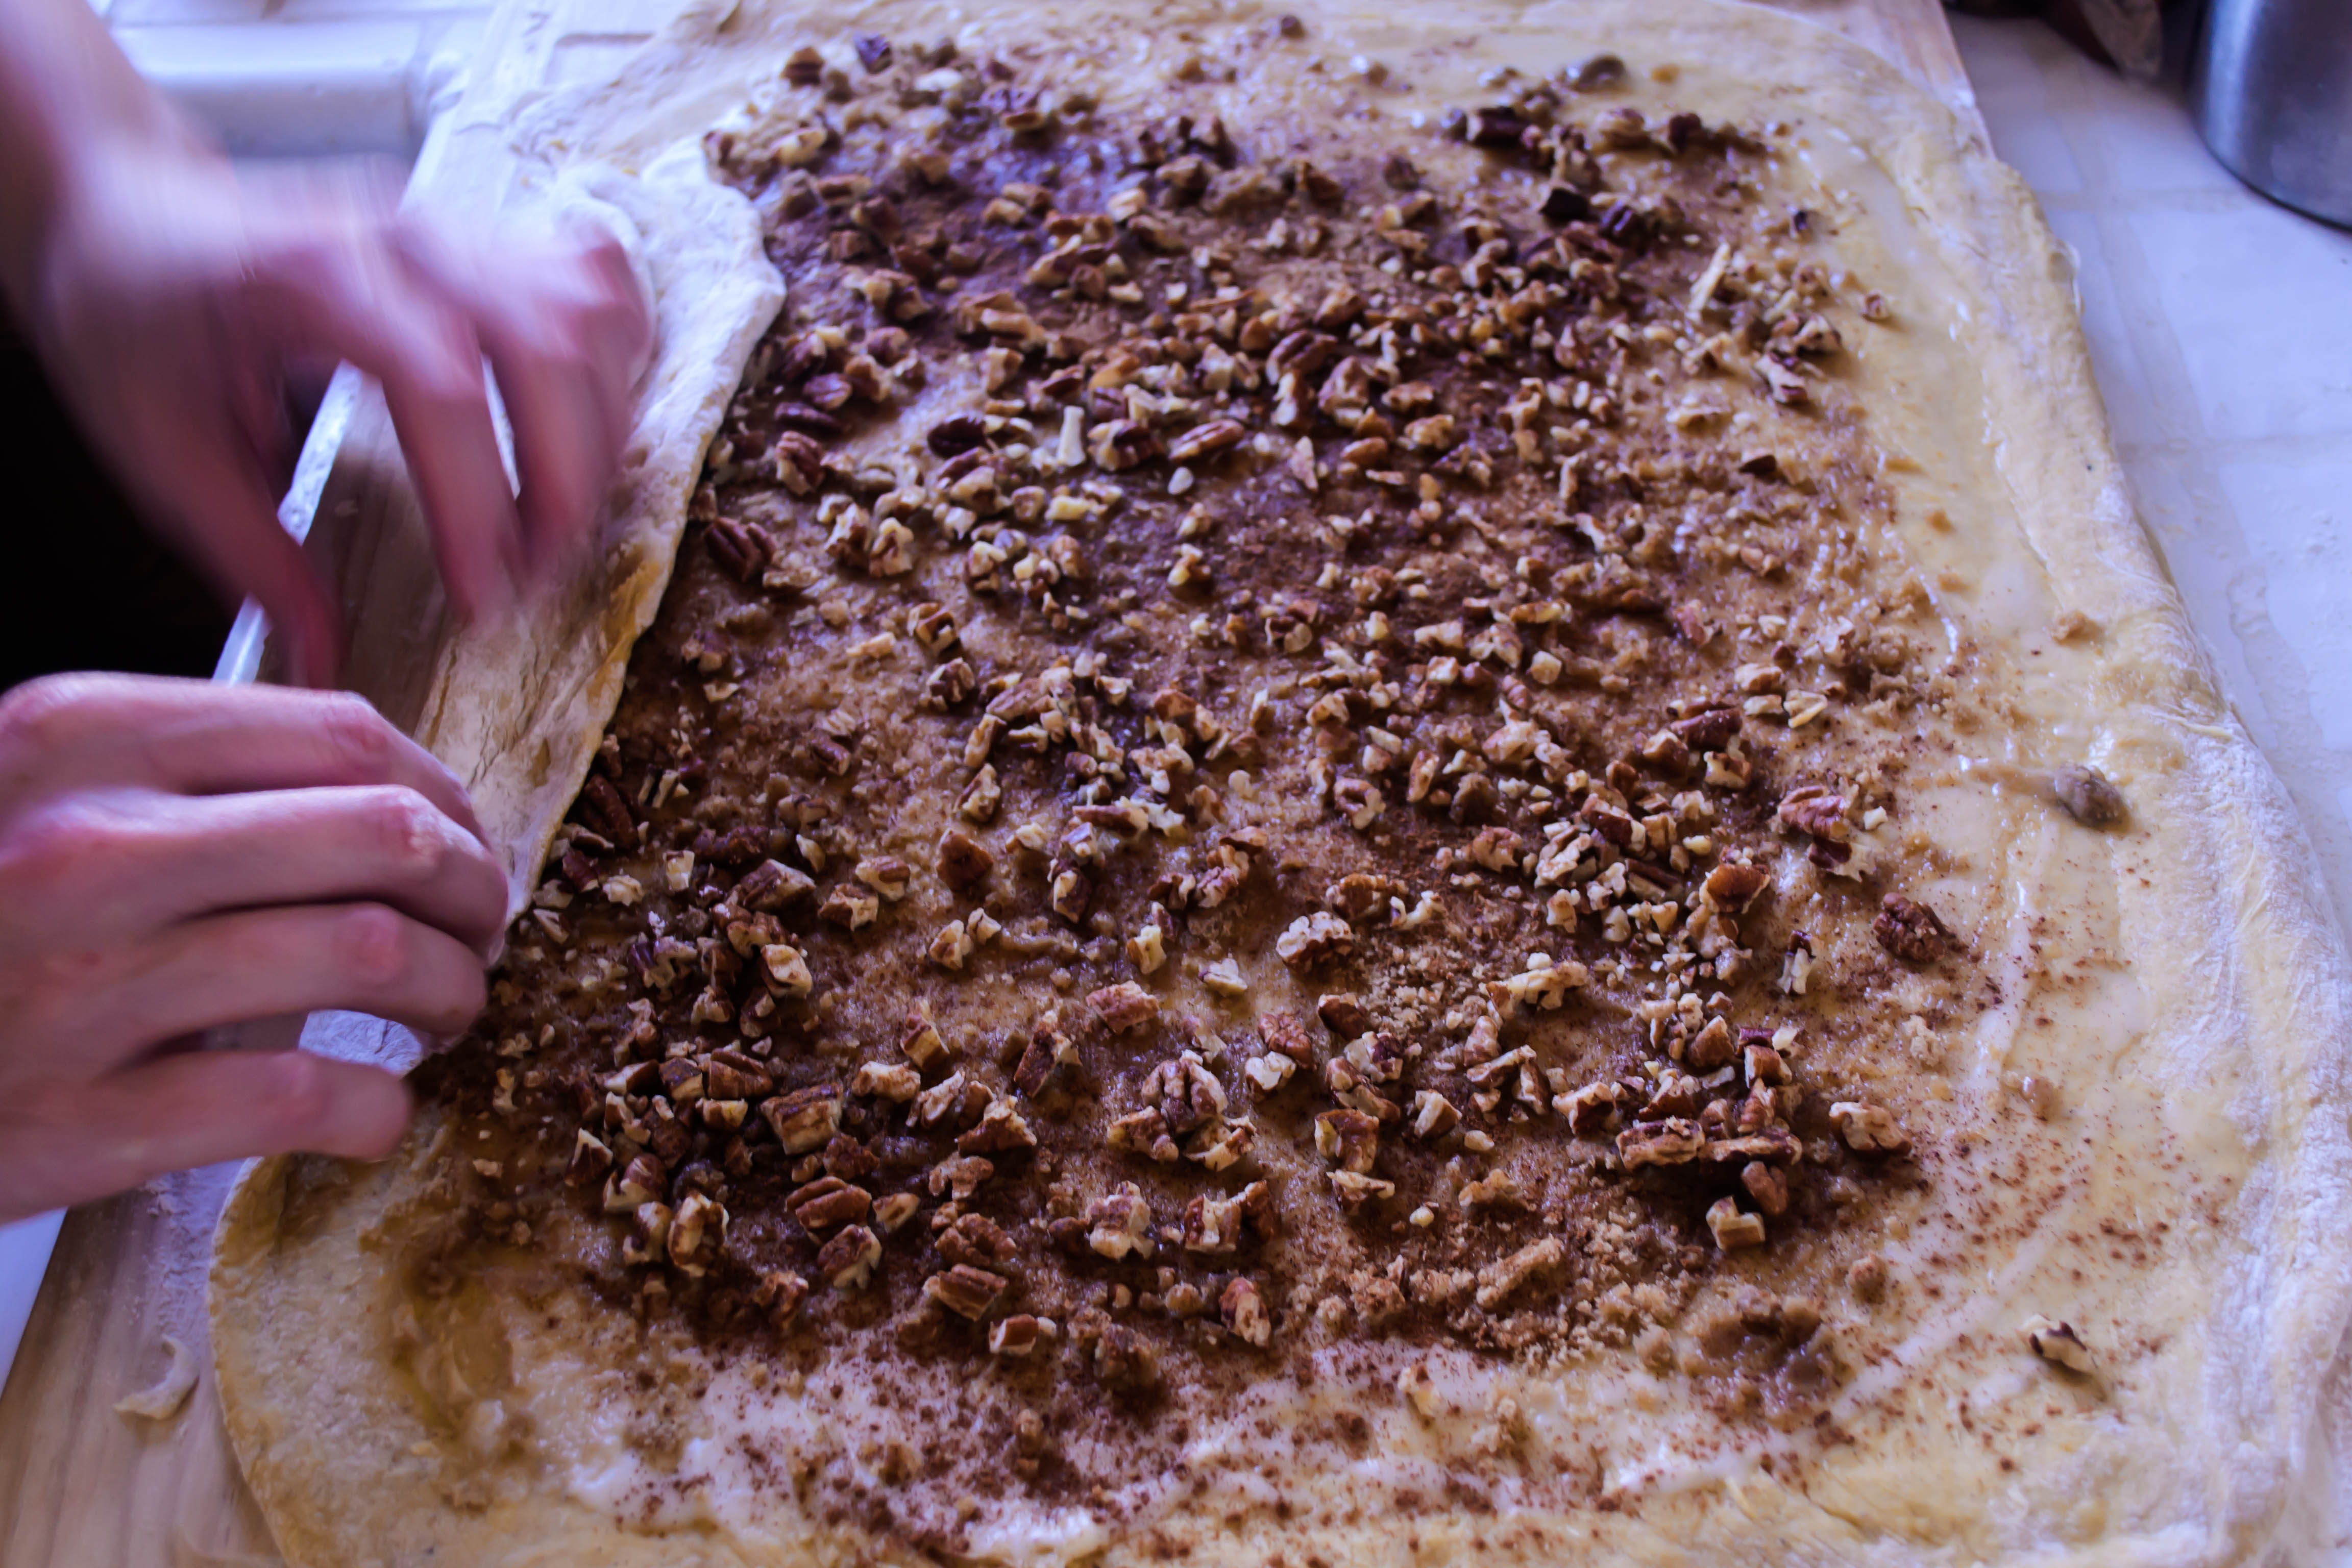
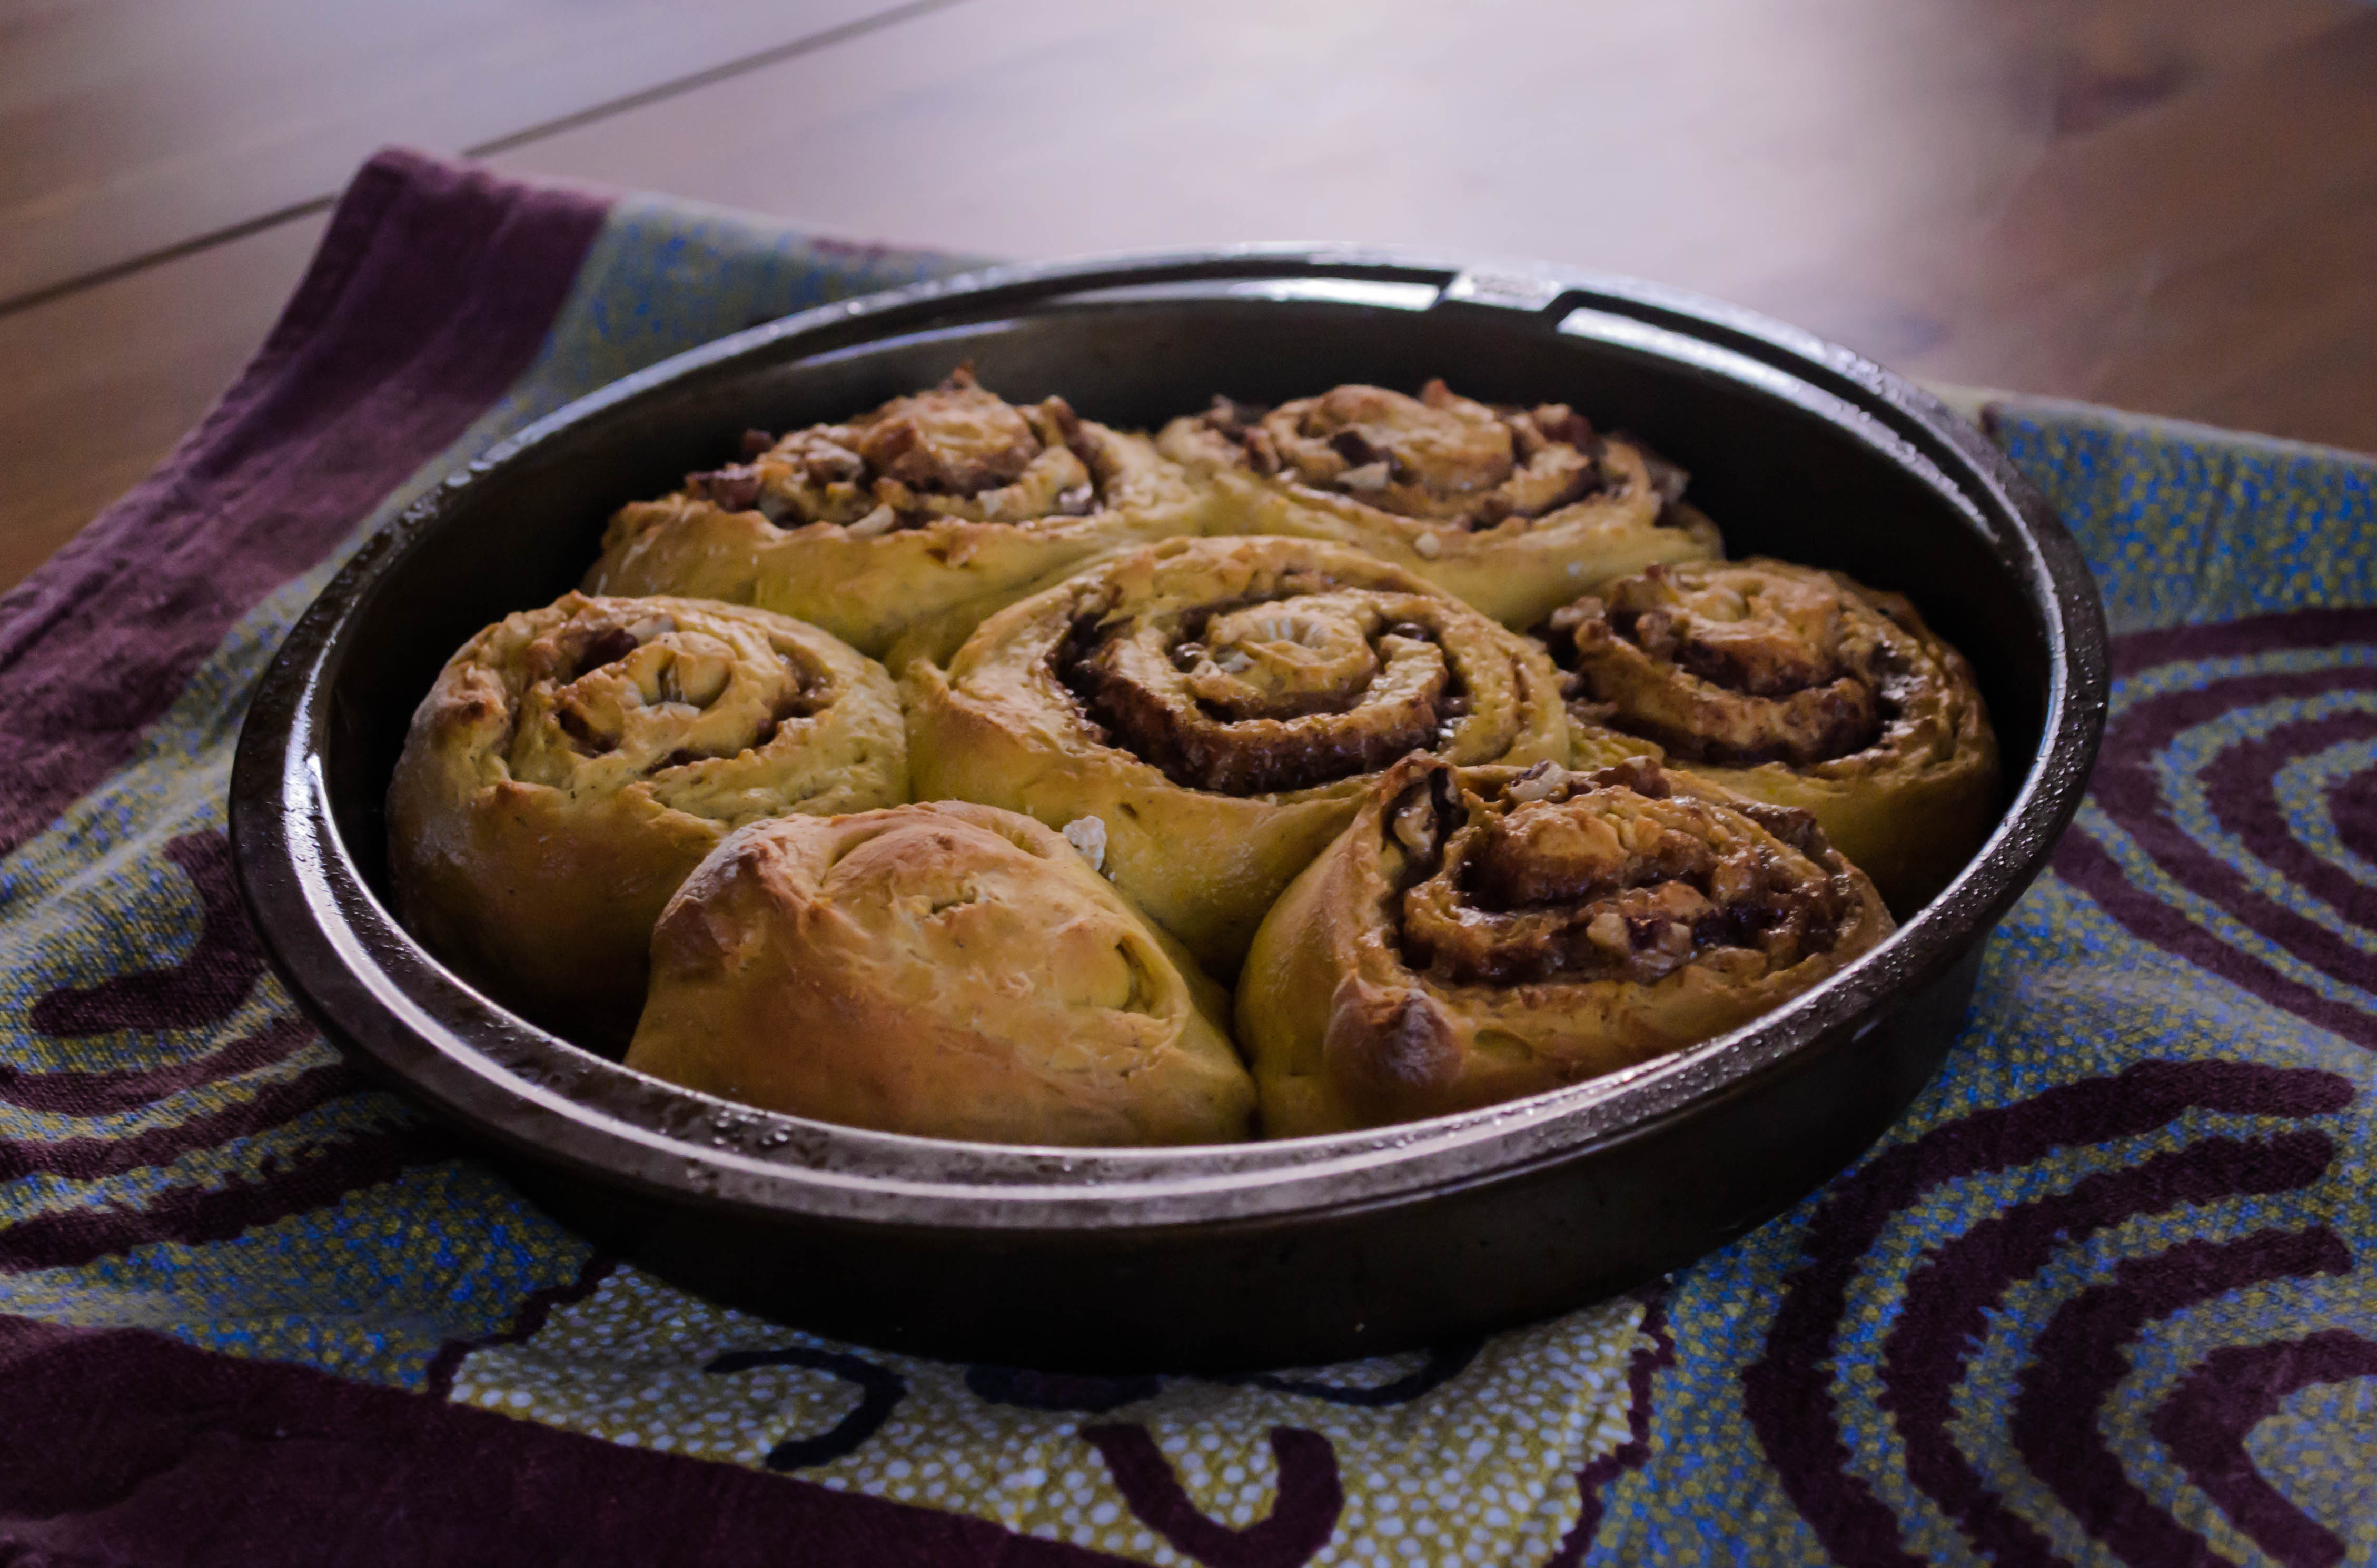
 For these rolls, I started with my Nana’s sweet roll dough, but used all whole milk instead of water for added richness. I replaced the white sugar with brown, to play with the autumnal feel of the pumpkin, and spiked the dough with all the spices that usually find their way into pumpkin pie. And then, of course, the bright orange vegetal sweetness of pumpkin puree. Once risen and rolled out, I spread it with melted butter, more brown sugar and cinnamon, and a scattering of toasted, chopped pecans. Rolled, sliced, and baked, they puffed into glorious swirls – orange gold, with dark bronze bubbling fissures twisting through them. Pulled apart just like that, they were delicious. Because I didn’t overdo it on the sugary center, they could almost pass as breakfast.
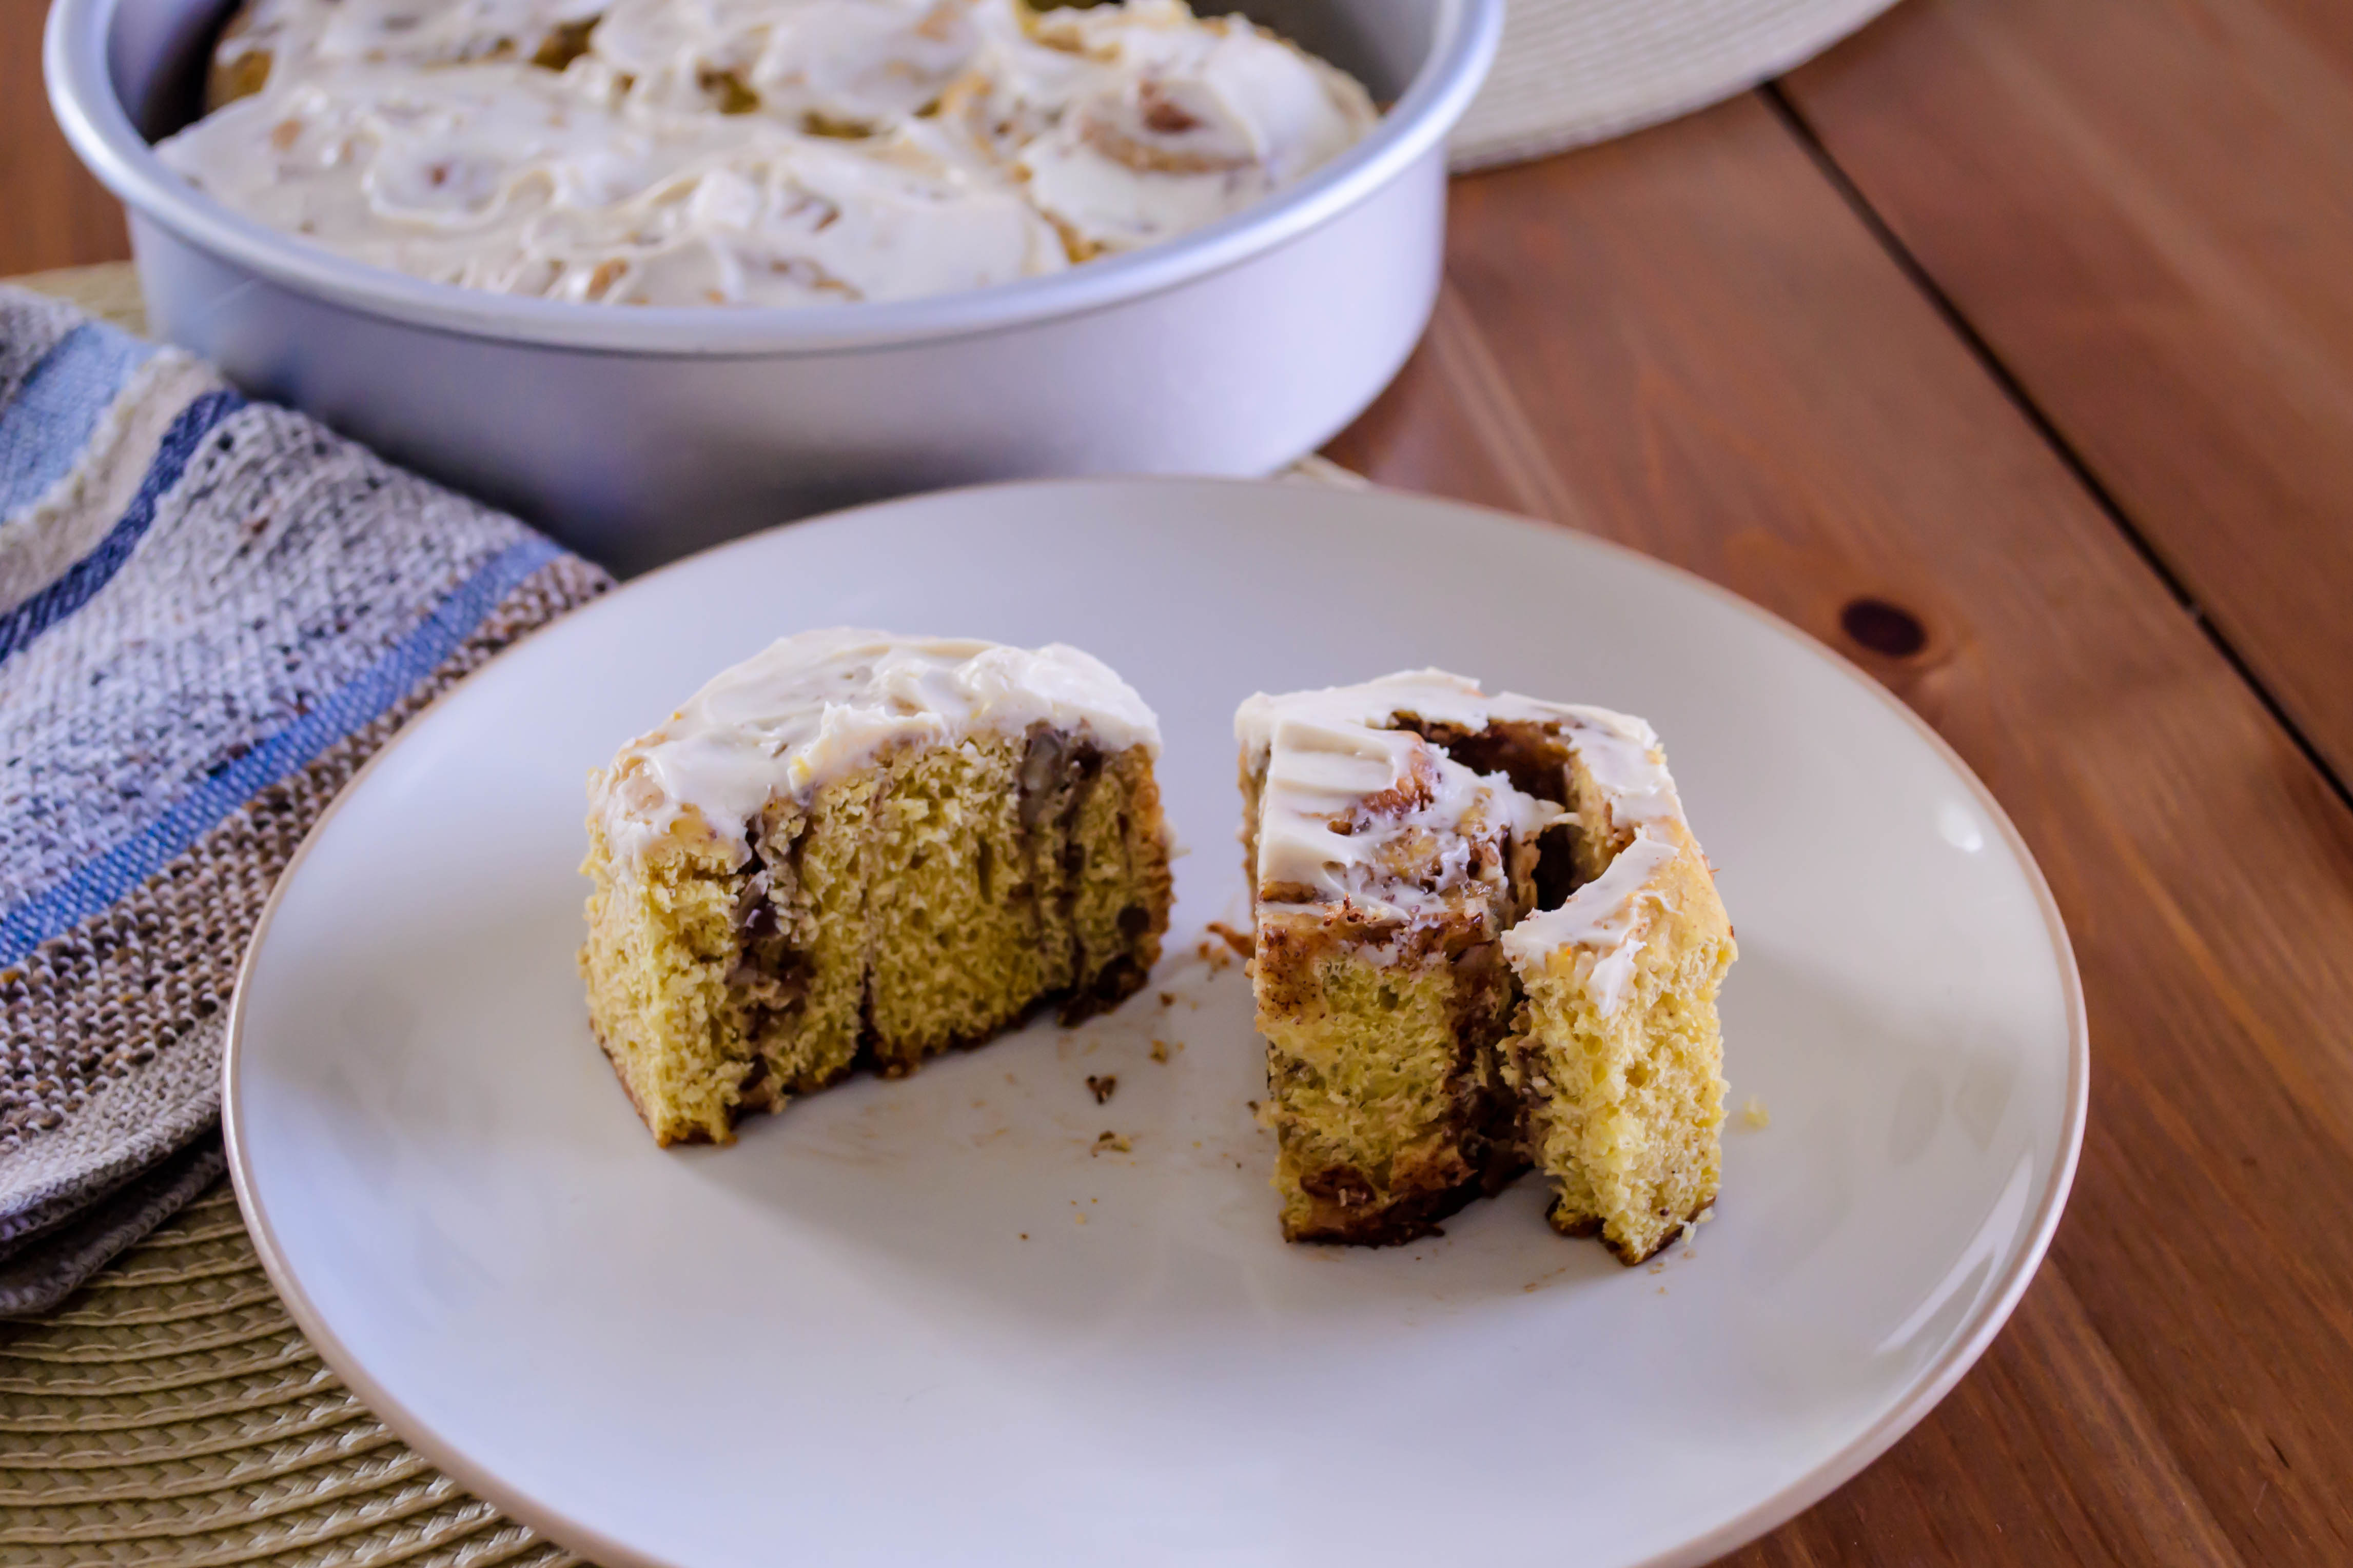
 But this is holiday food, and holiday food is so often about excess that I couldn’t help myself. A quick whip of cream cheese with a breath of powdered sugar, a splash of vanilla, and just a touch of heavy cream to loosen it up, and I had a soft, thick frosting to spread over their golden tops.
 I left two pans in the department mailroom at work. By the time I left in mid-afternoon, there weren’t even crumbs left.
 Making these rolls is an investment. They have a long ingredient list. The dough can be quite sticky. They require two rises. They demand rolling, chopping, toasting, sprinkling, whipping, spreading… but they also require pulling into shreds of sweet chewy dough, and assiduous finger licking. And meditative savoring. And here’s the thing: the holiday season often feels hectic. There is shopping to be done, and traveling to navigate, and wrapping and cooking and impressing family you rarely see, and all of that can feel like too much to squeeze in a complicated baking project.
 But I think, if you embark on such a baking project, knowing the time it requires, and sinking into its gentle rising and baking schedule, it provides its own kind of peace. Besides, these are too good not to make. So just make some. Thanksgiving breakfast, maybe. You’ll thank me later.

Pumpkin Pecan Sweet Rolls
Makes about 30
 When you tell people you live in Los Angeles, one of the first things they often say is something in the realm of “well you can’t beat the weather!” Well, okay, but you can get sick of it. As I drove home from work the day we had these sandwiches for dinner, one of the local radio DJs said something akin to “is it still summer? I won’t let it be fall yet.” Cue snarling and angry words from me. How could she?! I mean, I like the sun. I love summer. But here’s the thing: I miss my jeans. When I get home from work and evict myself from my teacher clothes, I miss sliding into the worn embrace of my soft, familiar denim. Not to mention spending a day without the hair plastered to the back of my neck. Appetizing, I know.

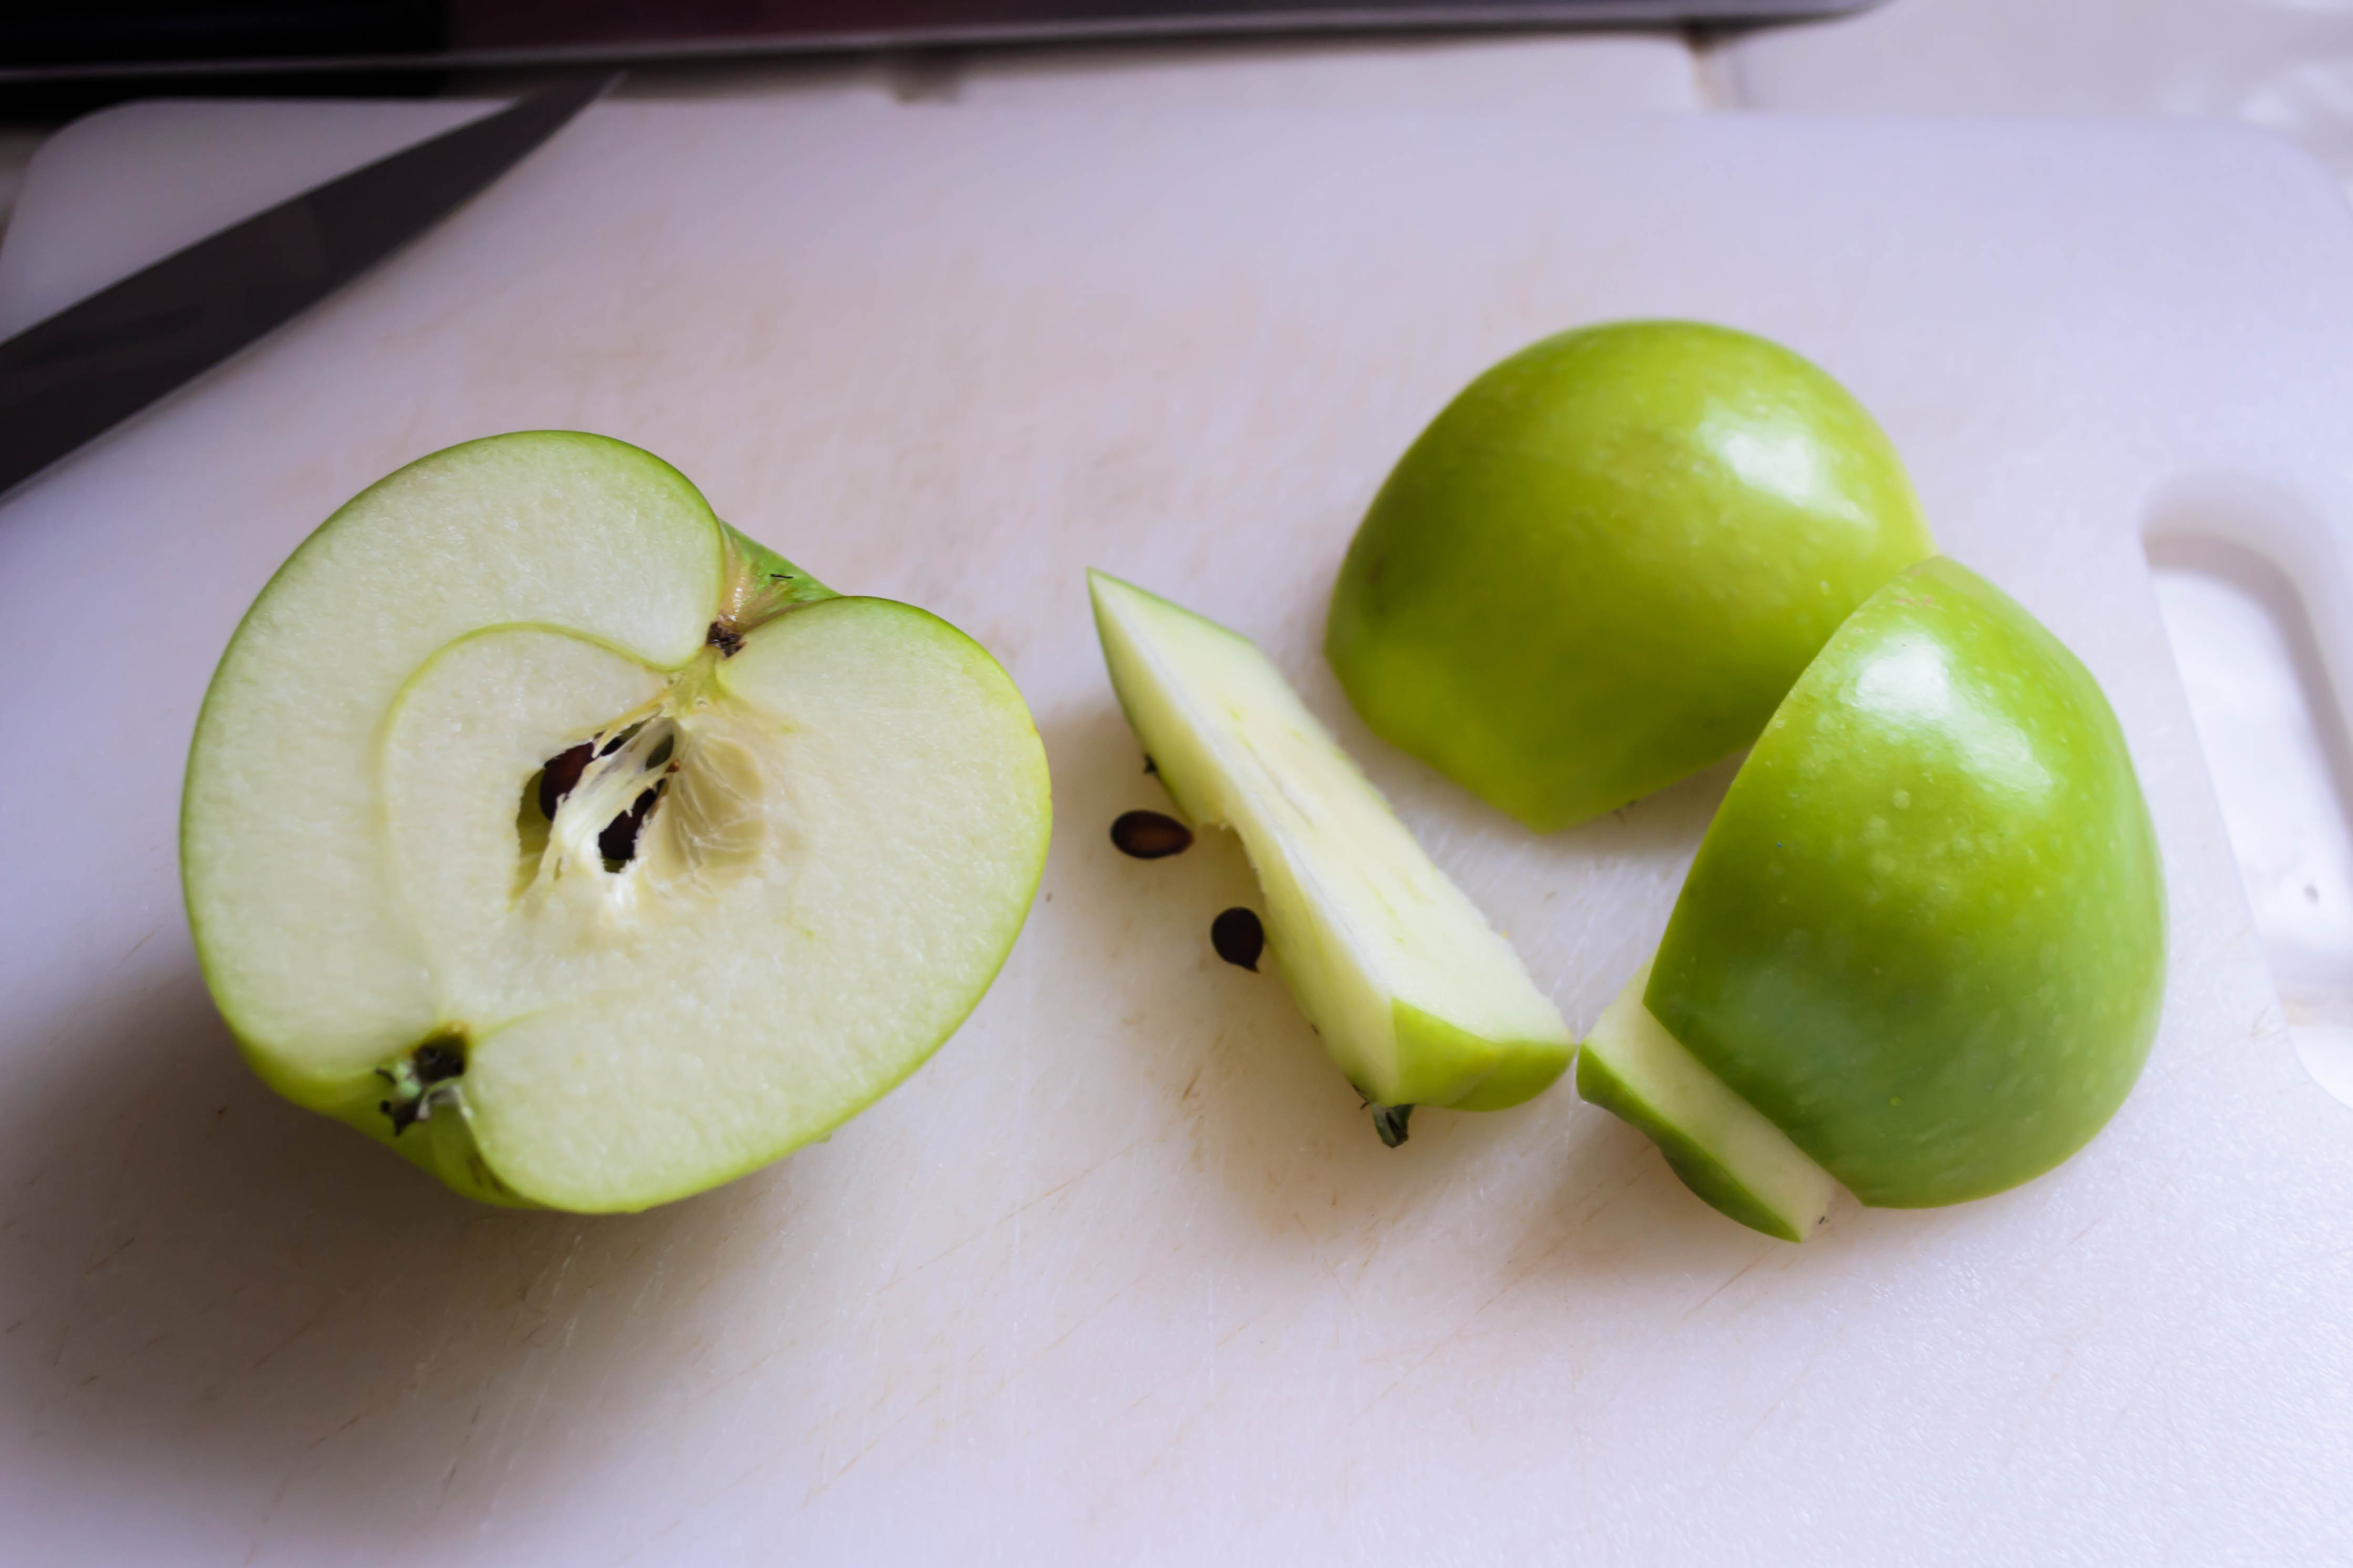
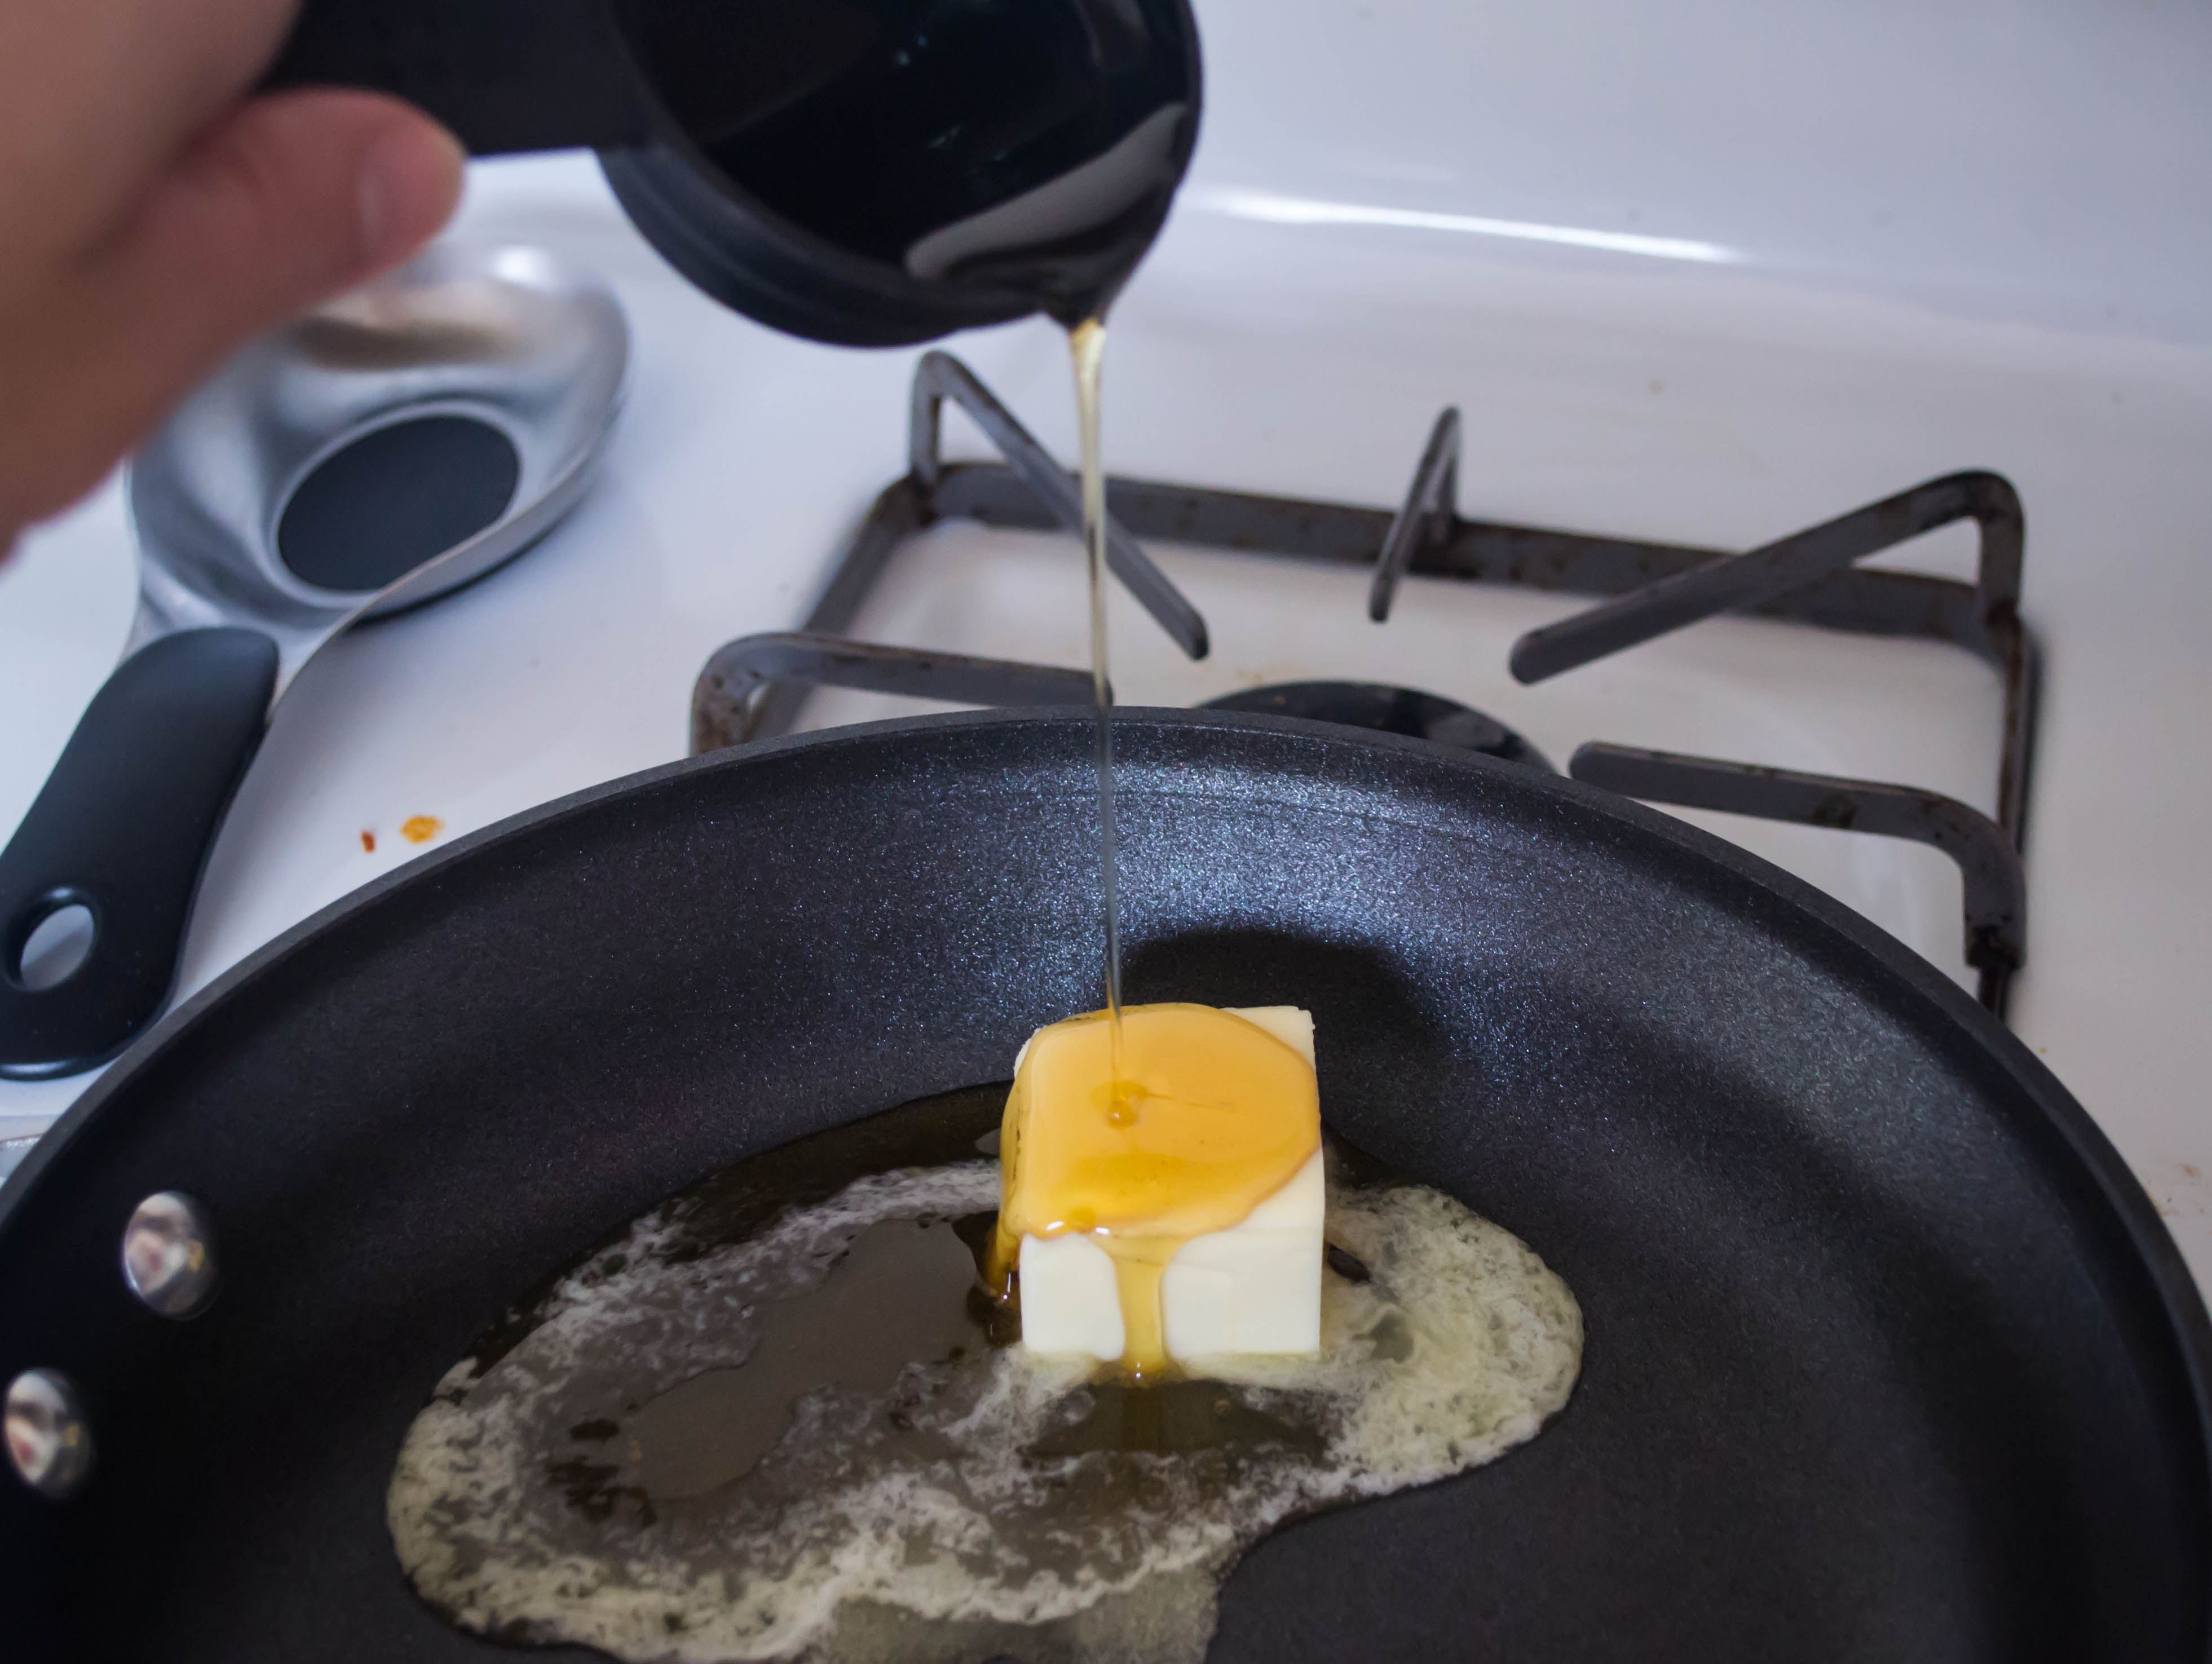 So maybe out of resentment at the season (or lack thereof, since it just slid from mid- to late September and we spent the last two weeks ping-ponging between mid-80s and near 100 degree temperatures), I came up with a dish that screams fall at the top of its lovely, melty little lungs. Apples. Cheddar cheese, as sharp as possible. Dense, moist sourdough. Sage, that most autumnal of herbs. Maple syrup. It’s a bit of a breakfast sandwich, but since when have I ever been opposed to that sort of thing as an evening meal?
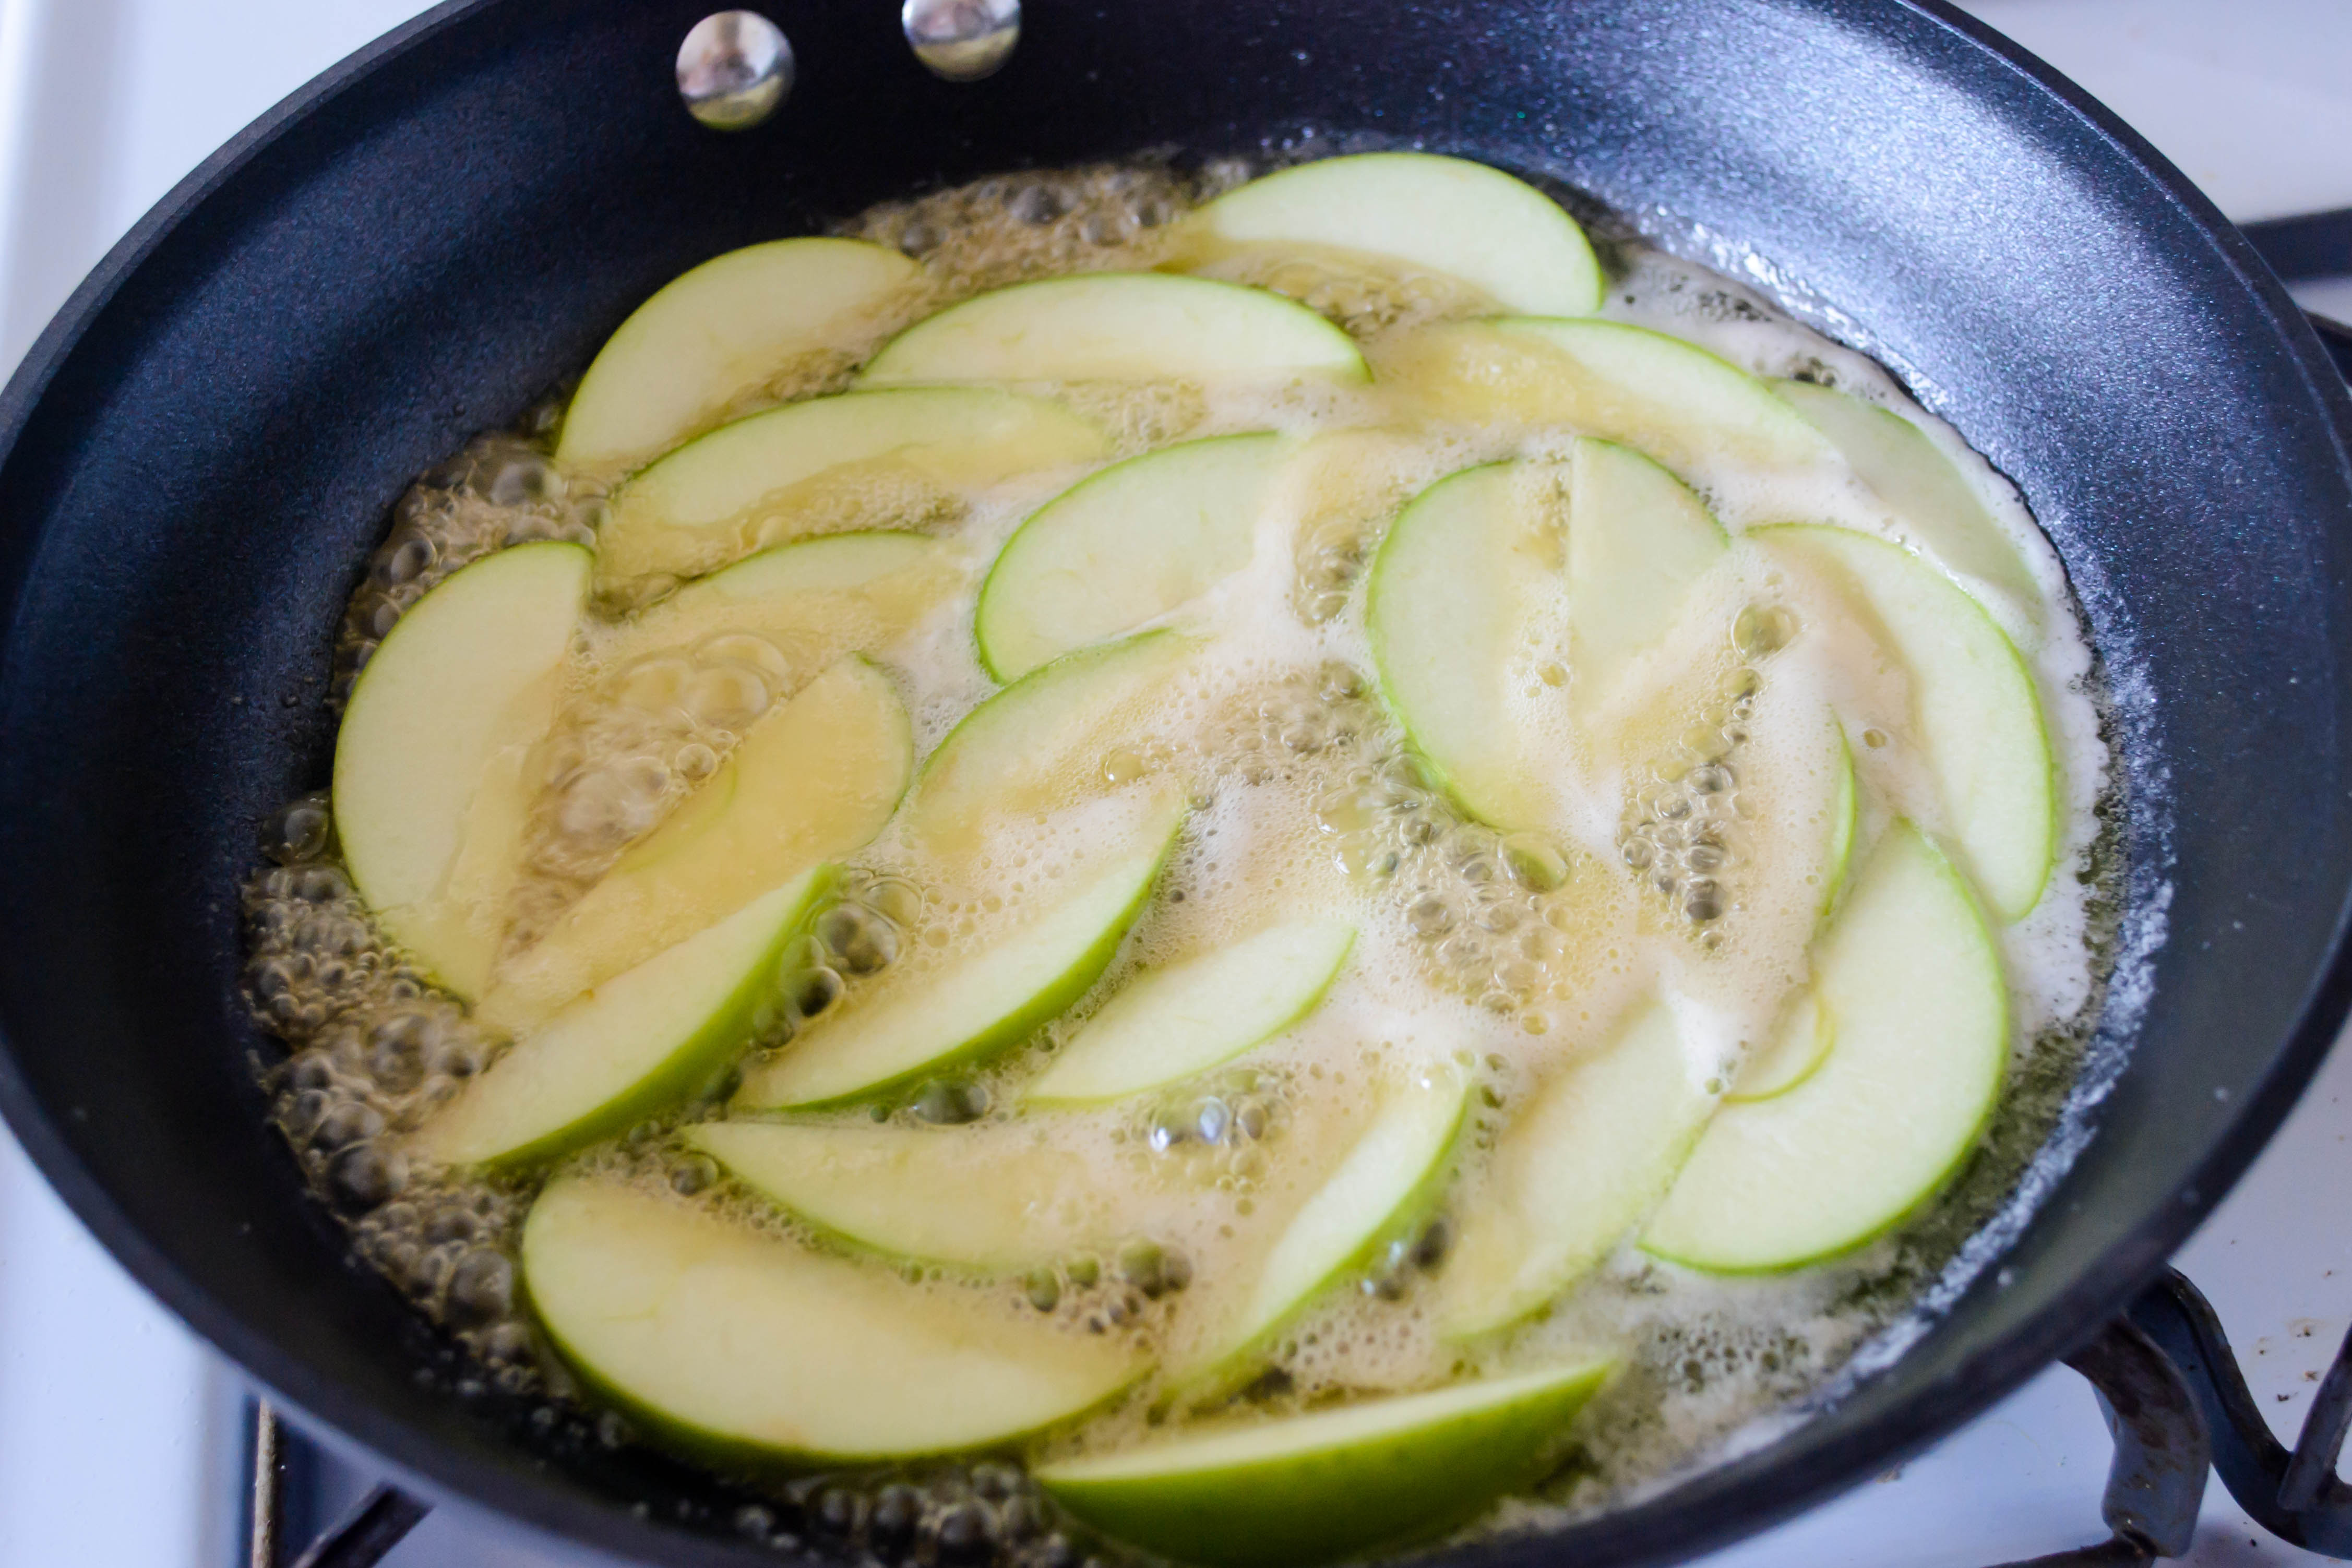
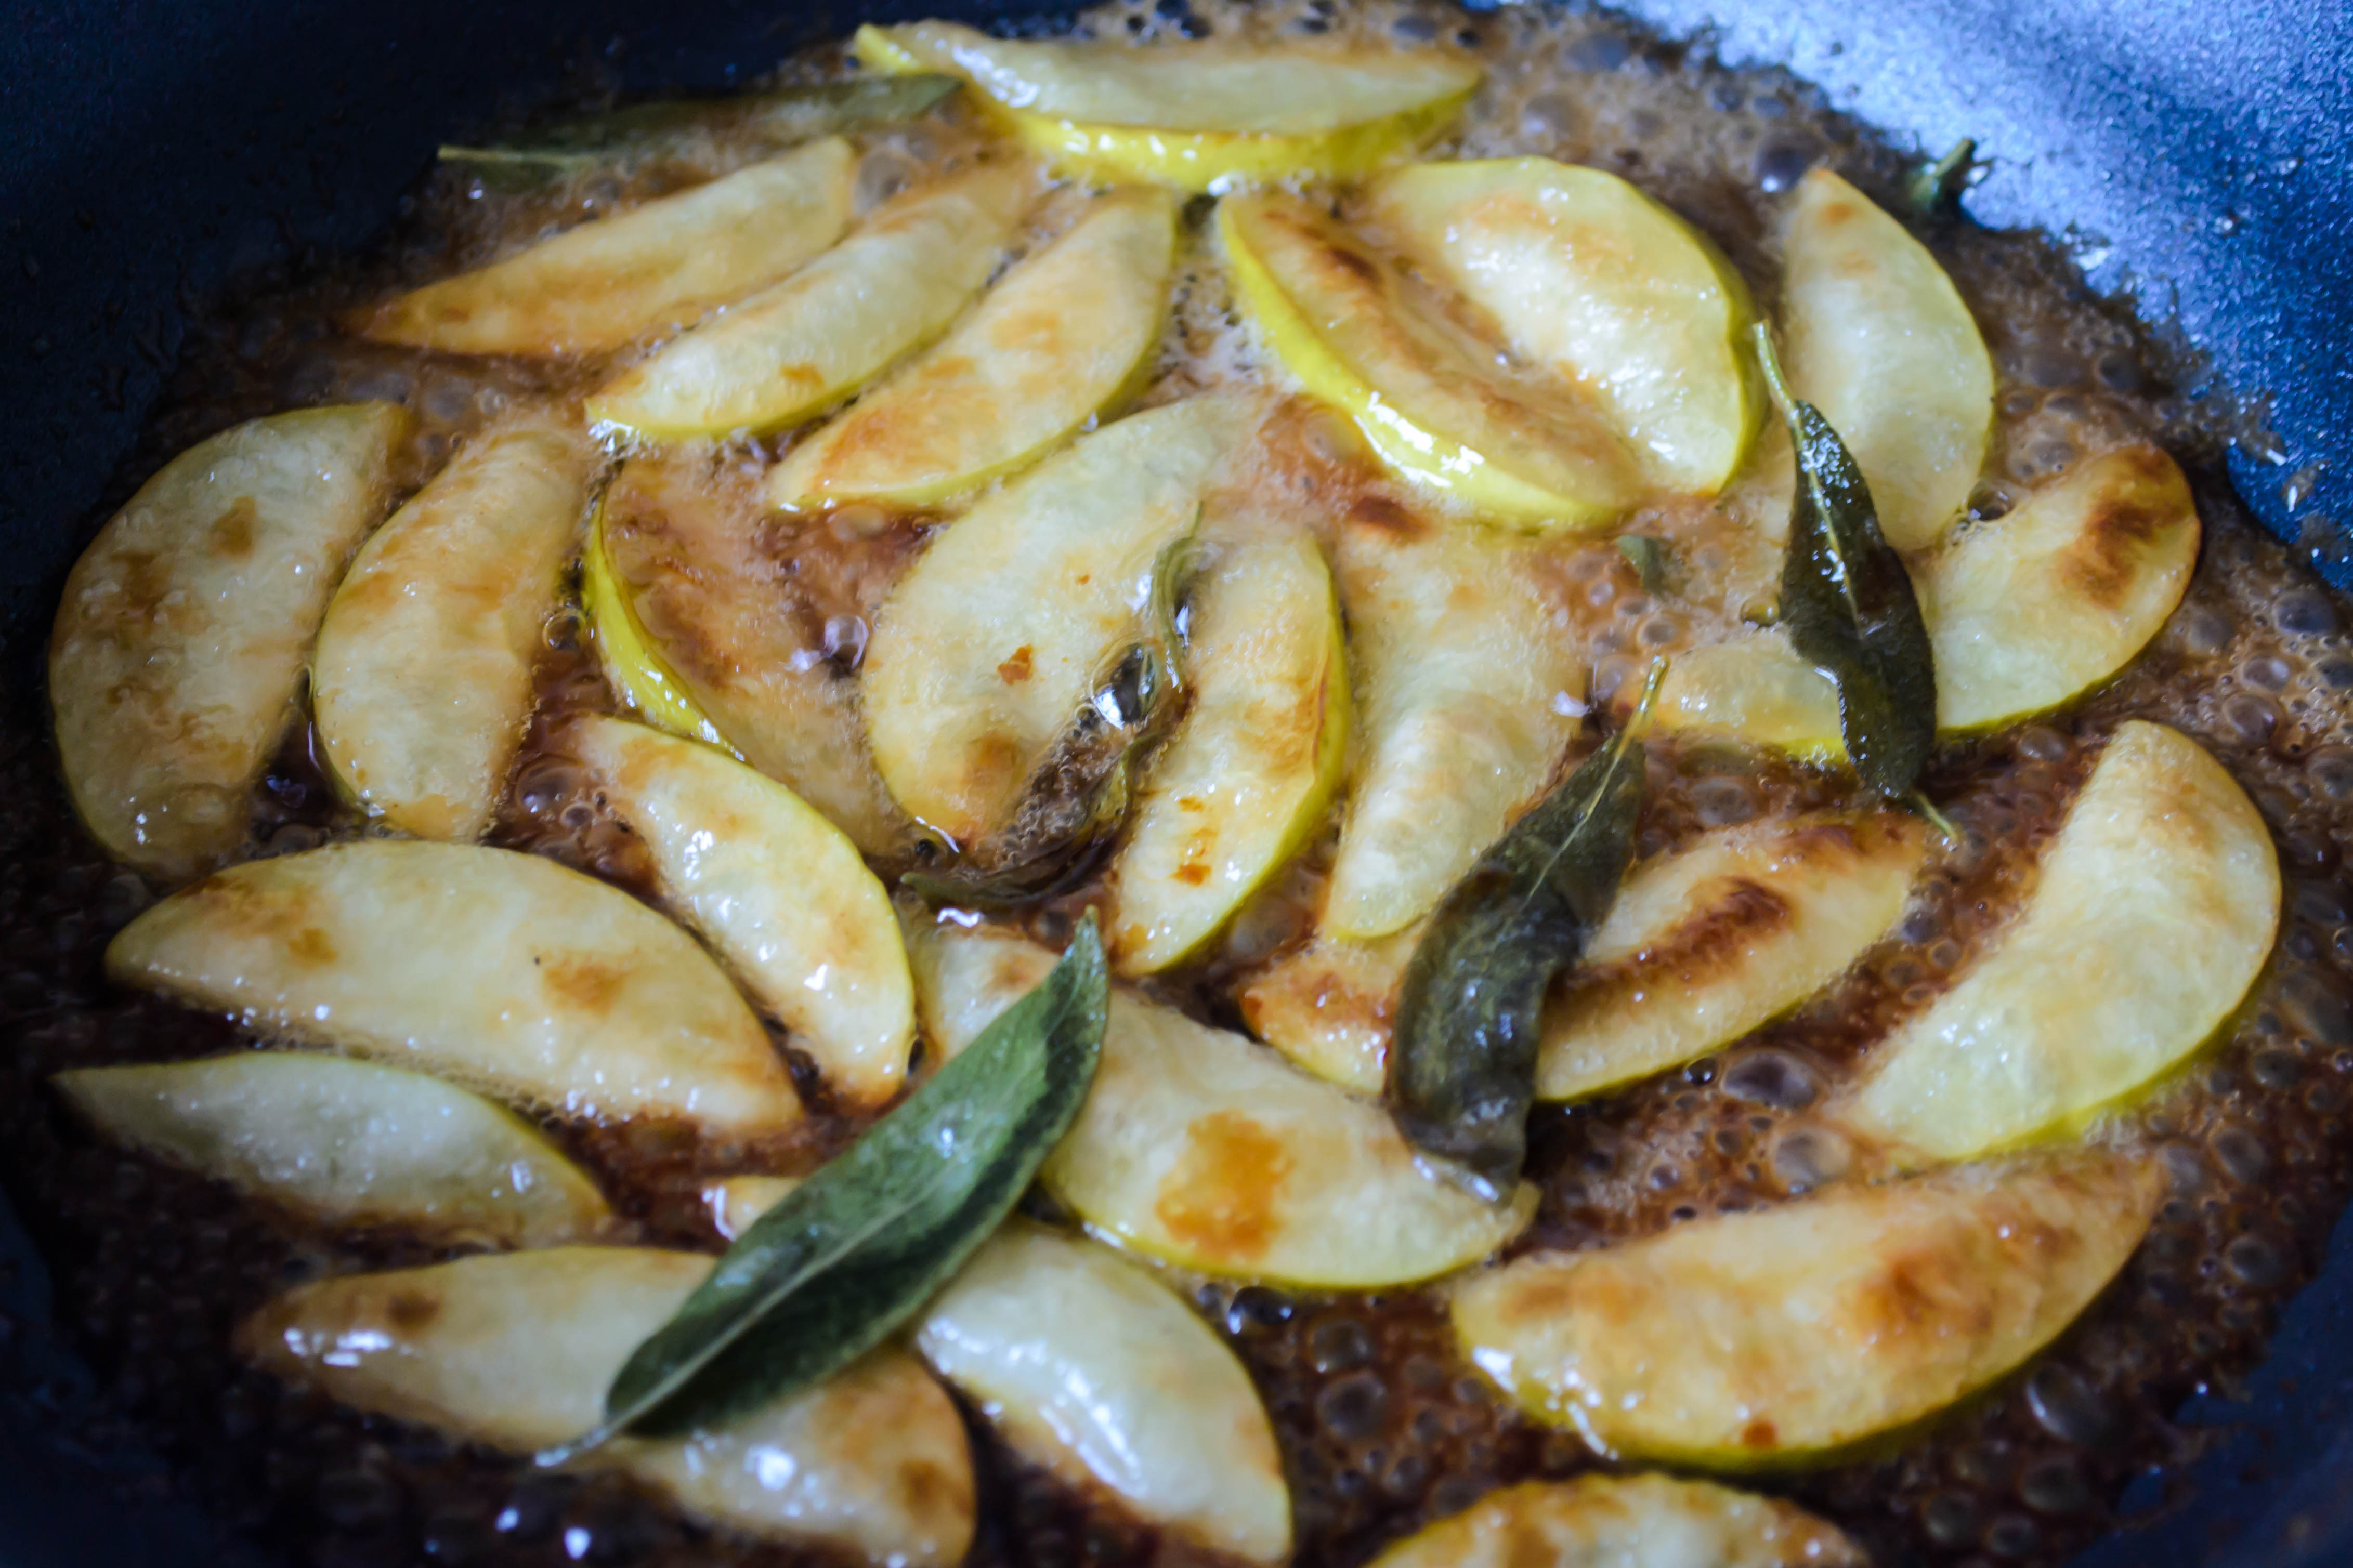 In its preparation, this sandwich takes the Monte Cristo as its font of inspiration. Though I’m using cheddar instead of swiss, and replacing ham with apples that have been gently sautéed in brown butter with a liberal dosing of maple syrup (are you hungry yet?), the whole assembled sandwich gets dunked in an egg batter and then fried until delicately crisp on the outside and limp with melted goo on the inside.

 In an effort to be responsible diners, we ate this with a wilted kale salad-ish concoction, but it honestly didn’t need any accompaniment. In fact, the second time I made it in as many weeks, I didn’t prepare any side dish at all, and that and the relatively petite slices of bread I used made me feel completely justified in demolishing two sandwiches all by my lonesome. Well, minus the apple slice or two that I shared with Miss Lucy. It’s tough to refuse those velvet brown eyes.

 Your fingertips will get greasy as you eat this. But despite the richness of the cheese and the eggy coating and the caramelized, syrupy apples, the sage keeps the whole thing from being overwhelming. Its sharp, herbaceous note cuts through the cheese, and it somehow miraculously maintains a bit of crunch even buried between the layers of filling. For me, it’s sandwich nirvana.

 A few weeks ago, my dad sent an email to me, my mom, and his sisters: a reading recommendation replete with a link to a story from All Things Considered. This is, in itself, not unusual. Dad often sends along news items he thinks are important or interesting. What made this one unusual and, frankly, quite special, was that it was about the acute and wonderful memories food makes for us. It was a story about a baker and a request for a very special cake – an old German cake made with damson plums. The request for this cake threw her back years to her childhood and a cake – the same cake – her opera singer mother used to make. As she watches and smells it baking, she feels like her mother Helga is there too, in the oven with that cake, singing through time and death and all those plums, and she cries tears of grief and nostalgia and joy.

 Dad sent it because he thought it was a good story, but also because his mother – my Nana – used to make a coffeecake with damson plums, which made this all sound so familiar. He asked if anyone had her sweet dough recipe, and suddenly the emails were flying. He was not the only one who felt the connection here. My aunts were likewise plunged into memories. Though the cake in the NPR story was a shortbread dough topped with plums, Nana’s cake, like the one her mother made before her, used a yeast dough. It was made in a square pan and she always made two at a time so she could share one with Pap, and have one for the three kids. It had to be damson plums or it just wasn’t right. It called back memories of eating, but also of being in the kitchen with their mother. Nana was with them in that cake.
 I knew I had to make it. It had called up too many happy memories for my family to remain simple nostalgia. Besides, I have Nana’s sweet dough recipe, and with the details I collected from my aunts’ emails, I felt like I had enough data to piece it together.
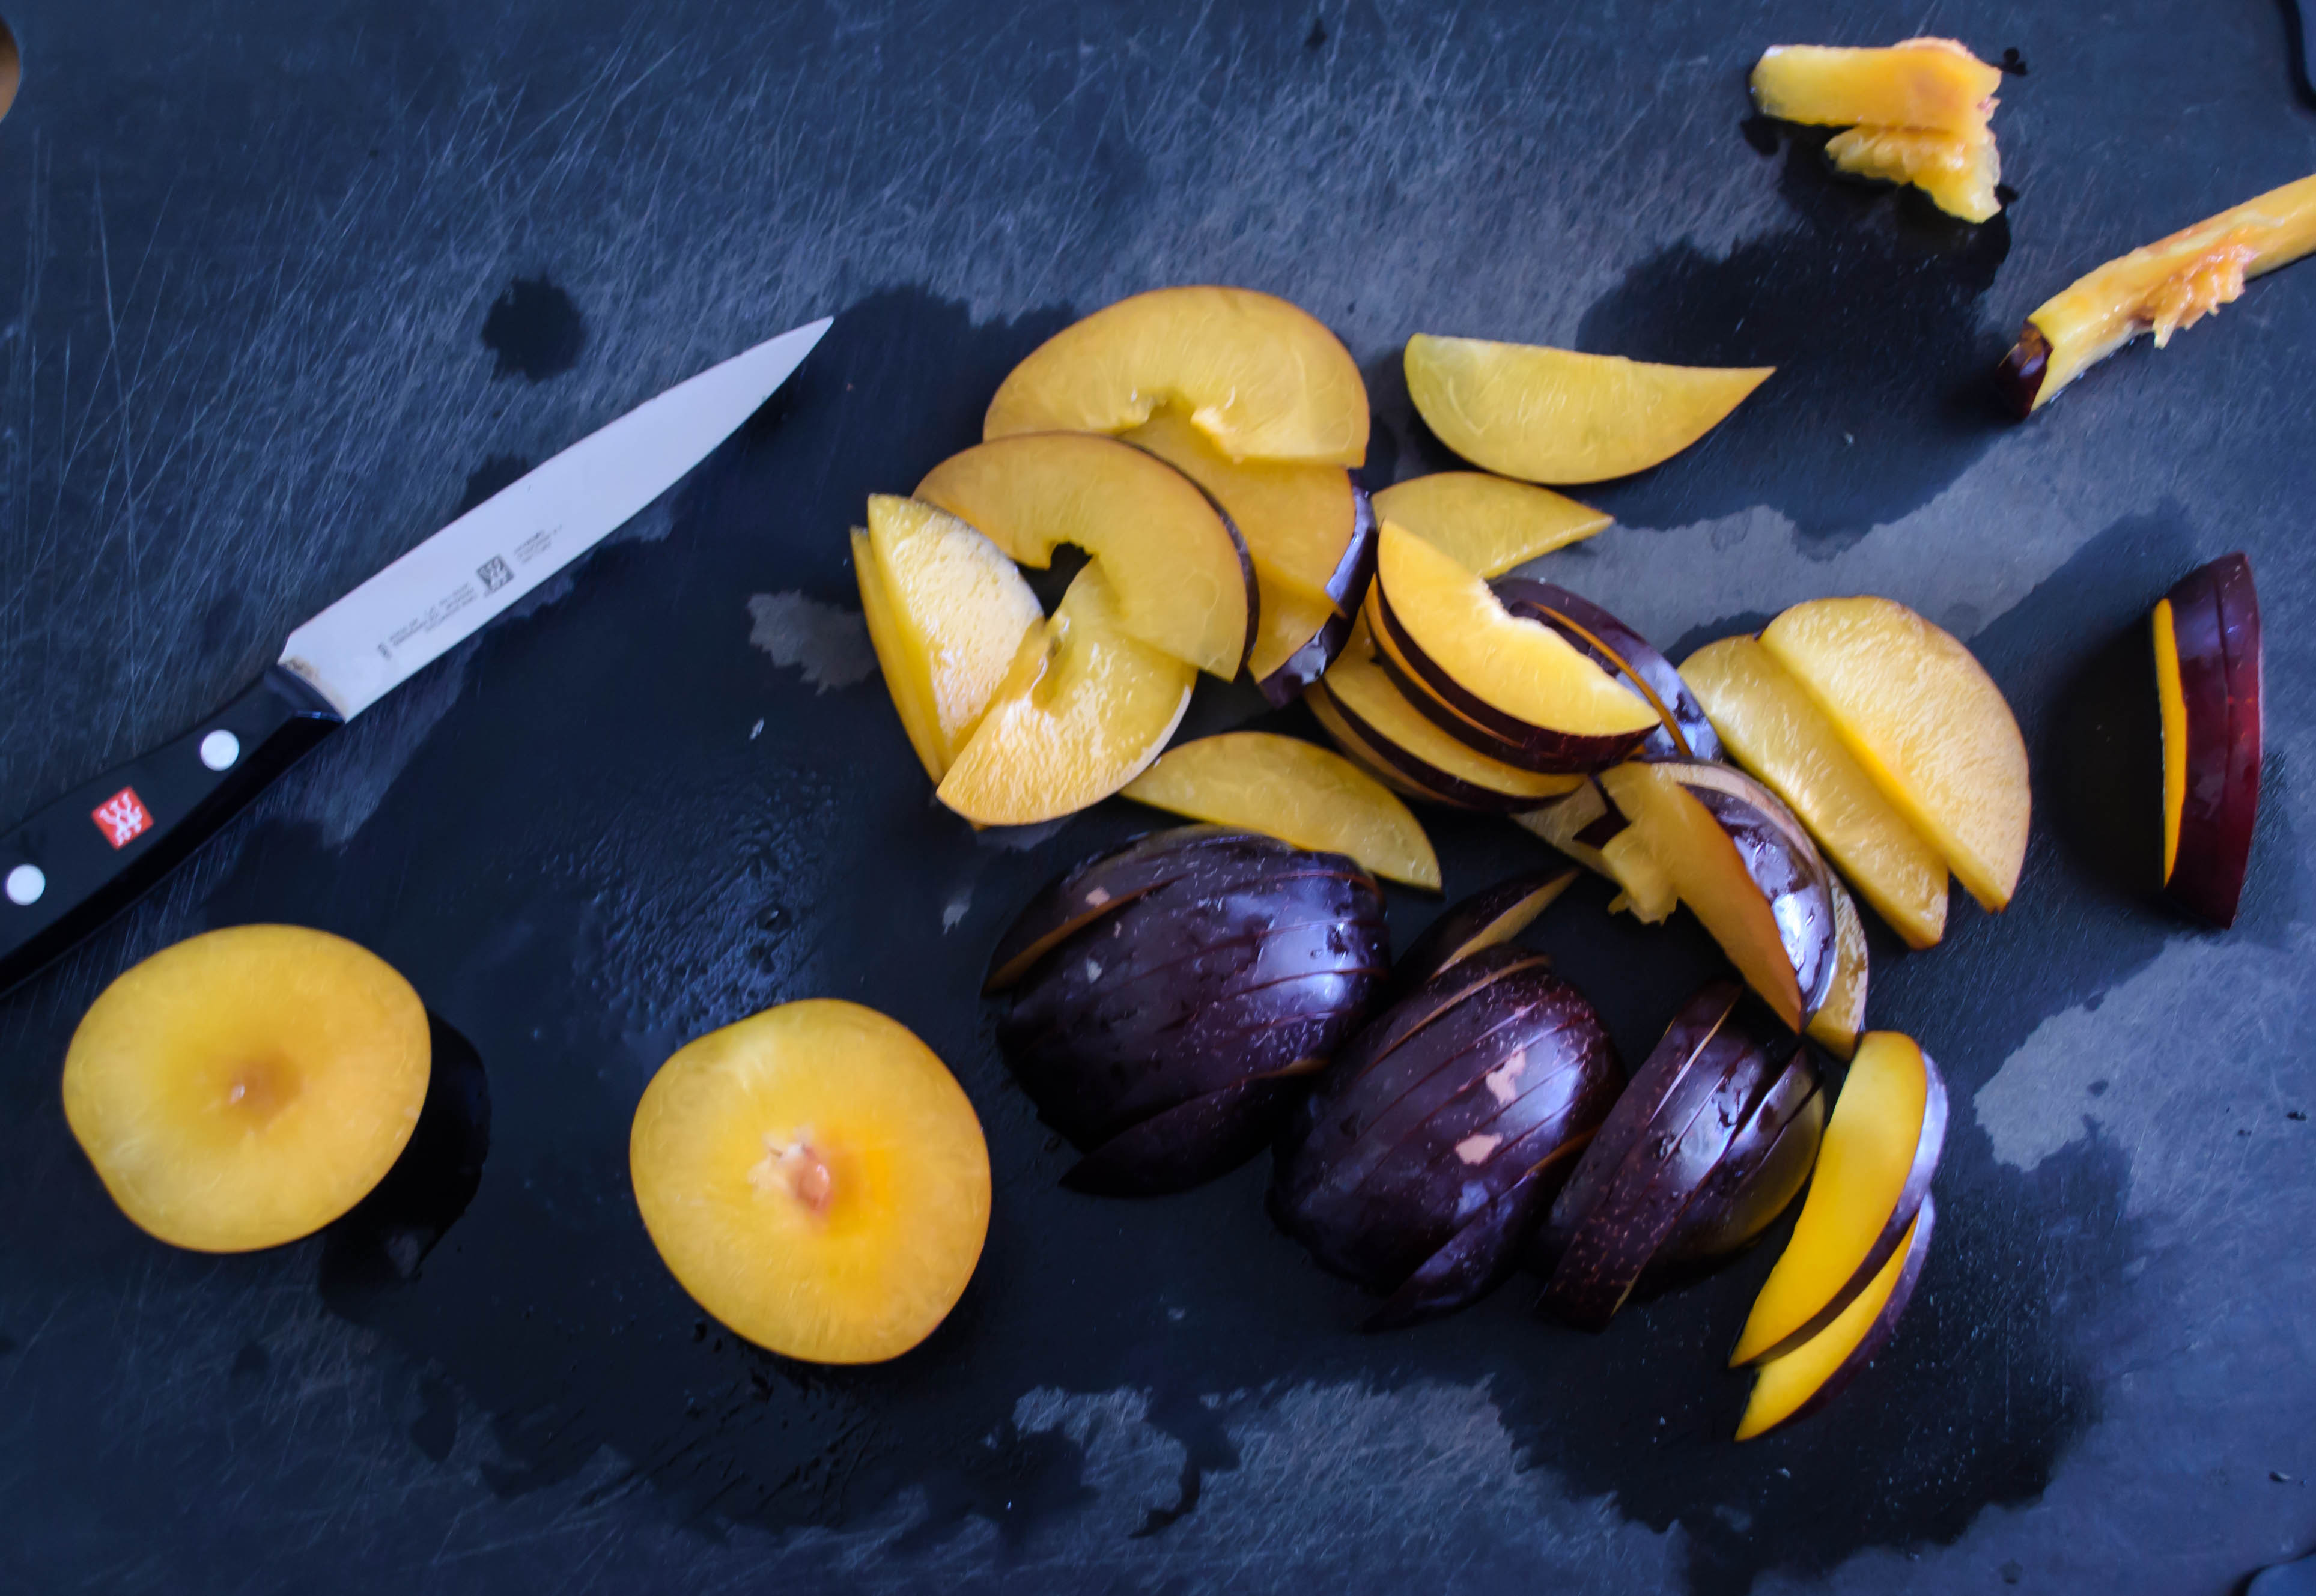
 But you know me. I fiddle. I adjust and tweak. I ruminate, and things change. So despite my pure intentions, this is not my Nana’s cake. First of all, I couldn’t find damson plums. Even at the stand at my Farmers’ Market that carries at least six different strains of plums and pluots, there was nothing labeled “damson,” and no one knew what I was talking about. A bit of internet research suggested I might try an Italian plum as a close substitute, but without ready access to those either, I settled on a deep, black-purple skinned variety with yellow flesh. The point seemed to be a plum that was not terrifically sweet, since the cake itself is snack or breakfast fare, not a sugared up dessert. From there, with the main ingredient already an adaptation, I felt freer to play a bit as I constructed the recipe.
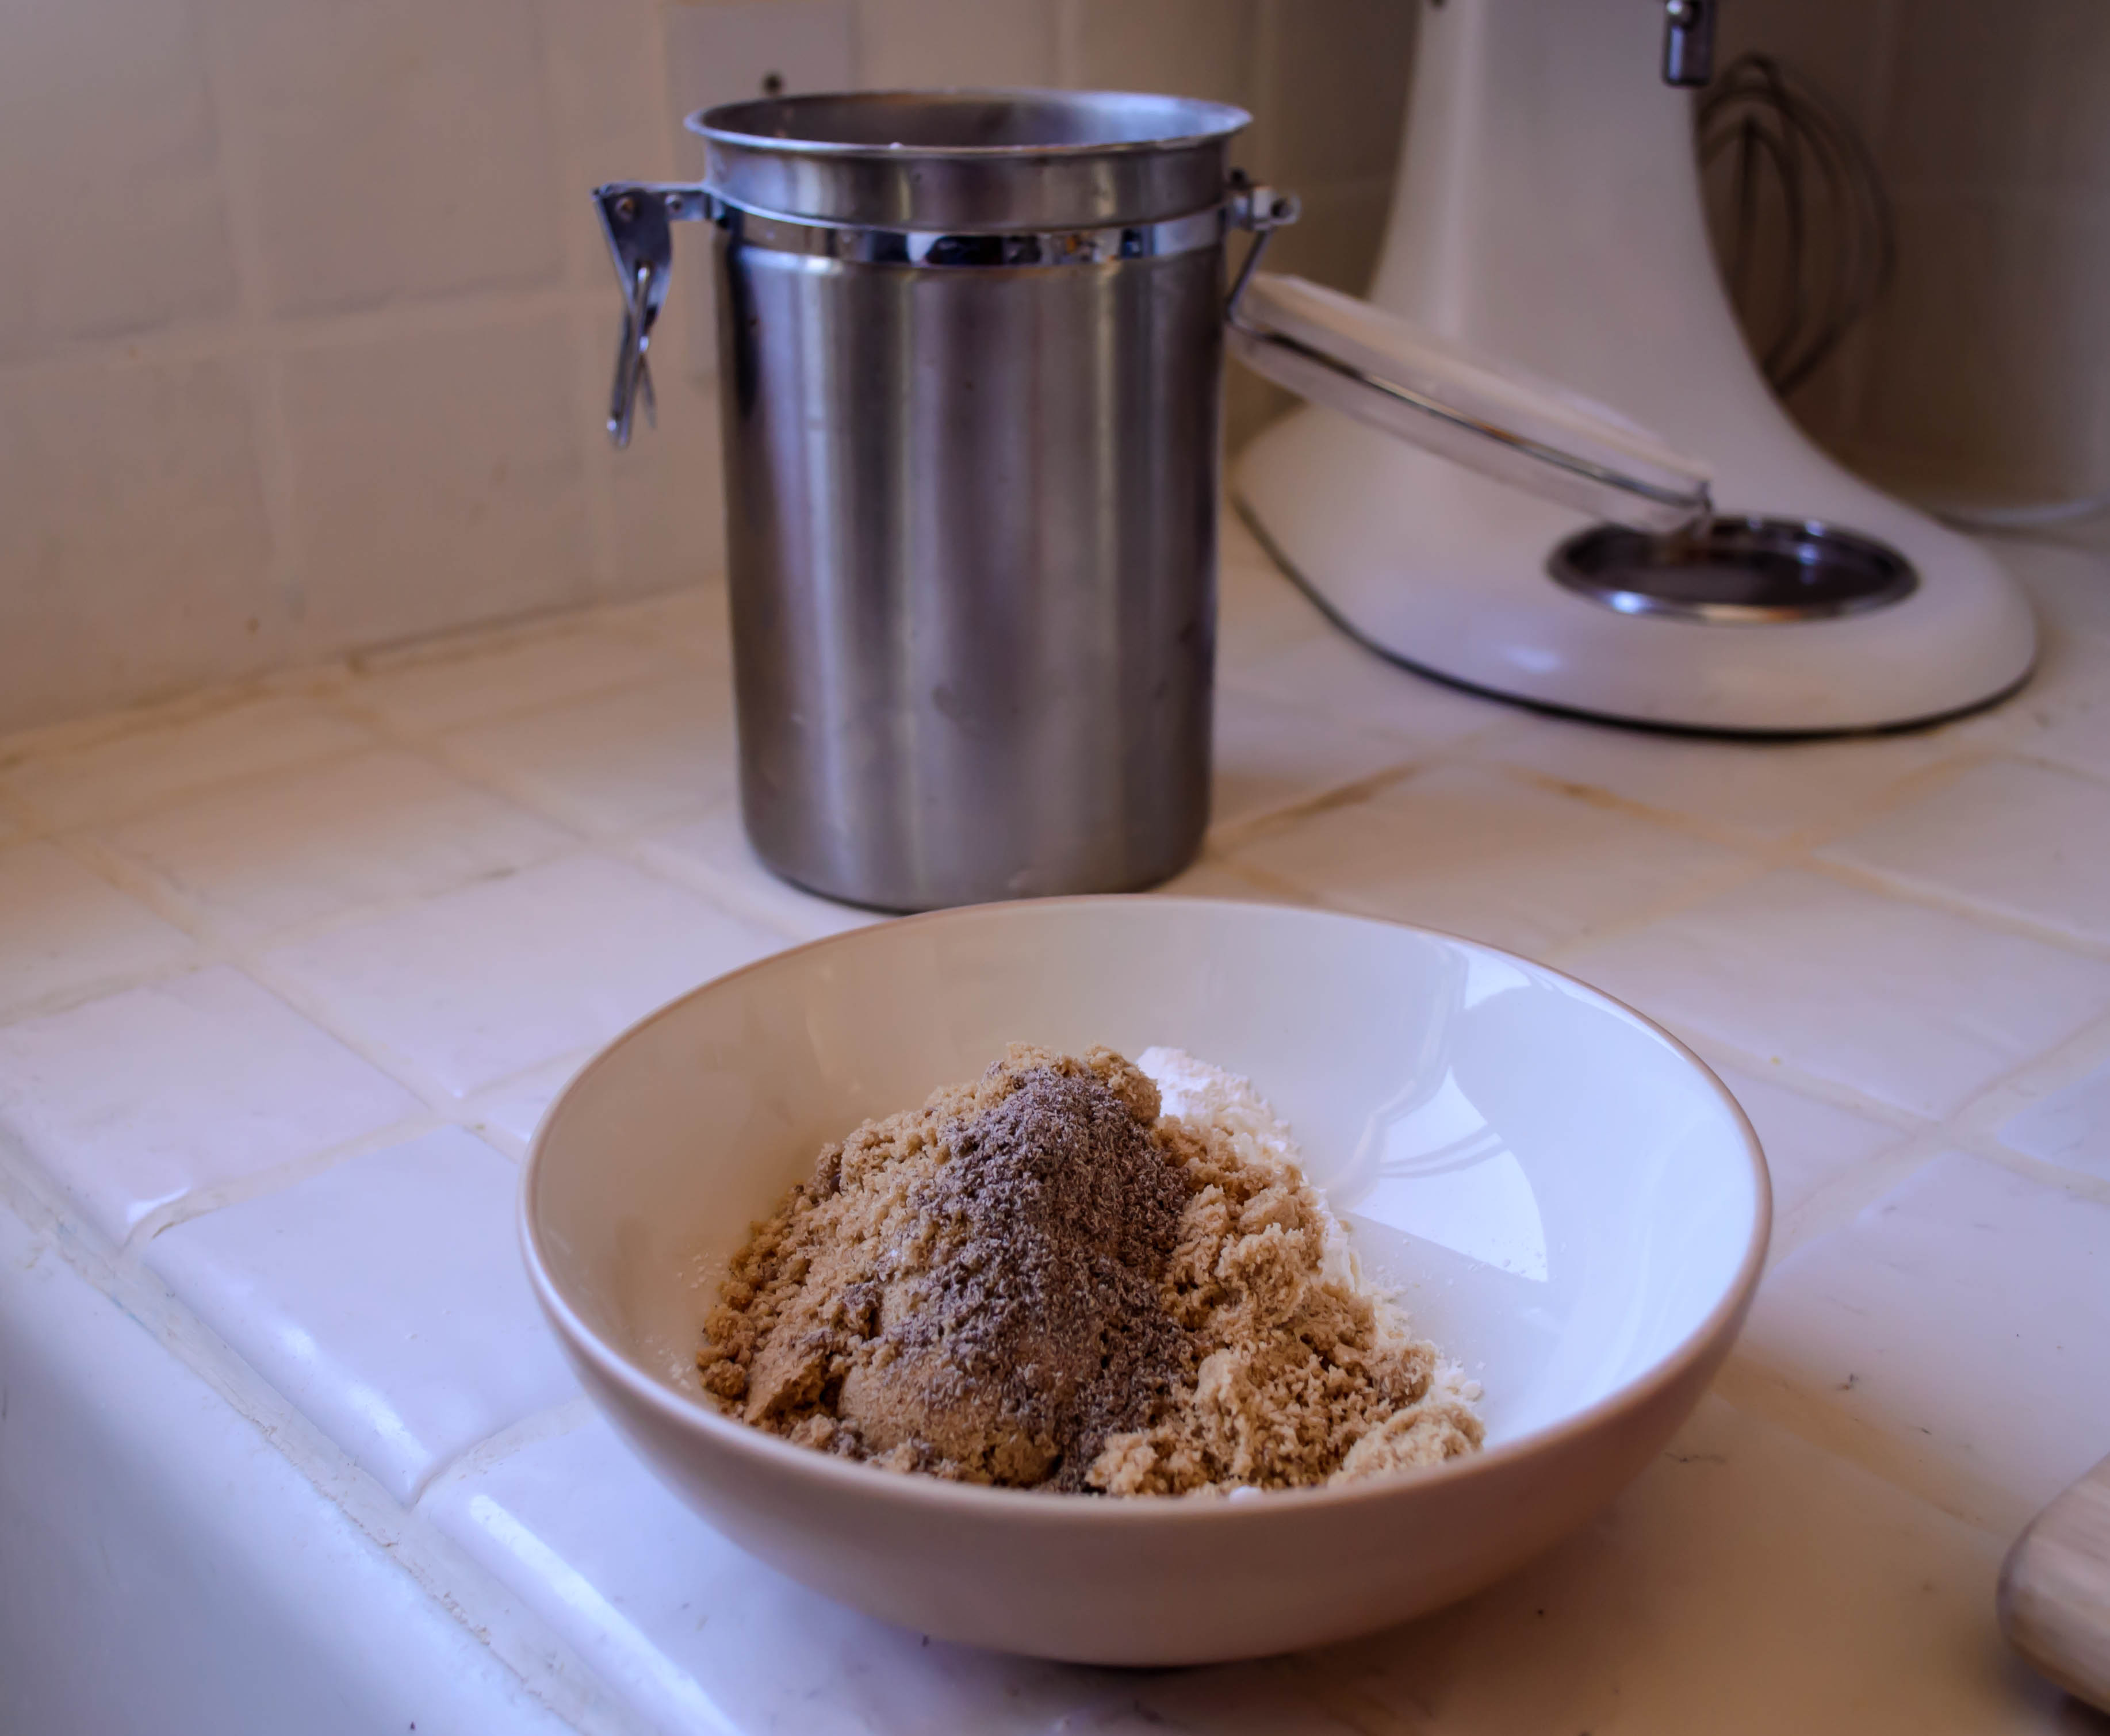
 From Nana’s original dough, I replaced water with milk, exchanged white sugar for brown, and added a healthy dose of cardamom. I suspect Nana never used cardamom in any of her baked goods, and likely never had any in her spice collection, but its pleasant citrusy aroma and warm spicy flavor go so beautifully with plums that I decided it was a necessary update. Since I was already playing quite a bit with what I imagine was Nana’s original procedure, I decided to go whole hog and add a simple streusel to the top just before baking. This was the right thing to do. A little extra spice, a little extra sweetness, turned crumbly in some places and melted into the plums in others, adding caramel loveliness to the whole thing.
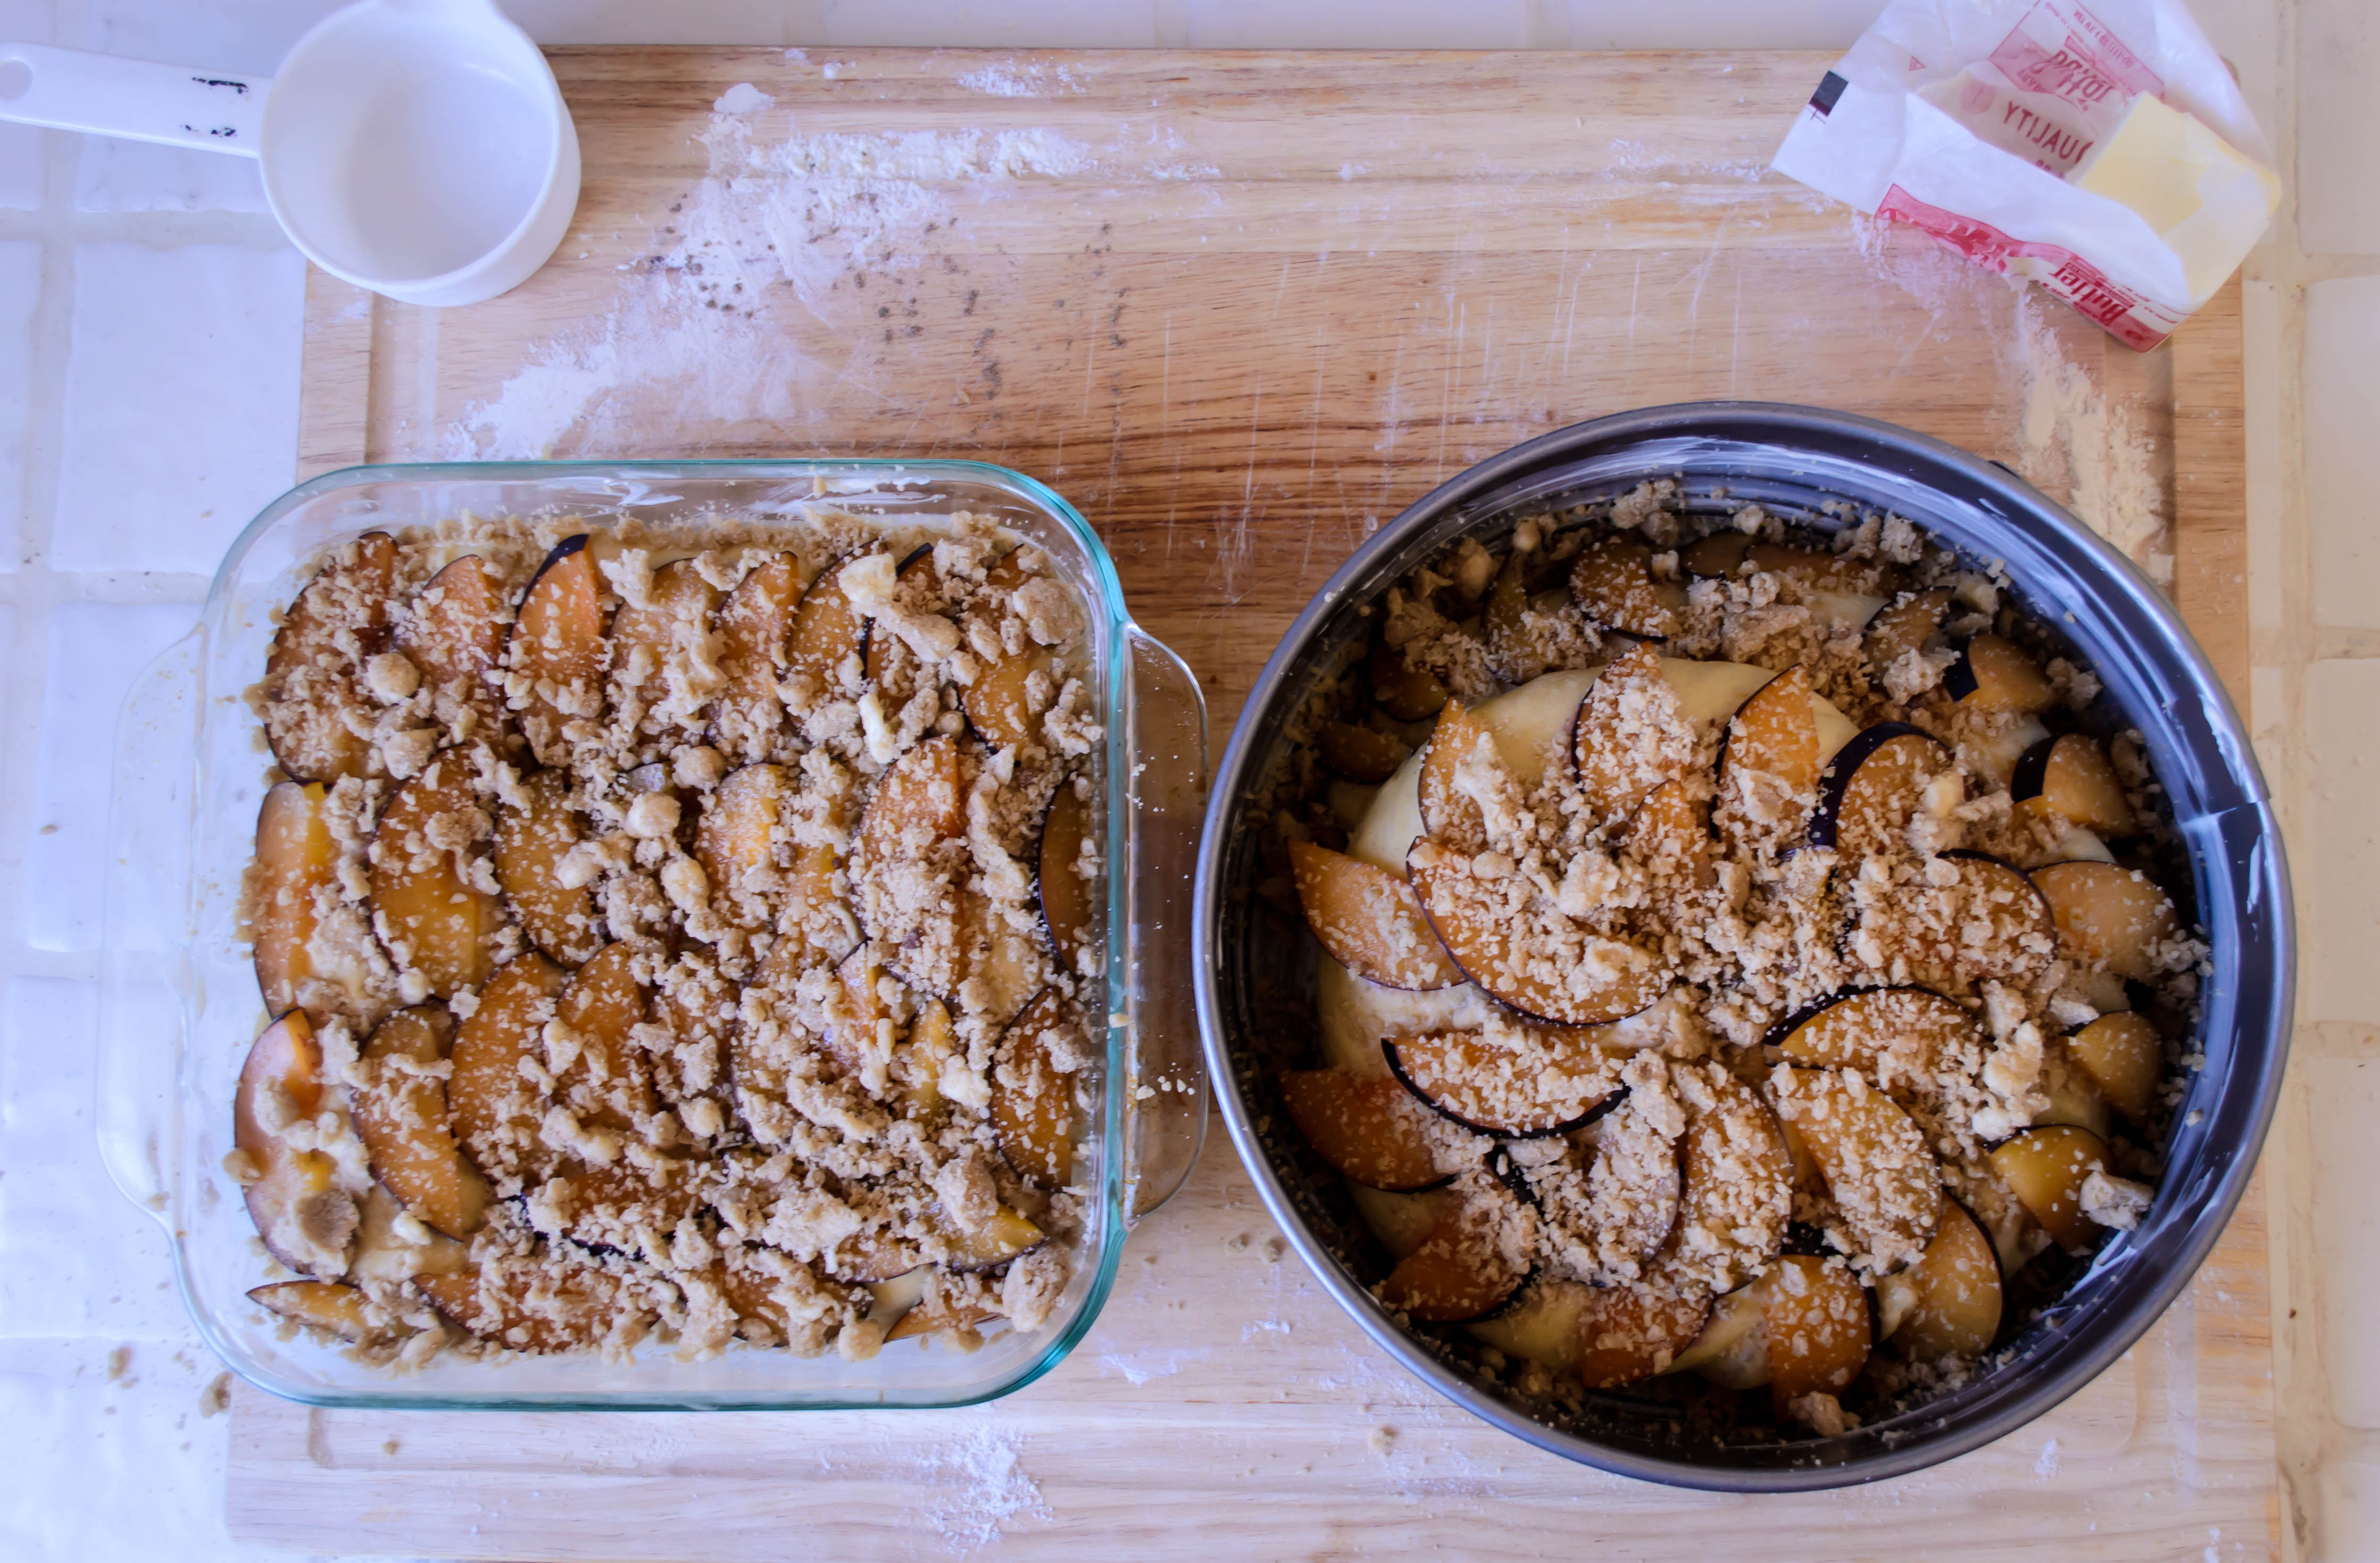
 Like Nana used to, I made enough dough for two cakes. Obeying the mandates of memory, I did one in a square pan. I wasn’t sure how it was going to turn out – just a hunk of dough flopped and poked into a pan – so for the other I tried for a twisted coil, laying the flat snail-shell of dough in a springform pan to rise. Interestingly enough, while adding streusel to the top was a successful adaptation, the pan and shape change was not so ideal. The square shape turned out better because it made for a more even distribution of plums. The coil, while it baked into a beautiful puffy spiral, was smaller to start with, which meant I couldn’t load on as many plum slices. When it expanded, both on the counter and in the oven, the plum distribution ended up a bit sparse (though the outcome was still delicious). The square shaped cake, which had nowhere to expand but straight up, retained its fruit coverage for a final product that can only be termed plummier. That, then, was the one I brought to work with me to share. By the time I left campus in mid-afternoon, only a tiny, plum-less corner remained.

 Nana, this is a good cake. I’m glad you made it, and I’m glad it was remembered. I don’t know whether you would have liked my version, and I know you wouldn’t have liked the mess I made in the kitchen while I worked on it. I do think, though, that you’d have liked the fact that I was happy while baking and that I made enough to share. And I think you would have liked that it made us all think about you so fondly.

A fabled land of farmers, farm shares, fancy (and not so fancy) restaurants, family meals, food projects and more.
cooking my way through my dissertation, one egg at a time
Fearless cooking from a tiny NYC kitchen.
food, in so many words.
Recreating the famous dishes of famous writers. Part recipe blog, part historical discussion, entirely unabashed love of books.
Epicurean Adventures from Eugene, Oregon
Celebrating the Harvest
Modern Iranian aka Persian Food & Culture Blog - Cuisine, Recipes, Stories , Photos, Pictures, DIY tutorials
Exploring Culinary Traditions of Africa, African America and the African Diaspora
food, in so many words.
food, in so many words.
food, in so many words.
Food-Stories-Recipes-Love
WordPress.com is the best place for your personal blog or business site.
