Project Cook: Soft-Centered Chocolates

Well. I wasn’t going to write anything today, especially not about this collection of chocolates I experimented my way through last weekend. But then E., a friend from college I had NO IDEA was following along (hi E! I’m so excited you’re here!!), asked on my humble-brag-okay-mostly-just-brag instagram post showing off my creations if I’d be posting the recipe or instructions here. And after I was done blushing, I remembered I had taken a few photos with my big camera along the way, and hey maybe I could put up a little something…

This collection was, as I said above, largely experimental, so I won’t be offering a precise recipe. I’d made three of them before with only a bit of adaptation: the amaretto truffles (top row), a white chocolate ganache spiked with amaretto as well as finely chopped almonds and dried apricots; the cranberry bourbon balls (second from bottom) were part of my Bittman project long ago, though in this iteration I used spiced rum, as one of my intended recipients doesn’t care for bourbon; and the whiskey caramels (bottom row), from the now long abandoned (I assume) blog Cheese and Chocolate, changing up that recipe only by coating the set caramel bars in dark chocolate and adding a sprinkle of sea salt on one corner.

What remains were, by rows, a failure-turned-unexpected-and-monumental-success (second from top); an easy win (third from top); and a disappointment (fourth from top or third from bottom, depending on how you’re counting). Just a little about each, and then a “recipe” and a few suggestions. The failure-turned-success I’m calling “White Russians”: an attempt at fudge that was too soft and poured out too thin, re-melted with more dark chocolate, some kahlua, and a little bit of vodka. This time it did set, so it got a coating of white chocolate and a line of espresso powder, and everyone who has tried it thus far has oohed and ahhed over it.

The “easy win” was a brandy and cherry truffle: a bit of brandy and a bit of luxardo cherry juice in the ganache, along with chopped luxardo cherries, a dark chocolate coating, and a dried cherry on top. I liked them and I wouldn’t say no to another (or two), but they aren’t the ones I keep coming back for. Maybe kirsch instead of brandy to heighten the cherry flavor?

The disappointment was one I made especially for R., who loooooooves the Middle Eastern confection halvah: basically a candy made from sesame and honey or sugar with a unique, sandy texture. I’d read this could be reproduced at home by mixing tahini and hot sugar syrup (I used honey), and tried out a recipe from The New York Times. While the flavor was great, the texture was somewhere between toffee and taffy: at first tooth-breakingly hard, then chewy enough to make me fear for my fillings. And despite halving the recipe, of course I ended up with more of these than of anything else. Nevertheless, I coated them in chocolate, sprinkled on some sesame seeds, and sent them along. None of my recipients has demanded I pay for their dental work yet, so I’m calling that a tentative success…

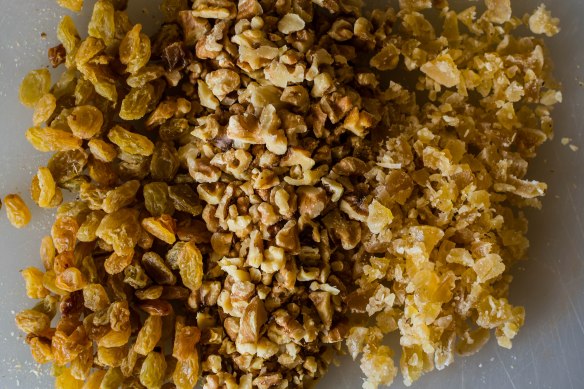
But enough of that, Chelsea, you’re probably saying. Tell us how to make the good ones. Right. Truffles and their ilk require three basic things: a ganache, which is a mixture of chocolate and (usually) cream, plain old melted chocolate to coat them, and some flavoring and/or decorating agent. Where it gets fun is in the flavoring: though you don’t want to overload the ganache that forms the center of your chocolates, you can probably crowd in as much as 1/4 cup of finely chopped dried fruit, or well-toasted nuts, or even candied citrus peel or crystalized ginger. Maybe even candy cane, if that’s your jam. I like to use a flavorful liqueur as part of the liquid component in mine, but you can replace that with something alcohol-free if you prefer – I’ve also used a ginger syrup as well as juice from luxardo cherries. I haven’t tried it, but a small amount of vanilla or almond extract would probably be great as well, or even one of those flavored syrups used for fancy coffee drinks or Italian sodas. And of course you could also just go pure with 100% cream.

Even though I said I wouldn’t, here’s a “recipe” and procedure. Let me know what you try, and may your holiday, if you celebrate this time of year, be bright.

Basic Ganache for Soft-Centered Chocolates
I’ve never timed myself on these – let’s estimate about 30 minutes to make the ganache, a few hours, or as much as overnight, to let it set, then another 30 minutes to coat the set centers. This is a project.
16 ounces semi-sweet, bittersweet, or white chocolate, divided
6-8 tablespoons heavy cream
Up to 2 tablespoons liqueur or liquid flavoring agent of your choice
Up to 1/4 cup finely chopped additions (see above for ideas)
Toppings of your choice, preferably related to the flavors inside
  • Prep a containment vessel: for 8 ounces of chocolate, I like to line a loaf pan with plastic wrap. You could probably also use parchment or wax paper; just be sure all the corners are covered.
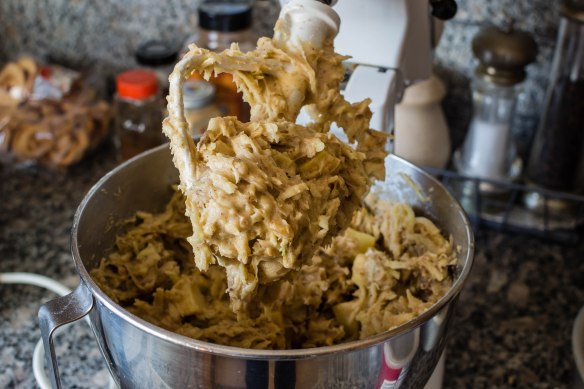
  • Melt 8 ounces of the chocolate and the cream in a double boiler, or (my preferred method) a glass bowl over a pot of hot water. Stir frequently, and don’t let the hot water touch the bottom of the bowl or splash into it. How much cream you use depends on how much liquid flavoring agent you want. With liqueurs and syrups I’d suggest 6 TB cream and 2 TB liqueur. With an extract, which are usually extremely strong, you’ll want more cream and less flavoring.
  • When the chocolate and cream have melted together smoothly, stir in the liquid flavoring agent, if you’re using it, as well as any finely chopped additions you’re using.
  • Carefully pour and scrape the whole puddle into your lined containment vessel and refrigerate until set. I usually leave it overnight, but realistically this doesn’t take more than a few hours. Once it has set completely, remove the block from the pan and slice it into your desired size squares or bars, keeping in mind they will be a little bigger once they are coated in chocolate. If your set ganache seems soft after slicing (this will especially be true if you are using white chocolate), take out some extra insurance by stowing the pieces in the freezer for a bit before coating them.
  • To coat, melt the remaining 8 ounces of chocolate, either semi-sweet, bittersweet, or white, in a double boiler. Place a big sheet of wax paper or parchment paper on your counter. Using a tool of your choice (I like a pair of forks for this), dip in each piece of ganache one at a time until completely coated, lift and wait a few seconds to let the excess drip off (or scrape carefully, if you’re impatient), then remove to the wax or parchment paper. If you are adding a topping of some kind, sprinkle or place it on before the chocolate coating hardens.
  • Let the coated chocolates sit until completely set, then box up as desired (mini cupcake wrappers work nicely to set them in), or just pop straight into your mouth. I won’t tell.

*** Other, less-involved ideas: dip dried apricots, or candy canes, or shortbread cookies in chocolate! If you want to be fancy, you could apply a white chocolate drizzle after letting them dry. You could also coat marshmallows, or pre-made caramels, or pieces of fudge in the melted chocolate of your choice (or, if you’re looking to mellow the sweetness of fudge, in straight cocoa powder). Prefer sprinkles to a chocolate drizzle? Get it. Crushed up candy canes to peppermint powder? Go wild.

Project Cook: Apple Spice Cake with Walnuts and Ginger

Sometimes dishes emerge from nowhere – no set, traceable inspiration; just an idea baked or simmered into existence. Philosophical. Cartesian cooking. Sometimes they are more geographical, linked to location and experience – blogs are rife with this, aren’t they? “This cake reminds me of my pilgrimage to…” But sometimes they are more narrative: visible evolution, each major ingredient or element its own origin story, entering the room at a moment that changes the direction of the final dish.

No surprise that the narrative method is one I favor. This magnificent stack began life as a carrot cake. That is, I wanted to make a cake, and after seeing (and resisting) a container of crystalized pineapple at the grocery store, carrot cake with crystalized pineapple sounded perfect. And then I thought about adding crystalized ginger too. And then I wondered whether some apple along with the carrot would be good, because fall, and pineapple turned into a third wheel that rolled away from the party. And then, inspired by old episodes I was watching of The Great British Bake Off, I wondered about adding dried apple, and maybe finely chopped, toasted walnuts to the filling instead of just plain cream cheese frosting, and suddenly the carrots – the very namesake of the cake! – started to feel out of place.

Suddenly I was planning an apple walnut cake. I tore through several cookbooks and a recipe site or two looking at various apple cake recipes – most rely on applesauce for both flavor and moisture, which I wasn’t interested in using – and came upon Deb’s roasted apple spice sheet cake, which does have a fair amount of applesauce, but also chunks of pre-cooked apples that, as she puts it, transform into “soft pillows of apple pie-like puddles.” I didn’t read much past that before deciding I, too, must have such puddles in my cake.

But I still wanted the moisture and freshness I knew shreds of raw apple would bring, and so while I dithered over recipes and quantities I remembered the cake’s initial origins and adapted my favorite carrot cake recipe: a triple layer extravagance from The Bon Appetit Cookbook that calls for pre-toasted nuts and a thick, rich, almost too sweet cream cheese frosting. Not much changes in the cake itself, aside from the significant shift from carrot to apple, except that I subbed in brown butter instead of the as-written vegetable oil, and as usual, it was a worthwhile extra effort.

This cake winds up so packed with threads of grated raw apple, toasted and chopped nuts, crystalized ginger, and the soft chunks of roasted apple, that it almost doesn’t feel like enough batter to encase the additions. The layers when you spread them into the pans are thin, but they do puff as they bake, into lovely, spicy, delicate layers you really do have to let cool for at least 15 minutes before taking them out of the pan. What became my middle layer, which emerged from the pan in six or seven moistly crumbling pieces, is proof positive of this. (Worth noting: if that kind of disintegration happens to you, reform the layer to the best of your ability on a sheet of plastic wrap, enclose it tightly, and put it in the freezer for half an hour or so before stacking and frosting. I was amazed by how well the pieces magically re-adhered.) If you’re worried about the fragility, I think you could get away with adding an additional ¼ cup flour to the recipe and still retain adequate moistness, but I haven’t tried this. If you do, let me know how it works out.

There are all sorts of other fun things you could do with the cake itself to change it up. Tart dried cherries would be lovely along with or instead of the golden raisins I’ve called for. Those raisins could easily be re-plumped in rum or brandy, a step I’m sorry I didn’t think of until my layers were already in the oven. The walnuts could be swapped out for pecans. You could play with the variety of apples you use – I almost always tend toward Granny Smiths or another tart green apple for cooking because I like their flavor and sturdiness, but you could mix and match as you please.

What I really want to talk about here, though, is the filling and the frosting. When I frost a cake, with a few notable exceptions, I typically put the same thing between the layers that I do around the outside. Here, though, whether it was thanks to Bake Off (likely) or just lightening strike inspiration, I wanted some texture in the filling, and the finely chopped mixture of dried apples and toasted walnuts woven through the cream cheese frosting was delightful.

As for that cream cheese frosting, it’s serviceable, easily pipe-able, and as rich and delicious as you could ever want. But N. and I noticed that, at least on the first day and despite the tablespoon of lemon juice I added for mitigation purposes, it is very, very sweet. Not surprising, given the number of cups of powdered sugar my recipe called for, but challenging for an insomniac to consider for an afternoon snack. So I have some thoughts, which I’ll admit I’ve tried exactly none of.

  1. You could decrease the quantity of powdered sugar down from 4 to 3 cups (you might end up wanting to add less vanilla as well, if you do this). This will produce a wetter frosting that might be harder to pipe, if that’s what you’re going for, but I think it would probably still spread successfully and stay where you put it.
  2. You could make the frosting a day ahead (would that make a difference? I don’t know…). Or, perhaps more logically, you could plan to make the whole thing a day before you serve it. We thought the whole cake tasted great – maybe even a bit better – after a night in the fridge.
  3. You could add a dried spice or herb to the frosting for an additional, not-so-sweet flavor. I thought first of ginger, which would make sense with the spices in the cake, but then, quite unconventionally, I thought of sage. Good with apples, decidedly savory, and about as stereotypically Fall as you can get, would a teaspoon or so of dried sage, finely crumbled and beaten into the frosting, tamp down that sweetness a bit?
  4. You could go the “naked” or “semi-naked” route, using only a small amount of frosting and spreading it on such that the sides of the cake artfully show through. You’ll have a fair bit of frosting left over if you opt for this route, but cream cheese frosting freezes quite well so I don’t see that as a bad thing. Emergency back-up frosting feels like a good idea.

Since I’m sure you’re limiting your social gatherings at this point and thus you might not be sure you really want a triple layer cake sitting around, you’ll be happy to know that this cake is a good candidate for freezing. We ate, over the course of I’m-ashamed-to-admit-how-few-days-it-was, about half of it, and then I carefully plastered over the cut portions with some extra frosting so no cake was exposed. Leaving the fully frosted cake in the fridge overnight ensures the frosting crusts a little bit, which makes it easy to wrap securely in plastic wrap and deposit in the freezer until you next need a rich, spicy, sweet reminder of fall.

Apple Spice Cake with Walnuts and Ginger
Adapted from The Bon Appétit Cookbook
Makes 3 9-inch layers, serves 10-12
About 90 minutes, plus cooling and frosting time
For the cake:
1 cup walnuts, divided (see filling and frosting ingredients, below)
4 large, tart apples, like Granny Smiths, peeled, divided
1½ cups unsalted butter (3 sticks)
2 cups granulated sugar
4 large eggs
2 cups all-purpose flour (as noted above, if you’re worried about very fragile layers, you could probably get away with 2¼ cups flour, but I haven’t tried that yet)
2 teaspoons baking soda
2 teaspoons baking powder
1 teaspoon salt
1 teaspoon ground cinnamon
½ teaspoon ground nutmeg
¼ teaspoon ground cloves
¼ teaspoon ground ginger
½ cup golden raisins (optional: soak in warmed rum or brandy for 10-20 minutes to rehydrate, then drain)
¼ cup chopped crystalized ginger
For the filling and frosting:
½ cup dried apples, finely chopped or cut with kitchen scissors
¼ cup finely chopped walnuts, from the 1 cup total listed above
½ cup unsalted butter (1 stick), at room temperature
16 ounces cream cheese, also at room temperature (I prefer Philadelphia brand)
1 tablespoon vanilla extract
1 tablespoon lemon juice
4 cups powdered sugar (see numbered thoughts on frosting sweetness, above recipe)
Optional: extra dried apples, crystalized ginger, and cinnamon, for decoration
  • To make the cake, preheat the oven to 375F and put the walnuts on a baking tray in the oven to toast while it is preheating. When they smell fragrant and have darkened slightly in color, they are ready. Remove and set aside until cool, then chop roughly.
  • Quarter and core 2 of the peeled apples, arrange on a foil-lined baking sheet and roast in the preheated 375F oven until they are browned underneath and dry to the touch, about 20 minutes. When done, set them aside to cool, then chop them roughly into chunks of your desired size.
  • Meanwhile, brown the butter and prepare the remaining apples. For the butter, melt all 3 sticks in a medium saucepan and let cook over medium heat until the solids on the bottom take on a toasty brown color. First it will foam up, then subside, then brown. It’s easiest to use a pot that does not have a dark surface, since you can see color changes in the butter more easily. Once those bits have browned, remove the pot from the heat and let cool.
  • For the remaining two apples, grate on the large holes of a box grater or use the shredding disc of a food processor (be careful to avoid stems and seeds). Gather the shreds into a clean kitchen towel and give them one good squeeze, then set aside. Don’t squeeze them out too much; we want some of that moisture for the cake.
  • Once all your pre-cooked ingredients have cooled down, lower the oven temperature to 325F and make the batter. In a large bowl (I used the bowl of my stand mixer), beat the sugar and the cooled brown butter together. Be sure to scrape in all of those browned bits from the bottom of the pot – that’s where much of the toasty flavor resides! Add the eggs one at a time, beating well.
  • Add the dry ingredients, sifting if you want to bother. I never do.
  • Stir in the golden raisins, ¾ cup of the toasted, roughly chopped walnuts, the crystalized ginger, and the grated apple. Finally, gently fold in the chunks of roasted apple.
  • Divide the mixture evenly between 3 well-greased 9-inch round baking pans. You can line with parchment paper too, if you want the extra insurance. The layer of batter in each will be thin. If you, like me, only have two 9-inch pans, bake two layers first, then use one of those pans again for the final layer after the first batch has cooled a bit.
  • Bake in the preheated 325F oven until a toothpick inserted comes out with just a few moist crumbs, 30-35 minutes.
  • Cool layers in pans for at least 15 minutes, then remove from pans and cool completely. I’m serious about that 15-minute thing, by the way. Trying to take them out before that could result in disintegration!
  • To make the frosting and filling, finely chop the remaining ¼ cup of walnuts and combine with the finely chopped dried apples in a small bowl.
  • In a large bowl, beat together the room temperature butter, cream cheese, vanilla, and lemon juice until well combined. Scrape down the sides of the bowl and the beaters to ensure full integration.
  • Add the powdered sugar ½ cup at a time, to prevent cough-inducing clouds, and beat well after each addition, until the frosting reaches your desired thickness.
  • Scoop out about 1 cup of the frosting and add it to the small bowl with the walnuts and dried apples; use a flexible spatula to mix in. This is your filling.
  • To fill and frost the cake, position one fully cooled cake layer on a plate or cake stand. (If you are messy like me, you might want to arrange strips of wax paper to cover the exposed parts of the cake stand or plate while you frost.) Using a flexible rubber or an off-set icing spatula, spread about ½ of the filling evenly over this first layer of cake, going all the way to the edges. Add the next layer of cake and repeat, then top with the final layer of cake.
  • Use the remaining cream cheese frosting to frost the cake as desired. If you want to do a crumb coat, use a small amount of frosting to coat the entire cake, not worrying about full coverage. When done, pop it in the fridge for a few minutes to let any crumbs that have come unstuck from the cake set into the frosting as it chills. Then remove from the fridge and continue. I usually scoop about two thirds of the frosting right onto the top layer of cake, then use an off-set spatula to gently push it toward the edges of the cake and down the sides, filling in any uneven gaps and creating as smooth a surface as I can. You may end up with extra frosting, which is convenient if you are thinking of freezing part of the cake, as explained above.
  • This looks lovely with just the frosting, but if you want to decorate a little, consider artfully arranging a few dried apple rings and chunks of crystalized ginger in the center of the cake, then dusting the top edge with cinnamon before slicing and serving.

Project Cook: Fig Olive Stout Country Loaf

Well. I know it’s been a while, and I know Halloween is over, but here we are just one agonizing day away from a nation-altering election that promises to be either a trick or a treat. If you’re an American, I hope you’ve voted. It’s too late now to mail in your ballot, but you can still drop it off at an official collection station, and you can still go in person tomorrow.

This loaf, too, which I baked on Halloween, has elements of trick and treat. The inspiration came from a snack we had a few years ago at a local brewery: a fig and olive version of that perfect Trader Joe’s savory-sweet raincoat cracker, spread with brie, was perfect with our nearby Scholb Brewery’s then-on-tap Contemplation Porter. I dutifully recorded this as an idea for a loaf in my “blog ideas” file, and promptly forgot about it until a week or so ago, when I decided it was time to see what kind of crackly crust I could get baking in my dutch oven.

The treat is, of course, the sweet and savory combination, surprisingly good, of dried figs and briny kalamata olives. In a nod to its brewery muse, to help out the yeast and amp up the roasty flavors of the finished product I’ve used stout in the dough instead of water (but you could certainly sub water back in if you prefer). The final loaf is dense but still bouncy, with a lovely chewy interior and bursts of sweet and salt from the olives and figs. Baking in the dutch oven results in a wonderful crust – thin but still crisp, with none of the leathery heaviness a homemade boule can sometimes produce.

The trick came, at least for me, in the handling. I adapted this recipe from Baking Illustrated’s basic Country Loaf. It’s a wet dough from the outset, not one I’d want to attempt without my stand mixer – kneading by hand would be quite sticky. It starts with a biga or sponge for overnight rise (a biga, sponge, or poolish is a form of a leavening method that operates similarly to sourdough, except you offer a bit of yeast for the flour and water to start with and only allow it to work overnight so there’s no true sourness. Depending on how long it works and how active the yeast is, this can affect moisture levels). On top of that, I went and added more than a cup of fruit. This rendered the shaping and scoring all but impossible, yet I still somehow wound up with a nice boule, its crust flour-dusted like a good artisan loaf, such that you’d never know the first rise produced a worryingly floppy puddle of goo. You’ll notice there are no photographs of the folding and shaping procedure. That’s why.

Lots of heaviness in this recipe – fruit aside, it also has a healthy dose of rye flour – means rising and baking take a good while, not to mention that whole starting the night before business. Baking Illustrated recommends a final internal temperature of a staggering 210F, and then you’ve got to twiddle your thumbs while it cools so the crumb structure inside can set up nicely. But accompanied by a pint of the same beer I used inside it, with a smear of triple cream brie on top, it was a late afternoon treat worth both the wait and the trickery.

Fig Olive and Stout Country Loaf
Adapted from Baking Illustrated
This is a 2-day project: day 1 = about 20 minutes, plus overnight rise. Day 2 = about 6 hours, including rising times + 2 hours to cool
Makes one large, round loaf
Sponge/biga
½ teaspoon instant or active dry yeast
1 cup room temperature water
1 cup bread flour
1 cup whole wheat flour
Dough
3–3½ cups bread flour, plus plenty of bread flour or all-purpose flour for shaping
¾ cup rye flour
1⅓ cups room temperature stout or porter (or water)
2 tablespoons honey
2 teaspoons salt
½ cup quartered (if you’re feeling fussy) or coarsely chopped (if you’re not) kalamata olives, patted dry on a paper towel
¾ cup stemmed and sliced (again, if you want to fuss) or coarsely chopped (if you don’t) dried figs


  • The night before you bake the bread, stir together the biga/sponge ingredients in a large mixing bowl. I used the bowl of my stand mixer, since that’s where I made the dough. Cover with plastic wrap and leave overnight.
  • The next day, the biga should look bubbly and smell slightly fruity. Add 3 cups of the bread flour, all of the rye flour, the beer, and the honey, to the biga and stir it together with a rubber spatula. Switch to the dough hook of a stand mixer and knead on the lowest speed for 15 minutes, adding the salt, the olives, and the figs during the final 3 minutes. If the dough is extremely sloppy, add the remaining ½ cup bread flour 2 tablespoons at a time, until it reaches a consistency you feel more comfortable with. It should be smooth, but still fairly relaxed and sticky. Cover with plastic wrap and let rise until tripled, at least 2 hours.
  • To prepare for shaping, flour a surface extremely well. Line a baker’s brotform, a basket, or a colander with a heavily-floured square of muslin or linen (I used a linen napkin). Flour your hands too; this is going to be sticky.
  • Turn out the dough onto the floured surface. If it’s anything like mine, it will puddle out somewhat distressingly. Be brave. Dust the top with flour, then lightly encourage it into a round by folding the edges of the dough into the middle from the top, right, bottom, and let, sequentially. Gather it loosely together. With the help of a bench scraper, if needed, transfer it quickly to your lined vessel, smooth-side down. Cover loosely with a large sheet of aluminum foil (we want the dough to be able to breathe a bit), and let it rise again until almost doubled in size, at least 45 minutes.
  • While the dough is rising, preheat the oven to 450F with a pizza stone or the bottom of a dutch oven on a rack in the middle position.
  • For baking on a pizza stone: place a small, empty baking pan on the bottom rack or the bottom of the oven, and prep 2 cups of water in an easy-to-pour container. Cover a pizza peel or the back of a large baking sheet with a large piece of parchment paper. Invert the risen dough onto the peel and remove the muslin or linen cloth carefully. Use a razor blade or very sharp knife to score the top of the dough. With scissors, trim the excess parchment until there is just an inch or so on all sides. Slide the dough, still on the parchment round, from the peel onto the preheated pizza stone, removing the peel with a quick backward jerk. Pour the 2 cups of water into the preheated pan at the bottom of the oven, being careful to avoid the steam, and close the oven door quickly. Bake until the internal temperature of the bread reaches 210F and the crust is very dark brown, 35-40 minutes.
  • For baking in a dutch oven: remove the preheated pot from the oven and set carefully on the stove. Place a large piece of parchment paper over the bottom of the dough in the colander. Hold the excess edges of the parchment and quickly, carefully invert so the round of dough drops directly into the dutch oven with the parchment underneath it. Don’t worry about the excess parchment edges. Use a razor blade or very sharp knife to score the top of the dough. Put the lid on and place the whole thing in the oven. Bake for 25 minutes with the lid on, then remove the lid and bake another 15-20 minutes, until the internal temperature of the bread reaches 210F and the crust is very dark brown.
  • For both methods: after the bread reaches an internal temperature of 210F, turn off the oven, open the door, and let the bread remain in the oven for 10 more minutes. Remove to a cooling rack and let it sit for at least two hours before slicing.
  • Serve with beer and creamy, spreadable cheese, or as desired.

Project Cook: Garden Focaccia

A garden path sentence is one in which the reader is misled, usually by a word or two that function(s) as a different part of speech than the reader expects, making the rest of the sentence seem incomplete or nonsensical when it is in fact grammatically correct. It takes its name from the idiom “to lead [someone] down the garden path”: essentially, to mislead or deceive them.

Here’s an example: “the old man the boat.” We initially see the phrase “the old man” and think that’s the subject of the sentence. Therefore, the ending “the boat” makes the sentence feel incomplete. But when we realize “man” is actually the verb and the subject is “the old,” suddenly it makes sense: this ship is being sailed by retirees.

Here’s another: “the horse raced past the barn fell.” Here, everything makes sense up until the last word if we’re reading the sentence with “the horse raced” as an active phrase. But it’s not, and it’s not the barn that fell either: the sense of the sentence only emerges if we understand what’s really being said is “the horse [that was] raced past the barn fell.”

Garden path sentences were introduced to me by one of my students a few years ago, and they blew my mind a little, but they shouldn’t have. Not only do I know full well as a student (and teacher) of words that sentences haven’t truly completed their meaning until their final punctuation mark is reached, but as a lover of food, I know that an expected direction, or perhaps being “led down the garden path” with an illusion or a twist, sometimes makes the dish that much more enjoyable.

It seems a bit cruel, perhaps, in a world in which the baking aisle of so many grocery stores has been ransacked, to show you a loaf of bread, but I was so taken with the images of decorated focaccias my Pinterest page was suddenly showing me, as taken as I was with the idea of garden path sentences, that here we are: a loaf literally studded with deceptive visuals, turning carefully placed herbs and vegetables into an edible flower garden.

I started with Anne Burrell’s recipe, making only the smallest of adjustments: she uses AP flour; I went with bread flour, reduced the olive oil a touch, and subbed in honey for the sugar used to start up the yeast. As for process, I added a step I’ve always done with my mom’s challah, letting the mixture – more batter than dough at that point – rest for 15-20 minutes after adding about half the flour. I think this gives a truer sense of how much flour is really needed, since the initial addition has a chance to start hydrating. It’s not 100% necessary, but I notice it means I wind up using a bit less flour overall, and that’s not a bad thing these days.

The real magic here – where we verge into complexity and deception – is during the rising: while the first rise is standard, letting the dough swell and double in a bowl, the second requires more unusual methods. You spread the risen dough out on an oil-drenched baking sheet (be sure yours has sides!), coaxing it with your fingers to spread reluctantly all the way into the corners. You press and stab your fingers all the way – all the way! – through the dough, making dozens of small holes straight down to the baking sheet below, to create that characteristic bubbled texture of a focaccia, before allowing it to rise again.

Halfway through this second rise comes the fun part – or the fiddly part, depending on who you are. Assorted herbs, thinly sliced vegetables and citrus zest, get pressed gently but firmly into the partially risen dough to form whatever patterns you desire. I used chives, parsley, and dill for “stems” and leaves, and then slender segments of olives and cherry tomatoes for “flowers,” and some curls of lemon zest for extra flair. I tried to roll a few tomato roses, but for me at least, cherry tomato skins provided not quite enough material to work with.

The finished loaf is quite the spectacle – the brightness of your “garden” fades a bit in the baking (there’s a metaphor here for spring into summer, perhaps), but the bake isn’t quite long enough for the delicate herb stems and leaves to burn – instead they crisp and frizz as residual oil soaks into the bread. You have to saw carefully with a bread knife to keep everything in place as you carve off big slices perfect with a salad, or a bowl of soup, or the base of a sandwich, or just straight out of hand. There’s a joke here about a garden variety of options, but I’ll leave you only with this: as he baked the bread disappeared.

It must have been delicious.

Project Cook: Garden focaccia
Adapted from Anne Burrell
Makes 1 large 9×13 inch loaf
1¾ cups warm water
2 teaspoons yeast
1 TB honey
4 ½ – 5 cups bread flour
½ + ⅓ cup olive oil
1 TB kosher salt + more for sprinkling
Assortment of herbs, vegetables, and/or edible flowers to decorate
  • Mix yeast, water, and honey in the bowl of a stand mixer and let sit 10-15 min, until the yeast is foamy and puffed. Add 3 cups of the bread flour and ½ cup of the olive oil, beat on slow speed with the paddle attachment just until the mixture comes together, then loosely drape with a clean kitchen towel and let sit 15-20 min. This allows the flour to begin hydrating and the yeast to start working.
  • Add 1 cup more flour and 1TB salt, then knead at medium speed with the dough hook 5-7 min until smooth and elastic. Sprinkle in remaining flour ¼ cup at a time if dough seems very sticky while kneading. I ended up using the full 5 cups of flour.
  • Cover with a clean kitchen towel or plastic wrap and let rise until doubled, about 1 hour in a warm spot. “Punch down” the risen dough by gently depressing your fist into the middle.
  • Pour the remaining ⅓ cup olive oil onto a 9×13 inch cookie sheet with sides and tilt the sheet back and forth until the bottom and sides are well oiled. Flop the risen, punched down dough onto the oiled sheet, then use your fingertips to coax it toward the sides. As you stretch the dough, create focaccia’s characteristic dimples by pressing and stabbing all the way through the dough all over its surface. You have to create actual holes, not just depressions, to retain the texture. Some of the olive oil from the baking sheet will lap up over the surface of the dough – that’s okay.
  • Cover the dough with your towel again and let it rise for another hour.
  • 30 minutes into the second rise, preheat the oven to 425F and add your decorations to the loaf: press in herbs, vegetables, and/or flowers in a pleasing pattern. Finish the rise, sprinkle on some kosher or coarse salt, then bake in the preheated 425F oven for 25-30 minutes until bronzed and crusty. Mine was quite well browned after 25 minutes.
  • Remove to a wire rack to cool before slicing carefully and devouring.

Project Cook: Seeded Pumpkin Biscotti

A few weeks ago, Irvin from Eat the Love posted on his instagram feed that he wasn’t seeing many pumpkin recipes from the bloggers he follows, and both politely and in fun, essentially told everyone to step it up! Instantly (although I’m definitely not one of his favorites – I doubt he knows I exist!) I knew I wanted to make pumpkin biscotti, using one of his tricks (more on that later). I would stud them generously with pumpkin seeds since I’d had that bag of pepitas in the pantry forever,* and maybe some other nuts, and top them with coarse, crunchy sugar or a criss-crossed shiny glaze, and I’d be right on trend.

And then, of course, I didn’t. Instead we had friends over, and I graded papers, and the kitchen was too warm, and I lost track of my biscotti for a while, but this past weekend, in between setting out Halloween decorations (and, of course, more grading), I finally got down to it. Supplies bought, I went looking for the rest of the ingredients, and after tearing through my pantry shelves, realized the wellspring inspiration for the whole recipes – the pumpkin seeds – were nowhere to be found.

Cut to me, grumbling and grouchy, on an emergency trip to the nearest grocery store, scouring what felt like every aisle until I finally found some, in measly little 2 ounce packages, next to the cocktail peanuts. Project back on track.

For the base dough, I turned to the gurus at King Arthur Flour. While their recipe looks delicious, I knew I wanted to raise the stakes a bit with various sources of crunch, and – here’s where Irvin becomes important for this recipe again – I wanted to use his pumpkin trick of drying the puree out on the stove before integrating it into the recipe. The problem with pumpkin, as I’ve noted previously, is its massive moisture content. The KAF recipe contains only ½ cup pumpkin puree, likely because it’s so wet that adding much more would not allow for crunchy cookies. I figured since I was going to reduce the moisture so much I could increase that quantity by half. This would give me a dryer ingredient with a more intense pumpkin flavor.

But making my mixture less wet entailed potential recipe problems. Biscotti should be crunchy, but reducing moisture content too much could lead to stale-tasting cookies, or a mix that didn’t hold together properly. Time to do some research. My favorite biscotti recipe, from the very first issue of Bon Appétit I ever bought, is flavored with lemon and walnut and has become a family Christmas standard. It differs considerably from the KAF recipe for pumpkin biscotti, with more egg, a good bit more butter, and of course a staggering 3 cups of chopped walnuts I was not planning to come even close to. The recipe creation then became guesswork, which involved a series of texts between me and my sister to try and figure out how to proceed.

I settled on increasing the amount of egg and butter, but not quite as much as my old reliable standby. Since I’d be adding nuts and seeds, I also opted to change up KAF’s procedure a bit to match the one I was used to: rather than putting the shaped, sticky batter straight into the oven, I wrapped mine in plastic wrap (which also helps shape it – more below…), chucked it into the fridge for a few hours, and then unwrapped and baked it once it had firmed up.

My go-to lemon and walnut biscotti recipe advocates cooling the flattened dough logs completely after their first bake, then slicing, lying the cookies down on their cut sides, and baking again at low heat. The KAF recipe I was half-following suggests cutting while still hot, then baking again with the cookies standing up on their flat bottom edges. I was intrigued and tried this new way, and I might never go back. Yes, the slicing requires delicacy, especially because the pumpkin seeds and pistachio pieces are harder than the surrounding dough, but cooking them standing up means first: the coarse sugar you press into the top stays put, and second: they brown evenly on both sides. Even browning, sugar-crunch layer, and you can even fit more on the baking tray at once. Say no more. I’m sold.

But I guess really there is one more thing to say, and that’s our assessment. These are outstandingly delicious. They are spicy and crunchy and not too sweet, and though the pumpkin flavor is mild it’s definitely there. The sparkling coarse sugar on top is perfect against the earthiness of the nuts and pumpkin seeds inside. It’s a good thing I’m taking a batch in to work tomorrow, because by the time I remembered I should count how many cookies this recipe made to report here, we had already eaten… enough of them… that guesswork was required, and when I realized I was eating what might have been my fourth in an hour or so, I sentenced them all to wait in a hard-to-open Tupperware on top of the fridge with the Halloween candy so they would be harder to access. We will certainly make these again, as should you. And I’ve already plotted out a version with amped up ginger and chopped dried apples for Christmas. Move over, lemon and walnut standard. Or at least be ready to share the plate.

* for a clear explanation of the difference between pepitas and plain old pumpkin seeds, see here.

Seeded Pumpkin Biscotti
Adapted from King Arthur Flour
Makes approximately 3 dozen
About 4 hours (including resting time) or overnight
1 cup pumpkin puree
½ cup pepitas
½ cup roughly chopped pistachios
6 tablespoons unsalted butter, softened
⅔ cups granulated sugar
1½ teaspoons ground cinnamon
¼ teaspoon ground nutmeg
scant ¼ teaspoon ground ginger
1½ teaspoons baking powder
½ teaspoon salt
2 eggs
2 cups all-purpose flour
1 tablespoon flax seeds
2-3 tablespoons coarse sugar, such as turbinado or demerara, for sprinkling


  • In a small skillet, cook the pumpkin puree over high or medium-high heat for about 15 minutes, stirring frequently, until the color has deepened and the puree has dried and has a texture something like a thick, crusted frosting. It will be reduced by about half. Set aside to cool.
  • While the pumpkin puree is reducing, if desired, toast the pepitas and chopped pistachios in a 300F oven for about 10 minutes. Set these aside to cool as well.
  • In a large bowl, or the bowl of your stand mixer, cream together the butter and granulated sugar. Add the cinnamon, nutmeg, ginger, salt, and baking powder, and beat with the paddle attachment until smooth and creamy.
  • Beat in the eggs and the cooled pumpkin puree until well combined. The pumpkin will take a minute or two to fully integrate.
  • With the mixer on low speed, add the flour a ½ cup at a time, then the flax seeds and the cooled pepitas and pistachios. Be sure to scrape the bottom of the bowl once or twice to ensure everything is mixed in. The resulting mixture will be very sticky.
  • Cut two pieces of cling wrap and spread them out on a clean counter. With a determined spatula, scrape half the dough mixture onto each. Using the plastic wrap, push and mold the dough into two long rectangles of about 10 x 2½ inches. Wrap them up in the plastic wrap, put them on a cookie sheet or other flat tray, and stow in the fridge for at least two hours, or overnight.
  • When you are ready to bake, preheat the oven to 350F. Retrieve the dough logs from the refrigerator, unwrap them from the plastic wrap, and position them an inch or two apart from one another on a parchment lined baking sheet. Sprinkle the tops with the 2-3 tablespoons coarse sugar, then use your hand to spread the sugar evenly and gently press it in to the top of the dough a bit so it adheres.
  • Bake the dough logs for 25 minutes; they will be just firm. Remove from the oven and let cool 10-15 minutes. Meanwhile, reduce the oven temperature to 325F.
  • After 10-15 minutes, use a sharp serrated knife to cut the logs crosswise into ½ inch slices. Use a gentle sawing motion to avoid breaking up the slices, which will still be very delicate at this point. Some of the nuts and seeds will be harder to cut through. Be sure to cut as straight up and down as possible; if the biscotti are thicker on the top than the bottom, they won’t stand up correctly for their second baking.
  • Stand the biscotti on their bottom edges on the same parchment lined baking sheet you used to bake the flattened logs. They can be fairly close together but should not be touching. Carefully return the pan to the 325F oven and bake for 40-45 minutes, until they are getting golden brown around the edges. They will still be soft in the middle.
  • KAF recommends turning off the oven, cracking the door, and allowing the biscotti to cool completely while inside, likely to ensure the finished cookies are crunchy. I did not do this because I had something else I needed to bake; I cooled them in the oven only 5 or 10 minutes, then removed the pan to a counter top and let them cool completely. Mine were still perfectly crisp all the way through.
  • Serve when completely cooled. Perfect with coffee, chai or other tea, or straight off the pan.

Project Cook: Herbed Fougasse (no recipe)

There’s a new season of a certain baking show out on Netflix which, at least in the US, they are releasing only week by week. I’m salivating to watch it, but because I know I can’t control myself, I’m not letting myself start until I have a good backlog of episodes built up. Instead, I’m watching… wait for it… older seasons of the same show. Surprise!

In a recent episode I watched, the bakers were tasked with making two fougasse loaves as their technical challenge. A fougasse is a bread hailing from southern France, usually flavored with herbs, shaped and slashed to resemble a leaf or an ear of wheat, with a chewy interior and a lightly crunchy crust. It is a bit oily, and is best – in my humble opinion, anyway – when it is topped with some coarse, crunchy salt. It’s the bread N. and I gravitate toward whenever we pick up a loaf from Whole Foods’ bread counter.

If the bakers on the show could do it, even not knowing what the final loaf was or how it should look, I determined I could too. I went for that wonderful, reliable text that is Shirley O. Corriher’s Bakewise, and slightly adapted her recipe for Fougasse with Biga. A biga is a pre-fermentation starter, like a poolish, that adds flavor and helps create a light texture. I subbed in some of my sourdough starter.

Corriher’s recipe doesn’t include any flavoring beyond what’s in the bread itself, but I opted for some mixed herbs – chopped rosemary and dill, and some tiny thyme leaves – to amp up the flavoring.

This is a project cook because the bread requires not one, not two, but three rises before baking. Corriher doesn’t knead much, but uses a stretching and folding method in between rises called autolysis. The dough that results is quite soft and sticky, but results in beautifully chewy, tearable cords of finished bread all the way around the leaf (except, as you can see, in a few spots where the dough stretched a bit too thin – these were aggressively crunchy instead, though still delicious).

All told, these were worth a morning of rises and folds and stretches, and despite that the original intention was to have bread with our dinner, since I wound up with two and they were still warm at lunchtime, we had to at least sample the goods… Next time I will add a little bit more salt to the dough itself – sprinkled on top was good, but the interior was a touch bland – and will not follow Corriher’s instruction to sprinkle the tops with cornstarch before their final rise. I’m not sure what it accomplished, and I didn’t love the look on its way out of the oven. I will add the herbs again, and I certainly will repeat the still-oven-hot drizzle of olive oil and coarse salt, as I did in this iteration.

* quality note: all photos this week taken with my iPhone.