Orange glazed broccolini

Food Blog December 2013-2882As I lounged on the couch Friday evening, halfheartedly sketching out a grocery list even as Thanksgiving dinner still occupied two thirds of my fridge and three quarters of my brain (let’s not even mention my stomach), I asked N. what he wanted to eat this week. “Heavy on the veg,” he said, and that was that. Into the cart, and then into a pan, went all the greens I could fit, with some salt, some pepper, and some sesame oil. On a whim, thin slices of garlic and a cautious tablespoon of orange marmalade followed, and the gluttony that resulted could more kindly be called love.

Food Blog December 2013-2874This recipe was originally conceived for broccoli rabe (also called rapini), that assertive, bitter collection of leaves with stubby little florets dotted between them. But this week my produce department didn’t have any, so I settled for broccolini instead. If we’re honest, though, it would probably also be fantastic with kale, or mustard greens, or regular old broccoli. Why leave him out?

Food Blog December 2013-2876
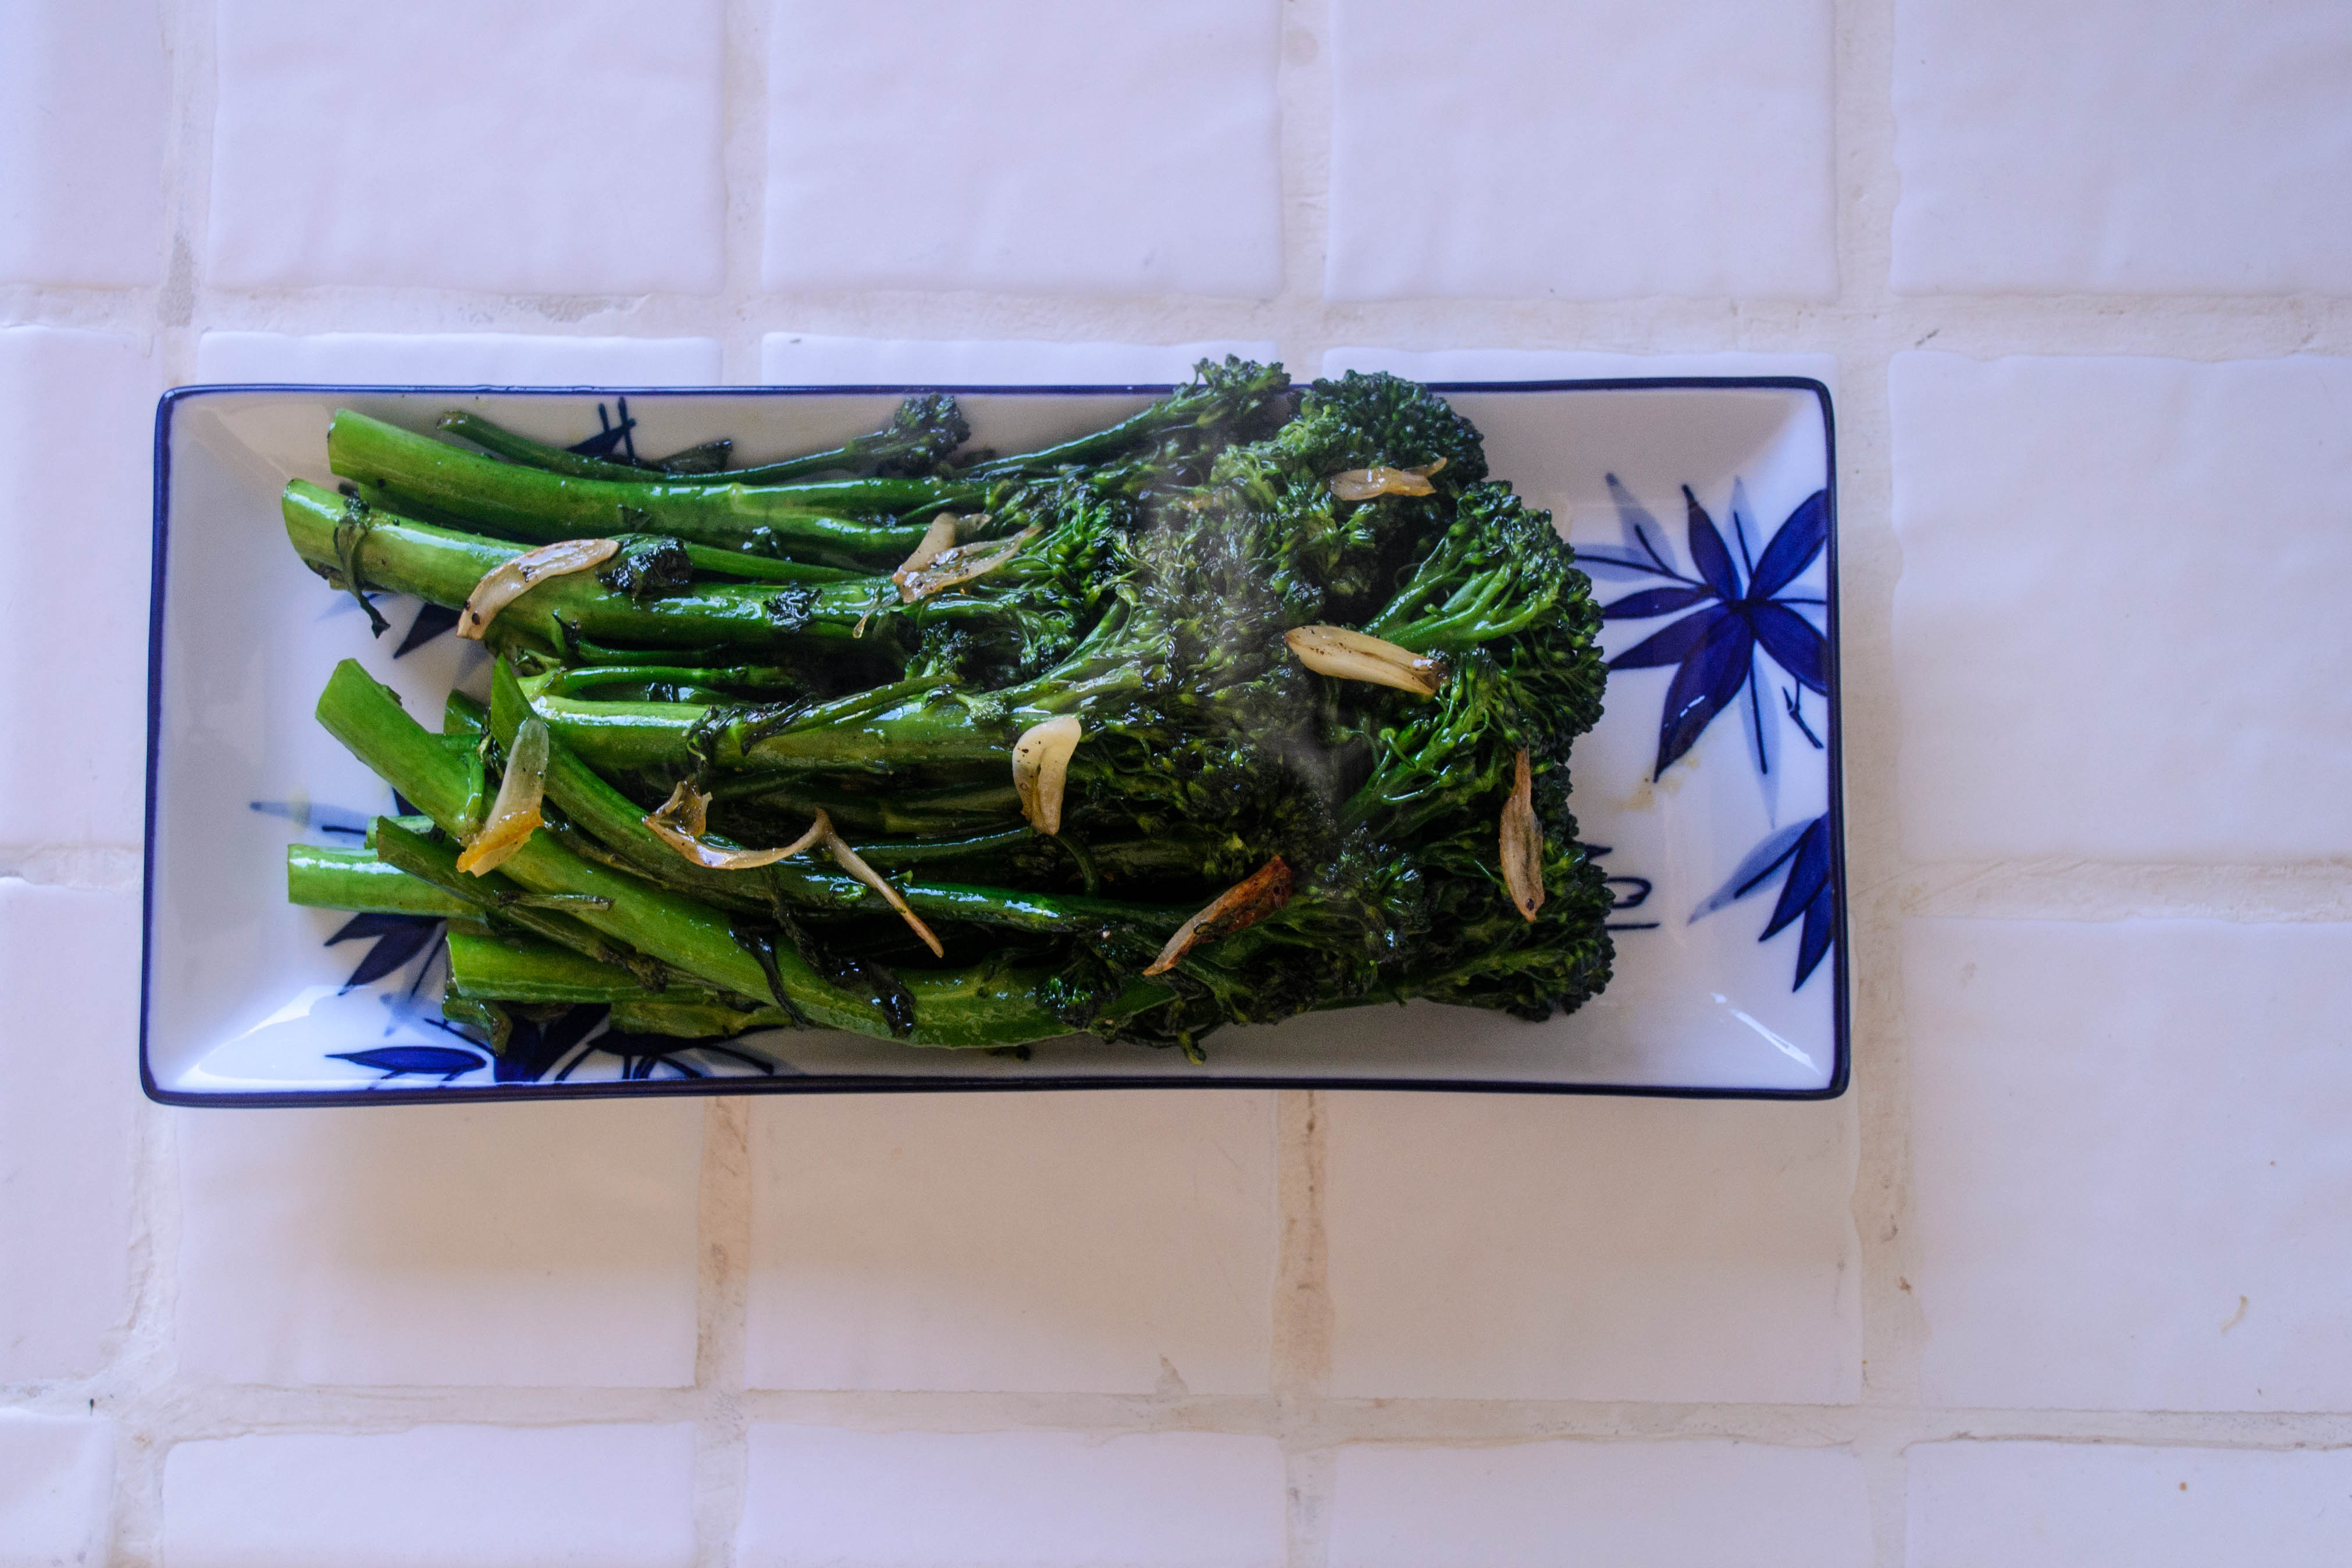
The point is, the bitterness of the vegetable plays incredibly well with the marmalade which, with its bits of orange rind, at once offsets but also complements the bitterness of the greens. The greens are lightly blanched which, for me, just means throwing them into a pot of heavily salted boiling water for something like 90 seconds, then draining, administering a stern flick to bounce extra water out of the florets, and tumbling into a skillet shimmering with a film of olive and sesame oil. The greens sauté for another minute or two, the garlic, tossed in with abandon, crisps into little chips, and the orange marmalade melts down over the whole thing in a jammy glaze studded with bits of rind, and you’re done. Once you start cooking, the whole thing takes maybe six minutes, and then you can eat the entire pan and call it lunch. Or, you know, share it with your family, because I would never do something like eating a whole skillet of barely sweet, crisp and garlicky vegetables without telling anyone…

Food Blog December 2013-2879
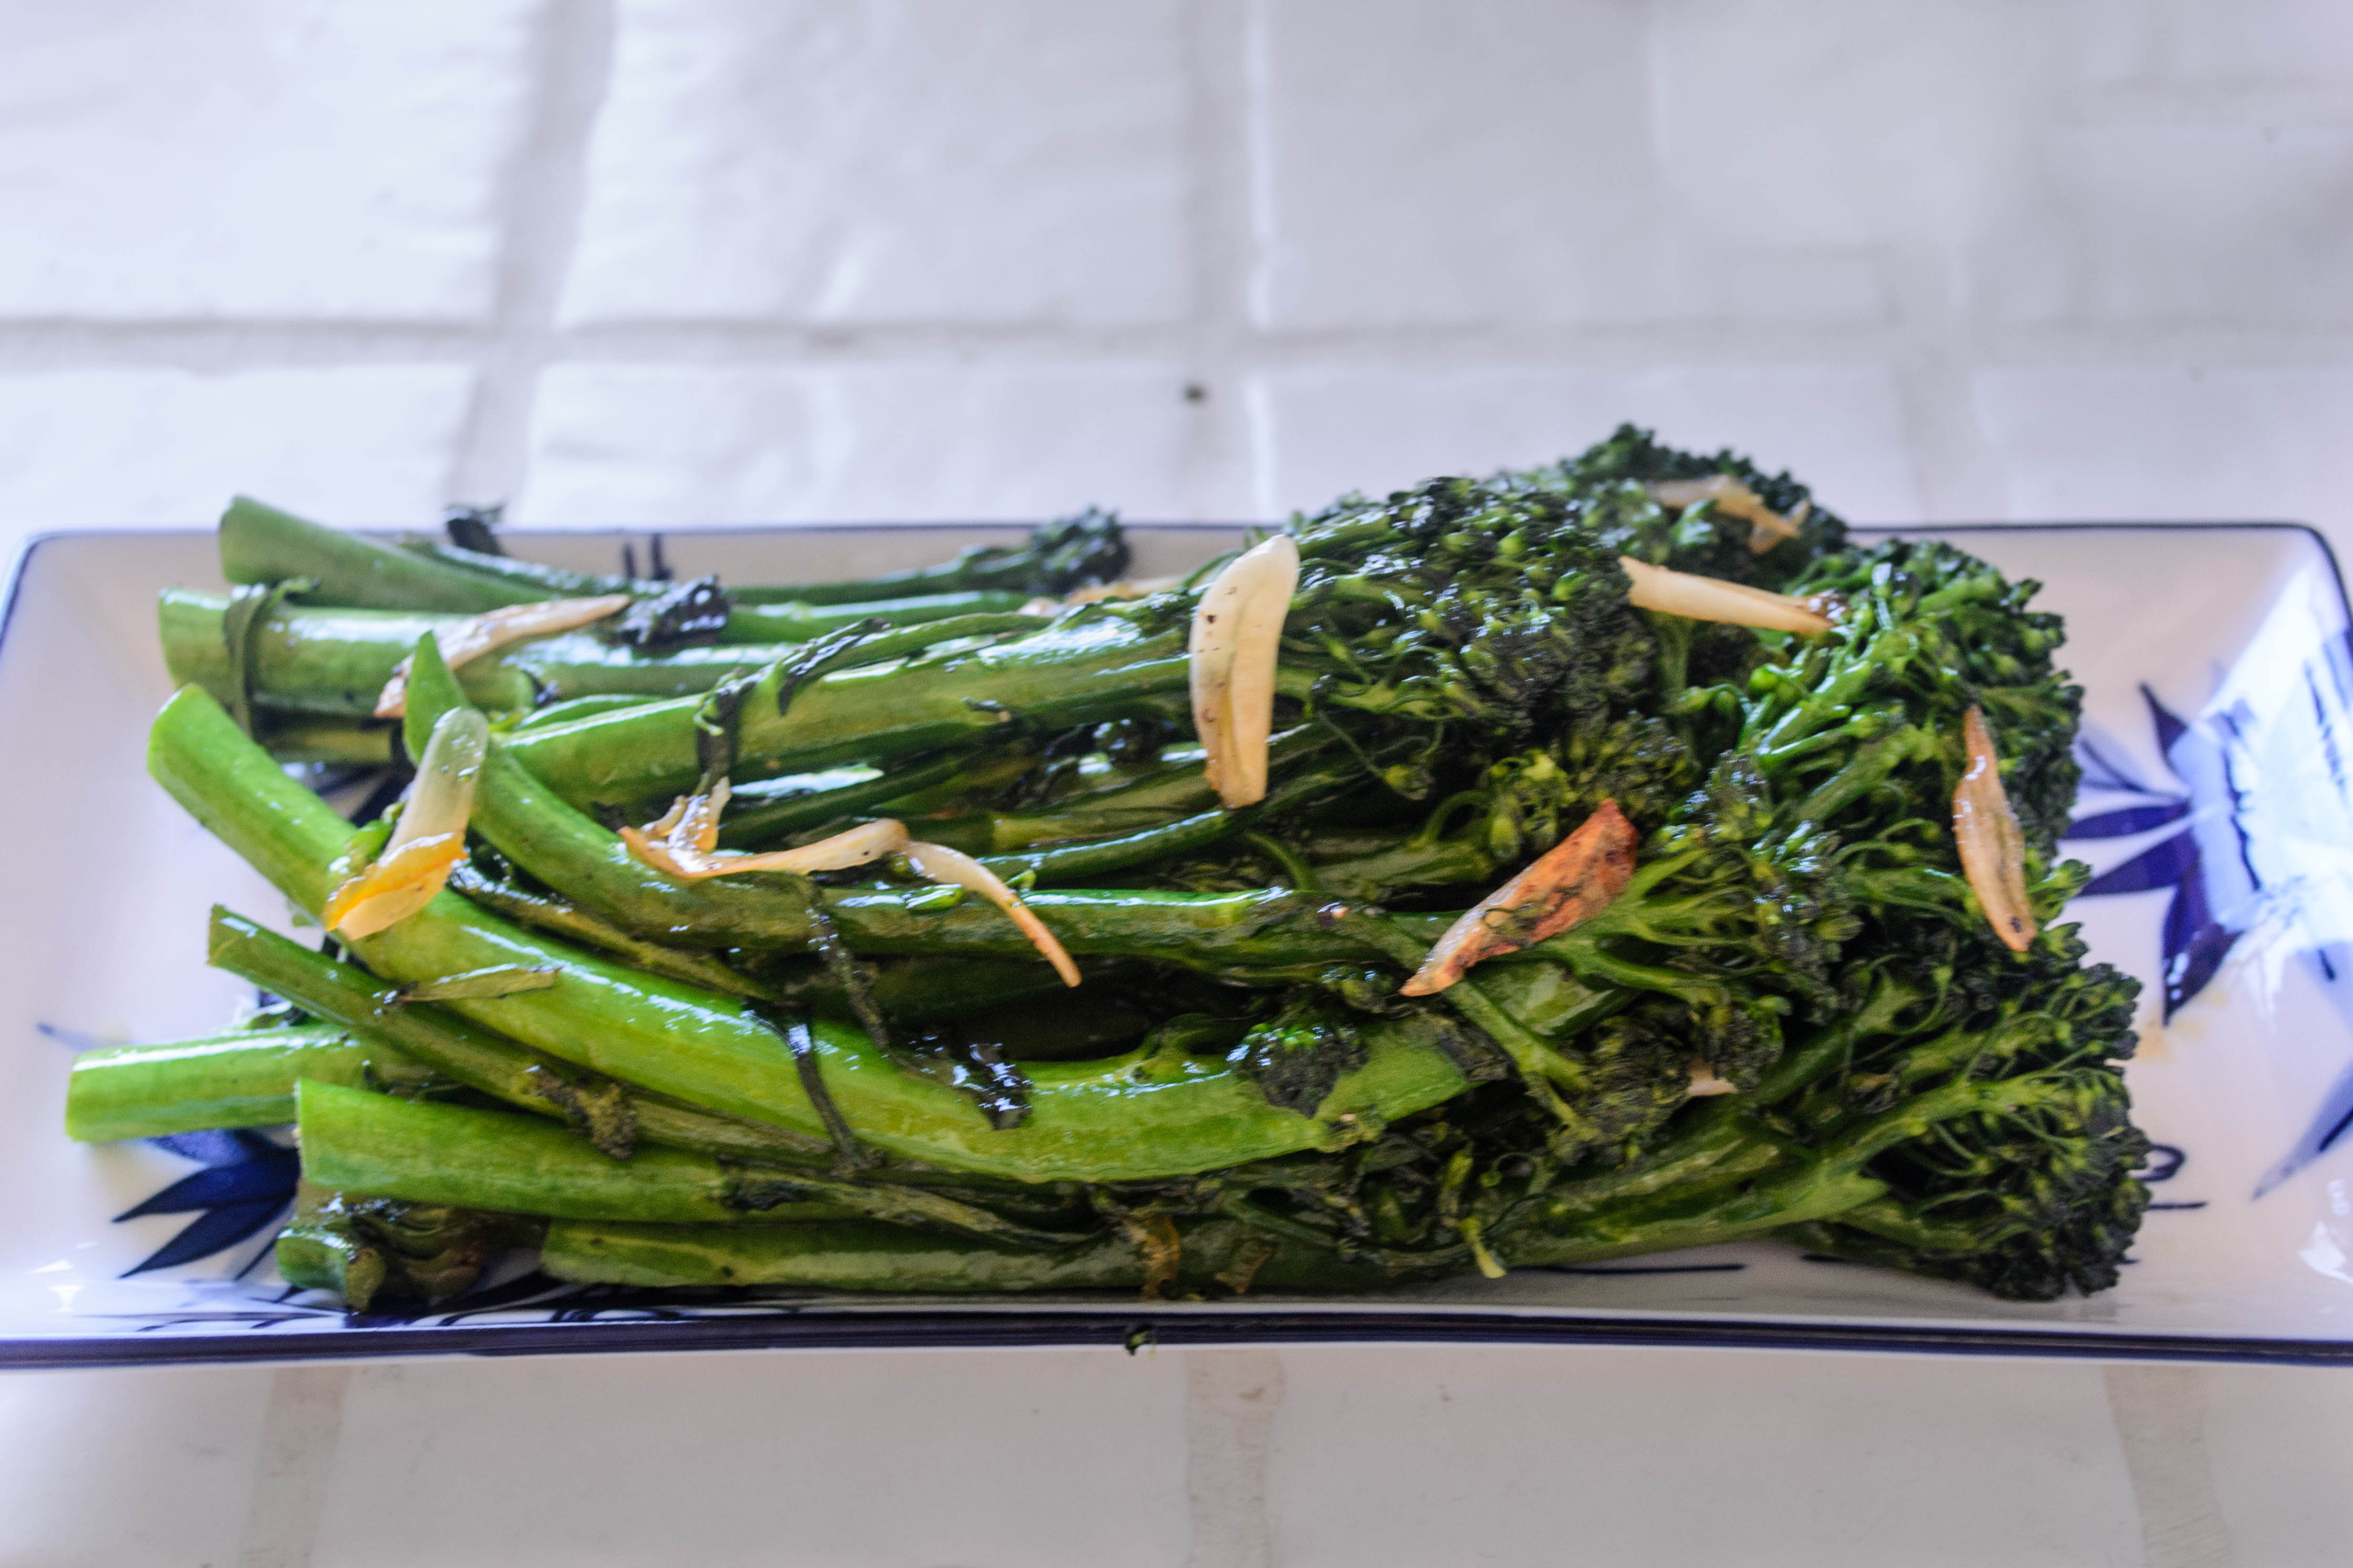
Variations: you could certainly adjust this dish to suit your whims. The marmalade could be lemon instead of orange, and red pepper flakes or even a dash of soy sauce would not feel out of place here. A scattering of lightly toasted sesame seeds over the finished dish would be lovely as well.


Orange glazed broccolini
Serves 2-3 as a side
2 bunches broccolini (or 1 large bunch of broccoli rabe or kale, or 1 large head of broccoli)
1 tablespoon olive oil
1 teaspoon sesame oil
3 cloves garlic, sliced paper thin
¼ teaspoon each salt and pepper, or to taste
1 scant tablespoon orange marmalade


  • Bring a pan of salted water to a rolling boil. While you wait for it to heat, prepare your broccolini: rinse the bundle and then trim off the bottom ½ inch or so of the stalk. If the stalk is ½ an inch or more in diameter, halve it lengthwise for easier consumption. Submerge in the boiling water for about 90 seconds, until the florets and stems are intensely green and just barely tender. Drain well.
  • Heat the olive and sesame oils in a large skillet over medium high heat. Toss in the broccolini and agitate the pan to coat it evenly. Add salt and pepper to taste, and sauté, tossing frequently, for 2-3 minutes.
  • Add the garlic and sauté one additional minute, until the little slices begin to brown and crisp a bit. Then add the orange marmalade and toss well to coat. As soon as it melts and glazes the vegetables, it’s done. Remove from the heat and serve immediately.

Orange Marmalade and Almond Sweet Rolls

Food Blog February 2013-0720
Guys, I’m pretty excited about this one.  It’s a mile marker for me in a couple of ways.  One, it’s a sweet application of yeast dough, which I’ve never tried before.  Two, I’m well into the second month of this project and I haven’t had any true disasters yet or fallen off the horse, which buoys my confidence.  Three, except for temperature and cooking time, which I had no idea about, I didn’t consult the internet a single time for clues about how to make this.  But four, and unquestionably most important, this is an adaptation of one of my Nana’s recipes, and I made it successfully.
Food Blog February 2013-0632
Nana was a cook.  She was an old-fashioned, from home, meat/starch/veg-that-sometimes-came-from-a-can kind of cook.  She was a clean-your-plate-before-you-can-have-dessert and sometimes a there-are-starving-children-out-there kind of cook.  But that was her era.  She raised her three kids on three square meals a day plus cookies.  She taught my two aunts how to cook, she cooked for our Pap almost up until the day he died, and she sent out a yearly box of Christmas cookies until I was almost through college.  My freshman year I remember getting a slip in my mailbox that meant I had a package to pick up, and finding, after returning to my room and tearing at it feverishly, that it was filled with sweets.  Chocolate dipped apricots, cream horns, which we called ladylocks, nut rolls, seven layer bars, pizzelle; these were how Nana sent us her love.  I always meant to send one back to her, when I was “grown up.”  It tugs at me a little that I never did.
Food Blog February 2013-0648
When she heard I was learning how to cook, she gave me my first cookbook: The Complete Guide to Country Cooking, along with a subscription to Taste of Home magazine.  One summer when we came to visit, I offered to help with the menu and she told her friends her granddaughter was going to be her cook for the week.  She said it was good, too.
In 2007, when I was about to get married, I received a large red photo album from my female relatives, featuring favorite recipes from their own kitchens.  Nana couldn’t attend my wedding – she was on oxygen and too weak for the plane ride across the country from Pennsylvania – but she had contributed recipes to this book, and even as I cherished her contributions I never thought I would make most of them myself: I was too inexperienced to try these dishes she had clearly mastered – lemon meringue pie and yeasted sweet dough were beyond my capabilities.
Food Blog February 2013-0628
But when I thought about cooking this past week, I thought about that stretch of dough from my dill bread and in its place saw cinnamon rolls.  They are, after all, filled and constructed in a similar way.    I love cinnamon rolls, but sometimes the dripping gush of cinnamon pooled in pounds of sugared butter is just too sweet for me.  Orange marmalade came into my mind, and with it, almonds.  They seemed like such a nice pairing, and as I wondered how to make them I found myself back in Nana’s section of my big red cookbook, staring at directions that now seemed less intimidating than they did six years ago.
Food Blog February 2013-0657
This is a beautiful, elastic, slightly sweet dough.  It is smooth and rich and expansive, and it makes a glorious roll.  It sighs like a feather pillow when you punch it down.  It wants very little from you – just a massage with melted butter, a liberal smear of marmalade and almonds, and gentle, careful rolling.  Inside, after baking, the orange and almond marry well, since the jammy part of the marmalade pools against the dough, but the zest and the almonds retain texture for the teeth to play with.
I doused one pan with a glaze made from fresh orange juice and powdered sugar, but I think that overdid the sweetness factor a bit too much: the glaze tasted like liquified orange Pez.  Better, I would say, would be a slick of soft cream cheese, perhaps whipped with a little brown sugar if you absolutely must.  But plain, browned, warm out of the oven, and a little sticky with its own sweetness, is just perfect all by itself for breakfast, for dessert, for mid-morning snack.  For any time that is right now, really.  Thanks, Nana.
Food Blog February 2013-0697
Orange Marmalade and Almond Sweet Rolls
Dough:
¼ cup warm water
2 tsp yeast
¼ cup scalded whole milk (heated to just below boiling – 45 seconds in the microwave does the trick)
¼ cup sugar
½ tsp salt
1 egg
¼ cup soft or melted butter
2 ¼ cups flour (you probably won’t need all of it – I ended up using a total of 1 ¾ cups)
Filling:
¼ cup melted butter
1 cup orange marmalade, warmed slightly
1 cup sliced almonds
Food Blog February 2013-0682
In the bottom of your mixing bowl, combine the yeast and water and stir gently.  Let it sit for at least 5 minutes so the yeast wakes up a bit.
Meanwhile, heat your milk, then cool it down.  You can hasten the cooling process if you forgot to soften your butter: just drop the still-cold stick right into your warm milk and swirl.  You’ll cool the milk and soften the butter simultaneously.
When the yeast bubbles and smells bready, add the cooled milk, softened or melted butter, sugar, and egg.  Stir to combine.  When the mixture has homogenized a bit, add 1 cup of the flour and the salt and stir again.  You will have a soggy, unworkable mixture.
Continue to add the flour ¼ cup at a time, stirring after each addition (if you are using a stand mixer, use the paddle attachment and just keep it on low speed until things come together).  When it starts to look like bread dough – pieces begin to have that floured, torn texture and hold together – and becomes just workable, don’t add any more flour to the mix.  Switch to your dough hook or a well floured board, and knead until smooth and elastic, about 5 minutes.
Once kneaded, put your shiny, smooth ball of dough in a lightly greased bowl and roll it over so all sides are moistened by the oil.  Let it rise in a warm place until it doubles – at least an hour and a half.  I like to heat my oven to 200F (my lowest setting) for a few minutes, then turn it off and let it cool for another few minutes before stowing my dough inside.
Food Blog February 2013-0658
When the dough is ready, it will have doubled in size, and the bottom will be covered with puffy little bubbles like the ones that let you know your pancake is ready to flip.  Punch it down by pushing your fist gently into the middle to let the gas escape.  Turn it out onto a floured board and roll gently, forming a rectangle of probably 2 feet by 3 feet.  Maybe 3 by 3, if it seems willing.  It should be ¼ – ½ inch all the way around.  My board was, clearly, a bit on the small side for this undertaking.
Food Blog February 2013-0663
Food Blog February 2013-0664
Give your layer of dough a massage with the ¼ cup melted butter, spreading it evenly over the surface until it’s gleaming, but leaving an inch or so margin around the edges.  This will help prevent spillage of the inevitable ooze when you start rolling.
Food Blog February 2013-0666
Spread the warmed marmalade over the buttered dough, again respecting the inch margin.  Warming it up by microwaving it for just 30 seconds or so helps it spread more evenly.  Sprinkle on the sliced almonds and get ready to roll.
Food Blog February 2013-0668
Food Blog February 2013-0675Food Blog February 2013-0677You have to do the rolling in small stages, I found.  Begin at the middle of the longer edge of your dough rectangle and make a few tight rolls, but then move to the edges and help them catch up.  They don’t roll on their own, since the piece of dough you are working with is so big, so your fingers will be busy (and no doubt sticky) flying from side to middle to side again.  Continue this process until you have created a long, tight roll of dough.  Some filling will unavoidably ooze out the ends, but if you’ve left a margin around all sides this should be minimal.  Turn the tube gently so the outer edge faces up, then pinch it gently into the next layer to create a seam so your rolls don’t become unrolls.
Food Blog February 2013-0679
Food Blog February 2013-0680
Carefully slice your rolled tube into individual portions.  I ended up with about a dozen squashy, messy, less-than-round offerings.  Deb at Smitten Kitchen suggests using a serrated knife and sawing gently, letting only the weight of the knife move down through the dough, to prevent the squashing I experienced.
Food Blog February 2013-0684Food Blog February 2013-0687Food Blog February 2013-0691
Nestle your rolls filling side up in greased baking trays – I used 9 inch cake pans – and let them rise again for 30 minutes.  This would also be a good time to preheat your oven to 375F.
Food Blog February 2013-0702Food Blog February 2013-0706
Stow your pans in the preheated oven for about 18 minutes, at which point the tops will be golden, the exposed marmalade will be somewhere between dripping and caramelizing, and the edges of each roll will have puffed against each other, some adhering thanks to the sticky filling.
Food Blog February 2013-0708
While they are warm, you can drench them in glaze or icing if you wish, or you can just gently liberate them from their pans and eat them with fork or fingers.  I like to unroll mine as I eat, saving the extra buttery, extra jammy middle bit – which everyone knows is the best part – for absolutely last.
Food Blog February 2013-0714Food Blog February 2013-0725
Most of the photo credit on this one goes to N., who got really into his job as stand-in photographer this week!  Thanks, honey.