Burrata, cress, and balsamic crostini

Food Blog September 2014-0558The first week of school has come and gone and went to bed. That being the case, and with a wonderful friend in town, Friday afternoon happy hour was without question the right thing to do. N. and I frequently enjoy a weekend happy hour of some sort, whether that involves a decadent spread, or just a few nubs of cheese and some almost-not-stale-yet crackers with a handful of dried fruit. Either way, there’s something tasty, something to sip, and a breezy deck to sit on.

Food Blog September 2014-0556
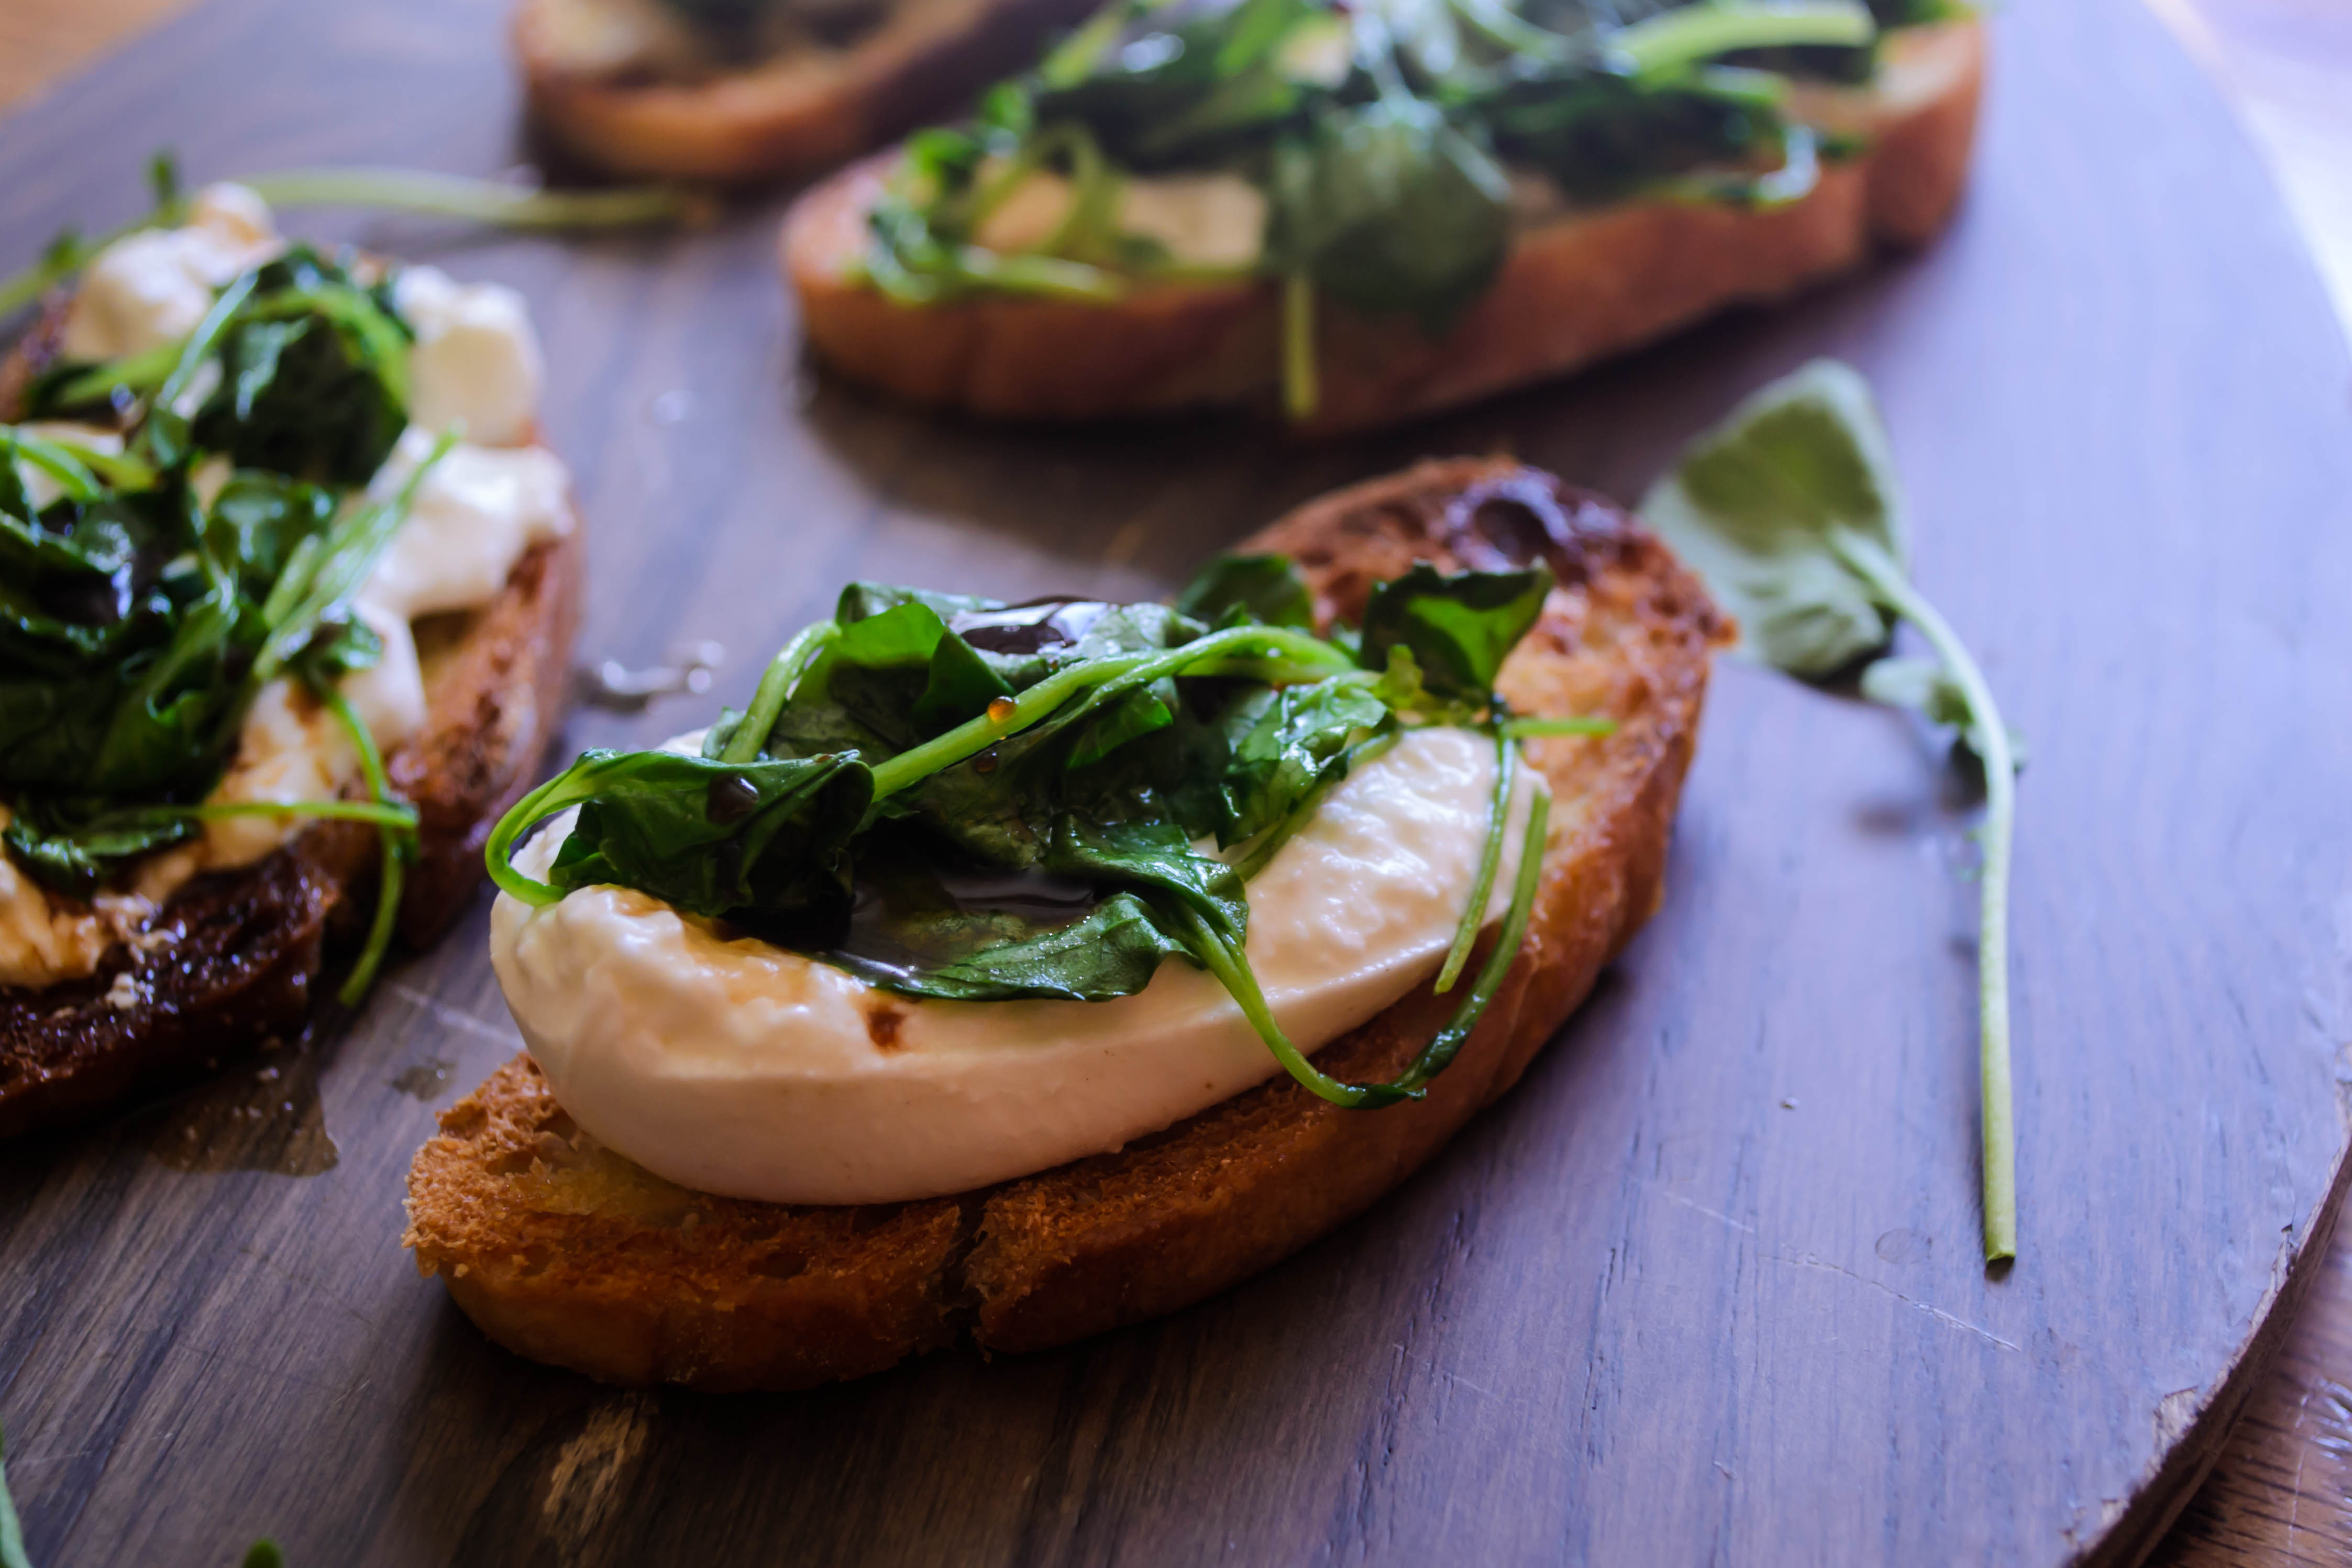
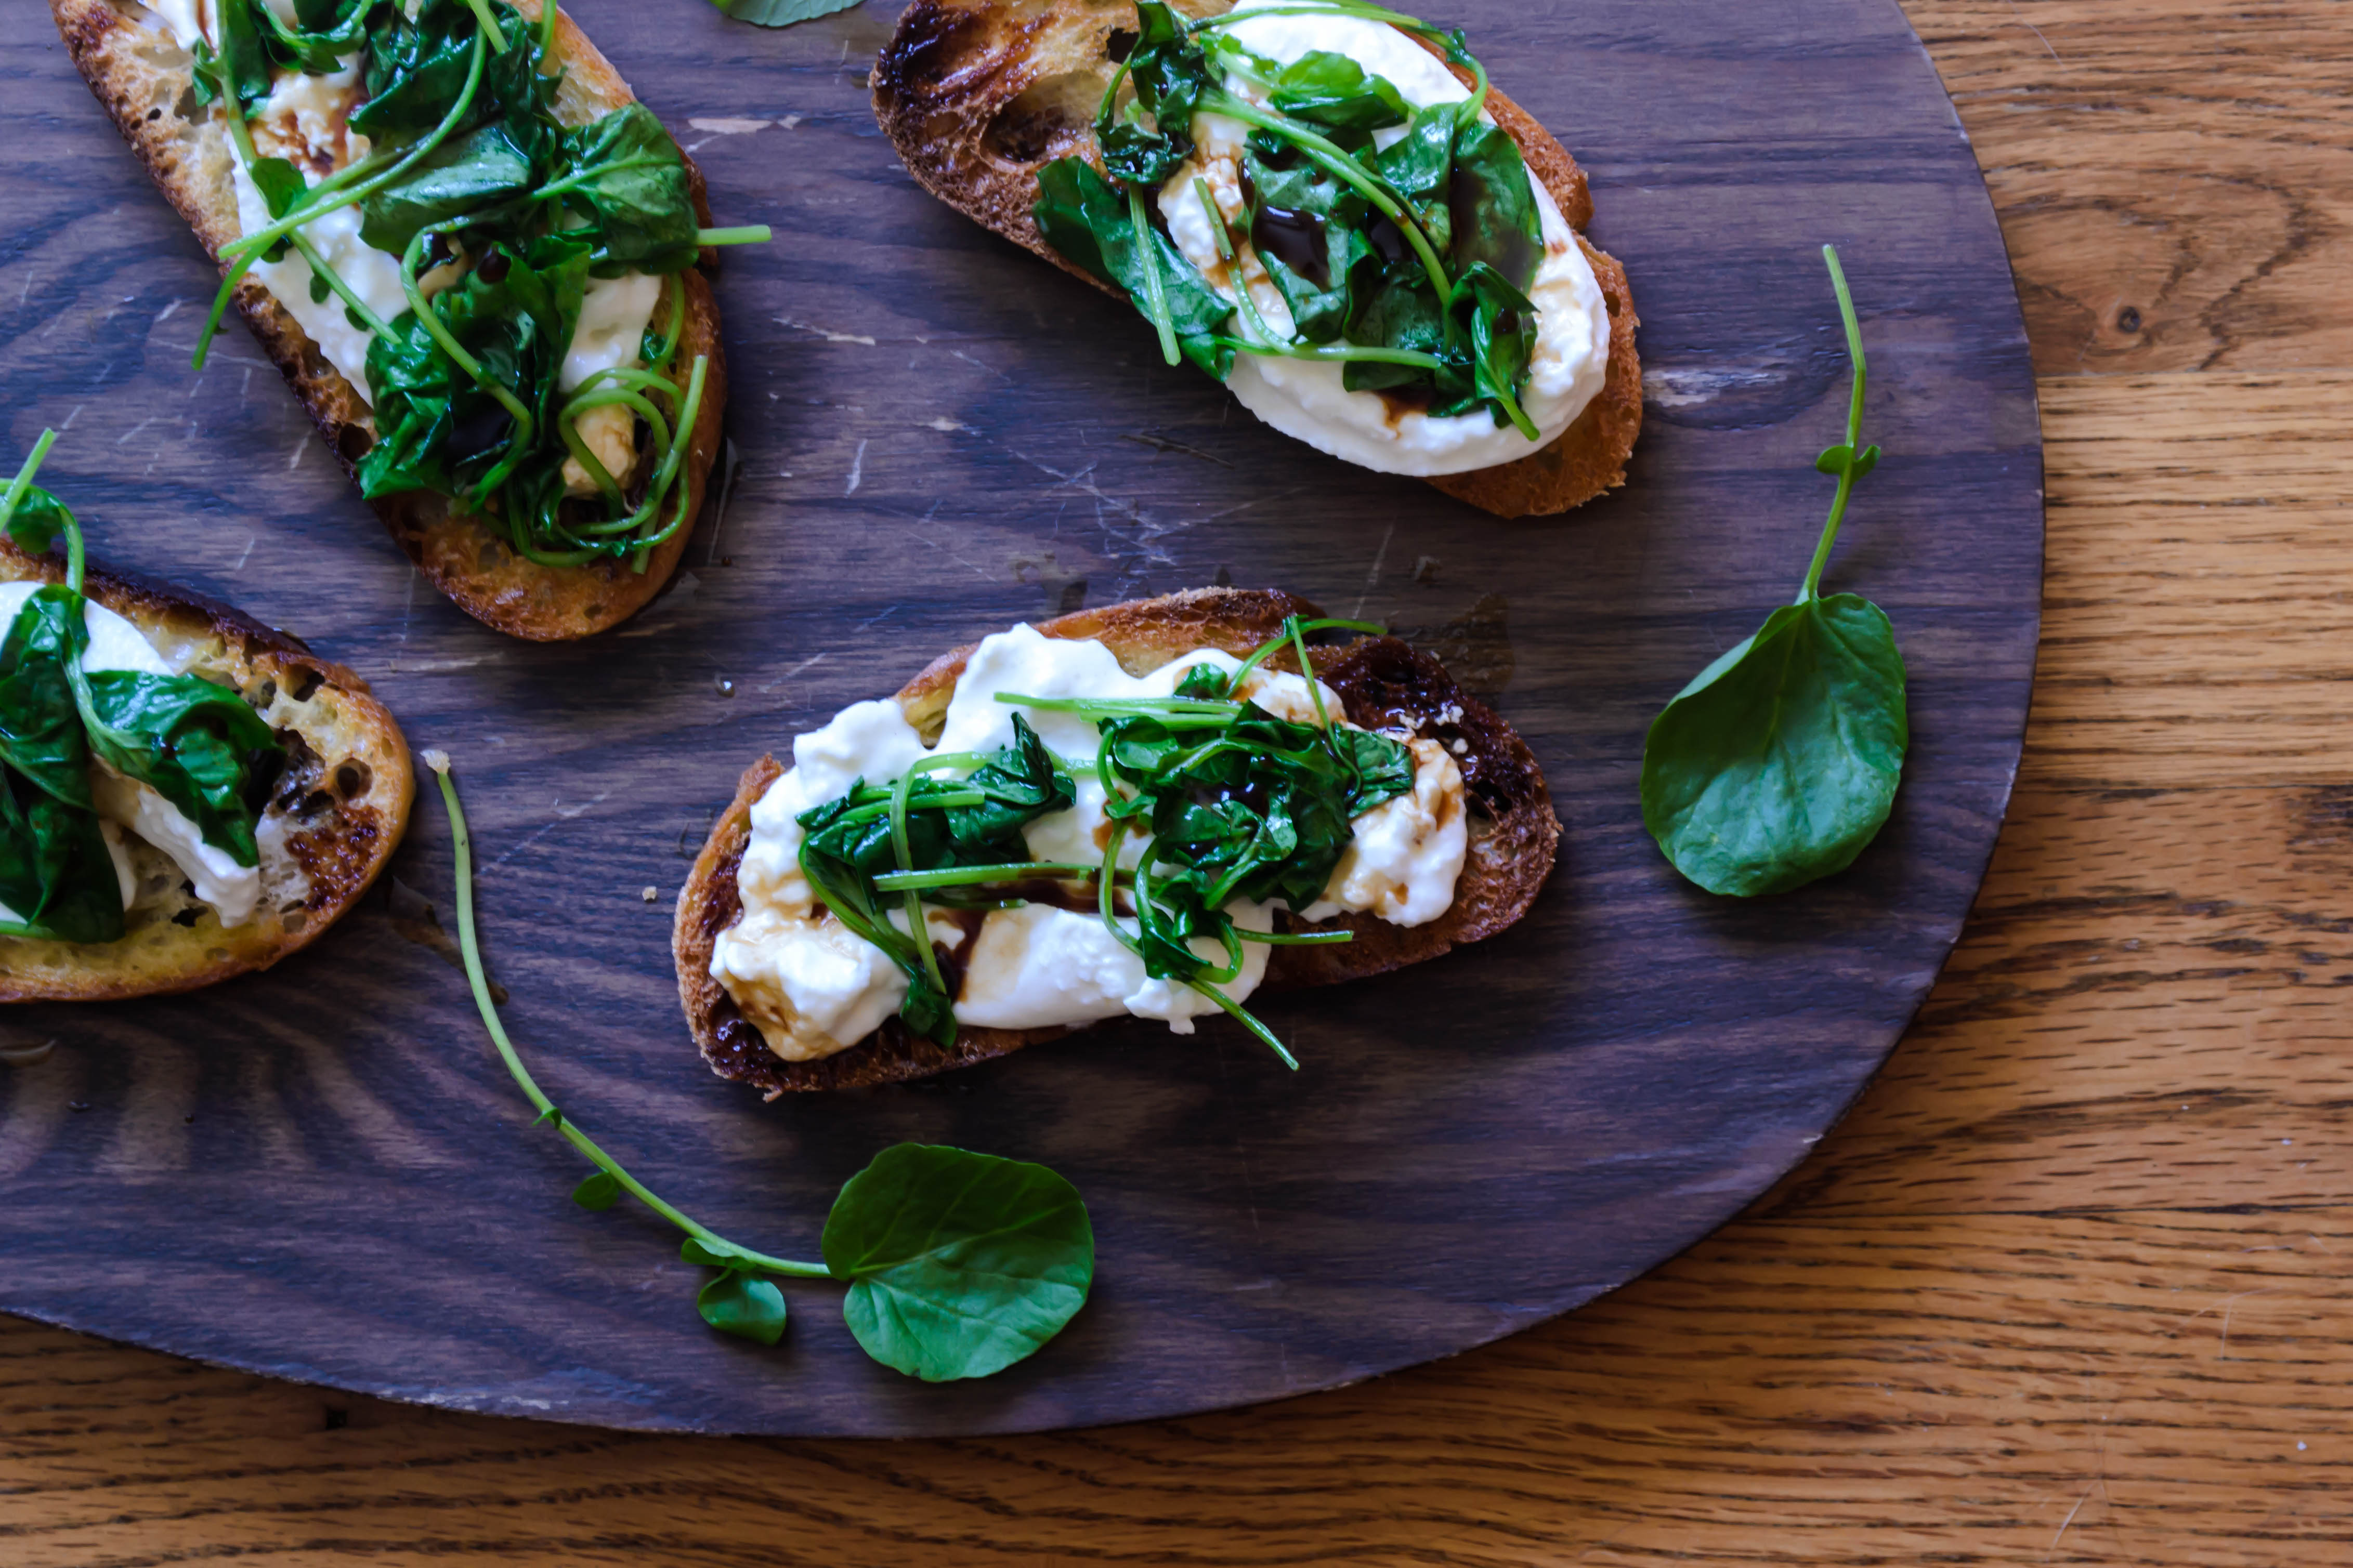
This week, though, called for something special. I had an alliterative crostini concoction in mind – a brash combination of burrata cheese, broccoli rabe, and a thick drizzle of balsamic vinegar all smeared atop a perfectly toasted slice of baguette. As these things usually turn out, however, ruled by what was on the shelves in the produce section, I had to make an adjustment or two. But I think what I ended up with was just as good – maybe even better.

Food Blog September 2014-0543Food Blog September 2014-0545Food Blog September 2014-0546
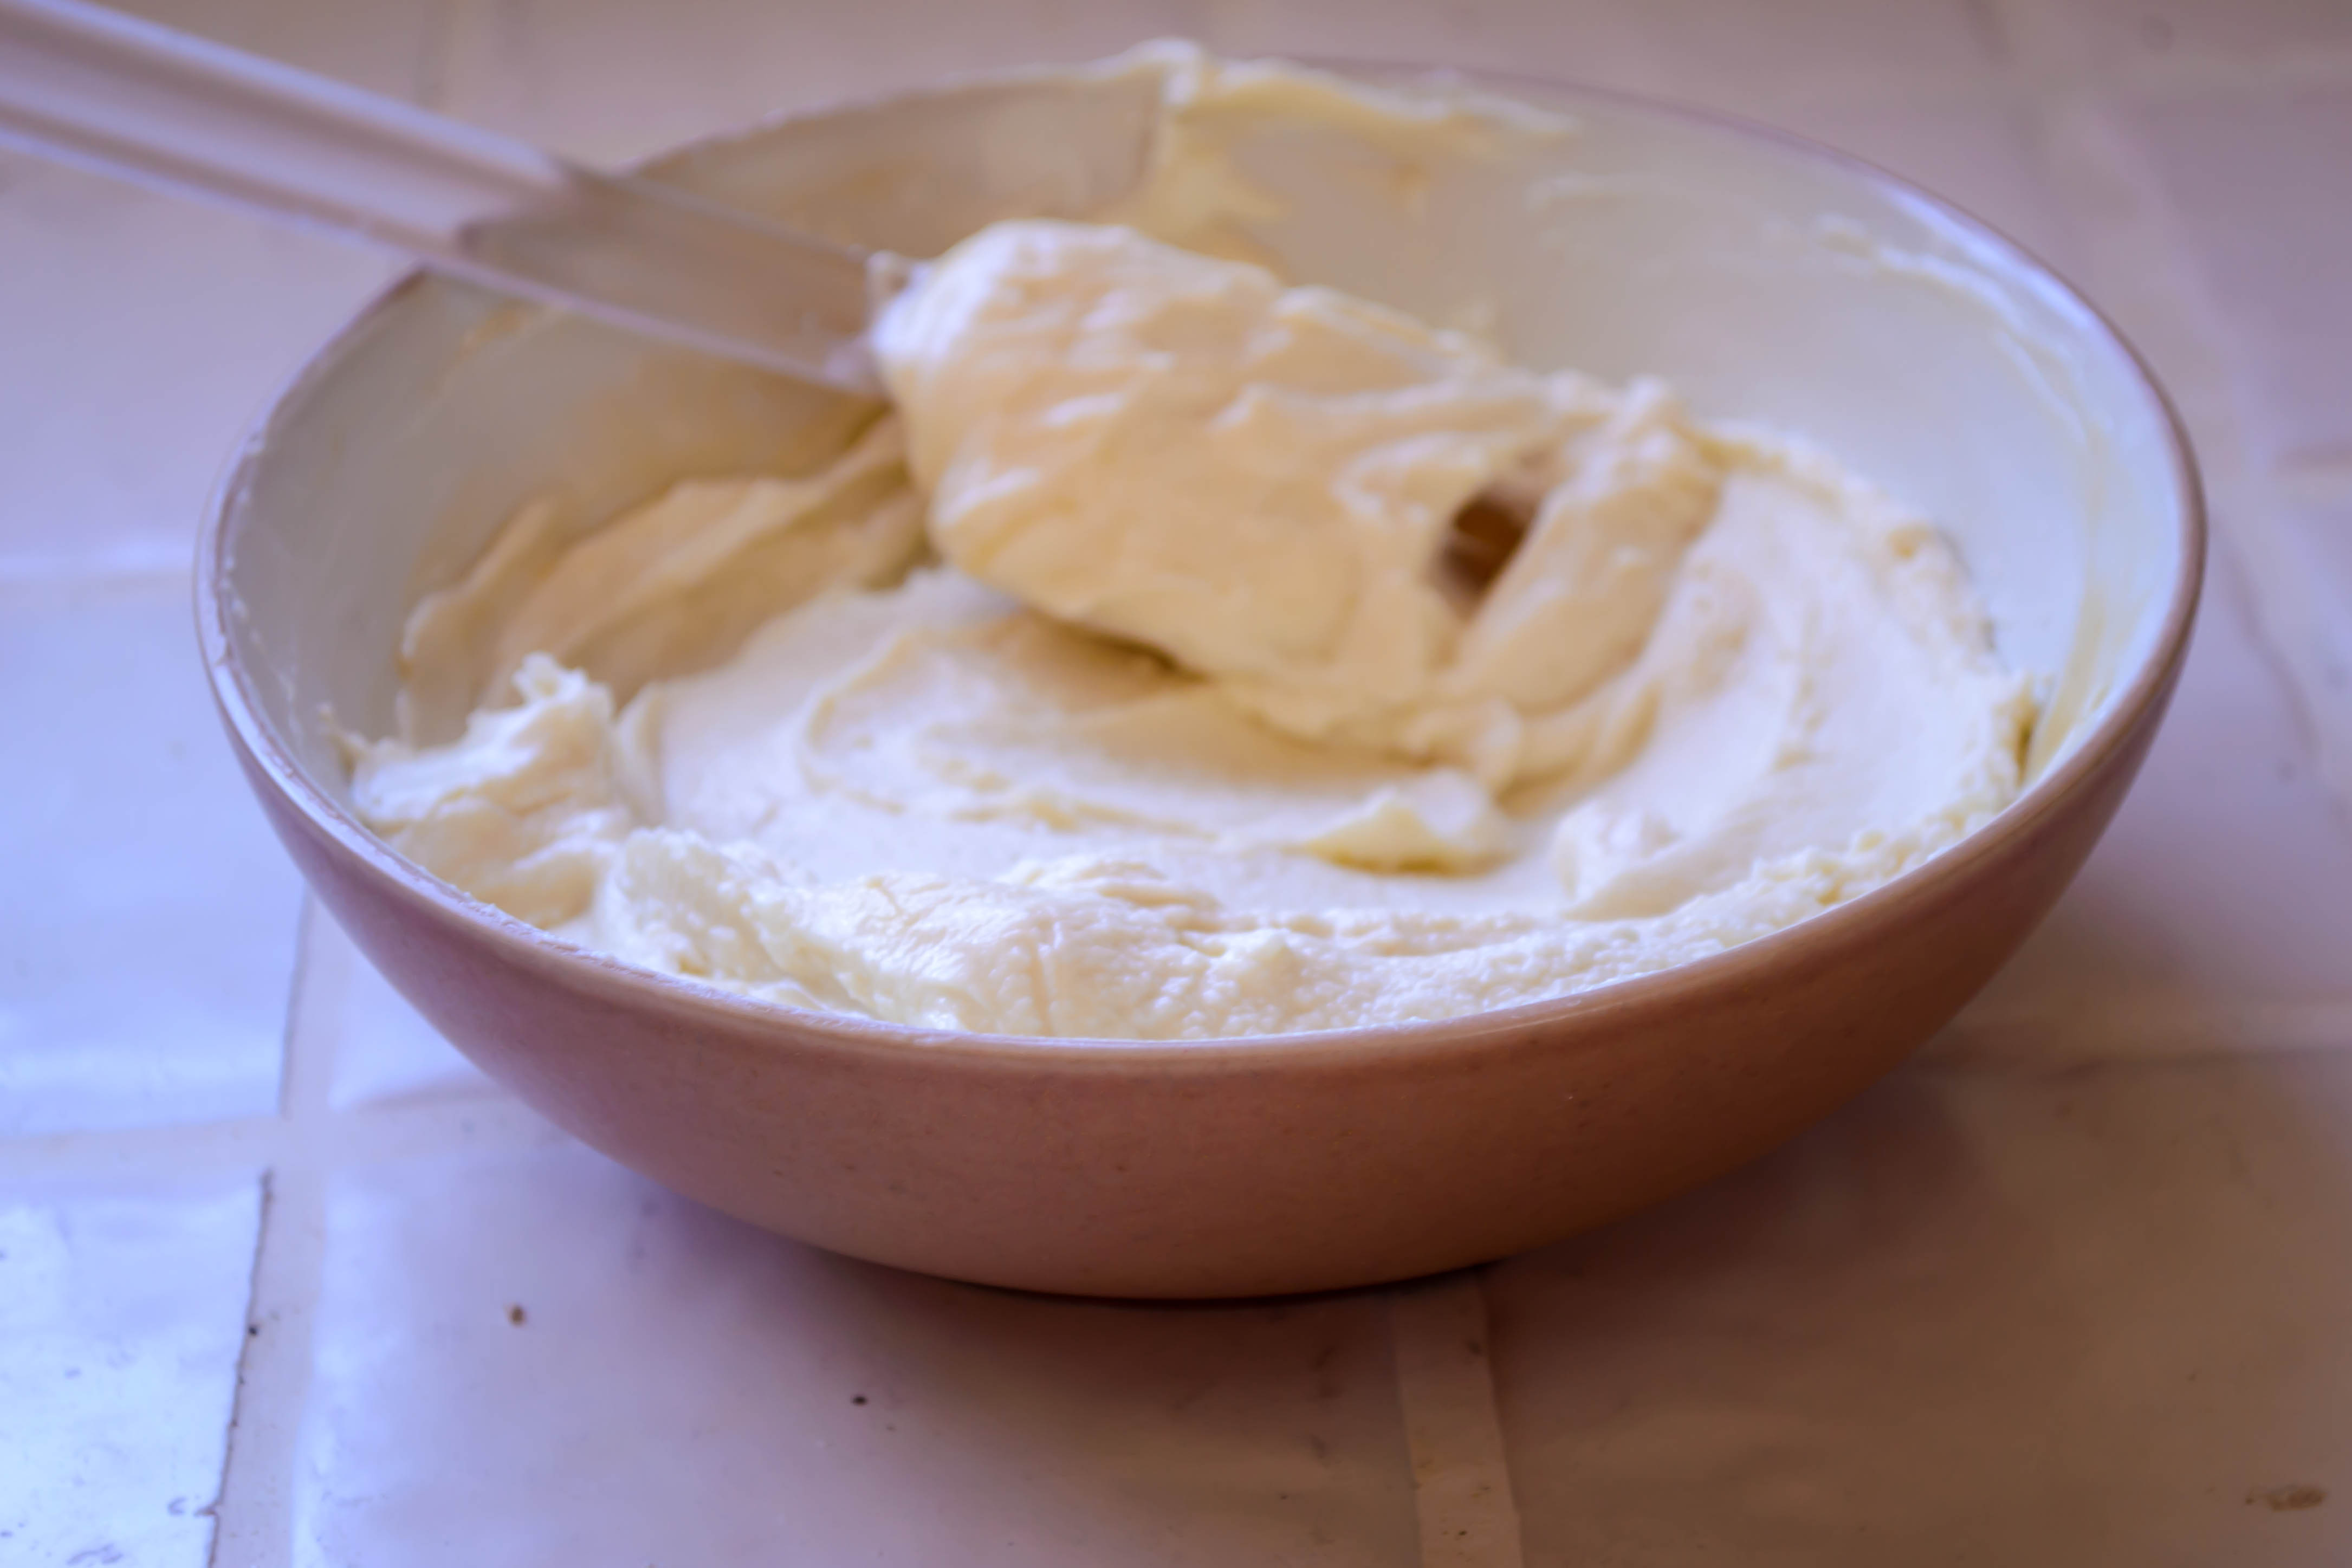
Let’s talk ingredients. Have you had burrata cheese? Think fresh mozzarella, but then one-up the creaminess and milkiness and melt-in-your-mouthiness, and you’ve got something like burrata. It’s a globe of fresh mozzarella cheese, filled with a mixture of curds and cream. When you cut into one of these fragile little blobs, what emerges looks something like ricotta in texture, but it’s all mozzarella freshness on the tongue. It’s a very sexy cheese, and a smear (don’t even think in terms of slices) atop some well-oiled, well-toasted bread sounded dreamy. I found some in my Trader Joe’s, but I think most specialty or upscale grocery stores – or maybe even your usual haunt with a well-stocked cheese counter – would have it.

Food Blog September 2014-0563Though I wanted broccoli rabe for its bitterness, I settled instead on some upland cress, which I assumed was another name for watercress. A shamefully lazy internet search (read: Wikipedia) has taught me that though they look similar, upland cress is part of the landcress, rather than the watercress, family. I didn’t know there was such a thing. Regardless, either one has the necessary peppery bite to offset the creamy sweetness of the cheese. In a pinch, I bet arugula would work too.

Food Blog September 2014-0560Food Blog September 2014-0549
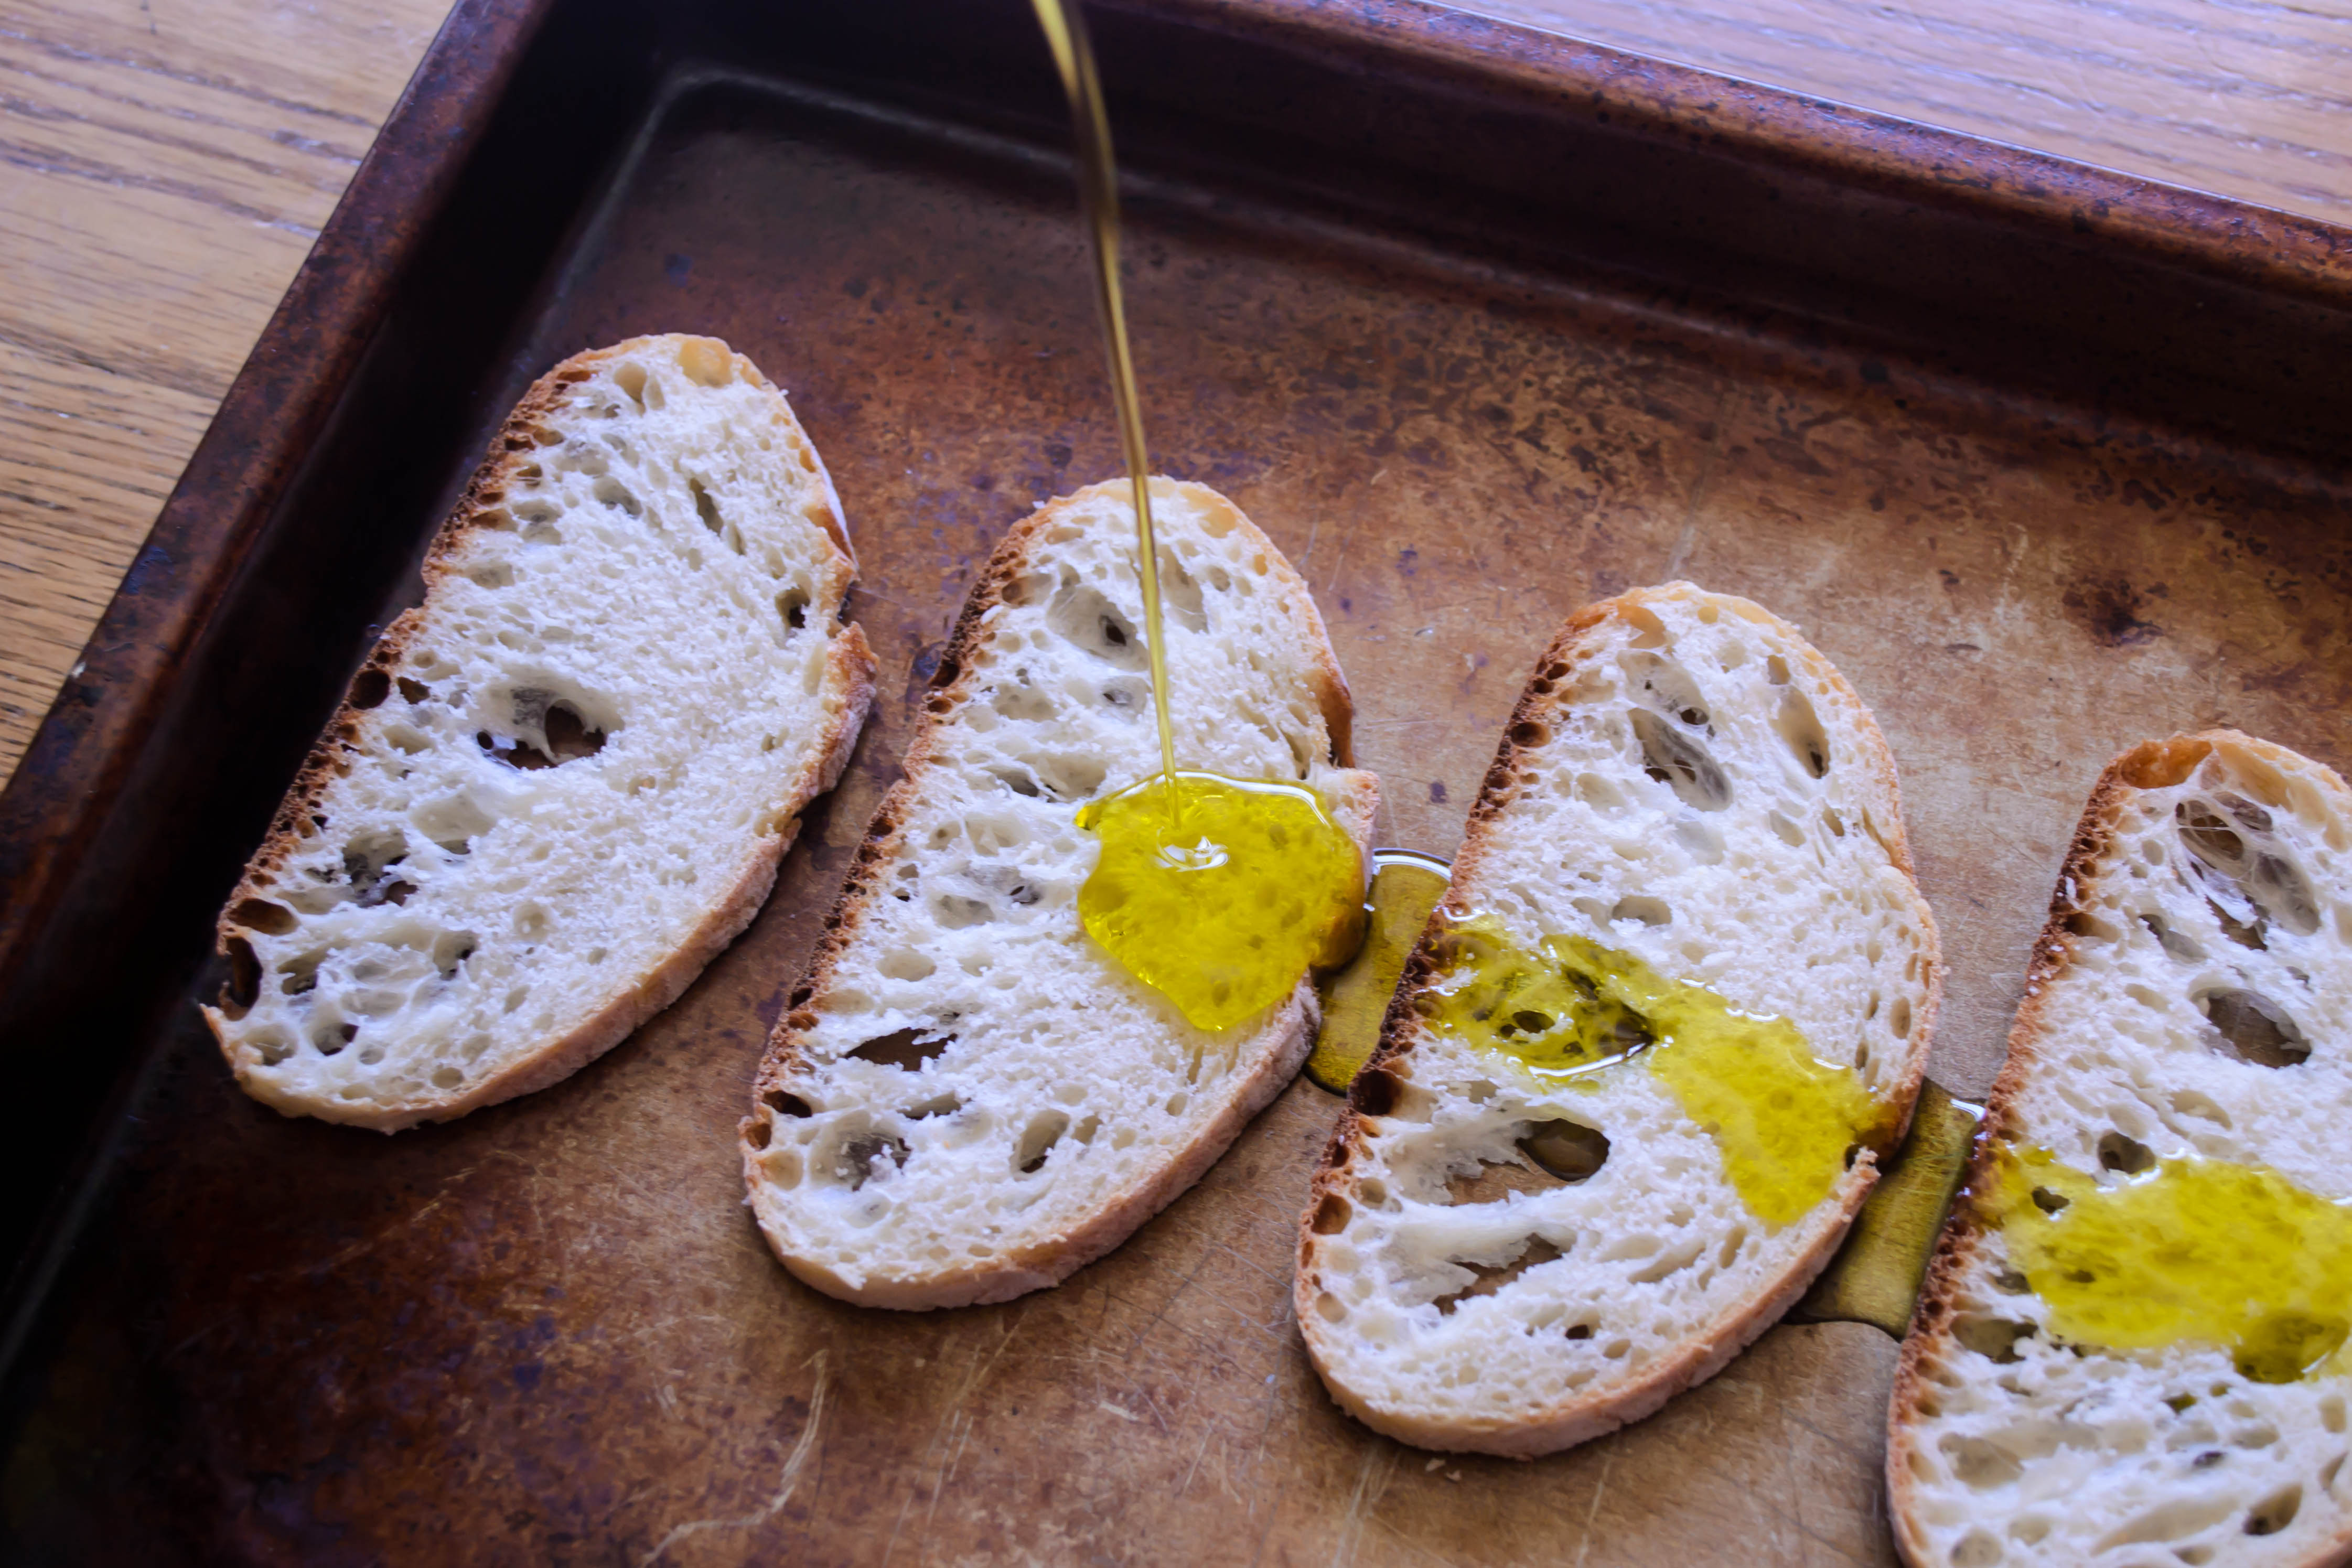
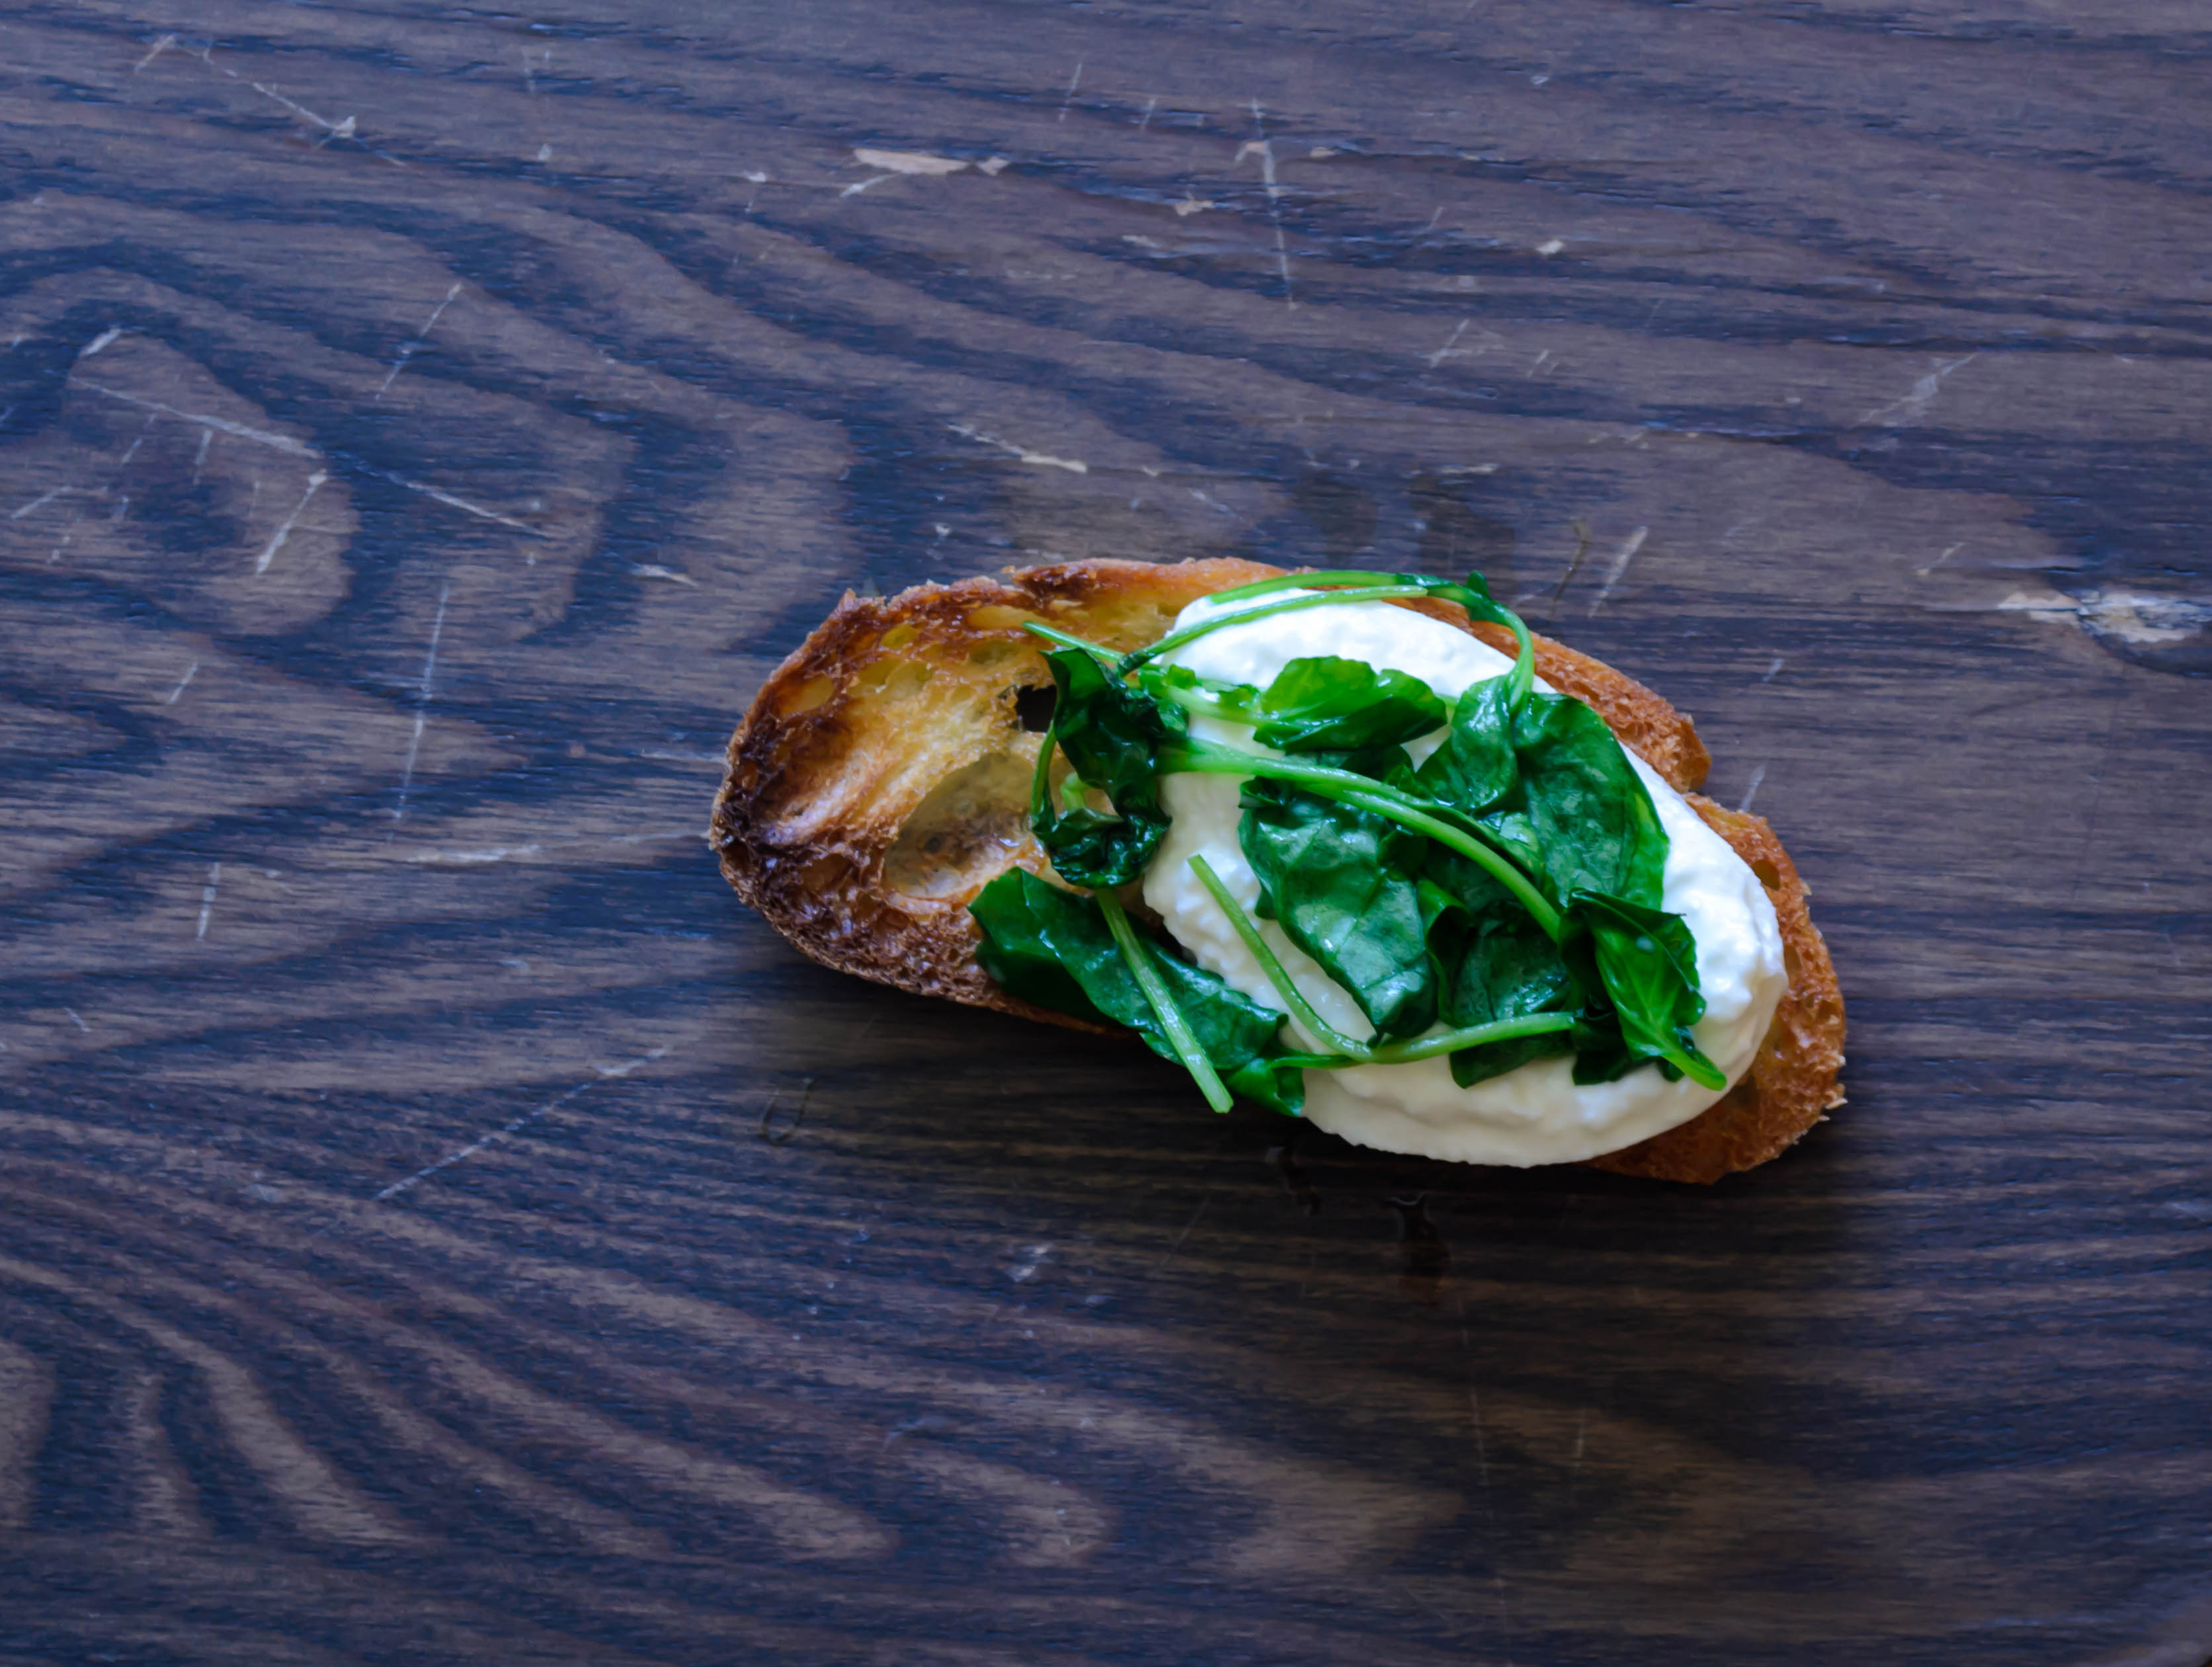
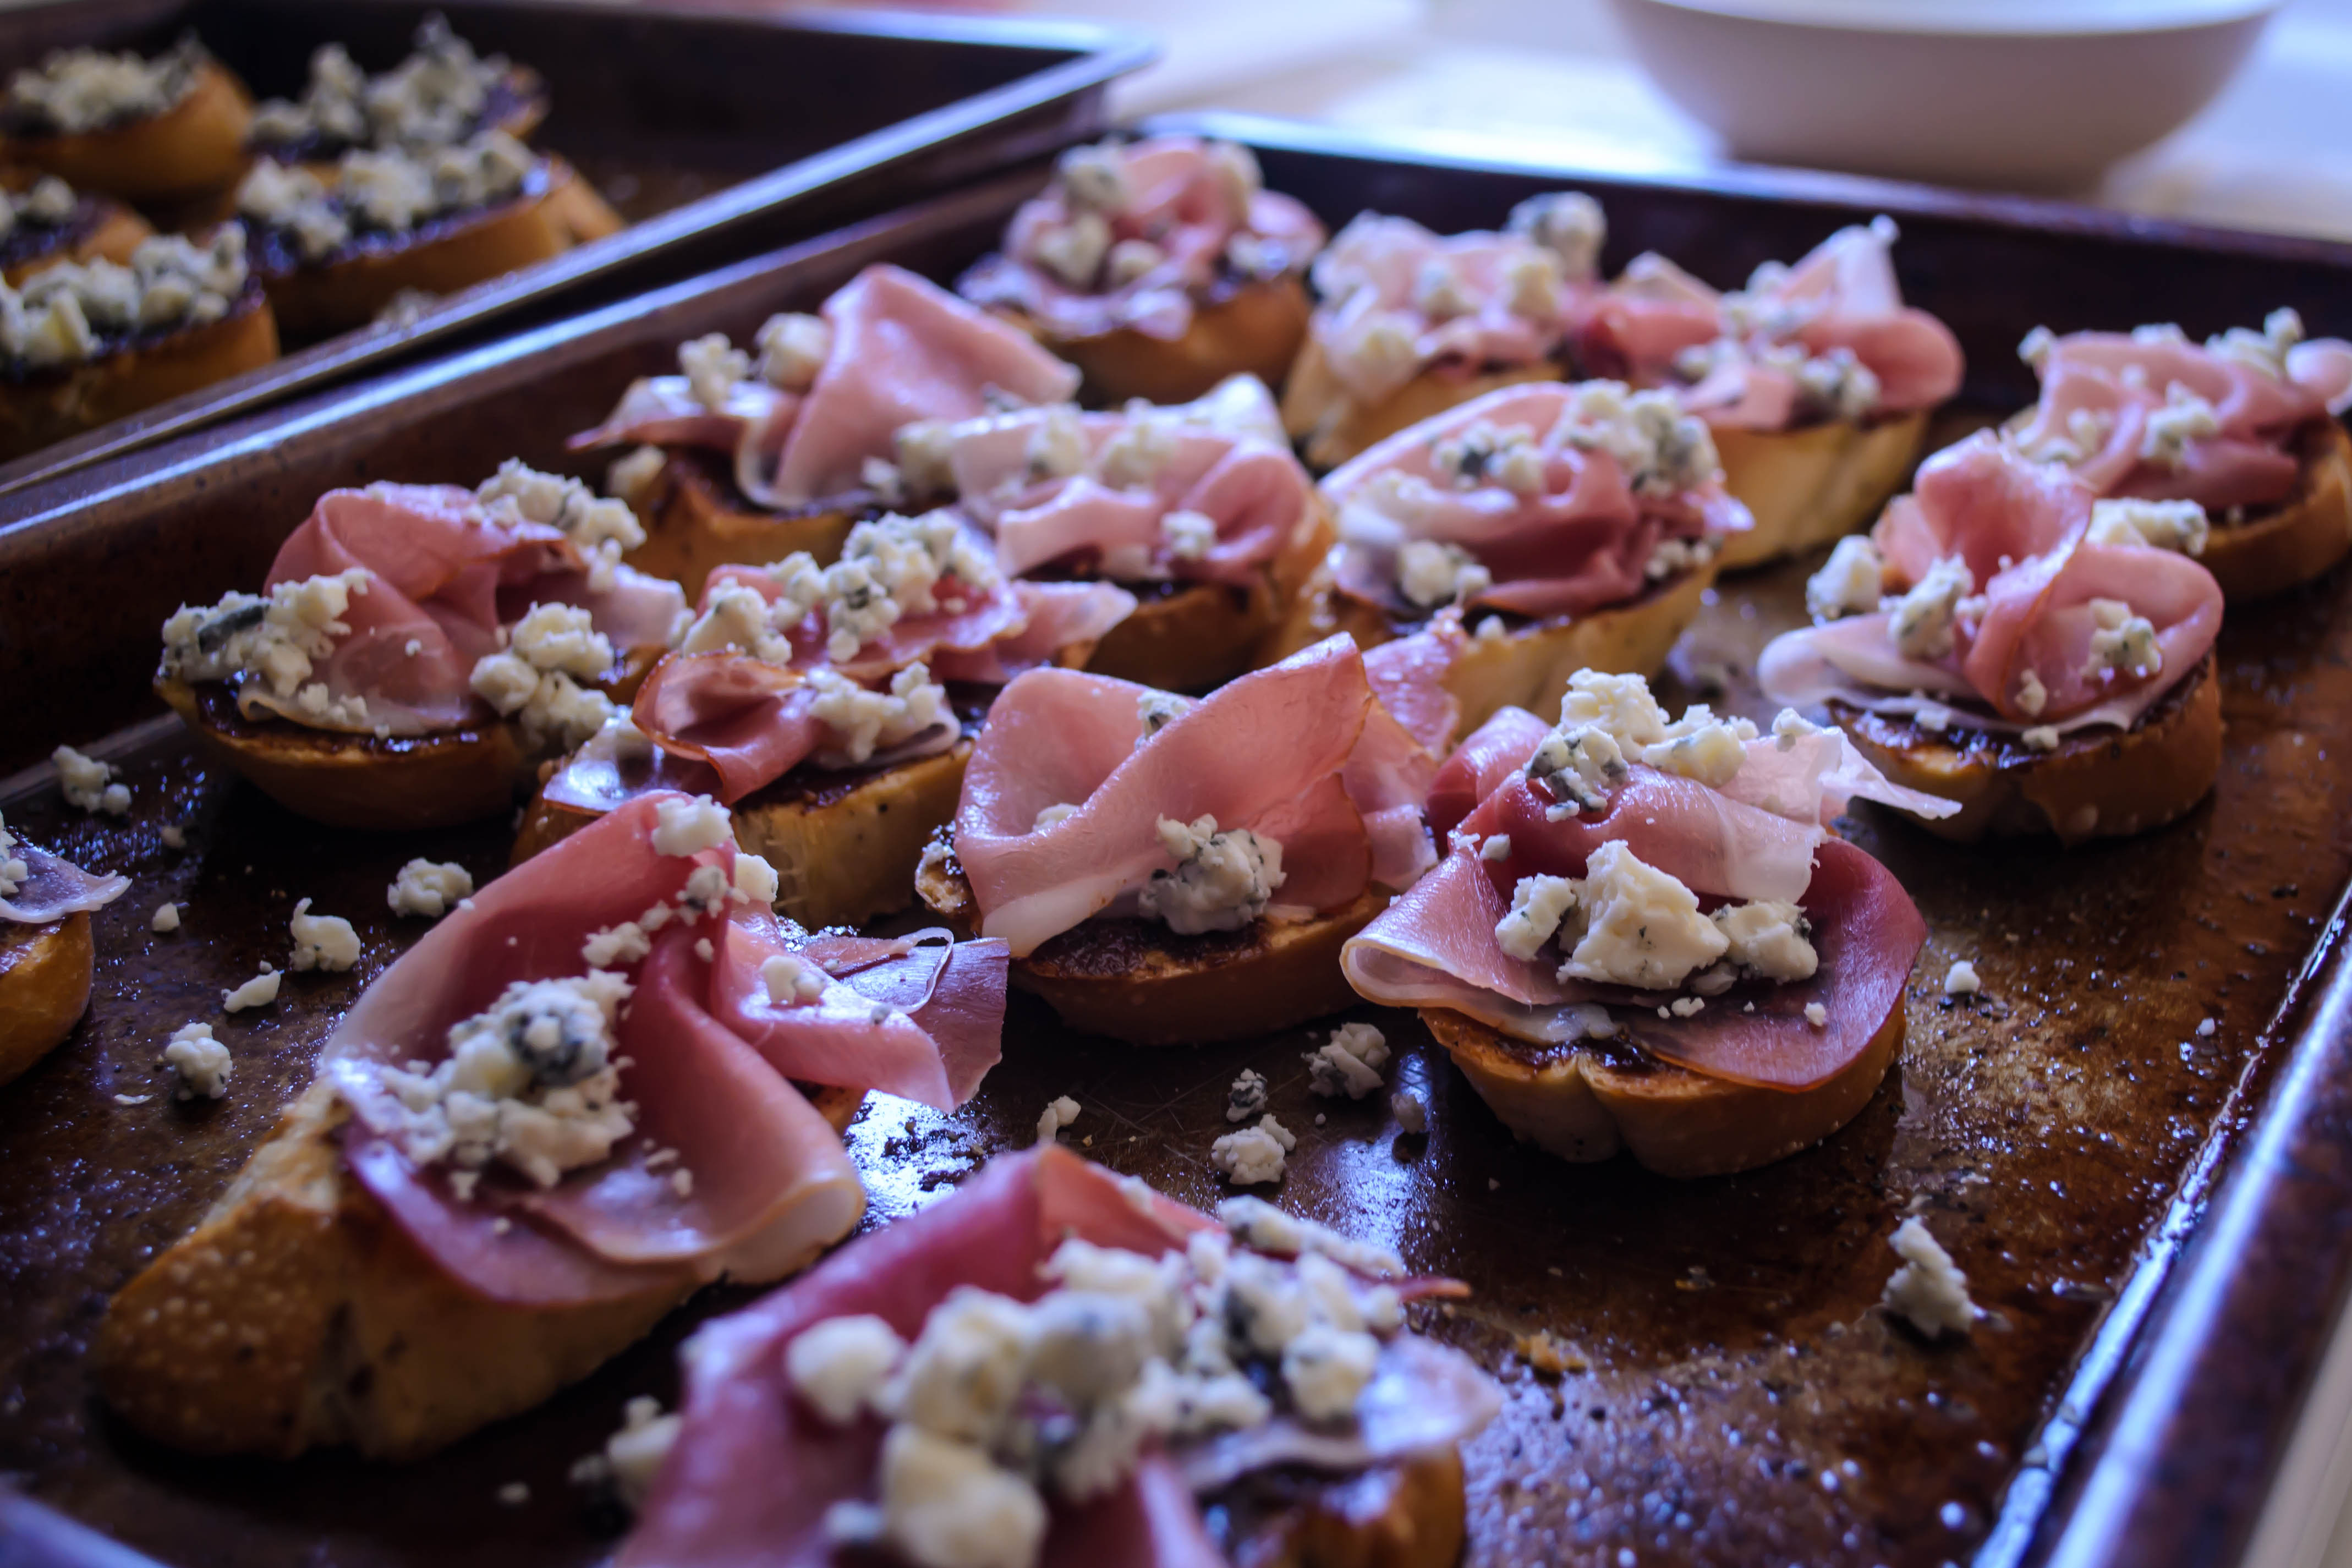
To put it all together, I decided I wanted a play of temperatures. After a liberal bath of olive oil, I toasted thin slices of bread – mine was in the ciabatta family, with its floury crust and moist, springy interior. A gentle smear of burrata on this warm toast, followed by a few sprigs of cress wilted into a resistless pile, all topped with a definitive drizzle of balsamic vinegar. Done. The cheese melts a bit into the bread; the cress and the balsamic and the residual olive oil flavors melding together create a kind of salad component. They are, I hardly need to say, delicious. I couldn’t stop sampling. It’s not just a nice play of flavors, but a good study in textures. I am criminal at over-toasting my bread, and this batch was just on the edge of being servable. But against the softness of the cheese and the pleasingly stringy feel of the wilted greens, the aggressive crunch of extra toasty toast was right.

Food Blog September 2014-0553I’d recommend a light, crisp wine to pair with this; something sparkling would be extra nice. I’d recommend a sun hat and sandals, if you have the option, and a few friends to laugh with. And I’d recommend making a bit more than you think you want, because you’re going to eat it all.

Food Blog September 2014-0557

Burrata, cress, and balsamic crostini
Ingredient quantities are a bit fast and loose here, because your demands for how much cheese, how many greens, and how liberal a drizzle of balsamic may be different from mine. And depending on how many people are clamoring for a taste and what size loaf you’ve bought, you may need more or less bread than I used. What seems most important is that one bunch of cress was enough to top 8 or so slices of crostini.
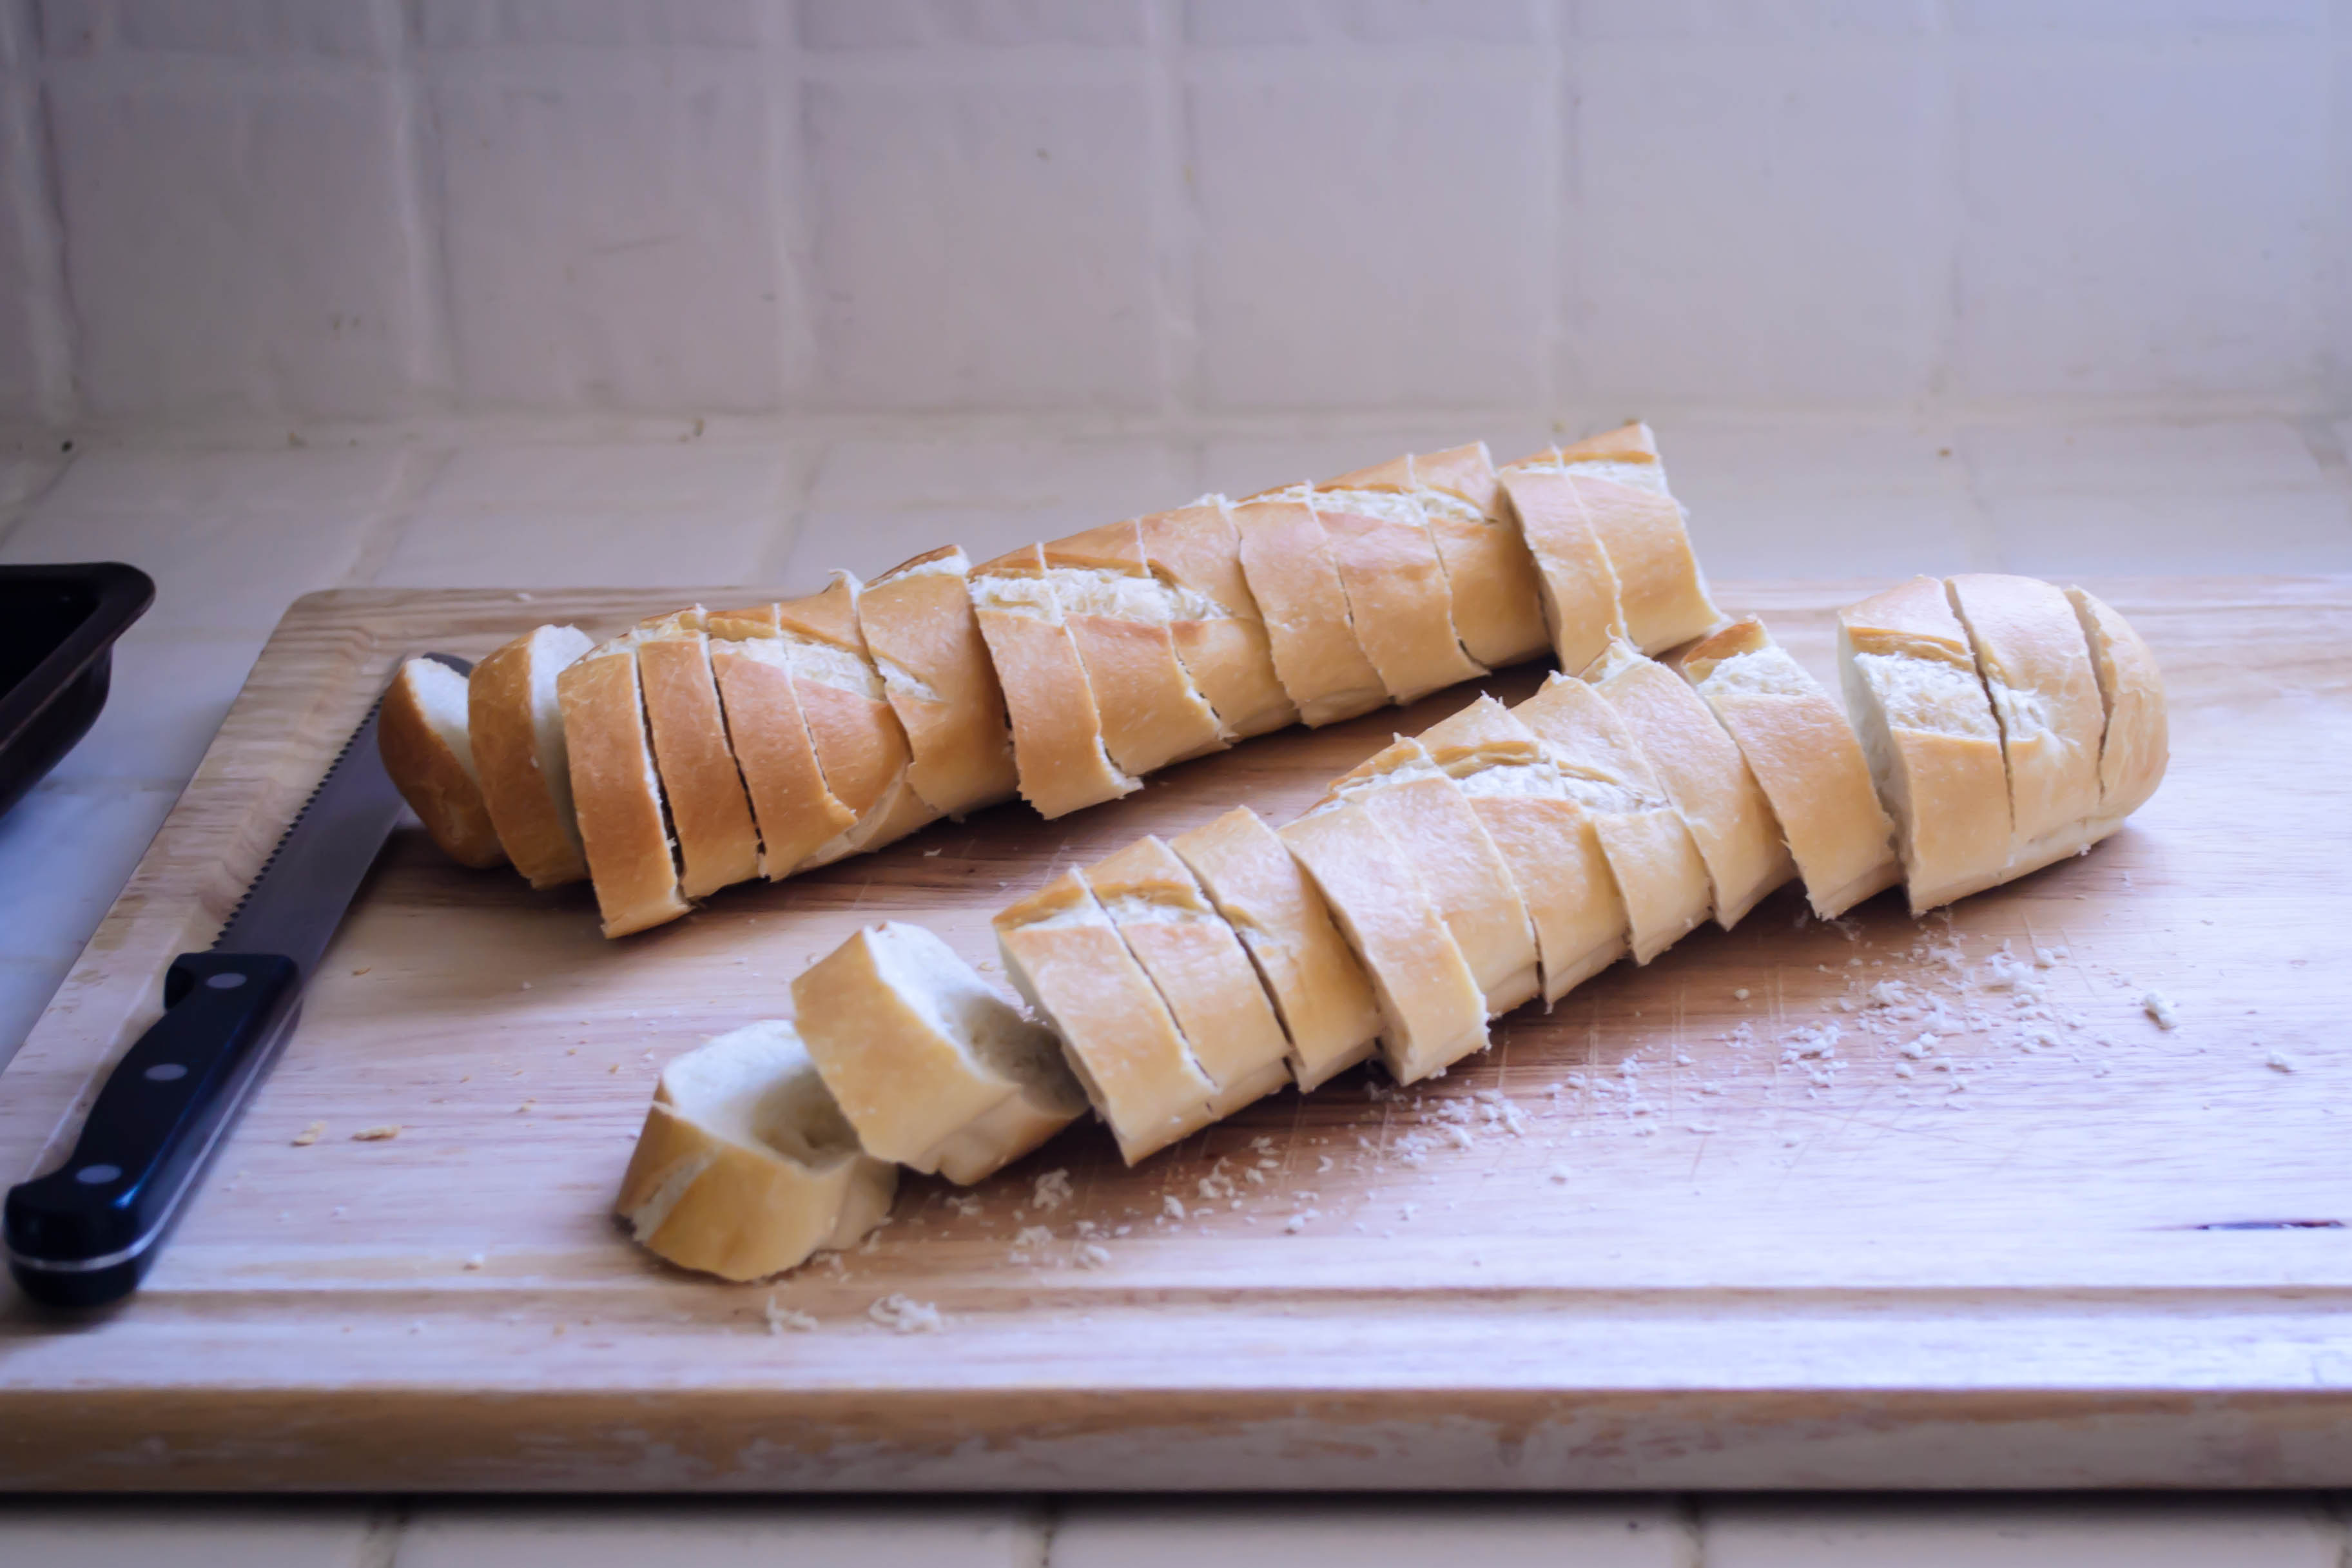
8-10 thin slices ciabatta or other fresh, artisanal bread
Olive oil, to drizzle and to cook the greens
1 bunch upland cress or watercress (or, as noted above, arugula)
Salt to taste
8 ounces burrata cheese
* Balsamic vinegar, for drizzling


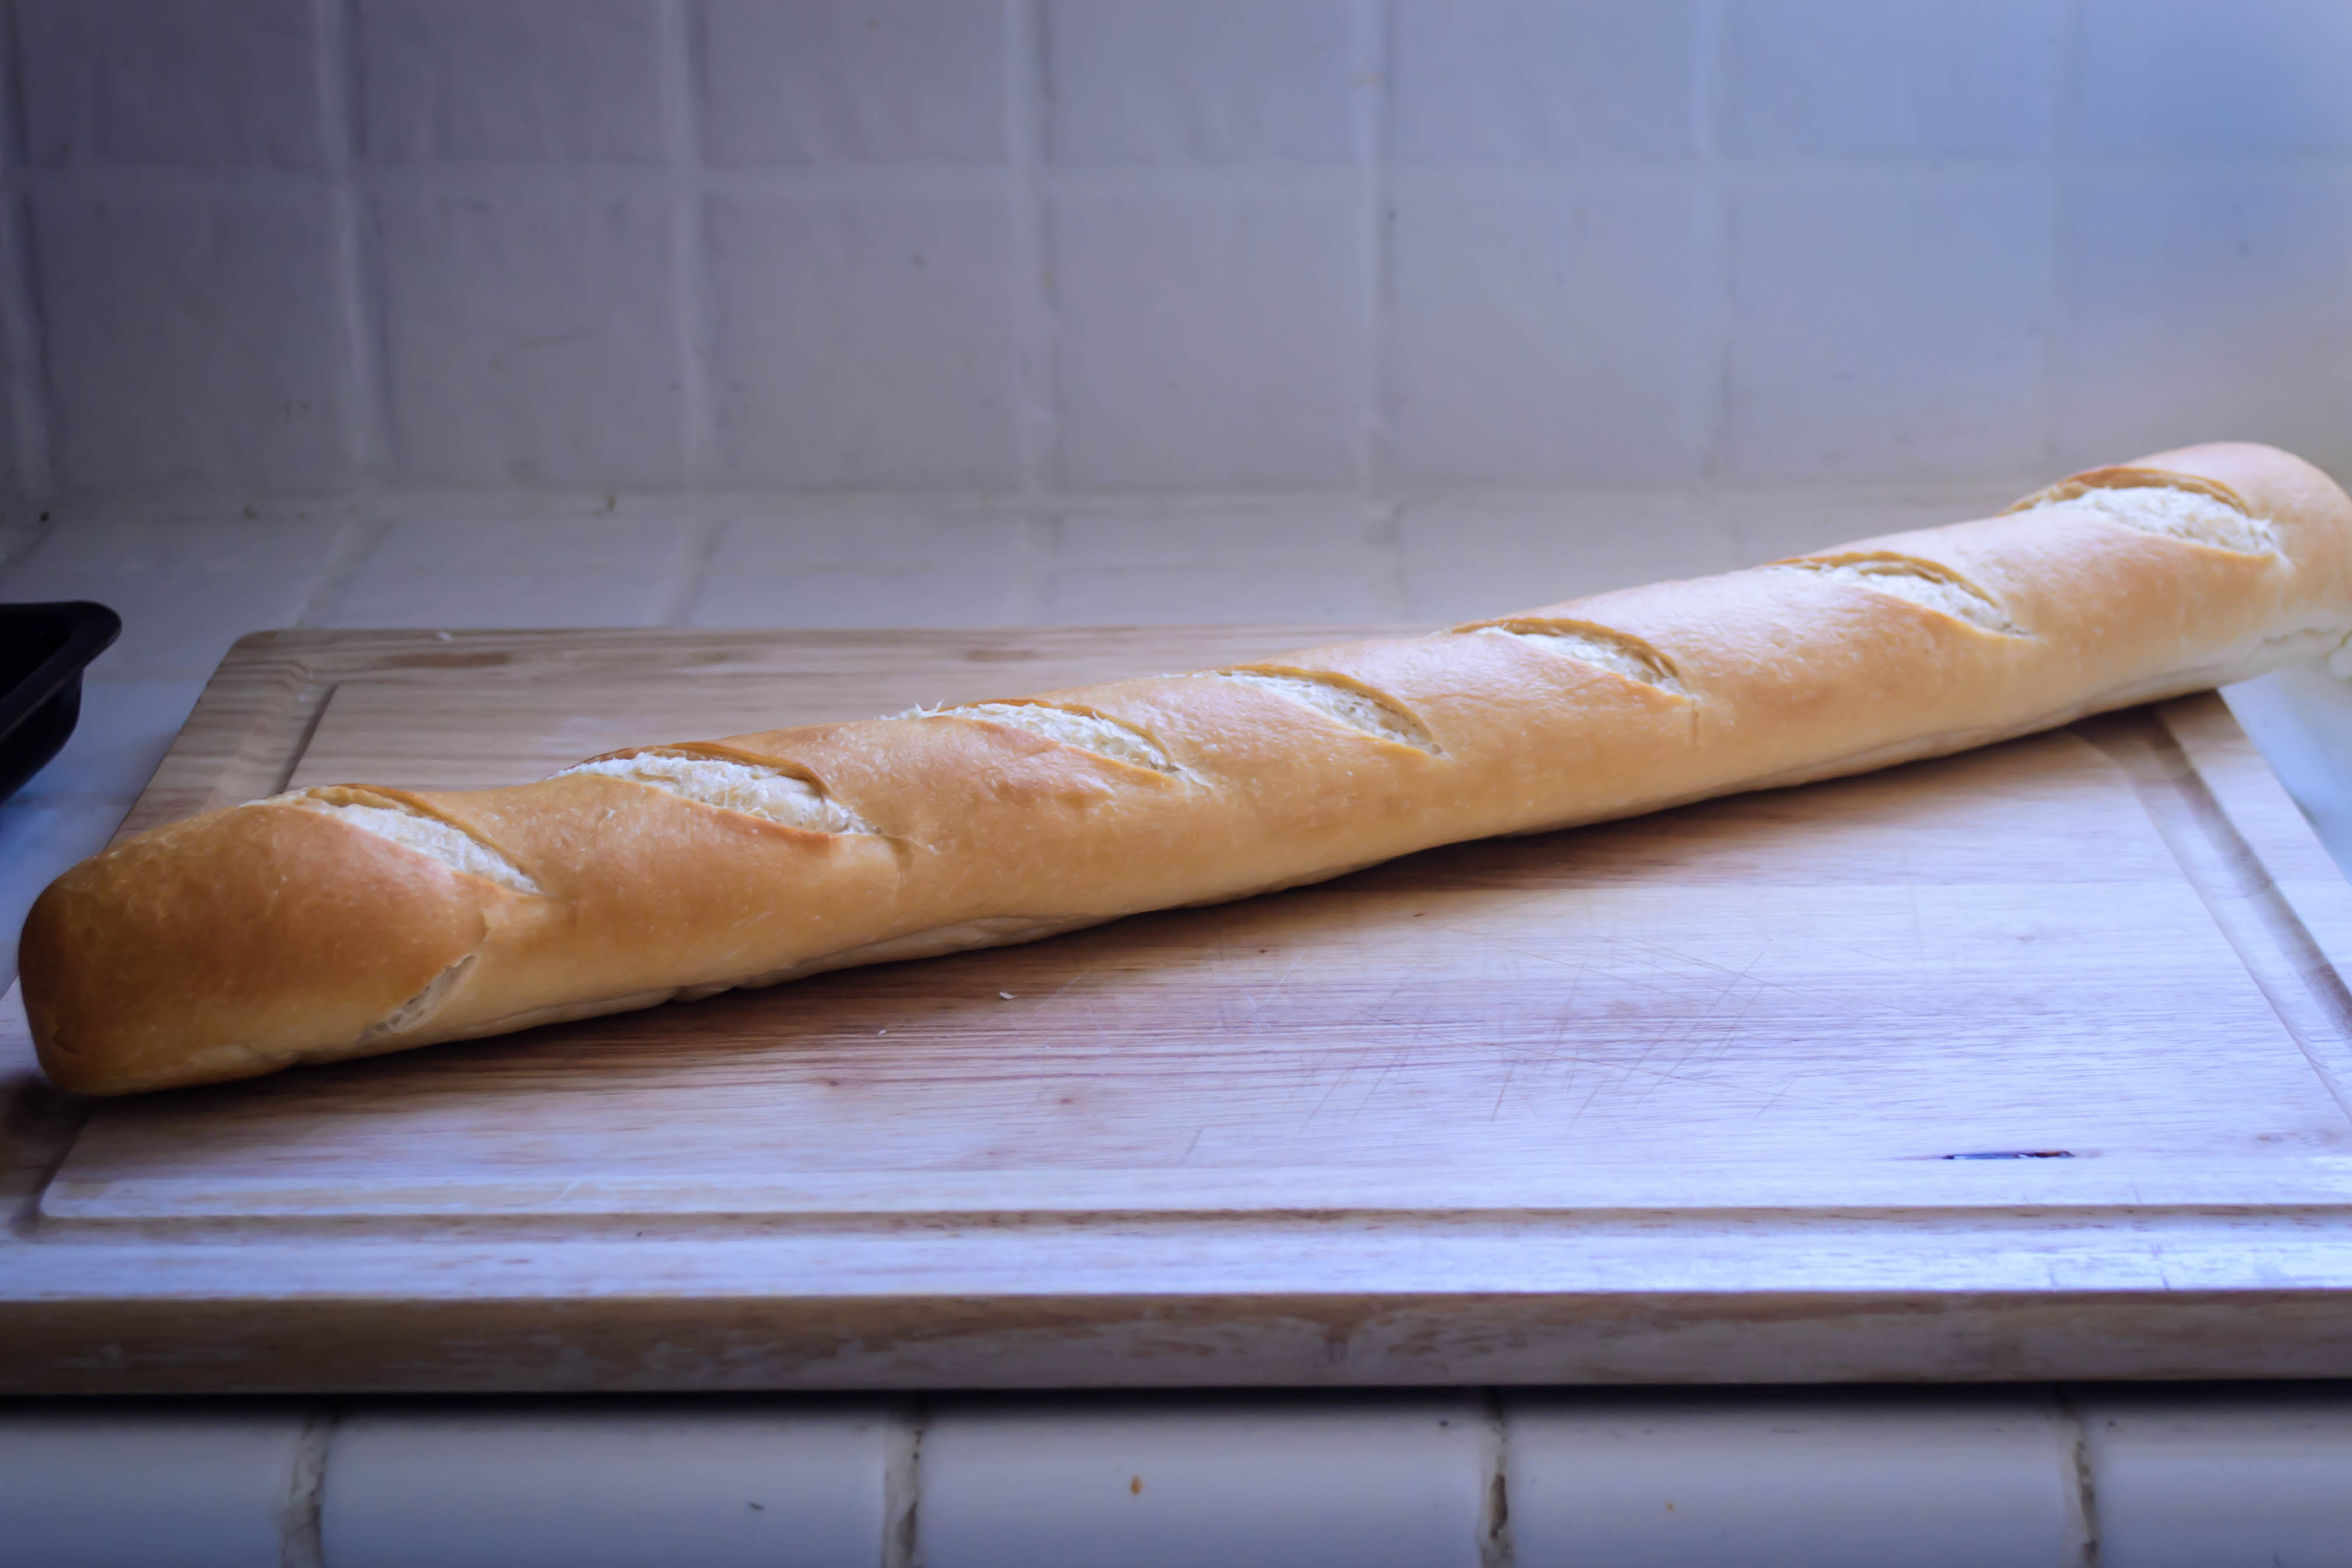
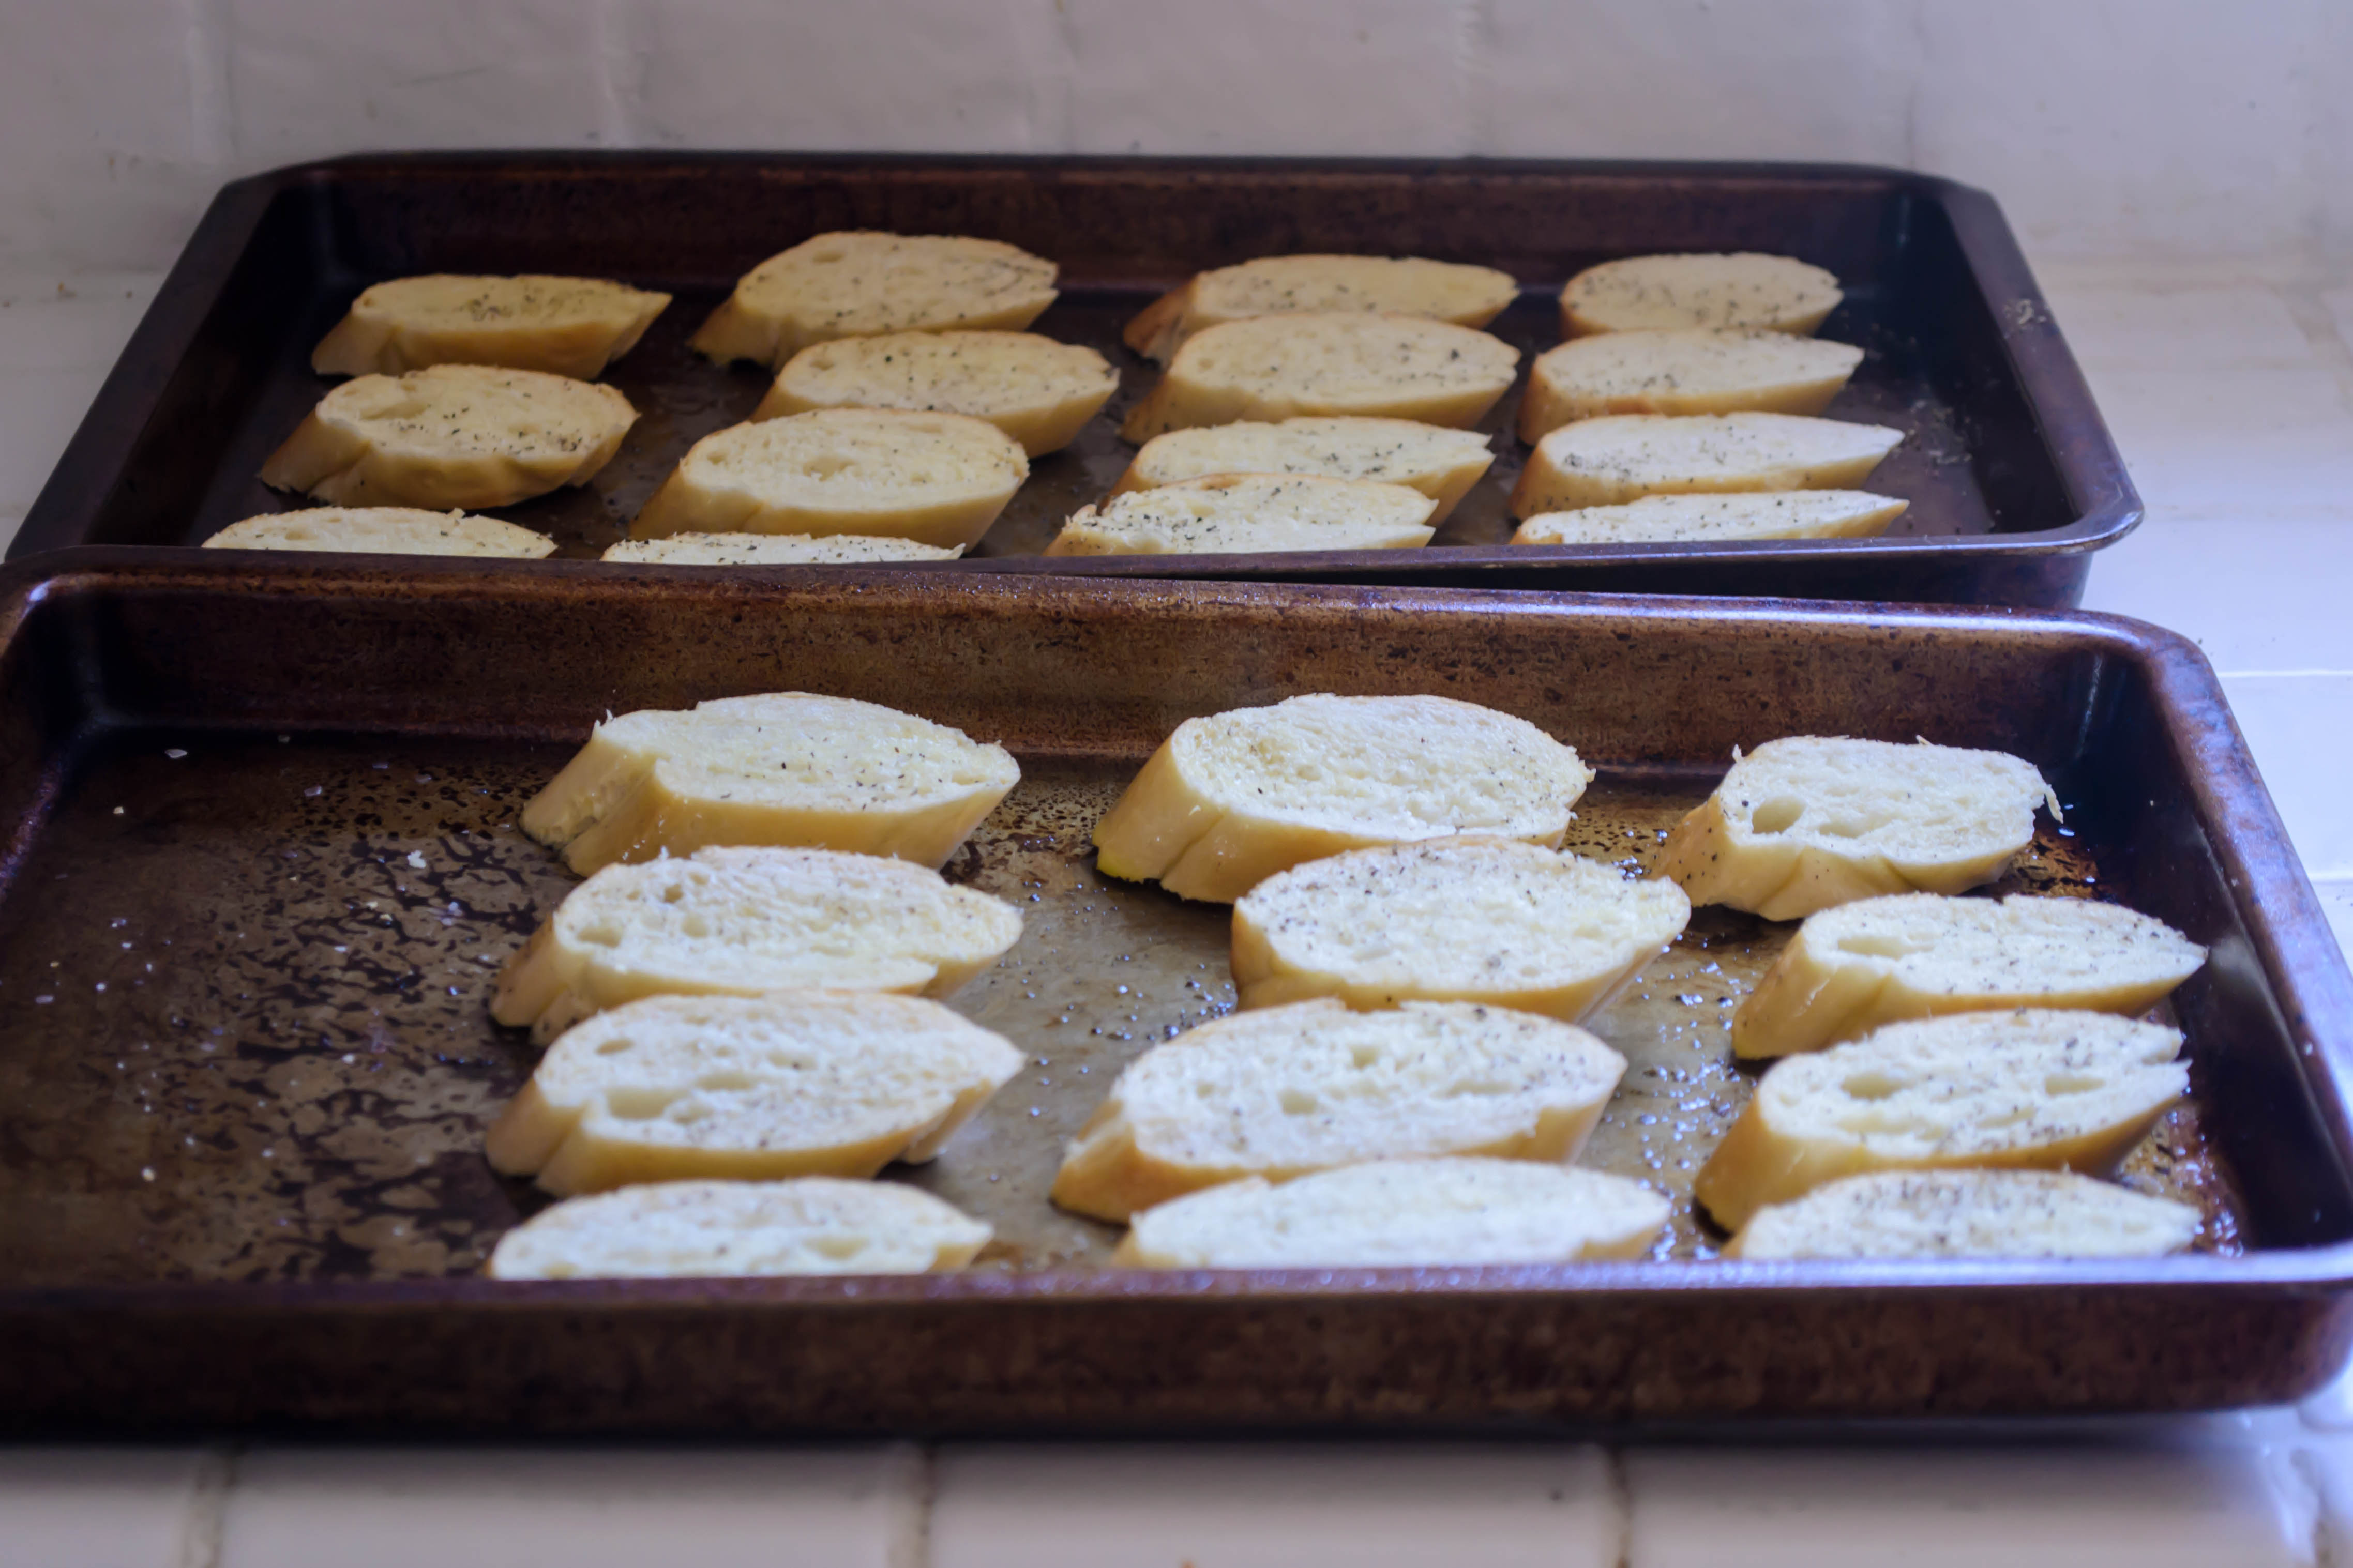
  • Preheat your broiler. While it warms, arrange bread slices on a sheet tray and drizzle with olive oil on both sides. Broil until deeply golden. Depending on your broiler, this could take anywhere from 2-5 minutes. Keep a close eye on it. When it is well bronzed and crisp, remove and set aside.
  • While your bread toasts (if you’re a successful multi-tasker), prepare your greens by slicing off the bottom inch or two of stem (there may be an attached root bundle at the bottom too). Warm a teaspoon or two of olive oil over medium heat in a skillet and add the cress with a pinch of salt. Cook, stirring often with a wooden spoon or tongs, until the cress has wilted down but is still bright green. It will have lost much of its crunch, but that’s okay. We are looking for tenderness here.
  • Just like that, we’re ready to assemble. For each piece of toast, cut a wedge of burrata and scoop onto the bread. Be sure you get the outside coating of mozzarella and the creamy curds inside. Top the cheese layer with a few sprigs of cress, then drizzle some balsamic vinegar over the whole thing and serve immediately.

* Note: if your balsamic vinegar is thin, or is more tart in flavor than you enjoy, try this – heat about ¼ cup of balsamic with 2 teaspoons brown sugar in a small saucepan until it simmers. Stir to dissolve the sugar, and allow it to reduce almost by half, so you have barely more than 2 tablespoons. This will thicken and sweeten the liquid, making it more of a glaze. It will still be plenty strong, though, so you’ll only need a little bit for each crostini.

Pesto Parmesan Pull-Apart Bread #TwelveLoaves

Food Blog August 2014-0476I’ve put off writing this post. I wasn’t sure how to begin. Every time I sit down to think about it, I end up surfing the net, scrolling through Facebook, seeing more and more headlines, reading more and more articles about the terrible things our world has been going through recently. As one of my friends and former colleagues put it recently, “the entire internet needs a trigger warning.”

Food Blog August 2014-0450I don’t often offer political or moral commentary on this site. That’s not its job. And I don’t often try to convince you that seeing things my way is the way you should see. My truths are mine, and yours are yours. But when terrible things happen, and when death and tragedy are instigated and framed through questionable motives – sometimes on both sides of the event – I question my own job here.

Food Blog August 2014-0451Food Blog August 2014-0454I’m not going to espouse to you what I think. Not today, and probably not ever, unless it’s something frivolous and food-related. I’m just going to say, with caution, that unless you have cut off access to emotions, to moral codes, or to the internet itself (I know, gasp!), over the past week or two – certainly over the past month – the world has been pretty depressing.

Food Blog August 2014-0457So that makes a food blogger wonder where she stands. When people are suffering, when people are angry and dying and struggling, for me, there is uncertainty: is it disrespectful or willfully unaware to coo over the cuteness of a cupcake or speckle my posts with just the right adjectives to describe the lusciousness of a sauce? I’ve considered this before, written about it before, and I always come back to the same conclusion: no. Food is important. Food means things, not just about nurturing our bellies but nurturing our hearts and our minds and, depending on what you believe, our souls. I talked to N. about this the other day, thinking again of how to write this post, and he said “we have to have some things to be happy about.” Food seems like one of those things.

Food Blog August 2014-0458Finally, what helped me figure out what to write so as to be aware of, respectful of, but not overwhelmed by these events I’ve found troubling, was the introduction to Yotam Ottolenghi and Sami Tamimi’s cookbook Jerusalem. Looking back through this lovely book, I was struck by a short section they have titled “A comment about ownership.” In a place – whether that is a city, or a nation, or the world itself – where we feel a need for the power that ownership and control bring us, it is hard to share. We pull ourselves apart from one another in an effort to feel safe, or right, or justified. Ottolenghi and Tamimi argue that searching out the true “owner” of a dish through its national or personal origin is not only difficult, but futile. Either it has been made before, or there exists another, or three, or a dozen, similar dishes claiming different origins: a “variation on a theme” (16).

Food Blog August 2014-0459Though Ottolenghi and Tamimi are commenting on dish origination – which makes sense, as they like to provide a little background about the meals they offer – what struck me was not just where a dish comes from, but where it goes. For a long, long time, sitting down at a table, or a fire, or a bowl, has meant something more than filling your stomach. It means trust, or love, or a forging of bonds. You eat together and you end up sharing more than a meal. I’m not sure that’s still true, but I think it should be.

Food Blog August 2014-0461So weirdly, when it came time to sample this month’s loaf for the Twelve Loaves project, I had chosen something divisive in its very name: pull-apart bread. When you tear into it, this loaf peels into separate bits, as I see happening so often in our world. Yet its richness, its docile tendency to give up layers and hunks and edges, suggests it is meant to be shared. We pull it into soft fragrant pieces, but we’re doing that together, and the act of sharing brings us comfort and happiness.

Food Blog August 2014-0464I’ve wanted to try a pull-apart bread for a long time, particularly after seeing Deb’s nod to Welsh Rarebit on Smitten Kitchen. To answer the call of summer herbs for Twelve Loaves, I settled on pesto, blending the sharp-sweet, fresh licorice scent of basil with the usual garlic, pine nuts, and lemon juice. I amped up the parmesan quotient and included it not in the spread itself, but as a separate layer to melt and cling.

Food Blog August 2014-0468There seem to be two schools on pull-apart bread. One involves rolling little spheres of dough and jamming them into a pan together, so when they cook they swell into one another and form tenuous ties. This is also commonly called Monkey Bread, especially when it is sweet. The other, which I haven’t seen as frequently but which I chose to work with after seeing Deb’s offering, results in something more like a Pillsbury Grands biscuit or puff pastry stood on end. It involves rolling the dough thin, slicing it in long strips, layering those strips and slicing them into squares, then levering those stacked squares – like servings of lasagna or birthday cake – sideways into a loaf pan like a deck of cards to rise into one another and smash together during baking. As you peel the warm layers apart, you get the bite of pesto and the salty richness of parmesan.

Food Blog August 2014-0473I want you to make this. It’s a bit of a project, but it’s so, so delicious. And when you make it, I want you to share it. Pull it apart, by all means. But let that action by extension pull you together.

Food Blog August 2014-0480

Pesto Parmesan Pull-Apart Bread
Makes a single 9×5 inch loaf
Adapted heavily from Smitten Kitchen
For dough:
2 teaspoons yeast
2 teaspoons sugar
½ cup milk, warm but not hot
2 ½ – 3 cups bread flour, divided
1 teaspoon salt
4 tablespoons soft butter
2 eggs
For filling:
3 garlic cloves, skins removed
¼ cup pine nuts
2 tablespoons lemon juice, or to your taste
4-5 cups packed basil leaves
½ cup (approximately) olive oil
salt and pepper to taste
2 cups parmesan cheese (I know, but it’s so fluffy!  2 cups is practically nothing… besides, you’re sharing…)


  • In a glass measuring cup, warm the milk. I like to pop it into the microwave for 20-30 seconds. When it is just warmer than body temperature (poke your fingertip in – it should feel just warm to the touch), add the sugar and the yeast and stir it up. Let this sit for 5 minutes or so while the yeast wakes up and begins to bubble.
  • Meanwhile, combine the salt and 2 cups of the flour in the bowl of a stand mixer and stir to combine. When the yeast and milk mixture is bubbly and smells like bread, add it to the flour and salt and mix on low speed using the paddle attachment until damply crumbly. Add the butter and the eggs and mix on low speed again.
  • Add an additional ½ cup flour and mix to combine. As soon as the dough starts to come together and there are no longer dry swaths of flour, switch from the paddle attachment to the dough hook.
  • Knead for 3-4 minutes until a soft dough the consistency of play-dough forms. If it looks really sticky or is not coming together or pulling away from the sides of the bowl at all, begin adding the additional flour 2 tablespoons at a time, kneading for a bit in between each addition. You may not need all of the additional flour – I only used 2 ½ cups total.
  • Lightly grease the inside of the bowl (or switch to a clean, lightly oiled one), flip the dough over a few times to ensure it is lightly greased as well, then cover the bowl with plastic wrap and set it aside for 50-60 minutes to rise. We are looking for the ball of dough to double in size.
  • While the dough rises, make the filling. Drop the garlic and the pine nuts into the belly of your food processor and let it run for a few seconds, until the garlic and pine nuts become a fragrant crumble. There is still some blending to go, so they don’t have to be a smooth paste yet.
  • Add the lemon juice and as many of the basil leaves as will comfortably fit, and turn on the processor. Most of the basil will almost instantly be shredded into tiny bits. If it isn’t, or if nothing seems to be happening, take out the lid from the food chute and begin pouring in the olive oil through this chute in a slow, steady stream.
  • Once there is room in the food processor bowl again, add the remaining basil leaves, if there are any. Repeat the olive oil streaming process until you have a thick paste. I usually end up adding my basil in two or three batches. You may use more or less olive oil – this is somewhat according to preference, but you do want a fairly thick pesto that you can spread, not pour.
  • Taste for seasoning; add salt and pepper and pulse to combine. Set aside until dough is finished rising.
  • When the dough has doubled in size, punch it down by gently depressing your fist into the center. Let it rest for a minute or two, then turn it out onto a well-floured board and, using a floured rolling pin, roll it out to a rectangle of about 12×20 inches.
  • Spread pesto over the entire rectangle of dough, right up to the edges. We don’t need a bare margin for this loaf.
  • Cut the rectangle crosswise into 5 strips of 12×4 inches (so the short edge of the initial big rectangle becomes the long edge of each of the 5 strips). Sprinkle one with about ½ cup parmesan cheese – this will be the bottom of the stack.
  • Carefully, using a spatula with a long blade or a dough scraper to help you, top your parmesan covered base with another strip of dough. Sprinkle another ½ cup parmesan atop this new layer.
  • Repeat until you have a stack of five layers, though the final layer will not have cheese on top, which is fine.
  • Gently, exceedingly gently, use a serrated knife to cut the dough layers into 6 segments of about 2 inches each. Turn each segment layer-side up (showing off its stratigraphy) and snug it into a greased 9×5 inch loaf pan. You can turn the pan up on its short end to make this a bit easier – take a peek at Deb’s images (link above) for a visual. Follow this with another segment, and so on, to create a stack of layers. When you finish and set the loaf pan back on its base, Deb says this looks a bit like a full card catalog drawer, and I think this is a good assessment.
  • Cover your strange, layered loaf with plastic wrap and set it aside to rise again for 30-45 minutes. Preheat the oven to 350F so it is ready when you are.
  • Once the dough has risen again, which will squash the layers together a bit, remove the plastic wrap and stow your loaf it in the 350F oven for 25-35 minutes until it is puffy and nicely bronzed on top.
  • Cool a minimum of 10 minutes in the pan (though 15 or even 20 is probably safer; mine collapsed upon removal), then carefully flip it out and serve warm for best flavor and “pull-apart” effect.

Guacamole Steak Salad

Food Blog August 2014-0352I remember it so clearly: the day my perspective on salads was enunciated aloud. It wasn’t by me. I’d had mixed, un-uttered feelings about salads for years, but it wasn’t until the year after I’d graduated from college, as I watched one of my roommates adding spinach, and then sliced tomatoes, and then garbanzo beans, and then hunks of cheese, and one or two (or five) other ingredients to a big red bowl – one of those bowls with the spout on one side for easy pouring, and a rubber bottom so it wouldn’t slide around the counter – and she looked up at me watching and said “I like my salads with a lot of stuff in them.”

Food Blog August 2014-0331Yes. That was right. That was why the salads my dad liked to pair with pasta – lettuce, a few tomatoes, maybe a sliver of cucumber or three, and the occasional crouton – didn’t seem worth it to me. That was why the house salad at innumerable restaurants was a chore to crunch through rather than a pleasure (I’d rather have had another basket of bread). There was a whole course for that sort of thing? Boring. Bring on the entree.

Food Blog August 2014-0335Food Blog August 2014-0337Food Blog August 2014-0342But salads are – can be! – exciting, if we are mindful of my roommate’s assertion. They just need a lot of stuff in them. And at this time of the summer, when all I want for dinner is a big salad, or something charred and fragrant off the grill, it seems the right moment to combine the two for a salad so stuffed with, well, stuff, that it needs no entree to help it along. It is no side; no first course. It is the main event. And this main event has found its way to our table an embarrassing number of times in the past few months.

Food Blog August 2014-0338Food Blog August 2014-0341Food Blog August 2014-0345I took guacamole as my inspiration, and chunked up all the ingredients necessary there – tomatoes, onion, cilantro, a whisper of jalapeno, if spicy suits you, and of course a mound of buttery, creamy cubes of avocado. Lime and garlic found their way in as part of a dressing, the brisk acidity and bite of raw garlic tempered a bit with a drizzle of honey. Because it’s grilling season, I couldn’t help but add some corn on the cob, grilled whole, then kernels lopped off to find their sweet, charred way into the mix. Since the grill was on anyway, the logical thing to do was to grill up a hunk of flank or skirt steak, liberally rubbed with spices, and slice it thin to lay across the top of all that veg. And then, because why not, a generous crumbling of queso fresco. Deconstructed guacamole. Steak. Corn. Cheese. Stuff.

Food Blog August 2014-0348This sounds like a salad only tangentially. I haven’t even mentioned crisp romaine, or toothsome kale, or fresh, grassy spinach. The thing is, as Mark Bittman taught me, the greens part of the salad is neither the starring role, nor (stay with me here) even necessary! Though I did end up including a greens foundation here (I chose cabbage because it stays crisp, and because it’s the green I like most in tacos – you could easily swap it out for lettuce of any sort, or even spinach if you prefer), the salad is bolstered by it, not overwhelmed with it. Any odd forkful is going to include a mix of vegetables, not a pile of cabbage with the occasional tomato you had to hunt around for.

Food Blog August 2014-0351If you’ve got a grill, this salad is executable without even looking at your oven or your stove. It is fresh and light, but still substantial, it carries a pleasant citrus bite but is creamy from the avocado and the cheese, and it makes a big bowlful. The steak is flavorful and slightly spicy; I’ve included my seasoning blend here, but you can use any mixture of spices you like – this is another tasty one. N. and I found ourselves fighting over the last succulent pieces as we went back for seconds. And though the salad stands alone just fine, as noted above, if you simply have to char a few corn tortillas over the grill at the last minute to serve in place of bread or chips on the side, I doubt anyone would argue. Because you, my friend, just won summer.

Food Blog August 2014-0354

Guacamole Steak Salad
Serves 4-6
For the steak:
1 pound skirt steak
1 teaspoon salt
pinch of cayenne pepper
1 teaspoon smoked paprika
1 teaspoon garlic powder
1 teaspoon onion powder
1 teaspoon ground cumin
1 teaspoon ground coriander
zest of 1 lime
1 tablespoon olive oil or vegetable oil
For the corn:
2 ears corn, husks and silk removed, stalk end still in place
salt and pepper for sprinkling
a few teaspoons olive oil to drizzle or spray over the corn
For the salad:
8-12 ounces thinly sliced cabbage shreds
16 ounces cherry tomatoes, quartered, OR 4 medium tomatoes, cored and cubed
8-10 green onions, roots removed, thinly sliced
2 avocados, pitted, peeled, and cubed
6 ounces crumbled queso fresco
½ cup packed chopped cilantro, from one bunch
For the dressing:
¼ cup lime juice (estimate 2-3 limes)
2-4 cloves garlic, very finely minced
2 teaspoons honey
⅓ – ½ cup olive oil
salt and pepper to taste
  • Preheat your grill to high. While it heats, we’ll prep the steak and the corn. Spread the steak out on a flat surface (I just unwrap it and leave it on the butcher paper wrapping it came in to save on dishes). Place the salt, the cayenne, and the other spices in a small bowl and combine with a fork. Add the lime zest and the olive oil and mix again – it will have the consistency of wet sand.
  • Scoop up half the sandy spice mixture you’ve created and rub it over one side of the steak. Be liberal in your application, and don’t be too gentle about it either – really massage it into the surface of the steak. Flip the steak over and repeat the process with the remaining half of the spice mixture, then set the steak aside to drink up some flavor.
  • Now we’ll prep the corn. Remove all husks and silk, but leave the stalk end on – it makes cutting the kernels off later on a bit easier because you have a built-in handle. Coat the corn with a drizzle or a few sprays of olive oil, being sure you get it on all sides of the ear. Sprinkle on salt and pepper as well, again, being sure all sides get seasoned.
  • Place the seasoned corn directly on the grates of the grill, and grill over high, direct heat for about 8 minutes, turning every few minutes. Your goal is to cook it through, and create a beautiful, golden char on all sides.
  • When the corn is done, set it aside to cool. In its place, flop the steak onto the grill and grill over high, direct heat for 5 minutes undisturbed. Flip it over and grill another 5 minutes, again, undisturbed. Remove to a plate or platter, cover with a layer of aluminum foil, and set aside to rest for about 10 minutes. This gives the juices time to redistribute and it allows for a bit of carryover cooking – by the time you slice it up, the steak will be medium to medium-well (skirt steak can be a bit uneven in thickness).
  • While all this grilling and resting is going on, make the rest of the salad. Place the cabbage, tomatoes, onions, cilantro, and queso fresco into a large bowl. You can either mix them all together, or arrange the ingredients in rows atop the cabbage like a cobb salad for pretty presentation.
  • To add the corn, stand up one of the grilled ears, which should be cool enough to handle by now, with the stalk sticking up toward you. Hold the stalk firmly and, with a sharp knife, cut straight down the ear, sawing back and forth a bit to help loosen the kernels. As you remove each segment of kernels, rotate the ear a bit to line up a new segment. Add the kernels to the salad. Some will be individual; some will be in big chunks. That’s okay. They will break up as we toss the whole thing.
  • To make the dressing, juice the limes and add the finely minced garlic, and the honey. Combine with a fork or a small whisk. Drizzle in the olive oil, whisking continuously, until the dressing emulsifies. Start with ⅓ cup of oil, then dunk in a chunk of tomato and give the dressing a taste to see what you think. Remember, it will taste stronger straight out of the mixing bowl than it will when you’ve tossed the entire salad with it.
  • Season the dressing to your liking, adding more of the olive oil if it is too acidic for you. Add the avocados to the salad immediately before you add the dressing, to prevent browning.
  • The last step here is to add the meat. Unwrap the steak from its rest and place it on a board or butcher block to slice it. Using a sharp knife, cut thin slices (no more than ¼ inch or so) against the grain at an angle. This will give you lovely tender slices. Drape the slices over the salad, down the center for a pleasing presentation.
  • Serve immediately, with a side of charred corn tortillas, if desired.

Fig, gorgonzola, and prosciutto crostini

Let’s talk about hazing for just a minute. I don’t mean the kind that covers the skies down here in Southern California – that filmy grayness that hangs a little thicker the closer to get to the skyscrapered center of Los Angeles. I don’t mean the kind that fills your brain when you remember there’s still a week of school left, and who knows how much grading after that. I mean the kind that happens when you’re the new guy. Being the new guy at my job means, through none of your own doing, that you are the party planner. At the department meeting in November, with no previous knowledge of customs or expectations, you suddenly get told that you (with any other new hires for the year) are in charge of planning the holiday party.
April May June 2014-3780You do it. It turns out fine. And in my case, you end up with some funds left over. And suddenly the hazing becomes self-inflicted. You find yourself sitting in your boss’s office suggesting we organize something for the end of the spring semester as well because, well, why not? We work hard. We might want a party to celebrate the close of the school year. So when May rolls around, you remember that suggestion, and those leftover funds, and suddenly you’re planning a happy hour for the colleagues you can’t believe you’ve grown so fond of in just a year, and feeling, under the weight of the grocery bags, again quite lucky to have landed this position.
April May June 2014-3770When I plan a party, I have a tendency to go overboard. Potlucks N. and I hosted during graduate school became theme parties. We were late to our graduation party because I wanted to make sure the pulled pork I’d made to share was perfect. Though I was determined to keep this work function a casual, easy-to-throw-together affair, I still found myself sketching out a shopping list two weeks in advance, when we weren’t even sure where the party would take place yet.
April May June 2014-3771And then I was suddenly not just adding ready-to-serve items to the list, but ingredients. I was menu planning.
April May June 2014-3773It seems to me that a gathering of the sort I executed this past weekend – a casual happy hour in a gorgeous community clubhouse in San Pedro – is perfectly lovely with entirely purchased snacks. A selection of red and white wines, good cheeses, some crackers and a vegetable platter, and perhaps some nice briny olives and hard salami, more than does the job. But adding one or two homemade items really makes things special. For me, these included some spring rolls and peanut sauce (I may share the recipe at some point, if I can get my act together), some freshly baked sourdough bread spiked with rosemary, and a crostini combination I am crazy for that was gone within the space of an hour.
April May June 2014-3775This crostini blends salty and sweet in a tremendously successful way. It’s pretty, it smells fantastic, it looks impressive, and it is so easy there’s barely a recipe at all. That’s what we all need, I think, for the end of the semester.
April May June 2014-3778Ready?
You slice a baguette, drizzle the slices with olive oil and pepper, and toast them. No salt, since we’ll be adding cured meat and cheese in a moment. You spread them with fig jam, nestle a half slice of prosciutto atop each, and then add a sprinkling of gorgonzola cheese. Then you shove the whole tray under the broiler for a few minutes until the edges of the prosciutto are crinkling and toasting with heat, and then you scoop your little toasts onto a platter and send them out to watch them disappear. Done. If you want, you can add a little wisp of baby arugula to the top for greenness and another peppery punch. As you can see, I did a tray without prosciutto, to allow vegetarian snackers to partake as well.

April May June 2014-3781*Note: these quantities are approximate. Depending on how well oiled you like your bread, how peppery you want your toasts to be, and how thick a layer of jam and cheese you want to offer, you may need slightly more or slightly less than I’ve suggested here.

Fig, gorgonzola, and prosciutto crostini
Makes 24-30 toasts, depending on how thick you slice your baguette
1 french baguette
¼ cup (approximate) olive oil (or olive oil spray)
½ teaspoon black pepper
½ cup fig jam
10-12 slices prosciutto, halved into fat rectangles (as opposed to long, skinny ones)
¾ cup crumbled gorgonzola cheese
1 bunch baby arugula, optional
  • First, preheat your broiler.
  • Slice your baguette on a bias into ½ – ¾ inch discs. Arrange on two baking trays in a single layer. Brush (or spray) with olive oil and sprinkle with black pepper. Broil for 2-3 minutes or until the top of each slice is golden. Flip over each slice and broil another 1-2 minutes until these, too, are golden. Set aside to cool slightly.
  • When the toasts have cooled enough to handle without toasting your fingertips, spread each one with a thin layer of fig jam, being sure to get all the way to the edges.
  • Top the jam with a slice of prosciutto, fluting it a bit as you set it on the bread so that it sits up like a rumpled napkin, rather than lying flat. This will ensure a bit of crisping, and it looks awfully pretty.
  • Sprinkle some gorgonzola crumbles atop the prosciutto, trying to keep them on the toasts as much as possible, rather than on the baking tray around the toasts.
  • Place your loaded sheet trays back into the broiler and let them go for just a minute or two, until the edges of the prosciutto are sizzling and crisp, and the gorgonzola starts to wilt and bubble slightly.
  • Remove from the oven, settle on a serving platter, and top each with a curl of baby arugula, if desired.

Photo Friday

I’m now feeling secure enough about myself, almost a month later, to share a few shots from my strawberries-and-goat-cheese biscuit disaster… They were pretty, and I love how ethereal the kitchen lighting is, but they were just so. damn. flat. Lesson learned. Jamming a full pint of strawberries into an innocent batch of dough does not fluffy biscuits make.

Food Blog Photo Friday 2014-3371 Food Blog Photo Friday 2014-3375 Food Blog Photo Friday 2014-3424 Food Blog Photo Friday 2014-3429

Lambikopita Burgers

Food Blog April 2014-3562
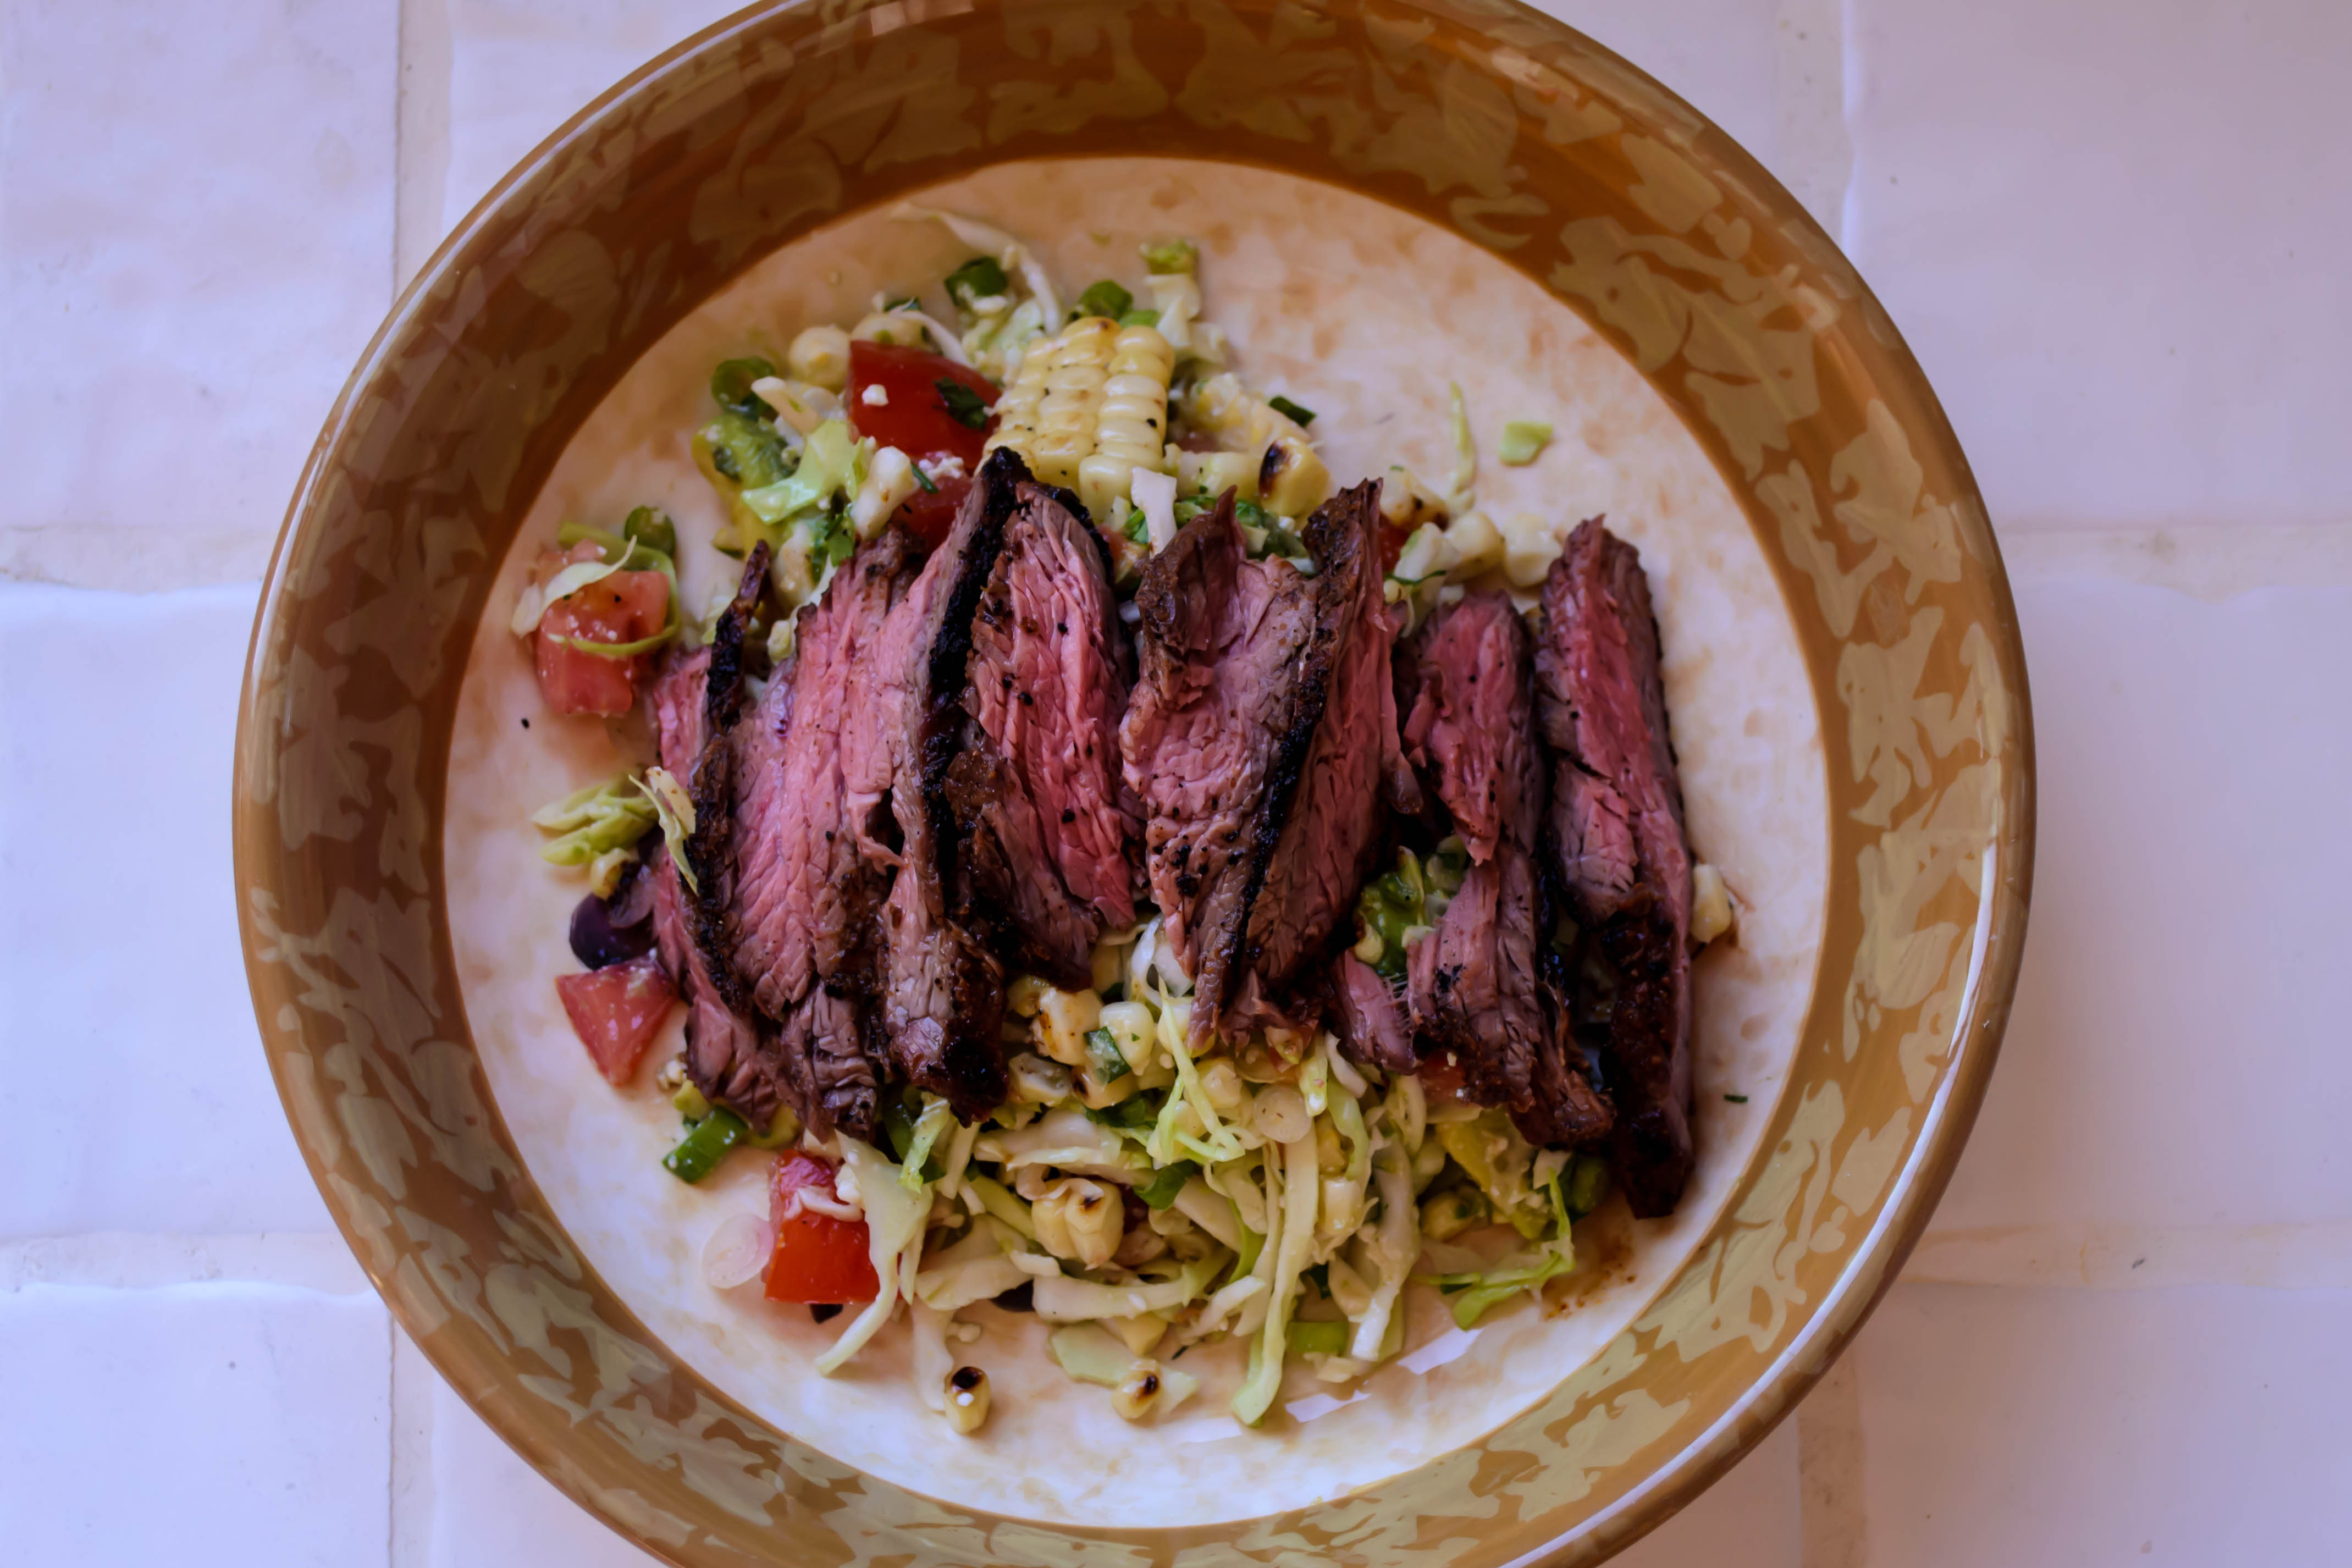
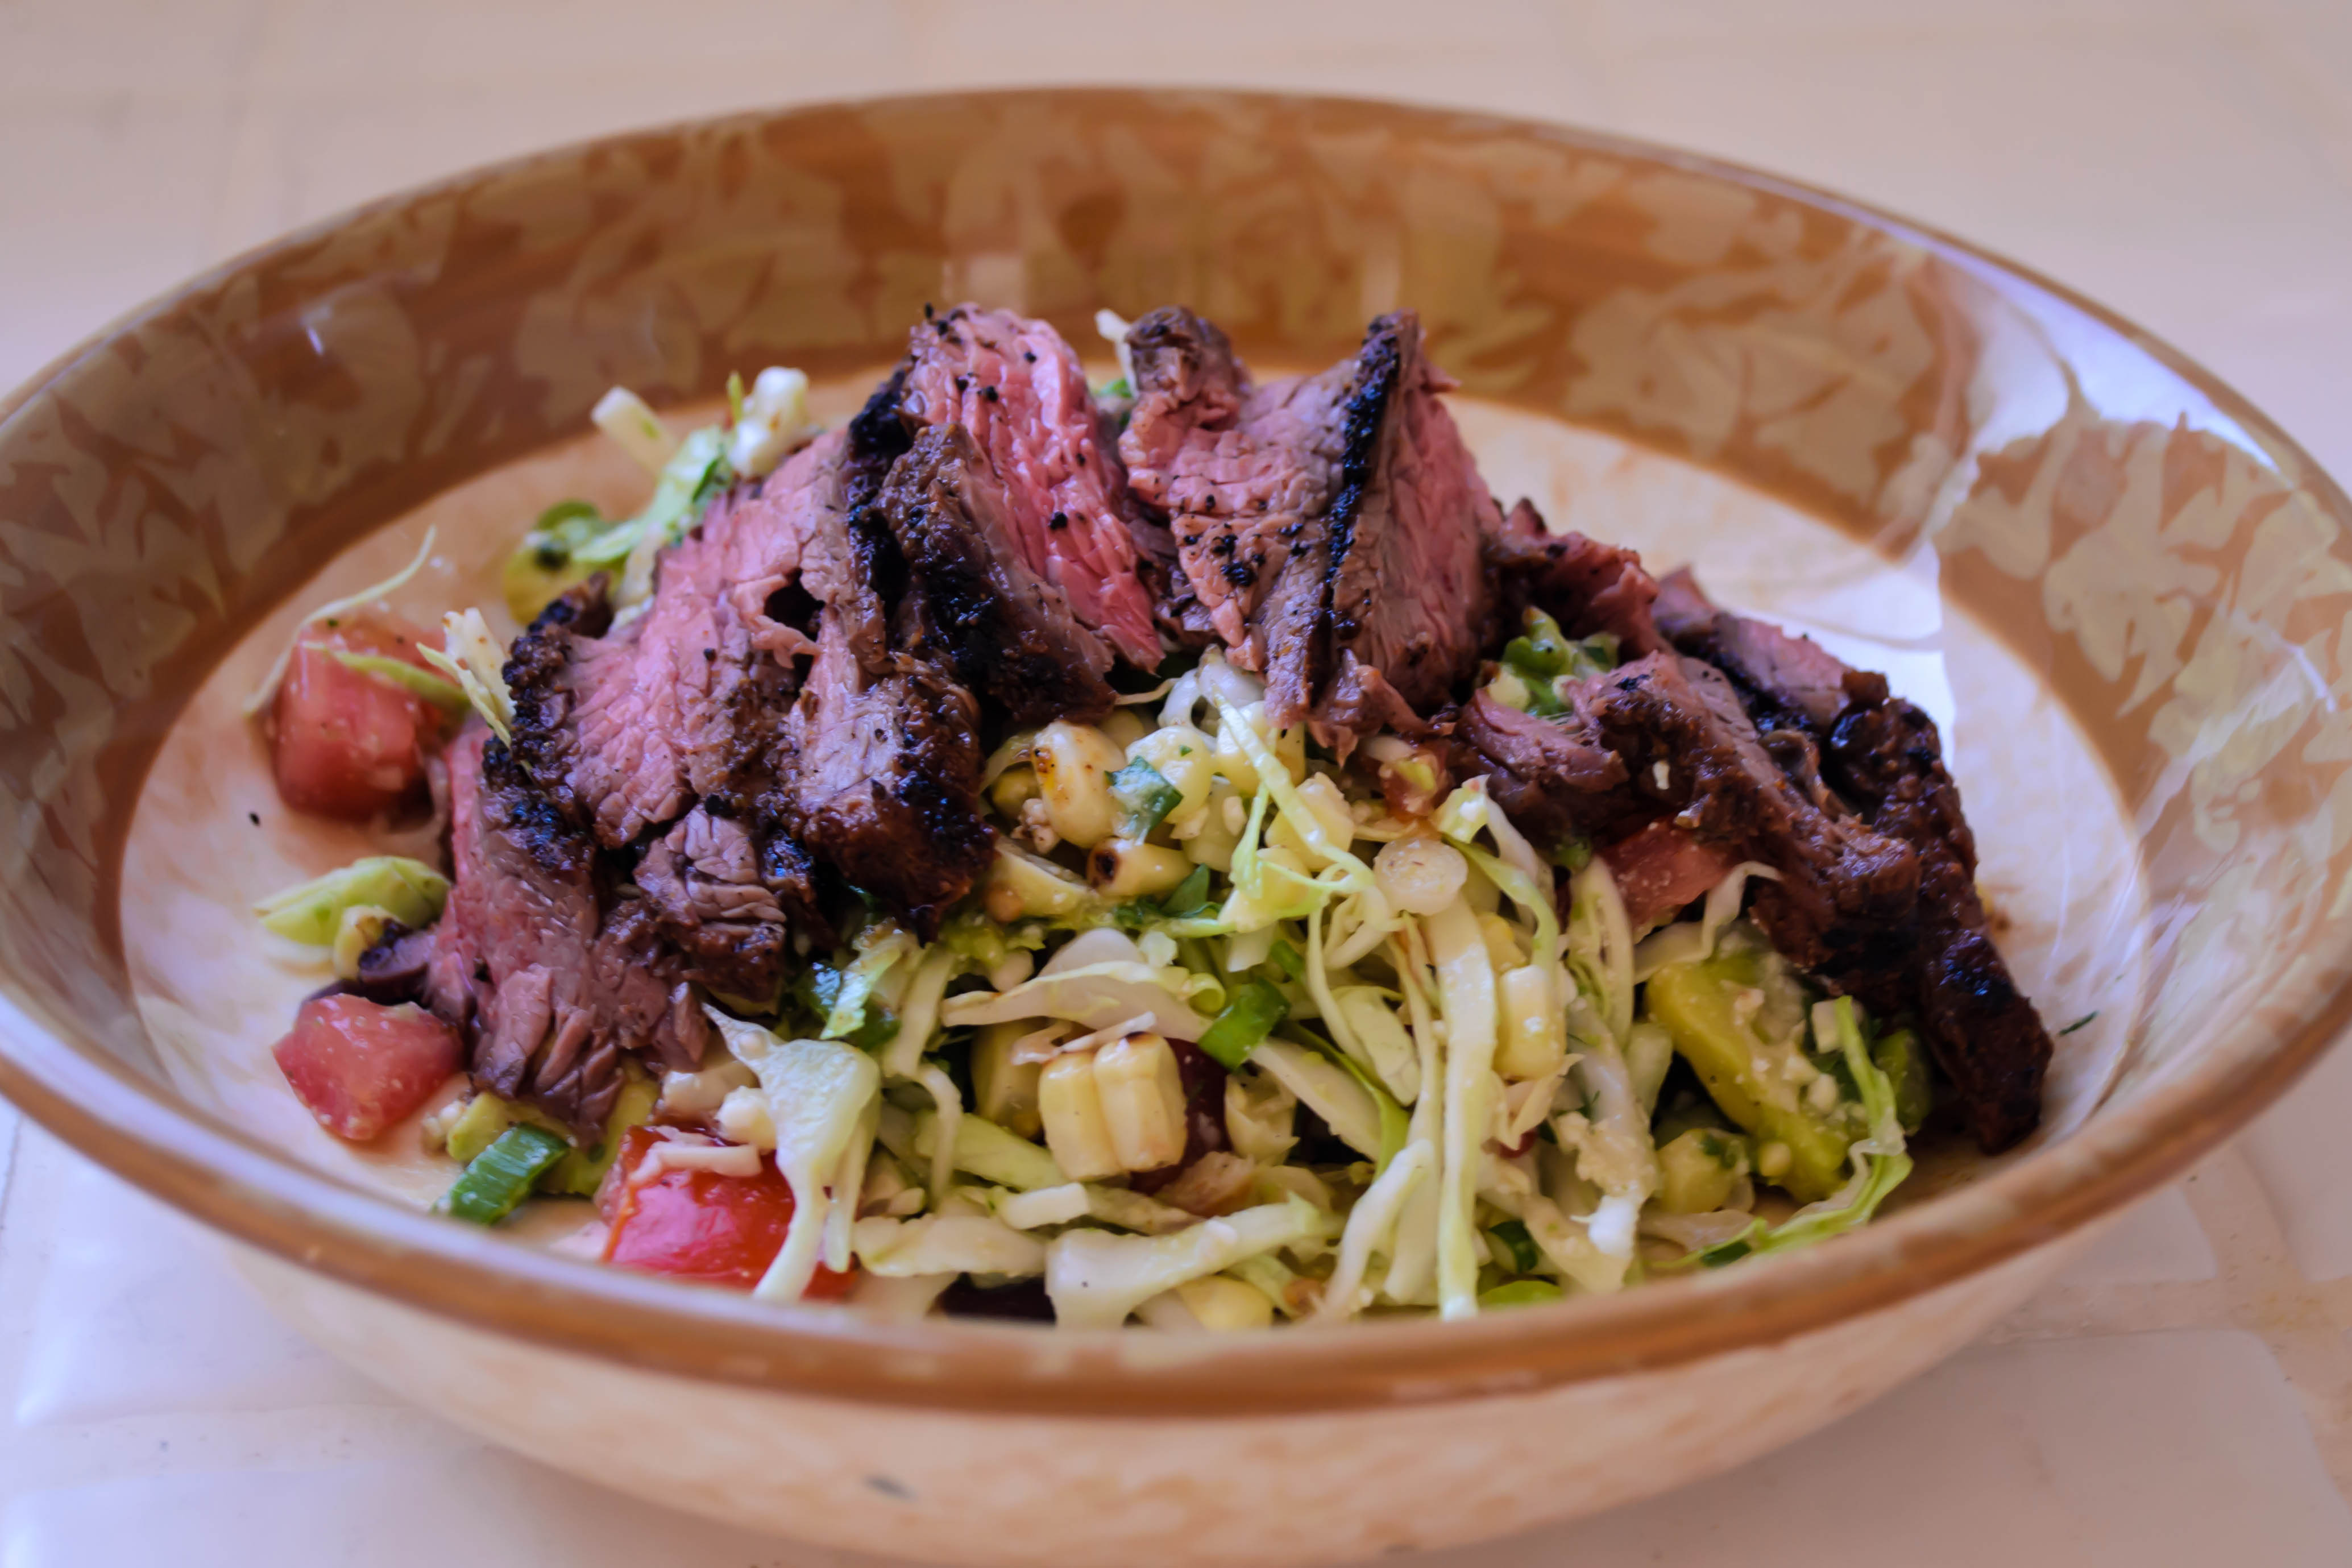
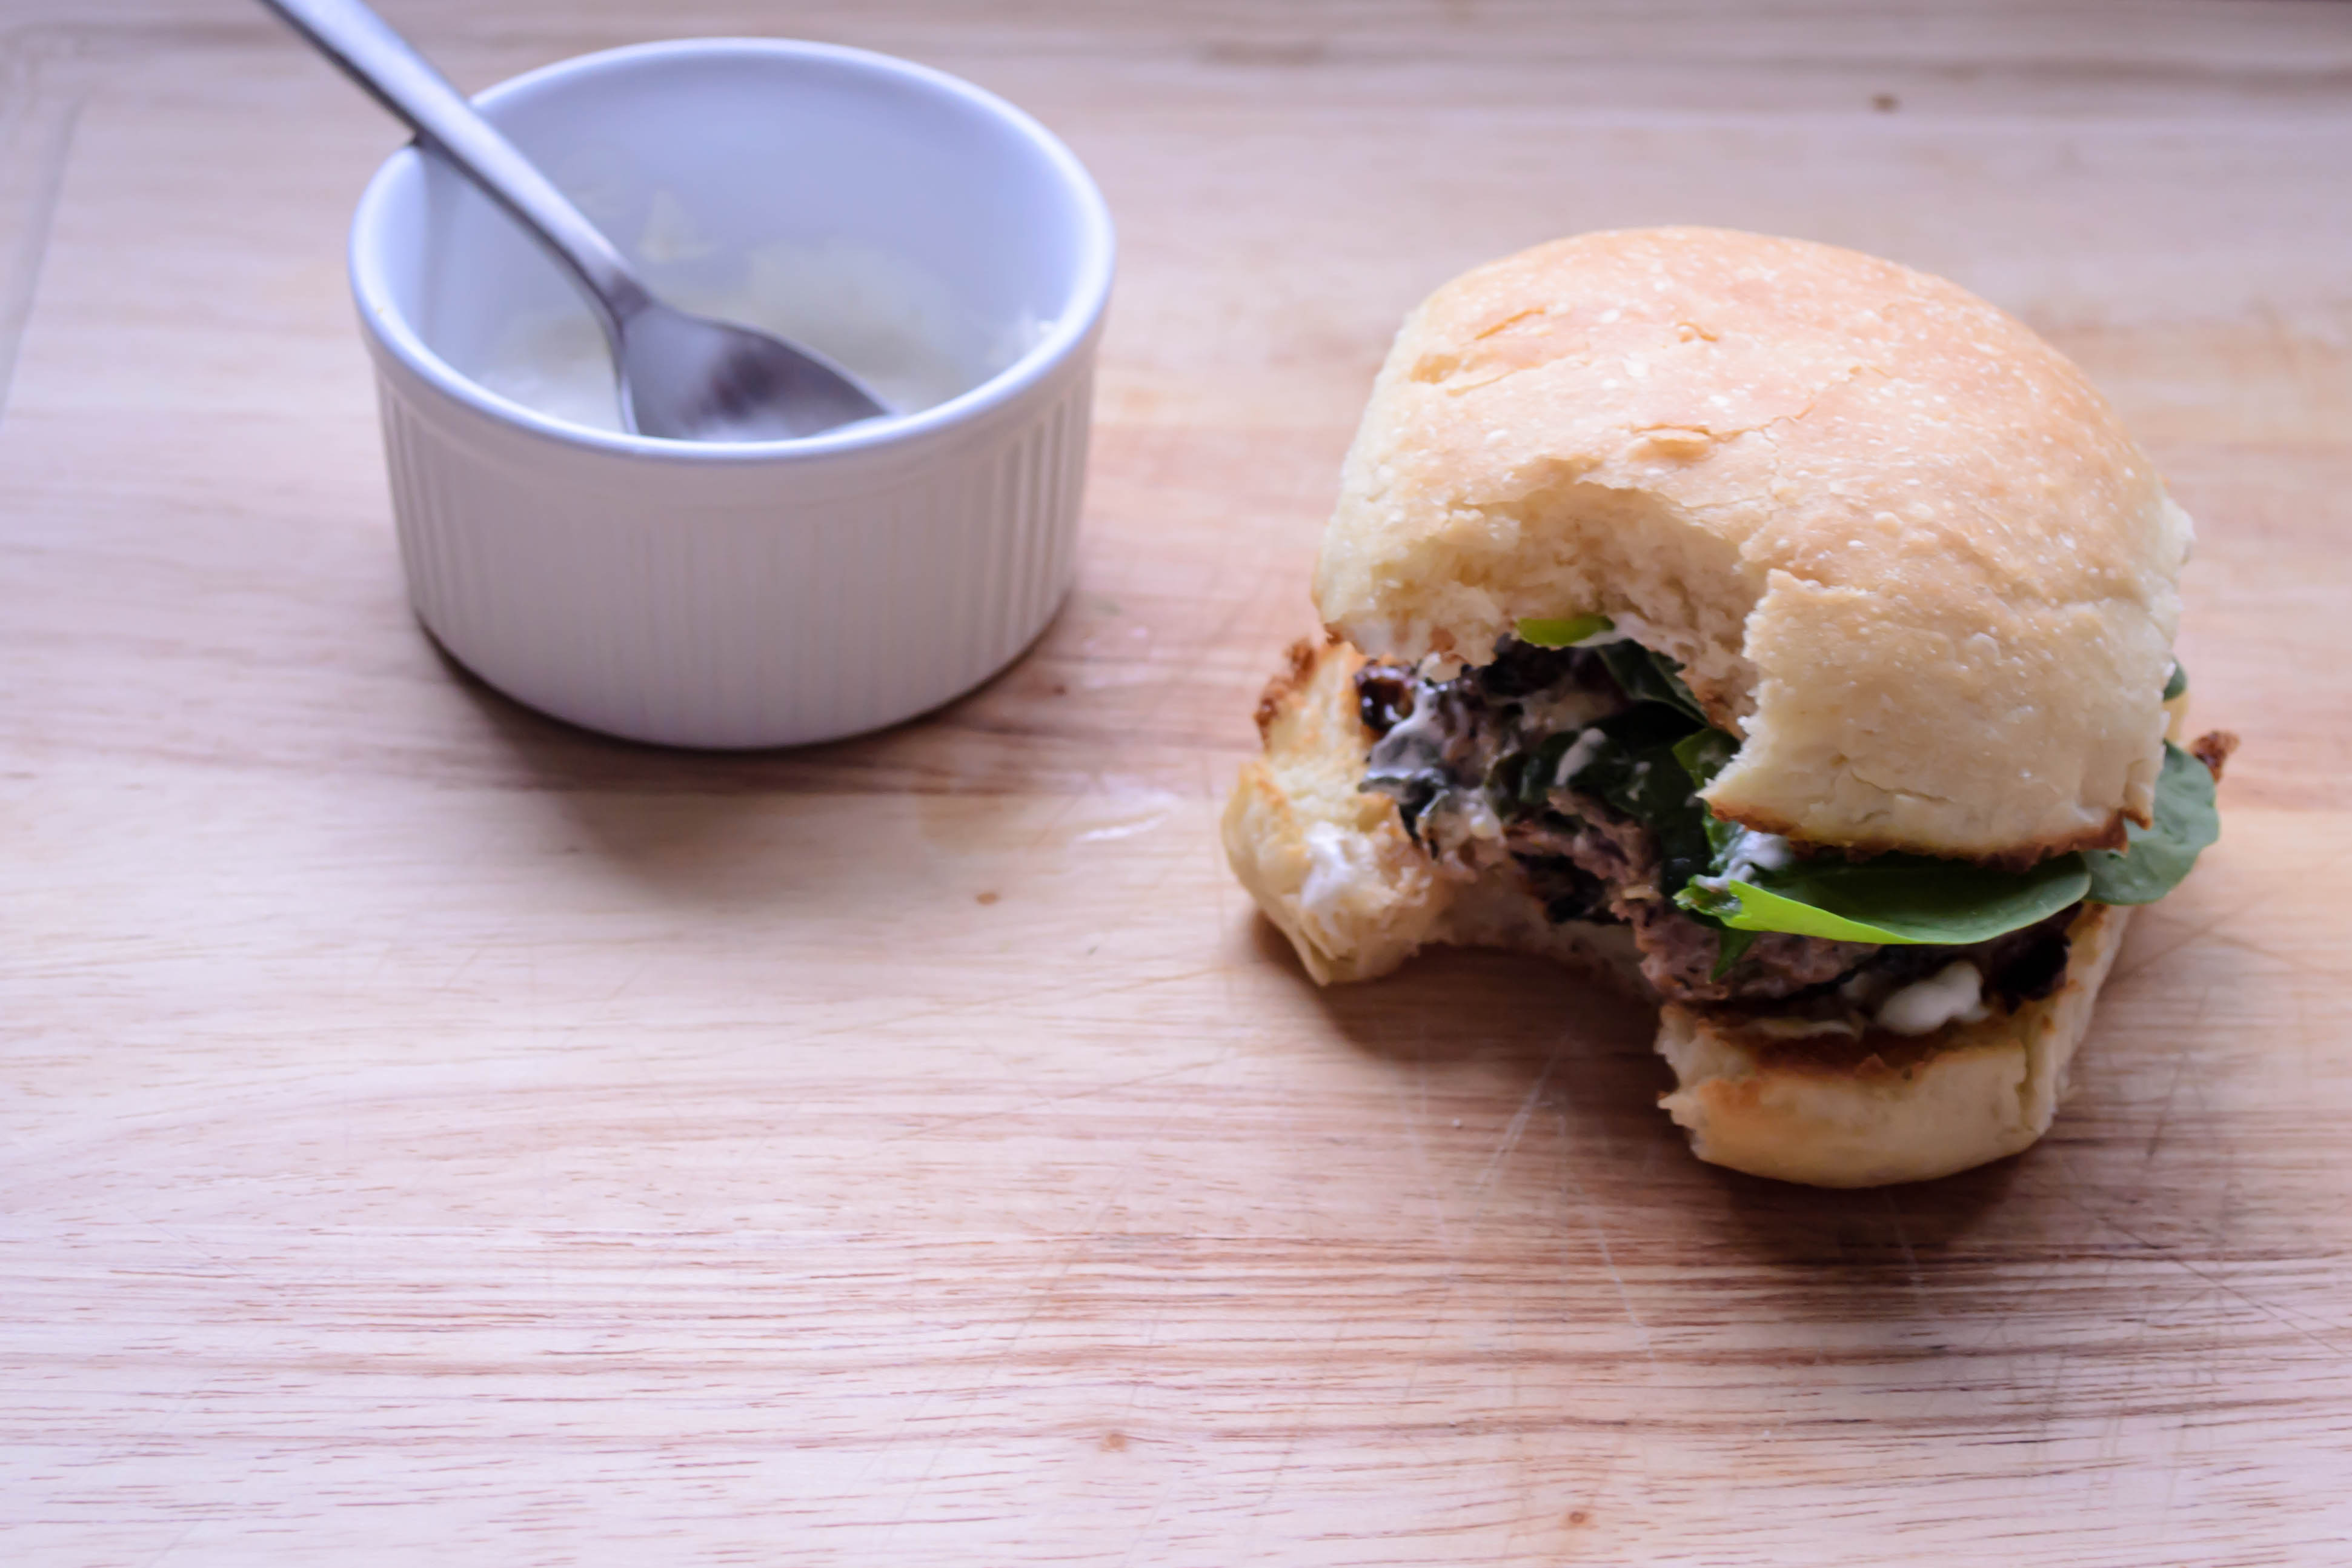
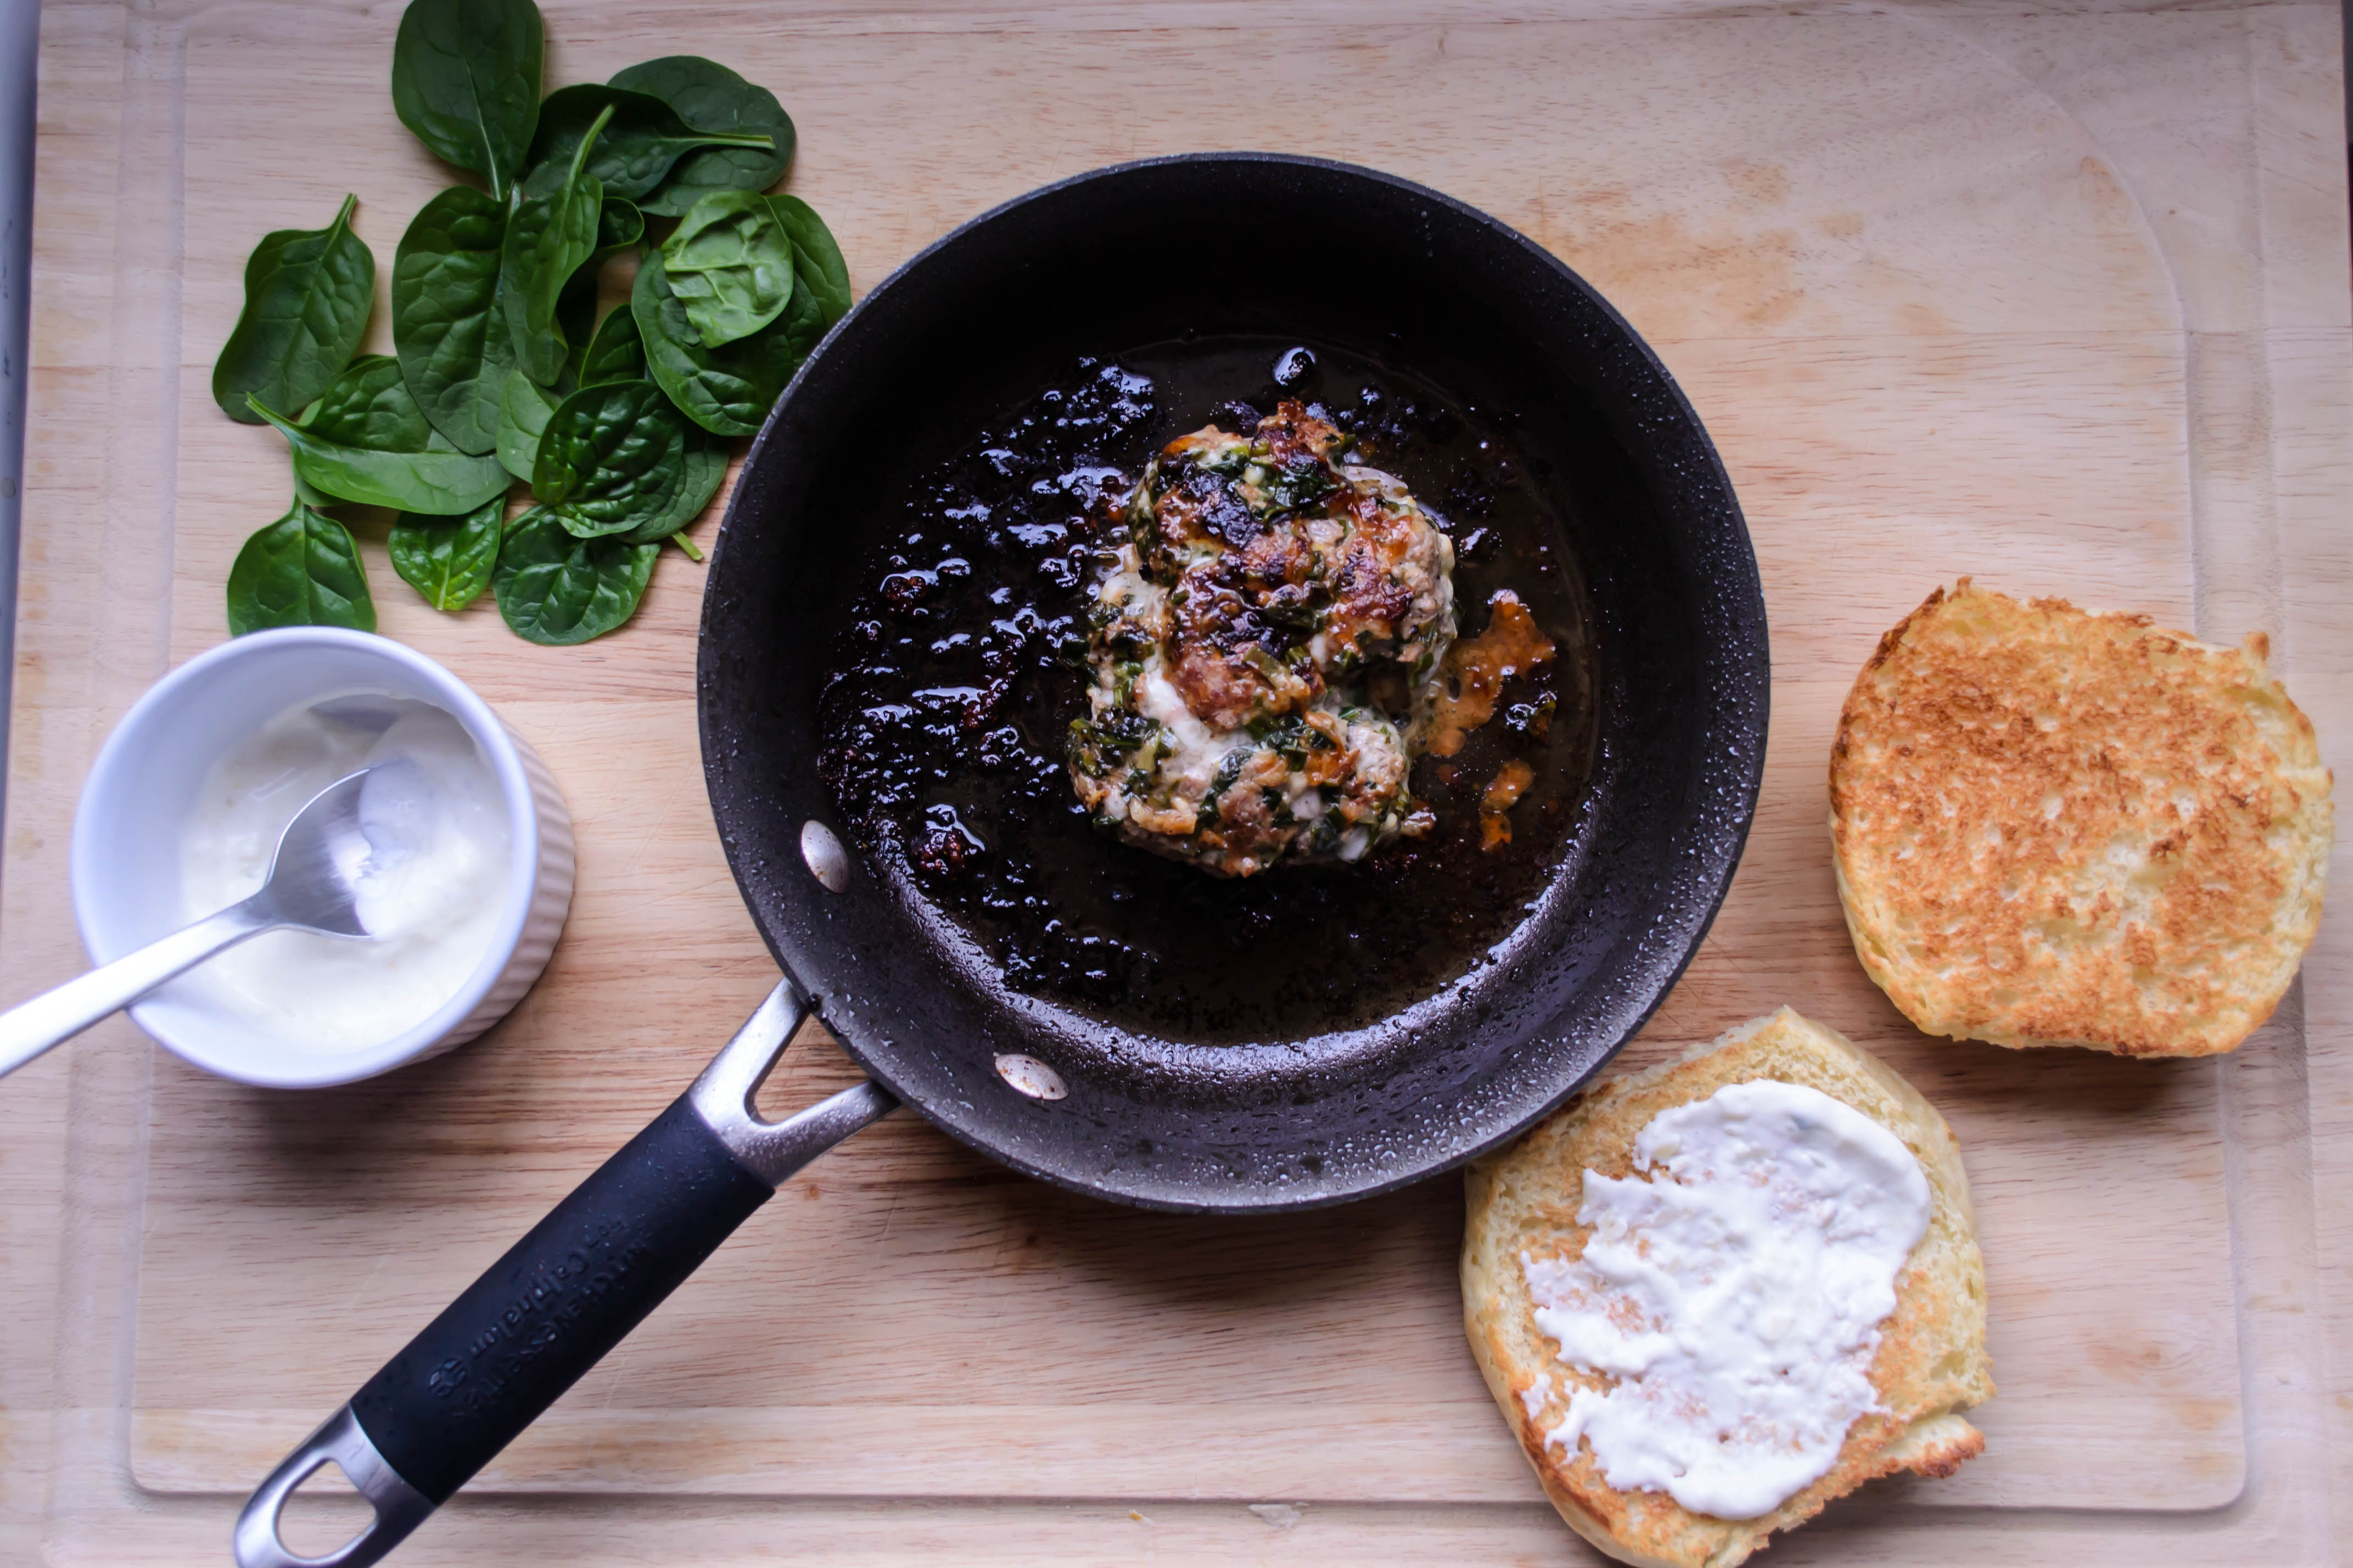
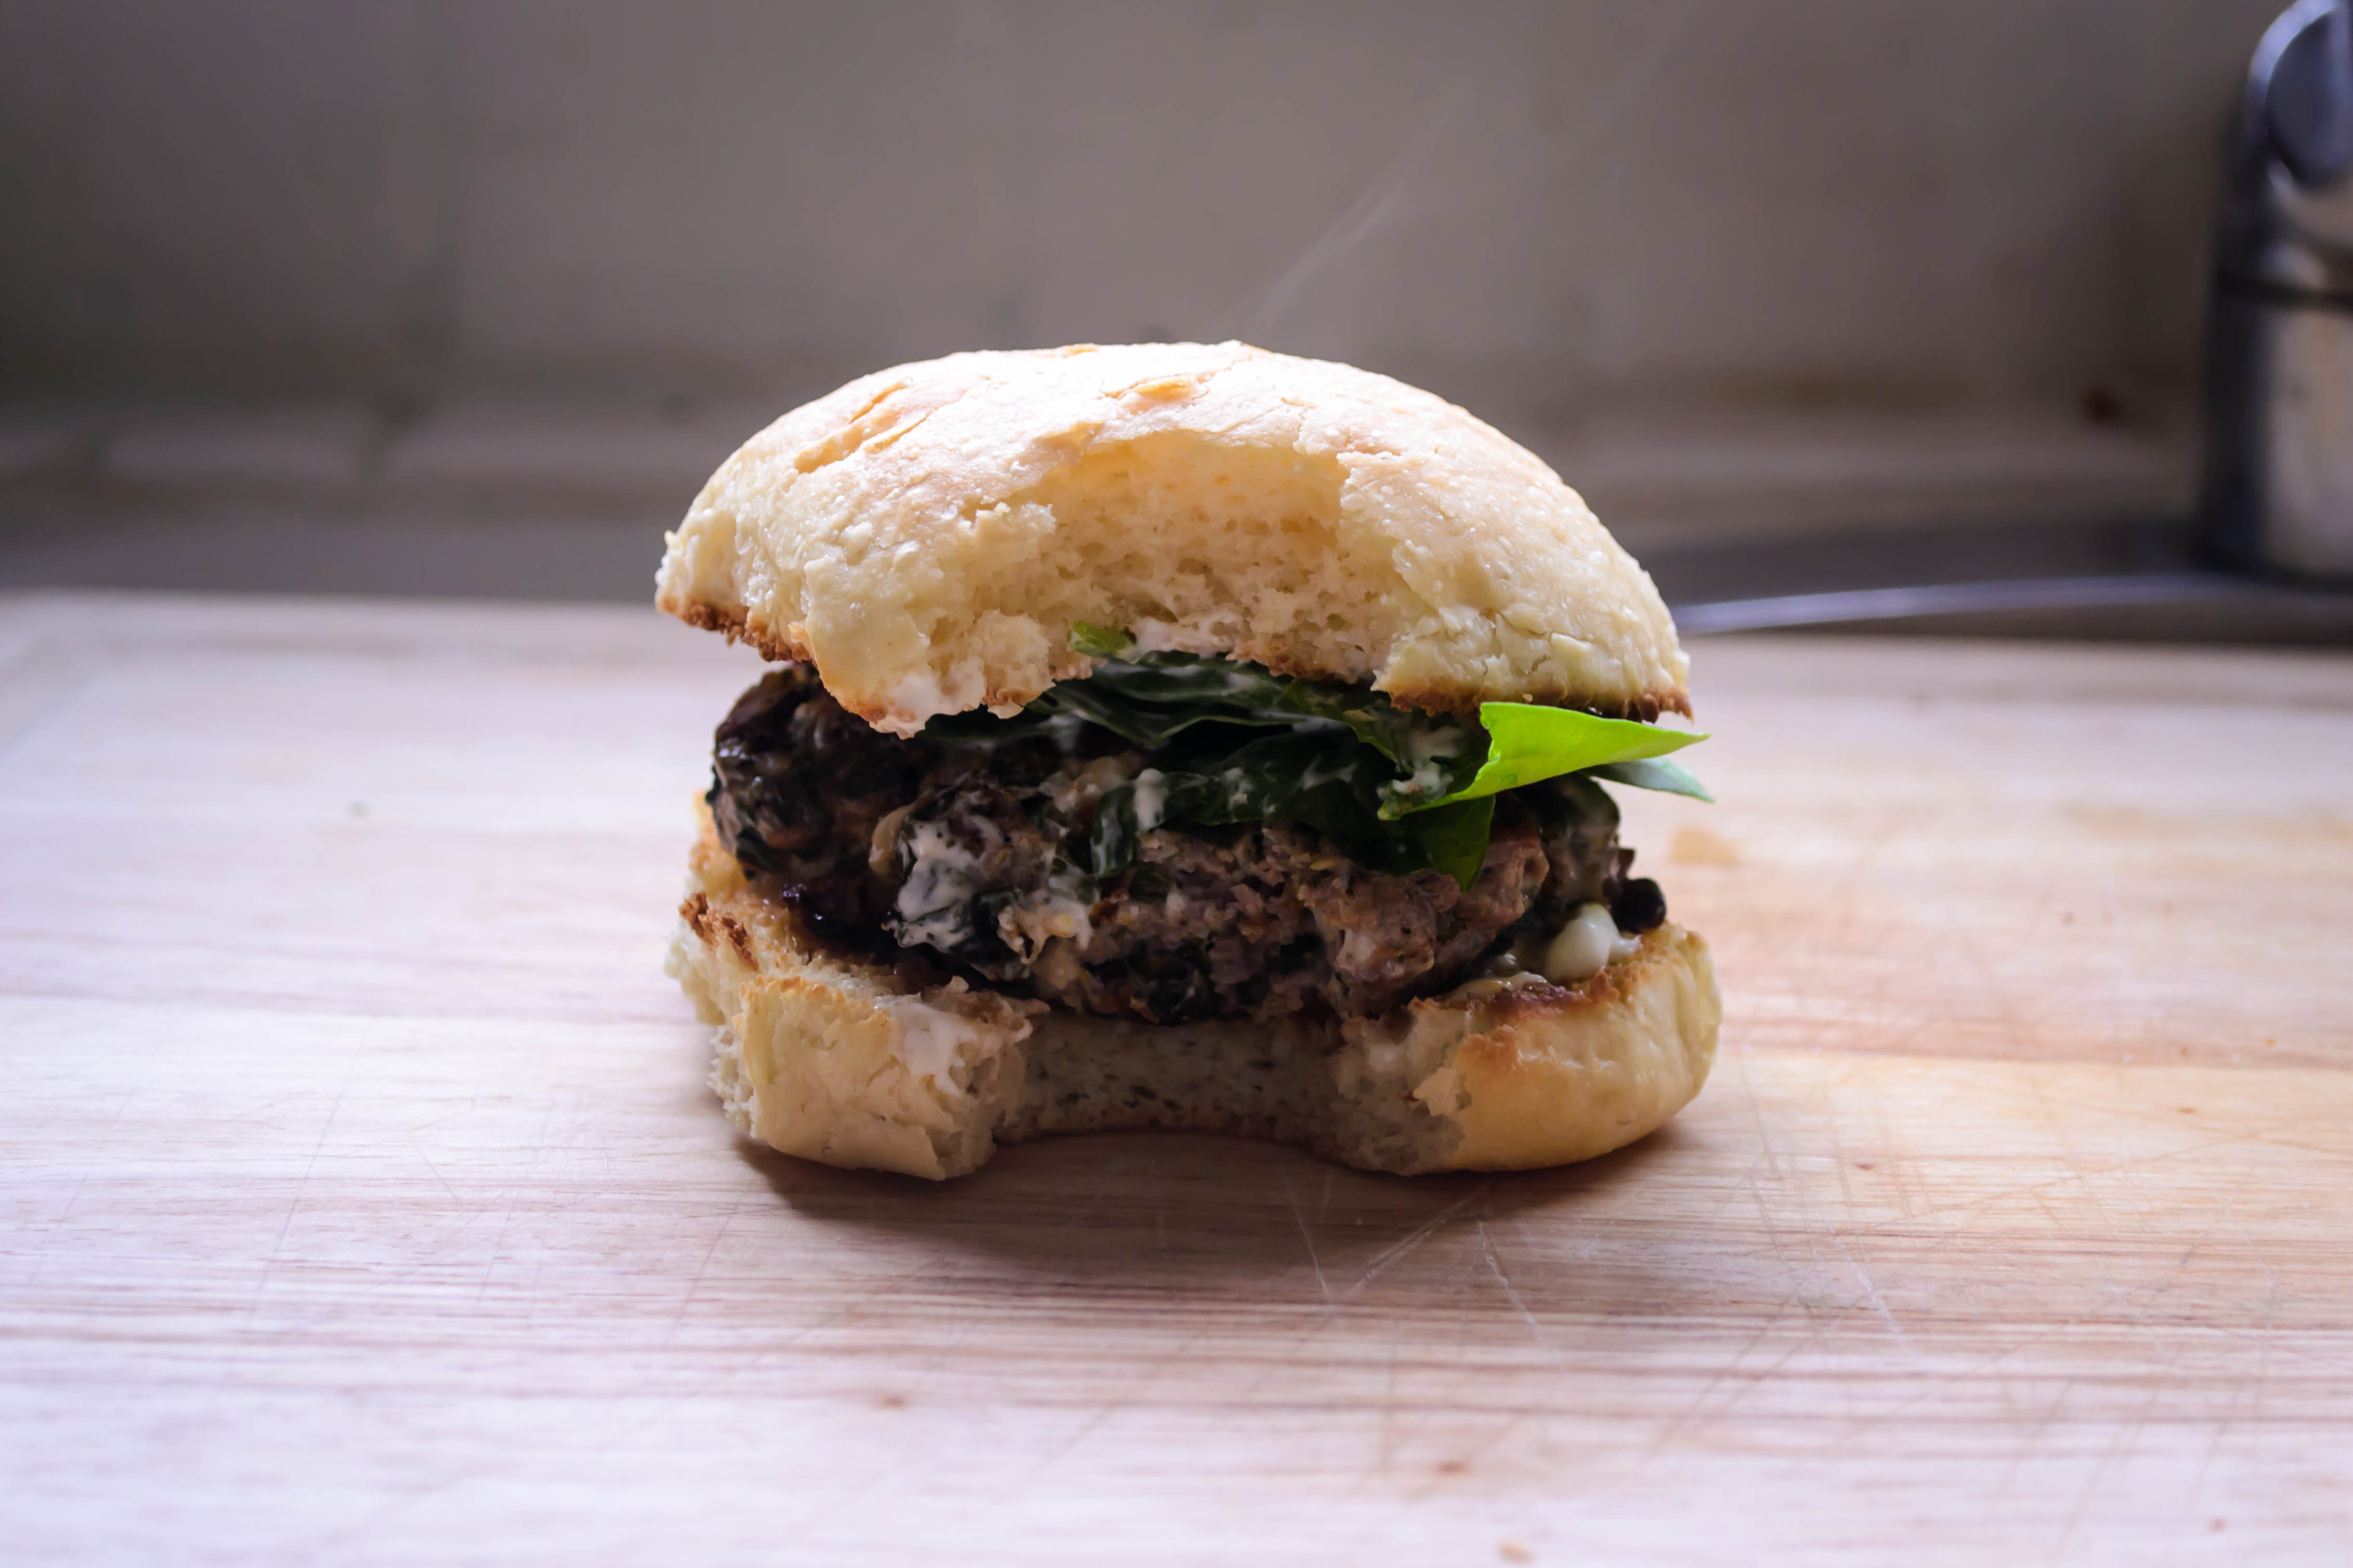
My bachelor habits are unusual. I typically don’t, when I’m making dinner just for my lonesome, go for what’s quick and easy. In fact, I use the rare occasions when I’m dining solo to catch up on cooking and consuming foods N. is not fond of. So when he was out of town last week visiting his parents, I took advantage of the evening alone to rendezvous with one of his major food rivals: lamb.
Food Blog April 2014-3574Most of the time (at least lately) I try to shy away from cute titles – I want to make sure you know what you’re getting – but this one was too clever not to use. This is a riff on a dish my sister made for us for Christmas (hi, R!), a version of spanikopita with crumbles of ground lamb and gooey shreds of mozzarella mixed in. Since my first thought upon tasting it was “more,” and then “more, more,” I thought a burger might be the answer. More of everything!
Food Blog April 2014-3544Food Blog April 2014-3548Food Blog April 2014-3551The delightful thing about spanikopita, to me, is the burst of briny saltiness from the hunks of cheese that muddle reluctantly into softness amid the spinach. I love the dill, and I love the earthy hit of nutmeg. Lately I’ve been adding lemon zest to the mix as well, for sour brightness to contrast the salty tang of the cheese.
Food Blog April 2014-3549Food Blog April 2014-3550All this, then, would have to go into my lamb burger. I’m not a big fan of massive additions to burgers. They seem, too often, fussy and unnecessary. That’s what toppings are for. But here, I think the incorporation works incredibly well for several reasons. First, lamb has a bit of a gamey flavor. Some of us like that, but for those who don’t, the additions of extra ingredients mean it’s a mild gaminess, not overwhelming. Second, it’s very easy for ground lamb to dry out. Here, where I’ve incorporated not just cheese but a sodden handful of sautéed fresh spinach, producing a dry product becomes a challenge. Third, but no less important, the addition of these extra ingredients bulks up the burgers, making the lamb – not nearly as cheap as everyday ground beef – stretch a bit further. This isn’t like a crab cake stretch, though, where your product is so drenched in seasoned bread crumbs you forget what kind of meat is supposed to be in there. All of these flavors dance well with the lamb, enhancing rather than masking it.
Food Blog April 2014-3554Food Blog April 2014-3558Food Blog April 2014-3556Because you’re cooking with a heady amount of cheese in the mix, these burgers will get crusty and deeply bronzed as the cheese seeps down onto the hot pan to toast. Don’t be alarmed. Settled on a bun with some fresh spinach leaves, to contrast the cooked tumble in the burger itself, this is nearly perfect. Slathered with some Greek yogurt whipped with lemon juice and fresh raw garlic, it turns into lamb burger nirvana.
Food Blog April 2014-3560Just because this isn’t, perhaps, a typical bachelor meal, what with the longish ingredient list and the time taken to prepare it from scratch, doesn’t mean I treated it as fancy. There’s no need for ceremony here; it’s too good. Hasty bites. No napkin. Straight over the sink. I don’t mind telling you, just between us, that I didn’t even bother with a plate.

Food Blog April 2014-3570

Lambikopita burgers
Makes 2
⅓ pound ground lamb
1 clove garlic, finely minced
2 green onions, finely sliced
2 teaspoons finely chopped dill
1 teaspoon lemon zest
2 tablespoons grated parmesan cheese
2 tablespoons crumbled feta cheese
¼ cup shredded or cubed mozzarella
½ cup fresh spinach leaves, plus more, to serve
⅛ teaspoon nutmeg, freshly grated, if possible
Salt and pepper to taste (I suggest ¼ teaspoon salt and ⅛ teaspoon black pepper)
3 tablespoons olive oil, divided


  • In a medium skillet, heat 1 tablespoon of the olive oil over medium heat. When it shimmers, add the ½ cup spinach leaves and sauté gently until they are wilted: 2-3 minutes. Remove from heat and let cool.
  • In a medium bowl, combine the lamb, garlic, onions, dill, lemon zest, and cheeses. Add the nutmeg, salt and pepper. The best way to do this is to get in there and use your hands, gently kneading with your fingertips to mix thoroughly.
  • When the spinach is cool, transfer it to a cutting board and chop finely. Don’t squeeze it out – we want that wetness to keep the burgers moist.
  • Add the chopped spinach to the lamb mixture and mix again to integrate it.
  • Divide the mixture in two and form patties of your desired diameter. Mine were probably 3 inches around. Keep in mind that the thicker your patties are, the longer they will take to cook.
  • In the same skillet you used for the spinach, heat the remaining 2 tablespoons olive oil over medium high heat. When it shimmers, add the lamb burgers, clamp on a lid, and turn the heat down to medium.
  • Cook for 4-5 minutes undisturbed, then cautiously lift with a spatula to check the bottom. When they are deeply bronzed and have a dark crust from the melting and toasting cheese, flip, recover, and cook for another 3-4 minutes, or until your desired doneness is reached.
  • Remove from heat, transfer to a bun of your choice dressed with condiments to your liking (I recommend the Greek yogurt spread below), top with fresh spinach, and serve.
Greek yogurt spread
2 tablespoons Greek yogurt
Squeeze of fresh lemon juice
1 garlic clove, chopped fine and pasted with salt


  • Combine ingredients in a small bowl, mix with a fork, spoon, or small whisk.