Winter fruits salad
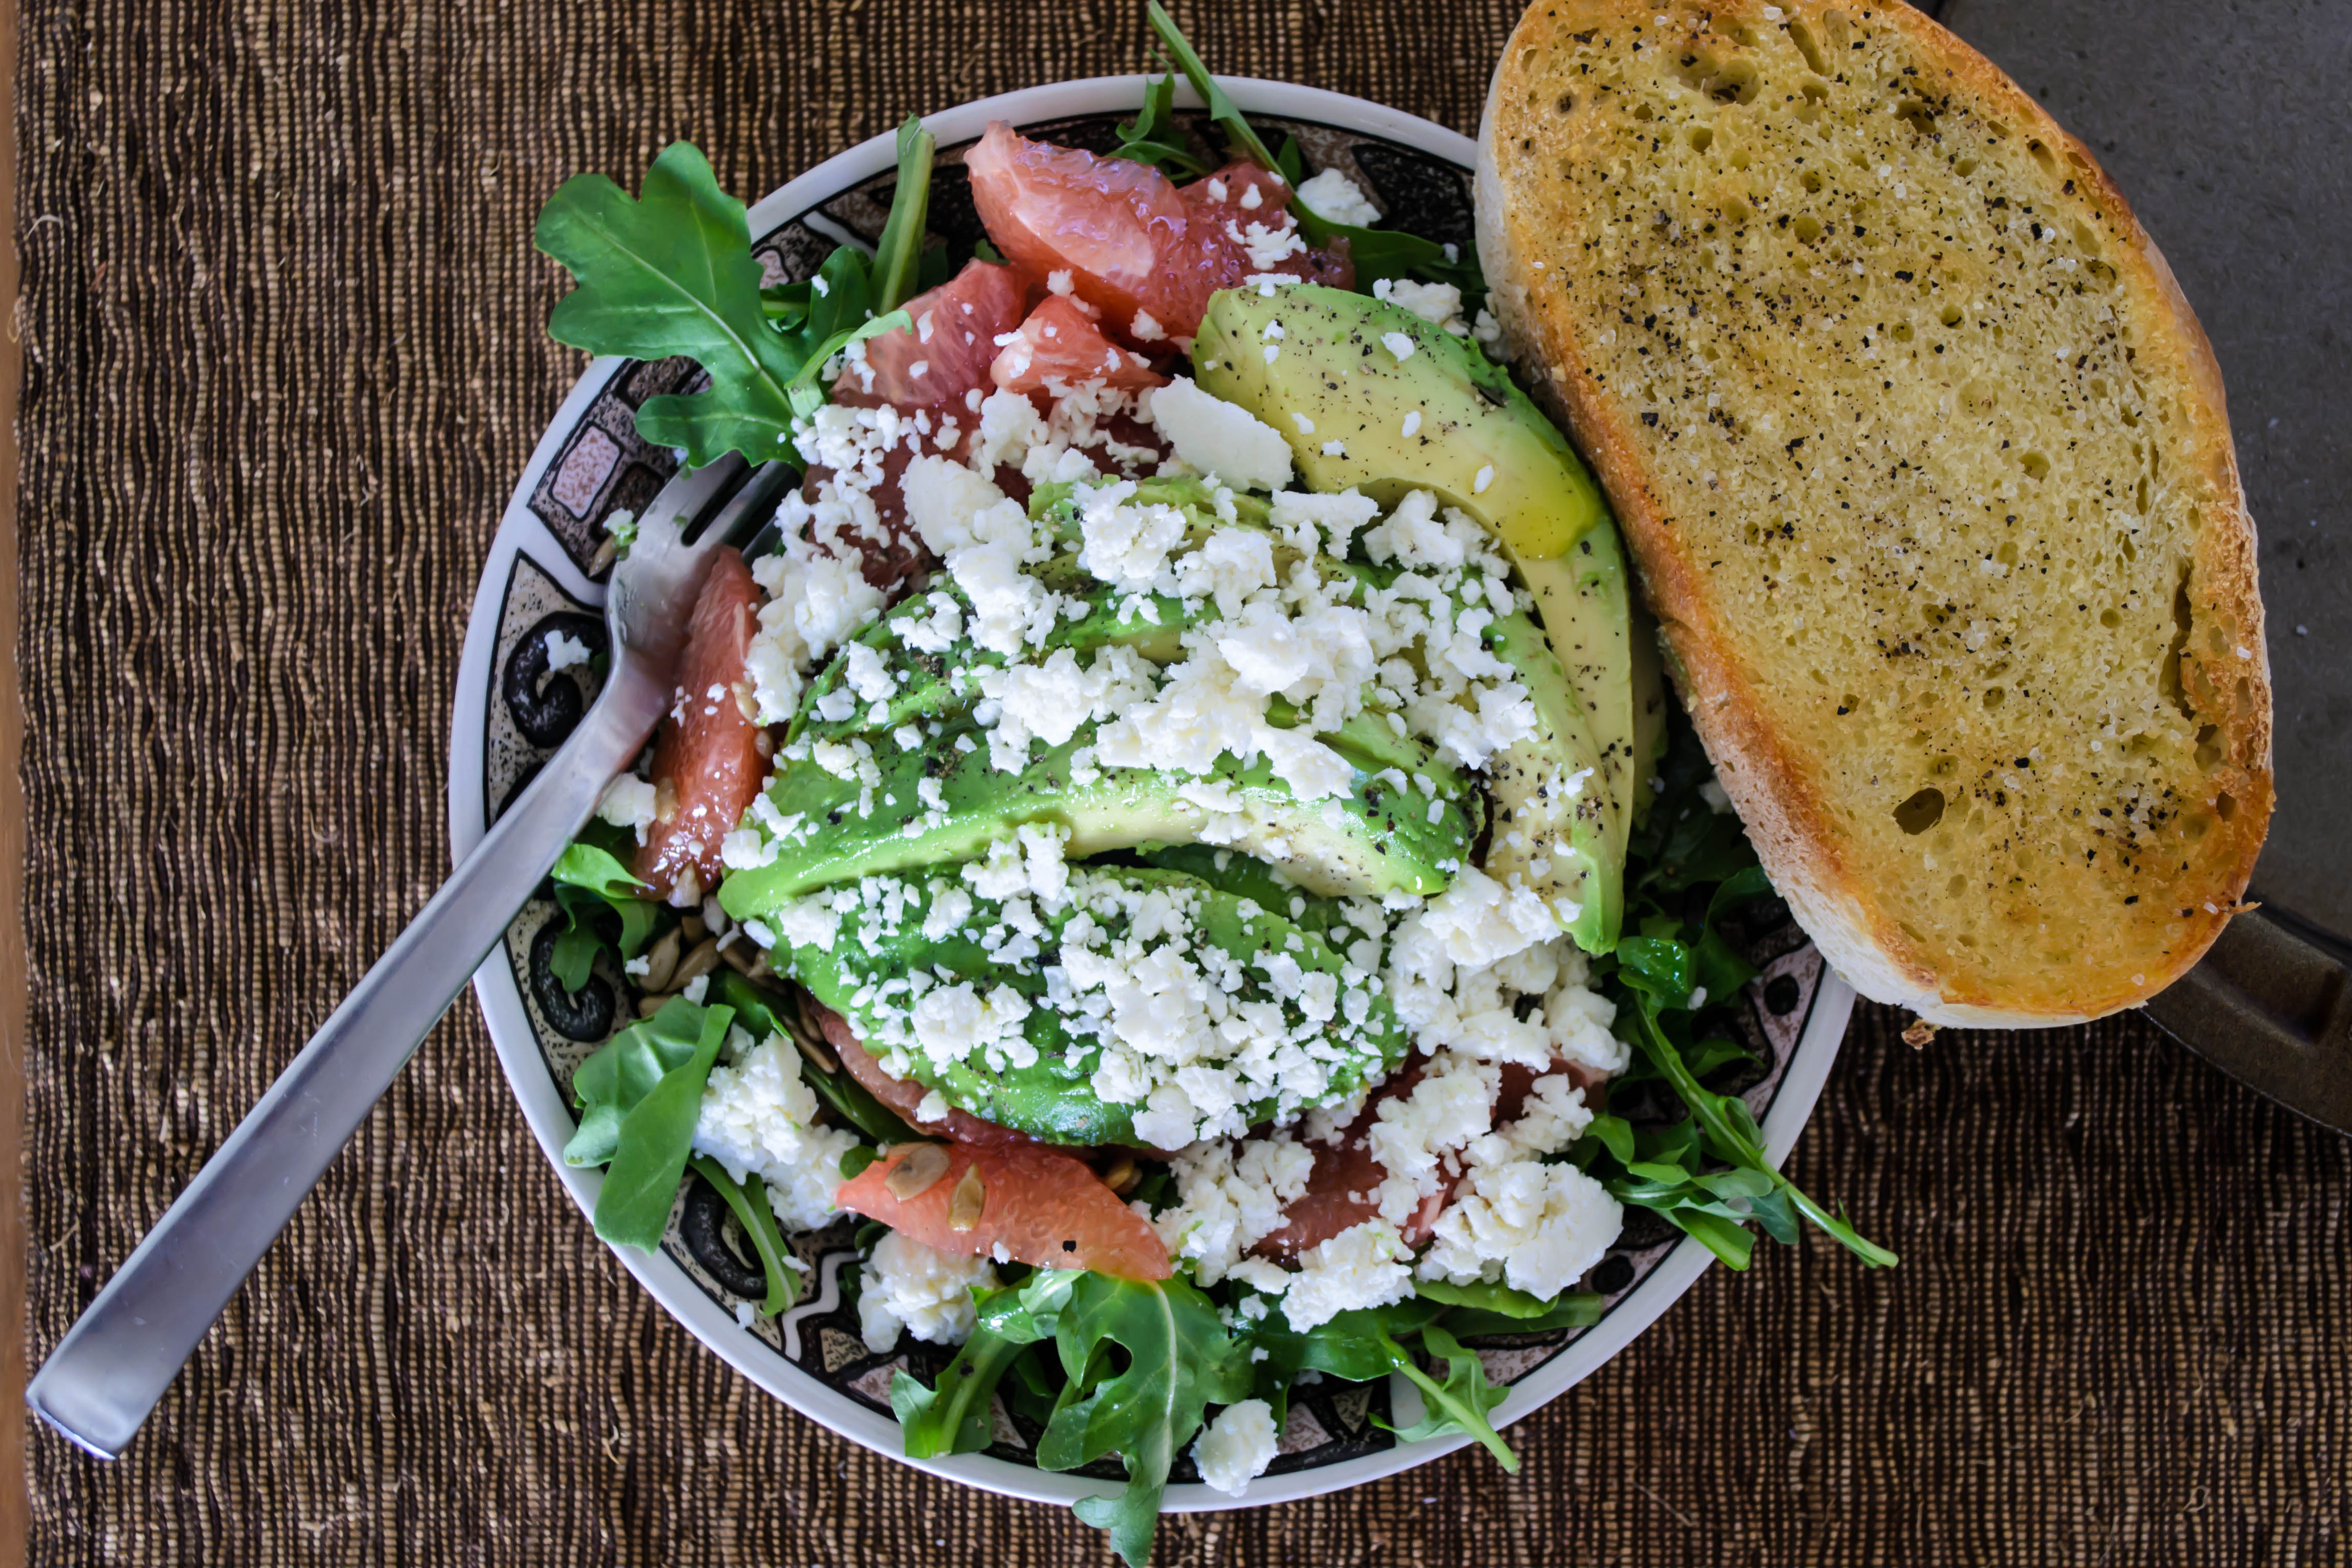

Winter fruits salad
If you have leftover chocolate from the holidays (hah), or if you need something impressive for that New Year’s Eve party you didn’t expect to be invited to (double hah), but you aren’t feeling up to full-blown candy making, this is your recipe.
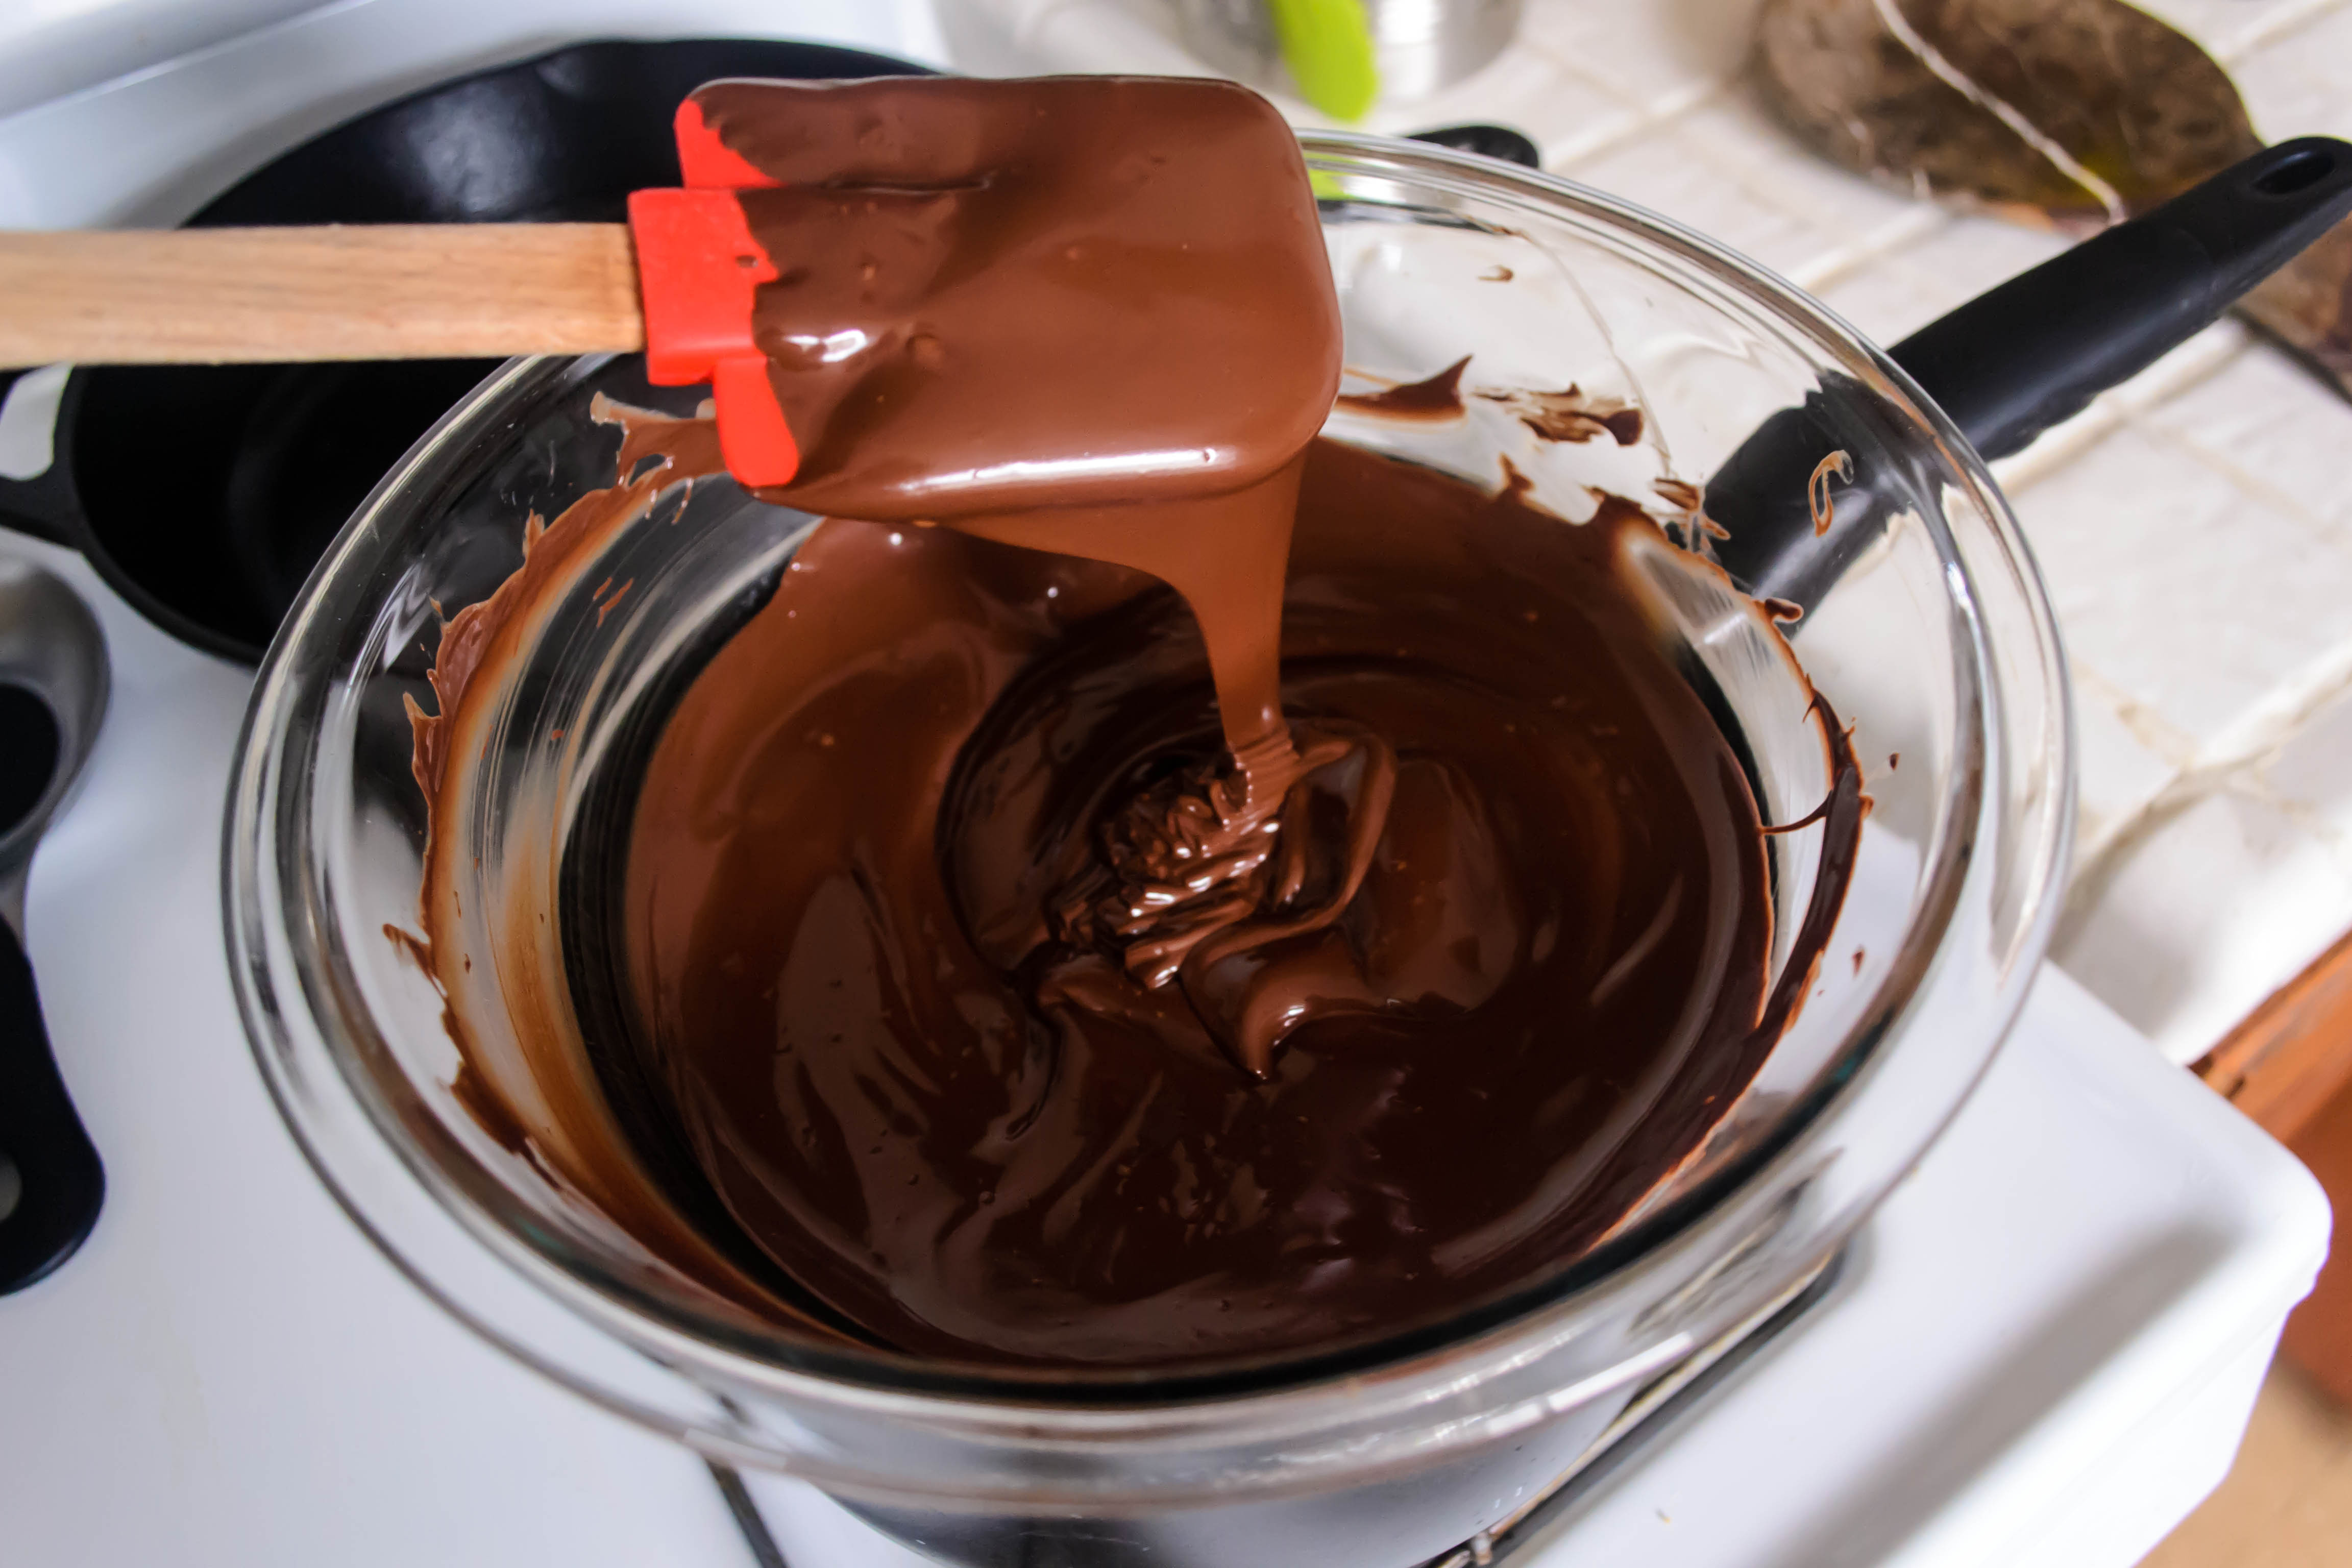 Chocolate bark is dead simple to make, totally delicious, and looks very fancy – essentially, you are producing a custom fruit and nut candy bar, but it takes only as long as the time chocolate needs to melt into a smooth, gloriously dark river of supple brown satin, and the time it takes that satiny pool to harden again. This leaves you sufficient time to shower, put on makeup, find the other earring from that pair that never stays together in the drawer, and possibly practice your dance moves, just in case.
 Just before you leave for the party (or moments before your guests arrive), you can cut up the block of glorious, jewel-studded candy into neat bricks or, if you’re me, random quadrilaterals (random shapes and sizes = no one questioning your honesty when you say you made it yourself), stack it on your prettiest serving platter, and wait for it to disappear.
 Fruit and nut chocolate bark
 Related recipe to follow…
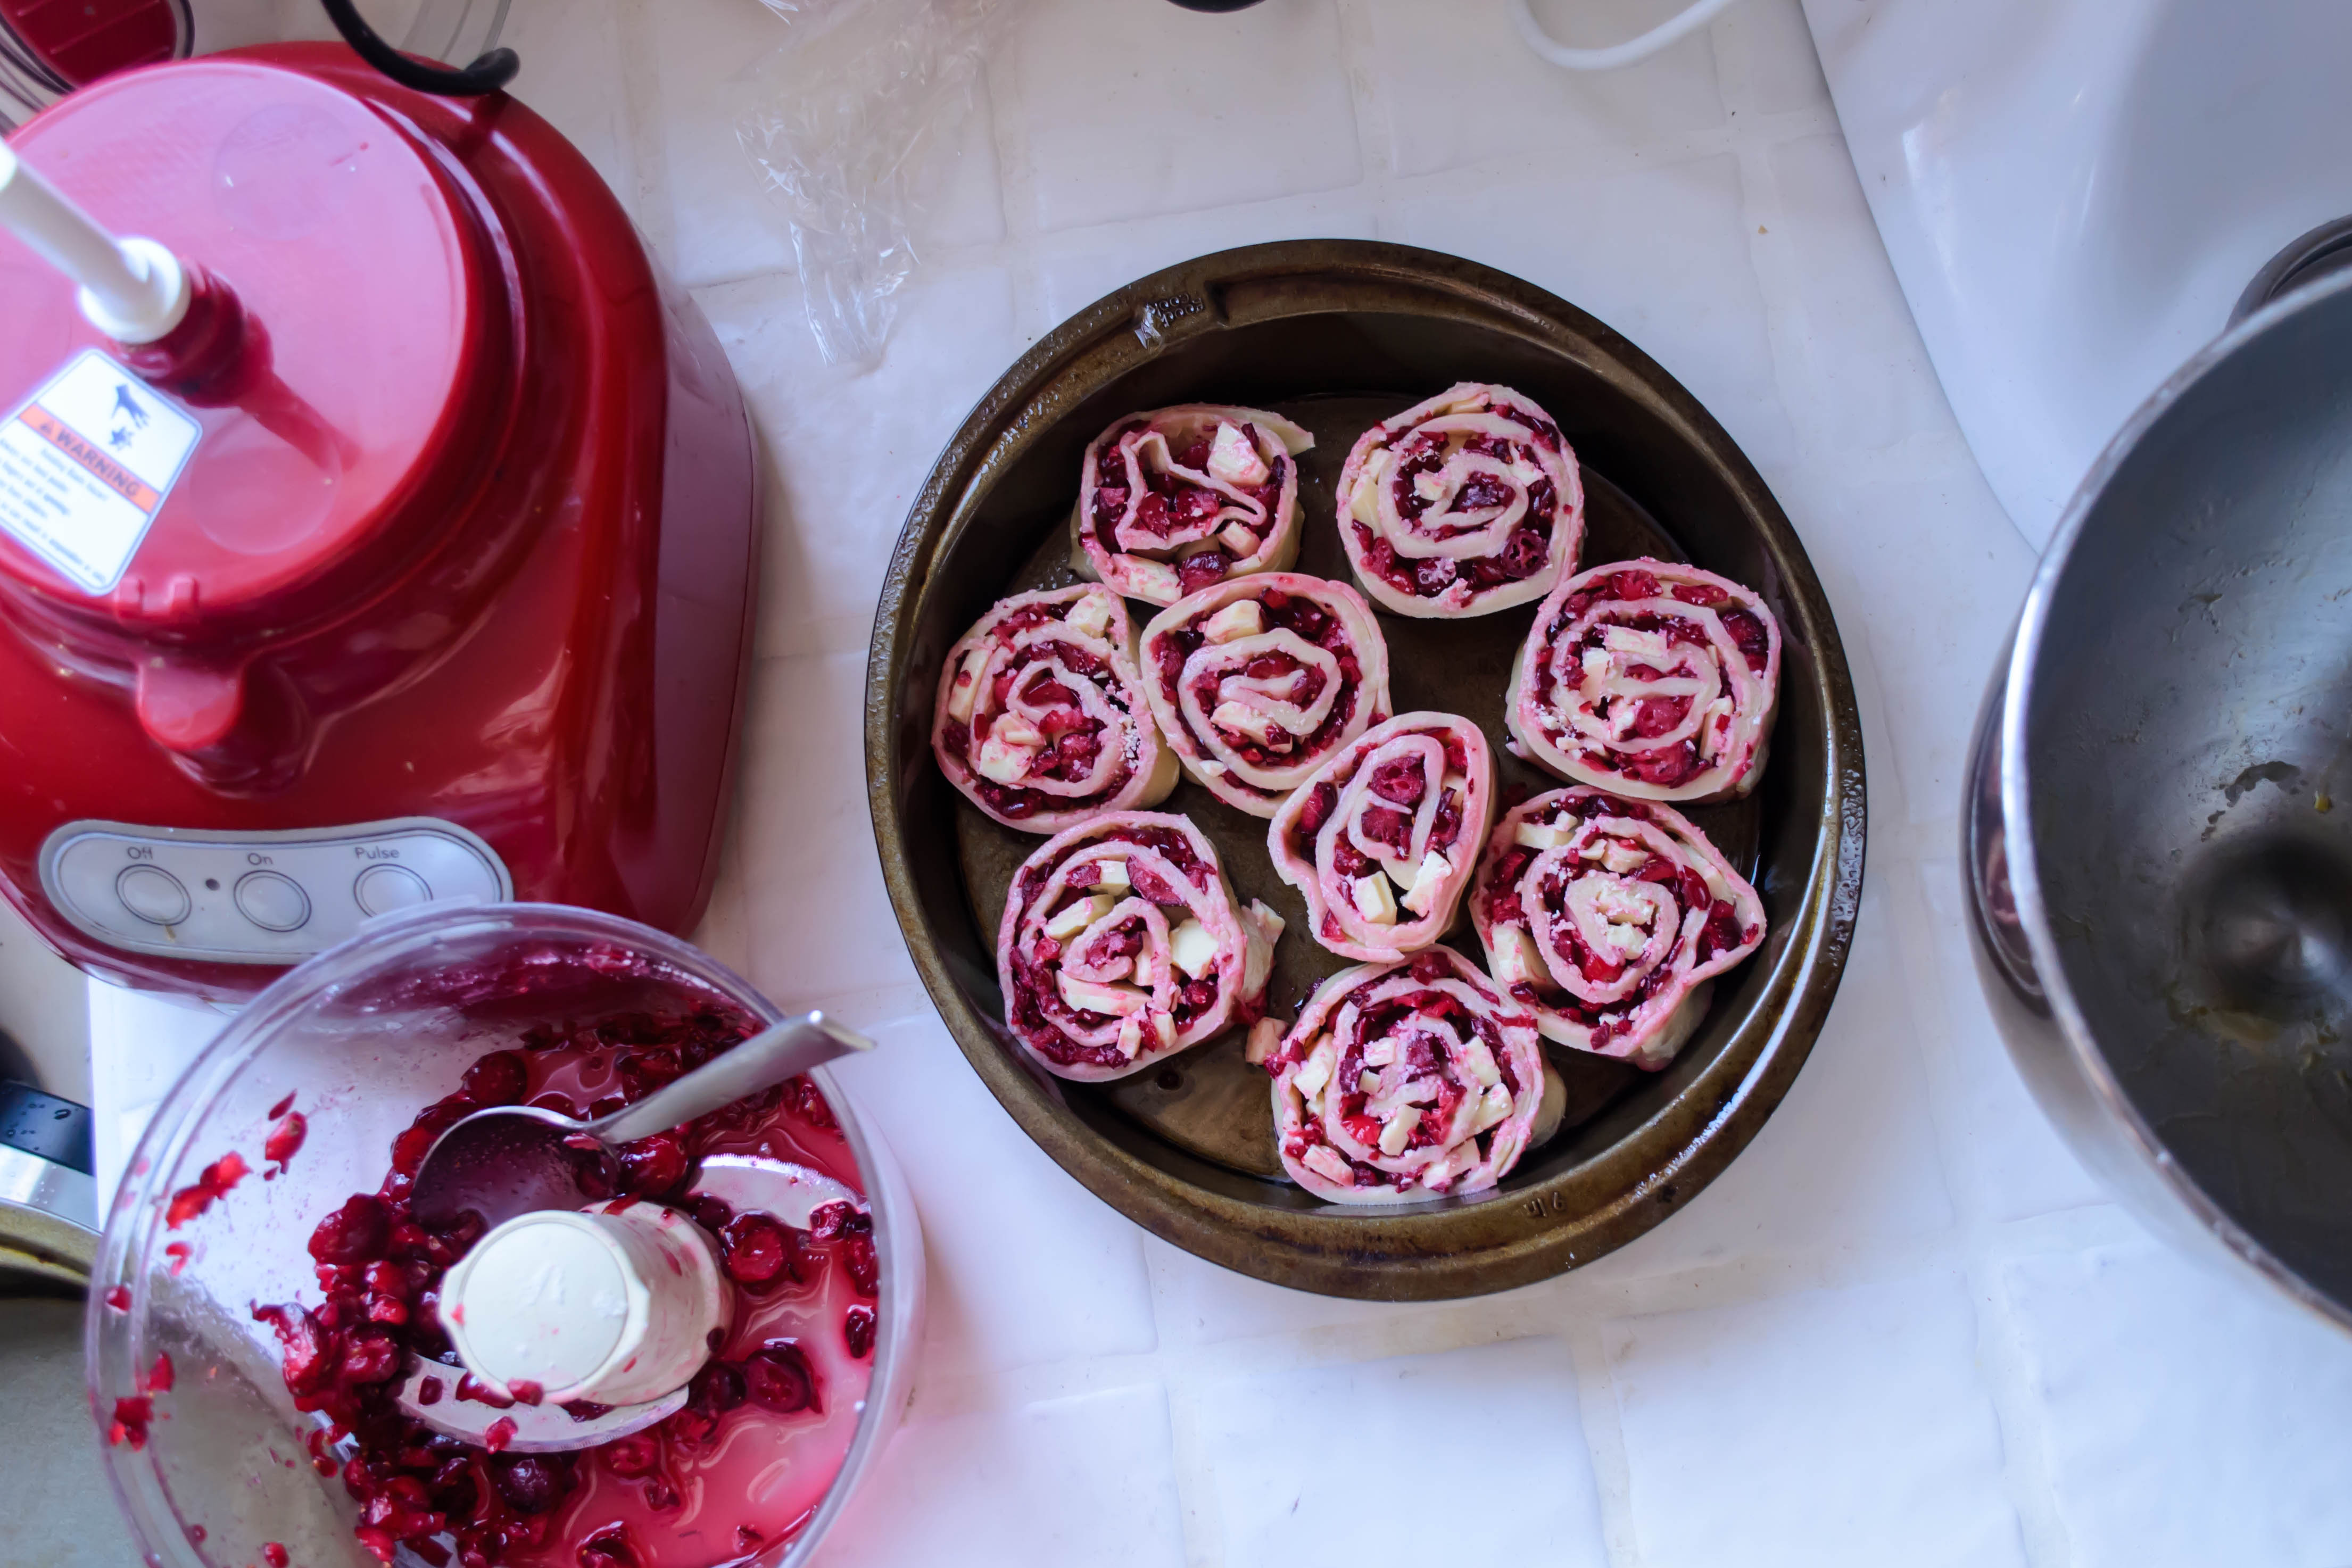
When I read this month’s Twelve Loaves premise of holiday breads, I was stumped for a few days. To me, and to my family, holiday bread means challah, and not only have I done that one here, but I’ve done it for another Twelve Loaves challenge! I certainly couldn’t reprise it. “Holiday” would have to mean “in the spirit of,” and not “in my own traditions.” I’d been kicking around the idea of pairing fresh cranberries and hunks of white chocolate in a cookie for some time, and somehow* this flavor combination morphed into the conception for a sweet roll. Softly sweet, chewy and rich, embracing a sweet tart filling, and drizzled all over with a white chocolate and cream cheese glaze, and the holidays are basically accounted for.
 I used my Nana’s sweet dough again – it is proving to be such a reliable and user friendly recipe that I see no reason to change it. The dough comes together into an almost play-dough consistency when it’s been kneaded enough, and it rises, slow and steady, tender but elastic, easily rollable, and neutral enough in flavor to accept any filling you throw at it. I opted to dress it up for the season with a touch of vanilla. A grating of orange peel would probably be lovely as well.


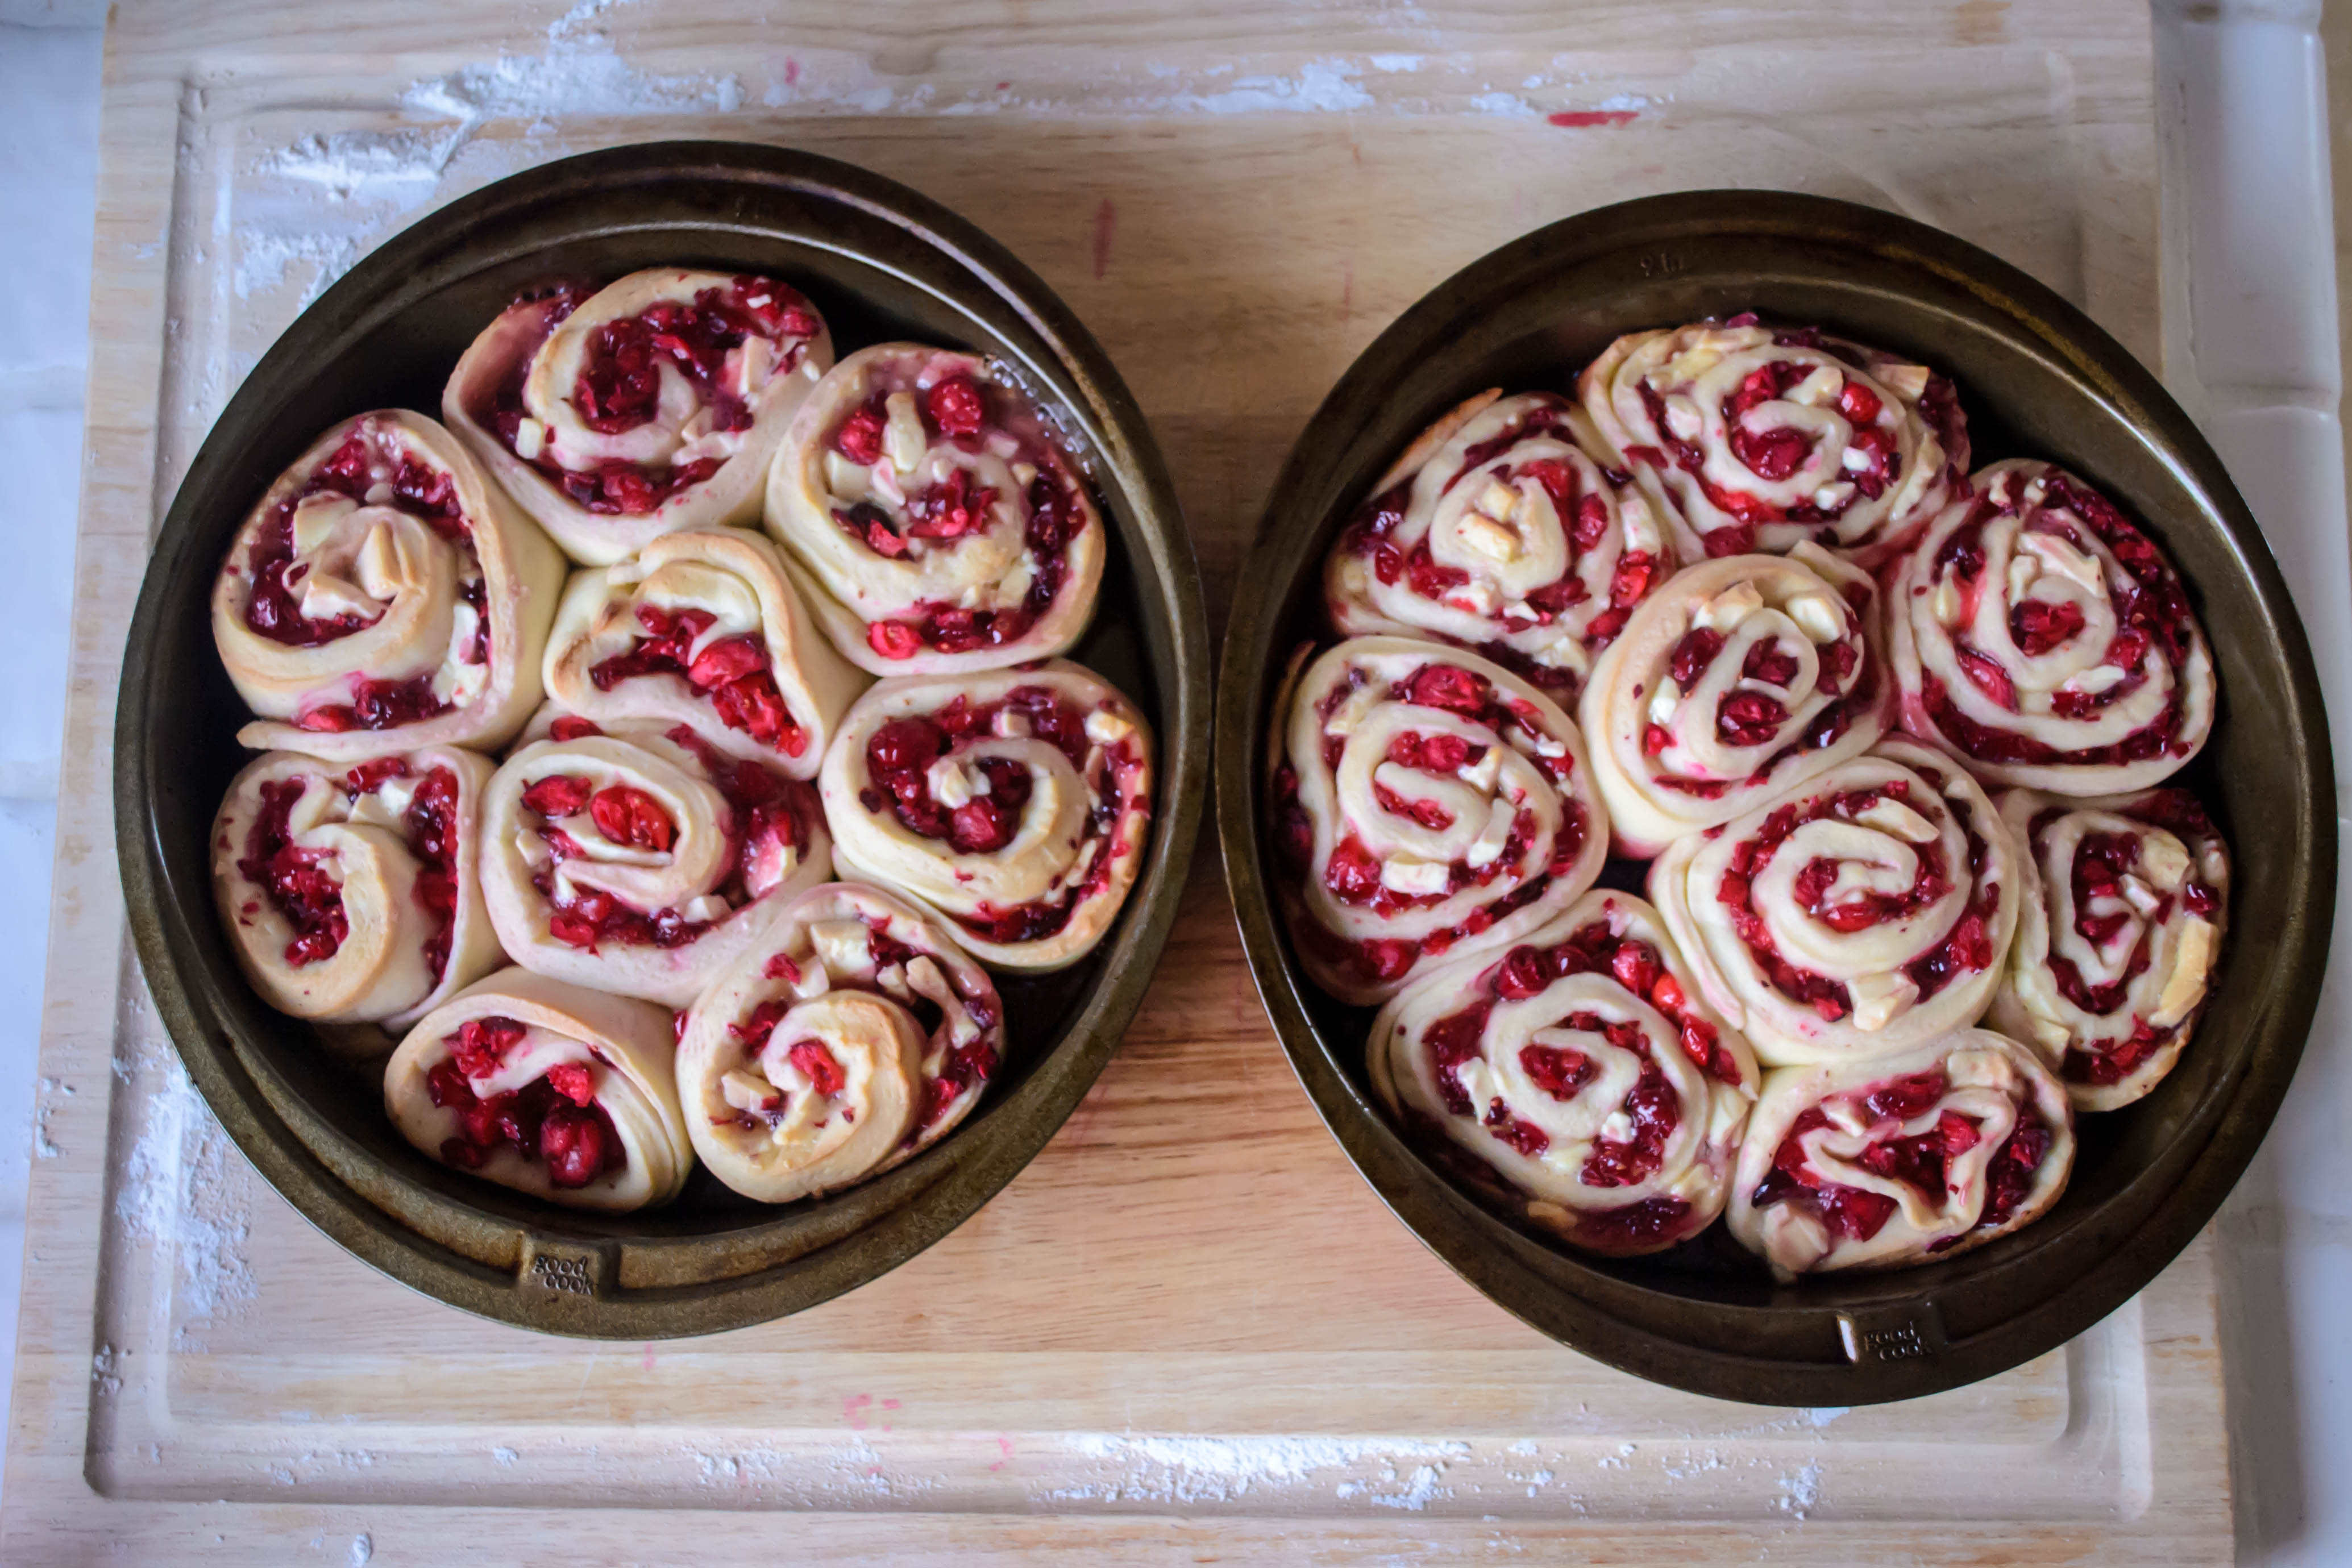
 These take two rises – one to let the dough expand and form gluten chains, and one after rolling out, filling, and slicing, to redistribute the yeast and develop the flavor a bit more – before a quick 20 minutes in the oven. I went for mini sized rolls, so I could have more of them, which entailed dividing my dough in two.
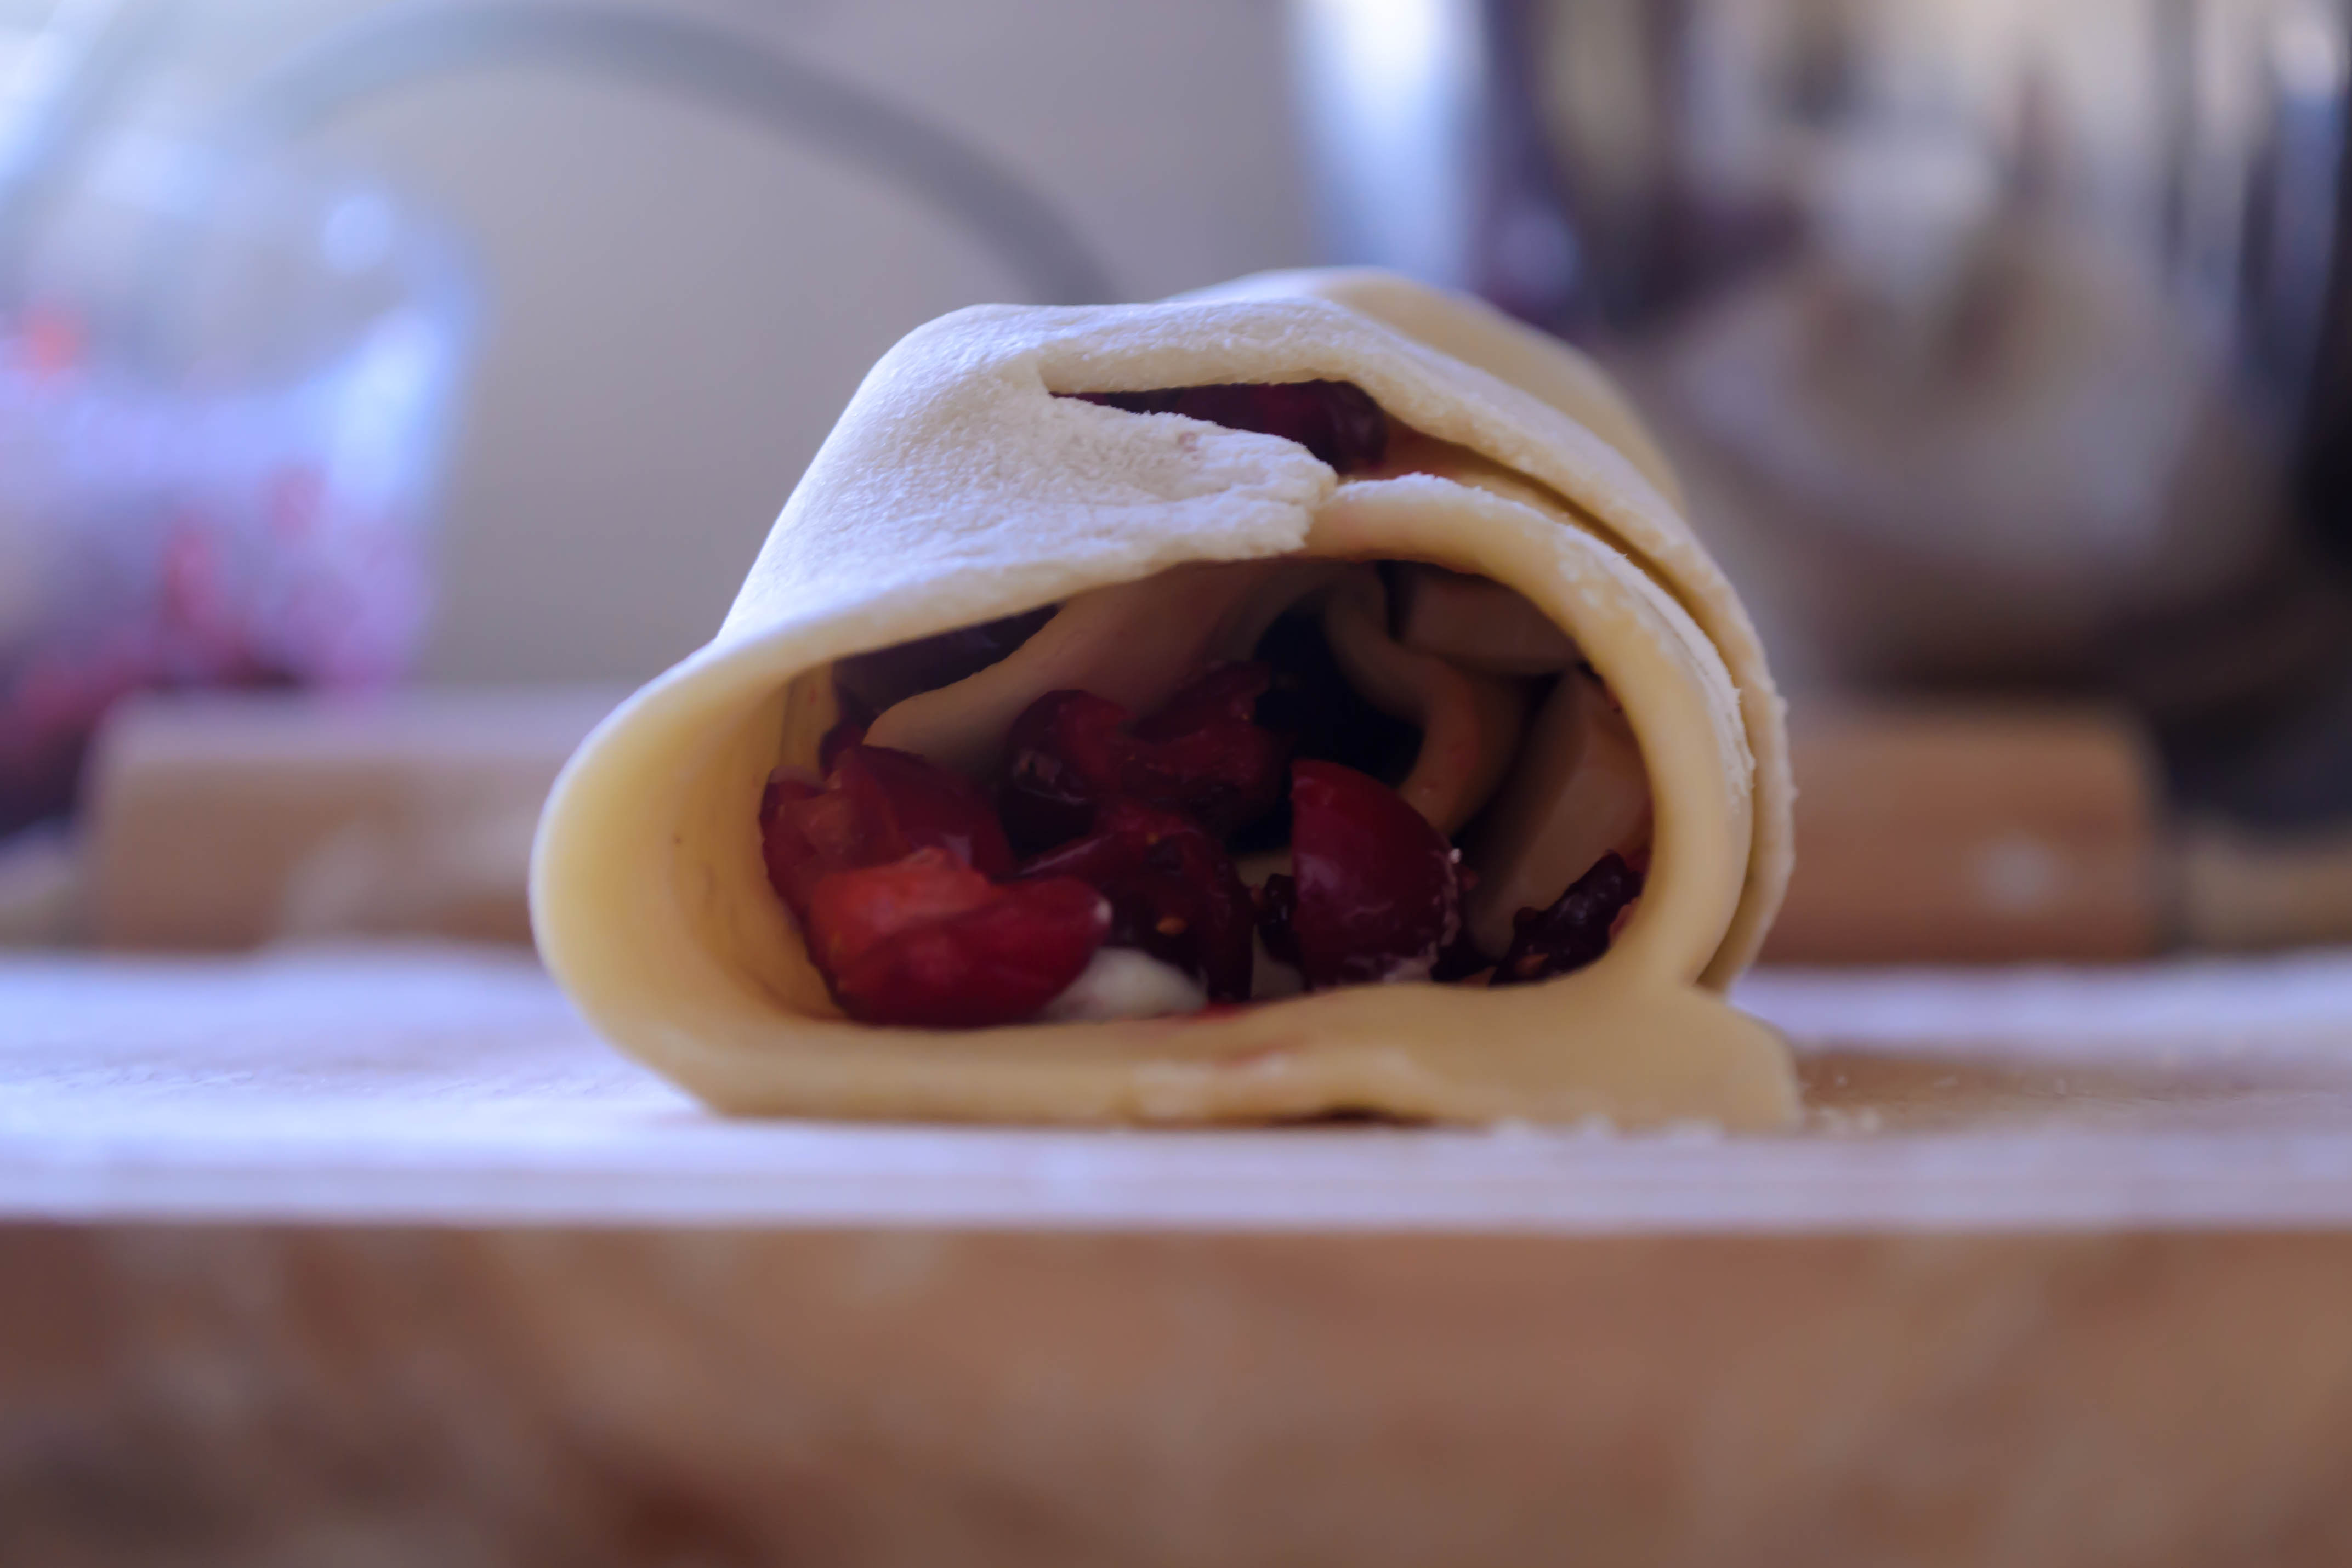
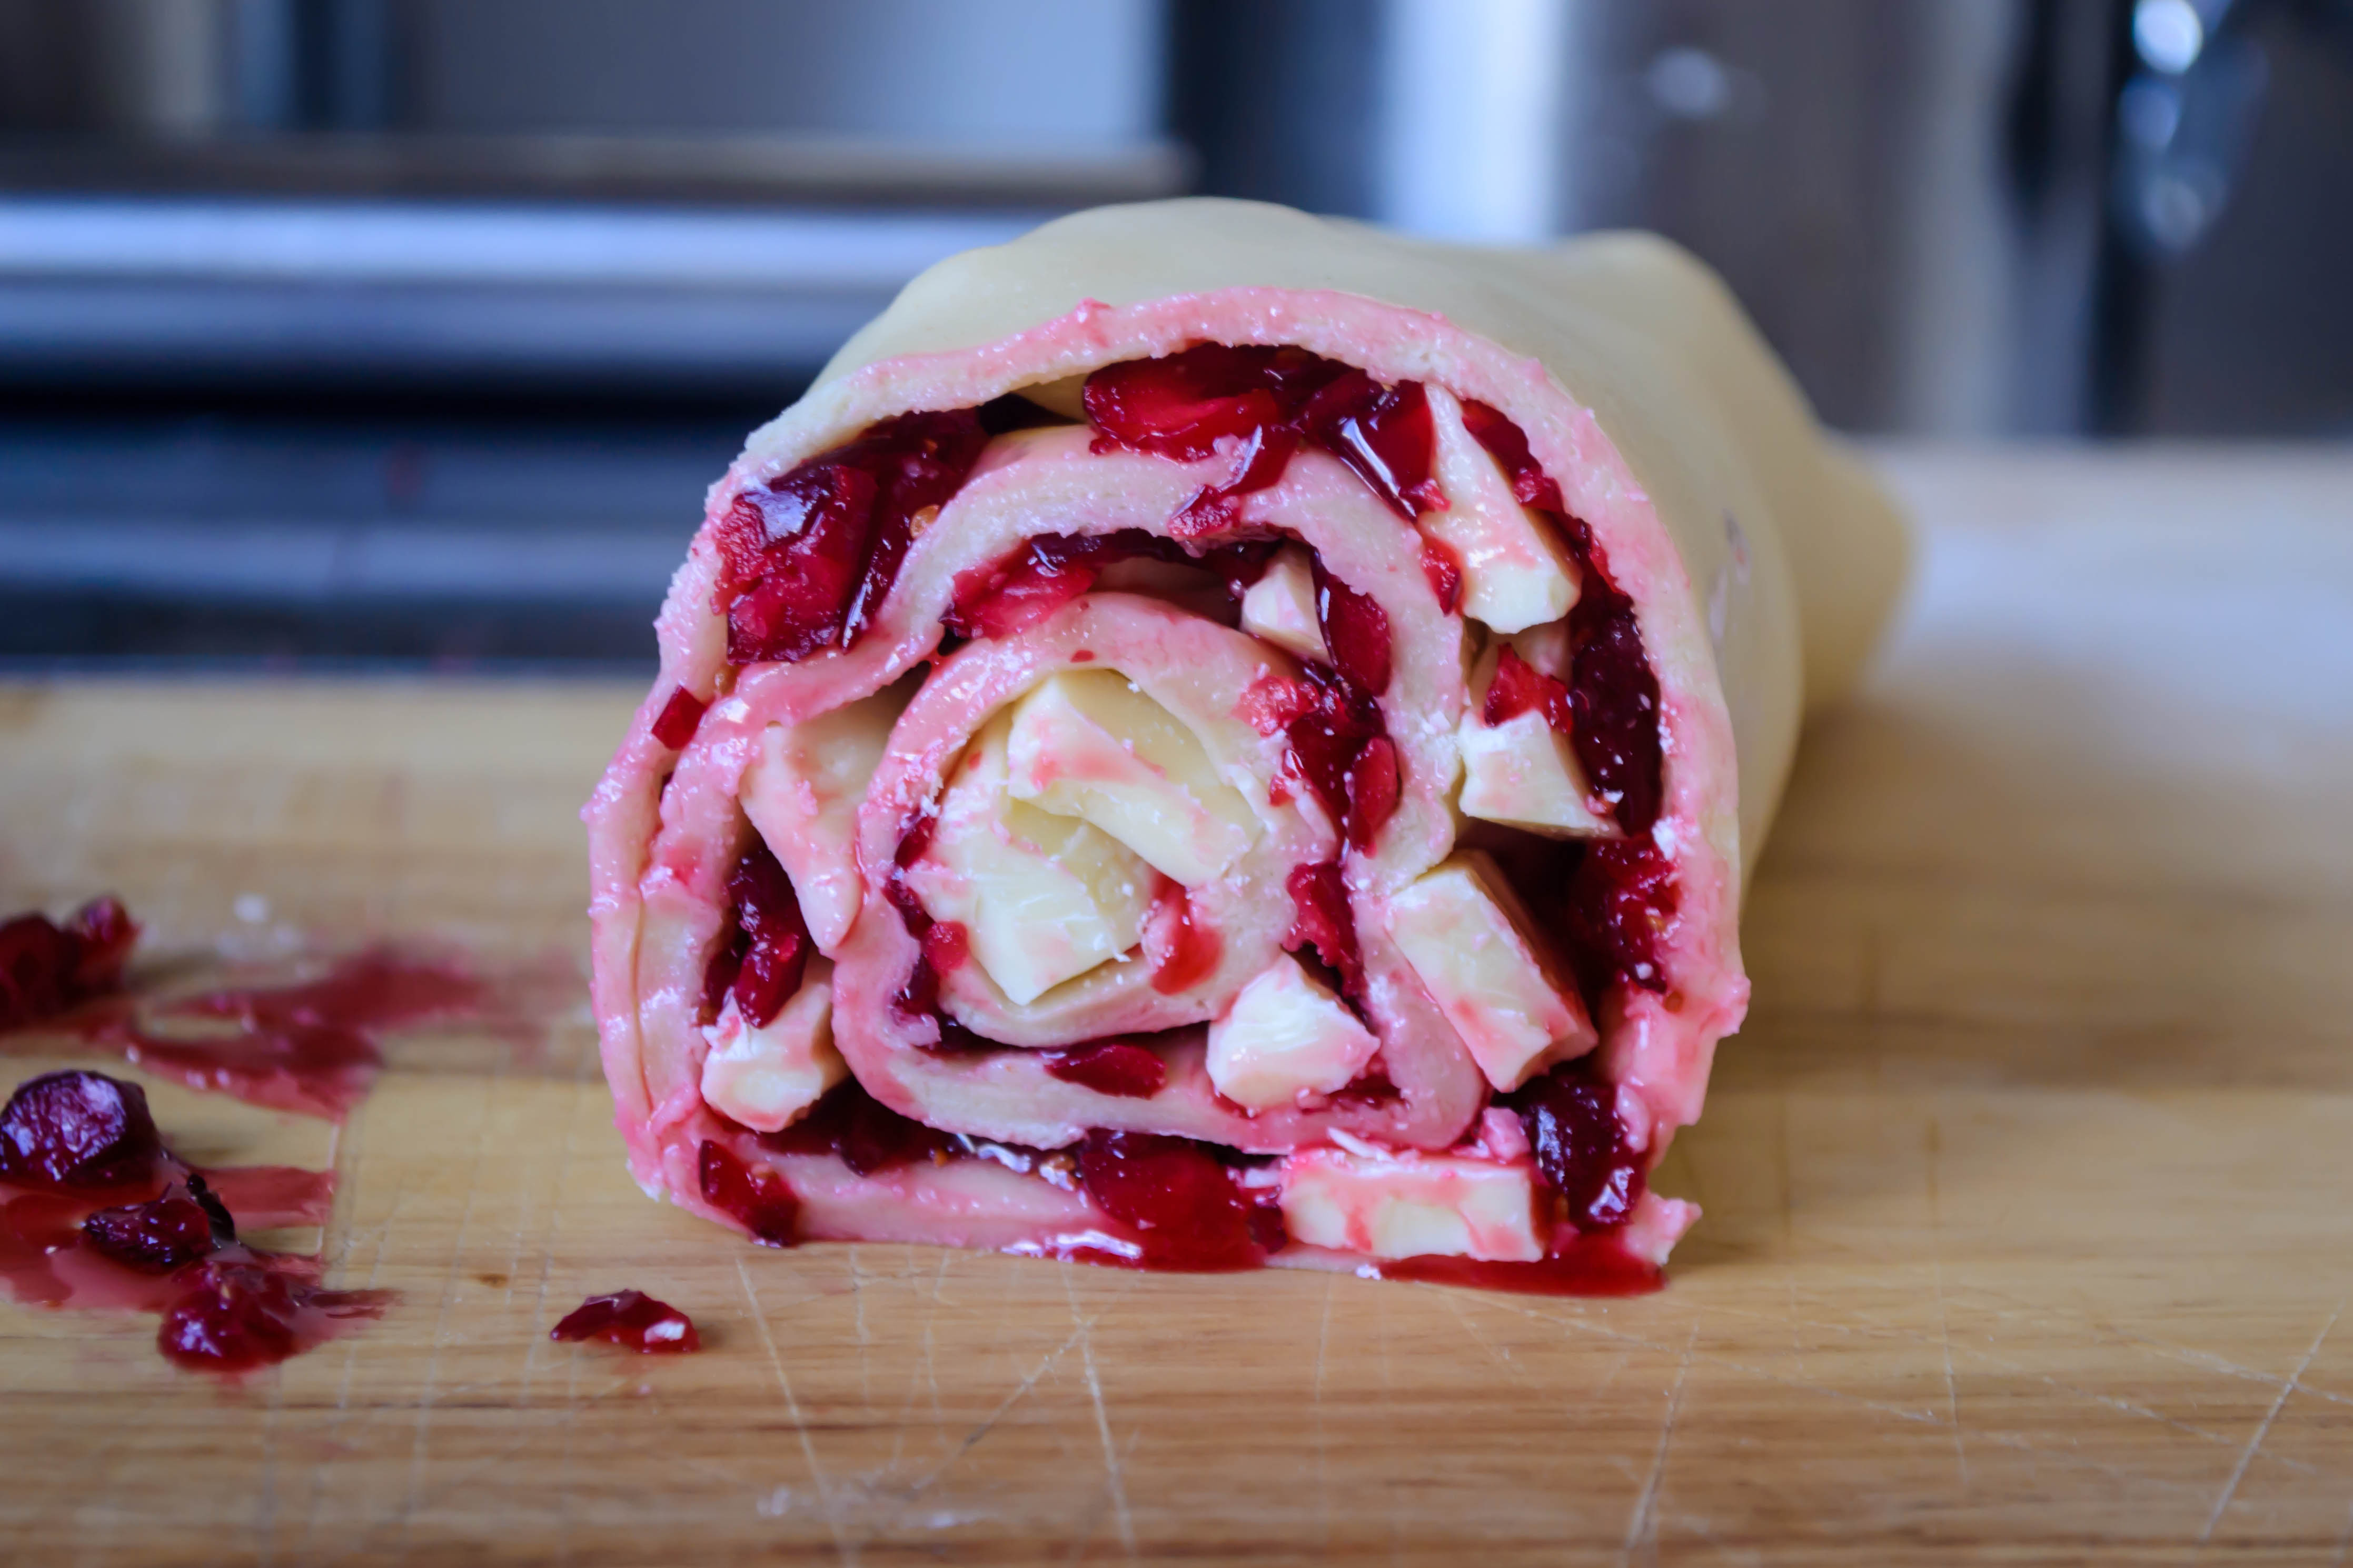
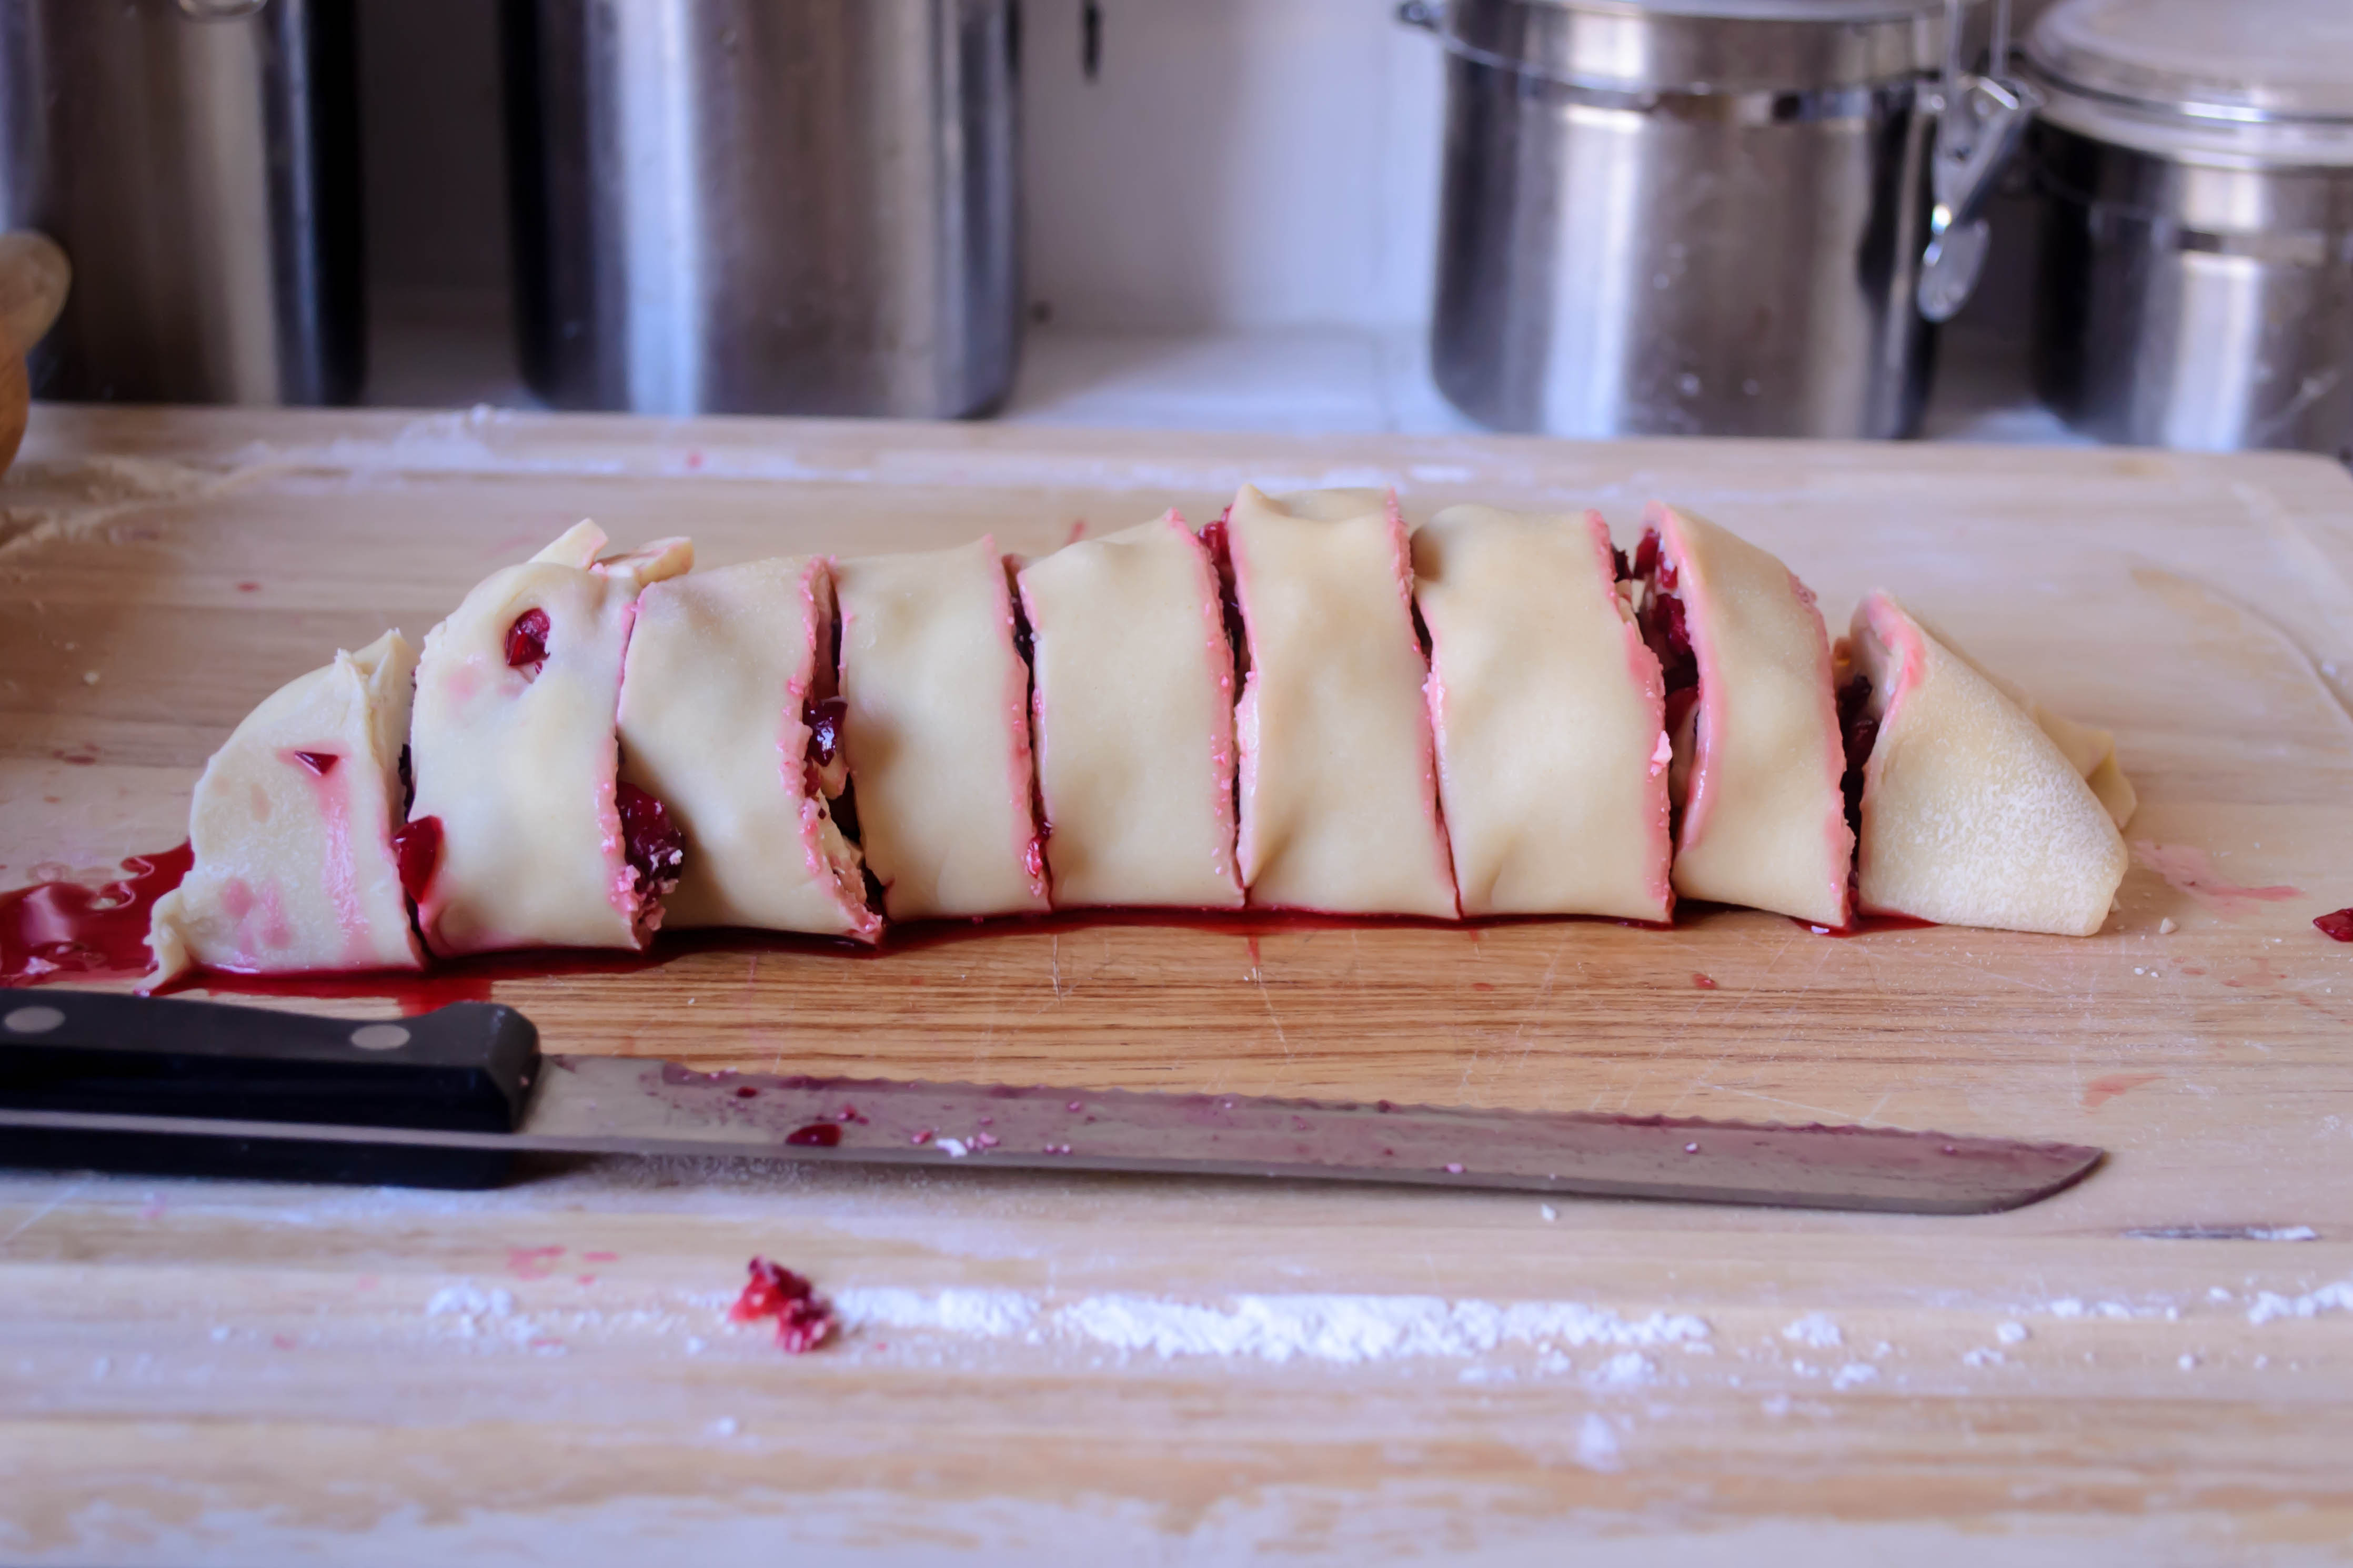 You could certainly also do full-sized rolls, which might require a slightly longer baking time. While they are still hot, golden and just crusty on top, but bubbling around the sides with the escaped gush of cranberries, you tip a smooth, ivory stream of melted cream cheese and white chocolate over them, and let them cool as long as you can stand it before serving. The brightness of the cranberries peeking out from under the frosting makes a nice contrast that does reference the Christmas holiday, especially if you really go for the obvious and serve it on a green plate. Not that I would ever do such a thing.
 We thought these were quite tasty, and a refreshing twist; certainly worthy of ending up in my department mailroom as a last-week-of-school treat, but if I’m honest, they are not the “match made it heaven” combination I had thought they would be. Cranberries and white chocolate are a holiday fling – experimenting, having fun, but they know it won’t last. They will probably break up come January, and cranberry might skitter home to orange to make amends. White chocolate, on the other hand, stimulated by cranberry’s tartness, might shack up with raspberries for a while, and you guys, what about tender raspberries and shards of white chocolate all wrapped up in a soft, champagne cake roulade? I think I just made you a come-summer promise…
 * “Somehow” probably means Deb, whose recent post on cranberry sweet rolls could just possibly have kicked my brain into this direction.

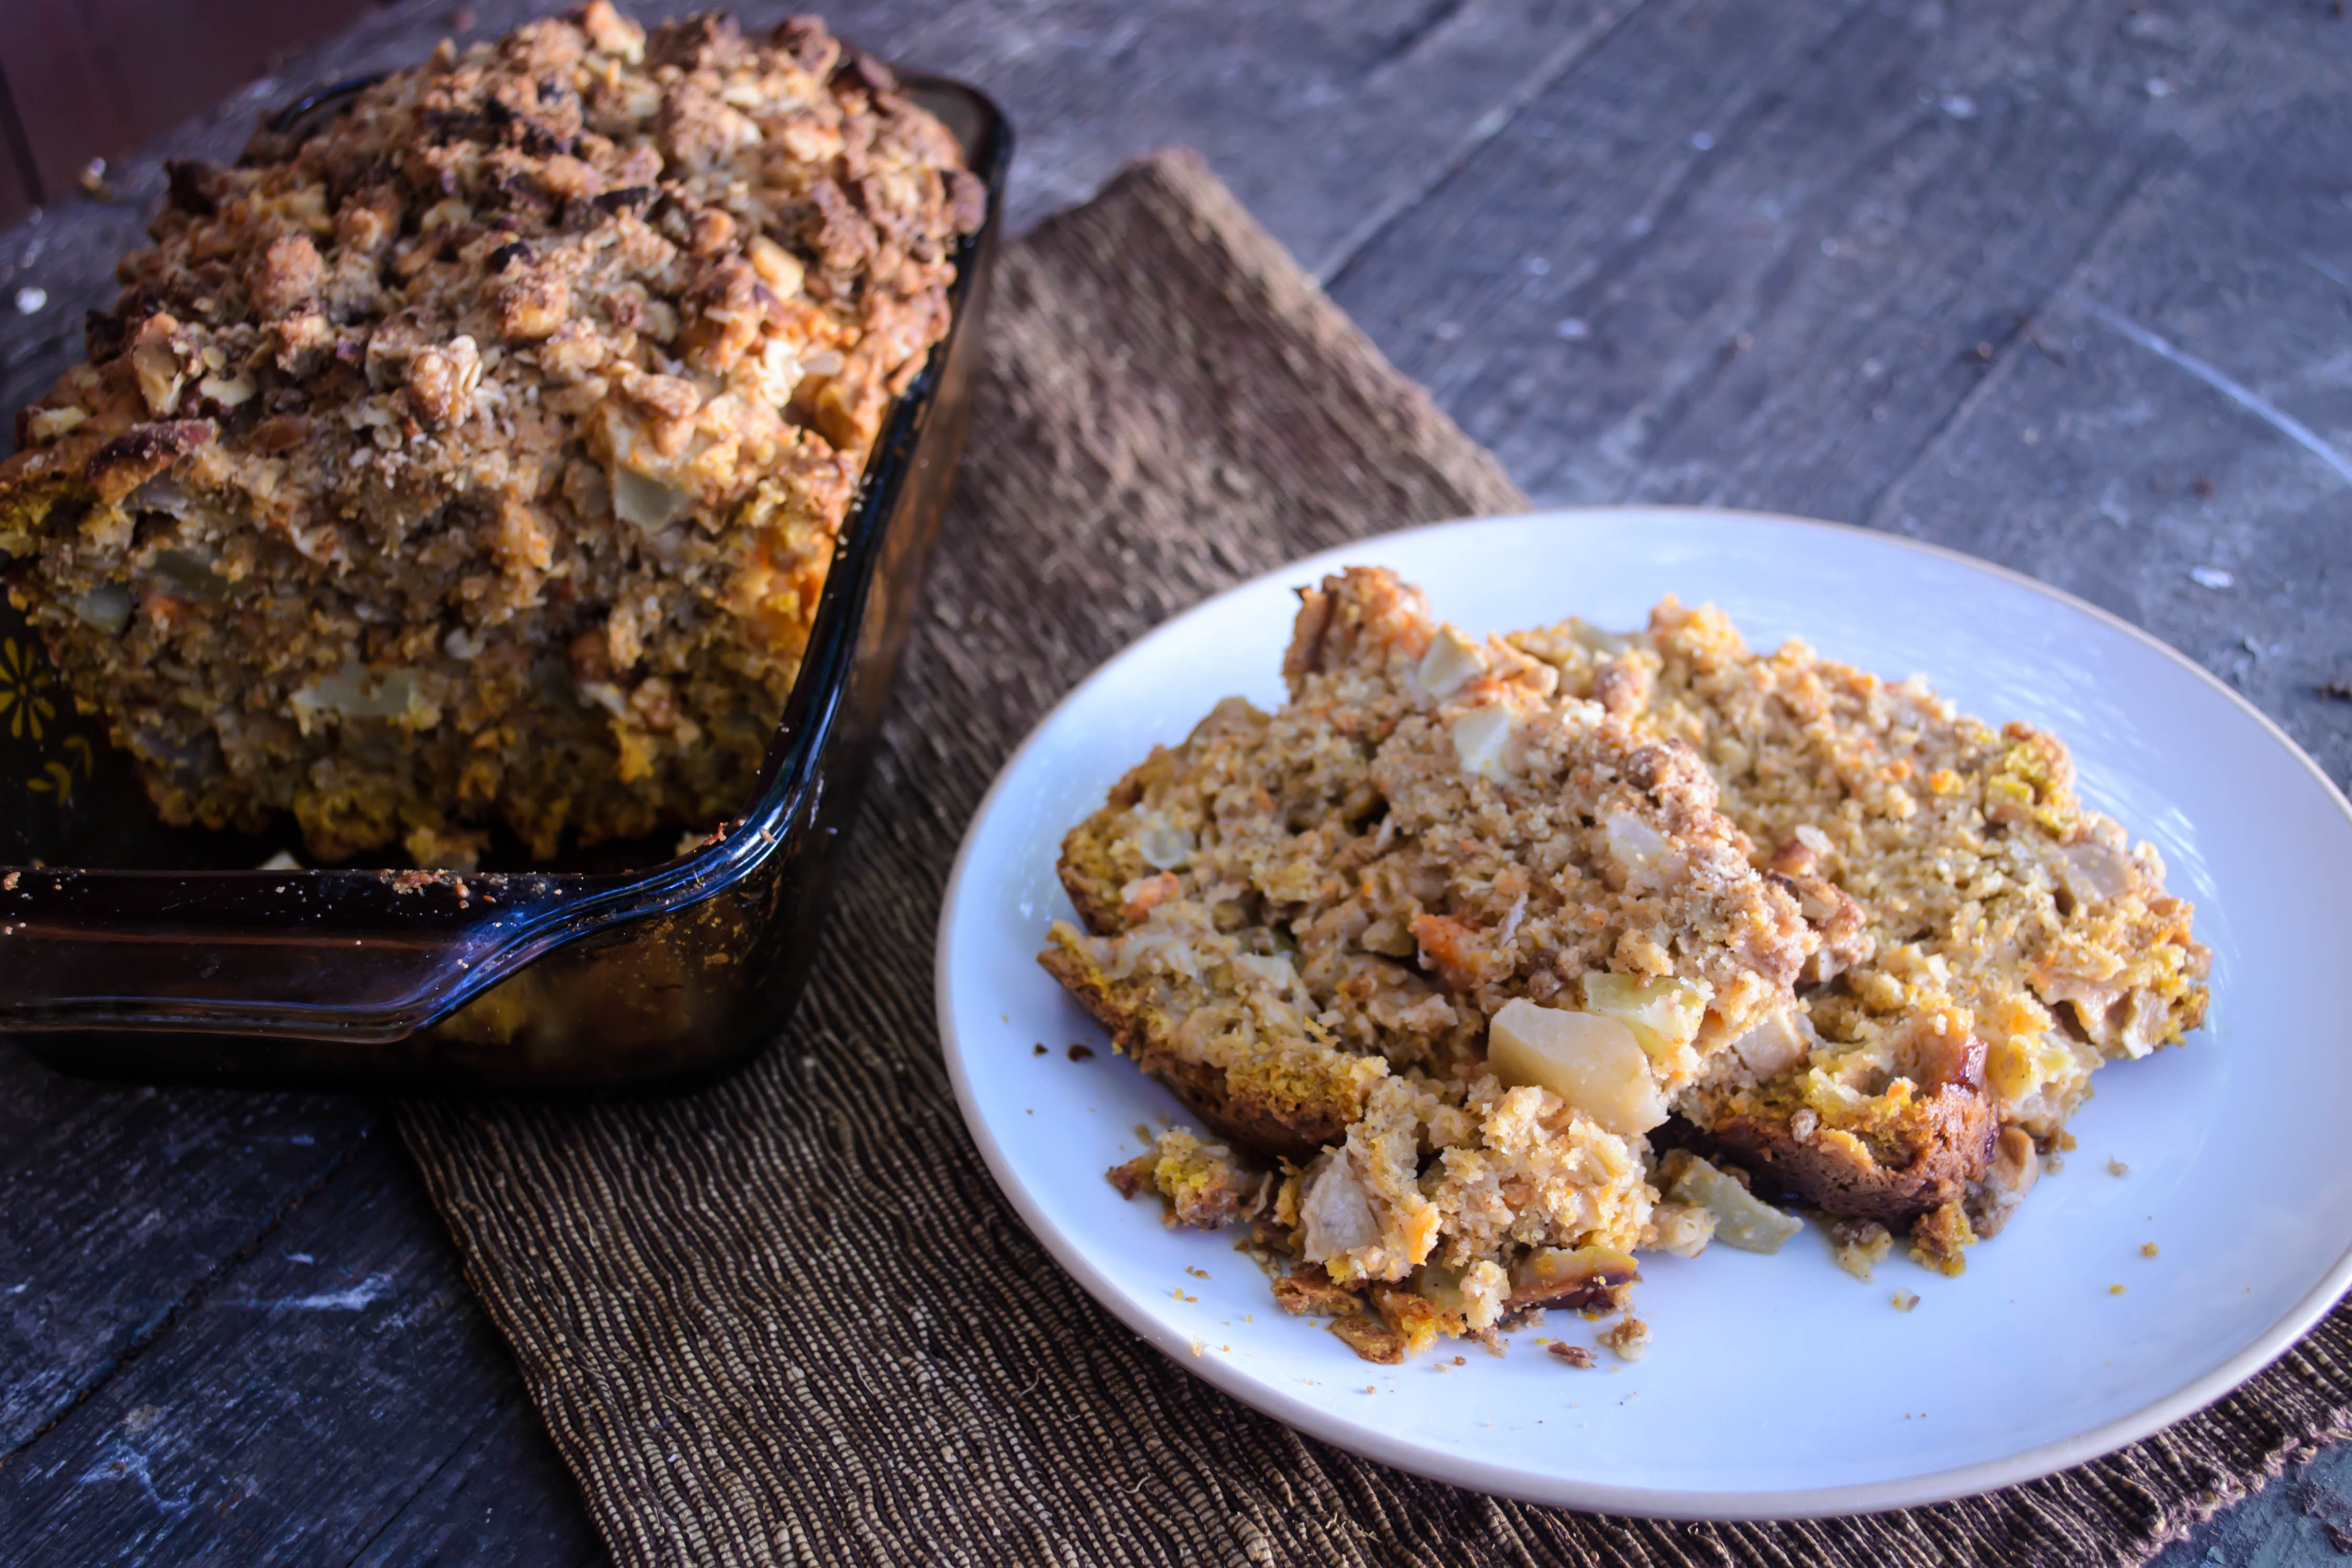
I seem to be increasingly fond of dishes with long titles. There’s nothing particularly extravagant about this quickbread (though I must admit, the prep work involved makes it not all that quick), but the title is lengthy because it does have a lot going on. Harvest color from a baked, mashed sweet potato, juicy chunks of apple, a hearty, wholesome boost from the oats, plus a hefty dose of brown butter, buttermilk, cinnamon, and a streusel topping crammed with walnuts and dried apple rings. But I didn’t want to overload you, so sweet potato apple oatmeal bread it is.
 This bread turned out to be a lovely little response to October’s Twelve Loaves theme: root vegetables. Upon first reading this mandate, I was a little concerned. I’ve already done loaded potato biscuits. Carrot cake is, eponymously, not bread. Beets and rutabegas and parsnips and all those other decidedly savory tubers I’d welcome in a roasting pan or in a latke just don’t seem like a good fit in bread, yeasted or otherwise.
 Los Angeles has recently decided that, since it’s almost the middle of October now, Fall might be okay. It might be acceptable to hover below 80 degrees during the day,* and nights could, possibly, occasionally, fall to the chilly (hah!) mid-50s. This has put me in mind of all the harvest flavors I love which, predictably, takes me to Thanksgiving. Once there, it’s only a tiny hop to the humble sweet potato.
 Sweet potatoes are true root vegetables. Unlike taro or ginger, which are technically modified stems, or even the grand old potato itself, which is a tuber but not a “true” root (I know, I was shocked too!), sweet potatoes are the root of the plant.


 Thankfully, they are also delicious. I love their mellow, starchy sweetness in savory and sweet applications, but I’d never tried incorporating them into bread before. I knew almost immediately I wanted a quickbread rather than a yeasted loaf, and from there it only remained to pair a few flavors. Apples seemed like a nice match for sweet potato: big, fresh Honeycrisps have been showing up at our Farmers’ Market lately, and their juicy tartness would be a good foil for the dependable mellow of my main player. Oatmeal would bulk up the bread a little, giving it strength to support the onslaught of apple and sweet potato I had in mind. I found an oatmeal quickbread recipe that sounded promising on Flour Child, but things really cemented when I read Irvin’s post on Spiced Brown Butter Apple Walnut bread on his blog Eat the Love.
 So, sweet potato, baked rather than steamed or boiled to cut down on moisture, an excessive mound of apples, left in sizable chunks that, when you start to mix them in will seem like far too many, rolled oats to bake into a breakfast-worthy slice, and the usual players – brown sugar and cinnamon and just enough salt – get topped off by a streusel you will want to eat not just on this bread, but on everything. Walnut pieces, more oats, cinnamon for flavor and flour for texture, enough butter to hold things together, and the crowning touch: roughly chopped dried apples that, when baked, dehydrate even more into crispy, gloriously tart-sweet candy. I’m already imagining it on oatmeal, or pancakes, or baked on its own into a take on granola.
 This is a moist loaf, and hearty, but not particularly dense. It can’t quite support its own weight, which means slices collapse easily on themselves because they are groaning under the quantity and size of the apples. It is also not terrifically sweet. I was aiming for a breakfast or a mid-morning snack kind of loaf. If you want something more dessert-like, or if you just have a determined sweet-tooth, try increasing the quantity of brown sugar by a few tablespoons.
* This morning’s meteorological news, however, may have made a liar out of me.

 Peaches relinquishing their skins.
A fabled land of farmers, farm shares, fancy (and not so fancy) restaurants, family meals, food projects and more.
cooking my way through my dissertation, one egg at a time
Fearless cooking from a tiny NYC kitchen.
food, in so many words.
Recreating the famous dishes of famous writers. Part recipe blog, part historical discussion, entirely unabashed love of books.
Epicurean Adventures from Eugene, Oregon
Celebrating the Harvest
Modern Iranian aka Persian Food & Culture Blog - Cuisine, Recipes, Stories , Photos, Pictures, DIY tutorials
Exploring Culinary Traditions of Africa, African America and the African Diaspora
food, in so many words.
food, in so many words.
food, in so many words.
Food-Stories-Recipes-Love
WordPress.com is the best place for your personal blog or business site.
