Project Sauce: Veloute with “Blue Plate Special”

I am realizing, as I continue this sauce project, how few of the sauces I’m examining are used “as-is.” Most, including this month’s velouté – the last of the flour-thickened sauces I’ll explore (next month we move on to eggs. I’m scared!) – are made as a base. They are, after all, “mother” sauces, so called not just because they are quite common, but because they are literally mothers: foundations that give birth to more complex sauces.

Food Blog March 2014-3496Velouté is very similar to béchamel, with the exception that here the roux (butter and flour cooked together) thickens a stock or broth, not milk. The stock in question is most commonly chicken or fish stock, which also tells you with which products it is most frequently served. To be technically correct, the stock or broth is supposed to be “white,” that is, made with bones that have not been previously roasted. However, I wasn’t about to make a special batch of stock just for this application, so I dug into my freezer and emerged with some icy golden goodness I’d made from roasting a chicken some months ago. Not exactly traditional (I so rarely am, after all), but manageable for our purposes.

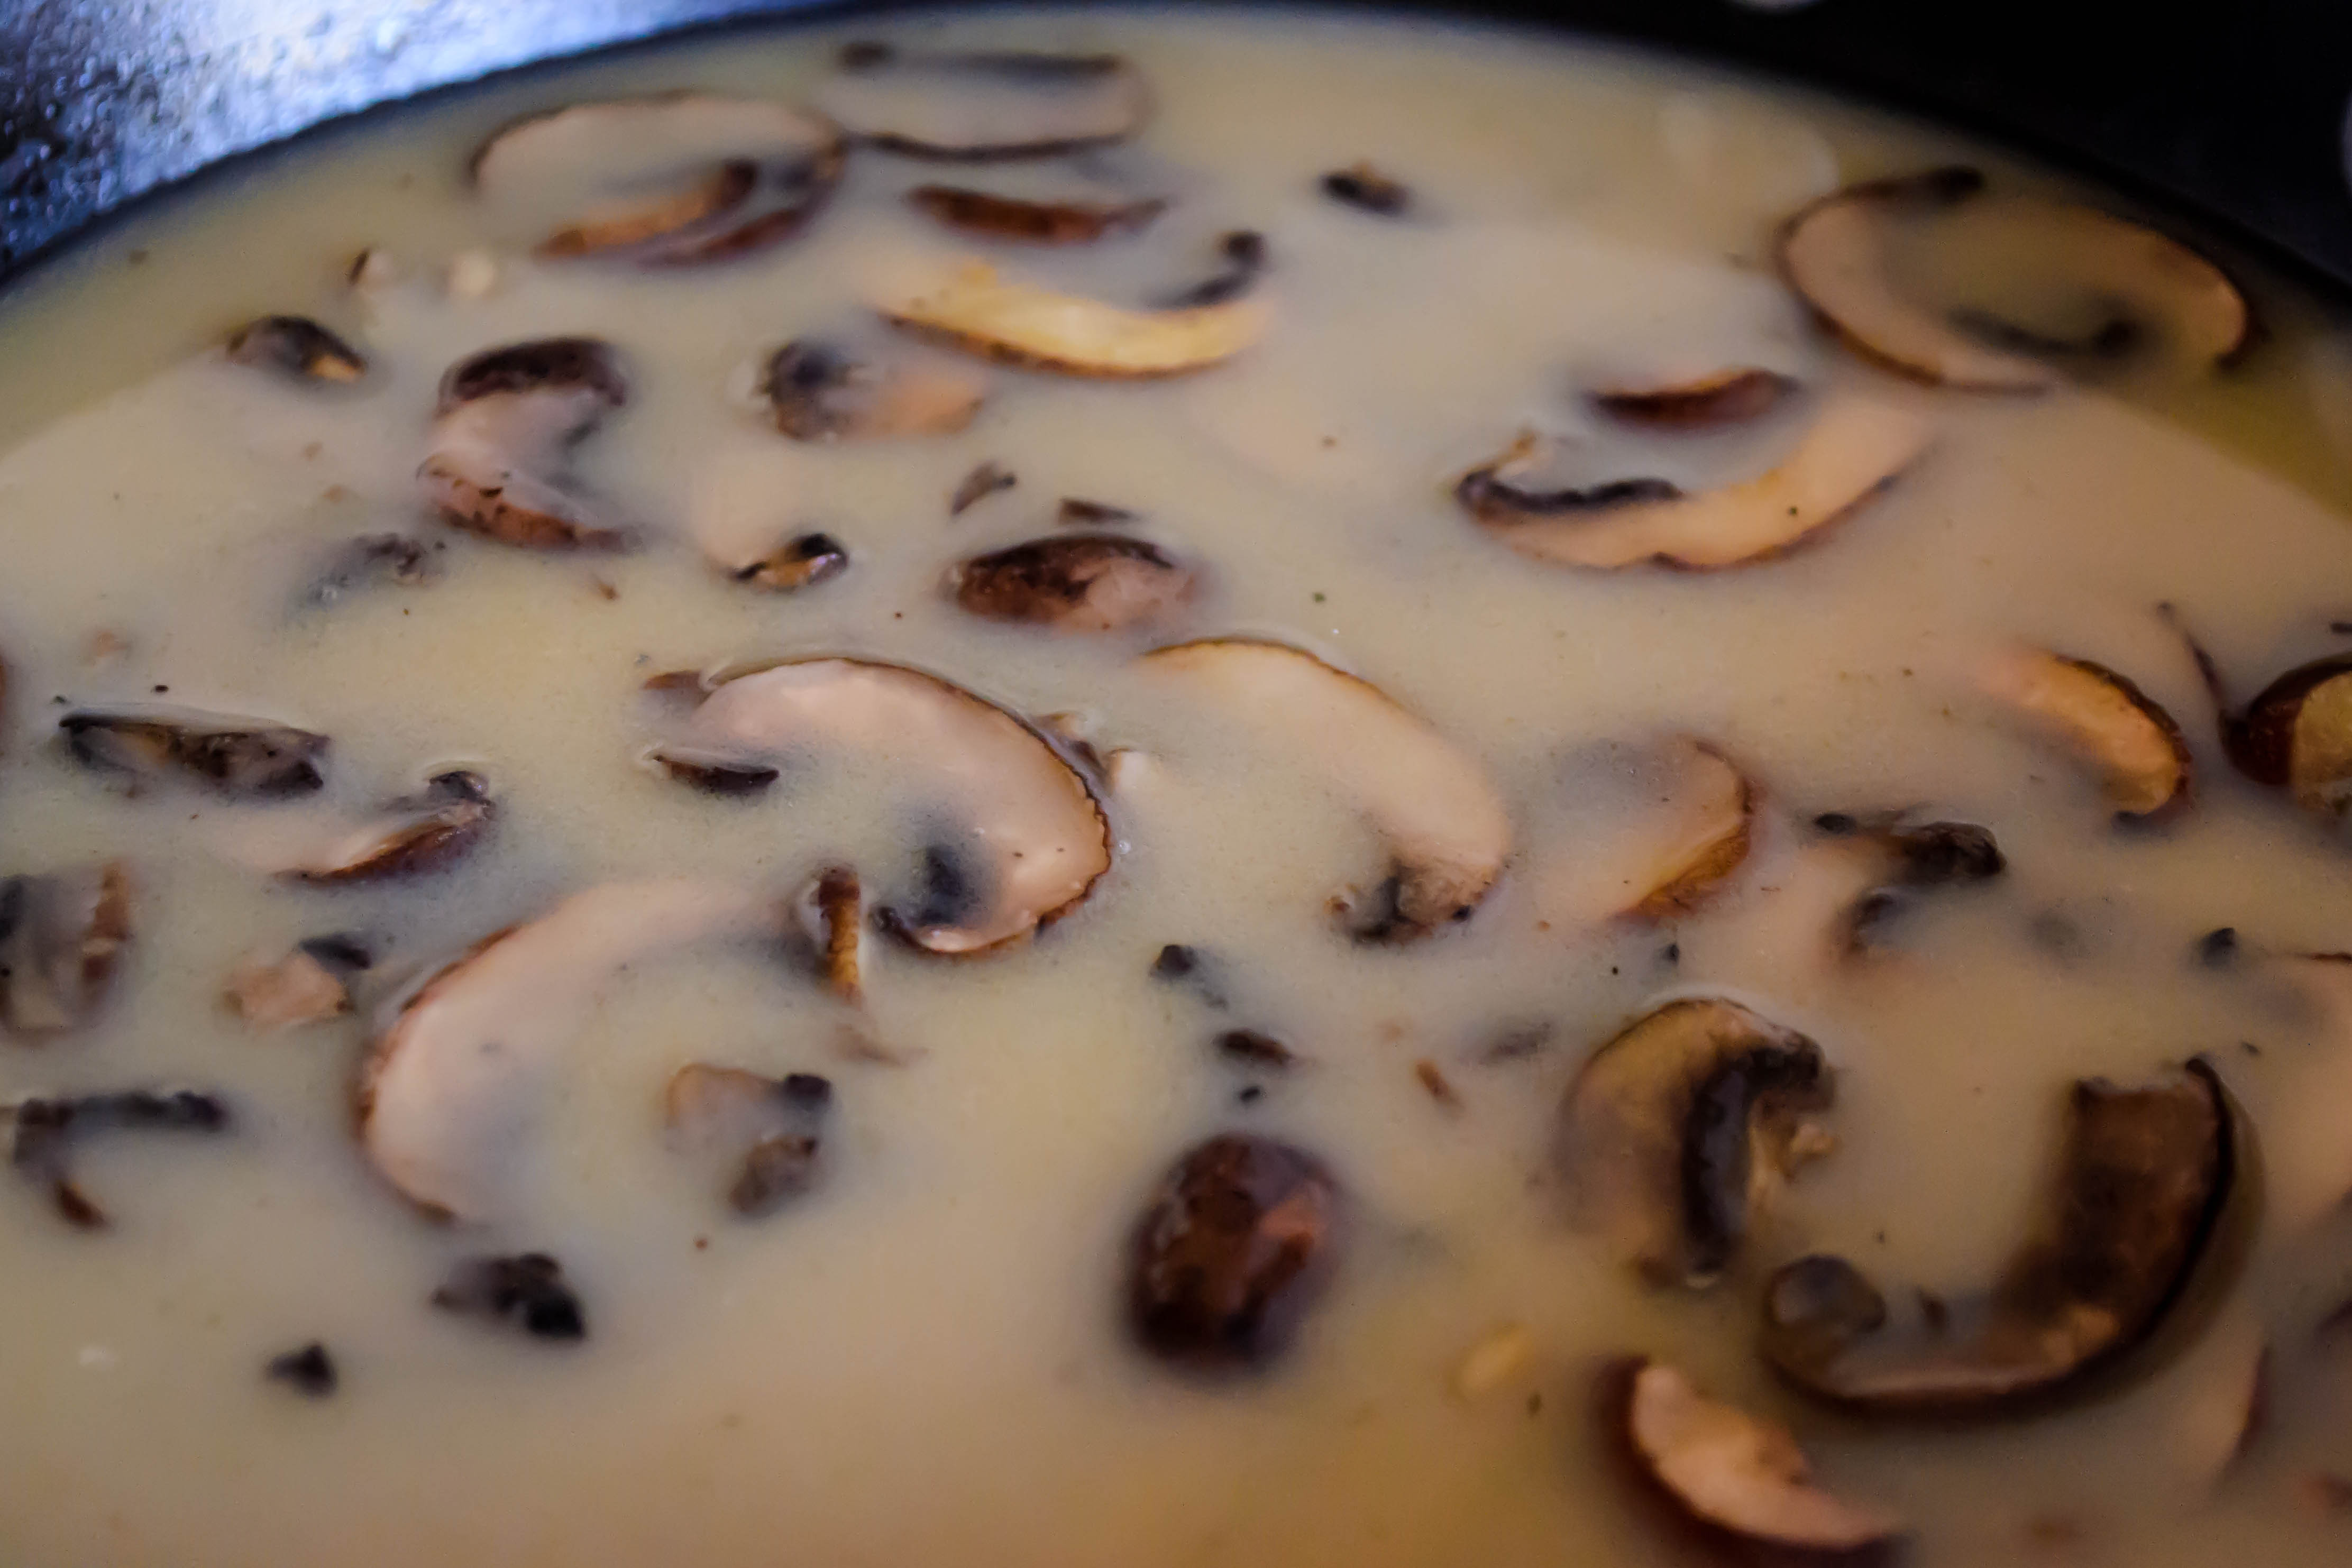
Recipes for velouté vary slightly on particulars. Some begin with mire poix (a French vegetable base consisting of diced onions, carrots, and celery), some recommend herbal accompaniments, some advocate finishing the sauce with a splash of cream, and the quantities of salt and pepper a cook should add differ depending on whose authority you accept. Some recommend adding heated stock to the roux, some call for the roux to be plopped into the heated stock. Either way, you essentially make a roux, combine it with the stock, whisk assertively to banish lumps, and settle in for a long, slow simmer during which time the sauce reduces, thickens, and develops flavor. Velouté means “velvet,” and when your sauce is done simmering you will understand why: it is so silky and fluidly pourable and soft. Mine was a pale matte gold, not quite thick enough to coat the back of a spoon, but sufficiently concentrated to pour in a solid stream rather than a liquid dribble. It smelled incredible – rich and meaty and flavorful – like midafternoon on Thanksgiving, the first time you open the oven to let the turkey aroma escape.

Food Blog March 2014-3486Yet for all its depth of flavor, prolonged cooking time, and high heritage, I couldn’t help but feel comforted by this sauce. There is something fundamentally homey and familiar about it. I realize Escoffier, the father of modern French cooking, will roll over in his grave when I write this, but it’s basically a simple gravy.

In restaurants, it was traditional to have a pot of velouté simmering away, ready to be dipped into to create more complex sauces and flavor bases. I wanted to keep things simple and pure, though, to really understand the sauce and its flavor, so I only made a slight adjustment.

I’ve got two recipes for you. This week, I’m celebrating velouté for its simplicity. Next week I’ll share a preparation that turns this rich, velvety sauce into something a bit more complex, but superbly tasty and comforting.

Food Blog March 2014-3493For the first, capitalizing on velouté’s similarity to a simple poultry gravy, I considered meals that incorporate such a familiar staple, and ended up with a sort of blue plate special: crispy chicken cutlet, buttery smashed potatoes, and lightly steamed green beans.

I often try to trace my thought process as I put dishes together, since the influences I’m incorporating aren’t always obvious. One of the derivatives of velouté is called sauce allemande, which includes egg yolk and mushrooms added near the end of the cooking time. To give this a nod, I decided to incorporate sautéed mushrooms to my sauce. Leery of the egg yolk idea, though, I transferred it to my chicken instead, dusting the breasts with flour and then dipping them in beaten egg before giving them a crisp coating. The mushrooms reminded me of my mom’s rice pilaf, which includes sautéed mushrooms and toasted almonds. Almonds seemed like a good pairing for the chicken, so I chopped them fine and combined them with panko. Almonds are equally nice with green beans, as are mushrooms, so the dish was starting to look cohesive, especially once I imagined my fragrant sauce kissing the whole thing.

Food Blog March 2014-3481Food Blog March 2014-3482Deep and rich thanks to its prolonged simmer, and silky smooth from the flour granules just bursting with all that liquid, this velouté made me realize why the judges on Chopped (don’t laugh, it’s my favorite guilty pleasure show) are always on about how important it is to have a sauce accompanying your dish. This enhanced all of the existing flavors on our plates. I kept going back for different combinations: sauce with chicken, chicken and sauce with potatoes, potatoes and sauce with green beans. All good. It really, as the Dude might have put it, tied the dish together.
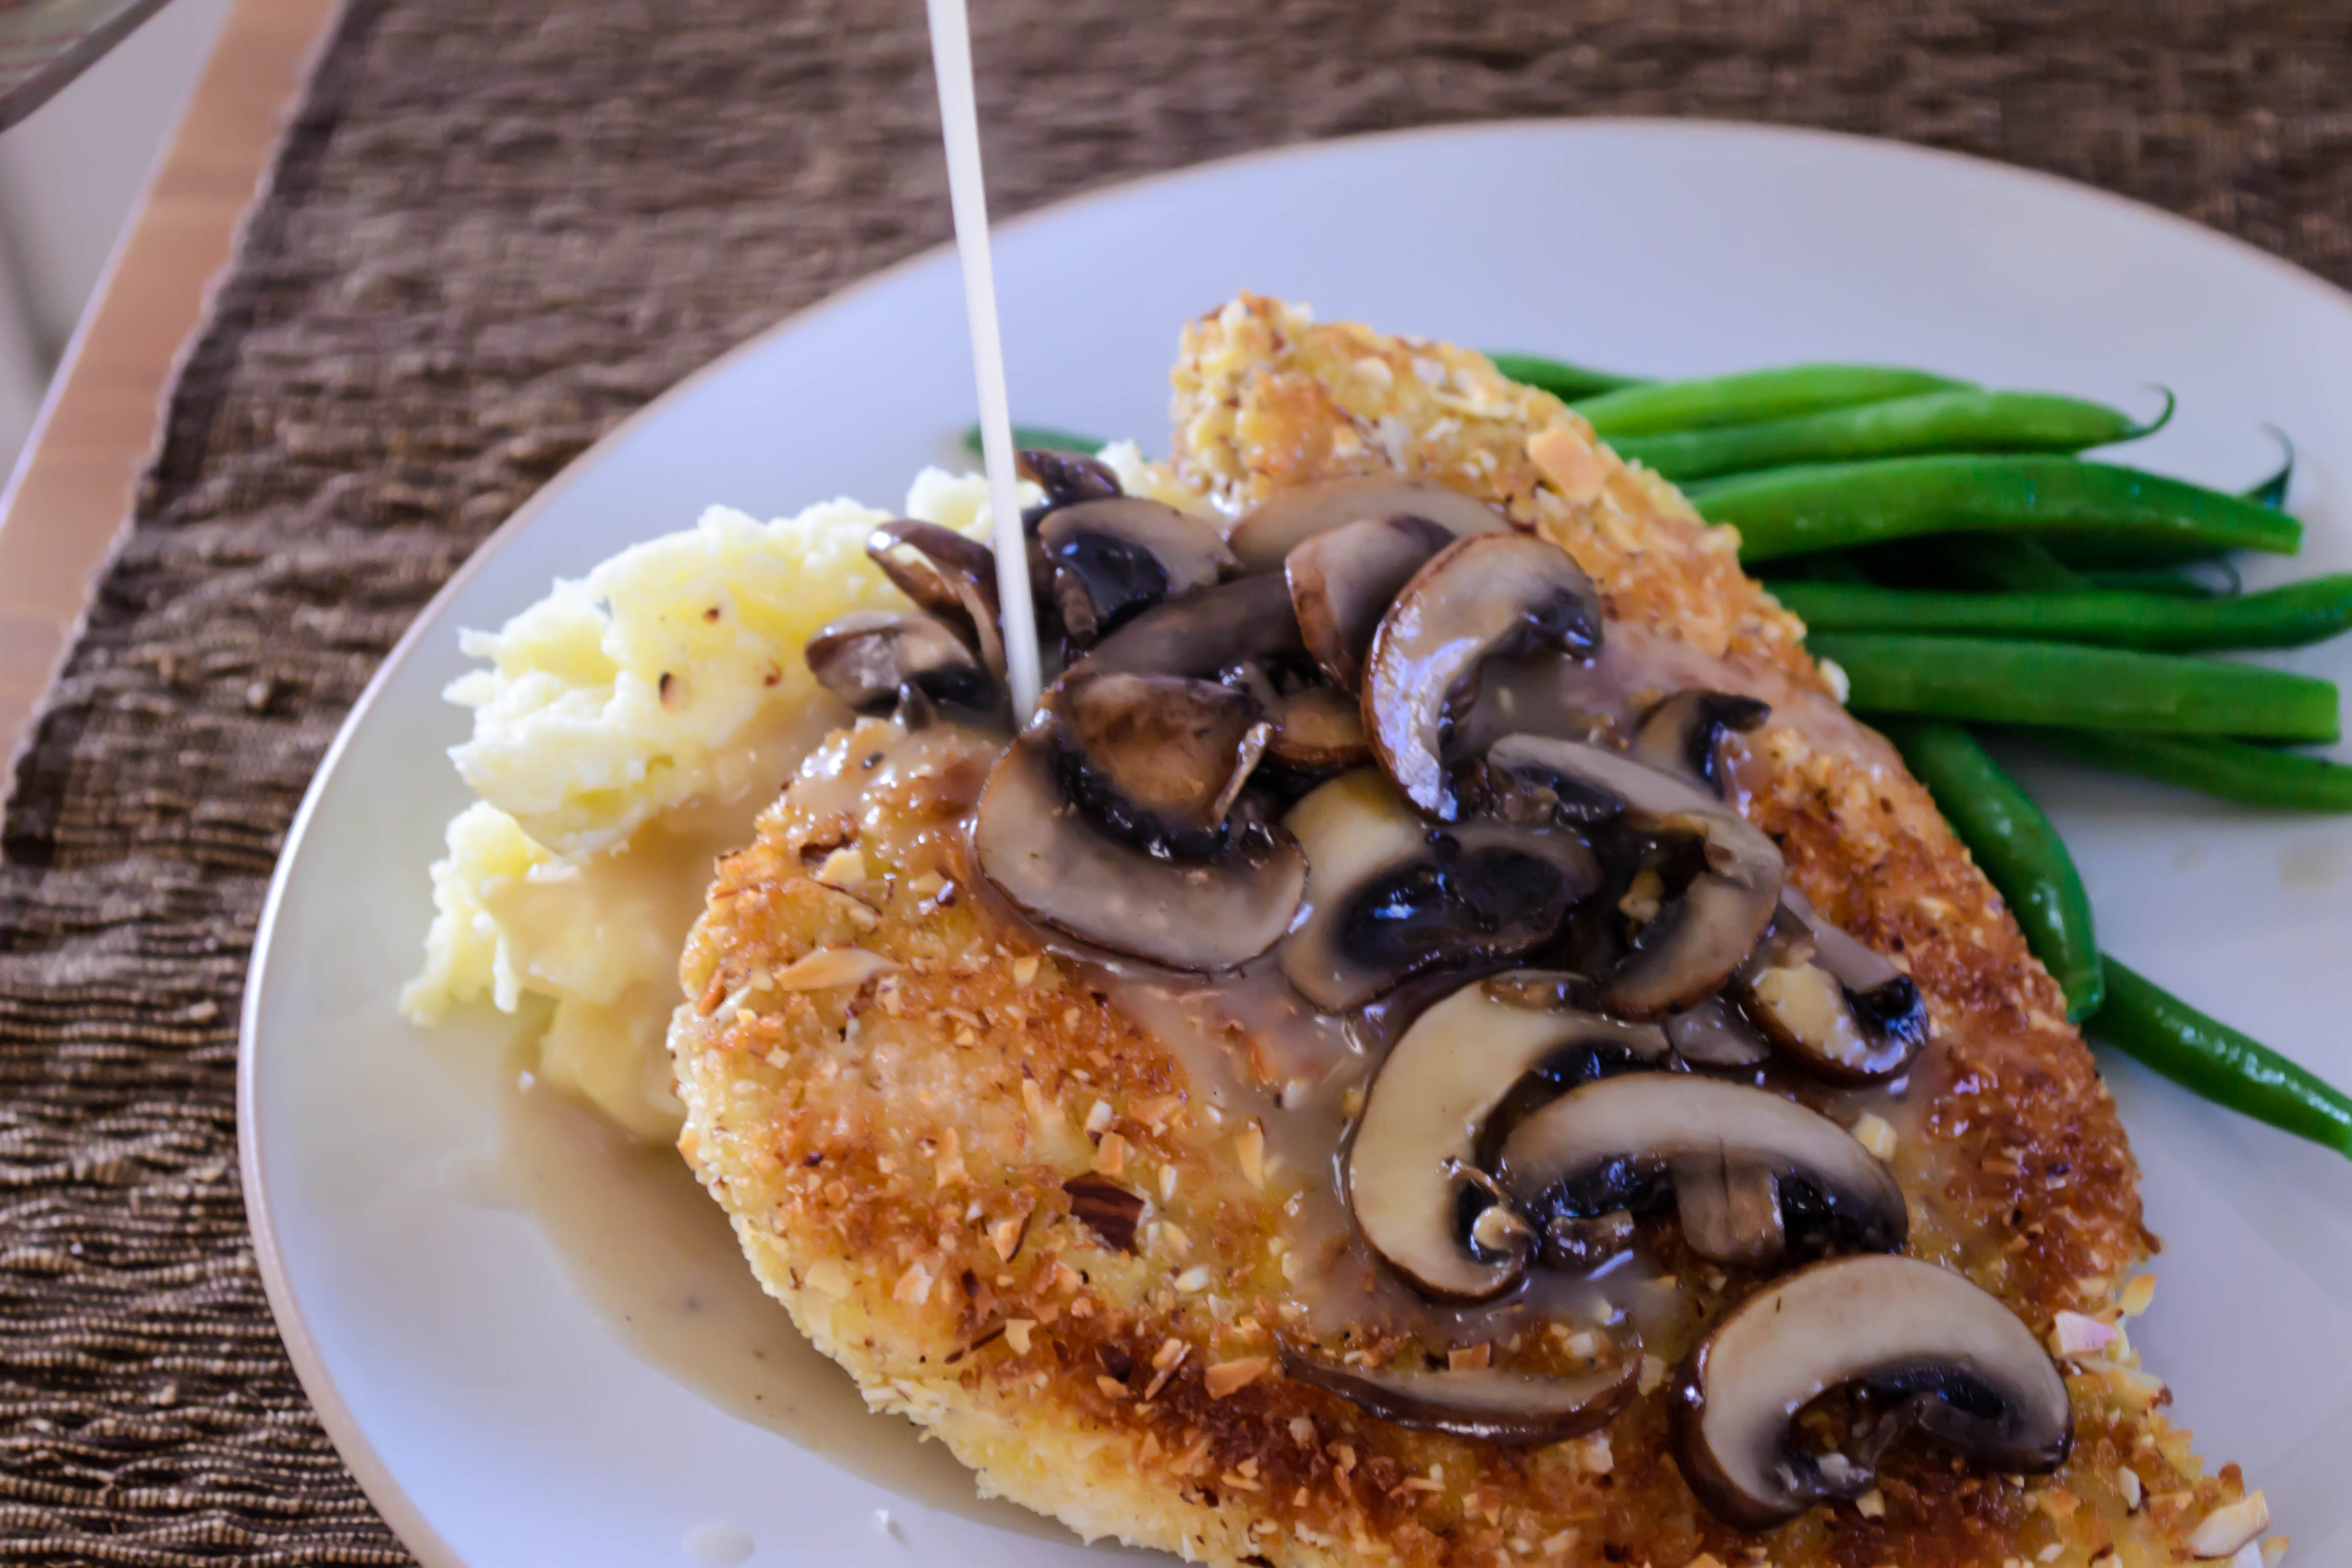
  Food Blog March 2014-3495

Basic Velouté
Makes about 2 cups
2 tablespoons butter
2 tablespoons flour
3 cups chicken stock or broth
Salt and pepper to taste
1 cup sliced, sautéed mushrooms


  • Heat the broth or stock in a medium saucepan until it comes to the barest simmer.
  • In a small skillet, melt the butter. When it is just melted, sprinkle in the flour and immediately combine with a whisk. I find sprinkling the flour around the skillet, rather than dumping it all in one place, makes for easier combining.
  • Cook the butter and flour together for a minute or two, whisking the whole time, until it takes on the consistency of a loose paste. You’ve now made a blond roux – minimal color, but maximum thickening power.
  • Either scrape the roux directly into the warm stock, or pour the stock slowly into the pan with the roux. Either way, whisk constantly to prevent clumping.
  • Simmer over low to medium-low heat for 30-45 minutes, whisking frequently to break up any lingering clumps or surface residue, until the liquid is slightly thickened, rich, and smells meaty. During this time, it will reduce by about a cup, leaving you with approximately two cups of sauce. You really do need to cook it for this long to achieve the desired consistency and depth of flavor.
  • Season with salt and pepper to taste.
  • Just before serving, stir in the sliced, sautéed mushrooms and warm through.


Sauce Velouté with “Blue Plate Special”
Serves 2
2 chicken breast cutlets (thin cuts of boneless, skinless chicken breasts)
1 cup flour
½ teaspoon salt
¼ teaspoon pepper
½ teaspoon garlic powder
1 egg
1 cup panko bread crumbs
½ cup sliced almonds, finely chopped
Olive oil, to cook chicken
2 large Yukon gold potatoes
2 tablespoons butter
¼ cup heavy cream
½ pound green beans, stem ends trimmed
1 recipe velouté with mushrooms
Additional salt and pepper to taste


For the chicken:

  • First, set up a breading station. I like to use two large plates and a pie pan for this. On one of the plates, combine the flour, salt, pepper, and garlic powder and spread it out to cover the entire plate. If you want additional or different spices, this is your chance to personalize. On the other plate, combine the panko and almonds. Sprinkle some salt and pepper in there as well, if you wish, and again, spread the mixture out for even coverage. In the pie pan, crack the egg and beat it up with a fork. Set these out in order: flour, egg, breading (see above photographs for reference).
  • Preheat the oven to 300F so that the cutlets can stay warm while you cook other elements of the dinner. Place a baking tray with a wire cooling rack on it in the middle of the oven.
  • Now, take a look at your cutlets. We want them no thicker than ½ an inch so they can cook quickly without burning the almonds in the breading. If they are that thin, great. Skip to the next step. If they are thicker, we need to pound them out. To do this, place one cutlet at a time in an unsealed plastic zip-top bag, or just wrap it loosely in plastic wrap. With a meat mallet, a rolling pin, or a heavy saucepan, pound the chicken by beating it with steady, forceful hits that push toward the outer edges of the breast. In other words, you’re not just punching straight down. You’re striking at a slight angle, from the middle toward the outer edges, which helps the meat spread without tearing.
  • When your chicken breasts are evenly ½ an inch thick, it’s time to bread them. Working one at a time, dredge the cutlet in the seasoned flour, pressing it with your fingers to ensure even coating. Flip it over and dredge the other side. Repeat with the egg, then with the panko and almonds, again being sure you press it in firmly to help the breading adhere.
  • Heat a good slick of olive oil in a skillet over medium heat. Once it is glistening, add the first cutlet, placing it down in the middle of the pan and then not moving it for four minutes.
  • After four minutes – no cheating! – peek at the underside of the cutlet. The breading should be golden and crisp but not burned, and thanks to being left undisturbed, not peeling and crumbling off the chicken! Flip the cutlet and sizzle on the other side for another four minutes until cooked through and crisp.
  • While you are cooking this cutlet, dredge and bread the second one.
  • When the first cutlet is golden brown and crisp on both sides, carefully move it from the skillet to your prepared, preheated oven tray. It is already fully cooked (at least it should be, if you’ve pounded it to a true ½ inch), so this will keep it warm and crispy until both pieces are done.
  • Repeat this cooking process with the second cutlet. If you need more time to prepare the rest of dinner, as I always do, these will hold in the warm oven for 15 minutes or so. You don’t want to go much longer than that, lest they dry out, but I was delighted by how moist ours still were.


For the potatoes:

  • Cut the potatoes into small, even sized chunks – the smaller you cut them, the faster they will cook. Plop them into a pot with plenty of salted water, then cover and set over high heat.
  • Bring the water to a boil, and cook, stirring once or twice if the water threatens to boil over, until the potato chunks are fork-tender. Depending on how small you’ve cut your potatoes, this could take anywhere from 10-20 minutes.
  • When the potatoes are done, drain into a colander and set aside.
  • Place the pot back on the stove over medium-low heat and add the butter and cream.
  • As the butter melts and the cream heats, put the drained potato chunks back into the pot and stir to combine. Using a potato masher or the determined back of a spoon, smash up the potatoes to your desired consistency. I like mine just a little chunky, with the thin skins still in there. Season to taste with salt and pepper.


For the green beans:

  • Heat a pan of salted water to a simmer.
  • Add the beans, stem ends trimmed, and simmer for 3-4 minutes, or until they reach your desired tenderness. We like them crisp-tender.
  • Drain the green beans, then return to the empty pan over medium heat with a slick of olive oil or a small knob of butter. Cook, tossing occasionally to distribute the fat, for a minute or two.
  • Season to taste with salt and pepper, and a squeeze of lemon juice or a tiny splash of white wine if desired.


To serve:

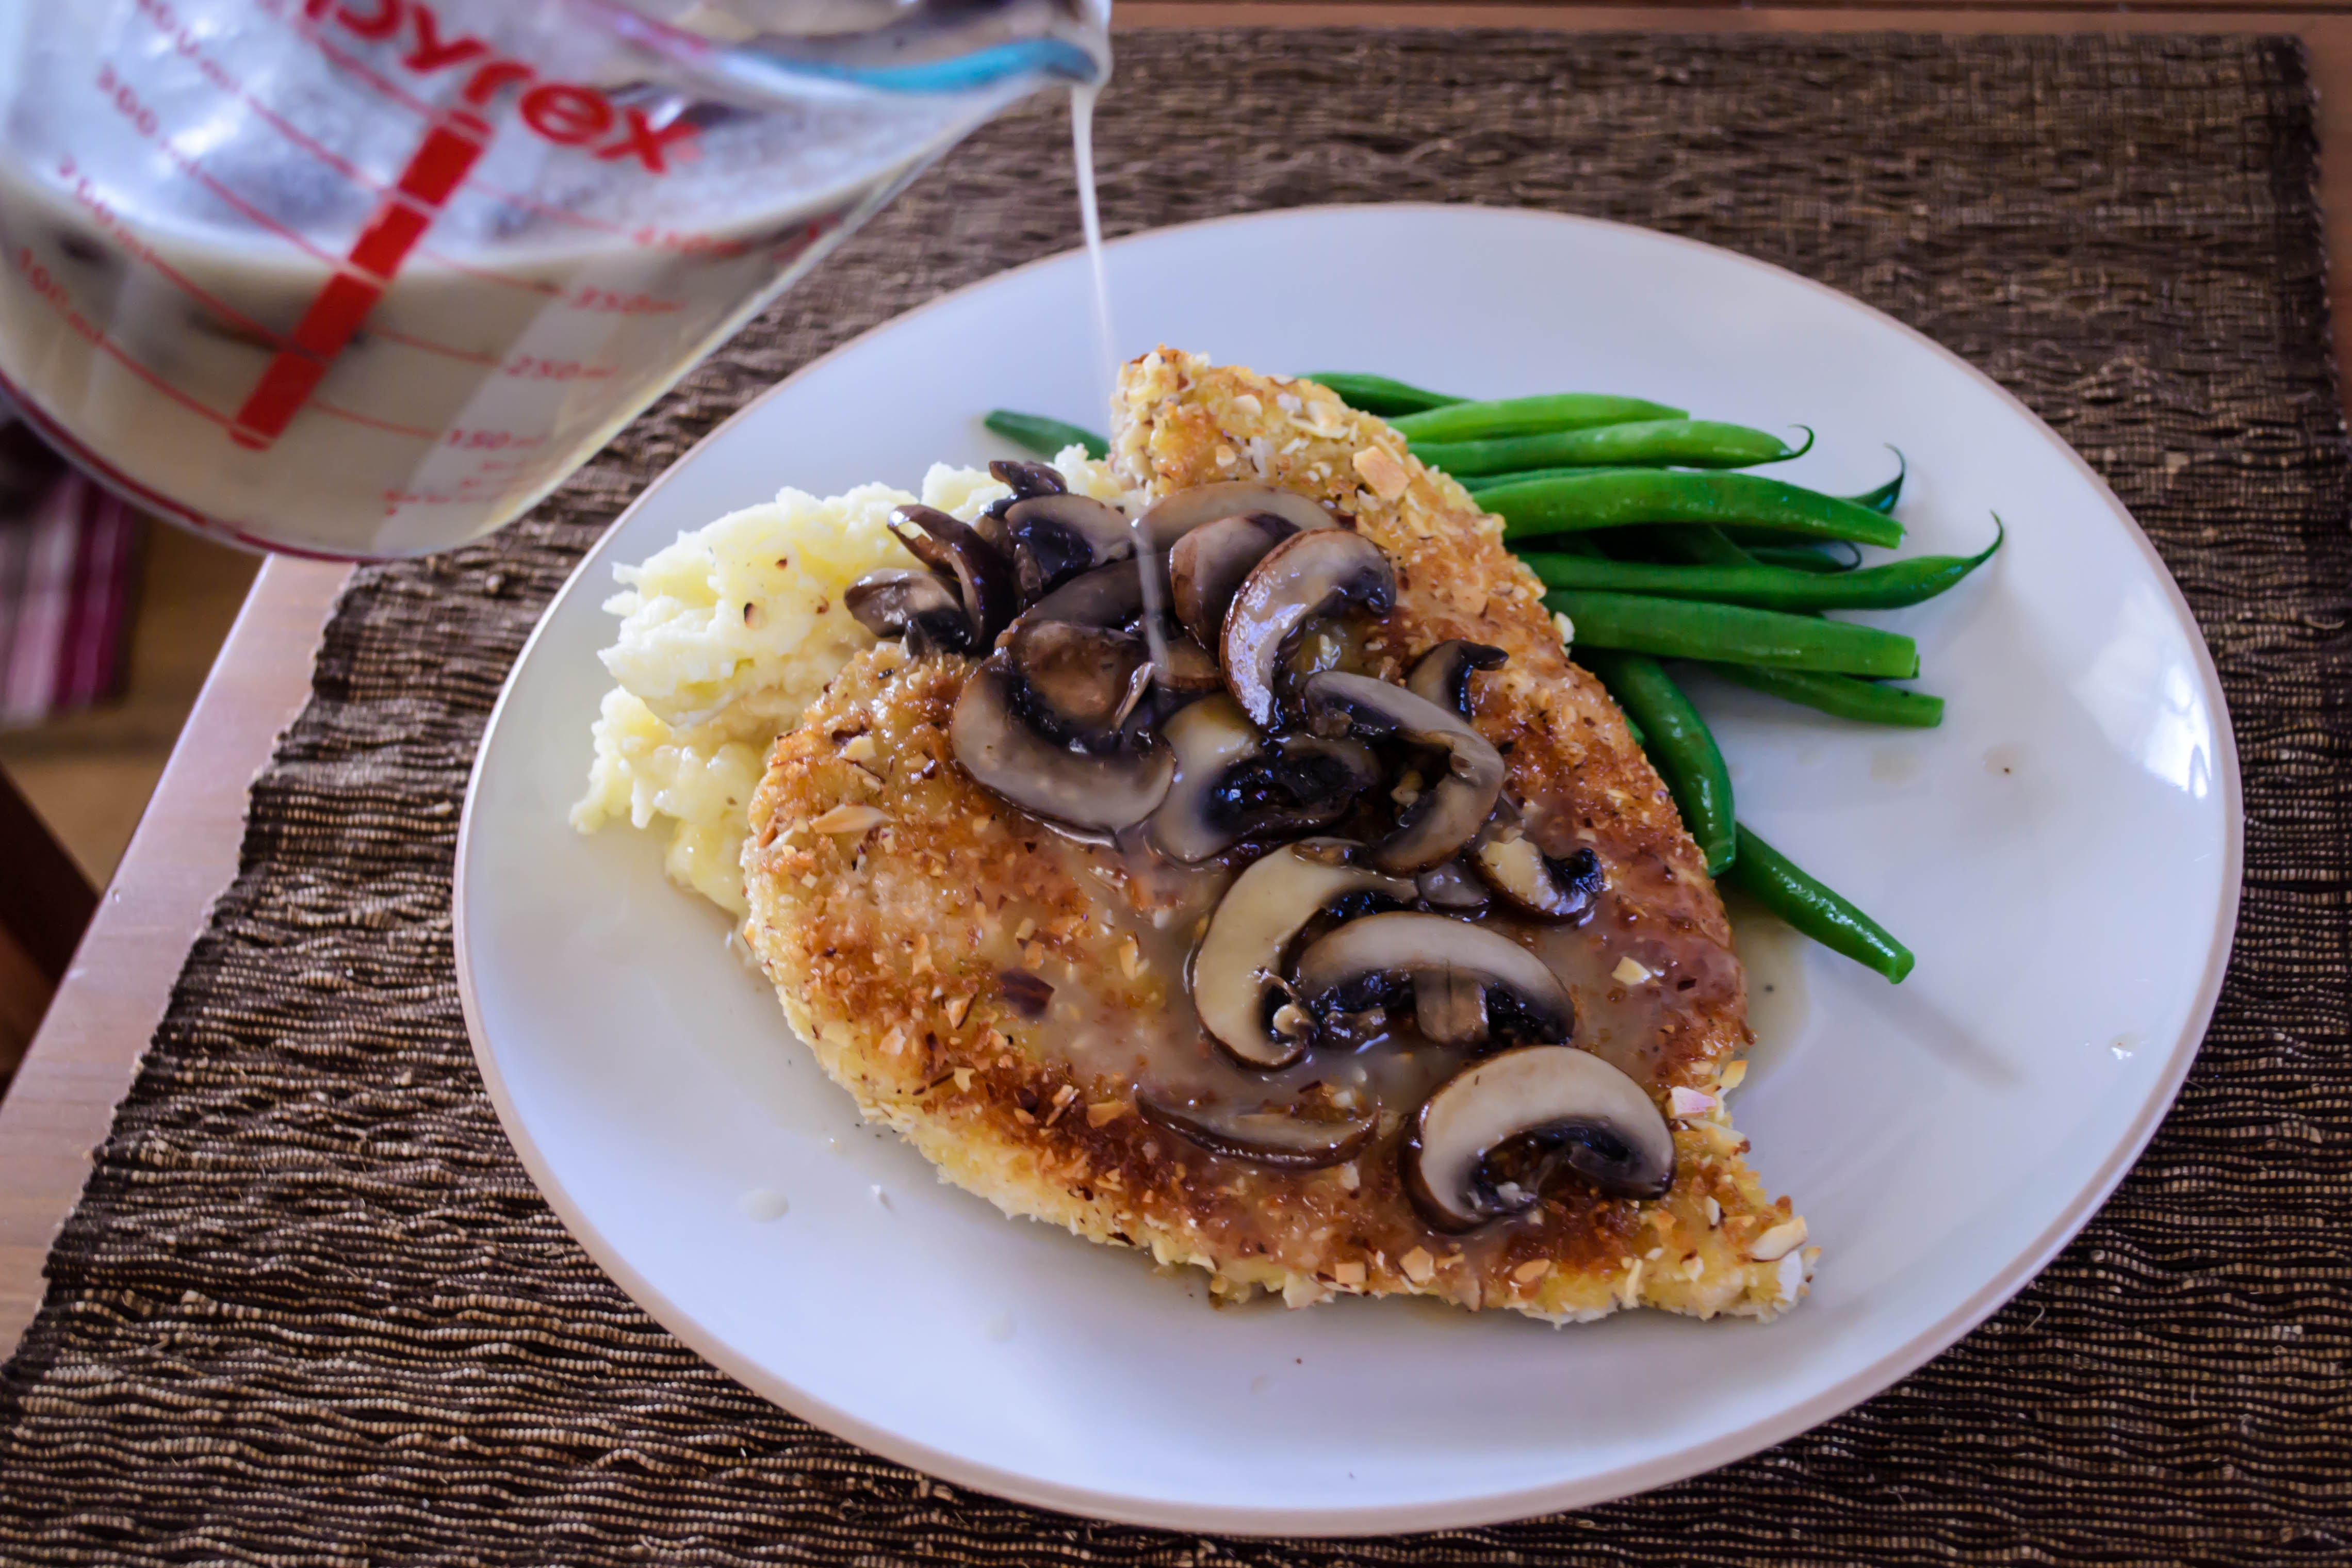
  • Consider your plate like a clock face. Position a scoop of mashed potatoes at 9 o’clock. Lay the green beans out in a curved little stack along the top few hours: let’s say 11-1. Now, lay the chicken breast partially atop the mashed potatoes, angling it from 9 down to 5.
  • Pour the warm, mushroom-spiked velouté over the chicken and the potatoes, so it slides and settles, gravy-like. Serve immediately to retain the crispness of the chicken coating.

Photo Friday

Holiday breakfast, a sequence.

Food Blog Photo Fridays 2013-6278Food Blog Photo Fridays 2013-6279Food Blog Photo Fridays 2013-6282Food Blog Photo Fridays 2013-6280* Note: my mom called this dish palacsinta; it’s essentially a pile of crepes, with sugar, butter, lemon juice, and pulverized hazelnuts in between each layer, baked until the edges are crispy, and served as a cake. In doing a bit of internet research, however, I’ve determined that palacsinta are Hungarian crepes, and that the layering is just one way of serving them.

** Note 2: as I was on vacation over the holiday, I took these shots with my smaller, more portable camera – a Canon PowerShot SD770 IS. I’m underwhelmed by the photo quality, but the stratigraphy of the dish was so pleasing I decided to share it anyway.

Quick Chocolate Bark

If you have leftover chocolate from the holidays (hah), or if you need something impressive for that New Year’s Eve party you didn’t expect to be invited to (double hah), but you aren’t feeling up to full-blown candy making, this is your recipe.

Photo Friday 2013-2955Chocolate bark is dead simple to make, totally delicious, and looks very fancy – essentially, you are producing a custom fruit and nut candy bar, but it takes only as long as the time chocolate needs to melt into a smooth, gloriously dark river of supple brown satin, and the time it takes that satiny pool to harden again. This leaves you sufficient time to shower, put on makeup, find the other earring from that pair that never stays together in the drawer, and possibly practice your dance moves, just in case.

Photo Friday 2013-2961Just before you leave for the party (or moments before your guests arrive), you can cut up the block of glorious, jewel-studded candy into neat bricks or, if you’re me, random quadrilaterals (random shapes and sizes = no one questioning your honesty when you say you made it yourself), stack it on your prettiest serving platter, and wait for it to disappear.

Photo Friday 2013-2965 Fruit and nut chocolate bark
makes a 9×14 inch slab, approximately
8 oz. semi-sweet or bittersweet chocolate
1/2 cup chopped, toasted almonds
1/2 cup dried cranberries
1/2 cup chopped dried apricots
  • Pour about 1 cup of water into a medium pot and begin to heat it over medium-low heat on the stove. Place a glass bowl over the top of the pot, being sure it covers the opening completely but does not touch the water inside. You are making a double boiler.
  • Cut the chocolate into small pieces and deposit it into the glass bowl. Stir occasionally. It will melt slowly as the water in the pot below the bowl heats. If the water comes to a boil, turn the heat down or off completely. The residual heat will be more than enough to melt the chocolate.
  • If you haven’t already chopped and/or toasted your toppings, now is a good time. Just take care to check and gently stir your chocolate every minute or so, to ensure that it doesn’t seize or burn.
  • Line a cookie sheet with parchment paper or wax paper.
  • When the chocolate is completely melted into a glossy, shiny puddle, pour it slowly and evenly onto the parchment paper-lined cookie sheet, leaving a slim border around the edges.
  • Using a rubber spatula or an off-set icing spatula, spread the chocolate into a rectangle of even thickness. Mine was about 9×14 inches, though I’ll confess to not measuring it exactly.
  • Sprinkle the fruit and nuts over the warm, still semi-liquid chocolate in whatever pattern or quantity you like. Set aside to cool.
  • After an hour or two, the chocolate will have hardened around the fruit and nut pieces, holding them in place. To serve, cut the slab of chocolate into chunks with a sharp knife.

Root Vegetable Barley Risotto

As I move on through my weird little life, I have come to realize that there are some rather shocking details in my relationship with food. Example: I just don’t like yellow curry. I’ve tried it. I’ve played with multiple applications. It just doesn’t work for me. Example two: Kraft Macaroni and Cheese is without a doubt my favorite hangover food. Well, that or biscuits and gravy with a side of hash browns. But only if those biscuits, gravy, and hash browns are from Brails Restaurant in Eugene, Oregon. Otherwise I’d take the boxed macaroni, complete with its powdered fluorescent orange box-mate, any day of the week.

Food Blog October 2013-2732But a more pertinent example for us today is risotto. I like risotto. I like the creaminess, the cheesy finish, the number of vegetables you can load it with; I even like the endless stirring. It’s therapeutic in a lot of ways. The only thing, in fact, that I don’t like about risotto is the rice. I know; who AM I? But the rice too often gets sticky and gloppy, and if it’s not gloppy, it’s soupy but somehow still underdone, and frankly I’m over it. No, if I’m going to have something toasty and nutty but also somehow creamy and chewy, I’m going with barley.

The idea of risotto without the rice is something like ice cream without the cream: contradiction central. Here, though, the truth is in the technique: the slow, steady stirring that lets the grain release its starches and become a warm, comforting dish of welcome-to-fall-I’m-so-glad-you’re-here.

Food Blog October 2013-2721If we were going to have fall, I decided, we were going to need root vegetables. Discs and sticks and chunks of rutabagas, carrots, sweet potato, and parsnips, all gleaming with olive oil and garlic herb salt, roasted until caramelized and tender. I folded these into the barley just as it finished, then dolloped in sizable lumps of soft, creamy goat cheese, a scattering of toasted pecans, and, because if it’s worth doing it’s worth overdoing, some whole fried leaves of sage and rosemary.

Food Blog October 2013-2724Alterations apropos of the season might entail swapping out the sweet potato or carrot for hunks of pumpkin or butternut squash, and you can certainly use walnuts or even pine nuts if you don’t like pecans. But I wouldn’t skip the goat cheese. Its insistent tang is a needed foil for the mellow autumnal combination of root veggies and barley.

We ate this so fast our forks had whiplash. It is warm and hearty, certainly, and the clamor of different flavors settles together so nicely that you can’t help but keep going back for another taste. The sage and rosemary mellow as they fry, producing a toasty earthiness rather than the overwhelming pine-forest flavor you might expect.

Food Blog October 2013-2728

Root Vegetable Barley Risotto
Serves 4-6
3 medium carrots
3 medium parsnips
2 medium rutabagas
1 medium orange fleshed sweet potato
¼ cup olive oil
1-2 teaspoons salt (a nice garlic and herb salt works well here, if you have it)
½ teaspoon pepper
¼ cup chopped pecans
¼ cup butter
10 sage leaves
1-2 teaspoons whole rosemary leaves
Scant 1 cup chopped onion (from ½ a medium onion)
4-6 cloves garlic, minced
1 cup pearled barley
½ cup dry white wine
Additional salt and pepper, to taste
6 cups chicken or vegetable broth, warm but not boiling
8 oz. soft goat cheese


  • First, preheat the oven to 400F and line two cookie sheets with aluminum foil. Place the cookie sheets in the oven while it preheats.
  • Peel the root vegetables (except the onion) and cut them into discs, slices, or chunks of approximately the same size, no thicker than about ½ inch. Place them in a bowl and toss with the olive oil, salt, and pepper.
  • Spread the vegetable chunks evenly in a single layer on the preheated trays, then return trays to the oven and roast for 45-60 minutes, tossing halfway through, until vegetables are fork tender and nicely caramelized. Set aside until risotto is ready.
  • While the roots are roasting, warm the broth in a medium pot. You want it at a bare simmer at most. No more, or too much will evaporate while you wait to add it to your risotto. (It shouldn’t be cold either – this will increase the risotto’s cooking time.)
  • In a large saucepan, toast the pecans over medium-low heat until they begin to take on a caramel aroma and look lightly browned. Be careful with them; they will burn easily. Don’t take your eyes away too long. When they are toasty, remove them from the pan and set aside.
  • In the same pan, melt the butter over medium heat, then add the sage and rosemary leaves. Be careful; sometimes they will spit a bit when they touch the hot fat. Fry them for about 45 seconds, agitating the pan a little to turn them around in the butter, until they have darkened just a bit. Remove them, reserving the butter in the pan, and drain them on a paper towel. They will crisp up as they cool.
  • Again in the same pan (see how economical we are being for whoever washes the dishes in your house?!), add the chopped onion and garlic. Sweat the onions and garlic for 5-8 minutes, until the onion is translucent and the garlic smells just the way it is supposed to. You know what I mean.
  • With soft, tender onions, turn the heat up to medium high and add the barley. Stir briskly for 1-2 minutes until the barley is fully coated in butter and has toasted a touch.
  • Deglaze the pan with the white wine, stirring vigorously to detach any browned bits from the bottom of your pan (but be careful not to be too vigorous, lest you ignite your wine). Continue stirring slowly until the wine is almost completely absorbed into the barley.
  • When the pan is nearly dry, add about a cup of the broth and stir to incorporate. Let it simmer, stirring frequently, until the broth is almost absorbed. The first time you add broth, this will take 10-15 minutes. The amount of time it takes for the barley to absorb the broth will increase as you add more liquid.
  • Repeat this process, adding broth and stirring, until the barley is tender but chewy and you have added all of the broth. This will take about 45 minutes.
  • When the barley has almost absorbed the last of the broth (it will be slightly soupy, but don’t worry), add the roasted root vegetables and season to taste with salt and pepper.
  • To serve, scoop some risotto into a shallow bowl, dollop on a good portion of goat cheese, sprinkle with pecans, and top with a few fried herb leaves.

Zucchini Almond Babka

This is the time of year when people who frequent food blogs are probably looking for one of two things: simple, delicious dishes to use up lots of late summer produce, or inspiration for encroaching harvest, autumn-centered meal plans.

Food Blog September 2013-2597Sorry to disappoint.

Food Blog September 2013-2578Yes, this week’s recipe uses a good pile of zucchini, shredded into a mass of green and white ribbons, and yes, it combines the warm, welcome flavors of cinnamon, nutmeg, and brown sugar that you might expect from a really good zucchini bread. But it takes those flavors and, peevishly, wraps them up in one of the more involved sorts of bread out there.

Food Blog September 2013-2585Babka is a sweet bread, raised with yeast and stuffed with butter and eggs. Most frequently, it is filled with chunks of chocolate until it is gasping under the weight, then rolled up, twisted, folded, twisted again, piled with streusel, and then baked until it is golden and crusty and melty and decadent. It tends to be a holiday treat which, considering the quantities of butter and time that go into producing a loaf, makes good sense. Though the bread itself is most likely of Eastern European origin, it probably didn’t intersect with chocolate until the mid 20th century at the hands of some, I must say, entirely sensible and clever American Jews. I mean, bread and chocolate all in one? Yes, please!

Food Blog September 2013-2586I wanted to make a lighter version (hah). I’ve been making zucchini bread for years, and I have a recipe I like, but with this year’s focus on dough, I needed something a bit more complex. I don’t remember exactly where the idea came from, but the idea of sweet, slightly vegetal zucchini flavored with the warm spices of zucchini bread and rolled up in a sweet, doughy loaf was something I had to taste. When the recipes for zucchini babka that I found used the zucchini threads in the dough itself, rather than rolling them up in the middle, I got determined.

Food Blog September 2013-2589The biggest problem here, of course, is how watery zucchini is. My great fear was that this would produce a loaf that was overcooked on the outside but still underdone in the center, as the great leaking mass of zucchini kept things too wet to bake properly. This fear was, thankfully, unfounded. A lengthy draining session followed by a firm squeezing made the zucchini, while still quite moist, apparently dry enough to use as a filling. Paired with well toasted almonds, brown sugar, and butter, it baked into a curious, almost custard-like texture. The stubby ribbons of zucchini were still in evidence, but the edges of dough around them mellowed into beautiful creaminess, like a little central vein of bread pudding.

Food Blog September 2013-2596Is this easy? Not especially. But it will use up some of your fall harvest, and it will impress whoever it is you most want to impress at this moment. Even, perhaps most importantly, you!

Food Blog September 2013-2599Food Blog September 2013-2610

Zucchini Almond Babka
Adapted from Martha Stewart
Makes one large loaf
For bread:
½ cup milk
1 ½ teaspoons yeast
¼ cup granulated sugar
1 large egg
1 egg yolk
1 teaspoon vanilla
2 cups flour
2 teaspoons cinnamon, divided
¼ tsp nutmeg
½ teaspoon salt
10 tablespoons butter (1 stick + 2 tablespoons), divided
2 medium zucchini, grated, drained, and squeezed
½ cup brown sugar
½ cup finely chopped toasted almonds
1 egg white (use the one you separated from the yolk above)
1 tablespoon milk
For streusel topping:
½ cup powdered sugar
1/3 cup flour
4 tablespoons butter
½ teaspoon cinnamon


  • First, prep your zucchini: grate it with the large holes on a box grater and set it in a colander, preferably lined with cheesecloth or a paper towel, so it can drain while you mix up the dough.
  • Heat milk in a small bowl until just warm to the touch. Sprinkle yeast over milk and let it stand until it is foamy and smells like bread; about 5 minutes.
  • In a bowl, whisk together the granulated sugar, the egg, the egg yolk, and the vanilla. Add egg mixture to the yeast and milk, whisk to combine.
  • In the bowl of an electric mixer fitted with the paddle attachment, combine the flour, 1 teaspoon of cinnamon, nutmeg, and salt. Add the egg mixture, and beat on low speed until the flour is mostly incorporated and forms a shaggy, craggy mass. This should take about 30 seconds.
  • Switch from the paddle attachment to the dough hook. Add 6 tablespoons of butter one at a time in 1-inch chunks, beating until incorporated after each addition. The dough will come together briefly, then fall apart into wet bits, and then come together again into a smooth, elastic, rich dough. This should take about 10 minutes.
  • Turn the dough out onto a lightly floured surface and knead a few times until it is smooth. It will feel moist and elastic against the heels of your hands.
  • Butter or oil your mixing bowl and place the ball of dough back into it, turning the dough to coat it with fat on all sides. Cover the bowl with plastic wrap and set it aside to rise for about 1 hour. During this time, it should double in bulk.
  • When your dough is almost done rising, squeeze your drained zucchini to eliminate as much water as possible, then combine the zucchini, brown sugar, remaining 1 teaspoon of cinnamon, and 4 tablespoons of butter in a small bowl. Stir or smoosh these together, then set the mixture back into a colander to drain again.
  • Butter or oil a 9×5 inch loaf pan and line it with parchment paper if desired. Beat the remaining egg white with milk and set it aside.
  • Gently punch down the dough by pressing your fist into the center. It will depress as the air releases. Set it on a generously floured surface and let it rest for 5 minutes.
  • Once dough has rested, roll it out into a 16-inch square; it should be about 1/8 inch thick.
  • Brush edges of the dough with the egg wash. Distribute all but about 2 tablespoons of the zucchini mixture evenly over the dough, leaving a ¼ inch border.
  • Roll the dough up tightly like a jelly roll, enclosing the zucchini mixture inside. Pinch ends together to seal. Twist 5 or 6 times.
  • Brush the top of the roll with egg wash, then carefully crumble the remaining 2 tablespoons of zucchini mixture over the left half of the roll, being careful not to let it slide off. Fold the right half of the roll over onto the coated left half. Fold ends under, and pinch to seal. Twist the roll 2 turns, and fit it into the prepared pan. This may make a bit of a mess, but be bold. It will all work out.
  • Heat your oven to 350F and prepare your streusel by combining the powdered sugar, flour, butter and cinnamon together in a small bowl. Two forks work well for this, but your fingers work better.
  • Brush the top of the loaf with egg wash, then crumble the streusel topping over it. You may have some extra, but don’t be afraid to load it up.
  • Loosely cover the loaf with plastic wrap and let it stand in a warm place for 20-30 minutes while the oven heats up and the loaf swells again.
  • Bake the loaf, rotating it halfway through if possible, until it is golden on top. This will take about 55 minutes. Lower the oven temperature to 325F and continue baking until the loaf is deep golden, 15 to 20 minutes more.
  • Remove from oven, transfer to wire rack until completely cool before you attempt to remove it from the pan and cut it into thick slices to serve. Beware: removing it from the pan and slicing too early will result in a failure in structural integrity! Be sure to let it cool.


Fig and Walnut Swirl Bread

As I continue to write this blog, I think a lot about the kind of person I am, and the kind of person I seem to be becoming.  I don’t mean this necessarily in a deep, philosophical or metaphysical way (although sometimes those things collide in the expanding corner of brain-space I use to think about food), but in a “what sort of food person am I?” kind of way.

Food Blog June 2013-1596Example: probably about five years ago, I wanted to make fried rice but didn’t have one of those seasoning packets, not even when I dug all the way to the back of my pantry (I can hear you gasping in horror that I ever had one in the first place.  What can I say?  We all have guilty secrets about one thing or another), so I tossed a few things together and ended up with a sauce we really liked.  I haven’t bought one of those seasoning packets since.  From there, I added different spices, different quantities, different ratios of garlic and ginger… and suddenly the bags of frozen stir-fry vegetables we were tossing in weren’t good enough anymore.  Fresh vegetables were now a mandate.  Fried rice used to be a quick and easy dinner!  Now it’s a totally from scratch undertaking.  And that’s the kind of (food) person I am becoming.

Food Blog June 2013-1545Example two: I used to subscribe to a number of cooking magazines.  Though I let my subscriptions run out (their cost made them an unjustifiable luxury during graduate school), I continued to use the collection I’d amassed, restricting myself to cooking recipes only from the current month’s issue: no August recipes in April.  This was an attempt to keep myself seasonal and inspired.  Well, this year it stopped working.  As each new month began, I’d eagerly flip through the appropriate month’s issue looking for something to excite me and drive me into the kitchen.  I’d close each issue with a sigh and toss it to the side.  There were many, many recipes I hadn’t tried before, but there just wasn’t anything in there that felt inspiring anymore.  Well, almost.  Once in a while, I’d find a recipe that I’d consider for a moment and then turn to N. and say something like, “this might be good, if you made it into a pasta dish instead of a sandwich and added some sundried tomatoes and herbed goat cheese.”  And I’d do it, and we’d be pleased with the result.

After a few months of this sort of thing, interspersed with a probably indecent amount of complaining about how I was bored by these recipes, N. finally turned back and said, “I think you’ve leveled up.”  Translation: your imagination has moved beyond what these magazines offer and you are now on to bigger and (we hope, for the sake of our taste buds) even better dishes.  And that’s the kind of (food) person I am becoming.

Food Blog June 2013-1552Example three: since I’ve started baking bread, I’ve been trying to plan meals around a yeasty undertaking once a week or so, to keep myself in practice and find “the best” versions of each type of baked good I undertake.  This has resulted in a development I’m not sure I’m entirely comfortable with: though I have continued to buy a weekly loaf of bread (I really like, oddly enough, the plain old sourdough loaf the bakery department at my grocery store produces) when I go shopping, I haven’t bought hamburger buns, or pie dough, or pizza dough, since beginning this little dough experiment.  Am I really the kind of person who no longer considers store-bought burger buns acceptable?  I’m not sure I’m ready for that kind of commitment, but that seems to be the kind of (food) person I am becoming.

Food Blog June 2013-1543Does that make me a snob?  Maybe.  It certainly makes me one of those “oh, I just made it by hand” kind of people you sometimes feel inclined to secretly snarl at.  But no one in the direct friendly fire of these developments is complaining, so maybe it’s not entirely a bad thing.

Food Blog June 2013-1549But it does make things more complicated, and more difficult to achieve, sometimes.  Like when I decided I really wanted cinnamon-raisin bread for breakfast, but instead of picking up a pre-packaged loaf as we shopped, I was determined to make it myself.

And then I forgot to buy raisins.

What’s a girl to do, with the plan in her head and the taste already in her brain and the soft chew of homemade bread aching in her teeth?

Food Blog June 2013-1555Well, she chops up some figs, and some well-toasted walnuts, and some hazelnuts for good measure, because she was almost out of walnuts.  She whirls together a soft, supple dough laced with brown sugar, cinnamon, and sour cream.  Nutmeg and lemon zest find their way in.  And she rolls up a crunchy crumbly sweet layer of fruit and nuts inside the dough, twists it to dispense the swirl, and lets it rise into a triumphant bulging loaf.

Food Blog June 2013-1564Food Blog June 2013-1569Food Blog June 2013-1570Food Blog June 2013-1573And what results, after it’s been rubbed with butter and cinnamon sugar for good measure and baked until golden and puffy, is something that drives standard cinnamon-raisin bread straight out of her mind.

Food Blog June 2013-1583The sour cream adds a beguiling richness to this loaf, making it almost unnecessary to add a slick of butter or cream cheese to a breakfast slice.  The figs and walnuts are a pleasingly earthy combination, and though I wasn’t crazy about the lemon zest I added at the spur of the moment, you might like the brightness it brings to the filling.

Food Blog June 2013-1594So.  Food snob?  Maybe.  But really, when you’re sitting down to breakfast with a loaf of homemade, fig-filled bread, your mouth is probably too full to complain.

Food Blog June 2013-1592Fig and Walnut Swirl Bread
makes 1 large loaf
For dough:
2 tsp yeast
½ cup warm milk
1 egg
1 tsp vanilla
¼ cup butter, very soft, or melted and cooled
¼ cup sour cream (go on and use the full-fat stuff; don’t deny yourself on such a little bit)
1 tsp salt
1 tsp cinnamon
¼ tsp nutmeg
2 – 2 ½ cups bread flour (see instructions below)
For filling:
½ cup toasted walnuts, chopped, or a mixture of walnuts and hazelnuts
(zest of 1 lemon – optional because I didn’t love it, but you might!)
¼ cup melted butter
¼ cup brown sugar
1 cup chopped dried figs (I like black mission figs, myself)
For topping:
1-2 TB butter, melted or very soft
2 TB brown sugar
1 tsp cinnamon


  • Stir the yeast into the warm milk and let it sit for 5 minutes or so to allow the yeast to wake up.  It will begin to get bubbly and smell warm and bready.
  • While you wait for the yeast, plonk the ¼ cup softened butter, the sour cream, the egg, and the vanilla into the bowl of a standing mixer (or into a large mixing bowl).
  • Add the yeast and milk mixture to the combined wet ingredients and mix them together briefly using the paddle attachment, just enough to combine things and break up the egg (if you are not using a stand mixer, an electric handheld or some elbow grease and a whisk will do nicely here).
  • Add the brown sugar, spices, salt, and 2 cups of flour.  Using the paddle attachment (or a sturdy wooden spoon if you aren’t a stand mixer sort of person), mix just until the flour is moistened and you have created a lumpy dough.
  • Switch to the dough hook (or turn your dough out onto a well floured board) and knead for 5-7 minutes.  The dough will be very sticky – we’ve added a lot of fat and a lot of moisture.  Don’t despair.  Add more flour a tablespoon or two at a time just until the dough cooperates (up to 2 ½ cups of flour, though depending on the relative humidity of the day, you might not need that much).  It will still be a bit sticky, but it will become more elastic and supple and much easier to work with.
  • Once your dough is smooth and stretchy and a bit springy, plop it into a greased or oiled bowl, cover it with plastic wrap, and set it aside in a warm place to rise for 90 minutes, or until doubled.
  • Meanwhile, prepare the filling: in a small bowl, combine toasted nuts, figs, brown sugar, and lemon zest, if using.  Melt the ¼ cup butter to prepare for glossing the dough.
  • Once doubled, punch down the dough to release trapped gas by gently deflating it with your fist.  Turn it out onto a floured board and roll it into a rectangle the width of the long edge of your loaf pan and about twice as long.
  • Now it’s time gloss the dough and add the filling.  Dribble the melted butter over your rectangle of dough and rub it all over the surface, right out to the edges.  I’m calling this “glossing” the dough because it leaves everything shiny and glossy and gleaming.  You might have a little extra butter; save it for the topping.
  • Sprinkle the dough with the fig and walnut mixture, leaving an inch or so border on all sides to prevent overflow.  You will likely have extra.  That is a most excellent thing because it goes so well with oatmeal or with Greek yogurt.  Instant snack.
  • Starting on the shorter side of your rectangle (the side that is the same length as your loaf pan), begin to roll up the dough as you would for a jelly-roll, starting with the middle and moving out to the sides.  Continue rolling until all the filling is enclosed, and then fold up the remaining, bare edge and pinch it firmly against the roll to create a seam.
  • Twist your log of dough a few times to ensure that a pretty swirl of filling is formed as it bakes, then settle it into a buttered or greased loaf pan.
  • Rub the top of the dough with soft or melted butter, then sprinkle it all over with the brown sugar and cinnamon.  Cover it lightly with greased plastic wrap and set it aside to rise again for 30 minutes.
  • During this second rise, preheat your oven to 375F.  When the dough has had half an hour to collect itself, remove the plastic wrap and bake it for 35 minutes, or until the bottom sounds hollow when thumped or the internal temperature is between 180-200F (the thump test is the standard way of checking for doneness on bread, but it seems sort of impossible when you are baking a big loaf in a loaf pan.  I prefer to take its temperature).
  • When it tests done, using whatever is your favorite method, remove it from the oven and let it cool for at least twenty minutes in the pan.  This will allow the structure to firm up so it slices nicely, rather than collapsing and squashing into itself when you so much as approach it with a serrated knife.
  • Slice and consume.  The filling can be a bit crumbly, so we ate it with forks like a slice of yeasted coffeecake.  Enjoy!