Apricot Bourbon Barbecue Sauce

Food Blog September 2014-0579I wasn’t expecting that a barbecue sauce would be one of the dozen pourable concoctions I developed this year. Call me a snob but, barbecue sauce? It just seems so… pedestrian. Break out a bottle, squeeze it over some drumsticks, and reach for the wet-naps.

Food Blog September 2014-0570But that’s exactly what happened. Faced with a summer that just won’t end (upper 80s/low 90s predicted for the first weekend of October. October, people!), we couldn’t bear to waddle back to the butter-laden list of French classics. Brimming from the success of last month’s gastrique, I found myself continuing to think about fruit-based sauces – at once sweet and tart and deep in flavor from long simmering – and realized that barbecue sauce is, at its core, something like a gussied-up gastrique. There’s almost always a molasses or brown sugar component, and there’s usually vinegar of some kind, even if that is hidden within one of the most ubiquitous barbecue sauce ingredients of all: ketchup.

Food Blog September 2014-0575I’ve never been a huge fan of ketchup, so I decided to steer clear of it here and build my own collection of flavors. I’d been considering the merits of combining the flavors of apricot and bourbon, and what better place to do that than in a sticky, bubbly sauce, well-spiced, just aching to be brushed gently over some lucky poultry? Deeply caramelized onions, a squeeze of dijon mustard, a whisper of cayenne, and some cider vinegar joined the party, and then, because the richness and depth of concentrated tomato is such an expected note in this sort of sauce, I gave in and added some tomato paste for verisimilitude.

Food Blog September 2014-0573The important thing about this sauce is the time you give it. The onions must be cooked down and toffee colored. The simmer must last at least twenty minutes – I did mine for thirty before I was satisfied. The thick, slightly lumpy result can be used as is, or you can give it a quick whir with an immersion blender or standard blender to make a glossy, velvety smooth glaze you’d eat just as happily on a piece of toast as on a grilled chicken breast or pork chop (at least, if you’re me). I briefly considered using fresh apricots here rather than preserves, but since the prep time already promised to be the better part of an hour, I decided to take just one shortcut. Besides, the sweetness quotient in fresh apricots is unpredictable, and dealing with their thin, impatient skins did not sound like a welcome addition to my weekend plans. The guaranteed sticky thickness of a pectin-laced jar of preserves was the kind of guarantee I wanted.

Food Blog September 2014-0576It should not come as a surprise that apricot and bourbon, balanced against a meaty tomato backdrop and laced with just enough spice, are a beautiful match. The chicken thighs we lacquered this onto never stood a chance. Neither would pork, or salmon, and I’d even venture that with a splash of soy sauce, this could make an interesting adaptation of teriyaki to sauce a bowl of perfectly steamed rice and veg. What’s more, even though it’s still summer here, the blend of fruity sweetness and dark caramel from the bourbon make this sauce a lovely offering for fall as well, if you are lucky enough where you are to be watching the seasons shift.

Food Blog September 2014-0582

Apricot Bourbon Barbecue Sauce
Makes 1 cup (will generously sauce 6-8 chicken thighs)

3 tablespoons olive oil
1 cup finely diced onion (about ½ a large onion – I like the purple ones)
1 teaspoon dijon mustard
1 tablespoon tomato paste
½ cup apricot preserves
½ cup bourbon + 1 tablespoon, divided
¼ cup water
1 tablespoon cider vinegar
½ teaspoon salt, or to taste
¼ teaspoon black pepper, or to taste
¼ teaspoon cayenne pepper, or to taste
6-8 boneless chicken thighs or desired protein


  • In a 10-12 inch skillet, heat the olive oil over medium heat and add the finely diced onions with a pinch of salt. Slap on the lid and cook for 10-15 minutes, stirring occasionally, until the onions are nicely caramelized. Lidding the skillet will help the onions brown faster while allowing for less burning.
  • When the onions are caramelized to your liking (deeper brown = deeper flavor), add the tomato paste, mustard, and cider vinegar and stir through. Then add the apricot preserves, the water, the salt and the black and cayenne peppers.
  • Remove the skillet from the heat and add the ½ cup of bourbon (reserve the remaining 1 tablespoon for later). We are doing this off the heat to prevent an accidental flame-up; alcohol can and will catch on fire!
  • Stir all ingredients together, bring to a simmer, and reduce the heat to low.  Simmer, stirring occasionally, for at least 20 minutes (but 30 is better).
  • When sauce is thick and shiny, remove from heat and cool to room temperature. Puree if desired for a smooth consistency, then stir in the remaining 1 tablespoon of bourbon.
  • To use, season your chicken thighs to your liking (maybe just salt and pepper, maybe a fancy spice rub). Preheat your grill to high heat and oil the grates.
  • Add the chicken thighs to the grill, spreading them out for faster, more even cooking, and brush the exposed side with the sauce. Close the grill lid and cook, undisturbed, for 5 minutes.
  • After 5 minutes, flip the chicken over, brush with more of the sauce, and close the lid to cook for another 5 minutes.
  • With a clean brush, slick the chicken one more time with the sauce and cook for a final 1 minute, just to get the surface really sticky and glazed and good. Serve hot, with whatever you deem best for a barbecue. For us, that meant potato salad and corn on the cob.

Chicken Salad on Smashed Avocado Toast

I do a lot of complicated, multi-step recipes here. There are reasons for this, of course. One is that I want to keep things interesting. I mean, there are millions – possibly billions – of “easy” recipes out there, boasting 5 ingredients or less, 10 minutes or less, all pantry or store-bought items, one-pot, you name it. But I figure, how many 5-ingredient-chicken-and-veggie-casseroles does the internet need? If I’m going to cook for you, I want it to be fresh and intriguing. Sometimes that means embracing complexity.

Food Blog June 2014-3758The other, more important reason, is that I want to challenge myself. It’s all very well to master a dish, and I like that. But after a while, I get bored. I need something new, to keep my taste buds and my fingers and my mind nimble. I chose to become a professor, which means I work to teach. But I couldn’t have embarked on this career without being a bit of an eternal student, which means I want to learn. That’s why I do these annual projects here – exploring dough, whisking away at a sauce a month. To keep myself enthralled and improving, I have to tackle new challenges.

Food Blog June 2014-3731These challenges find their way to you, most of the time, after some finagling and practicing. Usually I get an idea, fiddle with it, add and subtract and mess and annotate, and out comes a recipe that I post here. It’s not often that I throw together some depth-of-the-fridge ingredients and produce something I consider blogworthy.

Food Blog June 2014-3734But “not often” isn’t the same as never. A few weeks ago, as a heat wave rendered Los Angeles practically immobile (or maybe that was just my un-air-conditioned living room), I dragged myself to the kitchen to (I hoped) find something reasonably delicious to throw together for dinner that didn’t involve the oven or the stove. Great expectations, no?

Food Blog June 2014-3741What we ended up with was a dinner that made our eyebrows climb, and almost immediately we were thinking about when we would have it again. And as sometimes happens, it was just what I had, layered together into something great. Chicken salad. Toast. Avocado smashed with extravagant quantities of lemon juice and raw garlic. Layered and mounded into an open-faced sandwich as at home on a picnic blanket as on your dining room table. So bright and fresh! Satisfying but so light and summery! And, if you have had the presence of mind to make your chicken salad the day before (or, if you’ve got a deli you love, bought some), assembly requires all of five minutes with minimal application of heat. Oh, and if you find yourself in need of a way to use up some homemade mayonnaise, this is your salad.

Food Blog June 2014-3743This is a summer dinner you need to make. And then make again. Because really, complexity is fun, but sometimes simple is just right.

Food Blog June 2014-3750A few extra thoughts: the lemon and garlic smashed avocado is currently my food crush. It’s great with the chicken salad, but it would also be spectacular (and really quite aesthetically lovely too) underneath thin slices of hard boiled egg or smoked salmon. Or, you know, just plain on toast. Or to dip chips into. Or a spoon.

Food Blog June 2014-3747I’m also thinking you could quarter your toast slices, or even cut them into long, skinny toast soldiers, before loading them up, to make sweet tea sandwiches or easy hors d’oeuvres for a bridal or baby shower.

Food Blog June 2014-3753Finally, and this is not about chicken salad or avocado, if you have an iPhone, you should ask Siri “What does the Fox say?” Then you should ask her again. It could well be that I’m the last person on the planet to know about this, but still. You’re welcome.

Food Blog June 2014-3763

Chicken Salad and Smashed Avocado toasts
Serves 4
Much about this recipe is to your liking. More or less mayonnaise, more or less salt, a few extra grinds of pepper, a squeeze or two less lemon juice – use your taste buds and find out what you like best. These are suggested quantities that we found we liked enough to want to tell you about it almost immediately.
For the chicken salad:
4 boneless skinless chicken breasts, patted dry
2 tablespoons olive oil, divided
1 teaspoon salt
½ teaspoon pepper
⅓ cup finely sliced green onions (from 3-4 green onions)
⅓ cup celery, stalks halved or quartered lengthwise, then finely sliced (from 1-2 stalks)
2 tablespoons finely chopped fresh dill
2 teaspoons lemon zest
2 teaspoons Dijon or whole grain mustard
2 tablespoons roughly chopped capers
¼ cup mayonnaise, or to taste (for us, 6 tablespoons, or ¼ cup plus 2 tablespoon, ended up being perfect)


  • Preheat the oven to 350F.
  • Use 1 tablespoon of the olive oil to grease a 9×9 inch square baking dish.
  • Sprinkle the chicken breasts with the salt and pepper on both sides, then nestle them into the pan in a single layer. Drizzle the remaining tablespoon of olive oil over the chicken.
  • Bake for 45-60 minutes or until juices run clear and flesh reaches an internal temperature of 165F. You know, fully cooked chicken. Remove from oven and cool completely.
  • While the chicken cools, assemble and prep the other ingredients. Place the green onions, celery, dill, lemon zest, mustard, and capers in a large bowl and toss together with a fork.
  • When the chicken is cool, shred or cube it. I prefer my chicken salad shredded. To do this, place one chicken breast on a cutting board or a plate. Stab two forks, backs facing each other, into the chicken and pull them away from each other to shred it. Or, if you prefer, stab the chicken with one fork and hold it stationary, while you drag the other fork through the meat to create shreds. See photos above.
  • Add the cooled, shredded (or cubed) meat to the bowl with your other ingredients.
  • Add the mayonnaise and toss with the chicken and vegetables to combine thoroughly. Taste for seasoning, and adjust as desired. Be careful, though: the smashed avocado gets salt of its own, so don’t overdo it on the sodium here unless you are a salt fiend.


For the toasts:
8 slices sourdough bread (2 slices per person; thick sliced would be lovely)
2 whole avocados
2 tablespoons lemon juice
¼ teaspoon black pepper
4 cloves garlic
½ teaspoon coarse salt
Handful of arugula or spinach leaves, optional


  • Toast your bread in a toaster or under the broiler until nicely golden. While it toasts, halve your avocados, remove the pits, and put the flesh in a small bowl. Add the lemon juice and pepper.
  • Peel and finely chop your garlic cloves. When they are well minced, sprinkle them with the ¼ teaspoon coarse salt. Using the flat of your knife, drag it across the garlic and salt, applying firm pressure. The idea here is that the salt will act as an abrasive, breaking down the garlic into a paste to make it less aggressive (biting into a chunk of raw garlic is an adventure, but not always a fun one), and to help it integrate more easily into the avocado. Repeat until the garlic becomes a pulpy, juicy paste.
  • Scrape the salted garlic paste into the avocado bowl, and smash the ingredients together with a fork into a chunky green mass. Delicious. Taste for seasoning and adjust to your liking, remembering that the acidity will be cut a bit when you add the toast and chicken salad components.
  • To build these open-face sandwiches, for each slice of toast, spread a few tablespoons of smashed avocado all the way out to the edges, scatter a few fresh arugula or spinach leaves over it, if desired, and then spoon ¼ – ½ cup chicken salad on top in an even layer.
  • That’s it! Serve up. Enjoy.

Pot Pie Empanadas with Cheddar Crust

Food Blog March 2014-3536Unless you are feeding a large family, or your small family is a bunch of sauce junkies, chances are if you make something like the velouté I shared last week, you are going to have some leftovers. Mine worked out to just under a cup of sauce (you will probably have a touch more – I oversauced my chicken a bit because I was taking photos of the stream of velvet I was pouring), which was clearly too much to trash but, it seemed, not enough to do much with. True, I could have just warmed it up again and scarfed another cutlet, but that didn’t seem very original. Additionally, this sort of flour-thickened sauce doesn’t always reheat particularly well – think about the resolute globs of leftover Thanksgiving gravy. It was going to need some help.
Food Blog March 2014-3537Food Blog March 2014-3543When I thought velouté, I thought pot-pie. However, a mere cup of sauce didn’t seem like enough. Smaller quantities of sauce would require smaller packages. I’ve been tossing around the idea of hand-pies for a while (see what I did there? Yeah.), and suddenly it became clear that this final bit of sauce would become the base for the filling of pot pie empanadas, spiced up with chunks of cheddar cheese in the crust.
Food Blog March 2014-3513Food Blog March 2014-3515Yes. This was happening.

I think every culture has a snack food created by enclosing a savory little morsel in a puff of dough. Samosas, gyoza or pot-stickers, pierogies, Cornish pasties, think about it. For Spain, and for Central and South American cuisines, empanadas are that snack. A tumble of meat, cheese, and spices (with the occasional vegetable – a few summers ago I had a spectacular one filled with cheese and fresh spinach) wrapped up in a lovely soft dough that is sometimes baked but more often lovingly tipped into the deep fryer: it’s quite possibly my dream food.
Food Blog March 2014-3524Food Blog March 2014-3526Food Blog March 2014-3528And here I was about to Americanize it beyond belief. The leftovers of my grad school training screamed things at me about colonization and cultural appropriation, but I swatted them down. It’s improving the classic by acknowledging and incorporating a new angle. Yeah.

And it was so worth it.

The dough here is baked, not fried. I don’t have a deep fryer, and to be honest, crammed with cheddar as it was, the crust did not provide the most airtight of seals. I would have been nervous about dropping these into hot oil.
Food Blog March 2014-3519Food Blog March 2014-3522There’s nothing to be nervous about when it comes to the taste, though. You can stuff these with whatever you’d like in a pot pie, meats or vegetables. I opted for potatoes, carrots, a few mushrooms, green onions, a breath of garlic, and some green beans that had been in my fridge for a touch longer than they should have. A bit of shredded up chicken breast completed the pot. These get cooked in the leftover velouté with a splash of white wine (and a bit of water, if you feel there isn’t enough liquid) until they are tender, then, once they are cool, jammed a mere tablespoon at a time into circles of sticky but pliable dough. A quick fold, a squeeze, and a crimp with the tines of a fork, and they are ready to bake.
Food Blog March 2014-3529Food Blog March 2014-3532I had designs on serving these alongside a salad for a balanced meal, but we never made it to the salad. We just ate these, burning our fingers and our tongues as we picked up one and another and another. These are pot pies for crust lovers. The dough becomes rich and crisp and flaky, and the cheddar cheese is, I have to admit, a bit of a stroke of genius. It’s a perfect little package, and writing about it now, I desperately want another.

Sometimes leftovers are better than the original. This, friends, is one of those times.

Food Blog March 2014-3534Cheddar dough
Makes enough for 18-20 empanadas, if re-rolled once or twice
2 ¼ cups all-purpose flour
½ teaspoon salt (this doesn’t seem like much, but the cheese is salty and the filling will be seasoned)
8 tablespoons very cold butter (1 stick), cut into cubes
½ cup extra sharp cheddar cheese, cut into cubes
1 egg
⅓ cup ice water
1 tablespoon vinegar

  • Dump the flour and salt into a food processor and pulse once or twice to mix them.
  • Add the cubes of butter and cheese and pulse 4 times for 3 seconds each. This seems fussily precise, but it worked very well.
  • In a small bowl, beat the egg lightly with the water and vinegar. Add to the food processor and pulse once or twice until the mixture comes together in large clumps. You’ll know it’s ready when it stodgily mashes against the side of the processor bowl, reluctant to whiz in circles anymore.
  • Turn this mixture out onto a large square of plastic wrap. Using the plastic wrap to help you, form it into a disc 5 or 6 inches in diameter, then wrap up and refrigerate for at least 60 minutes. This will allow the flour granules to absorb some of the liquid and fat, which makes for easier rolling, and the butter (and cheese) to firm up again, which makes for better texture.
  • While the dough chills, make the filling.

Pot pie filling
These quantities may not seem like enough, but remember, you are using only minute quantities of filling for each empanada. Overfilling dumplings is somewhere in the top ten of my frequent cooking mistakes, so trust me. You will have plenty.
2 tablespoons butter
1-2 cloves garlic, finely minced
2 green onions, thinly sliced in little moons
3-4 mushrooms, diced
2 small carrots (or one large), diced
1 small Yukon gold potato, diced
6 green beans, stems removed, sliced into ½ inch pieces
½ cup cooked shredded chicken
¼ cup white wine
1 cup velouté
Salt and pepper, and herbs of your choosing, to taste

  • In a saucepan, melt the butter over medium heat, then add the garlic, onions, and mushrooms. Cook, stirring occasionally, until the mushrooms begin to brown, 5-8 minutes.
  • Add the potatoes and carrots, stir to combine.
  • Add the wine and velouté. Season with salt and pepper, if needed, and any herbs you feel inclined to add. Simon and Garfunkel’s usual suspects would certainly be welcome.
  • Cook over a healthy simmer until the carrots, which will likely take the longest, are almost tender. If the pan looks dry, add a little water or chicken broth. Depending on how small you have cut the vegetables, this could take anywhere from 10-20 minutes. Mine took about 15.
  • When the carrots are almost tender, add the green beans and simmer until they are just losing their raw crunch.
  • Kill the heat and add the shredded chicken, then let the whole mess cool to room temperature.

To assemble and bake:

  • Preheat the oven to 425F and spray two baking sheets with non-stick spray or line them with parchment paper.
  • Remove the dough from the refrigerator and unwrap it on a floured board. Using a rolling pin or a straight-sided wine bottle (it totally works!), roll it out into a rectangle or oval about ¼ inch thick. With the floured lip of a glass, a jar mouth, or a biscuit cutter, cut out into 4-inch rounds. When you cut, to avoid extra stickiness or tearing the dough, press straight down without twisting all the way through the dough. Once you have cut all the way through the dough, then you can twist the cutter a bit to loosen the round from the board.
  • Once you have made all the circles you can with the dough, gather up the scraps and roll them out again. One or two re-rollings should produce 18-20 dough circles.
  • Add about 1 tablespoon of the cooled filling to each round of dough. You will be tempted to add more. Don’t do it! A solid 1 tablespoon is about all that can fit without making a tremendous mess.
  • As you place each tablespoon of filling in the middle of the dough round, fold it in half and press the edges together with your forefinger and thumb. To seal each little half-moon package, set it down on the floured board again and press down on the edges all the way around with the back of the tines of a fork. This really crimps it closed, but it also looks pretty, which I’m a fan of.
  • Settle each empanada on your prepared baking sheet. They aren’t going to spread, so they don’t need too much room in between them, but you don’t want them touching each other. Each needs to get the full oven experience without its neighbors interfering.
  • Bake in your preheated 425F oven for about 20 minutes, until the crust is golden and crisp to the touch, and any filling that has had the misfortune of leaking out is bubbling assertively.
  • You will probably need to let these cool for 5-10 minutes before eating. Just enough time to, if you’re feeling virtuous, toss together a quick salad. Or, you know, not.

Project Sauce: Veloute with “Blue Plate Special”

I am realizing, as I continue this sauce project, how few of the sauces I’m examining are used “as-is.” Most, including this month’s velouté – the last of the flour-thickened sauces I’ll explore (next month we move on to eggs. I’m scared!) – are made as a base. They are, after all, “mother” sauces, so called not just because they are quite common, but because they are literally mothers: foundations that give birth to more complex sauces.

Food Blog March 2014-3496Velouté is very similar to béchamel, with the exception that here the roux (butter and flour cooked together) thickens a stock or broth, not milk. The stock in question is most commonly chicken or fish stock, which also tells you with which products it is most frequently served. To be technically correct, the stock or broth is supposed to be “white,” that is, made with bones that have not been previously roasted. However, I wasn’t about to make a special batch of stock just for this application, so I dug into my freezer and emerged with some icy golden goodness I’d made from roasting a chicken some months ago. Not exactly traditional (I so rarely am, after all), but manageable for our purposes.

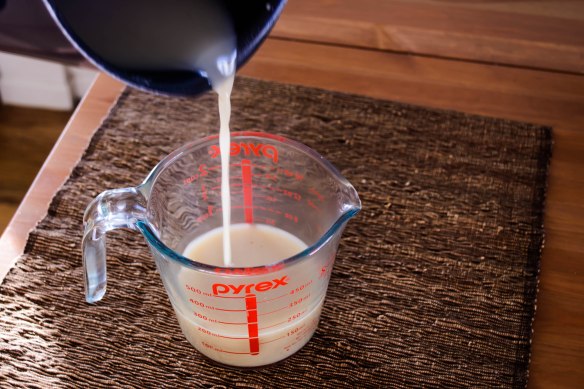
Recipes for velouté vary slightly on particulars. Some begin with mire poix (a French vegetable base consisting of diced onions, carrots, and celery), some recommend herbal accompaniments, some advocate finishing the sauce with a splash of cream, and the quantities of salt and pepper a cook should add differ depending on whose authority you accept. Some recommend adding heated stock to the roux, some call for the roux to be plopped into the heated stock. Either way, you essentially make a roux, combine it with the stock, whisk assertively to banish lumps, and settle in for a long, slow simmer during which time the sauce reduces, thickens, and develops flavor. Velouté means “velvet,” and when your sauce is done simmering you will understand why: it is so silky and fluidly pourable and soft. Mine was a pale matte gold, not quite thick enough to coat the back of a spoon, but sufficiently concentrated to pour in a solid stream rather than a liquid dribble. It smelled incredible – rich and meaty and flavorful – like midafternoon on Thanksgiving, the first time you open the oven to let the turkey aroma escape.

Food Blog March 2014-3486Yet for all its depth of flavor, prolonged cooking time, and high heritage, I couldn’t help but feel comforted by this sauce. There is something fundamentally homey and familiar about it. I realize Escoffier, the father of modern French cooking, will roll over in his grave when I write this, but it’s basically a simple gravy.

In restaurants, it was traditional to have a pot of velouté simmering away, ready to be dipped into to create more complex sauces and flavor bases. I wanted to keep things simple and pure, though, to really understand the sauce and its flavor, so I only made a slight adjustment.

I’ve got two recipes for you. This week, I’m celebrating velouté for its simplicity. Next week I’ll share a preparation that turns this rich, velvety sauce into something a bit more complex, but superbly tasty and comforting.

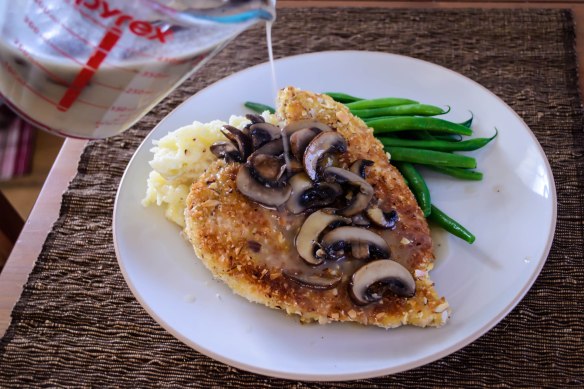
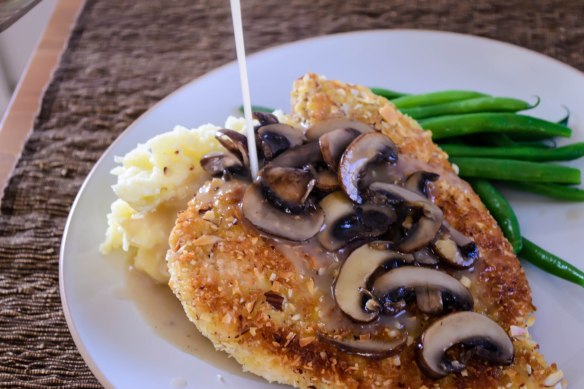
Food Blog March 2014-3493For the first, capitalizing on velouté’s similarity to a simple poultry gravy, I considered meals that incorporate such a familiar staple, and ended up with a sort of blue plate special: crispy chicken cutlet, buttery smashed potatoes, and lightly steamed green beans.

I often try to trace my thought process as I put dishes together, since the influences I’m incorporating aren’t always obvious. One of the derivatives of velouté is called sauce allemande, which includes egg yolk and mushrooms added near the end of the cooking time. To give this a nod, I decided to incorporate sautéed mushrooms to my sauce. Leery of the egg yolk idea, though, I transferred it to my chicken instead, dusting the breasts with flour and then dipping them in beaten egg before giving them a crisp coating. The mushrooms reminded me of my mom’s rice pilaf, which includes sautéed mushrooms and toasted almonds. Almonds seemed like a good pairing for the chicken, so I chopped them fine and combined them with panko. Almonds are equally nice with green beans, as are mushrooms, so the dish was starting to look cohesive, especially once I imagined my fragrant sauce kissing the whole thing.

Food Blog March 2014-3481Food Blog March 2014-3482Deep and rich thanks to its prolonged simmer, and silky smooth from the flour granules just bursting with all that liquid, this velouté made me realize why the judges on Chopped (don’t laugh, it’s my favorite guilty pleasure show) are always on about how important it is to have a sauce accompanying your dish. This enhanced all of the existing flavors on our plates. I kept going back for different combinations: sauce with chicken, chicken and sauce with potatoes, potatoes and sauce with green beans. All good. It really, as the Dude might have put it, tied the dish together.  Food Blog March 2014-3495

Basic Velouté
Makes about 2 cups
2 tablespoons butter
2 tablespoons flour
3 cups chicken stock or broth
Salt and pepper to taste
1 cup sliced, sautéed mushrooms


  • Heat the broth or stock in a medium saucepan until it comes to the barest simmer.
  • In a small skillet, melt the butter. When it is just melted, sprinkle in the flour and immediately combine with a whisk. I find sprinkling the flour around the skillet, rather than dumping it all in one place, makes for easier combining.
  • Cook the butter and flour together for a minute or two, whisking the whole time, until it takes on the consistency of a loose paste. You’ve now made a blond roux – minimal color, but maximum thickening power.
  • Either scrape the roux directly into the warm stock, or pour the stock slowly into the pan with the roux. Either way, whisk constantly to prevent clumping.
  • Simmer over low to medium-low heat for 30-45 minutes, whisking frequently to break up any lingering clumps or surface residue, until the liquid is slightly thickened, rich, and smells meaty. During this time, it will reduce by about a cup, leaving you with approximately two cups of sauce. You really do need to cook it for this long to achieve the desired consistency and depth of flavor.
  • Season with salt and pepper to taste.
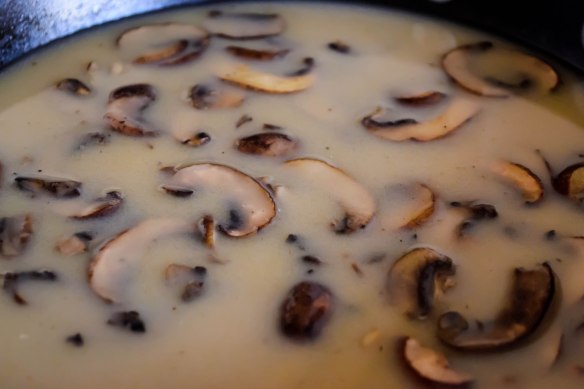
  • Just before serving, stir in the sliced, sautéed mushrooms and warm through.


Sauce Velouté with “Blue Plate Special”
Serves 2
2 chicken breast cutlets (thin cuts of boneless, skinless chicken breasts)
1 cup flour
½ teaspoon salt
¼ teaspoon pepper
½ teaspoon garlic powder
1 egg
1 cup panko bread crumbs
½ cup sliced almonds, finely chopped
Olive oil, to cook chicken
2 large Yukon gold potatoes
2 tablespoons butter
¼ cup heavy cream
½ pound green beans, stem ends trimmed
1 recipe velouté with mushrooms
Additional salt and pepper to taste


For the chicken:

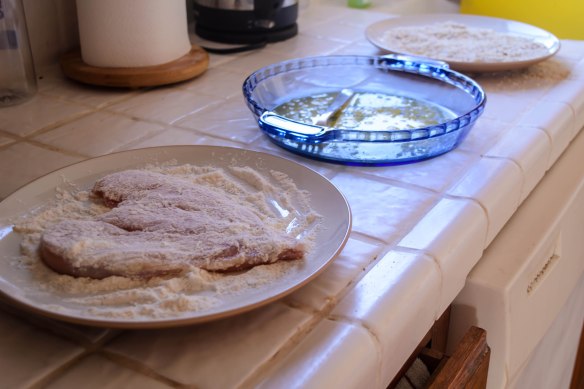
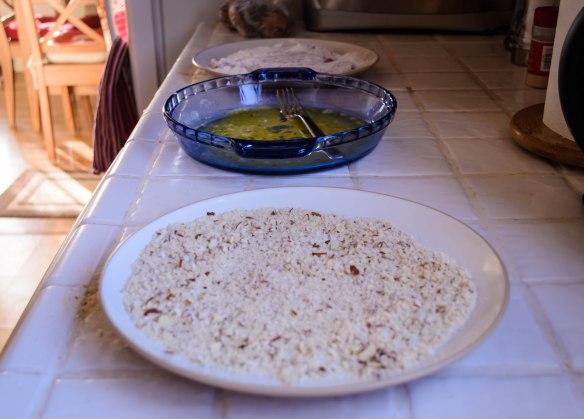
  • First, set up a breading station. I like to use two large plates and a pie pan for this. On one of the plates, combine the flour, salt, pepper, and garlic powder and spread it out to cover the entire plate. If you want additional or different spices, this is your chance to personalize. On the other plate, combine the panko and almonds. Sprinkle some salt and pepper in there as well, if you wish, and again, spread the mixture out for even coverage. In the pie pan, crack the egg and beat it up with a fork. Set these out in order: flour, egg, breading (see above photographs for reference).
  • Preheat the oven to 300F so that the cutlets can stay warm while you cook other elements of the dinner. Place a baking tray with a wire cooling rack on it in the middle of the oven.
  • Now, take a look at your cutlets. We want them no thicker than ½ an inch so they can cook quickly without burning the almonds in the breading. If they are that thin, great. Skip to the next step. If they are thicker, we need to pound them out. To do this, place one cutlet at a time in an unsealed plastic zip-top bag, or just wrap it loosely in plastic wrap. With a meat mallet, a rolling pin, or a heavy saucepan, pound the chicken by beating it with steady, forceful hits that push toward the outer edges of the breast. In other words, you’re not just punching straight down. You’re striking at a slight angle, from the middle toward the outer edges, which helps the meat spread without tearing.
  • When your chicken breasts are evenly ½ an inch thick, it’s time to bread them. Working one at a time, dredge the cutlet in the seasoned flour, pressing it with your fingers to ensure even coating. Flip it over and dredge the other side. Repeat with the egg, then with the panko and almonds, again being sure you press it in firmly to help the breading adhere.
  • Heat a good slick of olive oil in a skillet over medium heat. Once it is glistening, add the first cutlet, placing it down in the middle of the pan and then not moving it for four minutes.
  • After four minutes – no cheating! – peek at the underside of the cutlet. The breading should be golden and crisp but not burned, and thanks to being left undisturbed, not peeling and crumbling off the chicken! Flip the cutlet and sizzle on the other side for another four minutes until cooked through and crisp.
  • While you are cooking this cutlet, dredge and bread the second one.
  • When the first cutlet is golden brown and crisp on both sides, carefully move it from the skillet to your prepared, preheated oven tray. It is already fully cooked (at least it should be, if you’ve pounded it to a true ½ inch), so this will keep it warm and crispy until both pieces are done.
  • Repeat this cooking process with the second cutlet. If you need more time to prepare the rest of dinner, as I always do, these will hold in the warm oven for 15 minutes or so. You don’t want to go much longer than that, lest they dry out, but I was delighted by how moist ours still were.


For the potatoes:

  • Cut the potatoes into small, even sized chunks – the smaller you cut them, the faster they will cook. Plop them into a pot with plenty of salted water, then cover and set over high heat.
  • Bring the water to a boil, and cook, stirring once or twice if the water threatens to boil over, until the potato chunks are fork-tender. Depending on how small you’ve cut your potatoes, this could take anywhere from 10-20 minutes.
  • When the potatoes are done, drain into a colander and set aside.
  • Place the pot back on the stove over medium-low heat and add the butter and cream.
  • As the butter melts and the cream heats, put the drained potato chunks back into the pot and stir to combine. Using a potato masher or the determined back of a spoon, smash up the potatoes to your desired consistency. I like mine just a little chunky, with the thin skins still in there. Season to taste with salt and pepper.


For the green beans:

  • Heat a pan of salted water to a simmer.
  • Add the beans, stem ends trimmed, and simmer for 3-4 minutes, or until they reach your desired tenderness. We like them crisp-tender.
  • Drain the green beans, then return to the empty pan over medium heat with a slick of olive oil or a small knob of butter. Cook, tossing occasionally to distribute the fat, for a minute or two.
  • Season to taste with salt and pepper, and a squeeze of lemon juice or a tiny splash of white wine if desired.


To serve:

  • Consider your plate like a clock face. Position a scoop of mashed potatoes at 9 o’clock. Lay the green beans out in a curved little stack along the top few hours: let’s say 11-1. Now, lay the chicken breast partially atop the mashed potatoes, angling it from 9 down to 5.
  • Pour the warm, mushroom-spiked velouté over the chicken and the potatoes, so it slides and settles, gravy-like. Serve immediately to retain the crispness of the chicken coating.

Chatterbox

I’ve just begun rereading Neil Gaiman and Terry Pratchett’s genius collaboration Good Omens for perhaps the sixth or seventh time.  One of the characters introduced early in the novel is a Satanic nun named Sister Mary Loquacious from the Chattering Order of St. Beryl.  In looking back through some recent posts, I’ve noticed myself falling a bit on the loquacious side, with posts extending perhaps a bit longer than you’d like for a casual evening read.  So today, with three Bittmans to report on, I’m going to try to keep this brief.

54. Cook onion, curry powder and chopped ginger in oil until onion is soft; meanwhile, steam cauliflower florets until nearly tender. Add cauliflower to onion mixture, along with raisins; cover and cook until the cauliflower softens.

Two of my most hated food items as a child were cauliflower and curry.  Cauliflower was drab and slightly bitter – worthless unless smothered in sharp cheese sauce, and even then a bit suspect.  Curry powder was musty and unpleasant, and the two of them together sound like one of my youthful nightmares.  I kept this selection on the list because N. loves the flavor of curry.  But I knew that I would have to doctor up Bittman’s procedure to give this dish even a fighting chance.

1 head cauliflower

1 tsp curry powder, divided

½ tsp salt

½ tsp black pepper

generous glugs of olive oil (quantity will depend upon the size of your cauliflower)

¼ of a red onion

¼ cup golden raisins

2 TB fresh ginger, grated (this is easiest to do while it is mostly frozen; you keep your ginger in the freezer, don’t you?)

Brush a layer of olive oil on each of two cookie sheets and preheat the oven to 400F.

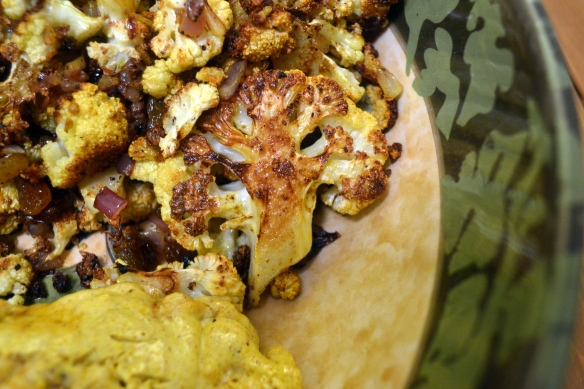
Core the cauliflower and slice it across into flat steaks of about ½ inch thick.  Some will collapse into florets.  That’s okay, but ideally you want nice long, horizontal pieces of cauliflower.  They look like flattened sprigs of Queen Anne’s Lace.  Toss the cauliflower with ½ tsp of the curry, salt, pepper, and more olive oil, then place on the tray in a single layer.  Don’t crowd them too much – the more space they have, the better they will brown.  Roast for 40 minutes, pausing at the 20 minute mark to flip each piece.

While the cauliflower roasts and caramelizes and browns, sauté the red onion in a little more olive oil.  When it begins to brown, toss in the raisins, the ginger, and the other ½ tsp of curry powder.  Cook together for another 2-3 minutes until the raisins plump and the curry aroma mellows a bit.

When the cauliflower is just tender and darkly golden, take it out of the oven and toss it with the onion and raisin mixture.

We had ours alongside some roasted chicken breasts I’d marinated in yogurt and garam masala.  It was delightful – if you favor a strong curry flavor, add more to both the cauliflower and the onions.  I was happy to have just a mild hint of earthy spiciness, and the unexpected sweetness of the raisins cut even this dankness in a very pleasant way.

16. Sauté equal amounts chopped, peeled apples and onions in butter until soft. Add stock or water to cover, then simmer for 10 minutes. Cool and puree. Serve sprinkled with Stilton or other blue cheese.

We weren’t sure about this one.  Nevertheless, we bravely decided to make just a small portion and see what happened.  These quantities will serve two.

1 medium apple, peeled and cored

1 medium onion

salt and pepper to taste

2 TB butter

1 ½ cups chicken stock

blue cheese

Melt the butter in a small pot over medium heat.  When it foams, it’s ready.

Meanwhile, dice the apple and onion into small chunks.  You want equal sized piles – we probably ended up with just over a cup of each.  Add them to the pot and cook over medium, stirring occasionally, for 10-15 minutes.  You want softening and tenderizing, not aggressive browning.

When the apples are tender and the onions soft and translucent, add the broth and seasoning (though we didn’t make any additions, some thyme or sage might be very nice here – try 1 tsp of finely minced fresh herbs) and simmer for 10 minutes.

Remove from heat and cool slightly, then puree and serve with 1-2 TB blue or gorgonzola cheese sprinkled on top.  We had a nice blue stilton.

It wasn’t that we didn’t like this, it was that it seemed odd as a soup.  It was slightly reminiscent of a butternut squash soup, but the apples were slightly sweeter than a squash, and the combination of their sweetness with the sharpness of the onion made this seem like an applesauce with too many ingredients.  Left chunkier, this might be nice draped over a roasted pork tenderloin – a meat that goes nicely with both sweet and sharper, savory flavors.  It might also be a good base for a butternut squash soup – the one additional player in this game could be the additional complexity it might have needed.


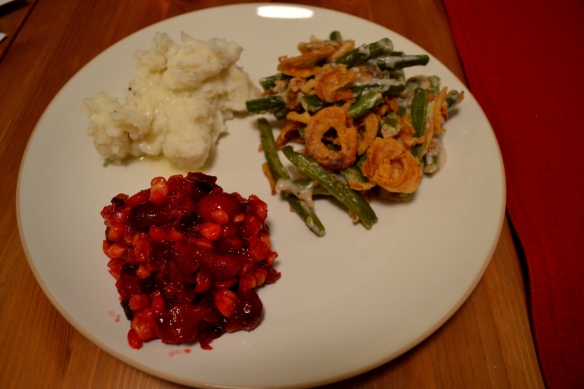
6. Cranberry-Corn Sauce: Cook a bag of fresh cranberries with about a cup of corn kernels, some chopped scallions, ¼ cup brown sugar (or to taste) and a splash of water, just until thick.

Our third Bittman this week was part of a pre-Thanksgiving Thanksgiving dinner.  When you grow up with a set collection of dishes that come to equate to this holiday, it can be hard to make a change.  When N. started having Thanksgiving dinner with my family, he missed his mashed potatoes and green bean casserole.  So I try, in the weeks that surround the holiday, to make up for these omissions. I make several smaller dinners featuring the dishes that don’t quite fit onto our holiday menu.  This seemed like the perfect side – not traditional enough for our Thanksgiving table, but satisfying in the mean time.

1 bag cranberries

1 cup fresh or frozen corn

3 green onions, thinly sliced

¼ cup brown sugar

¼ cup water

I tossed the cranberries, corn, water, and brown sugar together in a saucepan and set them over medium heat.  I added the green onions at this point too, but were I making this again I would add them later – the 15-20 minute simmering time resulted in a slightly adulterated color, and the fresh greenness would be so much nicer.  I advise adding them during the last five minutes of cooking time.

I let this simmer for about 20 minutes, until most of the cranberries had popped and the whole pot was a sticky, almost syrupy texture.  I let them cool off the heat with the pot uncovered for a few minutes, both because I like the flavor of cranberry sauce better the cooler it is, and because I wanted to let it gel up a bit further.

These weren’t as sweet as your typical cranberry sauce.  At least, they were not as sugary sweet.  The corn added a beautiful vegetal sweetness that seemed at once the perfect fit and a strange accompaniment.  We talked through this dish as we ate it, appreciating the maple overtones of the brown sugar and the tender crunch of the sweet corn, but thrown off slightly by the same qualities.  What we finally decided, as we sampled second helpings, was that they were a delicious side dish, but they didn’t feel like Thanksgiving.  Since the rest of the meal (garlic mashed potatoes and the old standard green bean casserole, slathered with cream of mushroom soup and the salty, salty crunch of french fried onions) was so traditional, having this difference, even in its subtlety, felt wrong.  If you’re a stickler for tradition, this cranberry dish would have a better chance as a chutney for grilled pork or maybe even lamb.

Next week is the big feast.  Oddly (odd because the entire Bittman list was conceived for this single day), I had some trouble figuring out where to fit his ideas in.  I’ve come up with a pair of selections to try out, and I will report back.  In the mean time, what dishes will grace your menu on Thursday?