Apricot Ginger Thumbprint Cookies

Food Blog December 2014-0956Up until I was in college, almost every year my family received a heavy box a week or two before Christmas. As soon as we tore through the tape we could smell them: Nana’s cookies. Ladylocks or cream horns, nut-rolls, pizzelles, thumbprints, sometimes chocolate dipped apricots or seven layer bars; everything nestled in its own individual wrapping and ready to be devoured. And she didn’t just send them to us, but to the families of her other two children as well, and who knows who else. I’m sure she saved a few for herself and Pap – who was quite the cookie fiend – to eat as the holidays approached.

Food Blog December 2014-0943I never thought about it when I was a kid, but this must have taken her weeks to do. I can only imagine the organization that went into it – I’m sure dough was made ahead of time and frozen until she was ready to bake, and what a baking day(s) it must have been! How many cookie sheets would that be, all rotating in and out of the oven? How many measuring spoons and bags of flour and sugar and butter?

Food Blog December 2014-0941I had big plans this season. I was going to give you with a week of cookies, presenting my favorite holiday offerings with which you could grace your own dessert bar (and if you have one of those, I politely demand to be invited over). Just one cookie recipe a day, and you and I would both be set for the whole season.

Food Blog December 2014-0944Alas, as usual, that whole having a day job thing took over. Amidst the stacks of papers, however, one cookie managed to sweet talk its way through: a modest tray of thumbprints that, offered up in my department’s mailroom, disappeared in less than two hours. My people are cookie people.

Food Blog December 2014-0946
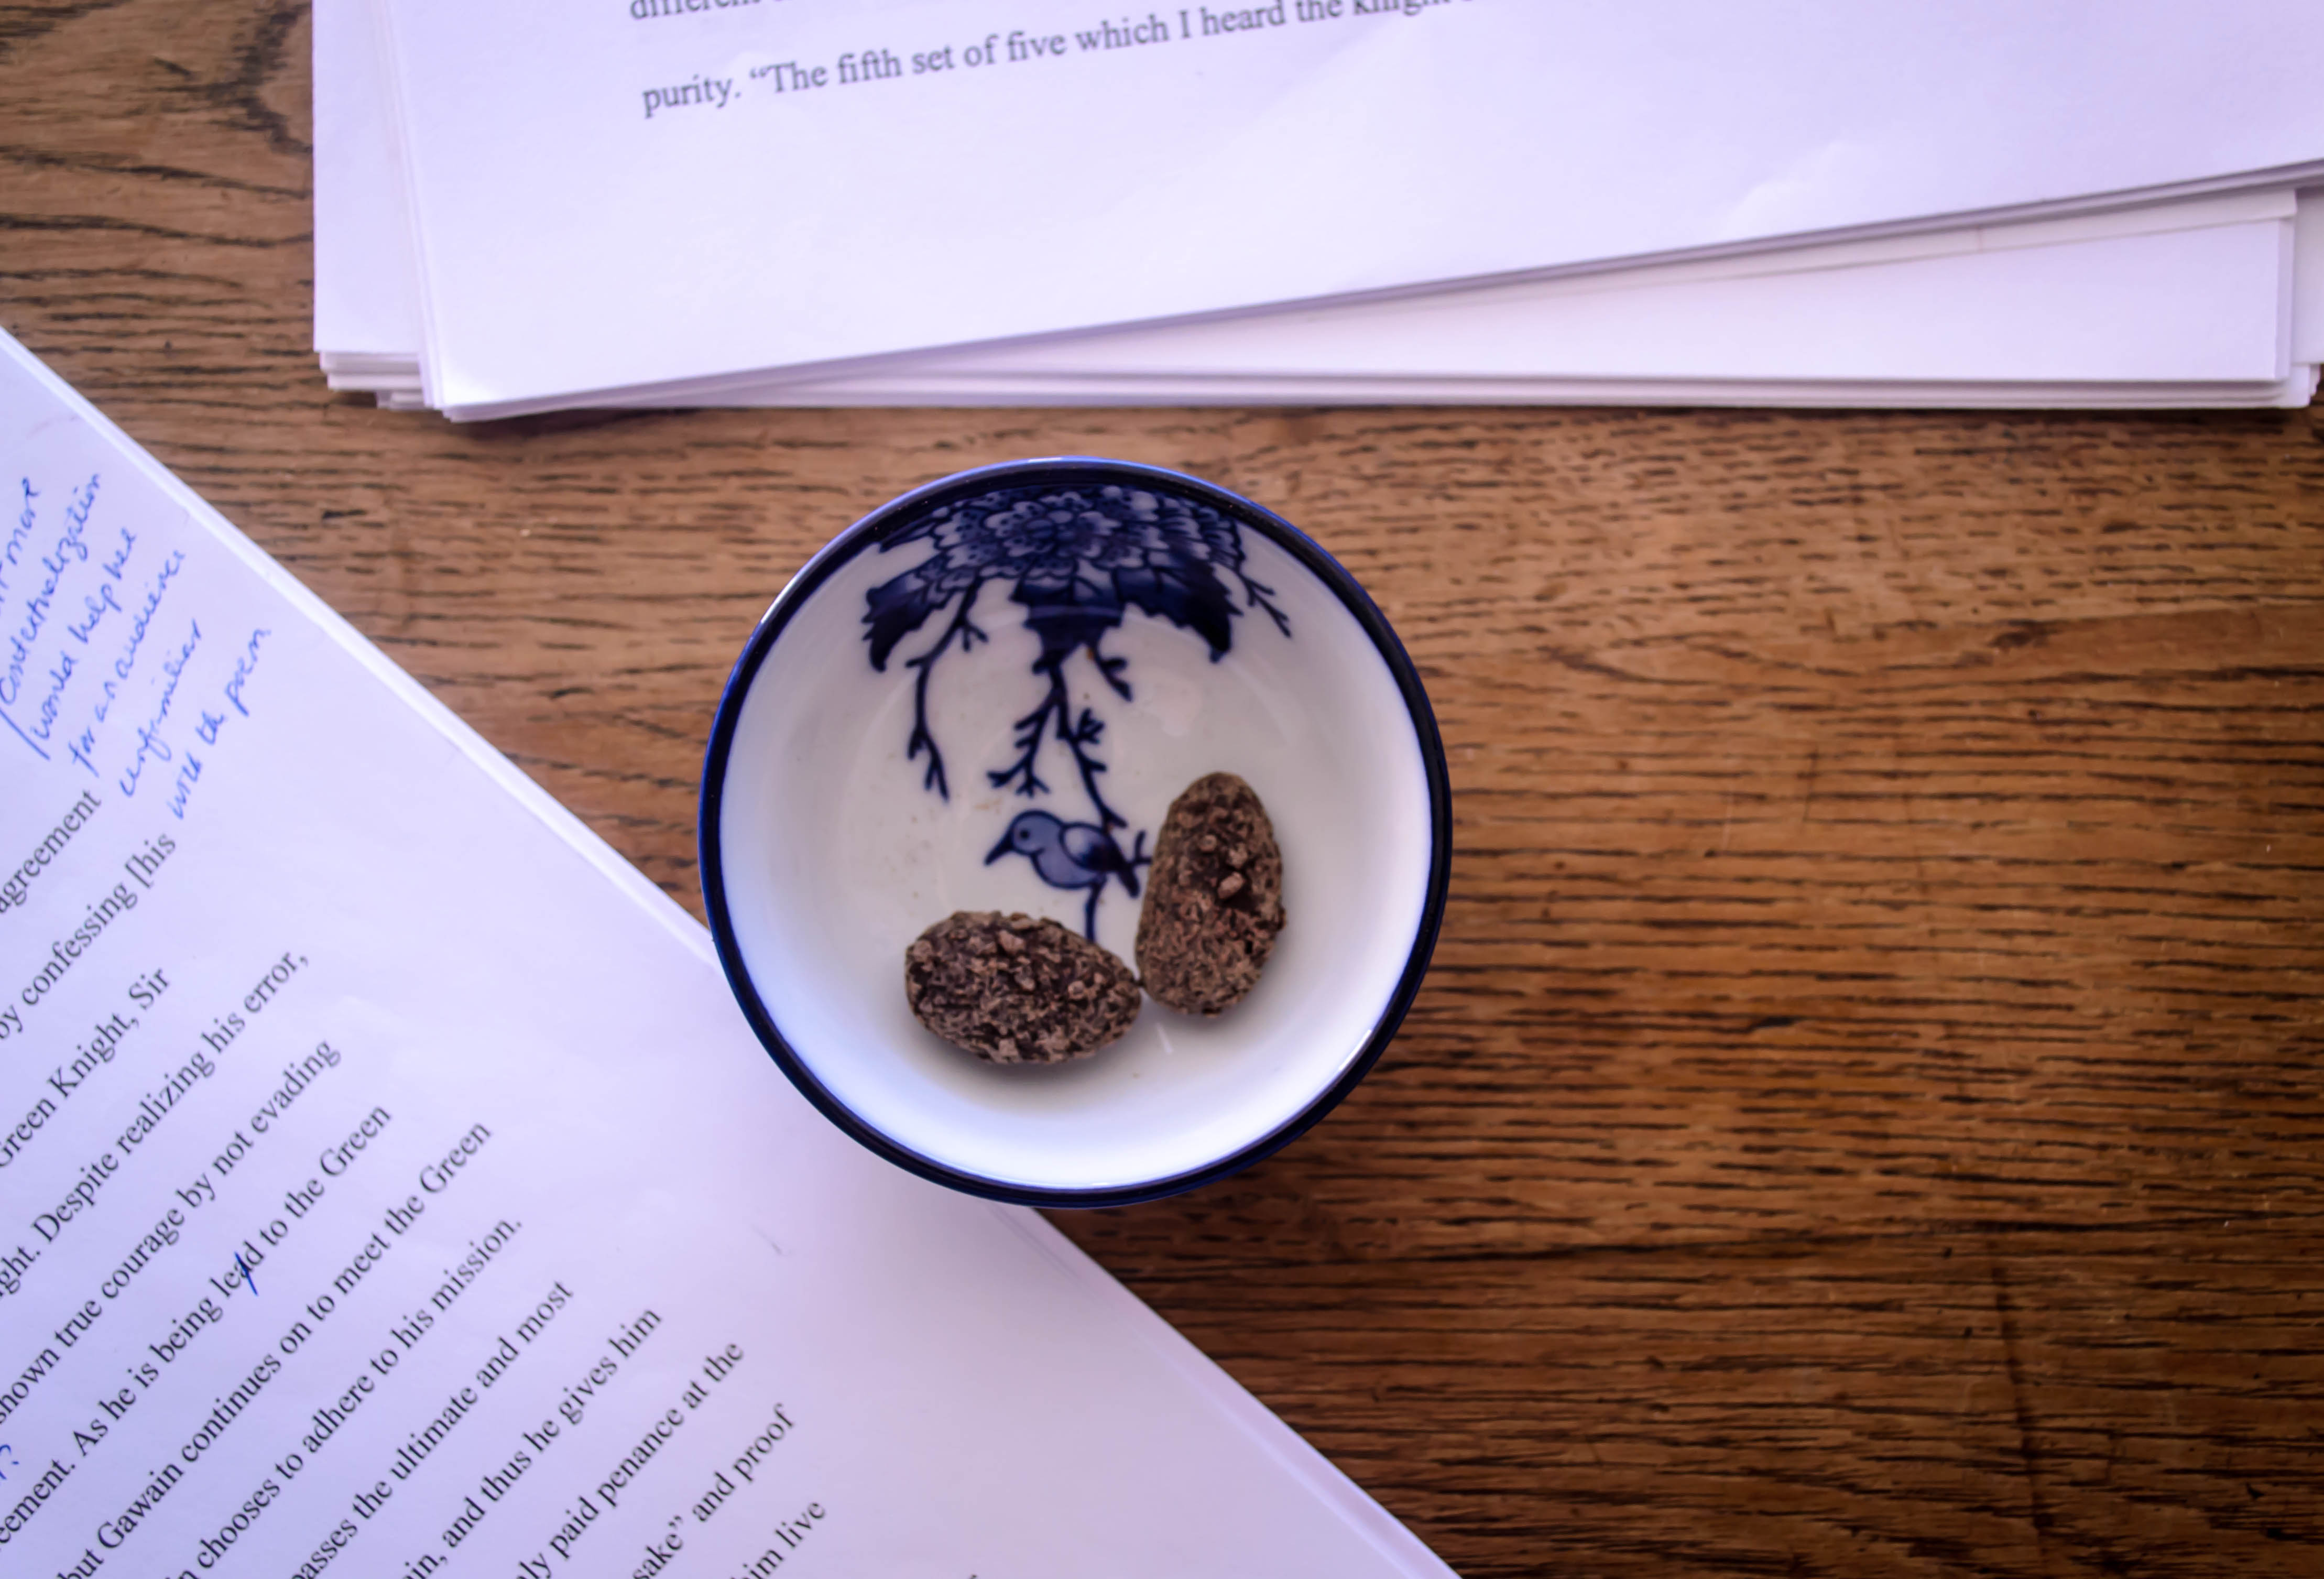
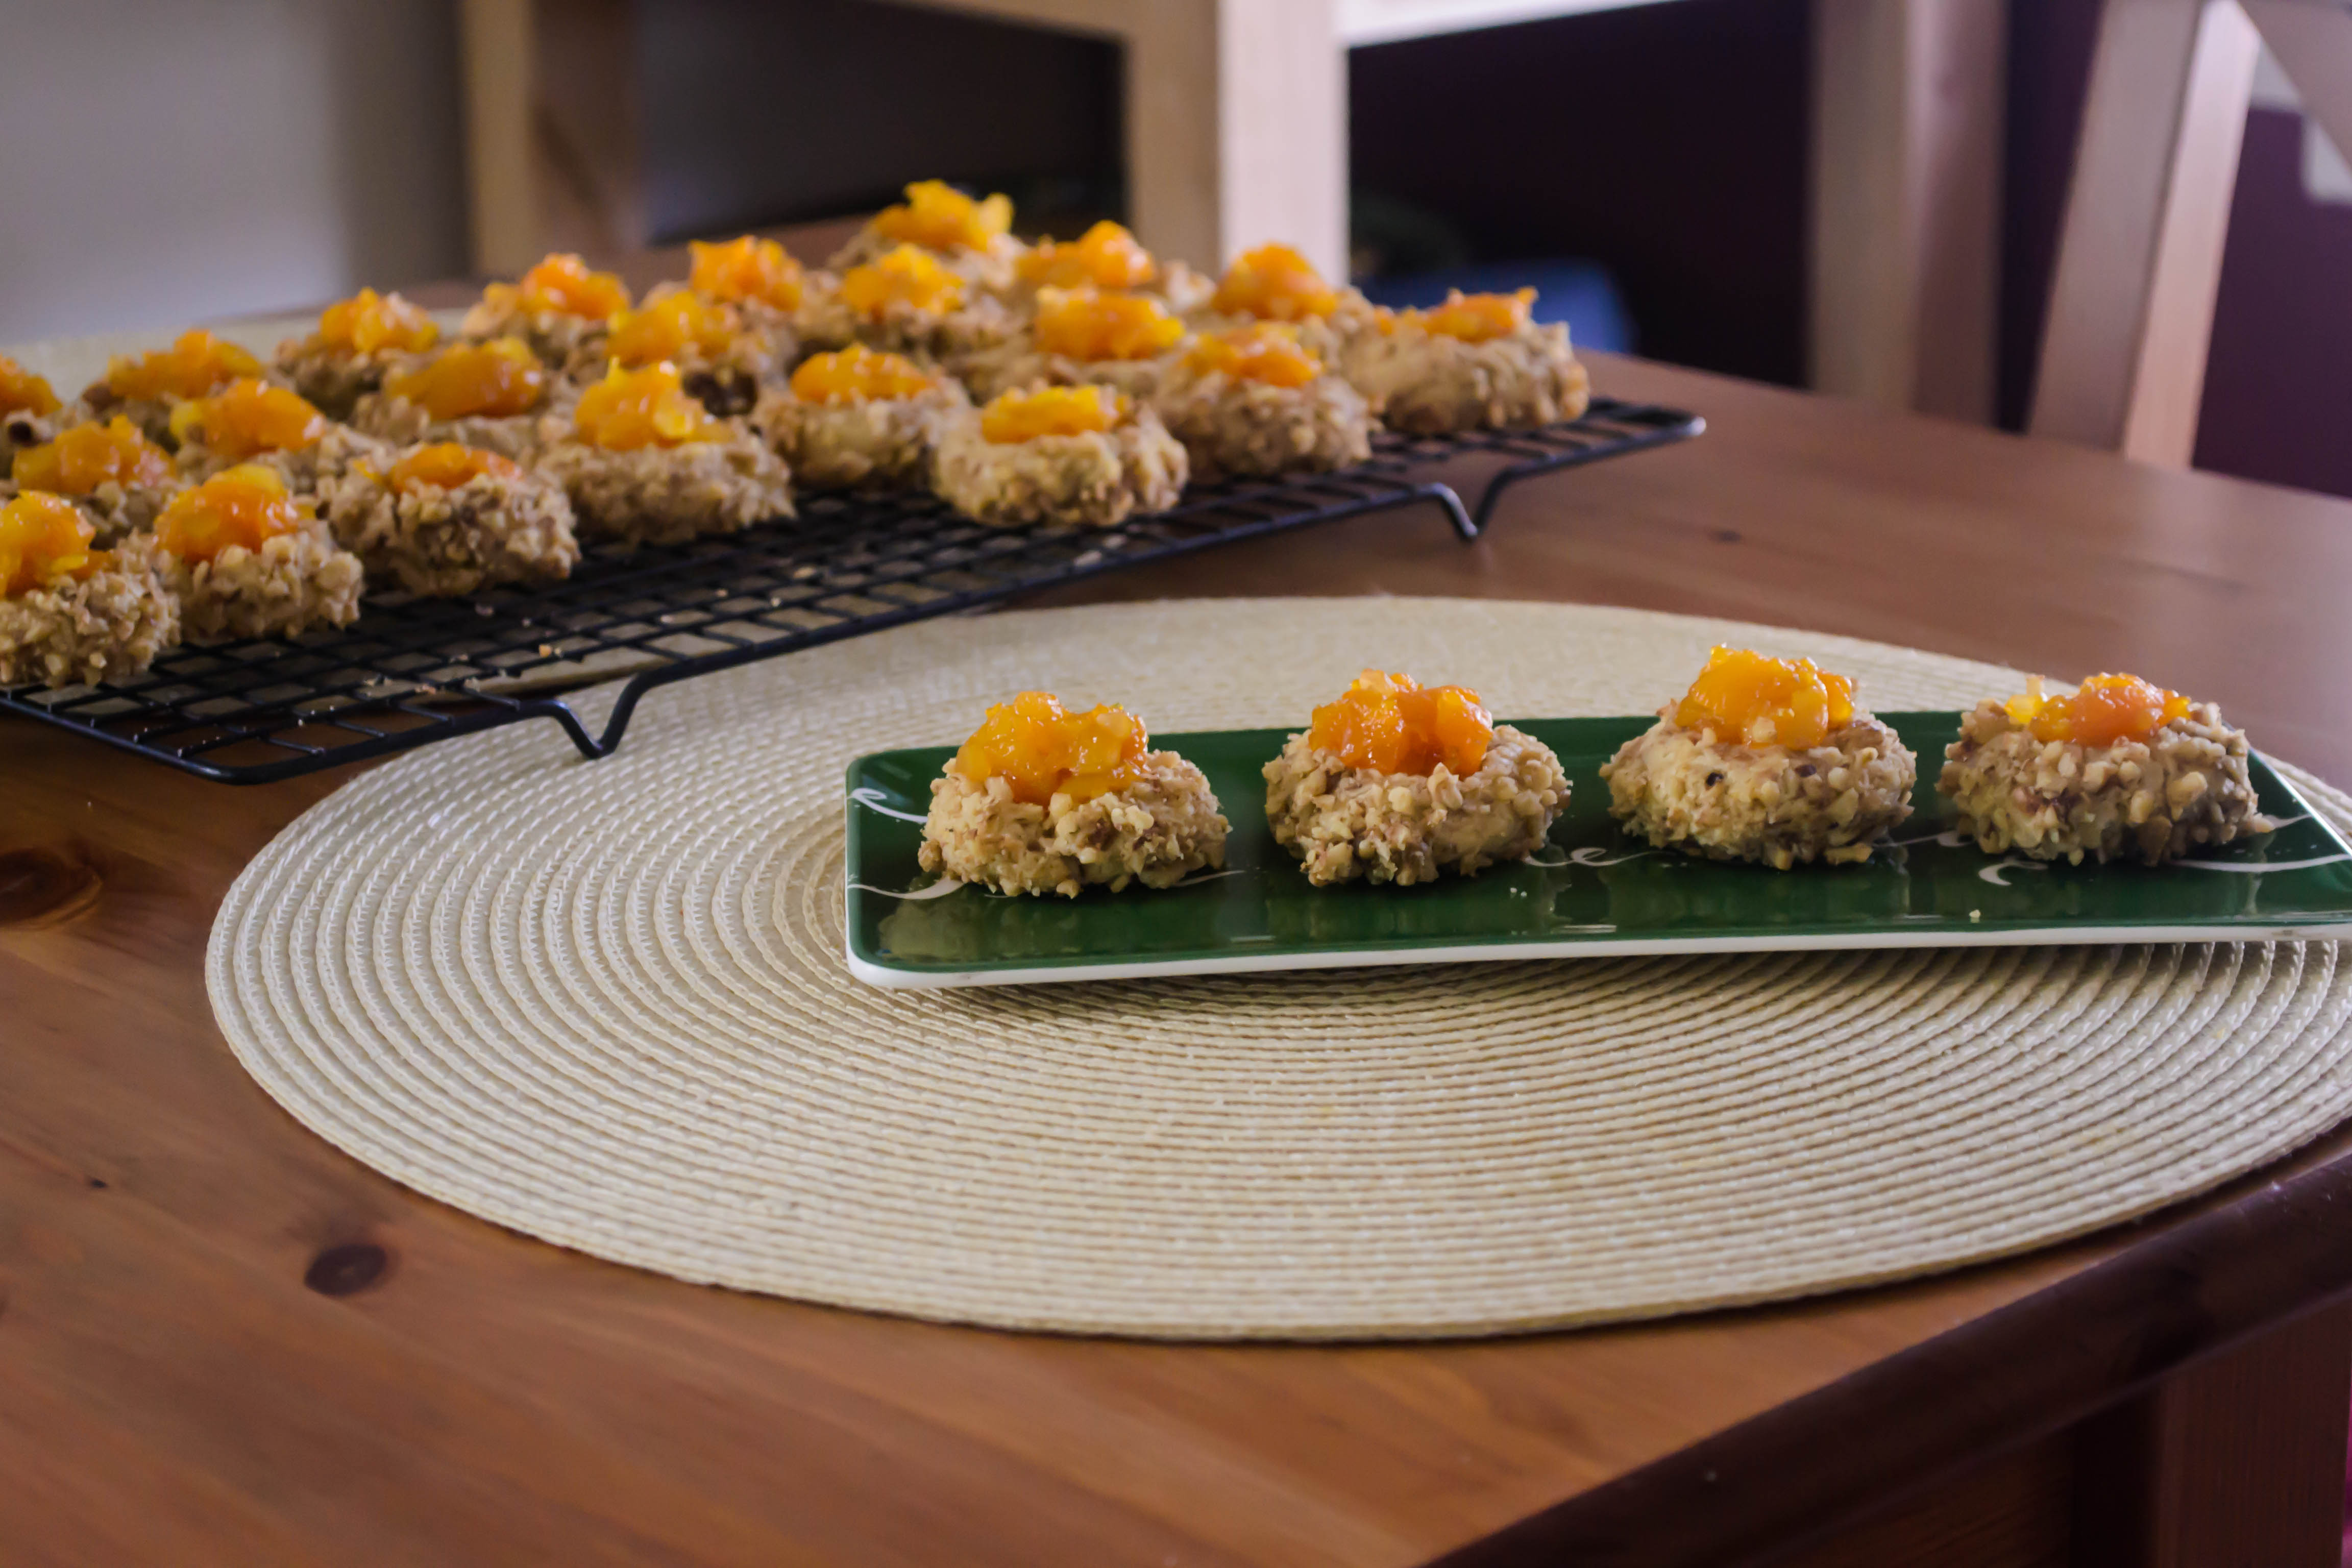
Thumbprints were always included in Nana’s Christmas cookie box. Somewhere between a sugar cookie and shortbread, but with brown sugar rather than white, the soft dough gets rolled into a ball, dunked in egg whites and then coated in chopped nuts. A gentle squash in the middle of the ball gives the cookie its name, and provides a little receptacle for more sweetness – after baking, Nana always filled the little cavity of the cookie with pink or blue royal icing.

Food Blog December 2014-0948I hadn’t thought about thumbprint cookies in years, but at some point this summer, something reminded me of these pretty little sweets and I knew I wanted to make my own version. None of my relatives – good bakers all – had a copy of Nana’s recipe, but one of my aunts told me to start with Betty Crocker, and gave me a few hints about how Nana might have adapted her version. In mine, I’ve replaced the margarine I’m almost sure Nana used with butter, and gone with a fruit-based jammy chutney for the center rather than the sweet icing she favored. Apricot and crystallized ginger, chopped fine or pulverized in the food processor, cooked down with some water, some sugar, and some lemon zest create a beautiful glossy compote reminiscent of those tubs of candied fruit that show up in grocery store produce sections this time of year, but with fresher, cleaner flavor.

Food Blog December 2014-0949It has been a long time since I tasted one of Nana’s thumbprints, but my first bite of these, still warm from the oven, told me I was close. The cookie itself is buttery and crumbly, both features enhanced by its walnut coating, and not overly sweet. The apricot and ginger filling give it a spicy-sweet character that went as well with the walnuts as I’d hoped, and they are actually tastier the day after baking. My recipe wound up making a mere 2 ½ dozen cookies, which doesn’t sound like a pittance, but when I brought home an empty tray after making my offering at work, N. and I wished we’d saved more than the four cookies I’d laid aside for us.

Food Blog December 2014-0952As a friend shocked me by revealing last night, it’s only ten days till Christmas, and Hanukkah starts tomorrow already. I hope your plans are going well, and if you do have the urge to bake something sweet for someone you love, this little gem of a cookie should be hard to resist.

Food Blog December 2014-0955

Apricot Ginger Thumbprints
Adapted from Betty Crocker
Makes about 2 ½ dozen cookies
For the filling:
1 cup dried apricots
¼ cup crystallized ginger
Zest of one lemon
¾ cup water
1 tablespoon brown sugar
Pinch salt
For the dough:
½ cup brown sugar
1 cup butter, soft but not melted (2 sticks)
1 teaspoon vanilla
2 egg yolks
2 egg whites
2 cups all-purpose flour
½ teaspoon salt
1 ½ – 2 cups finely chopped walnuts


  • Make the filling first, since it will need time to cool after cooking.
  • With a sharp knife or a food processor, chop the apricots and ginger until very fine.
  • Place apricot and ginger bits in a small pot with lemon zest, water, brown sugar, and the pinch of salt. Bring to a bubble, then reduce heat to medium-low and simmer until the mixture becomes thick, 15-20 minutes. Stir occasionally.
  • When mixture is a thick, jammy consistency, remove from heat and set aside to cool completely.
  • While apricot ginger mixture cools, preheat the oven to 350F and make the cookie dough.
  • Cream the butter until light and fluffy – about 2 minutes.
  • Add the brown sugar and cream together another 2 minutes, until this, too, is light and fluffy. Add the egg yolks and vanilla, and mix well to combine.
  • Sprinkle in the flour and salt, mix well to combine into a clumpy dough approximately the consistency of wet sand.
  • If at this point the dough is too soft to work with, stow it in the fridge for 15 minutes or so to let the butter harden up a bit.
  • While the dough chills, use a fork to lightly beat the egg whites, reserving them in a small bowl.
  • Chop or process the walnuts into small crumbs.
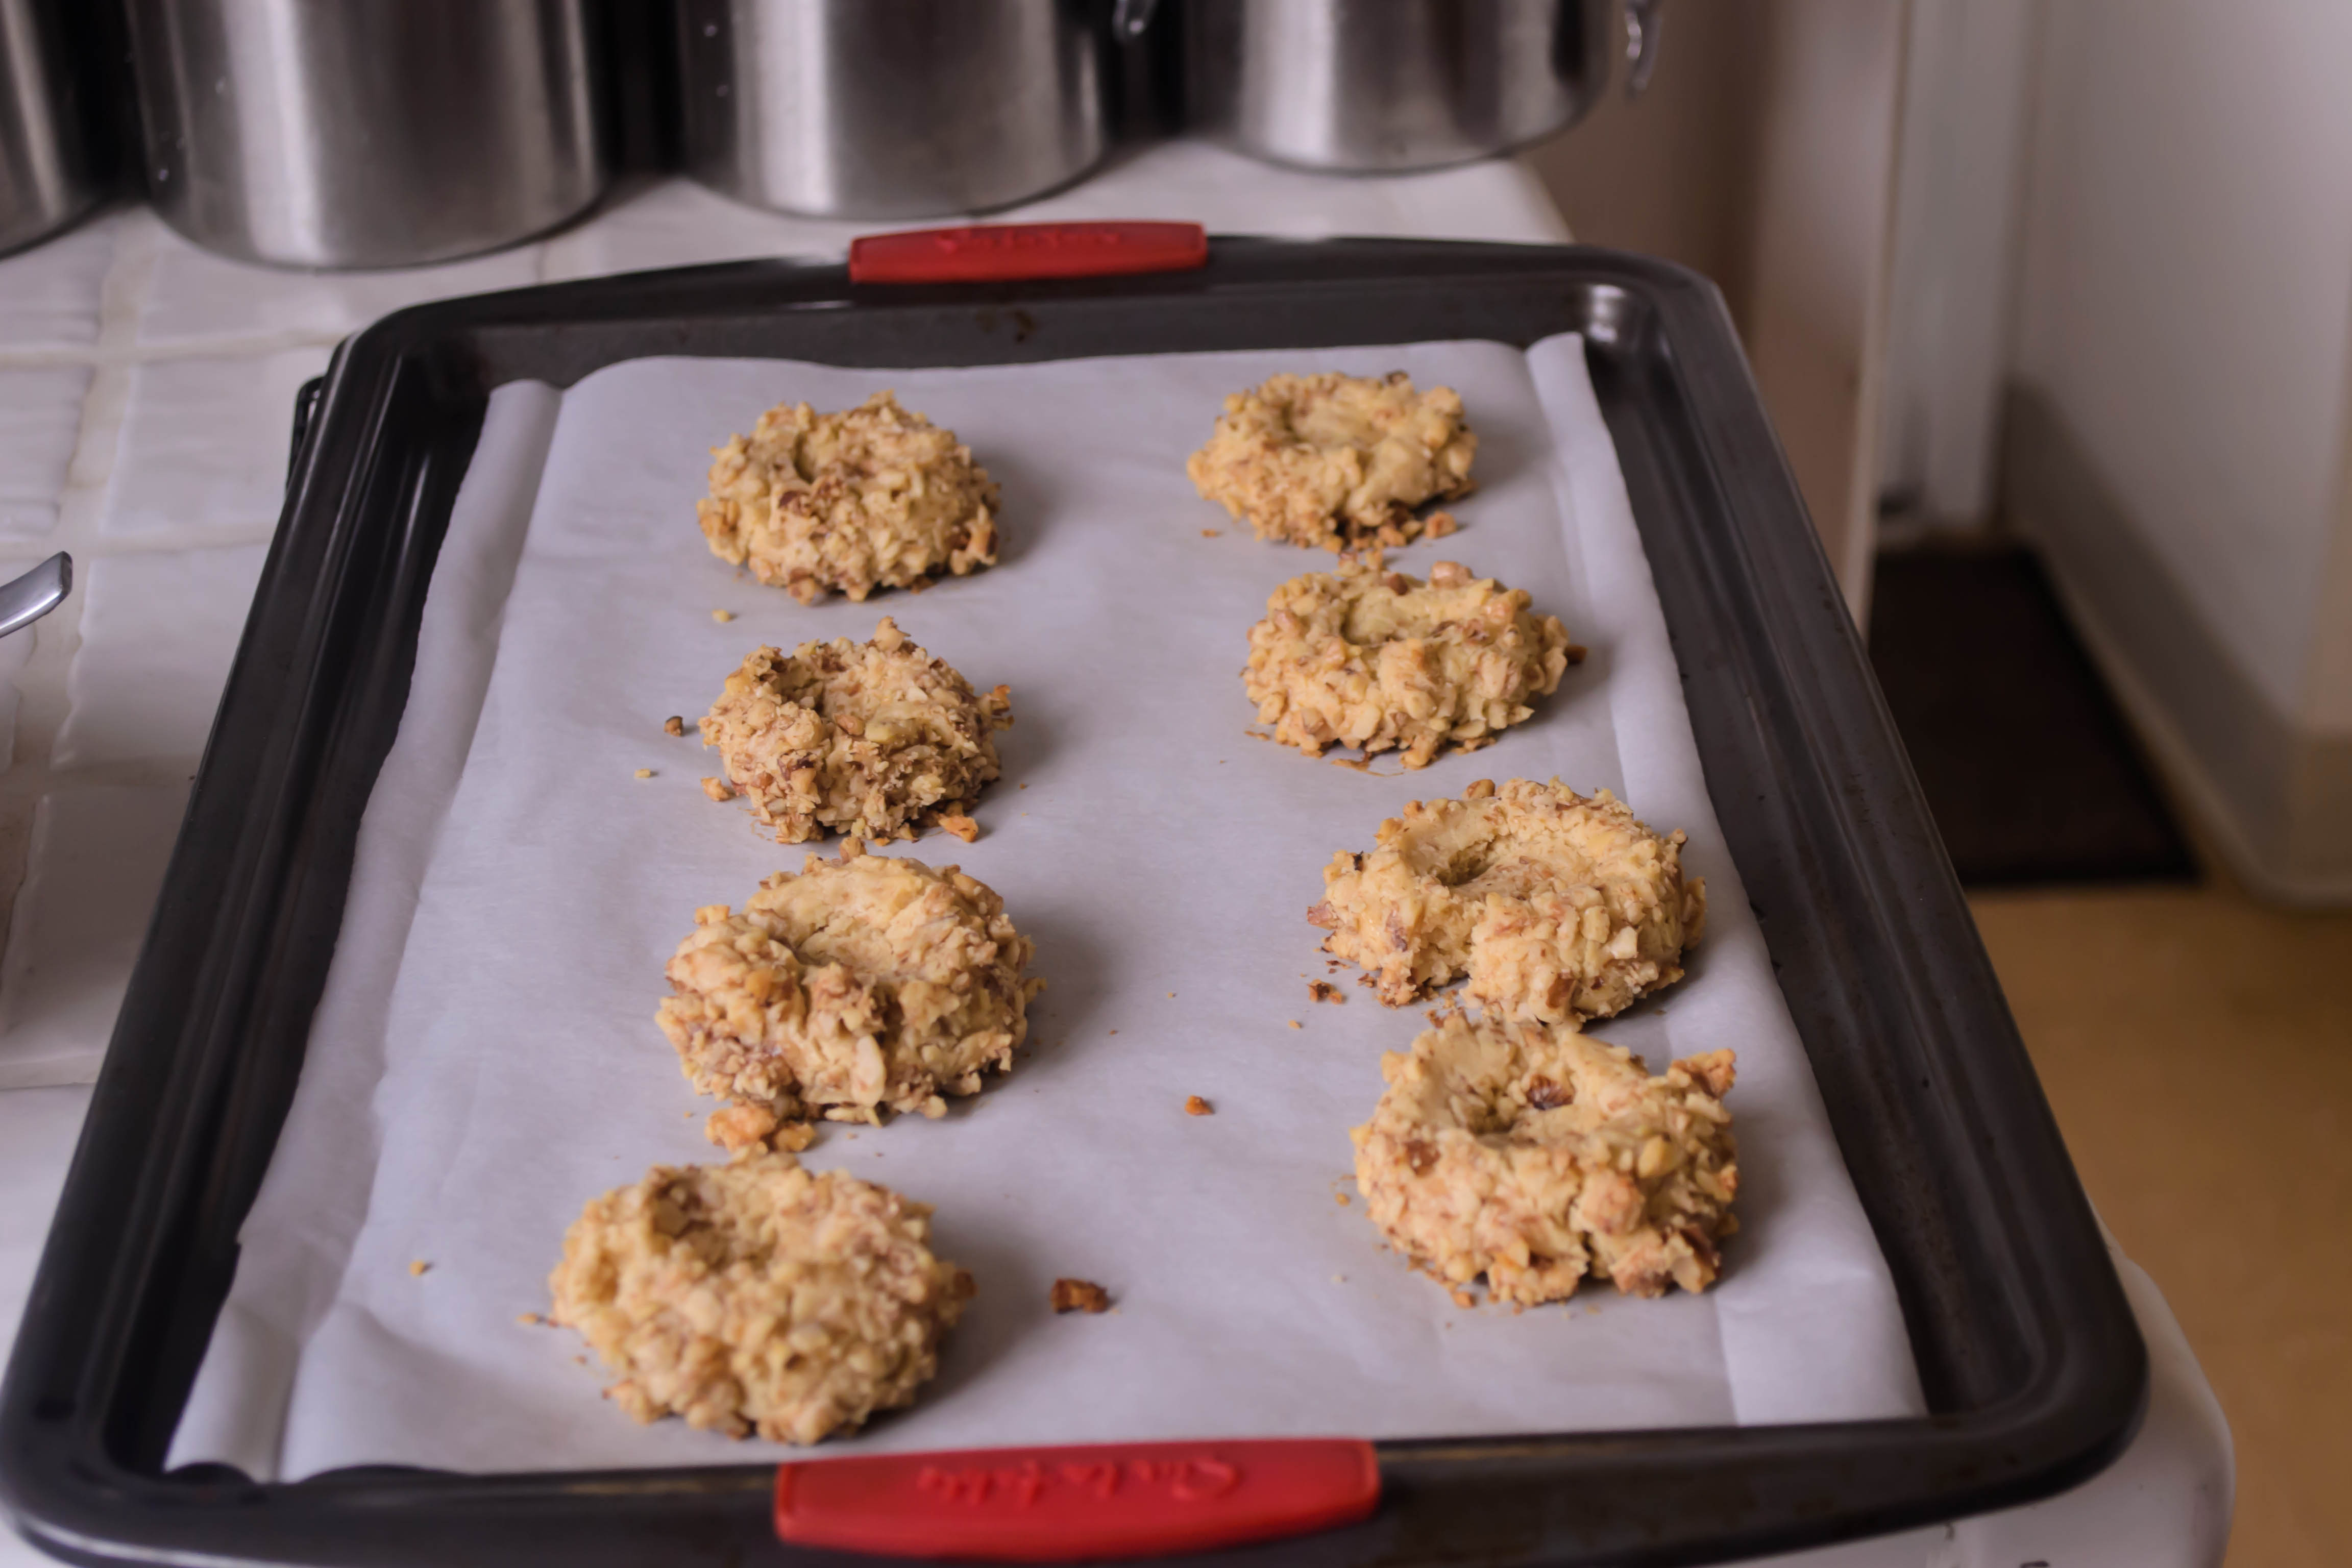
  • When you are ready to form the cookies, use a spoon or your fingers to portion out and roll 1-inch balls of dough. Dunk each ball in the egg whites, then roll in the walnuts until well coated.
  • Place each ball on a greased or parchment-lined cookie sheet, spacing them about 2 inches apart.
  • When your cookie sheet is full, use your thumb or finger to push down into the center of each cookie ball, making a depression. That’s the thumbprint!
  • Bake at 350F for 15 minutes, until cookies are lightly golden and have swelled up.
  • Upon removing the cookies from the oven, use the back of a spoon to lightly press down on the depressed area again, as it may have puffed up during baking.
  • Let cool on cookie sheet for 1 minute, then remove to a wire rack. While still warm, fill the center with apricot ginger mixture – each cookie should fit about ½ a teaspoon of the fruit filling.
  • Cookies are best cooled completely, and only get better the second day, though I suspect they won’t last much longer than that.


Rye and Mushroom Stuffing with Chestnuts and Hazelnuts

Food Blog December 2014-0936A few months ago, my sister and her boyfriend engaged in a Whole 30 food challenge to help them feel healthier and more in control of their diets before the holiday season. As part of the challenge, and to silence naysayers convinced this would mean a barrage of boring, bland food, my sister took photos of almost every meal they ate. Some of these looked so good I was ready to hop on the bandwagon myself (though, as she admitted, going without cheese for that long was a hardship. First world problems, I know).

Food Blog December 2014-0930One dish in particular caught and held my imagination. R. called it “hazelnutted mushrooms.” The combination of two much beloved, earthy, woodsy ingredients made me think of Oregon and long for its damp autumnal glory as Los Angeles cycled through week after week of 80 degree days.

Food Blog December 2014-0929As the idea simmered in my mind, I kept thinking of other ingredients that would pair well with hazelnuts and mushrooms. Sage, certainly, with its dusty sharpness. Whiskey, to deglaze with that sear of burning honey. Maybe even chestnuts, with their curious texture and meaty sweetness.

Food Blog December 2014-0932Once chestnuts entered the picture, there was no doubt this was destined to become a stuffing. With half a loaf of dark pumpernickel rye bread in the fridge longing for an application, I took action. Butter, onions, celery, deeply caramelized mushrooms, and the crunch and odd sweetness of chestnuts bolstering the broth-moistened bread and toasted hazelnut bits. The whiskey adds just a gentle flavor and a great smell to the stuffing that backs up the flavor of the chestnuts and somehow makes them make more sense as an ingredient – I wouldn’t do without it, but you can if you wish.

Food Blog December 2014-0935You’ve likely noticed there are fewer photos here than usual – it turns out that though “brown food tastes goooood” as Anne Burrell is apt to note in her throaty growl, it doesn’t always produce the most flattering or interesting photograph. Regardless, this brown food is indeed good, and deserves your attention. Though we weren’t willing to put this on the Thanksgiving menu (we are boring sticklers, and this big a shift in the sides might cause turmoil), it has considerable promise as a winter companion to roasted meats at other cold-weather holidays, especially if you tend to go with pork or beef. I think stuffed pork chops would be a particularly nice application. We kept it simple, though, and went (almost) vegetarian, pairing moist, heaping spoonfuls with mashed sweet potatoes and salty, crispy roasted brussels sprouts.

Food Blog December 2014-0936

Rye and Mushroom Stuffing with Chestnuts and Hazelnuts
Serves 6-8 as a side
6-8 slices dark rye bread, preferably stale
¾ cup raw, unsalted hazelnuts
6 tablespoons butter
½ a red onion, diced
2 large ribs of celery, diced
¾ pound (12 ounces) crimini mushrooms, stemmed and quartered
½ cup (6-8 ounces) cooked, peeled chestnuts, roughly chopped
8-12 fresh sage leaves, minced
¼ cup whiskey (I used Jack Daniels – you use what you like, or omit it and use extra broth instead)
2 – 2 ½ cups broth, chicken or vegetable
Salt and pepper to taste (how much salt you use will depend on the sodium content of your broth)


  • Preheat your oven to 350F and position a rack in the middle slot. Fill a baking sheet with your hazelnuts. Place a wire rack in the tray (it should fit over the hazelnuts) and spread out your rye bread on a single layer atop it. Toast in the preheated oven until the bread is quite dry and the hazelnuts are starting to look slightly oily; 10-15 minutes. Remove and set aside to cool.
  • Meanwhile, heat your broth in a small pot or in the microwave – it doesn’t need to be boiling, but it should be quite hot. If it does boil, turn it down to avoid losing too much through evaporation.
  • Melt the butter in a large skillet over medium heat. Add the diced onions and celery and cook until softened and translucent; 5-8 minutes.
  • Add the mushrooms and cook for an additional 5-8 minutes, until the mushrooms have soaked up much of the moisture in the pan and are soft. They may begin to brown a bit; that’s a good thing.
  • Add the chopped chestnuts and the sage and let them warm through for 1-2 minutes.
  • While the vegetables are cooking, chop your hazelnuts into rough chunks (it’s wise to wait until they are cool enough to handle), then add them to the vegetable mixture in the skillet.
  • Turn off the heat and immediately add the whiskey, which should bubble furiously when it hits the surface of the pan. Stir to combine – much of the whiskey will evaporate.
  • Tear or cut the rye bread into small pieces or cubes. It should be quite dry. Add the bread cubes to the pan and stir well to combine.
  • Now, add 2 cups of the hot broth and stir to combine. If the bread still seems fairly dry, add the remaining ½ cup. Season with salt and pepper to taste, then put a lid on the skillet and let the mixture sit for five minutes to allow the bread to absorb the broth.
  • After five minutes (or more – allowing it to sit a while at this stage is fine), deposit the stuffing mixture into a greased 9×9 inch baking dish, spread or pat into an even layer, and bake in your preheated 350F oven for 30-35 minutes, until the top layer is crusty but the interior is still nice and moist.
  • Serve hot, as an accompaniment for meat or veg.

Sweet Potato and Brussels Warm Salad

Food Blog November 2014-0792The first time I made this dish, which could be called a roasted side dish or a warm salad, depending on how you’re feeling, I didn’t actually make it. Let me explain. Like everyone (she says, because it makes her feel better), I have a few unfortunate… let’s call them character flaws. I’m clumsy. I drop things. I spill. I trip. Last week right in the middle of a lecture about pronouns and antecedents I bumped into the chalkboard and, in my recovery, stumbled into a wheeled desk chair that promptly rolled several feet across the classroom. My students were gracious enough to laugh at me.

Food Blog November 2014-0782Where my clumsiness can be amusing or endearing or even charming in other areas of life (I disagree, but N. seems to find it so), it occasionally winds up being dangerous in the kitchen. I take precautions: my knives are sharp, I stabilize my cutting boards, and I try not to do too many things at once. But once in a while, a knife slips, my mind wanders, and I wind up bleeding.

Food Blog November 2014-0783Food Blog November 2014-0788This unappetizing truth is what almost did this salad in. The first time I made it, this autumnal tumble of sweet potatoes, brussels sprouts, prosciutto, and walnuts, I had baked the prosciutto into saliva-inducing crisps, toasted the walnuts, and cooked off the sweet potatoes. All that remained, aside from a tart dressing I knew would involve whole grain mustard and cider vinegar, was to slice up a mess of brussels sprouts. To save on dishes, because N. hates washing the food processor, I was doing this delicate slicing by hand and, well, my hand slipped. In a matter of seconds, I was outside, sitting on the porch step with my hand in the air and my head between my knees thinking it was too early for the sky to be so dark, and N. was running for a bandage and asking questions about something called an emergency room.

Food Blog November 2014-0789When my head cleared a little, I decided the cut wasn’t bad enough to merit a hospital run, but it was bad enough that I wouldn’t be able to finish dinner. You’re up, N! We tagged out and N., usually a bit shy in the kitchen, did an admirable job slicing the rest of the sprouts, whisking up a sharp, perfectly acidic dressing, and tossing everything together. We ate, I recovered, and I suddenly had a fantastic war story to exchange with my sister when she suffered her own bit of kitchen clumsiness a few weeks later.

Food Blog November 2014-0794The dish stayed in the back of my mind. It was good when we ate it – nice for the day we’d had which, though warm, carried hints of cooler evenings to come – but I kept wanting more. The flavors should be deeper. The rawness of the brussels sprouts was okay, but with toasty edges they would be even better. My fix, as it usually is for things involving vegetables, was to roast everything. This created, I’ll admit, a bowl of cubes and shards that would never pass muster on a Pinterest board worth its salt. However,  it makes up for its homeliness by combining all the fall flavors and textures I was yearning for. It is sweet and earthy and vegetal, with the right amount of saltiness from the prosciutto. The walnuts have a slight, slight bitterness, which contrasts nicely against the sweet potato. And the dressing, tangy and light and packed with tiny mustard seeds that pop between your teeth, soaks down into the vegetables and lifts the whole thing back up into perfect, warm, satisfying fall salad territory.
Food Blog November 2014-0799

Roasted Sweet Potato and Brussels Sprouts “salad”
serves 2 as a main, 3-4 as a side
1 large sweet potato, peeled and cut into 1-inch chunks (about 3 cups)
16 ounces brussels sprouts, stem ends and any wilted or yellowing leaves removed, halved or quartered. You want the sweet potatoes and the Brussels sprouts roughly equal in size.
6 tablespoons olive oil, divided
1 teaspoon kosher salt
¼ teaspoon black pepper
5-6 slices prosciutto
1 cup walnuts, coarsely chopped
1 tablespoon whole grain mustard
2 teaspoons honey
2 tablespoons cider vinegar
Additional salt and pepper to taste, if desired


  • Preheat the oven to 450F and line a baking tray with aluminum foil. Pour 1 tablespoon of the olive oil directly onto the foil-lined tray and place the tray in the oven while it is preheating. While you wait for it to warm up, prep the vegetables.
  • Toss the sweet potato chunks and Brussels sprout pieces in a large bowl with 1 tablespoon of the olive oil, the salt, and the pepper. Once the oven is preheated, transfer the vegetables to a single layer on the foil-lined tray that has been heating up inside. The additional of the oil already on the tray means the exteriors of the vegetables will start cooking immediately.
  • As soon as you place the tray of vegetables into the oven, turn the heat down to 425F. Roast the sweet potatoes and Brussels sprouts for 20 minutes, then toss them to promote even browning and roast for an additional 20 minutes.
  • On another foil-lined baking sheet, spread out the prosciutto so the slices do not overlap. During the second 20 minute roasting of the vegetables, add the prosciutto tray to the oven and cook for about 10 minutes, until the slices are almost crisp and lightly bronzed.
  • Remove prosciutto slices to a paper towel to drain and cool, and add the chopped walnuts directly to the tray that previously held the prosciutto. Roast the walnuts for 5-6 minutes, until fragrant and slightly darker in color (keep an eye on them, though; they burn fast).
  • While the ingredients are roasting, make the dressing. In a large bowl (it can be the serving bowl, to save on dishes, if you like), whisk together the mustard, the honey, and the cider vinegar. While whisking, slowly pour in the remaining 4 tablespoons of olive oil. Taste and adjust seasonings if desired, but remember that the vegetables are already seasoned and the prosciutto is quite salty.
  • When the vegetables are roasted to your liking (I like them golden with slightly crusty edges, and yielding on the inside), remove from the oven and place them directly in the bowl with the dressing. Toss to combine. Crumble or chop up the prosciutto into bite-sized pieces, and add it and the walnuts to the bowl as well. Toss again to integrate, and serve warm or at room temperature.

Spinach and Goat Cheese Orchiette with Hazelnuts

One of the great things about the last house we lived in during our tenure in Eugene – the best house – the party house – was its location. Just over a mile from campus, it was also within walking distance of downtown (for the incredible produce and local craft market each weekend) and the fairgrounds.

Food Blog September 2014-0616The Lane County Fairgrounds played host to … well, let’s call it an interesting line-up of events. Among others, a gem and mineral show, a bridal show and wedding expo, a model train exhibit, and (I am not kidding) a wool festival. In the summers during the County Fair, we could smell the fried food and hear the cover bands from our backyard as the sun fell. Sometimes they were fun. But sometimes it was someone covering Huey Lewis and the News again. Now don’t get me wrong, I’m a believer in the power of love. After all, it don’t take credit cards to ride that train, and far be it from me to critique the theme song from Back to the Future! But several nights in a row, even if it’s only once a year, is pushing it.

Food Blog September 2014-0607Despite its foibles, the fairgrounds also hosted an annual event that N. and I went to every single year. The Friends of the Library Book Sale happened in the spring, and with most books priced at 50 cents or $1, the season was important, because we ended up having to establish rules. A household with two English literature PhD students may lack many things, but what it does not lack are books. By our third year in the program, we already had at least four bookshelves jammed so full we were piling books atop each other and committing the shelving equivalent of double parking with some of the smaller paperbacks. Every shelf sagged in the middle from the weight. Cheap books were a danger zone.

Food Blog September 2014-0611We ended up instituting a rule that we had to walk to the book sale. This required us to get some exercise and celebrate the season, but more importantly, it meant we were limited in what we could add to the collection by our own biceps. If you can’t carry it home, you can’t have it. It helped. A little.

Facing a room full of tables full of books, with more books in boxes underneath, is a daunting task. After I’d perused the “literature and fiction” area and the “classics” table, I would routinely wander to the cookbooks section. Selections here were usually hardback, which meant I’d be able to carry fewer of them, and (surprise, surprise) usually a bit pricier than the twelve ratty copies of Heart of Darkness with torn covers gracing the literature area. But for people with limited willpower, these kinds of hard and fast prohibitions are a good thing. They mean you have to really want what you’re getting, and that leads to better purchases.

Food Blog September 2014-0610Food Blog September 2014-0612I acquired several good cookbooks via this method, including one containing the first yeast bread I ever made (and it was a success!). But by far, the star has been an old annual collection of Food and Wine Magazine recipes, and within that collection itself, the single page that receives the most attention contains a pasta dish by Mario Batali. It features goat cheese, hazelnuts, and red pepper flakes coaxed into a sauce to coat a pile of orchiette, those little domes of pasta named for their apparent resemblance to little ears (though to be honest they have always reminded me more of a lady’s cloche hat).

Food Blog September 2014-0614Batali’s recipe is delicious but basic. He blends the aforementioned ingredients with a smattering of chopped parsley, a glug or two of olive oil, and a healthy pour of starchy, steamy pasta water into a creamy sauce. After tossing the pasta in all this tangy, spicy, nutty glory, Batali adds a dusting of toasted bread crumbs for some needed crunch.

My version, though it maintains the procedure, plays to my own tendency for gluttony. Unsatisfied with just goat cheese, I add some shredded white cheddar for extra savory tang. N. is a fiend for bread crumbs, so I nearly triple the quantity called for in the original recipe. In an attempt to atone for these culinary sins, I also add a tremendous half pound of fresh baby spinach leaves, lightly wilted in the pasta water during the last minute of cooking. Further, it’s gluttonous in its allowances for laziness: the sauce, such as it is, is constructed in the serving bowl, the spinach cooks with the pasta, and though you do have to dirty up your food processor, you can process the bread crumbs and the hazelnuts in it one after the other with no need to do more than tamp it out a bit in between.

Food Blog September 2014-0617The finished dish is a mountain of pasta, caressed with sauce and threaded through with enough wilted spinach to eliminate the need for a side salad (though if you still want one, be my guest!). It’s a study in textures, with the orchiette themselves retaining a lovely chew, the spinach soft, the sauce silky but rumbling with pebbles of hazelnut resistance, and topped off with the perfect golden crunch of the toasty bread crumbs. Behind all this is the steady heat of the red pepper flakes, which I alternate quantities of – sometimes just enough to add a suggestion of spice, sometimes enough to clear the sinuses of the persistent fall allergies the LA basin is kind enough to grant me. Either way, it’s a dish that I forget about in between instances, but once I’ve tasted a fresh, steaming forkful, it becomes the only thing I want to eat ever again. Again.

Food Blog September 2014-0619

Spinach and Goat Cheese Orchiette with Hazelnuts
adapted from Mario Batali
Serves 8

1-1/2 cups fresh bread crumbs (whir 4-5 slices of sourdough in a food processor)
1/2 cup hazelnuts
6 ounces goat cheese, at room temperature
6 ounces extra sharp white cheddar, grated, at room temperature
1/4 cup extra virgin olive oil
1/4 cup minced fresh parsley
1 teaspoon crushed red pepper flakes (or to your taste; this quantity produces a moderately spicy flavor)
1 pound orchiette, preferable, or another vaguely shell-shaped pasta
8 ounces fresh baby spinach
salt and pepper to taste

  • Preheat the oven to 350F. Once you’ve processed your bread into 1-1/2 cups of fine crumbs, spread them out on a cookie sheet and toast them in the oven until golden, tossing and fluffing occasionally. Depending on the density and size of your crumbs, this will take 10-15 minutes. Once golden and crisp, remove from the oven and set aside.
  • Use the same food processor, shaken free of bread crumbs, to grind the hazelnuts into a gravel with individual pieces about the size of coriander or mustard seeds (i.e. we want them small, but not quite ground into a paste).
  • Heat well-salted water to boiling in a large pot and cook orchiette according to package directions.
  • Meanwhile, put the goat cheese, shredded cheddar cheese, crushed red pepper flakes, olive oil, parsley, and ground hazelnuts into a large serving bowl. Mash it about with a rubber spatula to combine into a thick, lovely, cheesy paste.
  • In the last minute of the pasta’s cooking time, add the 8 ounces of baby spinach leaves and push them down into the boiling water with a wooden spoon.
  • When the spinach is wilted but still bright green and the pasta is tender but still pleasantly chewy, drain both, reserving about 1 cup of the pasta water.
  • Add pasta and spinach to the serving bowl with the cheese and nut mixture. Begin to add the pasta water, 1/4 cup at a time, stirring, until a thick, sauce forms that coats the pasta evenly. This may not take the entire cup of water; thin the sauce just to your desired consistency.
  • Season to taste with salt and pepper, then scatter on the breadcrumbs immediately before serving.

Baked Tofu Spring Rolls and Peanut Sauce

As I noted last week, I’ve been out of town. In fact, I’ve been off the continent (though not out of the country). Now that we’re back on the mainland, I suppose I owe you a few reflections.

July Food Blog 2014-4009Kauai is beautiful. But if you’ve ever seen Jurassic Park, or Raiders of the Lost Ark, or even the opening sequence of M*A*S*H, you already know that. It’s a tropical island dotted with beaches and rainforests. It couldn’t be anything but beautiful. But what struck me as we wandered, sandal-and-swimsuit-clad, through the little towns and massive resort complexes, was how friendly it was. I don’t just mean ordinary smiling helpful friendliness. That much is expected too, since so much of the island’s industry is built on tourism and the service jobs it requires. I mean food friendliness. Many, many businesses proudly assert themselves as GMO-free. The Kauai Coffee plantation, which we visited one afternoon (photos to follow, I’m sure), is basically off the grid. They are entirely water powered by rainfall and river flow from one of the island’s mountains, and create enough energy to power parts of nearby towns as well, sometimes. It is one of the most sustainable businesses I’ve come across, but they don’t shove it in your face, just pronounce it matter-of-factly and leave you feeling that yes, this is the right thing.

July Food Blog 2014-3993 July Food Blog 2014-3996 July Food Blog 2014-3997It’s not just that, though. It has become reasonably common practice in large restaurants or fine dining establishments, and even in some chains, for menus to include vegetarian, vegan, dairy-free, and gluten-free options. On Kauai, even many of the smallest, most local food stands are open and friendly to the idea. I guess maybe “food friendliness” translates to “willing accommodation.” There are menu codes indicating which foods are prepared without gluten, without dairy, and which can be quickly adjusted to include or remove allergens. And what was most friendly, to me, was that many of these adjustments did not involve an extra cost. Why should it, I thought, when sometimes this change is as simple as enshrouding perfectly grilled fish in a corn tortilla rather than flour?*

July Food Blog 2014-3998In that spirit, then (and because I promised my friend Ch I would post this recipe oh, a month ago…), today I want to bring you one of my favorite, most dependable and well-received party snacks that just happens to also be vegan and, if you make it with the right sort of soy sauce (even Kikkoman has a GF option now!), gluten-free as well. These pretty, tasty, surprisingly easy spring rolls involve shreds of bright carrot, bibb lettuce, fresh grassy mint, and rice noodles, a stick of tofu pressed, drizzled with soy sauce, and baked until meaty and firm, all lovingly wrapped in rice paper. Then, if you’re me, you whip up a quick batch of pantry-scavenged peanut sauce to dip them into, and you have something suitable for almost every meal. They aren’t totally allergen-free, because if you can’t have rice you can’t have the noodles or the wrappers these use, and if you have problems with peanuts, peanut sauce is of course out of the question. But they do manage to come close, accommodating the need to avoid animal products and that pesky gluten monster. Plus, they are fairly cheap to make, produce large quantities, and most importantly, are just plain delicious.

July Food Blog 2014-4000 July Food Blog 2014-4004July Food Blog 2014-4005July Food Blog 2014-4002July Food Blog 2014-4003Spring rolls are a good food to take to a party, but they are also a good food to produce party style, because they can easily incorporate an assembly-line style production method. Last month, I had a few friends from work over who wanted to learn to make them, and we sat around the little table in my little “dining room” and spent the afternoon rolling, and, as you might imagine, eating, spring rolls. They kindly acquiesced, probably thanks to the free snacks and wine I was plying them with, to let me snap a few photos of the process, so that’s what you’re seeing here. Thanks, ladies!

July Food Blog 2014-4006* This doesn’t, of course, guarantee 100% safe dining for people with celiac or other severe gluten intolerances, since kitchen cross-contamination is always a concern. But it is nice that for those avoiding gluten, even casually, there’s a cost-free option.

July Food Blog 2014-4013

Baked Tofu Spring Rolls
Makes 18-24, depending on the width of your tofu slices. Each one then gets halved, leaving you with 36-48 snackable pieces.
14 ounce block firm or extra firm tofu, sliced horizontally into three thin squares
¼ – ½ cup soy sauce or tamari (gluten-free soy sauce, but check labels carefully)
3-4 ounces dry rice noodles (sometimes called Maifun or Rice Sticks; I like Dynasty brand)
3 carrots, peeled and grated
1 head butter lettuce, leaves removed, halved, and crisp rib removed
30-40 leaves mint from one bunch
Round rice paper spring roll wrappers (I like the brand with the rose on the label)
Warm water

  • At least three hours before you want to serve your spring rolls, slice the tofu as described and press it by placing the thin squares between layers of paper towels and placing something heavy on top of them. I often use my cast iron pan for this. A baking dish weighted with cans or bottles works well too. Leave the tofu to press for at least 60 minutes to squeeze out some of the water.

  • During the last 15 minutes of pressing, preheat oven to 325F and line a baking tray with aluminum foil. Space out the tofu squares on the aluminum foil, being sure they don’t touch.

  • Dribble each square with soy sauce to coat and bake for 60 minutes. After the first 30 minutes, dribble the top of each square with more soy sauce, as the first application will have soaked in. When they are done, the edges of the squares are deep brown, solid, and feel a bit rubbery. Remove and let cool completely, then cut into ½ inch strips (roughly index-finger-width).

  • While tofu bakes and cools, prep the other ingredients – grating carrots, stemming mint leaves, separating lettuce leaves, etc. Submerge the rice noodles in hot water and let them steep for 8-10 minutes, until they feel flexible and are tender when bitten. Drain well and set aside to cool.

  • To roll, set up an assembly line – mint, then lettuce, then carrots, then tofu, then noodles. Be sure to have a plate or other vessel on which to place your finished rolls at the end of the line-up. Add warm water to a wide, shallow dish or bowl that the rice paper will fit into. You will address this step first.

  • Here we go: submerge one rice paper wrapper in the warm water and let it sit until it becomes completely pliable. I find this tends to take somewhere between 30 and 45 seconds.

  • When the rice paper is ready, remove and place on a flat surface. If you wish, you can briefly spread it on a paper towel to soak up some of the drips, but this isn’t strictly necessary.

  • Place 1-3 mint leaves around the rice paper wrapper, bottom surface facing up. This ensures the top, more attractive side of the leaf will be visible through the wrapper on the finished roll.

  • Next, place a piece of lettuce in the center of the wrapper so the longer edge of the lettuce (if there is one) faces you. Sprinkle this with grated carrots (a few teaspoons, though I always eyeball it).

  • Lay a piece of tofu in the cradle of lettuce and carrots you’ve created, positioning it with the long edge facing you (so, horizontally – see photos above for reference). Top the tofu with a small pile of noodles – no more than a few tablespoons, were we picky enough to measure them out – arranging them across the tofu.

  • Now we roll! As the wrapper faces you, fold in the left and right “edges” over the short sides of the tofu, so what you have looks like a long oval with two squared-off sides. Next, take the side of the wrapper closest to you and fold it completely over your fillings, then pull tight toward you. Roll up the wrapper, tucking each revolution tightly so the fillings are well contained. The tighter rolled, the better they will stay together.

  • Repeat until you run out of tofu slices! You will get a nice rhythm established. I find I can complete a roll in the time it takes a new rice paper wrapper to soften. Then you are all set to start the next.

  • Just before serving, halve each roll on the bias (with a diagonal cut) for attractive presentation.

  • These will keep, packaged in an air-tight container in the refrigerator, for 1-3 days. Let them come to room temperature before serving, as the rice paper is a little tough when cold.

Peanut Sauce
Makes a generous 1 cup
½ cup peanut butter
½ cup water
2-3 tablespoons soy sauce or tamari
1 tablespoon sriracha or other hot sauce
1 tablespoon grated ginger (if the fresh ginger is frozen, it grates really easily)
1 tablespoon rice vinegar or lime juice

  • In a small saucepan, combine all ingredients over medium low heat. Stir gently with a small spatula or a spoon.

  • As the ingredients melt together, at first the mixture will look watery and very grainy. Keep stirring gently, and it will smooth and thicken to an almost-pourable texture.

  • Taste for seasoning. If it is too salty, add an additional tablespoon each of peanut butter and water. If it is not spicy or salty enough, add more sriracha, soy, or ginger as needed.

  • Serve warm.

  • As it cools, the peanut sauce will separate slightly. Stir vigorously to re-combine.