Wasabi Roasted Cauliflower

*

This is not the most photographically alluring side dish I’ve ever made. It doesn’t offer crisp angles or bright colors or sharp contrast. It doesn’t stack neatly or layer into a cup or offer much opportunity for props. It’s essentially just an inelegant heap of cauliflower and breadcrumbs, that most anemic of vegetables tumbled together with toasted panko.

But here’s the thing: the cauliflower is roasted for a quick half hour at very high heat, so that its florets bronze and crisp but still retain some juiciness, and then the moment it comes steaming out of the oven, you toss it in a mixture of wasabi mayonnaise and chives, and then you douse the whole tray with panko that you’ve toasted in olive oil to an intense golden crunchiness, and you toss, and you pile it onto your plate, and what you find yourself most invested in is the size of the pile, not its aesthetic potential.

I found the basis for this simple little vegetable side among my mom’s recipes during the Christmas holiday. I typically go through her cookbooks when I visit, and this one was shoved into a binder with a collection of snippets and newspaper clippings from the food section, in her own handwriting, with the word “delicious” written at the bottom. I was intrigued, so I did what any technologically-steeped child does: I snapped a photo of the recipe with my phone, and then promptly forgot about it for two months.

When I came back to the recipe a few weeks ago, I saw immediately that I would make a few changes. Mom’s version instructed me to steam the cauliflower, but I’ve never been a fan of the cabbage-y mustiness that steaming or boiling this particular vegetable produces. No, if part of the point was to elicit a crunch, then we would go the extra mile and roast it first. Hers suggested mixing regular mayonnaise with wasabi paste, and you can certainly do that if you want to adjust the level of spiciness, but there are a number of brands of pre-mixed wasabi mayonnaise available, and I happen to like the balance and ease of Trader Joe’s version, so I’m using that (though I’ve provided quantities for the mix-it-yourself-option as well). Mom probably used a standard American style breadcrumb, and toasted it in butter. I went for panko instead, for even more shattering crispness, and increased the quantity considerably for my breadcrumb-loving dining partner.

The first thing you notice when you eat this is the panko. It is toasty and deep with just enough salt, and just as you’re fully appreciating the texture, the wasabi hits with that perfumed, nostril-curling sharpness. You are taken aback at first, but you keep chewing, and then you get the tender/crisp roasted richness of the cauliflower underneath, and then you’re suddenly shoveling in another bite. We decimated our first tray in an embarrassingly short space of time, and I wanted to eat this again three days later. So we did.

The first time I made this, we piled it next to fillets of salmon. The next time, it was a side for simple pan-browned bratwurst. It was perfect with both, and the hefty dosing of breadcrumbs means you likely won’t miss having a starch. You could dress things up a bit by adding a teaspoon or two of sesame oil to the olive oil you use to toast the panko or roast the cauliflower, and only after we were washing dishes after dinner did I consider the idea of combining the panko with some sesame seeds, or adding citrus zest for extra brightness, or pulverizing some dried seaweed sheets and tossing them in with the crumbs at the last minute. If you want to flirt with these possible additions, I’d suggest about 3 tablespoons of sesame seeds, or the zest of one lemon or lime, or 2 tablespoons of seaweed – it can be fairly strong.

* GUYS. IMPORTANT UPDATE ON THIS RECIPE. INSTEAD OF THE SESAME AND/OR SEAWEED SUGGESTED ABOVE, ADD ABOUT 2 TB FURIKAKE SEASONING TO YOUR PANKO. YOU’RE WELCOME.


Wasabi Roasted Cauliflower
Serves 2-4 as a side dish
35-40 minutes
1¼ cups panko bread crumbs
4 tablespoons olive oil, divided
(optional: zest from one lemon or one lime, or 3 tablespoons sesame seeds, or 2 tablespoons very finely chopped or pulverized dried seaweed, OR 2 TB furikake seasoning (sesame and seaweed lightly seasoned with salt and sugar)
½ teaspoon salt
1 large head of cauliflower, trimmed into medium florets (I went for large bite-size)
(optional: 1-2 teaspoons sesame oil)
1 tablespoon finely sliced chives or green onions
¼ cup + 1 tablespoon wasabi mayonnaise OR scant ¼ cup regular mayonnaise + 1 tablespoon wasabi sauce or paste, or to taste


  • Preheat the oven to 450F and line a 9×13 inch baking tray with aluminum foil. While the oven warms, cut up the cauliflower and spread it out in a single layer on your prepared baking tray. Toss it with 1 tablespoon of the olive oil (and the sesame oil, if you are using it). This doesn’t seem like much oil for roasting, but we are adding more fat later with the mayonnaise, so we’re taking it easy here. Roast in the preheated oven for 15 minutes, then retrieve, flip over each piece (yes, I’m serious) to expose the other side, and roast a further 15 minutes.
  • While the cauliflower is roasting, heat the remaining 3 tablespoons of olive oil in a skillet over medium heat. When it is shimmering, add the panko and the ½ teaspoon of salt (if you are using citrus zest or sesame seeds, now is the time to add that as well). Toast, stirring very often, until the panko crumbs are dark golden, probably 3-4 minutes at the outside. Set aside. (If you are using seaweed crumbs, stir them in once the panko has cooled.)
  • After you’ve toasted the panko, combine the wasabi mayonnaise (or the regular mayonnaise with the wasabi sauce or paste) and the chives or green onion in a small bowl.
  • When the cauliflower is roasted, take it out of the oven, scoop and dollop the wasabi mayo mixture onto it, and toss gently to coat. Add the toasted panko crumbs (it will seem like too much, but trust me), again toss gently to ensure even coverage, and serve immediately, scattering on any extra crumbs that are unwilling to adhere.

Save

Zucchini Crepes with Mascarpone Almond Cream

food-blog-february-2017-0288There is no way I can connect this recipe with Black History Month. I’ve tried. The transition just isn’t there. But when this issue of The New Yorker showed up on our doorstep, with this beautiful new imagining of the iconic Rosie the Riveter staring confidently back at me on the front, I wanted to make sure you saw her. Clearly a response to the Women’s March, she is also a powerful image of intersectional feminism, replacing the white WWII era working woman with an African American marcher, pink pussy hat and all. And though the cover doesn’t bear Rosie’s original accompanying phrase – “We can do it” – there’s no way to divorce that message, with all its connotations, from this new version.

There is so much to do, but we can do it.

food-blog-february-2017-0260These started not as crepes but as a desire to modify my favorite zucchini spice bread recipe into a pancake (I told you there was no transition. I just wanted to show you my magazine cover and remind you about the history we should be celebrating this month). There would be nutmeg and cinnamon, there would be caramelized crisp edges, there might be golden raisins… and then I made the mistake of searching for “zucchini bread pancakes” online, and of course the first hit was Deb’s recipe, deepening, as ever, my intense love-hate relationship with her and her site. Let me be clear, before you start emailing me: I adore Smitten Kitchen (look, Deb, I’m even giving you traffic!). I have the cookbook, I went to a signing and thoroughly embarrassed myself, and I trawl through her archives all the time, because she has tried everything! But there’s the hate part (or, at least, the jealous part): she’s tried everything! I certainly wasn’t going to make zucchini bread pancakes if she already had the consummate version (which, of course, I just automatically assume she does. Being a jealous fan-girl is weird).

food-blog-february-2017-0263food-blog-february-2017-0267So I had to go with something different, and somehow something different became crepes. I wasn’t sure how they would work, given the sodden heaviness large quantities of shredded zucchini often contribute to a dish, but the zucchini were already in the fridge and the milk on the door was begging to be used, so the experiment had to move forward.

food-blog-february-2017-0255I’m calling these crepes, but they don’t share ratio or ingredient quantities with other crepe recipes. My grandfather called them Swedish pancakes, probably more because he was Swedish than due to any recipe authenticity. They are a bit moister than some crepes – a little less papery around the edges, maybe a bit heavier, and we’ve never been particularly fussy about getting them wafer thin. Here, the addition of the zucchini makes these qualities important, since the batter has to be substantial enough to hold up to the extra weight of the vegetation.

food-blog-february-2017-0268food-blog-february-2017-0272As I always yell at food competition contestants when they scrunch or tear or mangle their first crepe, the first one probably is going to be ugly. Maybe the second one too. But you have to persist. Crepes require a bit of a rhythm – you have to get a feel for how much batter goes into the pan, how steeply to tilt your pan while you swirl to get an even coating of batter, and how long it really does need to cook before you can flip that delicate, eggy circle. And ultimately, really, it’s okay when that first one rips, because now you get to eat it surreptitiously and make sure it’s good. Cook’s prerogative.

food-blog-february-2017-0277These were indeed good. The zucchini is mild, so don’t worry if it’s not your very favorite vegetable flavor, but it cooks so quickly that every bit of grassy rawness was gone. They could go in a sweet or a savory direction, but I opted for sweet, whisking mascarpone cheese with some honey, some lemon, and roughly chopped toasted almonds for a bit of crunch. Lemon and zucchini play well together, as do zucchini and almonds, and it’s nice to have some texture in with the softness of the cheese and the pliable delicacy of the pancake.

food-blog-february-2017-0280We had these for dinner as a decadent response to a rainy day, but they would make an indulgent breakfast or a superb brunch course as well. You can fold the crepes up into a triangular, handkerchief-like packet with a mound of cheese inside, or you can roll up into a cylinder, which is what my family has always done. I found I liked a few almonds sprinkled over the top, and an extra drizzle of honey as well. Any extra crepes keep fine covered in the fridge for a day or two, until you take them out, reheat them with a bit of salted butter, and smother them with cinnamon sugar, because some days require that kind of solid self care, so you can get out there and keep going.

food-blog-february-2017-0293

Zucchini Crepes with Mascarpone Almond Cream
Makes 10-12 crepes in a 10-inch skillet
30-40 minutes
For the filling:
½ cup whole raw almonds
8 ounces mascarpone cheese
1 tablespoon heavy cream
2 tablespoons honey
zest of one lemon
1-2 teaspoons lemon juice
additional honey, to drizzle
For the crepes:
2 cups shredded zucchini, from 2 medium zucchinis
2 cups milk
2 tablespoons melted butter
3 eggs
1½-1¾ cups all-purpose flour
1 teaspoon sugar
⅛ teaspoon salt


  • First, make the filling. Preheat the oven to 350F. While it heats, roughly chop the almonds – it’s okay to have some uneven sizing. Spread them out on a baking tray and toast in the oven 10-15 minutes until they are golden brown. Start checking at 10 minutes; keep in mind they will continue to cook after you take them out of the oven.
  • In a bowl, whisk the mascarpone cheese and the heavy cream together until light and fluffy (I used the whisk attachment of my stand mixer). Add the honey, the lemon zest, and the lemon juice, whisk again and taste for seasoning – you are looking for something lightly sweet, and rich but not overwhelming. When the almonds cool, fold ¾ of the amount into the mascarpone mixture, reserving the remainder to sprinkle atop the crepes.
  • To make the crepes, shred the zucchini in a food processor or with the large holes on a box grater. Collect them on a clean kitchen towel and squeeze to remove as much liquid as possible. Let it sit for 2 minutes, then squeeze once more.
  • Warm the milk slightly in a bowl or large glass measuring cup and add the melted butter, stirring to incorporate. This ensures the butter will integrate evenly, rather than hardening back into chunks. Let cool to room temperature and whisk in the eggs, then 1½ cups of the flour, the sugar, and the salt. Finally, whisk in the zucchini shreds. You should have something like a thin cake batter, probably thinner than your average pancake batter. If it seems too liquid, add the remaining ¼ cup of flour.
  • To cook the crepes, heat about 2 teaspoons butter in a 10-inch skillet or crepe pan over medium-high heat. Pour in about ⅓ cup of batter, turning and swirling the skillet as you do so to allow for a thin layer of batter to coat the entire surface. Try to spread out the zucchini a bit – it has a tendency to clump up in the middle, which results in uneven cooking.
  • Cook 1-2 minutes per side, until golden and almost dry. Don’t be alarmed if the first crepe tears or is otherwise mangled – they are delicate, and you have to get a rhythm going. After every two crepes, add another few teaspoons of butter to the skillet.
  • As you finish cooking each crepe, remove from the skillet to a covered plate to keep them warm. They won’t stick together – there’s enough fat in them to prevent clinging.
  • To serve, spread out one crepe on a flat surface and spread a few tablespoons of the mascarpone and almond mixture in a line a bit to the left of the center. Use the tines of a fork or your fingers to lift the edge of the crepe over the mascarpone filling, then continue rolling up into a tight burrito shape. Remove to a serving plate and continue with remaining crepes and filling. Sprinkle the finished rolls with the remaining almonds, and if desired, drizzle with more honey before serving.

Grape and Cherry (Tomato) Avocado Toast

food-blog-january-2017-0152
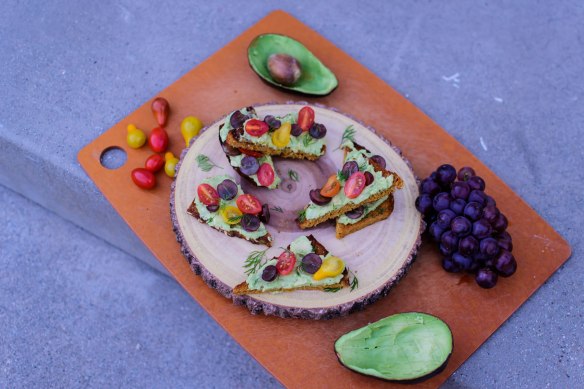
This one is a restaurant recreation from a spot we like in Culver City. These guys appreciate the lux/simplicity combo that is avocado toast; in fact, they are also the inspiration for my last foray into this ever-so-trendy meal base.

food-blog-january-2017-0136Cherry tomatoes and grapes seemed like a strange combination, and I was dubious about how well grapes would play with avocado, but it all works. The tomatoes are bright and acidic, and the grapes are tart enough that, with a squeeze of lemon and flake or two of salt on top, they toe the savory/sweet line successfully.

food-blog-january-2017-0157

I hope all is well in your world.


Grape and Cherry (Tomato) Avocado Toast
Serves 2 as an appetizer; 1 as a light lunch
About 15 minutes
4 thin slices sourdough or French bread (you can remove the crusts if you want more uniform toasts)
Olive oil spray, or 1-2 teaspoons olive oil
1 teaspoon coarse sea salt, divided
1 ripe avocado
1 tablespoon lemon juice, divided
freshly ground black pepper to taste
12 cherry tomatoes, halved (I like a mix of colors)
12 red grapes, halved
1 teaspoon fresh dill sprigs
1 teaspoon finely chopped chives
  • Preheat your broiler to high and prep the bread by spraying or brushing it with the olive oil on both sides. Sprinkle ¼ – ½ teaspoon coarse salt evenly over both sides of all four slices (that is, ¼ – ½ teaspoon for all four, not ¼ – ½ teaspoon per slice). Set the slices on a broiler tray or a wire oven rack set over a cookie sheet and broil on high, flipping each slice over once, until nicely browned and quite crisp on both sides. Don’t step away or try to prep other ingredients while you broil; the bread can burn very quickly. Once you have crisp, golden toast, set it aside to cool slightly.
  • In a small bowl, smash up the avocado with 1-2 teaspoons of the lemon juice. Add black pepper to taste, and slightly underseason with salt (we’ll be adding more to finish). You can go with a perfectly smooth mixture if you want, but I like to leave a few small chunks of avocado for extra texture.
  • Smear ¼ of the avocado mixture in an even layer onto each piece of toast. Then cut each slice on the diagonal and arrange it on a plate or serving platter. Arrange the halved grapes and tomatoes on each piece – aim for even distribution. Scatter the chives and dill sprigs over the top, then squeeze on the remaining 1 teaspoon lemon juice and a very light sprinkle of coarse sea salt. That way we get a crunch and salty kick with each piece.
  • Serve immediately – underneath the weight of the avocado, the toast will soften very quickly.

Save

Carrot Soufflé

2016-food-blog-photo-december-7A few weeks ago, I got my “what to blog about” inspiration from the unlikely source that is the Trader Joe’s samples counter. They were demo-ing carrot soufflé, a bright orange spoonful of light, sweet puree that I immediately wanted to play with. I’ve done a sweet potato soufflé before, and I thought a carrot version would work equally well as a semi-sweet holiday side dish, bumped up with a few flavor partners these bright, knobbly spears play well with.

2016-food-blog-photo-december-0684I’m not usually a fan of oranges in holiday dishes (especially the aforementioned sweet potatoes: keep that orange juice out of my carbs!), but carrots and orange are too chummy to keep separated for long. Ginger seemed like another good guest to invite to this party, and a good squeeze of maple syrup to add a burnished kind of sweetness in there.

2016-food-blog-photo-december-5Soufflé carries with it a reputation of delicacy and fussy fragility, and in some ways this is true. The elegant, gravity defying puff that is its signature is in part a result of egg whites beaten just so, but also of careful handling and a patient, even leisurely attitude. And sometimes it just falls. When that happens, you just have to shrug and accept it. Maybe have another glass of eggnog.

2016-food-blog-photo-december-0697This is a (reasonably) convenient soufflé recipe in that it involves an equal number of egg whites and egg yolks. There’s a bit of fussiness with separating, ensuring you haven’t tainted the pristine whites with even a breath of yellow, or they won’t rise up into that spongy cloud you need. But scrupulous attention helps with that, and a dash of cream of tartar ensures a quicker, fluffier snowdrift of whipped whites.

2016-food-blog-photo-december-6Apart from that, it’s just a question of integration. The carrots, after a softening boil in water and orange juice, get blended with flavoring agents, yolks, and a glug or two of cream, and then it’s just a question of folding in those whites carefully and gently, trying not to deflate anything. I’ve explained my method in the step-by-step below, but here’s another excellent reference from the kitchn, if you want more detailed guidance.

2016-food-blog-photo-december-7After a careful deposit into the oven (we want all the air we can keep in this dish of orange velvet), you are rewarded with a bronzed puff, heavier than meringue or mousse, lighter than custard – that impossible, almost strange, texture only a soufflé has – and you scoop out great spoonfuls because it’s so light, and brightly carrot-y, enhanced by the orange and the ginger and luxurious from the cream. I think this would go well with a turkey or ham-based holiday menu, but we had ours with herb and butter basted salmon, and found we didn’t miss having a starch component. Besides, it left room for a dessert I’ll show you next week: another puff, but of a very different sort, equally on board for the impending holidays.

2016-food-blog-photo-december-8

Carrot Soufflé
80-90 minutes, including cooling time for the carrots
Serves 4
2½ cups peeled, 1-inch carrot chunks (6-7 medium carrots)
zest from one large orange
¼ cup fresh orange juice from one large orange
2 cups water
1 teaspoon salt
2 tablespoons butter
1 tablespoon brown sugar
1 tablespoon grated fresh ginger
¼ cup maple syrup
½ cup heavy cream
3 eggs, separated
¼ teaspoon cream of tartar, optional


  • In a medium pot with a lid, combine the carrots, orange juice, water, and salt. Plonk in the juiced halves of the orange too (reserve the orange zest for later). Pop on the lid and bring to a boil over medium high heat, and boil until the carrot pieces are tender but not falling apart: 10-15 minutes, depending on the size of your carrot chunks. Drain and cool to just above room temperature (we’re going to add raw egg yolks and don’t want them to scramble).
  • While the carrots are cooking and cooling, preheat your oven to 375F and prepare your baking dish: use the 2 tablespoons butter to grease a 1½ quart round baking dish with straight sides (by all means use a proper soufflé dish for this if you have one; I don’t. But hey, it is almost Christmas…). Sprinkle the brown sugar over the buttered sides of the container, then stow it in the freezer for 5-10 minutes. The sugar sanding creates texture to help the soufflé climb the walls of the container, and freezing it makes it take longer to dissolve in the heat of the oven, so you’re giving your puff a head start.
  • In the pot with the cooled carrot chunks, add the fresh ginger, the maple syrup, the heavy cream, the reserved orange zest, and the 3 egg yolks. Use an immersion blender (or transfer the whole mix to a blender or food processor) to break down into a smooth puree. Be sure no carrot hunks remain.
  • In a separate bowl, add the cream of tartar to the egg whites. Using a handheld electric mixture (or a whisk, if you need to work on your arms), beat the whites at first over medium, then high speed until medium peaks form. The whites will foam, and then become pure white, and finally begin to stiffen like a good whipped cream. To determine the stiffness of your peaks, turn off the beaters and lift them straight out of the whites. If you get little hills that collapse back into the mixture, you have soft peaks. If you get little tips that fold over just a bit when you pull the beaters away, you are looking at medium to stiff peaks, which is what we want.
  • Using a rubber spatula, scoop about ⅓ of the egg white fluff into your carrot puree base and stir until no white streaks remain. No need to be careful with this part – full integration is just fine.
  • Now, slide the other ⅔ of the whites into the sweet potato mixture and fold in gently until just combined – some white streaks may remain and that’s fine. I like to fold by drawing my spatula around the edge of the bowl in a horseshoe shape, then pulling it back toward me in a straight line.
  • Retrieve your frozen baking dish and fill with the soufflé mixture, being careful not to let it plop from too high (in case of deflation). Smooth off the top the best you can – this seems fussy, but it will aid in even rising.
  • Bake in a preheated 375F oven keeping the door closed the whole time for 35-45 minutes, until the edges are nicely browned and the soufflé has puffed up in the center as well as the sides. For maximum wow factor, transport carefully and immediately to the table, so your fellow diners can appreciate your soufflé skills before it deflates. Dig in with a large spoon and enjoy.

Pumpkin Oatmeal Rye Bread

2016-food-blog-november-0522I’ve felt pressed since summer, when it comes to posting – I’ve been, all too often, a negligent blogger. There are many reasons for this, especially in the past few weeks, but I realized part of the reason lately, and that reason is the absence of a group. I liked the challenge of a monthly bread assignment, and between the dissolution of the Twelve Loaves baking party, heat, and busyness, I haven’t been doing as much experimental bread baking as I used to. I looked back, for another cooking project a week or two ago, at the notes I’d made about Suzanne’s site in my Five Seed Loaves post, and was reminded of the idea for a bread – inspired by hers – that incorporated rye flour, and canned pumpkin, and maybe some rolled oats for heft. With a long weekend looming and the season of pumpkin upon us, it seemed like the right thing to do.

2016-food-blog-november-05012016-food-blog-november-0504The problem with canned pumpkin, as anyone knows who has grown frustrated by repeated testing of that pumpkin chocolate chip bread that just will not finish baking, is its incredible water content. It keeps baked goods amazingly moist, but it also is a sopping, wet, hard-to-deal-with mess if you aren’t careful, especially in dough.

2016-food-blog-november-32016-food-blog-november-0498Irvin helped me solve this problem, with the ingenious tip he discovered of cooking down your canned pumpkin first, to eliminate some of that pesky moisture and concentrate the flavor. A quick, hot fifteen minutes of near-constant stirring and folding results in a thick, deeply sunset orange pan of something the texture of thick frosting that adds flavor and richness, but won’t bog down your mixture. I foresee many pumpkin-centric baking projects in the future, now that I know this helpful little extra step.

2016-food-blog-november-0507As with most breads, this one involves a substantial knead, a long first rise, a punch and a shape and – after a roll in some pumpkin seeds and rolled oats for texture and indication of predominant ingredients – a second rise before baking for a little over half an hour. These loaves incorporate some molasses for sweetness and color, and milk rather than water.

2016-food-blog-november-0525I must admit, the rye flavor doesn’t come through overly much here, though I suspect it added to the substance and of course to the lovely toasty color of the finished loaf. The pumpkin is mild as well, but you can taste it despite the absence of the telltale wintry spices that usually accompany this big squash. It’s satisfyingly orange inside (which makes photo editing tricky, by the way!), and it is a rich autumnal flavor I already want to taste again. The oats all but disappear into the dough as it bakes, and they contribute to the pleasant, spongy density of the thick slices you’ll be carving off to slather with cream cheese.

2016-food-blog-november-0529

Pumpkin Oatmeal Rye Bread
Makes 2 9×5 inch loaves (though mine were a little stubby from overly tight loaf shaping)
4-5 hours, approximately
15 ounce can of pumpkin puree (not pumpkin pie filling)
1½ cups warm milk
small pinch white sugar
1 tablespoon active dry yeast
1½ cups rolled oats, divided
2 cups dark rye flour
¼ cup molasses
1 tablespoon salt
2 tablespoons melted butter
2-3 cups bread flour
½ cup raw pumpkin seeds


  • Cooked the canned pumpkin in a skillet over high heat for 10-15 minutes, stirring frequently to avoid burning, until it is thick and reduced and takes on the consistency of a thick, spreadable frosting. You should wind up with only about ¾ cup left. Let it cool to room temperature.
  • While the pumpkin cools, combine the warm milk with the yeast and sugar, stirring briskly, then let sit for about 10 minutes to allow the yeast to activate. The surface of the milk will get bubbly and smell bread-y.
  • In the bowl of a stand mixer, combine the yeasted milk, 1 cup of the oats, the rye flour, the molasses, the melted butter, the salt, and the cooled pumpkin. Use the paddle attachment on low to medium speed to combine.
  • Now begin adding the bread flour ½ cup at a time, paddling in each addition, until a soft dough forms that pulls and tears away from the side of the bowl. You may not need the entire 3 cups of flour – I ended up using about 2½ cups total.
  • Switch to the dough hook and knead on medium speed for about 5 minutes. The resulting dough will be soft and sticky – a play-dough that clings to your fingers – but that’s okay. The oats need time to absorb the liquid so it will become less tacky as it rises.
  • Spray the inside of the bowl with a non-stick spray or olive oil, flipping over the dough so both sides are coated. Cover the bowl with plastic wrap and set it in a warm place to rise until doubled; 60-90 minutes.
  • When the dough has doubled, punch it down by depressing your fist gently into the middle, then let it sit to get its breath back for about 10 minutes. While it rests, spray two 9×5 inch loaf pans with non-stick spray and start the oven preheating at 375F. Combine the pumpkin seeds with the remaining ½ cup of oats and spread out on a flat, rimmed surface like a cookie sheet.
  • Carefully dump the risen dough out onto a very lightly floured board. The more flour you use, the more trouble you’ll have getting the seeds and oats to stick. Divide the dough into two equal hunks, then form each into a loaf and roll it through the seed and oat mixture before settling it into its respective loaf pan. If you have a lot of trouble getting the oats and seeds to stick, spray the loaf with nonstick spray or olive oil first, then have another go.
  • Cover the loaf pans with plastic wrap and set the loaves aside to rise again for about 45 minutes.
  • When the loaves have just about doubled in size again, remove the plastic wrap covering them and carefully set them into your preheated oven to bake until their central temperature reaches 180-200F; about 35 minutes.
  • Let the loaves cool in their pans about 10 minutes, then remove to a wire rack to cool completely.

Save

Save

Quinoa and Kale “Winter” Salad

Boo!2016-food-blog-october-0317Not really. Alas, the only Halloween-ish-ness I can attach here, for all my attempts to catch up with the impending holidays (and everything else), are the “scare” quotes in the title. (Haha? Maybe? I know; groan.)

2016-food-blog-october-02942016-food-blog-october-0302Instead, let’s pretend I’m so caught up that I’m actually looking forward. Forget autumn; I’m already a season ahead. This is a winter kind of salad: no wimpy lettuce and out-of-season tomatoes here, but sturdy greens and the substantial base of quinoa. A good grain salad is a lovely thing – an entrée rather than a starter or a side, if you fill your plate enough – and this one is no exception. It is based on a bright incarnation from the Firestone Walker brewpub located near us, and it screams California, doesn’t it? As if just quinoa or kale on its own weren’t enough, this one offers the hipster bifecta in one brightly colored mound. If we completed the trio and added avocado, we’d probably all spontaneously sprout handlebar mustaches and skinny jeans (although seriously, avocado chunks would be a nice addition here). The aforementioned scare quotes in the title are because, although this is a winter salad, the place it really screams winter… is in California. The kale and cabbage are cold-weather vegetables everywhere, with kale really becoming sweet and crisp after exposure to frost, but the orange segments and the bright gemstones that are pomegranate seeds are also winter crops – spots of brightness in the chill that we can at least dream of in what constitutes a Southern California winter.

2016-food-blog-october-03032016-food-blog-october-0307As a good salad should, this one has plenty of textures for your teeth to play with: the quinoa offers a toasty, chewy bite, the cabbage is raw so it provides a rough crunch, and the feta has that strange squeaky-soft chew. I like that pop of a pomegranate aril and the sudden crushing of the seed within; it’s a nice little metaphor for today, isn’t it? A sweet, plump, juicy treat, but the trick of an unexpected crunch hiding within.

2016-food-blog-october-0315

Quinoa and Kale “Winter” Salad
Serves 4
About 30 minutes
1 tablespoon olive oil
1 cup quinoa, rinsed and drained
2 tablespoons white wine (optional)
2 cups chicken broth, vegetable broth, or water
2 cups red cabbage, sliced into thin ribbons, then halved or quartered into bite-size sticks (see photo)
4-5 ounces kale, thick stems removed, finely chopped (will be about 2 cups when chopped)
½ cup pomegranate seeds
2 large oranges: one cut into segments or supremes (see here for a clear photo tutorial by the kitchn), one reserved for juicing
½ cup crumbled feta cheese + 2 tablespoons
2 tablespoons finely sliced chives or green onions
¼ cup fresh orange juice
1 tablespoon champagne or white wine vinegar
2 teaspoons honey (optional)
¼ cup olive oil
salt and pepper to taste


  • In a medium pot, heat the olive oil over medium heat until it is shimmering. Add the rinsed, drained quinoa and toast, stirring frequently, until the grains are dried and smell nutty. Add in the white wine, stirring while it steams and absorbs, then add the broth or water, stir, and clamp on a lid.
  • Let the liquid in the quinoa pot come to a boil, then reduce the heat to a simmer and cook until the liquid is absorbed and the little thread-y looking germ around the quinoa has loosened and separated (see photo above). Package directions usually say this takes 12-15 minutes; I find I like my quinoa a bit more cooked: 18-20 minutes. You do you. When the quinoa is finished cooking, remove the lid, fluff it up a bit, and set aside to cool.
  • While the quinoa cooks, prep the rest of your ingredients: thinly slice the cabbage and cut down the big slices into short, stumpy ribbons, chop the kale finely, and cut the chives or green onions into wispy circles. Make supremes from the orange, and add them along with the vegetables, the cheese, and the pomegranate seeds into a large bowl.
  • You can also use this time to make the dressing: in a 2-cup glass measuring cup, whisk the orange juice with the vinegar and the honey. You can squeeze out the core of the orange that you supremed earlier for some of this, but unless it’s very juicy you will likely need a bit more from the second orange. Stream in the olive oil, whisking constantly, to form a nicely emulsified dressing. Add salt and pepper to taste, whisk up once more, and set aside.
  • When the quinoa is finished and has cooled a bit, pour the dressing over it, stir and fluff to distribute evenly, then dump into the bowl containing the rest of your ingredients. Toss gently to combine.
  • To serve, either scoop out mounds onto individual plates, or just present in a large salad bowl or platter. Just before serving, top with the remaining 2 tablespoons of feta cheese.

Save

Save