Parsley Pie Crust

Food Blog January 2013-0412

I’ve never been one to start at the beginning.  Stories require backing up and wait- wait- let me explain who that was.  Dreams are recalled near the end, and only slowly do the initial details return.  Directions often skip a step or come in fuddled order.  I don’t know whether this is a consequence of a disorganized brain, or whether it’s a signal of confused genius (hah!).  The Odyssey, with its in media res trope, was an enormity to my teenage brain when I first encountered it during high school.  What a wonderful way to present information, and how validating and revelatory it was to find out that this was a classical method!

So it was no big surprise that, when facing the first week of my dough challenge, I couldn’t start at the beginning.  Ruhlman arranges Ratio with doughs first, true, but he seems to traverse the category in a solids-to-liquids order.  Bread comes first, pate-a-choux closes the chapter.  To me, this was even more intimidating than the idea of tackling dough at all.  Bread is something I want to build toward, not race into headfirst.

I flipped ahead in the book to take on my own personal Waterloo: pie crust.  Supposedly “easy as.”  But I’ve never found it that way.  My crust is somehow tough AND crumbly.  It collapses, it sticks, it refuses to roll in a smooth circle, it requires patching and crimping and pressing and it’s just easier to buy Pillsbury.  But now I’m in it, and I’ve got to conquer this thing.

Despite this personal beginning, it wasn’t enough for me to just make a pie crust.  You guys have probably all made pie crust.  How boring would it be for me to just report on the quiche I made?  At the end of the pie crust section, Ruhlman lists a number of alternatives and additions.  Ground nuts, cracked peppercorns, a dusting of spices, parmesan cheese?  I had never considered this.  I had to try it out.

Our quiche would have a parsley crust.  Coincidentally, this made my experimentation a perfect candidate for submission to Weekend Herb Blogging.

(I started with parsley, and then I started imagining adding lemon zest, and big particles of cracked black pepper, and then I realized that I just wanted some of the herbed buttermilk biscuits I so heralded when I made them for my Bittman project.  Biscuits are in our future, friends.)

The ratio for pie dough – at least this one – is 3, 2, 1.  Three parts flour, two parts fat, one part water.  This is by weight.  The problem here is, despite my desire to conquer this beast, and despite the impressive (read: verging on ridiculous) collection of kitchen tools I’ve amassed over the years (pot sticker press, anyone?), I don’t have a kitchen scale.  That makes it hard to work in weights.

Food Blog January 2013-0385

Fortunately, though he advocates it persistently, Ruhlman provides the general weight range for a cup of flour, so I worked with that.

Every pie crust recipe I’ve ever read, Ruhlman’s ratio included, calls for the water to be ice cold.  I get this: you want the fat to remain cold during this construction phase so it can melt and leave flaky pockets as it bakes.  Ice water keeps things frosty.  I decided to skip the ice cube middle man and stuck my water in the freezer for a few minutes.

Food Blog January 2013-0396

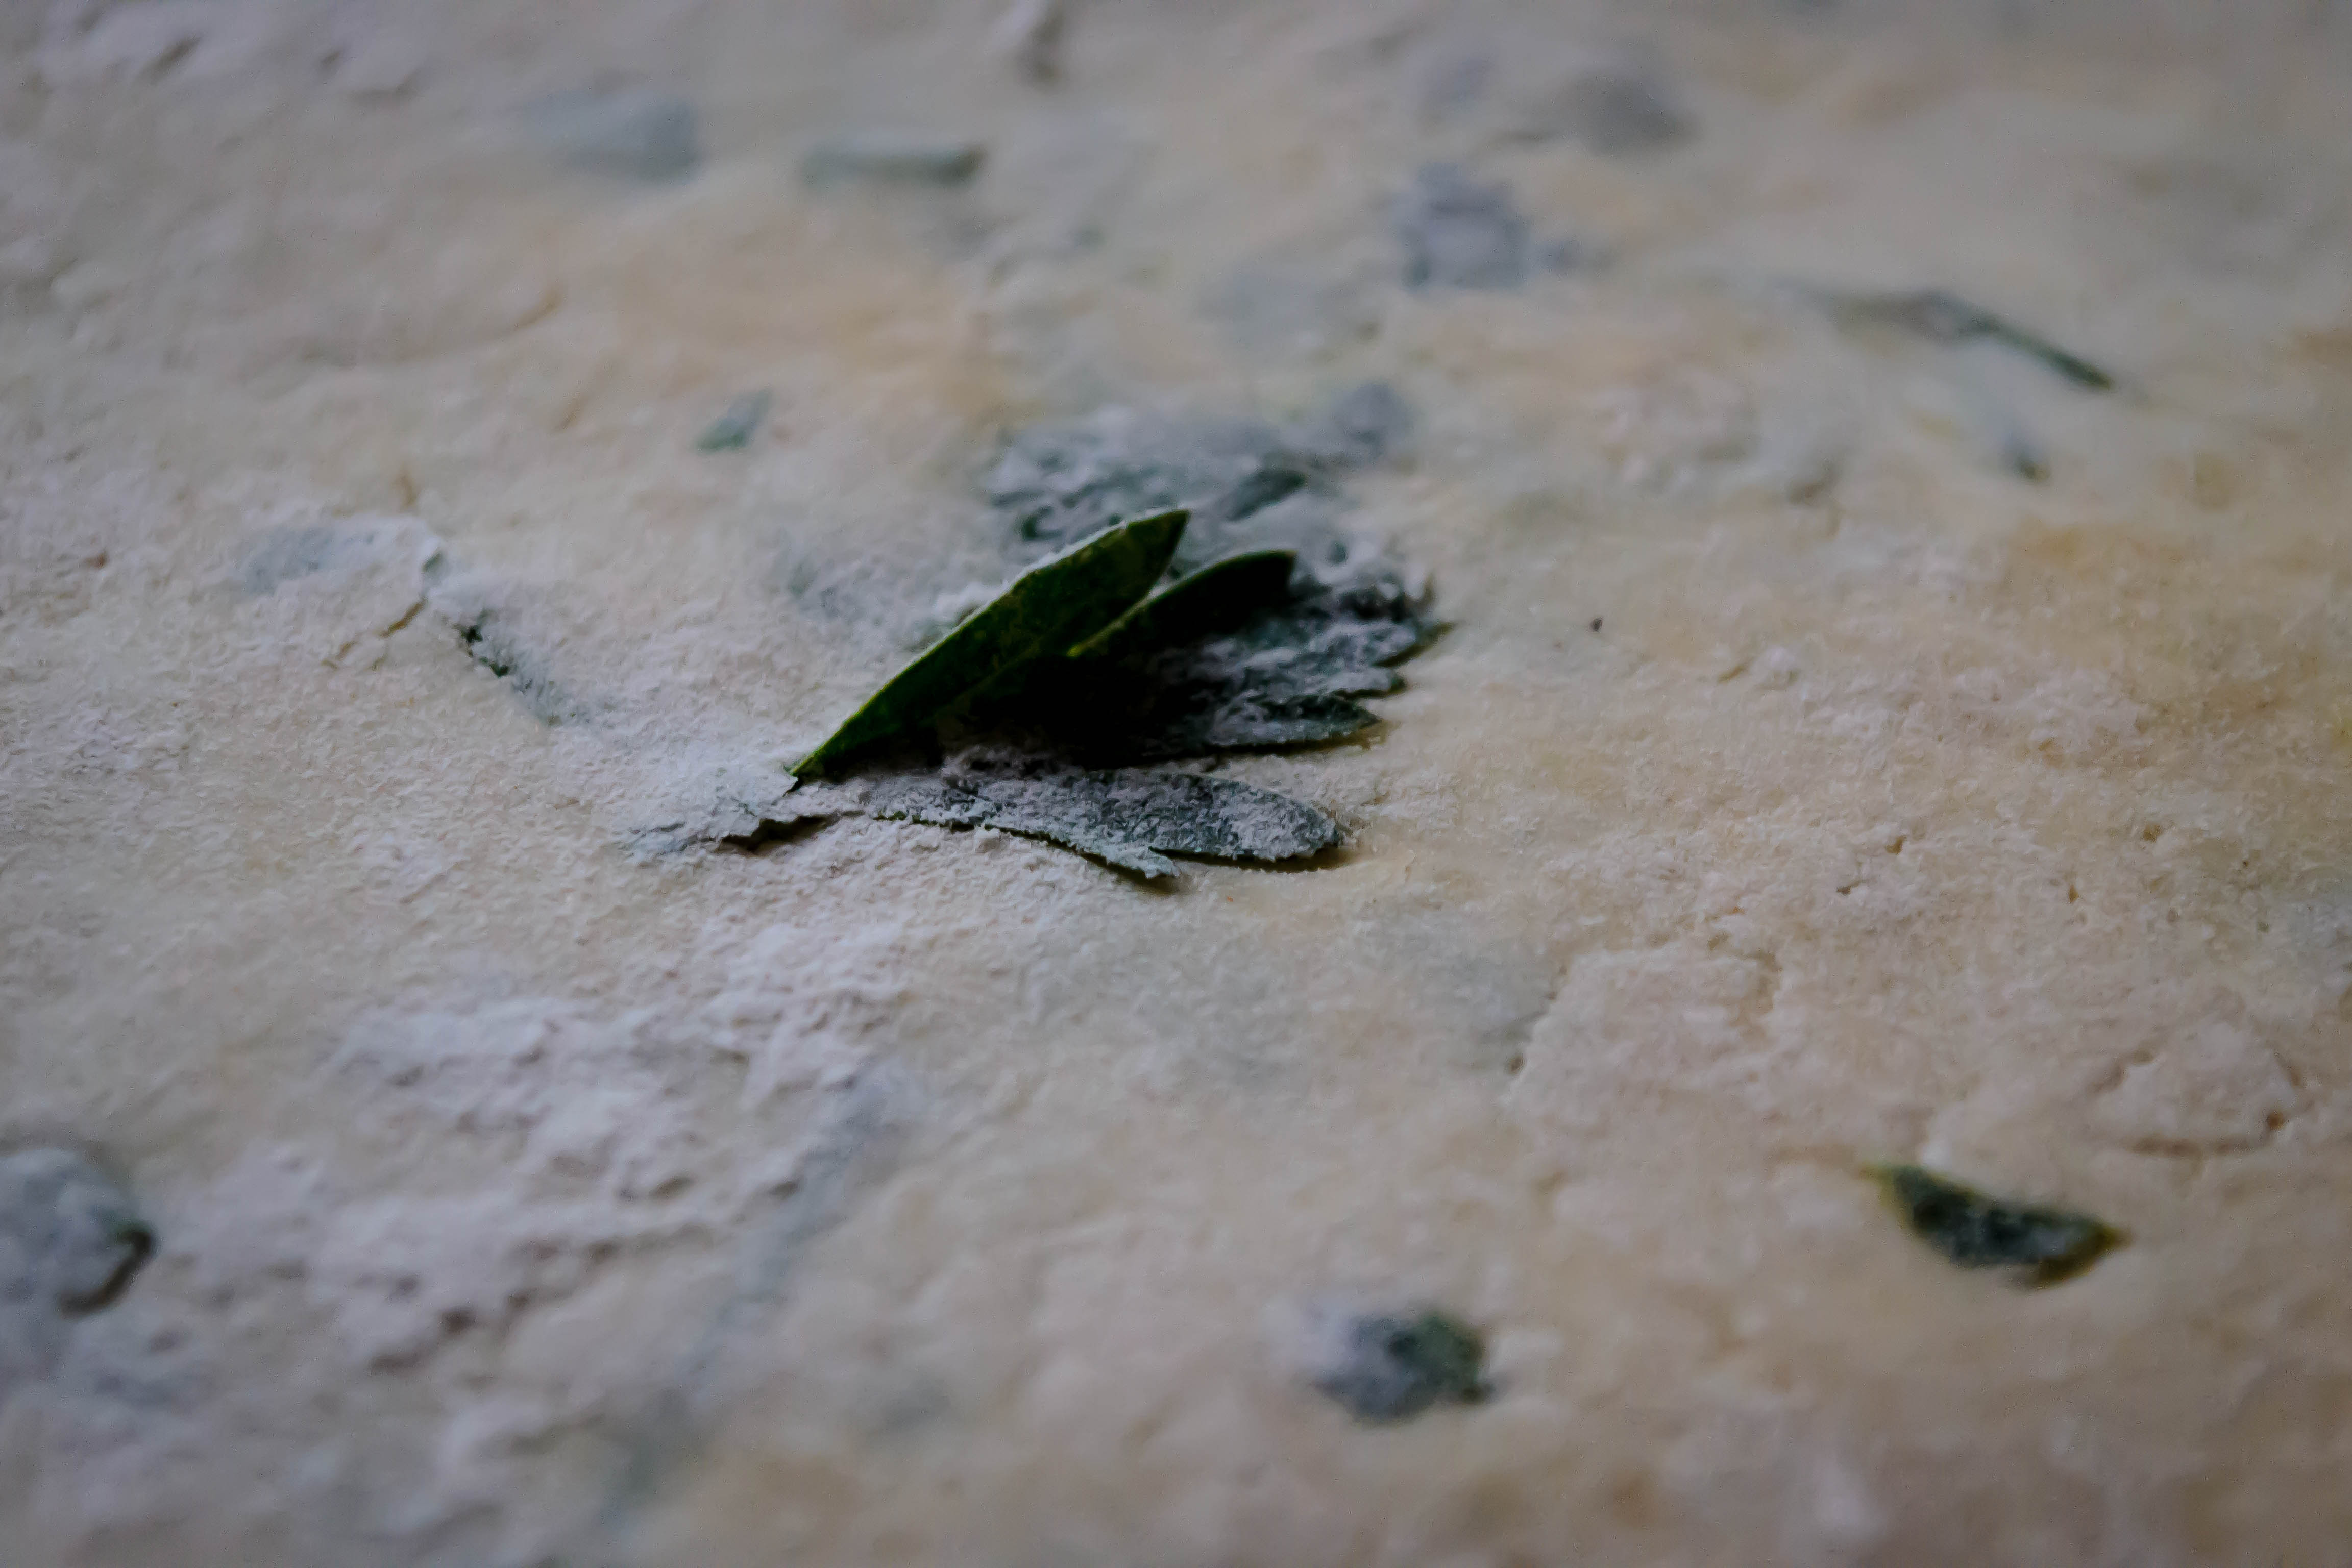
Usual procedure here: cut in the butter, add salt (and parsley, in this case), incorporate just enough water to bring things together, form into a disk and refrigerate to firm the fat back up.  Then you can roll out, fill, and bake.

Food Blog January 2013-0398

Food Blog January 2013-0401

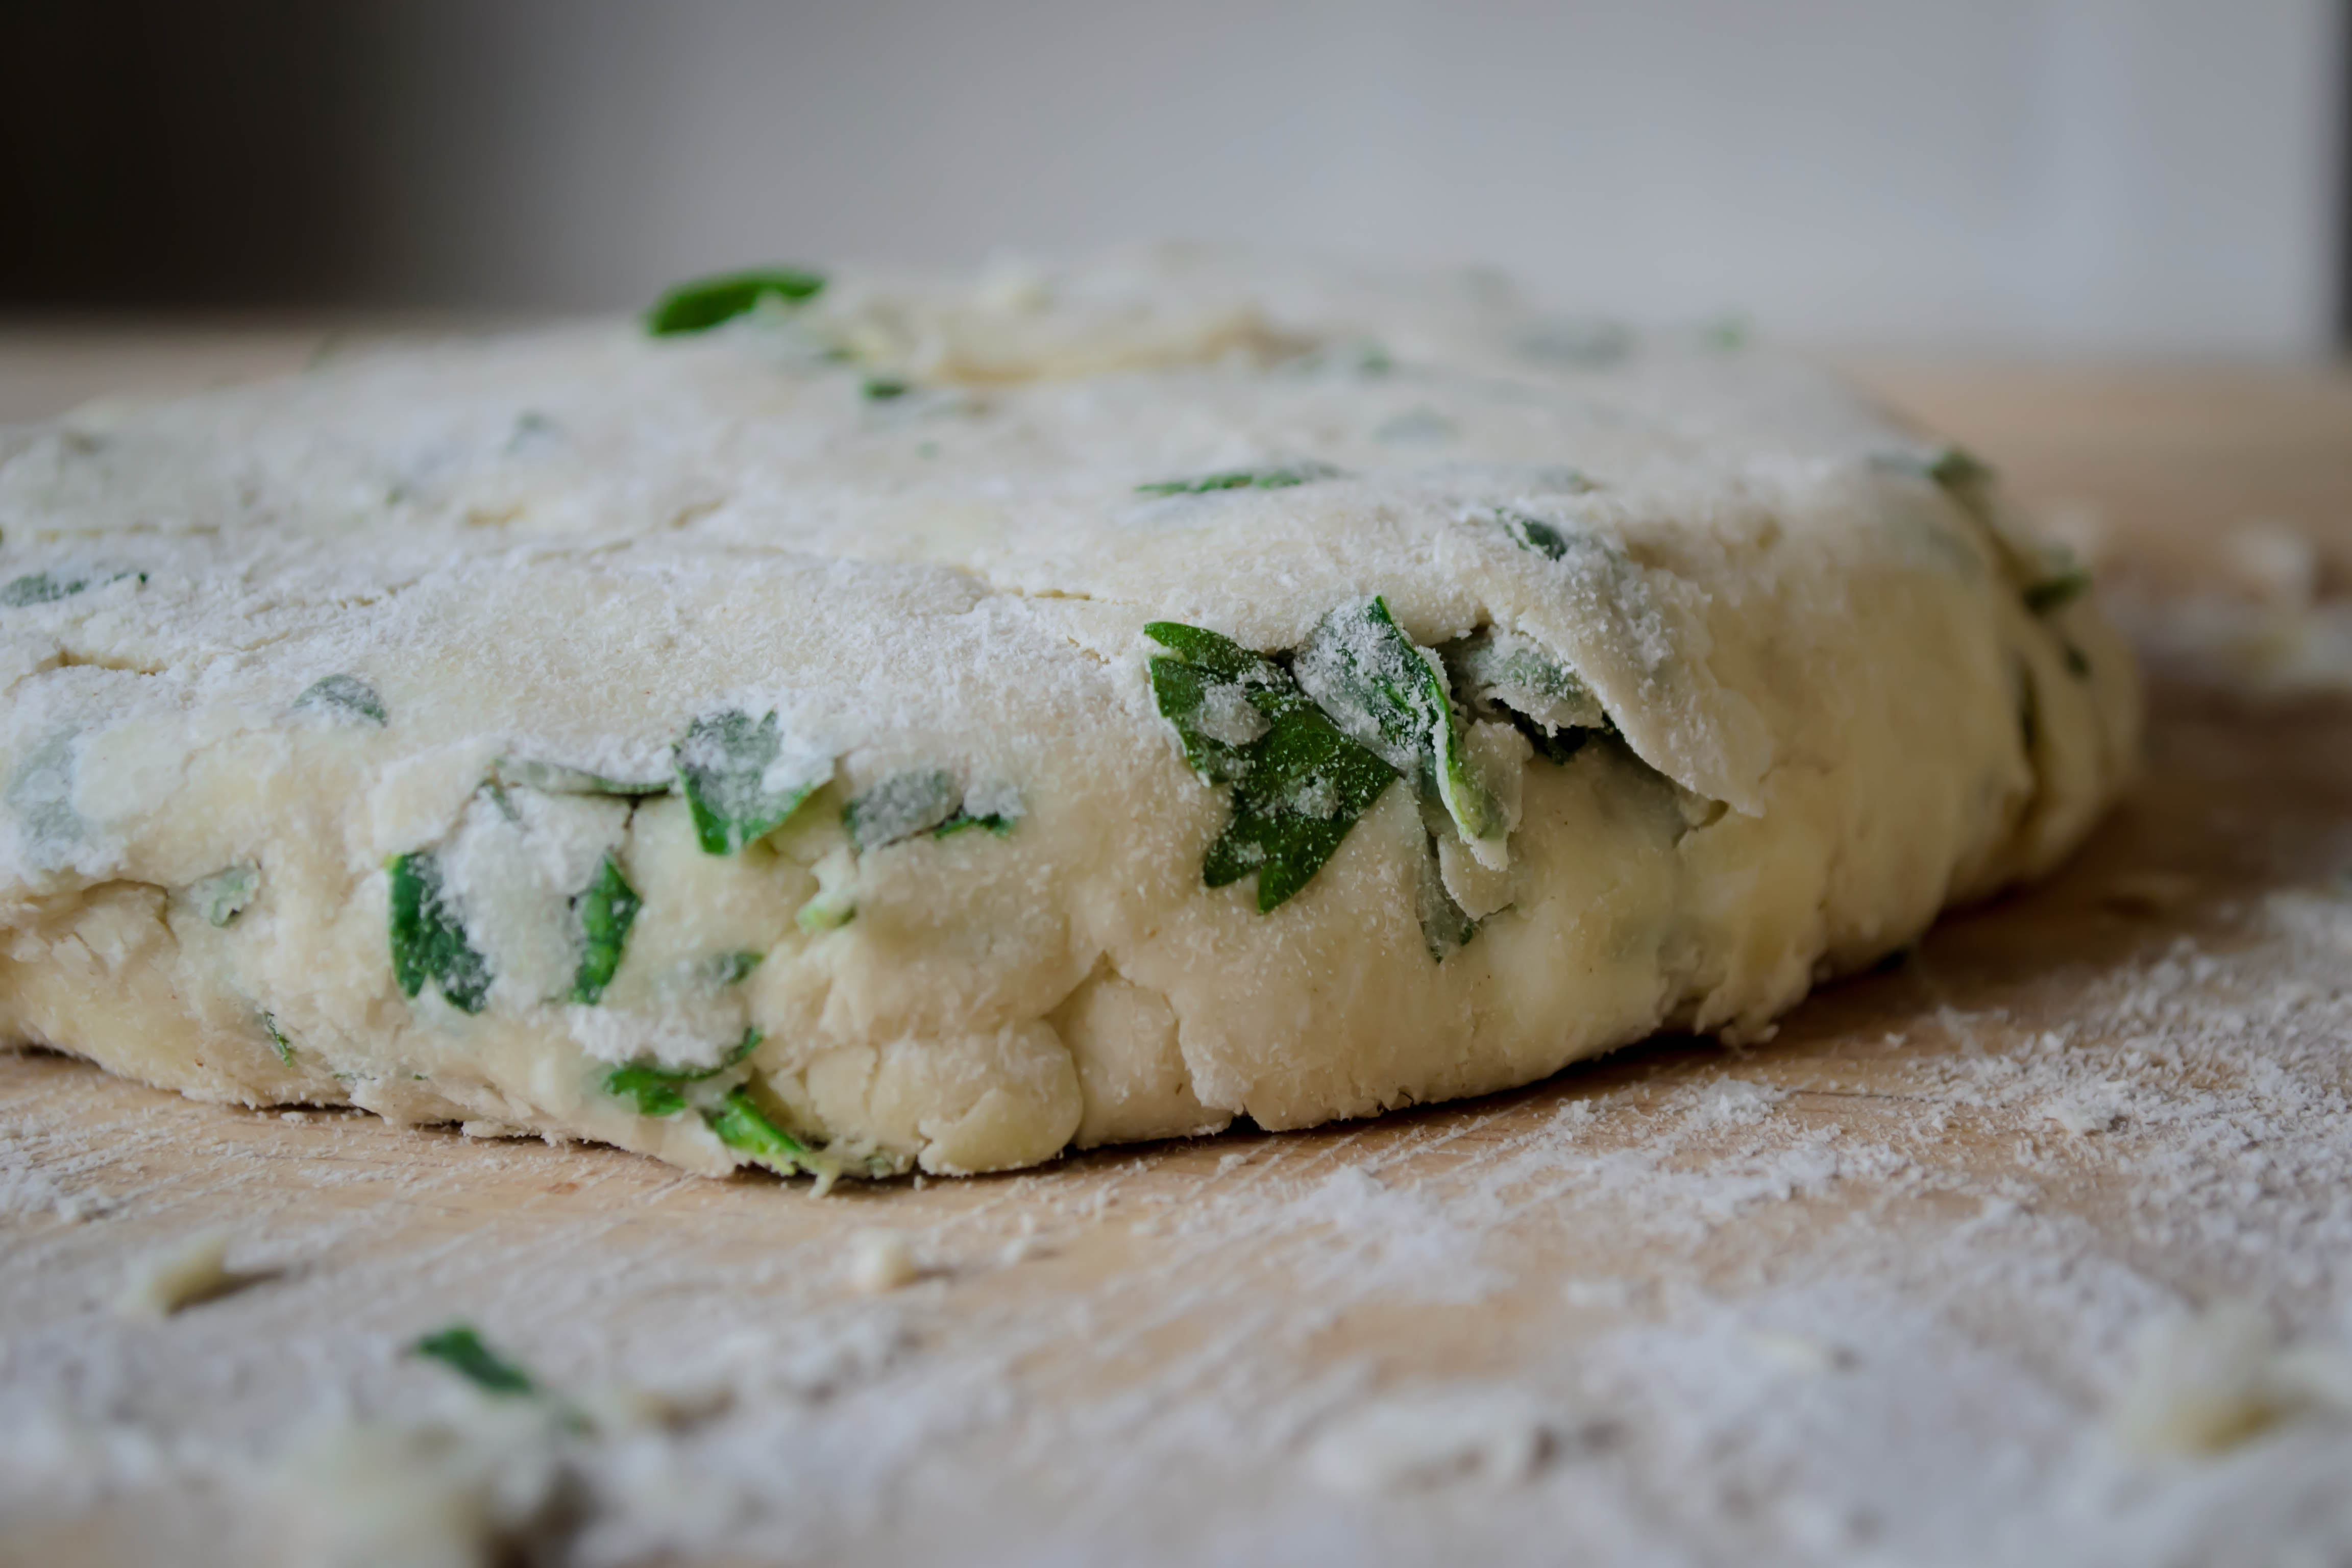
That all sounds pretty simple, but somewhere in there things tend to go wrong for me.  This crust was (relatively) easy to work with.  It didn’t disintegrate, it didn’t melt, it didn’t even crack in too many places.  I think playing with biscuit and cracker doughs this past year accustomed me to the feeling and delicacy required to not destroy a circle of dough.  It was barely moist and not exactly elastic, but it did have a bit of give.  It baked to a lovely golden color, the flecks of green were intriguing and special, and the quiche that rested just wobbling between its sturdy walls was delicious.

Food Blog January 2013-0407

But the crust was tough.

I can assume a few reasons for this.

1.) It’s possible my ratio was off.  Because I didn’t weigh my flour, I may have had too much or too little in the mix.

2.) More likely, I overworked the dough.  I pressed and kneaded and folded until the dry bits at the bottom of my mixing bowl were willing to play along, and perhaps I was too insistent about that demand for inclusion.

Food Blog January 2013-0408

Like everything else, it seems pie crust needs a revisit to get it right.  The feeling of the dough between my fingers is familiar, but I have to learn its textural intricacies.  How much water is just enough?  How crumbly can it be and still hold together?  How much of the dryness do the fat and water absorb while the wrapped disk rests?  Without another attempt or three, I won’t know.

But it tasted good.  It crunched against the quiche and while it didn’t shatter at the slightest fork pressure, it did have that dryness against the teeth you expect from crust.  The parsley contributed a grassy freshness and made the flavor more complex, especially the following day.  I could see this working similarly well with dill, or thyme, or maybe even marjoram, all of which pair nicely with broccoli and mushrooms.

Onward, then.

Food Blog January 2013-0417

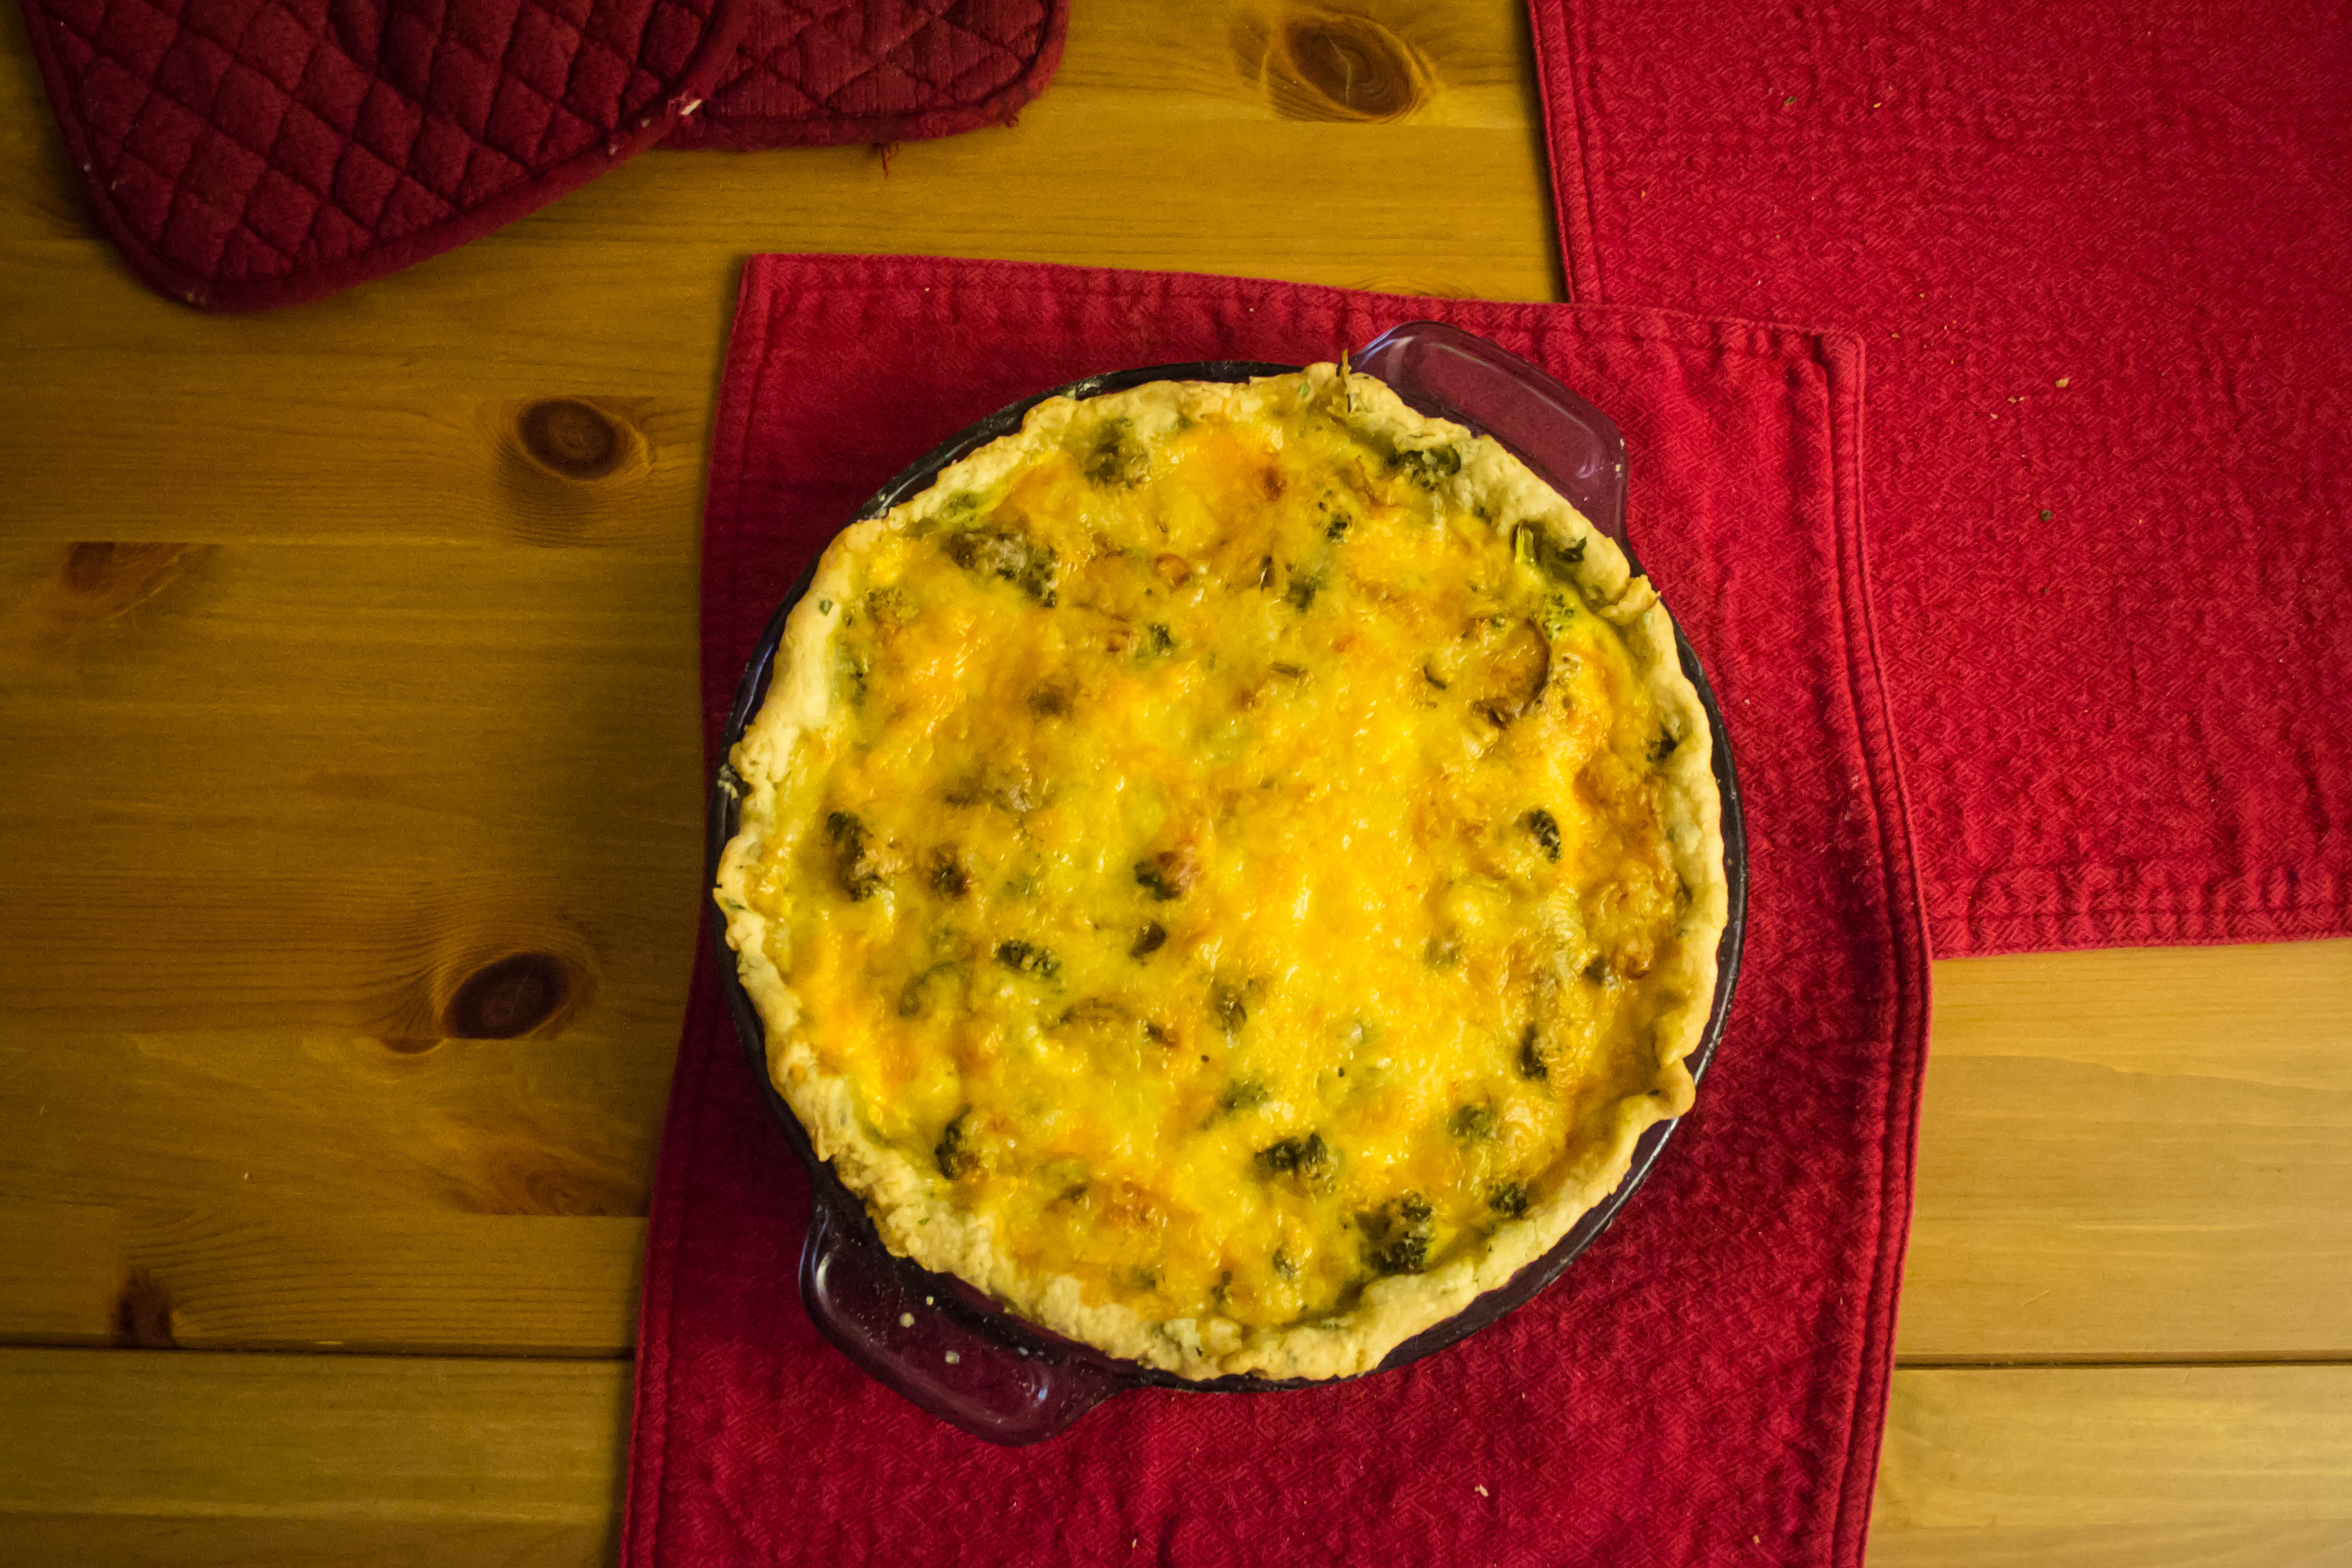
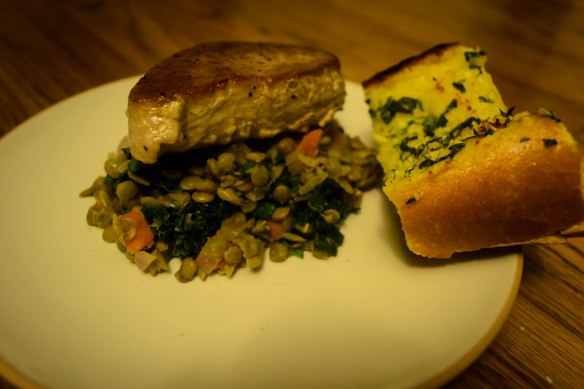
Broccoli mushroom quiche with parsley pie crust

(The quiche recipe is my mom’s.  I’m sure she got it from somewhere, but I don’t know that she even knows where anymore.  I’ve changed very little here, though her version usually contains bacon instead of mushrooms)

Crust:

1 heaping, lightly fluffed cup of flour (or 6 oz., if you’re doing this properly)

1 stick (8 TB, 4 oz., etc) butter, cut into 16 or so pieces

2-4 oz. very cold water

Pinch salt

2 TB chopped parsley (or dill, or oregano, or marjoram, or thyme… whatever you like best, I expect)

Filling:

1 cup small broccoli florets

6-8 crimini mushrooms, sliced thinly

¼ cup green onions, diced

Olive oil

Salt and pepper to taste

4 eggs

1 cup milk

1 ½ cups grated extra sharp cheddar cheese

½ cup grated swiss cheese

First, make the pie crust.  Measure out your water and put it into the freezer while you assemble your other ingredients.

In a bowl, combine the flour and butter pieces.  With your hands or a pastry blender (I always use the pastry blender – I hate the too-dry feeling of slowly crusting flour on my hands), cut the butter into the flour until it is pea-sized chunks and smaller.  Add the salt and herbs and combine gently.

Dribble in some water – 2 oz. to start with – and combine.  If the dough really isn’t coming together, add more water.  When you can press a few teaspoons of the dough between your fingertips and it stays together, turn the whole mass out onto a floured board and work lightly to bring it together into a disk.

Wrap the disk in plastic wrap and stow it in the fridge for half an hour or so.

When the dough disk is cold and firm, bring it back to your floured board and remove the plastic wrap.  Roll it out, moving a rolling pin (or wine bottle) in a few strokes straight away from you and back toward you only.  Avoid diagonal movements.  The dough will become a long oval.  Then, flip the dough over and turn it 90 degrees so you are facing a fat, flour-drenched oval instead.  Roll again, still moving the rolling pin straight away from and back toward you.  Repeat this process until you have a rough circle an inch or two larger than the diameter of your pie plate.

Lightly roll half of the dough around your rolling pin and drape it loosely into the pie plate, unrolling as you go, letting the crust settle into the dish.  Trim, crimp, or fold over any dangling edges as aesthetically as you are able.

Set aside (or perhaps return to the refrigerator?) while you make the filling.

Preheat the oven to 350F.

Heat some olive oil in a skillet over medium-high heat.  When it is shimmering, add the mushrooms and give them a good stir, taking care that as many as possible have contact with the bottom of the pan (that is, don’t leave them piled atop one another if you can help it).  Then leave them alone for a good five minutes, or until they begin to develop a golden crust.

While the mushrooms are getting golden, steam or microwave the broccoli florets until they are just crisp-tender and still very bright green.  Set them aside.

Turn your mushrooms and let them sizzle for another five minutes or so.  When they are golden on both sides, turn the heat down to medium and add the onions.  Cook until soft and translucent.  Toss the broccoli in the pan, then add salt and pepper to taste.  Mom often adds tarragon or marjoram at this point as well – start with ½ tsp and see what you like.  Remove from heat and set aside to cool for a few minutes.

While the vegetables cool, beat the eggs and milk together.  Add a dash of grated nutmeg, if you like, or some cracked black pepper.  As the quiche bakes, this will become a lovely firm custard.

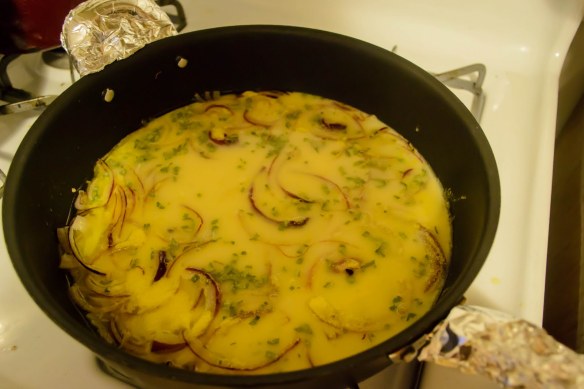
To assemble, fill the pie crust with the vegetables, spreading them in an even layer.  Gently pour the custard over the vegetables.  Toss the shreds of cheese together and spread them evenly across the top of the filling.

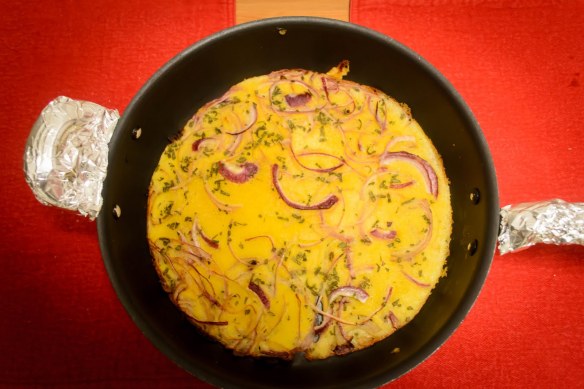
Bake for 50-60 minutes, or until the cheese is golden and the quiche has puffed in the middle.  If it’s not puffed yet, it’s not done.  The ingredients will be cooked through, but when you cut into it you will find a disappointing watery layer at the bottom.  Give it another few minutes.

With the center puffed and the cheese sizzling, remove the quiche from the oven and let it sit for 5-10 minutes so the cheese can solidify a bit and doesn’t string all over when you try to cut through it.

Slice and serve. Food Blog January 2013-0418

Finish line

The problem with cramming for final exams – as many of my students were doing only a few weeks ago – is that you end up trying to process too much information, and just as quickly as you learn new things, the old things you thought you knew start sliding away. That’s the glory and the power of writing. Once it’s on the page, it’s solid. No matter how many holiday dinners you eat (I’m onto my third or fourth at this point), those words will still tell you exactly what you did and (sometimes) how you felt about it.

I feel like I’m cramming for my final. Last week, before the holiday, before the family time, before the outpouring of memories and laughter and swallowed tears of all kinds and barking and yelling and joy, I made three Bittmans in a desperate bid to stay on top of the project.

42. Brussels Sprout Sliders: Trim and halve large brussels sprouts, toss with olive oil and roast at 400 degrees until tender but not mushy. Using the brussels sprout halves as you would hamburger buns, sandwich them around a piece of crispy bacon or ham, maybe a little caramelized onion, and a dab of whole grain mustard. Keep everything in place with toothpicks.”

I always intended to make this one for a Halloween party. It seemed fitting: for some, brussels sprouts are a frightening, disdained vegetable. But this new perspective on them makes them fun and perhaps even appetizing to those disbelievers who see them only as a bitter waterlogged grenade of disappointment. But I never did. So they became an appetizer for two:

6 brussels sprouts, trimmed and halved

2 strips bacon, cut into eight even pieces (you’ll use six for the brussels. Eat the other two, or share with a tall, handsome somebody who shows up in the kitchen when the smell becomes too enticing to ignore)

dab (maybe 1 tsp total?) whole grain mustard

Preheat the oven to 400F.

Line a small baking dish (I used a 9” cake pan) with aluminum foil and drizzle the foil with olive oil. Brush or rub the olive oil into an even layer so every millimeter of foil is covered.

Set the sprouts, cut side down, on the oiled foil, spacing them evenly so none are touching. This will ensure even roasting rather than steaming.

Food%2520Blog%25202011-2013-0204

Roast for 15 minutes, until the cut edges are browned and just crisp. Using tongs, flip over each sprout so they teeter on their curved sides. Roast for another 15 minutes.

While sprouts are roasting, cook the bacon. Mine was already cooked – saved from another porky occasion – so during the last five minutes of sprout roasting I added the bacon pieces to the pan to heat them up a little.

When the sprouts are browned and lightly tender, set them aside until they are cool enough to handle. As soon as you can bear to touch them, add a tiny spread of mustard across one cut edge, seat the bacon atop it, and place another sprout half on top to complete the sandwich. Drive a toothpick through the whole thing and serve as an hors d’oeuvre.

Food%2520Blog%25202011-2013-0205

We gobbled these down like we hadn’t eaten in weeks. They were delightful and I highly recommend them as a party item: crisp bacon, zesty mustard, and the nutty crunchy slight bitterness of roasted brussels sprouts, all collected together in one perfect bite. Perhaps a New Year’s Eve treat to help the hours pass.

Food%2520Blog%25202011-2013-0210


Soup and bread seemed like a good meal to follow our sprouts.

82. Cornmeal Flatbread with Onion and Sage: Mix 1 cup cornmeal with 1 teaspoon salt; slowly whisk in 1½ cups water. Cover and let sit for an hour (or up to 12 hours in the refrigerator). Put ¼ cup olive oil in a 12-inch ovenproof skillet along with a thinly sliced red onion; stir. Heat the skillet in a 400-degree oven for a few minutes, then stir and pour in the batter. Bake at 375 degrees until the flatbread is crisp at the edges and releases easily from the pan, about 45 minutes.”

I followed these directions fairly exactly, with the exception that I used only half an onion. The olive oil and onion went into the oven for five minutes at 400F, at which point the onion slices were sizzling and the oil was shimmering beautifully.

Bittman neglects to note where and when to add the sage, so I stirred a tablespoon of finely chopped fresh sage into the batter just before adding it to the skillet.

Food%2520Blog%25202011-2013-0203

This concoction baked for 45 minutes, until it was set, the onions were crisp-tender, and the whole thing loosened easily from the skillet and slid almost gracefully onto a serving tray.

Food%2520Blog%25202011-2013-0212

We cut large wedges and tasted. It was unlike any other bread I’ve come across – more like baked squares of polenta than anything else, which made sense when I stopped and thought about it. Were I renaming this dish, I think I would call it Polenta Pizza. It was well oiled and spongy in texture, squishing pleasingly between our teeth and driving us back for additional tastes. N. wasn’t sure he liked it at first, but then he went back for a second slice and then a third. When I ribbed him about this, he said he was still deciding what he really thought, and needed more samples to truly make up his mind.

Food%2520Blog%25202011-2013-0214

This odd little bread course could easily be dunked in saucers of warmed marinara sauce, or sprinkled with mozzarella or parmesan for a pleasing salty bite. Though the onions and sage were good, you could probably saute almost anything in that skillet before adding the batter: sausage, peppers, mushrooms… anything you’d put on a pizza.

A decadent appetizer and a well-oiled pizza/bread need a sober, sensible kind of soup to balance them out.

19. Saute chopped onions, garlic, celery and carrots in olive oil, then add chopped tomatoes (boxed are fine) with their juice, lentils and stock or water to cover. When everything is soft, add a squeeze of lemon juice or a splash of red wine vinegar. Garnish with parsley.”

Since we were leaving town the next day, I didn’t want huge quantities. (This still made enough for four, but I froze the leftovers so nothing was lost)

½ red onion (left from the flatbread, so convenient), diced

4-6 small cloves garlic, minced

1/3 cup each celery and carrots, sliced

¾ cup lentils

13.5 oz can petite diced tomatoes

2½ cups chicken broth (or vegetable broth, or water)

1 TB lemon juice

2 TB fresh, finely chopped parsley

salt and pepper to taste

I heated 2 TB olive oil over medium heat, then tossed in the onions to sweat for a minute or two before adding the garlic and the other vegetables. When the onions were translucent and tender, I added the tomatoes, lentils, and broth and turned the heat up to medium high until the whole pot came to a boil.

Once boiling, I gave it a healthy stir and then turned the heat down so the soup would just simmer, letting the lentils soften gently and the vegetables tenderize.

Simmer for at least 35 minutes, then taste the lentils to see if they are tender enough for your taste. We like them soft but not mushy, with minimal resistance but still able to hold their shape.

Just before serving, squeeze in the lemon juice, stir gently, and dip into serving bowls. Scatter the surface with a grassy sprinkle of parsley.

Food%2520Blog%25202011-2013-0215

We liked this, though it wasn’t the best lentil soup I’ve ever had. The flavors were enticing and the lemon juice made it a bright, rather than heavy, soup. The problem with it was that I like my lentil soup more like a stew or a chili. The brightness of the lemon made the shower of shredded pepperjack cheese I was considering adding seem extraneous and out of place, and I tend to get crotchety when denied cheese. But alongside the flatbread and the richness of the brussels sprouts, it was hearty but didn’t weigh us down.

2012 is fading like the last sheen of daylight across the hills in winter. 2013 charges toward us, all mystery and sharp promise. I thought about cheating and saying I was done; these three dishes are the final three, I made it, all boxes are checked, all questions answered, funtoosh, kaput (extra points if you can name my source!), but I just can’t. I’m too close. This final exam is too important. This resolution needs to be one I keep. I have two dishes left. I have two days, one of which will be spent driving from the Sierra Nevada foothills where N.’s parents live back to Los Angeles and my little house. I hope I’m going to make it. The finish line is in sight. Now I just have to stagger across it.

Veganize it!

I must admit to getting nervous.  Counting this week’s offerings, I’m down to 8 Bittman selections, and just over 3 weeks in which to complete them all.  If I face the honest fact that it’s unlikely I will attempt any of these concoctions during Christmas or the days that surround it, as family and I insist on old familiar dishes, reality tells me I in fact have just over 2 weeks left.

But I have a determined set to my jaw, sometimes, and I can feel it approaching.  This must be done.  It can be done.  It may mean making soup for lunch from scratch sometimes, but as I’m learning, soup doesn’t have to be something that simmers all day long.  It can be a quick meal.

It can be delicious, too.  This week’s selection is proof positive.

Food Blog 2011-2013-0168

“Thai Squash Soup: Simmer cubed winter squash, minced garlic, chili and ginger in coconut milk, plus stock or water to cover, until soft. Puree if you like. Just before serving, add chopped cilantro, lime juice and zest, and toasted chopped peanuts.”

This was a lunchtime experiment, because N., in one of his tragic shortcomings, doesn’t like coconut.  At first I thought it was something I could break him of.  I have, after all, in under a decade, convinced him to eat everything from sushi to quinoa to kale chips.  He is, as an eater, unrecognizable as the man I met in college.  But the coconut sensitivity is the food analogue to ESP.  He can eat a granola bar with coconut oil hidden deep in the ingredient list and say “I’m not sure I like this.”  If I don’t choose my sunscreen carefully and it happens to have that delightful coconut aroma that means it’s well and truly summer, N. tells me I smell funny.  So a coconut milk based soup had to be consumed in his absence.

Food Blog 2011-2013-0160

½ big butternut squash, peeled, seeded, and cut into small cubes

1 13.5 oz. can coconut milk

½-1 cup water or vegetable stock

½ tsp red chili flakes

3-5 cloves garlic, minced

1-2 tsp ginger, minced

salt to taste

2-3 TB cilantro, roughly chopped

2-3 TB peanuts (if you have a nut allergy, consider using the butternut squash seeds instead), toasted and chopped.  I used dry roasted peanuts for mine.

zest and juice of ½ a lime

Put the squash, chili, garlic, and ginger into a pot.  Add the coconut milk and, if necessary to cover the chunks of squash, water or stock.  Bring to a boil, then simmer over medium heat for 20-25 minutes, or until the squash is tender.

During this simmering process, don’t forsake your kitchen completely.  Coconut milk boils over, just like regular milk.  If you leave to, say, comb out your hair, do your makeup, and put a few things away, you might return to a stove swimming in chili infused coconut milk sludge sitting underneath your burners.  One of which isn’t working anymore.  Just saying…

Once the squash cubes are tender, you can choose to puree or not to puree.  I, feeling lazy, took my potato masher to them and ended up with a slightly chunky, rough textured soup that I liked the look and feel of.

Food Blog 2011-2013-0164

Top with garnishes and eat!

Alternative: I liked this, and the simmered squash had a nice, fresh flavor.  But I missed the caramelized depth you get when you roast it.  Were I making this again, I would roast the squash with olive oil and salt until it was tender.

While the squash roasted, I would add the spices to the coconut milk and simmer for 10-15 minutes.  Then, when the squash was cooked and the milk was hot and flavorful, I would add the chunks of squash and proceed as above.

This bowl of soup was surprising.  It awoke flavors of sweet, sour, spicy, and bitter.  The squash was tender and freshly vegetal.  The coconut milk added this incredible unctuous creaminess that felt round and thick against my tongue, but the squash itself and the lime flavor kept it light and fresh and delicate at the same time.  The peanuts were the right crunch, and I surprised myself by finished an enormous bowl and feeling quite satisfied but not overly full.

 Food Blog 2011-2013-0167

The soup wouldn’t have been right without the lime juice.  I’m learning, as I continue to cook, that acid is a seasoning just like salt or nutmeg.  This new understanding, and a little bit of experimentation, saved the next dish from being muddy and boring.

“56. Cook lentils, thyme sprigs and chopped carrots in a pot with water to cover until tender; drain and remove thyme. Cook chopped onions in oil until soft; add chopped kale and allow to wilt. Add lentils, stir to combine and cook until kale is tender. Add chopped parsley.”

With the holiday season practically upon us, this seemed like a sobering, “healthy” dinner choice which would, against all the logical reasons for eating healthy, permit us to have cake for dessert.

1 cup lentils

12-15 baby carrots, quartered lengthwise, chopped into small rounded triangles

6 sprigs thyme

4 small whole cloves garlic

½ red onion, chopped

2 cups kale

2 TB parsley

sprinkle of red wine vinegar to taste

I put the lentils, carrots, thyme, and – in a flash of inspiration – garlic in a pot and added water according to the lentil package directions (depending upon what color lentils you use, you may need more or less water).  I added a bit extra, since I realized the carrots might benefit from some bubbling too.  I let them simmer for about 35 minutes, at which point the lentils were just barely still resistant between my teeth.

Never enthusiastic about using multiple pots, I dumped the lentil mixture into a strainer and then, with a bit of olive oil to lubricate the surface, sauteed the chopped onions in the same, now-empty pot.  When they were just beginning to turn golden around the edges, I added the kale and a sprinkle of salt.  Softening the onions and wilting the kale took about ten minutes.

After the kale had collapsed a bit, I dumped the lentil mixture back in, folded it gently in with the greenery, and let them stew over low heat until the kale was the texture I like.  I tasted and felt the muddiness of the lentils and carrots: winter vegetables are wonderful, but sometimes the heaviness they impart is reminiscent of the dirt from which they were pulled.  Lentils, though they aren’t root vegetables at all, tend to have a similar effect.

This was my inspiration point.  Only a few drops of red wine vinegar pulled the flavors up out of the garden ditch they’d been wallowing in and made them interesting and individual again.  Add the vinegar and chopped parsley at the last moment.

Food Blog 2011-2013-0157

I mounded this on our plates and topped it with a tuna steak (I know, that’s not vegan.  But the Bittman is, and that’s what matters here!).  It would have been better with salmon – the more delicate meatiness would have contrasted nicely against the lentils and carrots.  The tuna was almost too dense a pairing, calling back to the muddiness of the pre-vinegared dish.  Lamb rubbed with harissa, or maybe even a grilled portobello or a big steak of tofu, pressed, dried, and rubbed with a marinade that involved roasted red peppers, are other potentially promising pairings.

 Food Blog 2011-2013-0155


* As the year draws to a close, I’m thinking a lot about friends I’m now physically far from.  This title celebrates two of them: M. and Ph.  Both became unintentional vegans due to food allergies, and M. is fond of exclaiming, of dishes she likes the sound of but cannot eat thanks to its animal product ingredients, “I’m going to try to veganize it!”  So here you go, ladies: these are pre-veganized.  And gluten-free.  And yummy.  What more could you ask for?!

Fading light. And bourbon.

My home office – the room where grading, blogging, photo editing, and general work happens – has the most wonderful light in our house.  A huge sliding glass door lets sunlight pour in during the morning hours, and in the afternoon I get brightness mediated by the roof of the house.  Even when it’s overcast, there is still so much natural light that it makes for wonderful food shots.

But winter is a problem.  I’m discovering that if I make a dish for dinner, I’m not going to be able to photograph it from my office because it’s too dark by 5pm.  And wedded to this blog and this project as I am, there’s no way we’re having dinner at 4:30 in the afternoon just so I can get the best light in the house.  So I’m trying out new angles, and new placement, and new adjustments.  I’m learning more about artificial light: which arrangements I find glaring and which I find acceptable.  Bear with me, and look forward to the return of Daylight Savings Time!

“17. Sauté chopped onion in butter, then chunks of sweet potato and stock or water to cover. Simmer until the sweet potatoes can be pierced with a knife, then add chopped kale and cook until wilted.”

This was easy, and quick, and tasty.  I made a few additions to Bittman’s recommendations and think the soup really benefited from them.  I used:

4 TB butter Food blog 2011-0133

½ a medium onion (mine was yellow)

1 big sweet potato, peeled and cut into small chunks (the smaller the chunks, the faster they will cook, so make your decision based on how much time you have and what size is most pleasing to you)


Salt, pepper, ground nutmeg to taste

4 cups broth – vegetable or chicken, depending on your preference

6 oz. kale

1 tsp red wine vinegar

Heat the butter in a pot over medium heat.  When it has melted, add the onion and cook gently, stirring occasionally, until the onion is soft and translucent but not bronzed.

Add the sweet potatoes and seasoning, stir to combine for a minute or two, then add the broth.  The quantity of liquid you need will depend entirely upon the size of your sweet potato.  You may need more or less than the 4 cups listed here.

Let the soup simmer until the sweet potatoes are tender but not falling apart.  Mine took about 15 minutes.

Add the kale and stir to combine.  You will be bewildered by how quickly it collapses on itself, wilting from smoky green to a brighter, more vibrant hue as it is immersed in the liquid.  Cook just until it reaches the texture you like against your tongue – I let it simmer for about 5 minutes, because I like my kale to still put up some resistance and retain its bright color.

I tasted and thought this needed something.  Extra salt to heighten the flavor of the kale, certainly, but there was a kind of dullness about the whole concoction.  Remembering my soup lessons from Alton Brown, I sprinkled in just a hint of red wine vinegar, and the difference was amazing.  The whole thing was brighter, somehow, even though you couldn’t taste anything harsh or stringent.

We consumed this happily with freshly toasted, garlic-rubbed slices of pugliese.  It was good, but could have been stuffed with even more flavor: I’d consider adding garlic, ginger, maybe even rice or ramen noodles.

Food blog 2011-0137

“4. Onion jam with bacon and bourbon: Thinly slice red onions and cook in olive oil with chopped bacon until soft. Add a little bourbon and brown sugar to taste and cook until the jam thickens.”

Bourbon is new for me.  N. has been enjoying the occasional scotch for a few years now, but we recently acquired a bottle of Knob Creek and I’ve been appreciating the floral notes of it – so much less musty and boggy than its British cousin.

4 slices thick-cut bacon, halved lengthwise into long strips, then sliced into small rectangles

½ large red onion, thinly sliced

¼ cup bourbon

2 TB brown sugar

Freshly ground black pepper

1 small sprig rosemary

Food blog 2011-0144

I used about a tablespoon of olive oil to start the pan, but I don’t think you really need it.  Just toss in the bacon slices over medium heat and let them work for about 5 minutes.  You will get a shimmer of fat across the bottom of the pan that is more than enough to start the onions sizzling in.

Add the onions and cook over medium or medium-low for at least ten minutes, until the onions soften and the bacon is mostly cooked.  Stir with some frequency to ensure even cooking.

Off the heat (especially if you are using a gas stove) add the bourbon and the brown sugar.  Stir to combine, then return to medium heat and simmer slowly for about 20 minutes, to let the flavors mingle and the bourbon soak into the onions and bacon.

After a few minutes of cooking, I added pepper and rosemary for additional flavor components, and I think they were a good choice.  The rosemary’s woodsy flavor was a nice contrast to the fatty bacon and sweet onions.  Everything cooked down into a sticky, caramelized jam that I draped across some baked rounds of polenta.

Food blog 2011-0148

This was delicious, but misplaced.  The meaty, smoky bacon was intensified by the bourbon, and the brown sugar and onions had a nice note of molasses.  It didn’t belong on polenta.  It belonged, I think, on a freshly toasted piece of crostini, possibly smeared with a thick slice of brie.  The funkiness of the cheese could stand up nicely to the sweet smoky strength of this jam.

We paired our misguided polenta with green beans, lightly blanched and then seared in a hot pan and deglazed with a bit of red wine.  These, too, were delicious, but not the ideal pairing for the sweet saltiness of my jam.  Apples, maybe, or red grapes would make better pairings.  Regardless, we ate with joy and returned to the pan once or twice for a final sweet chunk of sticky, gooey jammy bacon to sweeten our palates, even though dessert was still to come.


“91. Pears in Red Wine: Simmer 2 cups red wine with ½ cup sugar, 2 cloves, a cinnamon stick and a few slices of ginger in a pot for a few minutes, then gently poach peeled and cored pears (use a spoon to hollow them from bottom), until soft. Cool or chill, and serve with a bit of the poaching liquid.”

This is supposed to be one of the most sophisticated desserts you can offer: not overly sweet, laden with mulled flavor, perfect for a gourmet adult party in celebration of autumn.  Pears, with their temperamental habits and signature grainy texture, are perhaps the same kind of acquired taste as wine or coffee or any of those other “adult” tastes.  As dessert for our onion-jam-crusted dinner, I decided to attempt these.

Food blog 2011-0140

I used 2 pears, but followed the rest of Bittman’s quantities exactly.

Food blog 2011-0142Well, one exception to note: I thought about getting fancy and adding things like citrus peel or rosemary (apparently I’m hooked on the stuff these days).  But in the end, I just splashed in a bit of bourbon to link the flavor profile back to our dinner: red wine from the beans, bourbon from the jam, and this dessert would fit right in.

After the first simmer, in which I stirred gently to let the sugar dissolve and the spices mull gently into the wine, I prepared the pears.

The issue with pears is that inside their tender skins they are slippery little beasts.  You can’t grasp them too firmly or they sigh into bruises.  You can’t hold them too delicately or they slide out of your hands and threaten to slip from the edge of the kitchen counter.

I dove into my attempt to core the pears only after peeling them.  This, and the attempt to do so with a spoon, may have been a mistake.  The spoon tore through the tender flesh of the pear but was too wide to remove only the core.  Further, I wasn’t sure how much core I was supposed to be removing, so I ended up with two pale, naked, slightly mutilated pears, which I slid into their (hopefully) healing bath of alcohol.

I let them simmer, turning them occasionally to dye all sides a lovely burgundy, for about 15 minutes.  Then I turned off the heat and let them sit a further 20 minutes until we were ready for dessert.

Surrounded by a moat of spiced wine, these were achingly tender and nicely flavored.  I would choose pears that were less ripe if I attempted this dessert again, because a bit of additional texture might have done them good.  As it was, though, much of the graininess disappeared in the poaching, and the soft floral flavor was really nice against the wine and assertive spices.  A scoop of vanilla ice cream on the side would have made this a richer endeavor, but I think the creaminess would have matched well with the fruit and the wine.   Or maybe I just need the extra comfort as we roll into December…

Food blog 2011-0150

Giving thanks

The house feels empty.  Wednesday through Saturday, my family visited for Thanksgiving.  This morning, with them on the road home, fog hovering sticky in the sky, the cheery burgundy tablecloth in the washing machine, and a stack of lingering dishes I’m trying to ignore proclaiming themselves from the sink, our little home was stark and cold.  I could say that the memories of the holiday will keep me warm, but that would only be true in a metaphorical sense.  What I really want is another baked apple.

90. Baked Apples: Combine chopped pecans and chopped dried fruit (raisins, dates, figs, cranberries all work) and toss with maple syrup and a sprinkle of cinnamon, allspice or nutmeg or all three. Fill the cavities of cored apples with the fruits and nuts, dot each with butter, put into a baking dish and roast about 30 minutes, until tender. Better with vanilla ice cream.”

We had a few small apples from our local Farmers’ Market waiting for attention in the fruit bowl, so I set about collecting partners for them to make a dessert for two.

2 small apples

¼ cup chopped pecans

¼ tsp pumpkin pie spice (I agree with Joy the Baker that we should probably just make our own, but if you, like me, purchased some in a moment of confused weakness, this seems a harmless way to put it to use)

1-2 TB each:

chopped dried figs (I used black Mission, my current favorite)

craisins

golden raisins

3 TB maple syrup

Preheat the oven to 350F.

Core the apples, keeping the bottoms intact if you can.  If you can’t, just wrap the bottom quarter or so in aluminum foil and set them in a baking dish.  This will keep the filling from escaping.

In a small bowl, combine the nuts, fruit, and spice(s).  Drizzle in the maple syrup and stir gently to combine – you want even stickiness throughout.

Using a small spoon, or your fingers, insert as much filling as you can into the cored apples.  You will notice that this quantity makes about twice as much as you need for 2 small apples.  That’s okay.  The leftovers are a fantastic topping for oatmeal the next morning.

Once full, stow your apples in the oven for 30 minutes, or until they are tender when pierced with a knife.  Liberate, evacuate to a dessert plate, and pair with vanilla ice cream.

These were a lovely dessert.  They felt light, because they were primarily fruit, but were still sweet enough to satisfy that after-dinner craving.  The apples still had some resistance, but were warmed through and starting to collapse into themselves.  The ice cream was a perfect accompaniment – I wouldn’t want this dessert without it.  I might ideally have chosen an apple with more tartness to contrast against the sweetness of the syrup and dried fruit, but in such a case, especially if the apple were on the large size, I would advocate a longer baking time.  If the fruit and nuts protruding from the top of the apple start to brown too much, give them a tinfoil hat to hide beneath.


“84. Sage Crackers: Pulse 1 cup flour, 1 teaspoon salt, ½ cup Parmesan and 4 tablespoons cold butter in a food processor. Add ¼ cup cream and 1 tablespoon finely chopped sage.  When just combined, roll as thinly as possible, score into squares, sprinkle with salt and bake at 400 degrees until golden.  Let cool, then break into pieces.”

I’ve always liked a nice cheese-and-crackers platter as an appetizer option, and these seemed like a good option to lead into the big Thanksgiving meal: relatively easy to make, but impressive – who wouldn’t be staggered by the effort of making homemade crackers even with a homemade feast to produce as well?

Bittman’s directions and quantities here are pretty specific, so I just followed his directions.  I omitted the salt, because Parmesan carries so much of its own tangy hit, and my parents are not big salt eaters.  It should also be noted that pulsing this mixture until just combined does not create a rollable dough, unless my idea of “just combined” is different from Bittman’s.  However, turning out the just-clinging crumbs onto a floured board and kneading for only a minute or two does produce a nice textured ball of dough that can be rolled out with minimal sticking.

I’d recommend aiming for a shape as close to a rectangle as possible.  Further, roll that rectangle to the size of your biggest cookie sheet.  That way you can carefully transport onto the greased or parchment-lined sheet tray by draping the dough loosely over the rolling pin.  Score it very gently into rectangles or squares of your chosen size (cut halfway through the dough with a knife, not all the way through), and into the oven with it!

When I checked these 20 minutes later, they were a little more golden than I wanted.  They were, in fact, heading toward a burnished bronze (is that not the kindest way ever of saying they were all-but-burned?).

After the cracker sheet had cooled for a few minutes, I broke it along the scored lines into neat (mostly) rectangles and we passed around a few samples.  The outside edges, which were thinner, had a slightly over-toasted flavor we didn’t love.  The inside rectangles, though, were crisp and flavorful, with a flaky – almost chalky – texture reminiscent at once of pie crust and shortbread.  My dad in particular, who enjoys this texture, thought they were great.

And now the confession: my final Bittman for this week is a bit of a cheat.  But I’m okay with that, because I also think it was a bit of a cheat for him, though in the best and most useful way.

“101. Buy some cheese. Unwrap it and put it on a plate with some walnuts and fruit; let come to room temperature. Serve with good bread.”

This is the final numerical entry of the list, and that means it’s in the dessert category.  While I accept that some people prefer a cheese course to dessert, I’m not sure I consider this an acceptable option for Thanksgiving.  It is, however, acceptable as an appetizer idea, as I mentioned above.  So that’s what I did.  In addition to the sage parmesan crackers above, I made my favorite craisin rosemary biscotti-style crackers with white bean and almond dip, and set them all out with some creamy Stilton, a nice rich chevre, and a wedge of Manchego obtained from a stand at the Farmers’ Market where we finally decided we’d had too many samples to feel right about not purchasing.  Surrounding these, I added dried apple rings, black Mission figs, and a fresh Granny Smith cut into slim slices.  The walnuts, which I was ready to add as well after a brief toasting, were subjected instead to accidental scorching, and had to be sacrificed.  We will speak of them no further.

What can you say about a cheese platter, besides that it was delicious?  We adored the Manchego, and soft crumbles of Stilton paired well with the fresh apples.  I tried fig and goat cheese together, and now I think chevre-stuffed-figs sounds like an amazing experiment.  We decimated the platter in little over ten minutes, but thankfully were not too stuffed to take full advantage of the turkey dinner that followed.

With Thanksgiving handled, that leaves only five weeks of 2012, and only twelve Bittman selections to go!  New Year’s Eve is on a Monday, but that still counts as this year if I need to jam in a few final selections, right?

I think I can, I think I can, I think I can…

Counting Down

It’s interesting that as I left my 20s behind chronologically, I entered my 20s in this Bittman project.  As of this moment, on this particular Sunday afternoon, I have 25 Bittman concoctions left to make, most of them soups and desserts.  At a rate of two per week, I will finish by the end of this year.  This means we’re getting toward some major milestones, some very big deals, some lasts on the list.

The first of this pair is one such last.

“34. Combine cooked bulgur with chopped or grated apple, minced orange rind, grated ginger and chopped parsley. Back in an oiled dish, use as stuffing or serve as a salad.”

This was the final remaining entry on the “Stuffings and Grains” list. We left it till last for no particular reason, but during a week in which a collection of Valencia oranges sat languishing in our fruit bowl, it seemed like the right thing to do.

I’ve been fairly good lately about writing down ingredient quantities as I add them, but for this entry I never even lifted a pen.  It happens.  I can own up to it.  A week of non-stop grading, perhaps, made me leery of that inky instrument.  Or maybe it was our relative rush: leave it to me to design a complex, glaze-bearing dinner on a night we needed to eat early.  Some things must get sacrificed, and it turns out it’s not the glaze, it’s the notations.

Here are my approximations:

1 cup bulgur wheat

2 cups water, stock, or a combination of the two

1 large fuji apple, diced into small squares

2-3 TB finely minced orange rind

1 TB grated ginger (this is really easy to do when the ginger is frozen)

¼ cup chopped parsley

salt and pepper to taste

Cooking bulgur is very similar to cooking rice.  I poured the wheat and the water into a pot and let it come to a boil before simmering for 15 minutes or so while I prepped my other ingredients.

After dicing the apple, grating the ginger, and chopping the parsley, I turned to the oranges.  Since Bittman specified “rind” and not “zest,” I used a y-shaped potato peeler to remove long, brilliant segments of rind.  I slid a sharp knife carefully between the rind and any white pith that got caught in the peeling, and then sliced into very thin strips, rotated them 90 degrees, and sliced again so I was left with tiny squares.

Before these happy bright piles all nestling on my cutting board got too comfortable, I tipped them into the pot of bulgur and carefully folded them in for even distribution with some salt and pepper to taste.  The experience of the still-chilly ginger hitting the hot bulgur was sinus-clearingly intense, but lovely.  An aroma-only aperitif.

With everyone incorporated, I dumped the pot’s contents into a greased baking dish and stowed it in a 350F oven for half an hour.

Orange and ginger suggested an Asian flavor profile, even though apples and parsley didn’t.  I decided to work with the dominant elements, though, and so I paired the bulgur with salmon and spinach.  The salmon would be rubbed with sesame seeds, powdered ginger, and orange rind bits before receiving a heavy sear and then an orange-juice glaze.  The spinach would be sauteed with garlic chips and sesame oil.

As with all things, this didn’t happen exactly as imagined.  It takes a long time, as it turns out, to simmer the juice of six oranges down into a thick glaze without burning their sugars.  Similarly, it takes time and babysitting to ensure garlic chips that are crisp, not charred.  And when you are trying to do all this on the same night as a homecoming football game you’ve promised to attend, certain shortcuts must be taken.

The salmon, while it seared beautifully, received not so much a glaze as a flood of boiled, ginger infused orange juice.  Still, when this liquid hit the hot salmon pan, it did bubble down into something thick and rich (if a little darker than intended).

The spinach, rather than the crunchy, spicy accoutrements I intended, had to settle for a last-minute sprinkle of sesame seeds to keep it company.

Still, the meal was overwhelmingly successful.  The salmon was outrageously delicious, and I’m going to have to make it again, writing down the procedure this time so I can share it with you.  The orange sauce perfumed the fish and kept it moist and buttery and tender.  Even though it was a bit darker than I’d planned for, the sauce took on caramel notes that seemed utterly intentional.

The bulgur was lovely.  It was toasty and fluffy and well seasoned.  The apple had cooked lightly as the dish baked, leaving it just softened but not without resistance.  The orange rind was delightfully not overpowering, but gave a warm spiciness to the grain.  It was good with the salmon, but would also be delicious with pork chops (playing on the traditional applesauce pairing) or, if you replaced the parsley with mint, a lovely side for leg of lamb.

In summary, a triumphant triumph: not only is the Stuffings category successfully completed, but it was completed with a success.


With the weather cooling (finally!) and the Soups category still looming largely untasted before me, I decided to try one to close out the week.

“21. Brown a little crumbled or sliced sausage in olive oil; a sprinkle of fennel seeds is good, too. Add chopped escarole, cooked white beans with their juice, and stock or water to cover. Simmer until the greens are tender and the beans are warmed through. Garnish with olive oil or Parmesan.”

I must admit I made some changes to these directions based on availability and personal taste.  I don’t like fennel.  It’s one of a very few spice flavors I just can’t take.  Over-fennel-ed sausage – like the kind that appears on many chain pizza restaurant pies – just doesn’t appeal to me, and the idea of fennel seeds crunching between my teeth and filling a mouthful of soup with their anise awfulness made their addition out of the question.

As for the escarole, I could find none.  I searched through mountains of salad greens at several local markets and this particular strain was resolutely absent.  But I did find a really beautiful bunch of kale and decided it would be a satisfactory substitute.

So here’s what I ended up with:

8 oz. bulk sausage

1 big bunch kale (chopped, this was probably 6-8 cups)

3 cloves garlic (some spice to replace the abhorred fennel seemed appropriate)

1 15 oz. can white beans with their liquid

2 cups chicken broth

salt and pepper to taste

Eschewing olive oil, I squeezed the sausage into a pan and let it brown over medium heat, separating and crumbling it as it cooked with a flat-sided wooden spoon.

I rinsed, stemmed, and chopped the kale into manageable pieces, and when the sausage was cooked through, I tossed in the mountain of greens.  No, that’s not true.  I inserted handfuls carefully so they wouldn’t spill all over the stove, and ran out of room with only half my kale added.  N. came into the kitchen when he heard me laughing hysterically, and stared in amazement at the mound of kale pieces sitting inches above the top of my pot.  I had to press it down with my hand, compacting the frilled, tough leaves down toward the bottom of the pot.  It always looks like too much.  It’s always not.  In the time it took me to mince the garlic, the kale had already begun to wilt and settle more comfortably into the confines of the pot.

When I could barely smell the garlic and the kale was level with the sides of the pot (as opposed to threatening to spill over them) I added the white beans, their juice, and barely two cups of low sodium chicken broth.  One of the things I’ve discovered about myself is that when it comes to soups and salads, I like them to be full of, well, stuff.  Lettuce with the odd crouton is no good.  I want dried cranberries, and walnuts, and avocado, and gorgonzola.  Thin, brothy soups don’t please me either.  Give me big chunks of vegetables, or slurpable noodles, or rich shreds of meat.  In the days when I’d indulge in the occasional Cup’o’noodle, I always drank the broth out first so I could concentrate on the important part: the just dripping mounds of noodles left behind.

So this soup, for true enjoyment, needed only enough broth to make its categorization accurate.  A scant two cups and we were assured plenty of “stuff” in every spoonful.

While the soup simmered, I stretched, sliced, and sprinkle mozzarella onto some pre-made pizza dough.  Twisted and snuggled on a baking sheet, these when into the oven to become bread sticks.  Fifteen minutes later when they were sizzling and firm, the soup was done.

This is not a soup you want to let simmer for hours.  The beans, especially if you are using canned like I did, will eventually become mealy and then disintegrate.  The kale begins to lose its emerald brilliance after a while, and though it will still taste good, it won’t be as pleasing to consume.  Simmer for fifteen to twenty minutes max.

Then you get to shave on some parmesan and eat it.

Neither of us was sure we would like this soup.  But we shouldn’t have been so foolish.  N. has placed the products of this project on a pass/fail system.  This is what happens, I suspect, when you have two teachers in the family.  He announces his verdicts after dinner, and he treats them as though Mr. Bittman has just submitted an exam or a paper assignment.  “Bittman passes on this one,” he told me last night as we cleaned up.  It wasn’t just his happiness at pairing his dinner with the first Jubelale of the season.  He really did like the soup.  And I think he was right.  This was a fast, easy, delicious little warmer.  Cooking the kale in the sausage grease gave it some additional flavor and took away that raw bitterness dark leafy greens can sometimes have.  The beans got creamy and delicate, and the starch from their liquid thickened up the minimal broth I used.  Even without the broth, these ingredients seem like a stellar combination that should be taken advantage of at many opportunities.  Sautéed together, perhaps with the addition of chopped onion and maybe butternut squash or sweet potato, they could be a nice little hash.  Wrapped in pastry with some thickened gravy, they could be a pot pie.  Folded with some grated mozzarella and enclosed in pizza dough, they become a perfect calzone.  And as the weather continues to cool (I hope, I hope, I hope), gravies and pot pies and warm cheesy casseroles are exactly what I want to pair my remaining Bittman dishes with.

It seems a bit stress-inducing to start with a countdown.  It’s a looming certainty of what must be achieved.  “That’s a lot,” N. said when I told him how many were left.  But after tonight’s dinner, it will be 24.  And by the end of next week, it will be 23.  And by having you out there reading, it means I must achieve, yes, but it also means I’m promising something to you.  Food.  Words.  Proof of my experiments.  And stress-inducing or not, that’s a kind of accountability I like having.

25 to go…