Cold Comfort

Tragedy, when it strikes, whether it be national and sweeping or personal and held tight against you – and I have experienced both this week – plunges you into strangeness.  There is shock, there is disbelief, there are weighty moments of contemplation, there is knowledge of helplessness.  There is the feeling of being alone.

When I feel the chill and the incomprehensible wounding of tragedy, I want my belly full of warmth and familiarity and comfort.  And while it may seem trivial or even juvenile to want to write about food in the aftermath of gut-twisting pain, I think there is an important connection to be made.  As Shauna said shortly after Hurricane Sandy, one of the ways food is important is that it brings us together.  Her post moved me deeply, and made me feel that it’s not trivial or disrespectful to feel the need to talk about humble little food in the aftermath of disaster.  The loneliness and helplessness of pain can be beaten back by community.  When we come together, we are able to offer one another comfort, even if it is slight, and the metaphorical warmth of our togetherness can often eclipse physical heat.  Food bridges that gap.  It offers a physical warming, yes, in that it nurtures us and fills us and helps us carry on as individuals.  But it also links us – we eat together, we break bread, and in eating together we share ourselves with each other in meaningful ways, even if we didn’t realize that sharing took place.  It binds us in communities, however small, and having fellows in a bad situation, whether they are fellow mourners or whether they are comforters and supporters, gives us the opportunity for light and warmth, if we are able to feel that connection.

So when I talk about food today, I want to talk about food that warms us.  I want the fullness of soup and the richness of dessert.  I want the clinking of spoons and the sprinkling of spice that stabilizes and relaxes and envelopes us.  I want us to be able to feel the warmth of love which, to me, is most easily expressed through a transfer of food: if I feed you, it’s a good bet I care about you.  It’s a small thing, and you may think it’s a silly thing or an unimportant thing, but it is perhaps the only thing I can do in this moment to reach across the feeling-less blips of the net-scape and offer you warmth.  But I mean it.  Take this warmth.

“95. Indian Pudding: Combine 3 cups of milk and 1/3 cup of cornmeal in a saucepan over medium heat. Bring to a simmer; stir in 1/3 cup of molasses, 1 tablespoon sugar, ¼ teaspoon salt, 1 teaspoon ginger and ½ teaspoon cinnamon and simmer, stirring occasionally, until thick. Add 1 tablespoon of butter and stir until melted. Pour pudding into buttered baking dish and bake at 300 degrees for about 2 hours, uncovered, until golden brown and set in the middle. Serve with ice cream or whipped cream.

Food Blog 2011-2013-0169

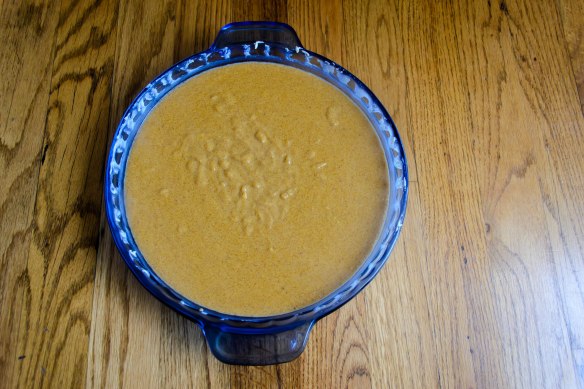
Stirred sternly, this mixture took on the texture and the color of pumpkin pie filling.  It began to spit and burble like a pot of grits (which, in a somewhat removed way, it was), and I decided it had done its time.  Into the oven with it.

I think I overbaked this.  Just the barest firmness across the top, like a good cheesecake, is what is needed.  Mine was stiffly set.  I also think I chose the wrong cooking vessel.  I used a glass pie dish.  Serviceable, sturdy, but too wide.  The pudding came out an odd inch or so thick.  A deep mass of wobbly richness would have been preferable.

Food Blog 2011-2013-0172

Despite these fallbacks, it was still very, very good.  Perhaps it was the color and the texture, but it really did remind me of crustless pumpkin pie.  The cornmeal and milk became a custard, and the rich deepness of molasses and autumnal spices left me wanting to douse this with a healthy dollop of Reddi-whip.  I settled for vanilla ice cream instead.

Food Blog 2011-2013-0174

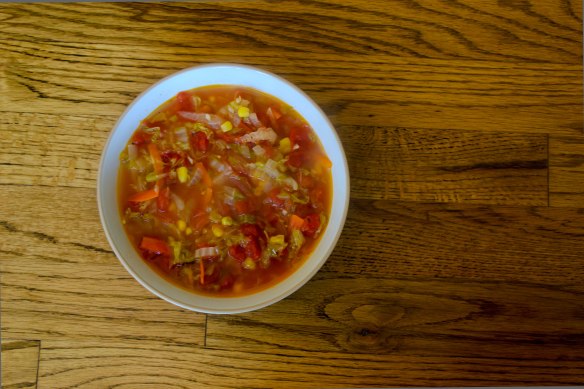
“18. Hot and Sour Vegetable Soup: Sauté chopped onions and garlic in vegetable oil until soft. Add chopped or shredded carrots, cabbage, and daikon or turnip, frozen corn, chopped boxed tomatoes with their juice and stock to cover; bring to a boil. Simmer for 15 minutes, then finish with about a tablespoon of rice wine vinegar per 2 cups of soup and loads of black pepper.”

Soup warms the belly like very little else.  This one, with the copious quantities of black pepper and the inevitable sour burn of the rice vinegar, promised a cauldron of comfort.  Quantities listed here make enough for two large bowls – quite enough for a deep December lunch.

2 TB vegetable oilFood Blog 2011-2013-0179

¼ large onion, diced

4 cloves garlic, minced

1 carrot

½ medium turnip

8 napa cabbage leaves

½ cup frozen corn kernels

14.5 oz can of petite diced tomatoes

2-3 cups chicken or vegetable broth

2 TB rice vinegar

½ tsp salt

½ pepper to start – add more to your liking

Heat the vegetable oil over medium heat and sauté the onion and garlic for a few minutes, until the onions just begin to pick up color.

Meanwhile (or beforehand, if you are not speedy with your vegetable prep), peel the carrot and turnip.  Once you have disposed of the scraps, continue to peel the carrot into thin strips with your vegetable peeler.  Cut the pile of ribbons in half or in quarters to create bite-sized pieces.

Cut the turnip in half from root to tip, then crosswise into thin slices.  Julienne each thin slice so you have slim matchstick pieces.

Stack the napa cabbage leaves, then roll into a thick cigar and slice as thinly as possible.

Add the vegetables to the onion and garlic.

Add the corn kernels and the broth and simmer the whole pot for 15-20 minutes, or until all vegetables are tender and everything is warmed through.

Add the rice vinegar, salt, and pepper, stir gently, and serve.

I loved everything about this soup except the tomatoes.  They weren’t a bad addition, there were just too many of them.  Were I making this again, I might decrease the quantity, or just drain the can and add only the liquid for the color and acidity.  The strings of carrot and turnip kept a minimal bite, and the combination of vinegar and pepper was near perfect.  The puckering sourness played against and contributed to the bland crunch of the vegetables, and alongside a hastily prepared hunk of garlic toast, this was a satisfying lunch on a chill day: it was heat, and comfort, where both were needed.

Food Blog 2011-2013-0178

Be well, all.

Veganize it!

I must admit to getting nervous.  Counting this week’s offerings, I’m down to 8 Bittman selections, and just over 3 weeks in which to complete them all.  If I face the honest fact that it’s unlikely I will attempt any of these concoctions during Christmas or the days that surround it, as family and I insist on old familiar dishes, reality tells me I in fact have just over 2 weeks left.

But I have a determined set to my jaw, sometimes, and I can feel it approaching.  This must be done.  It can be done.  It may mean making soup for lunch from scratch sometimes, but as I’m learning, soup doesn’t have to be something that simmers all day long.  It can be a quick meal.

It can be delicious, too.  This week’s selection is proof positive.

Food Blog 2011-2013-0168

“Thai Squash Soup: Simmer cubed winter squash, minced garlic, chili and ginger in coconut milk, plus stock or water to cover, until soft. Puree if you like. Just before serving, add chopped cilantro, lime juice and zest, and toasted chopped peanuts.”

This was a lunchtime experiment, because N., in one of his tragic shortcomings, doesn’t like coconut.  At first I thought it was something I could break him of.  I have, after all, in under a decade, convinced him to eat everything from sushi to quinoa to kale chips.  He is, as an eater, unrecognizable as the man I met in college.  But the coconut sensitivity is the food analogue to ESP.  He can eat a granola bar with coconut oil hidden deep in the ingredient list and say “I’m not sure I like this.”  If I don’t choose my sunscreen carefully and it happens to have that delightful coconut aroma that means it’s well and truly summer, N. tells me I smell funny.  So a coconut milk based soup had to be consumed in his absence.

Food Blog 2011-2013-0160

½ big butternut squash, peeled, seeded, and cut into small cubes

1 13.5 oz. can coconut milk

½-1 cup water or vegetable stock

½ tsp red chili flakes

3-5 cloves garlic, minced

1-2 tsp ginger, minced

salt to taste

2-3 TB cilantro, roughly chopped

2-3 TB peanuts (if you have a nut allergy, consider using the butternut squash seeds instead), toasted and chopped.  I used dry roasted peanuts for mine.

zest and juice of ½ a lime

Put the squash, chili, garlic, and ginger into a pot.  Add the coconut milk and, if necessary to cover the chunks of squash, water or stock.  Bring to a boil, then simmer over medium heat for 20-25 minutes, or until the squash is tender.

During this simmering process, don’t forsake your kitchen completely.  Coconut milk boils over, just like regular milk.  If you leave to, say, comb out your hair, do your makeup, and put a few things away, you might return to a stove swimming in chili infused coconut milk sludge sitting underneath your burners.  One of which isn’t working anymore.  Just saying…

Once the squash cubes are tender, you can choose to puree or not to puree.  I, feeling lazy, took my potato masher to them and ended up with a slightly chunky, rough textured soup that I liked the look and feel of.

Food Blog 2011-2013-0164

Top with garnishes and eat!

Alternative: I liked this, and the simmered squash had a nice, fresh flavor.  But I missed the caramelized depth you get when you roast it.  Were I making this again, I would roast the squash with olive oil and salt until it was tender.

While the squash roasted, I would add the spices to the coconut milk and simmer for 10-15 minutes.  Then, when the squash was cooked and the milk was hot and flavorful, I would add the chunks of squash and proceed as above.

This bowl of soup was surprising.  It awoke flavors of sweet, sour, spicy, and bitter.  The squash was tender and freshly vegetal.  The coconut milk added this incredible unctuous creaminess that felt round and thick against my tongue, but the squash itself and the lime flavor kept it light and fresh and delicate at the same time.  The peanuts were the right crunch, and I surprised myself by finished an enormous bowl and feeling quite satisfied but not overly full.

 Food Blog 2011-2013-0167

The soup wouldn’t have been right without the lime juice.  I’m learning, as I continue to cook, that acid is a seasoning just like salt or nutmeg.  This new understanding, and a little bit of experimentation, saved the next dish from being muddy and boring.

“56. Cook lentils, thyme sprigs and chopped carrots in a pot with water to cover until tender; drain and remove thyme. Cook chopped onions in oil until soft; add chopped kale and allow to wilt. Add lentils, stir to combine and cook until kale is tender. Add chopped parsley.”

With the holiday season practically upon us, this seemed like a sobering, “healthy” dinner choice which would, against all the logical reasons for eating healthy, permit us to have cake for dessert.

1 cup lentils

12-15 baby carrots, quartered lengthwise, chopped into small rounded triangles

6 sprigs thyme

4 small whole cloves garlic

½ red onion, chopped

2 cups kale

2 TB parsley

sprinkle of red wine vinegar to taste

I put the lentils, carrots, thyme, and – in a flash of inspiration – garlic in a pot and added water according to the lentil package directions (depending upon what color lentils you use, you may need more or less water).  I added a bit extra, since I realized the carrots might benefit from some bubbling too.  I let them simmer for about 35 minutes, at which point the lentils were just barely still resistant between my teeth.

Never enthusiastic about using multiple pots, I dumped the lentil mixture into a strainer and then, with a bit of olive oil to lubricate the surface, sauteed the chopped onions in the same, now-empty pot.  When they were just beginning to turn golden around the edges, I added the kale and a sprinkle of salt.  Softening the onions and wilting the kale took about ten minutes.

After the kale had collapsed a bit, I dumped the lentil mixture back in, folded it gently in with the greenery, and let them stew over low heat until the kale was the texture I like.  I tasted and felt the muddiness of the lentils and carrots: winter vegetables are wonderful, but sometimes the heaviness they impart is reminiscent of the dirt from which they were pulled.  Lentils, though they aren’t root vegetables at all, tend to have a similar effect.

This was my inspiration point.  Only a few drops of red wine vinegar pulled the flavors up out of the garden ditch they’d been wallowing in and made them interesting and individual again.  Add the vinegar and chopped parsley at the last moment.

Food Blog 2011-2013-0157

I mounded this on our plates and topped it with a tuna steak (I know, that’s not vegan.  But the Bittman is, and that’s what matters here!).  It would have been better with salmon – the more delicate meatiness would have contrasted nicely against the lentils and carrots.  The tuna was almost too dense a pairing, calling back to the muddiness of the pre-vinegared dish.  Lamb rubbed with harissa, or maybe even a grilled portobello or a big steak of tofu, pressed, dried, and rubbed with a marinade that involved roasted red peppers, are other potentially promising pairings.

 Food Blog 2011-2013-0155


* As the year draws to a close, I’m thinking a lot about friends I’m now physically far from.  This title celebrates two of them: M. and Ph.  Both became unintentional vegans due to food allergies, and M. is fond of exclaiming, of dishes she likes the sound of but cannot eat thanks to its animal product ingredients, “I’m going to try to veganize it!”  So here you go, ladies: these are pre-veganized.  And gluten-free.  And yummy.  What more could you ask for?!

Fading light. And bourbon.

My home office – the room where grading, blogging, photo editing, and general work happens – has the most wonderful light in our house.  A huge sliding glass door lets sunlight pour in during the morning hours, and in the afternoon I get brightness mediated by the roof of the house.  Even when it’s overcast, there is still so much natural light that it makes for wonderful food shots.

But winter is a problem.  I’m discovering that if I make a dish for dinner, I’m not going to be able to photograph it from my office because it’s too dark by 5pm.  And wedded to this blog and this project as I am, there’s no way we’re having dinner at 4:30 in the afternoon just so I can get the best light in the house.  So I’m trying out new angles, and new placement, and new adjustments.  I’m learning more about artificial light: which arrangements I find glaring and which I find acceptable.  Bear with me, and look forward to the return of Daylight Savings Time!

“17. Sauté chopped onion in butter, then chunks of sweet potato and stock or water to cover. Simmer until the sweet potatoes can be pierced with a knife, then add chopped kale and cook until wilted.”

This was easy, and quick, and tasty.  I made a few additions to Bittman’s recommendations and think the soup really benefited from them.  I used:

4 TB butter Food blog 2011-0133

½ a medium onion (mine was yellow)

1 big sweet potato, peeled and cut into small chunks (the smaller the chunks, the faster they will cook, so make your decision based on how much time you have and what size is most pleasing to you)


Salt, pepper, ground nutmeg to taste

4 cups broth – vegetable or chicken, depending on your preference

6 oz. kale

1 tsp red wine vinegar

Heat the butter in a pot over medium heat.  When it has melted, add the onion and cook gently, stirring occasionally, until the onion is soft and translucent but not bronzed.

Add the sweet potatoes and seasoning, stir to combine for a minute or two, then add the broth.  The quantity of liquid you need will depend entirely upon the size of your sweet potato.  You may need more or less than the 4 cups listed here.

Let the soup simmer until the sweet potatoes are tender but not falling apart.  Mine took about 15 minutes.

Add the kale and stir to combine.  You will be bewildered by how quickly it collapses on itself, wilting from smoky green to a brighter, more vibrant hue as it is immersed in the liquid.  Cook just until it reaches the texture you like against your tongue – I let it simmer for about 5 minutes, because I like my kale to still put up some resistance and retain its bright color.

I tasted and thought this needed something.  Extra salt to heighten the flavor of the kale, certainly, but there was a kind of dullness about the whole concoction.  Remembering my soup lessons from Alton Brown, I sprinkled in just a hint of red wine vinegar, and the difference was amazing.  The whole thing was brighter, somehow, even though you couldn’t taste anything harsh or stringent.

We consumed this happily with freshly toasted, garlic-rubbed slices of pugliese.  It was good, but could have been stuffed with even more flavor: I’d consider adding garlic, ginger, maybe even rice or ramen noodles.

Food blog 2011-0137

“4. Onion jam with bacon and bourbon: Thinly slice red onions and cook in olive oil with chopped bacon until soft. Add a little bourbon and brown sugar to taste and cook until the jam thickens.”

Bourbon is new for me.  N. has been enjoying the occasional scotch for a few years now, but we recently acquired a bottle of Knob Creek and I’ve been appreciating the floral notes of it – so much less musty and boggy than its British cousin.

4 slices thick-cut bacon, halved lengthwise into long strips, then sliced into small rectangles

½ large red onion, thinly sliced

¼ cup bourbon

2 TB brown sugar

Freshly ground black pepper

1 small sprig rosemary

Food blog 2011-0144

I used about a tablespoon of olive oil to start the pan, but I don’t think you really need it.  Just toss in the bacon slices over medium heat and let them work for about 5 minutes.  You will get a shimmer of fat across the bottom of the pan that is more than enough to start the onions sizzling in.

Add the onions and cook over medium or medium-low for at least ten minutes, until the onions soften and the bacon is mostly cooked.  Stir with some frequency to ensure even cooking.

Off the heat (especially if you are using a gas stove) add the bourbon and the brown sugar.  Stir to combine, then return to medium heat and simmer slowly for about 20 minutes, to let the flavors mingle and the bourbon soak into the onions and bacon.

After a few minutes of cooking, I added pepper and rosemary for additional flavor components, and I think they were a good choice.  The rosemary’s woodsy flavor was a nice contrast to the fatty bacon and sweet onions.  Everything cooked down into a sticky, caramelized jam that I draped across some baked rounds of polenta.

Food blog 2011-0148

This was delicious, but misplaced.  The meaty, smoky bacon was intensified by the bourbon, and the brown sugar and onions had a nice note of molasses.  It didn’t belong on polenta.  It belonged, I think, on a freshly toasted piece of crostini, possibly smeared with a thick slice of brie.  The funkiness of the cheese could stand up nicely to the sweet smoky strength of this jam.

We paired our misguided polenta with green beans, lightly blanched and then seared in a hot pan and deglazed with a bit of red wine.  These, too, were delicious, but not the ideal pairing for the sweet saltiness of my jam.  Apples, maybe, or red grapes would make better pairings.  Regardless, we ate with joy and returned to the pan once or twice for a final sweet chunk of sticky, gooey jammy bacon to sweeten our palates, even though dessert was still to come.


“91. Pears in Red Wine: Simmer 2 cups red wine with ½ cup sugar, 2 cloves, a cinnamon stick and a few slices of ginger in a pot for a few minutes, then gently poach peeled and cored pears (use a spoon to hollow them from bottom), until soft. Cool or chill, and serve with a bit of the poaching liquid.”

This is supposed to be one of the most sophisticated desserts you can offer: not overly sweet, laden with mulled flavor, perfect for a gourmet adult party in celebration of autumn.  Pears, with their temperamental habits and signature grainy texture, are perhaps the same kind of acquired taste as wine or coffee or any of those other “adult” tastes.  As dessert for our onion-jam-crusted dinner, I decided to attempt these.

Food blog 2011-0140

I used 2 pears, but followed the rest of Bittman’s quantities exactly.

Food blog 2011-0142Well, one exception to note: I thought about getting fancy and adding things like citrus peel or rosemary (apparently I’m hooked on the stuff these days).  But in the end, I just splashed in a bit of bourbon to link the flavor profile back to our dinner: red wine from the beans, bourbon from the jam, and this dessert would fit right in.

After the first simmer, in which I stirred gently to let the sugar dissolve and the spices mull gently into the wine, I prepared the pears.

The issue with pears is that inside their tender skins they are slippery little beasts.  You can’t grasp them too firmly or they sigh into bruises.  You can’t hold them too delicately or they slide out of your hands and threaten to slip from the edge of the kitchen counter.

I dove into my attempt to core the pears only after peeling them.  This, and the attempt to do so with a spoon, may have been a mistake.  The spoon tore through the tender flesh of the pear but was too wide to remove only the core.  Further, I wasn’t sure how much core I was supposed to be removing, so I ended up with two pale, naked, slightly mutilated pears, which I slid into their (hopefully) healing bath of alcohol.

I let them simmer, turning them occasionally to dye all sides a lovely burgundy, for about 15 minutes.  Then I turned off the heat and let them sit a further 20 minutes until we were ready for dessert.

Surrounded by a moat of spiced wine, these were achingly tender and nicely flavored.  I would choose pears that were less ripe if I attempted this dessert again, because a bit of additional texture might have done them good.  As it was, though, much of the graininess disappeared in the poaching, and the soft floral flavor was really nice against the wine and assertive spices.  A scoop of vanilla ice cream on the side would have made this a richer endeavor, but I think the creaminess would have matched well with the fruit and the wine.   Or maybe I just need the extra comfort as we roll into December…

Food blog 2011-0150

Giving thanks

The house feels empty.  Wednesday through Saturday, my family visited for Thanksgiving.  This morning, with them on the road home, fog hovering sticky in the sky, the cheery burgundy tablecloth in the washing machine, and a stack of lingering dishes I’m trying to ignore proclaiming themselves from the sink, our little home was stark and cold.  I could say that the memories of the holiday will keep me warm, but that would only be true in a metaphorical sense.  What I really want is another baked apple.

90. Baked Apples: Combine chopped pecans and chopped dried fruit (raisins, dates, figs, cranberries all work) and toss with maple syrup and a sprinkle of cinnamon, allspice or nutmeg or all three. Fill the cavities of cored apples with the fruits and nuts, dot each with butter, put into a baking dish and roast about 30 minutes, until tender. Better with vanilla ice cream.”

We had a few small apples from our local Farmers’ Market waiting for attention in the fruit bowl, so I set about collecting partners for them to make a dessert for two.

2 small apples

¼ cup chopped pecans

¼ tsp pumpkin pie spice (I agree with Joy the Baker that we should probably just make our own, but if you, like me, purchased some in a moment of confused weakness, this seems a harmless way to put it to use)

1-2 TB each:

chopped dried figs (I used black Mission, my current favorite)

craisins

golden raisins

3 TB maple syrup

Preheat the oven to 350F.

Core the apples, keeping the bottoms intact if you can.  If you can’t, just wrap the bottom quarter or so in aluminum foil and set them in a baking dish.  This will keep the filling from escaping.

In a small bowl, combine the nuts, fruit, and spice(s).  Drizzle in the maple syrup and stir gently to combine – you want even stickiness throughout.

Using a small spoon, or your fingers, insert as much filling as you can into the cored apples.  You will notice that this quantity makes about twice as much as you need for 2 small apples.  That’s okay.  The leftovers are a fantastic topping for oatmeal the next morning.

Once full, stow your apples in the oven for 30 minutes, or until they are tender when pierced with a knife.  Liberate, evacuate to a dessert plate, and pair with vanilla ice cream.

These were a lovely dessert.  They felt light, because they were primarily fruit, but were still sweet enough to satisfy that after-dinner craving.  The apples still had some resistance, but were warmed through and starting to collapse into themselves.  The ice cream was a perfect accompaniment – I wouldn’t want this dessert without it.  I might ideally have chosen an apple with more tartness to contrast against the sweetness of the syrup and dried fruit, but in such a case, especially if the apple were on the large size, I would advocate a longer baking time.  If the fruit and nuts protruding from the top of the apple start to brown too much, give them a tinfoil hat to hide beneath.


“84. Sage Crackers: Pulse 1 cup flour, 1 teaspoon salt, ½ cup Parmesan and 4 tablespoons cold butter in a food processor. Add ¼ cup cream and 1 tablespoon finely chopped sage.  When just combined, roll as thinly as possible, score into squares, sprinkle with salt and bake at 400 degrees until golden.  Let cool, then break into pieces.”

I’ve always liked a nice cheese-and-crackers platter as an appetizer option, and these seemed like a good option to lead into the big Thanksgiving meal: relatively easy to make, but impressive – who wouldn’t be staggered by the effort of making homemade crackers even with a homemade feast to produce as well?

Bittman’s directions and quantities here are pretty specific, so I just followed his directions.  I omitted the salt, because Parmesan carries so much of its own tangy hit, and my parents are not big salt eaters.  It should also be noted that pulsing this mixture until just combined does not create a rollable dough, unless my idea of “just combined” is different from Bittman’s.  However, turning out the just-clinging crumbs onto a floured board and kneading for only a minute or two does produce a nice textured ball of dough that can be rolled out with minimal sticking.

I’d recommend aiming for a shape as close to a rectangle as possible.  Further, roll that rectangle to the size of your biggest cookie sheet.  That way you can carefully transport onto the greased or parchment-lined sheet tray by draping the dough loosely over the rolling pin.  Score it very gently into rectangles or squares of your chosen size (cut halfway through the dough with a knife, not all the way through), and into the oven with it!

When I checked these 20 minutes later, they were a little more golden than I wanted.  They were, in fact, heading toward a burnished bronze (is that not the kindest way ever of saying they were all-but-burned?).

After the cracker sheet had cooled for a few minutes, I broke it along the scored lines into neat (mostly) rectangles and we passed around a few samples.  The outside edges, which were thinner, had a slightly over-toasted flavor we didn’t love.  The inside rectangles, though, were crisp and flavorful, with a flaky – almost chalky – texture reminiscent at once of pie crust and shortbread.  My dad in particular, who enjoys this texture, thought they were great.

And now the confession: my final Bittman for this week is a bit of a cheat.  But I’m okay with that, because I also think it was a bit of a cheat for him, though in the best and most useful way.

“101. Buy some cheese. Unwrap it and put it on a plate with some walnuts and fruit; let come to room temperature. Serve with good bread.”

This is the final numerical entry of the list, and that means it’s in the dessert category.  While I accept that some people prefer a cheese course to dessert, I’m not sure I consider this an acceptable option for Thanksgiving.  It is, however, acceptable as an appetizer idea, as I mentioned above.  So that’s what I did.  In addition to the sage parmesan crackers above, I made my favorite craisin rosemary biscotti-style crackers with white bean and almond dip, and set them all out with some creamy Stilton, a nice rich chevre, and a wedge of Manchego obtained from a stand at the Farmers’ Market where we finally decided we’d had too many samples to feel right about not purchasing.  Surrounding these, I added dried apple rings, black Mission figs, and a fresh Granny Smith cut into slim slices.  The walnuts, which I was ready to add as well after a brief toasting, were subjected instead to accidental scorching, and had to be sacrificed.  We will speak of them no further.

What can you say about a cheese platter, besides that it was delicious?  We adored the Manchego, and soft crumbles of Stilton paired well with the fresh apples.  I tried fig and goat cheese together, and now I think chevre-stuffed-figs sounds like an amazing experiment.  We decimated the platter in little over ten minutes, but thankfully were not too stuffed to take full advantage of the turkey dinner that followed.

With Thanksgiving handled, that leaves only five weeks of 2012, and only twelve Bittman selections to go!  New Year’s Eve is on a Monday, but that still counts as this year if I need to jam in a few final selections, right?

I think I can, I think I can, I think I can…

Chatterbox

I’ve just begun rereading Neil Gaiman and Terry Pratchett’s genius collaboration Good Omens for perhaps the sixth or seventh time.  One of the characters introduced early in the novel is a Satanic nun named Sister Mary Loquacious from the Chattering Order of St. Beryl.  In looking back through some recent posts, I’ve noticed myself falling a bit on the loquacious side, with posts extending perhaps a bit longer than you’d like for a casual evening read.  So today, with three Bittmans to report on, I’m going to try to keep this brief.

54. Cook onion, curry powder and chopped ginger in oil until onion is soft; meanwhile, steam cauliflower florets until nearly tender. Add cauliflower to onion mixture, along with raisins; cover and cook until the cauliflower softens.

Two of my most hated food items as a child were cauliflower and curry.  Cauliflower was drab and slightly bitter – worthless unless smothered in sharp cheese sauce, and even then a bit suspect.  Curry powder was musty and unpleasant, and the two of them together sound like one of my youthful nightmares.  I kept this selection on the list because N. loves the flavor of curry.  But I knew that I would have to doctor up Bittman’s procedure to give this dish even a fighting chance.

1 head cauliflower

1 tsp curry powder, divided

½ tsp salt

½ tsp black pepper

generous glugs of olive oil (quantity will depend upon the size of your cauliflower)

¼ of a red onion

¼ cup golden raisins

2 TB fresh ginger, grated (this is easiest to do while it is mostly frozen; you keep your ginger in the freezer, don’t you?)

Brush a layer of olive oil on each of two cookie sheets and preheat the oven to 400F.

Core the cauliflower and slice it across into flat steaks of about ½ inch thick.  Some will collapse into florets.  That’s okay, but ideally you want nice long, horizontal pieces of cauliflower.  They look like flattened sprigs of Queen Anne’s Lace.  Toss the cauliflower with ½ tsp of the curry, salt, pepper, and more olive oil, then place on the tray in a single layer.  Don’t crowd them too much – the more space they have, the better they will brown.  Roast for 40 minutes, pausing at the 20 minute mark to flip each piece.

While the cauliflower roasts and caramelizes and browns, sauté the red onion in a little more olive oil.  When it begins to brown, toss in the raisins, the ginger, and the other ½ tsp of curry powder.  Cook together for another 2-3 minutes until the raisins plump and the curry aroma mellows a bit.

When the cauliflower is just tender and darkly golden, take it out of the oven and toss it with the onion and raisin mixture.

We had ours alongside some roasted chicken breasts I’d marinated in yogurt and garam masala.  It was delightful – if you favor a strong curry flavor, add more to both the cauliflower and the onions.  I was happy to have just a mild hint of earthy spiciness, and the unexpected sweetness of the raisins cut even this dankness in a very pleasant way.

16. Sauté equal amounts chopped, peeled apples and onions in butter until soft. Add stock or water to cover, then simmer for 10 minutes. Cool and puree. Serve sprinkled with Stilton or other blue cheese.

We weren’t sure about this one.  Nevertheless, we bravely decided to make just a small portion and see what happened.  These quantities will serve two.

1 medium apple, peeled and cored

1 medium onion

salt and pepper to taste

2 TB butter

1 ½ cups chicken stock

blue cheese

Melt the butter in a small pot over medium heat.  When it foams, it’s ready.

Meanwhile, dice the apple and onion into small chunks.  You want equal sized piles – we probably ended up with just over a cup of each.  Add them to the pot and cook over medium, stirring occasionally, for 10-15 minutes.  You want softening and tenderizing, not aggressive browning.

When the apples are tender and the onions soft and translucent, add the broth and seasoning (though we didn’t make any additions, some thyme or sage might be very nice here – try 1 tsp of finely minced fresh herbs) and simmer for 10 minutes.

Remove from heat and cool slightly, then puree and serve with 1-2 TB blue or gorgonzola cheese sprinkled on top.  We had a nice blue stilton.

It wasn’t that we didn’t like this, it was that it seemed odd as a soup.  It was slightly reminiscent of a butternut squash soup, but the apples were slightly sweeter than a squash, and the combination of their sweetness with the sharpness of the onion made this seem like an applesauce with too many ingredients.  Left chunkier, this might be nice draped over a roasted pork tenderloin – a meat that goes nicely with both sweet and sharper, savory flavors.  It might also be a good base for a butternut squash soup – the one additional player in this game could be the additional complexity it might have needed.


6. Cranberry-Corn Sauce: Cook a bag of fresh cranberries with about a cup of corn kernels, some chopped scallions, ¼ cup brown sugar (or to taste) and a splash of water, just until thick.

Our third Bittman this week was part of a pre-Thanksgiving Thanksgiving dinner.  When you grow up with a set collection of dishes that come to equate to this holiday, it can be hard to make a change.  When N. started having Thanksgiving dinner with my family, he missed his mashed potatoes and green bean casserole.  So I try, in the weeks that surround the holiday, to make up for these omissions. I make several smaller dinners featuring the dishes that don’t quite fit onto our holiday menu.  This seemed like the perfect side – not traditional enough for our Thanksgiving table, but satisfying in the mean time.

1 bag cranberries

1 cup fresh or frozen corn

3 green onions, thinly sliced

¼ cup brown sugar

¼ cup water

I tossed the cranberries, corn, water, and brown sugar together in a saucepan and set them over medium heat.  I added the green onions at this point too, but were I making this again I would add them later – the 15-20 minute simmering time resulted in a slightly adulterated color, and the fresh greenness would be so much nicer.  I advise adding them during the last five minutes of cooking time.

I let this simmer for about 20 minutes, until most of the cranberries had popped and the whole pot was a sticky, almost syrupy texture.  I let them cool off the heat with the pot uncovered for a few minutes, both because I like the flavor of cranberry sauce better the cooler it is, and because I wanted to let it gel up a bit further.

These weren’t as sweet as your typical cranberry sauce.  At least, they were not as sugary sweet.  The corn added a beautiful vegetal sweetness that seemed at once the perfect fit and a strange accompaniment.  We talked through this dish as we ate it, appreciating the maple overtones of the brown sugar and the tender crunch of the sweet corn, but thrown off slightly by the same qualities.  What we finally decided, as we sampled second helpings, was that they were a delicious side dish, but they didn’t feel like Thanksgiving.  Since the rest of the meal (garlic mashed potatoes and the old standard green bean casserole, slathered with cream of mushroom soup and the salty, salty crunch of french fried onions) was so traditional, having this difference, even in its subtlety, felt wrong.  If you’re a stickler for tradition, this cranberry dish would have a better chance as a chutney for grilled pork or maybe even lamb.

Next week is the big feast.  Oddly (odd because the entire Bittman list was conceived for this single day), I had some trouble figuring out where to fit his ideas in.  I’ve come up with a pair of selections to try out, and I will report back.  In the mean time, what dishes will grace your menu on Thursday?

Last salad

I think Fall has finally found Los Angeles, and only a week and a half to go before Thanksgiving.  Within a week, we went from temperatures in the mid-80s to a high of barely 70F.  My living room went from a comfortable lounging 75F to barely hitting 70 despite blinds wide open to catch the sun all day.  Thankfully, the items I have left on my Bittman list accommodate this weather change.  Today I have to report the last salad of the list, and a foray back into desserts.  Both have decidedly autumnal collections of flavors (I wrote “flavor profile” first, and then I thought, “who do you think you are?”).  Many of the food blogs I read have been reporting for the past week or two on Thanksgiving recipes, and I thought about doing that too.  But then I remember that Bittman’s entire list is conceived as Thanksgiving sides, so if you’ve been following this little blog for any length of time, you’ve been seeing Thanksgiving options – with only a few disruptions – for the past two years!

“67. Sprinkle shelled pumpkin or squash seeds with a little chili powder; roast, shaking occasionally, until lightly browned. Combine with grated sweet potatoes (raw or lightly sautéed in butter or oil), raisins and a vinaigrette made with red wine vinegar, olive oil, Dijon mustard, a touch of honey and maybe a little more chili powder.

I gathered:

1 small sweet potato

1 TB pumpkin seeds

chili powder to taste (mine is really mild – I probably used about a teaspoon)

2 TB butter

2-3 TB raisins

These measurements look small, but I was planning this for just the two of us and didn’t want any leftovers.

We were having this “salad” with spanakopita, so I decided to capitalize on the heat of its baking.  I popped the pumpkin seeds onto a baking tray, drenched them with chili powder, and tucked them into the oven for a few minutes.  When you hear the first couple of pops, they are done.  Don’t leave them too long – not only will they burn, they will propel themselves all over your oven.

I set aside the lightly toasted seeds and turned to the sweet potato.  N. and I proved in earlier experiments that we don’t like it raw – the starchy feel when you chew is just too much – so I was glad Bittman allowed for a cooked option.  I melted the butter while I grated the sweet potato, and tossed the shreds of bright orange onto the fizzing fat.  If you have more patience than I do, you might wait for the butter to brown a bit to add nuttier, deeper flavor to the sweet potatoes.

I let the little ribbons of sweet potato cook for a few minutes over medium heat.  The goal was not to brown them, just to lightly cook them through.  When I estimated them to be two minutes from done, I tossed in the raisins and folded the mix together.  This gave the raisins time to match the sweet potatoes in temperature, and it allowed them to plump up and take in some buttery flavor.

Heat off, I turned to the dressing.  Whisk together:

1 TB red wine vinegar

1 tsp honey

1 tsp dijon mustard

sprinkle of chili powder

2 TB olive oil

I tossed this lightly with the sweet potatoes and raisins, then topped them with the pumpkin seeds (which I almost forgot AGAIN!  What is it with me and missing the crunch?) and it was ready for tasting.

We liked this.  I’m not sure it read as a salad – in fact I’m not sure what it read as at all.  At once, it was not quite a salad, but also not quite a vegetable side, and not quite a chutney.  But it was tasty.  The red wine vinegar was acidic enough to counter the sweetness of the potato and raisins nicely.  It was a refreshing bite against the richness of our spanakopita.  The crumbling cubes of feta hidden in the spinach blend imparted the final necessary taste: a briny saltiness so welcome to the rest of this sweet and butter-drenched meal.

I took my next choice (partly made because it sounded delicious, but partly to use up the phyllo) to an election party.

“93. Pumpkin-Raisin-Ginger Turnovers: Mix pureed cooked pumpkin, raisins, chopped crystallized ginger and sugar.  Brush a sheet of phyllo with melted butter and cut lengthwise into thirds. Put a spoonful of the filling at the top of each strip. Fold down to make a triangle and repeat, like folding a flag. Repeat with remaining filling. Brush the tops with butter and bake 20 to 30 minutes. Dust with powdered sugar.

Whether you are elated, distraught, or ambivalent about the results of the vote, these little turnovers were worth celebrating over.

1 15 oz. can pumpkin puree

½ cup sugar

½ cup raisins

¼ cup finely minced crystallized ginger (or you could try grating this on your microplane.  I’m not sure how that would work, but since candied ginger is gummy and hard to chop, it might be helpful)

butter

phyllo dough

I couldn’t resist adding about a teaspoon of cinnamon.

First, I preheated my oven to 375F and put the butter into a small pan, which I set over low heat so it would melt but not brown.

I shlooped the pumpkin from the can to a bowl and whisked in the sugar and fruit.  I suggest you use a fork for this, not a traditional whisk.  The mixture clumps and sticks in the slender spokes and results, if you are at all like me, in cranky frustration.

When everything is well mixed, turn to the phyllo.  If you’ve never worked with it before, don’t be afraid.  The amazing way it changes from dry papery sheets to flaky, buttery pastry is worth the challenge.  Here’s what I do:

Set up an assembly line on your counter.  At one end, unroll the phyllo and set a just-damp kitchen towel (or couple of paper towels) over the top.  This will help, if you are a slow worker, to prevent it from drying out and breaking.  Next to that, you need a board big enough to accommodate one sheet of phyllo.  Next to that, place your butter, followed by your filling, followed by the final resting place for your wrapped confections.

Carefully peel off one sheet of phyllo and place it on your board with the shorter end facing you.  Recover the remaining stack with the damp towel.  Using a pastry brush, brush the whole sheet with butter.  Cut it in long thirds (you’ll begin your cuts on the short edge of the rectangle, so that you create three long, thin strips, as opposed to three short, squat strips).  Then, place about two tablespoons of filling at the top of each strip, and begin to fold in triangles.

To make the first fold, bring one corner down to the opposite edge of the strip.  Don’t press too hard, or the filling will ooze out everywhere.  The second fold will be straight down: the remaining corner (now doubled because you’ve folded over your first triangle) folded down onto the same edge.  Continue to fold, keeping your filling in the center of a triangle, until you reach the end of the strip of phyllo.

Place that on a parchment-lined or greased baking sheet and brush the top with a little more melted butter.  Repeat until you run out of filling.  Since these won’t rise or spread, you can place them quite close to one another on the baking sheet.  Don’t overlap them, though, because only the dough exposed to the air will brown.

This sounds complicated, but once you get into a rhythm it’s relatively easy and quite satisfying.  You end up with two trays of sweet little parcels that you can stow in the oven for 20-30 minutes until they become magically golden and flaky.

When they were done, I dusted them liberally with powdered sugar and tented them with aluminum foil to take to the party.  I brought home an empty, sugar dusted tray with a lone raisin abandoned in one corner.

They were so tasty.  The pumpkin-raisin-ginger combo was insane: earthy and sweet and, with the addition of the cinnamon, warmly spiced.  Inside the phyllo, it was a contest of texture too: unremittingly soft pumpkin with the occasional chewy juicy punch of raisin, against sharp flaky crunch of sugar-dusted pastry.  We couldn’t resist tasting a few before dinner, and then we had to revisit them again for dessert.  These will, I suspect, make repeat appearances in my kitchen.  They could probably be made a few hours ahead as well, or transported and baked on location: wrap them up, dredge them with butter, and store them under a damp towel or some plastic wrap until ready to bake.  If you don’t like pumpkin pie, or you’re tired of it (I know, heresy!), these might be a fun alternative Thanksgiving dessert option.