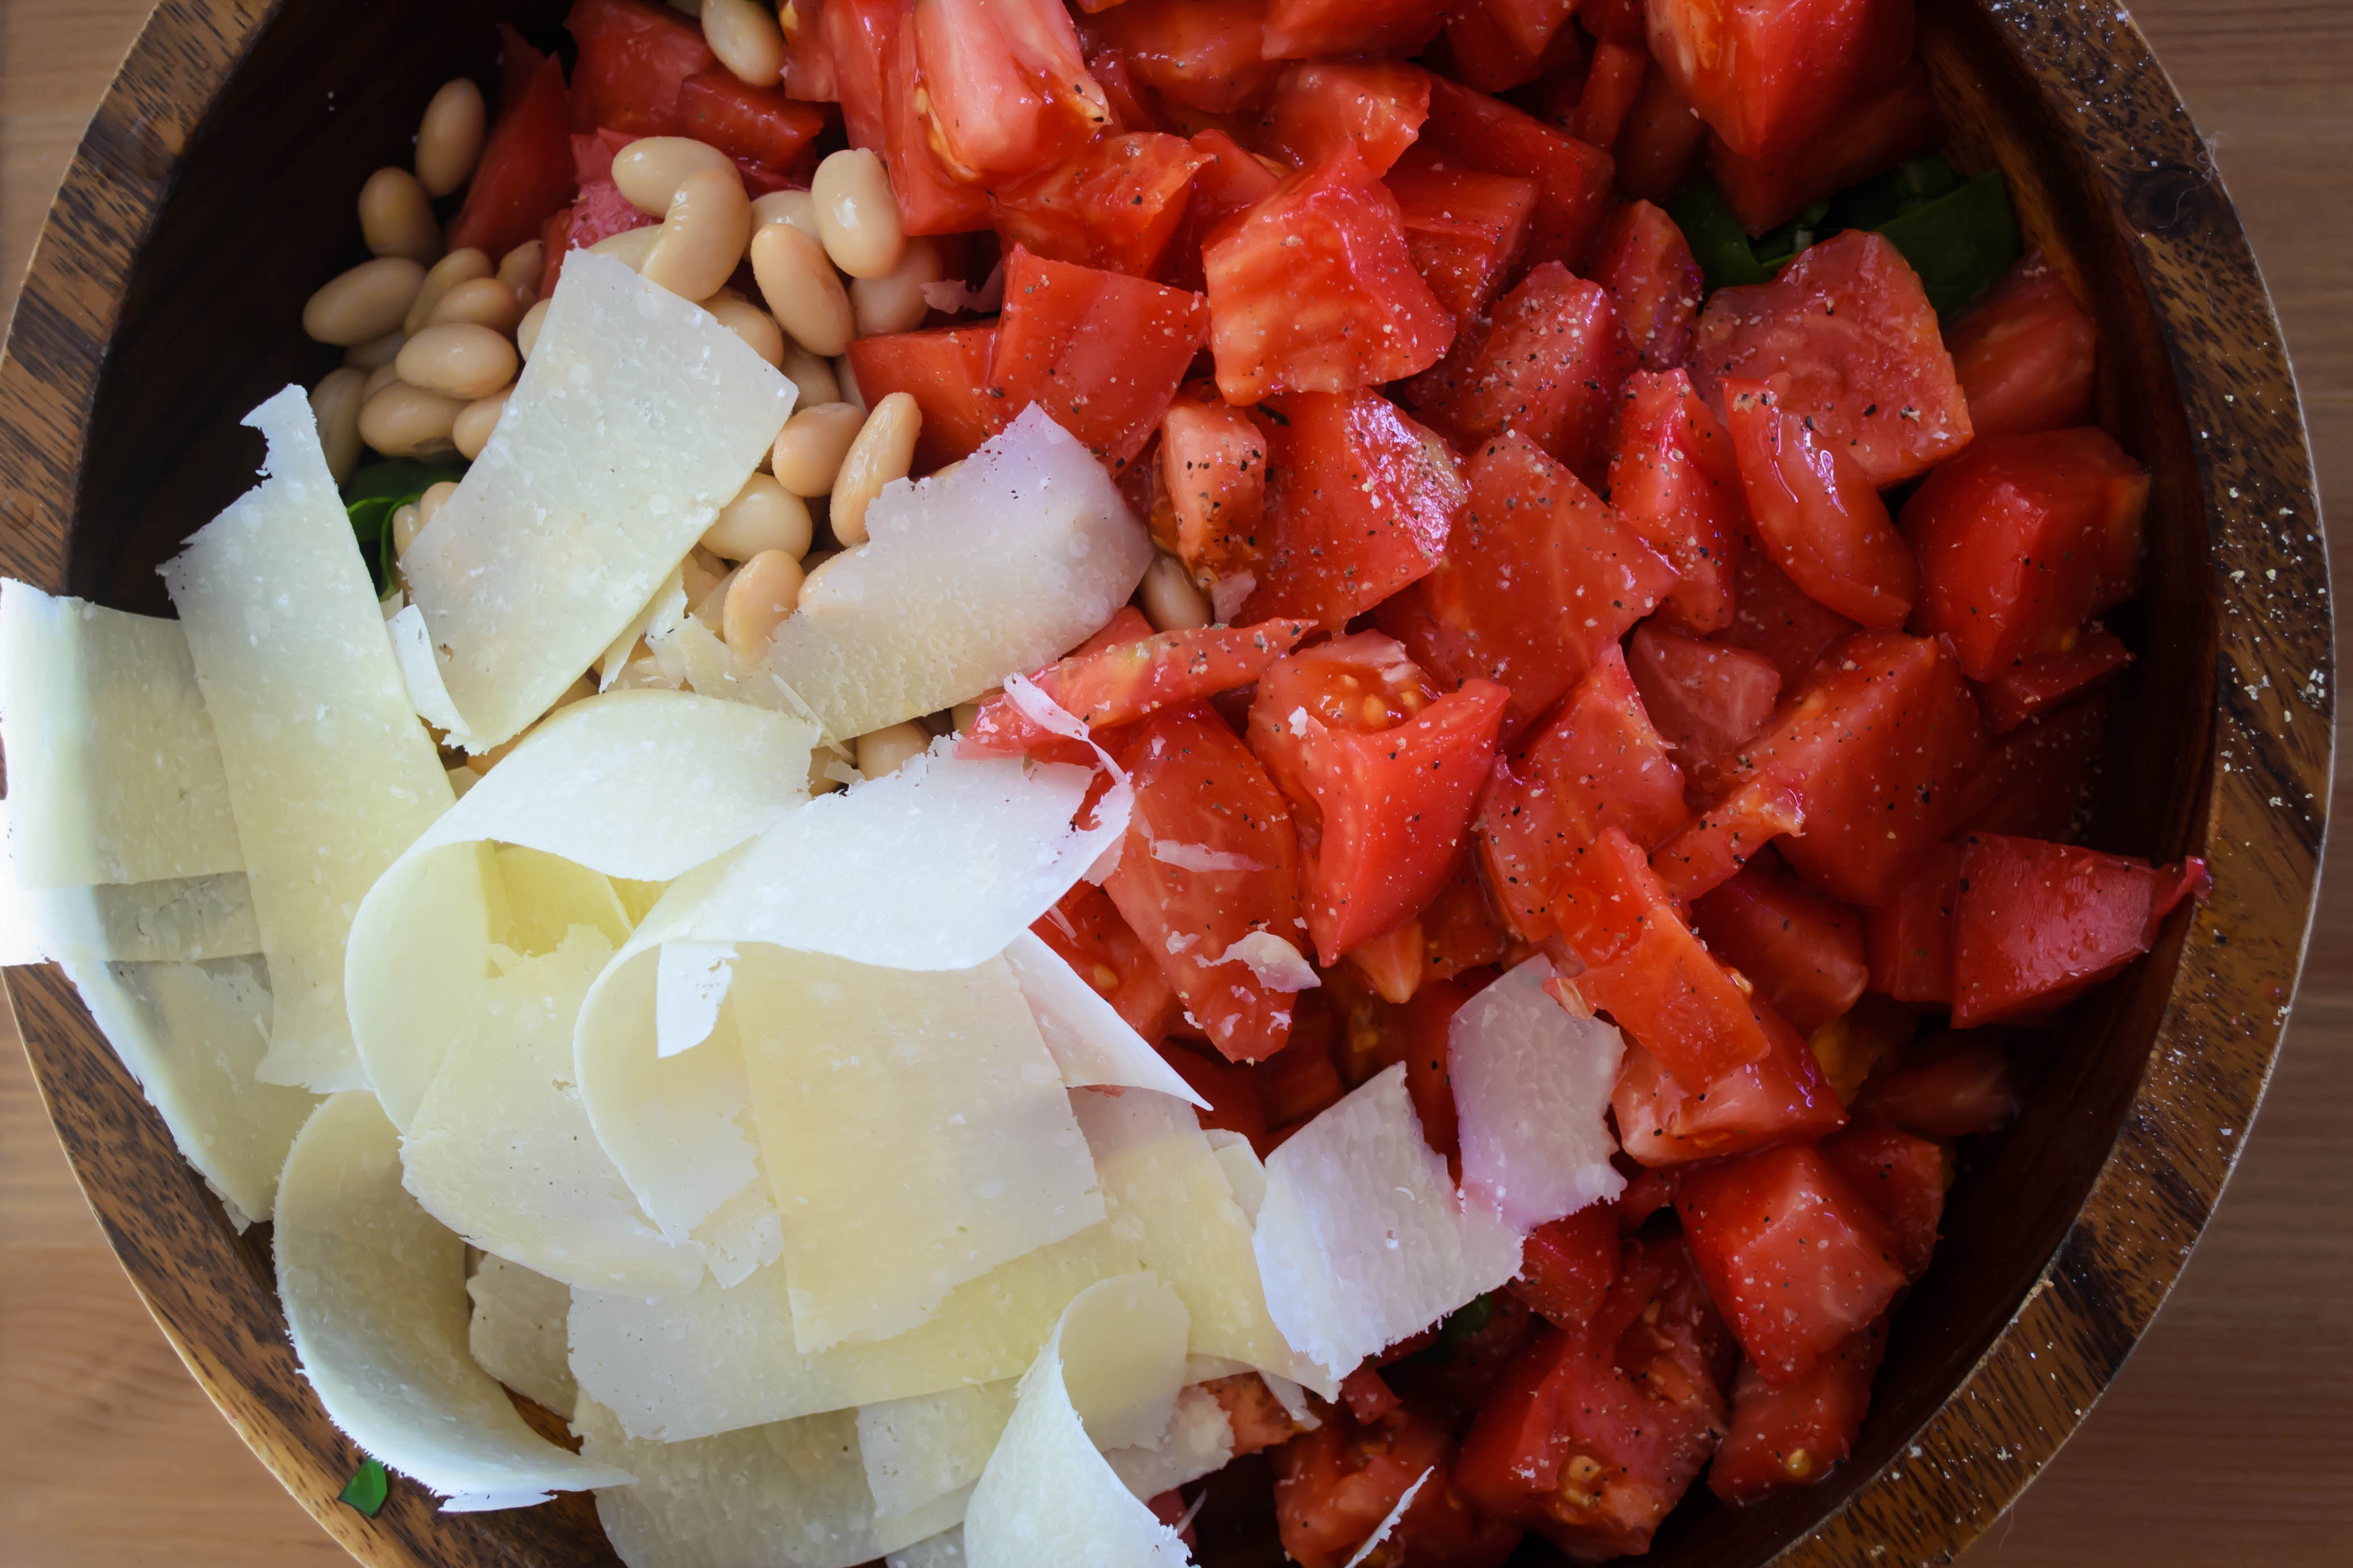
Homecoming: chard, heirloom tomatoes, and basil from the garden. A can of white beans from the pantry. Shavings of parmesan from a wax-paper-wrapped-wedge at the back of the fridge.

Homecoming: chard, heirloom tomatoes, and basil from the garden. A can of white beans from the pantry. Shavings of parmesan from a wax-paper-wrapped-wedge at the back of the fridge.
As Molly said a few weeks ago, sometimes recipes are so good they need no long-winded, story-laced introduction. These cookies are like that. You should just go and make them right now. But for the sake of propriety, or normalcy, or expectations, I’ll just explain how these – perhaps the best cookies I’ve ever made – certainly the best cookies I’ve tinkered with my own recipe for – came about.
 Perhaps months ago, a friend mentioned molasses spice cookies on Facebook (incidentally, and perhaps obnoxiously, have you acquainted yourself with the blackberry eating Facebook page? Come on by, if you’d like), and suddenly I had to have them. So I poked around, checking one recipe and another, and finally, as I often do, turned to Smitten Kitchen to see what Deb’s take on the issue looked like.
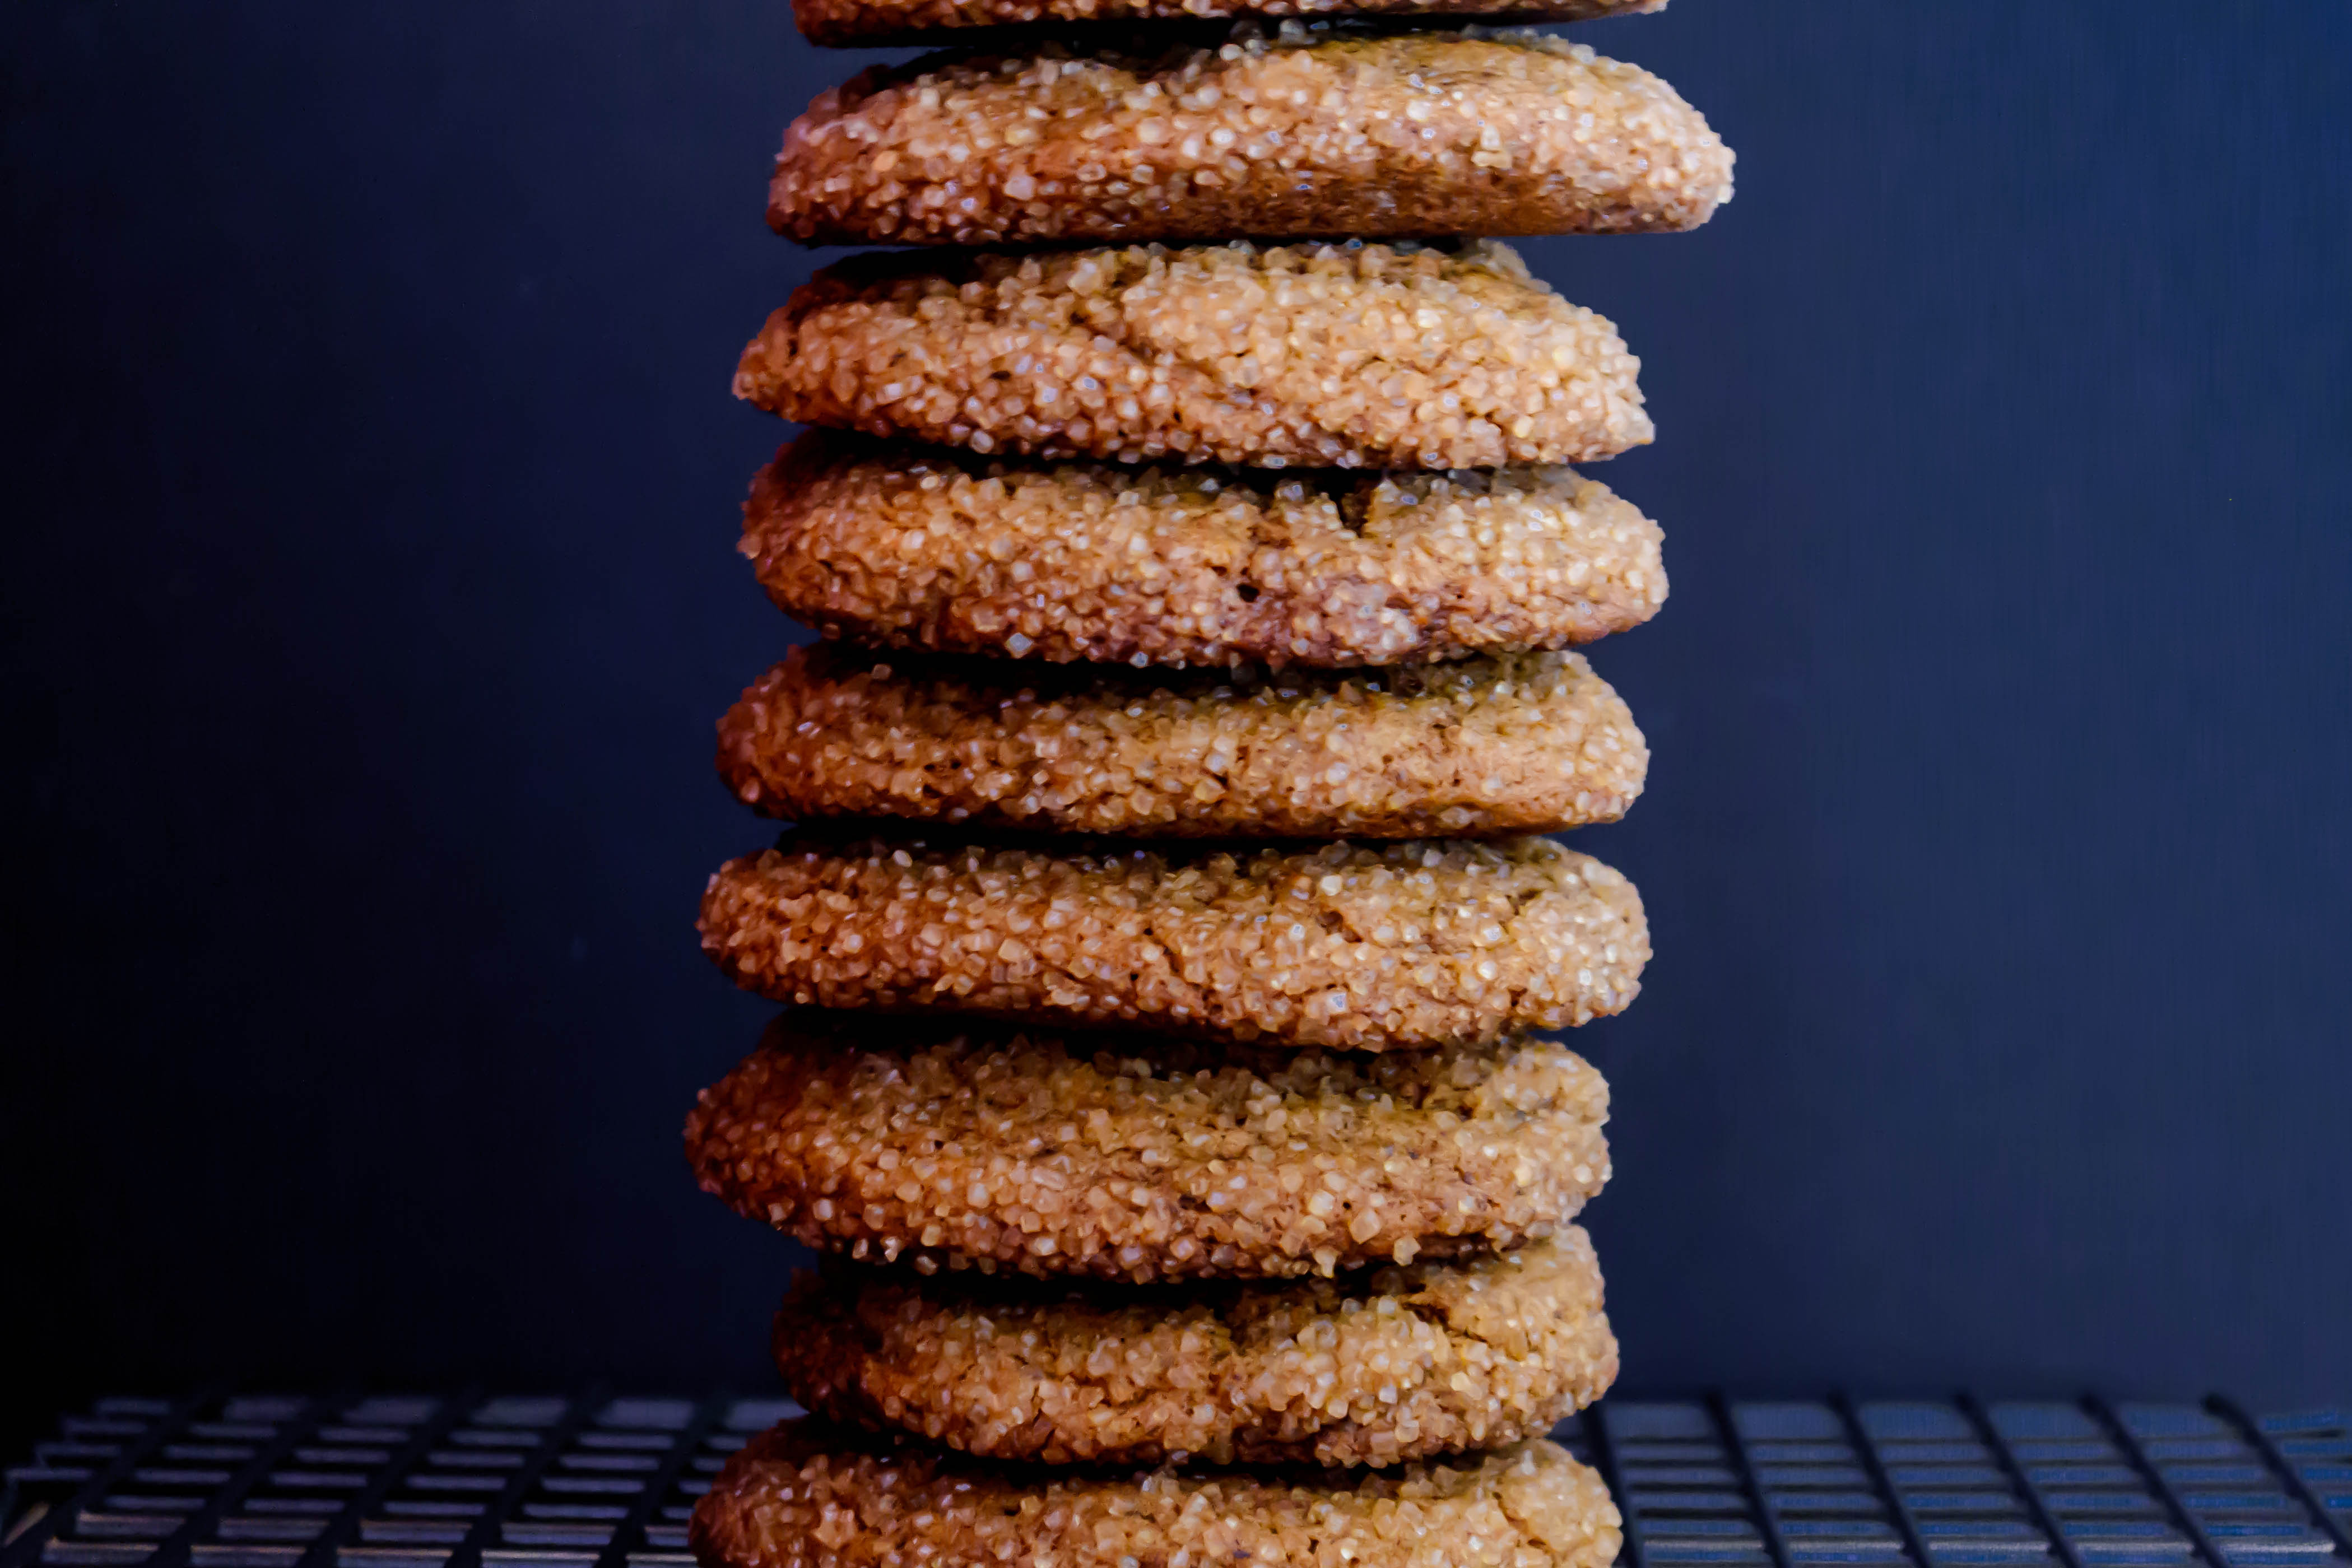
 I mixed up a batch of Deb’s recipe, subbing out white sugar for all brown, adding some espresso powder for a bit of kick and rolling the cookies in coarse, crunchy turbinado sugar rather than standard granulated. And then in between bouts of shoving them into our faces, I sent a stack to a few friends, who proclaimed them some of the best cookies they’d eaten.
 For normal people, I’d wager this assessment of “best ever” would be enough to declare the recipe finished. But I’ve never been entirely normal. Yes, these cookies were good. They were soft and spicy and warm, and the crunchy sugar on the outside was a perfect contrast. They crinkled into little cracks on top and would have made ideal “bread” for a sandwich of ginger ice cream. But I wasn’t done. I upped the quantity of espresso powder so you could really taste a hint of it against the molasses. I added orange zest for perfumed freshness and black pepper for an additional and different kind of zing.
 And then I thought about texture. For years, my dad has been searching for the perfect chewy chocolate chip cookie (more on this achievement in the future, I suspect…), and remains unsatisfied with recipes that churn out cakey or fluffy domes of dough. The first batch of these molasses wunderkind were like that – lovely spice and flavor, but a bit on the soft side for me. Some of this softness was my choice of sweetener; using all brown sugar is always going to leave you with a softer product than white sugar. So will honey. Both are hydrophilic, which simply means they attract moisture and thus stay flexible and soft, even after a few days (case in point: my friends who received theirs via post had no complaints about stale cookies!). But some of this textural challenge is also related to flour.
 Let’s talk about flour for a moment, if you’ll permit me. “All-purpose flour” is one of the most misleading claims in the baking universe. Flour – at least wheat flour – does what it does thanks to gluten, which are the little strands of protein that form snaky, chewy chains that result in the stretchy but still pillowy texture of bread. The higher protein content your flour has, the more gluten it has and the more developed those chains will be. The issue is, all-purpose flour is going to have a different protein content depending on the company whose flour you buy, the particular type of wheat used, and, to some extent, the year’s harvest itself. So if you’ve ever made a batch of cookies that turned out perfectly the first time and then somehow, subtly different in texture the next time, you might have used a different batch of flour with a higher or lower protein content.
 So how does this relate to the chewiness I was after? Here, as should surprise no one (at least no one who knows me), I turned to Alton Brown. If higher protein flour results in chewier cookies, why not sub in the flour made specifically for gluten development? Bread flour. And that was it. Replacing just a ¼ cup of the all-purpose flour from the original recipe with bread flour produced a cookie that still crackled on top and felt appealing between our teeth, but held up with a bit more resistance, demanding an extra chew or two. The perfect chewy cookie. We planned to bring a batch of these to my family when we went to visit them last week, but as we each took yet another from the bag mid-drive, we realized there were only three left from the whole endeavor – enough for my family to each taste just one.

As I continue to write this blog, I think a lot about the kind of person I am, and the kind of person I seem to be becoming. I don’t mean this necessarily in a deep, philosophical or metaphysical way (although sometimes those things collide in the expanding corner of brain-space I use to think about food), but in a “what sort of food person am I?” kind of way.
 Example: probably about five years ago, I wanted to make fried rice but didn’t have one of those seasoning packets, not even when I dug all the way to the back of my pantry (I can hear you gasping in horror that I ever had one in the first place. What can I say? We all have guilty secrets about one thing or another), so I tossed a few things together and ended up with a sauce we really liked. I haven’t bought one of those seasoning packets since. From there, I added different spices, different quantities, different ratios of garlic and ginger… and suddenly the bags of frozen stir-fry vegetables we were tossing in weren’t good enough anymore. Fresh vegetables were now a mandate. Fried rice used to be a quick and easy dinner! Now it’s a totally from scratch undertaking. And that’s the kind of (food) person I am becoming.
 Example two: I used to subscribe to a number of cooking magazines. Though I let my subscriptions run out (their cost made them an unjustifiable luxury during graduate school), I continued to use the collection I’d amassed, restricting myself to cooking recipes only from the current month’s issue: no August recipes in April. This was an attempt to keep myself seasonal and inspired. Well, this year it stopped working. As each new month began, I’d eagerly flip through the appropriate month’s issue looking for something to excite me and drive me into the kitchen. I’d close each issue with a sigh and toss it to the side. There were many, many recipes I hadn’t tried before, but there just wasn’t anything in there that felt inspiring anymore. Well, almost. Once in a while, I’d find a recipe that I’d consider for a moment and then turn to N. and say something like, “this might be good, if you made it into a pasta dish instead of a sandwich and added some sundried tomatoes and herbed goat cheese.” And I’d do it, and we’d be pleased with the result.
After a few months of this sort of thing, interspersed with a probably indecent amount of complaining about how I was bored by these recipes, N. finally turned back and said, “I think you’ve leveled up.” Translation: your imagination has moved beyond what these magazines offer and you are now on to bigger and (we hope, for the sake of our taste buds) even better dishes. And that’s the kind of (food) person I am becoming.
 Example three: since I’ve started baking bread, I’ve been trying to plan meals around a yeasty undertaking once a week or so, to keep myself in practice and find “the best” versions of each type of baked good I undertake. This has resulted in a development I’m not sure I’m entirely comfortable with: though I have continued to buy a weekly loaf of bread (I really like, oddly enough, the plain old sourdough loaf the bakery department at my grocery store produces) when I go shopping, I haven’t bought hamburger buns, or pie dough, or pizza dough, since beginning this little dough experiment. Am I really the kind of person who no longer considers store-bought burger buns acceptable? I’m not sure I’m ready for that kind of commitment, but that seems to be the kind of (food) person I am becoming.
 Does that make me a snob? Maybe. It certainly makes me one of those “oh, I just made it by hand” kind of people you sometimes feel inclined to secretly snarl at. But no one in the direct friendly fire of these developments is complaining, so maybe it’s not entirely a bad thing.
 But it does make things more complicated, and more difficult to achieve, sometimes. Like when I decided I really wanted cinnamon-raisin bread for breakfast, but instead of picking up a pre-packaged loaf as we shopped, I was determined to make it myself.
And then I forgot to buy raisins.
What’s a girl to do, with the plan in her head and the taste already in her brain and the soft chew of homemade bread aching in her teeth?
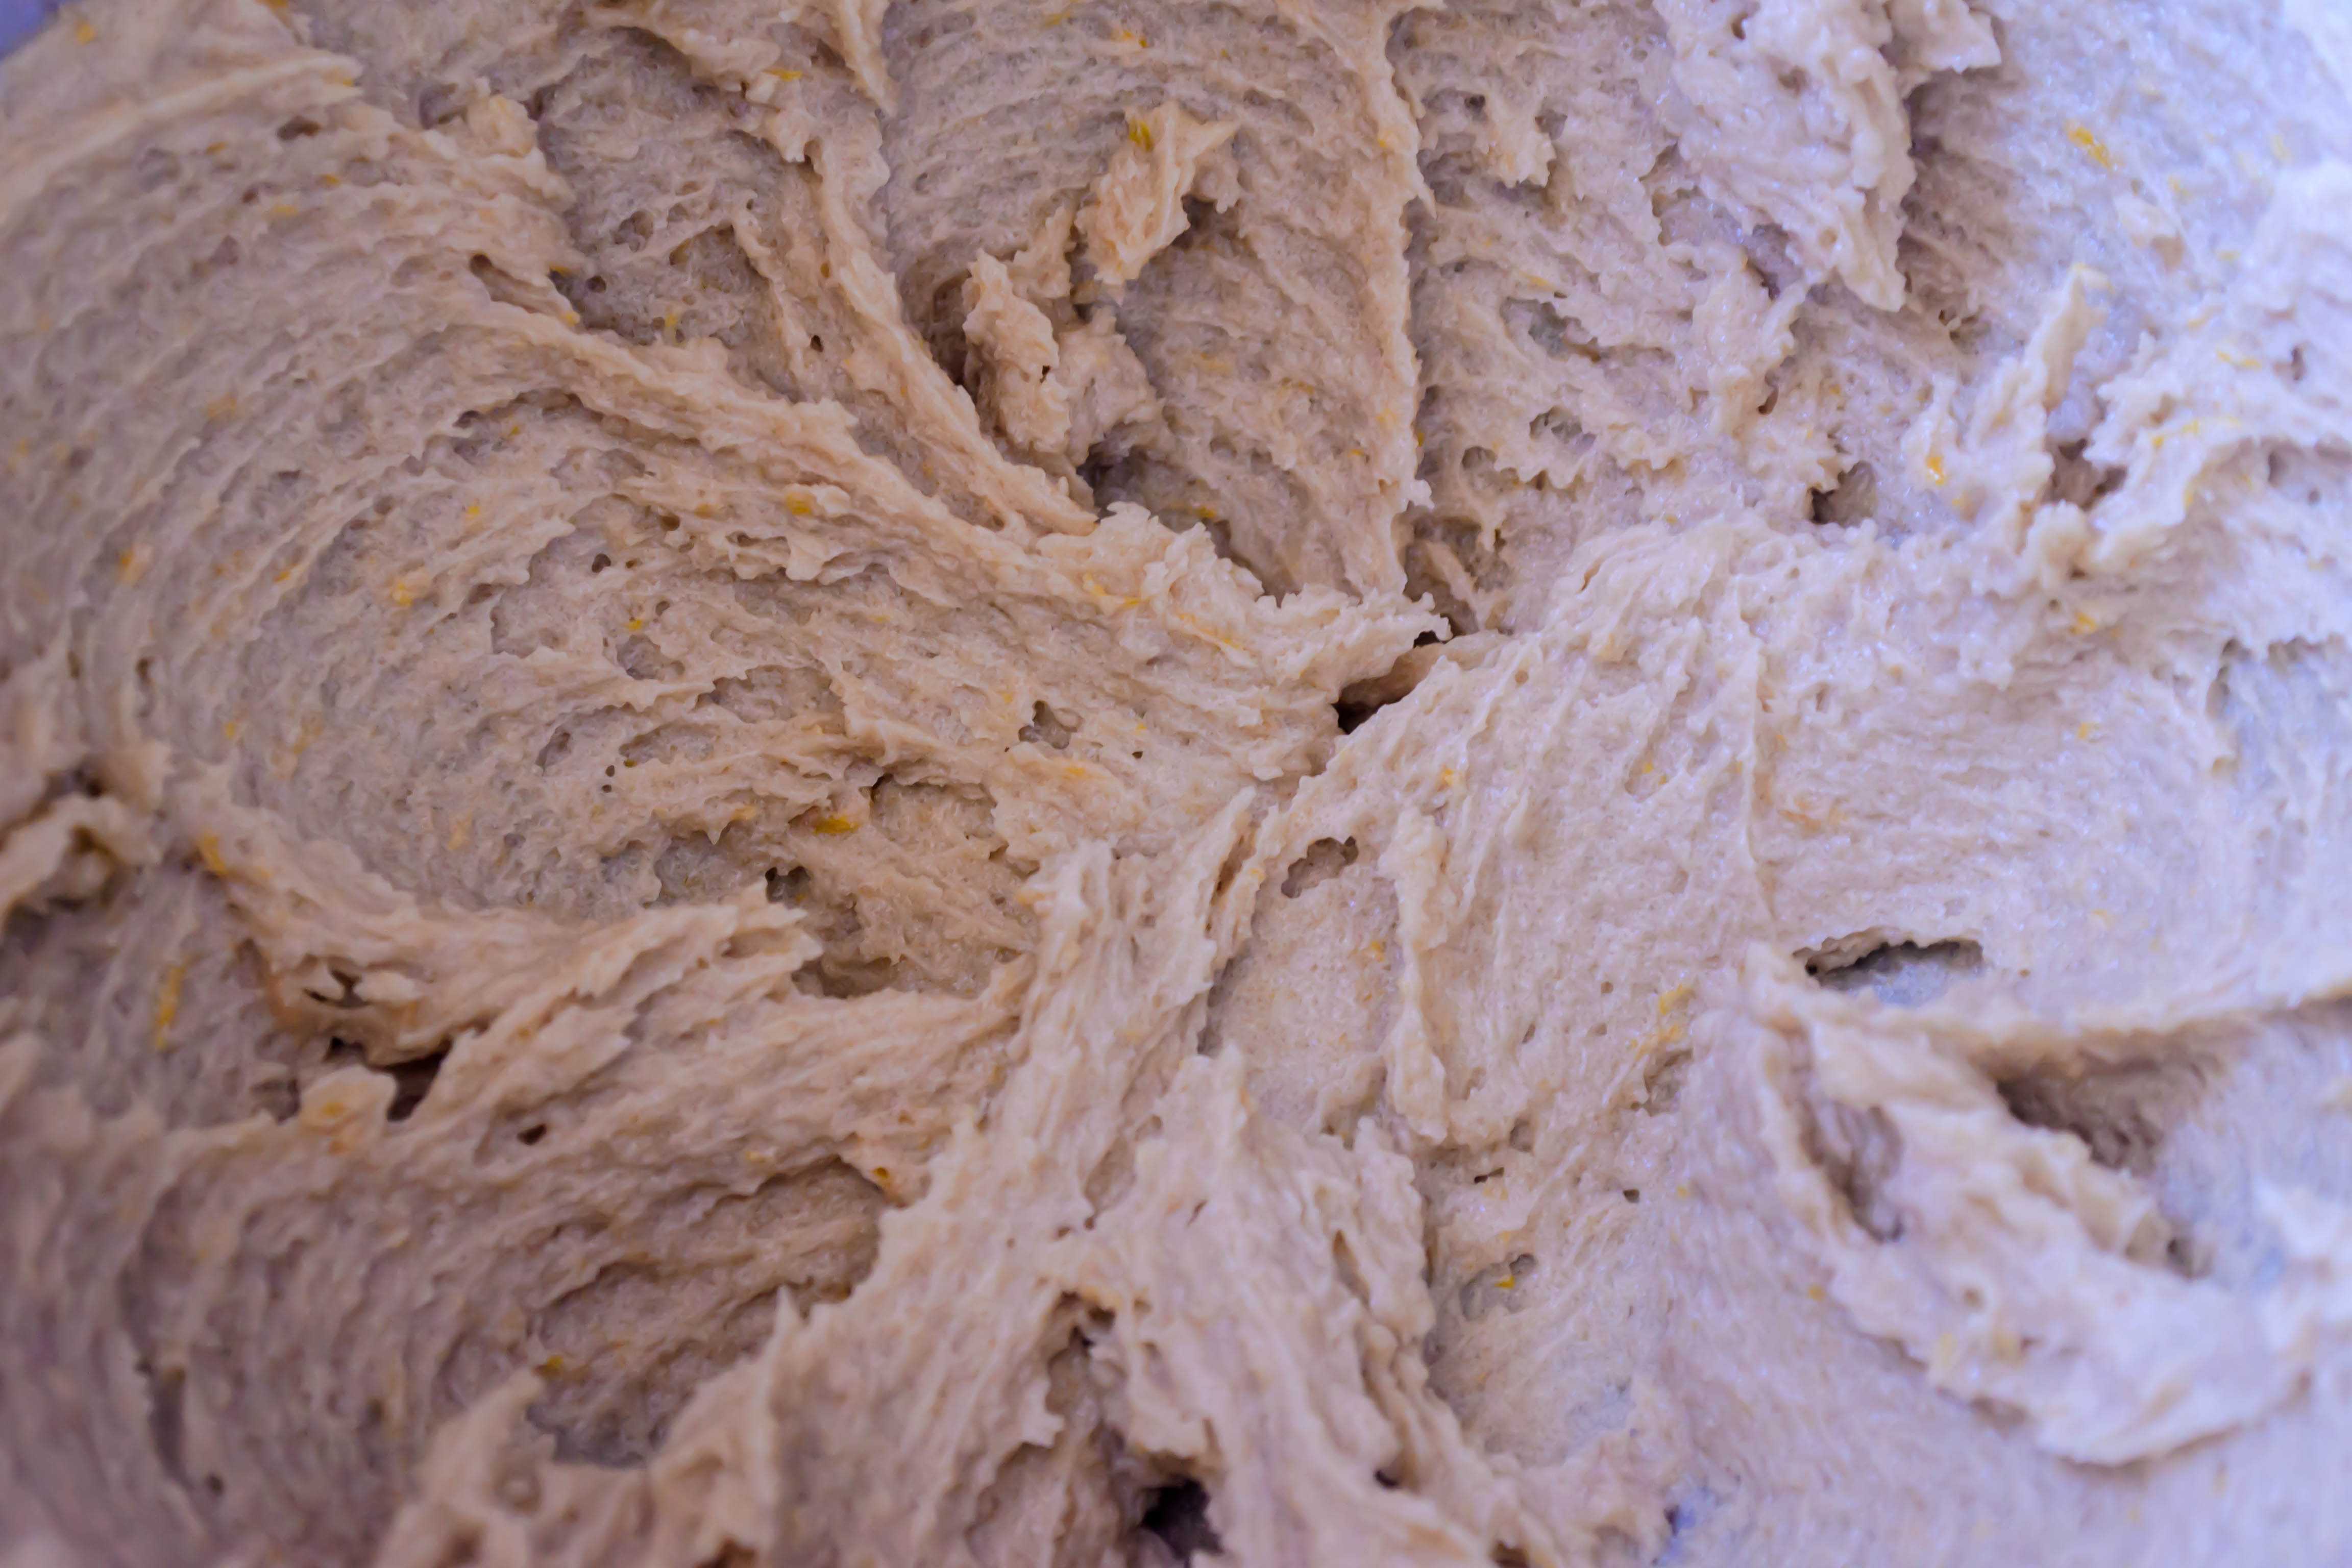
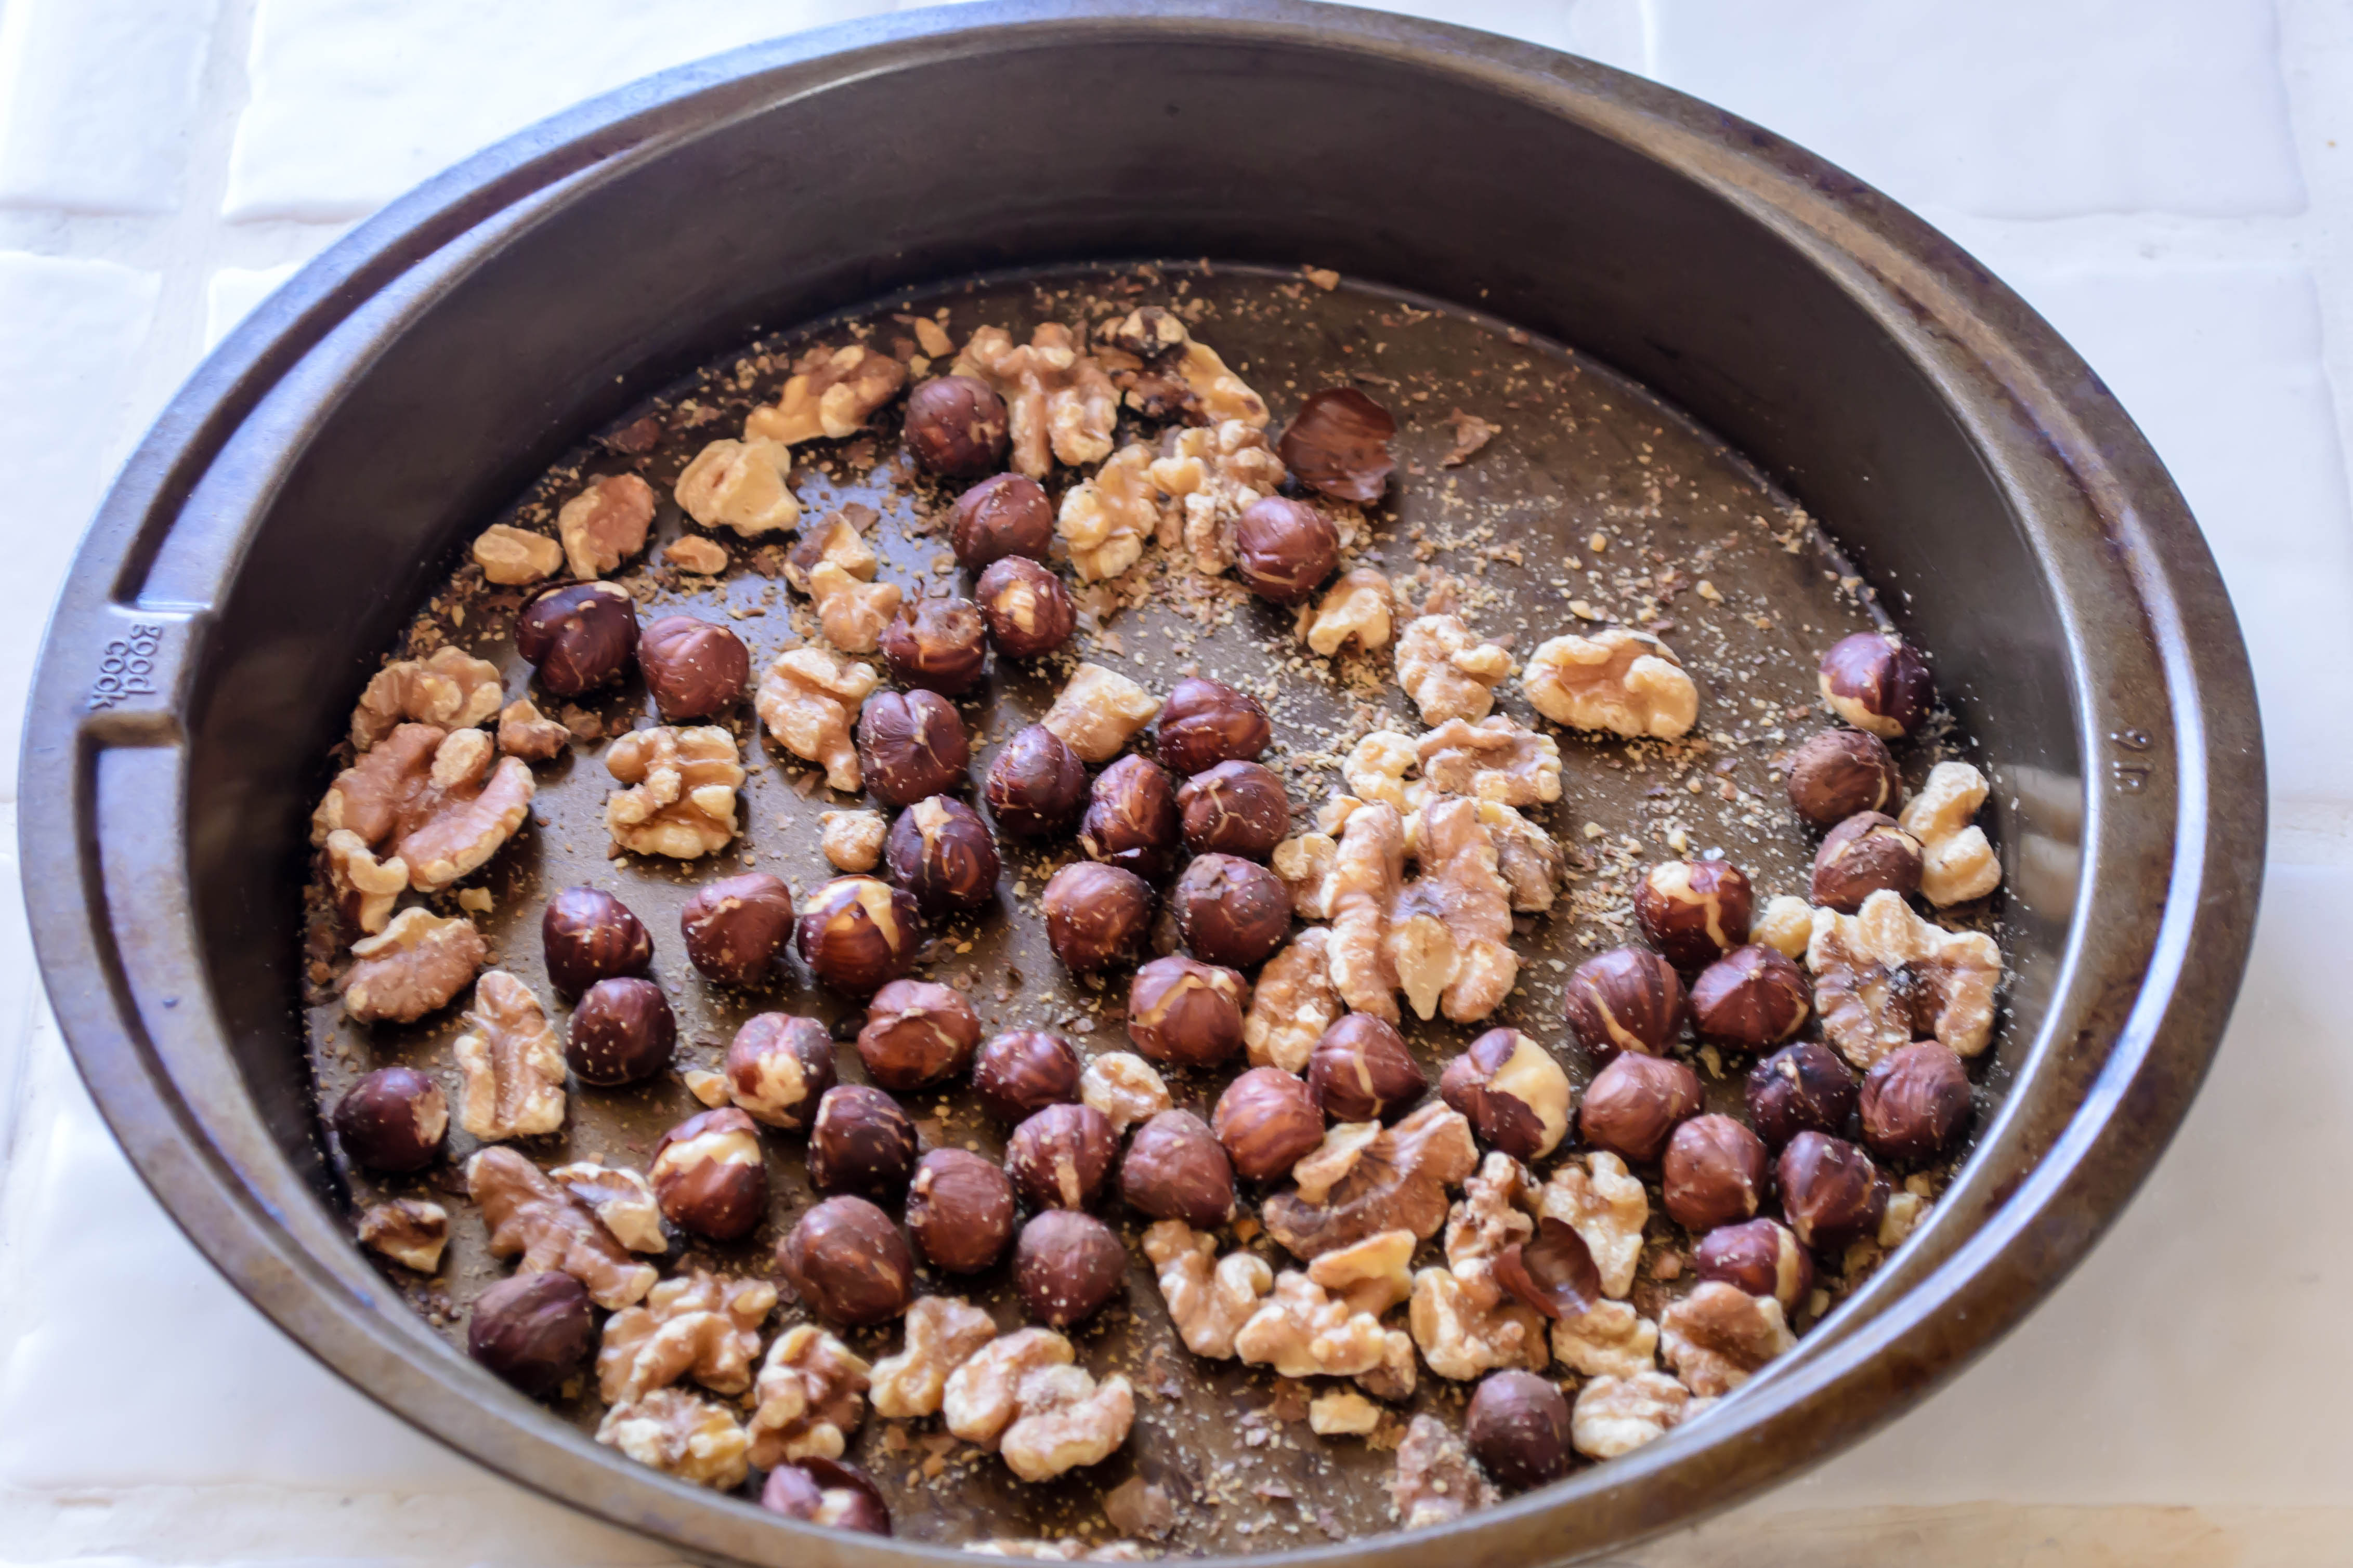
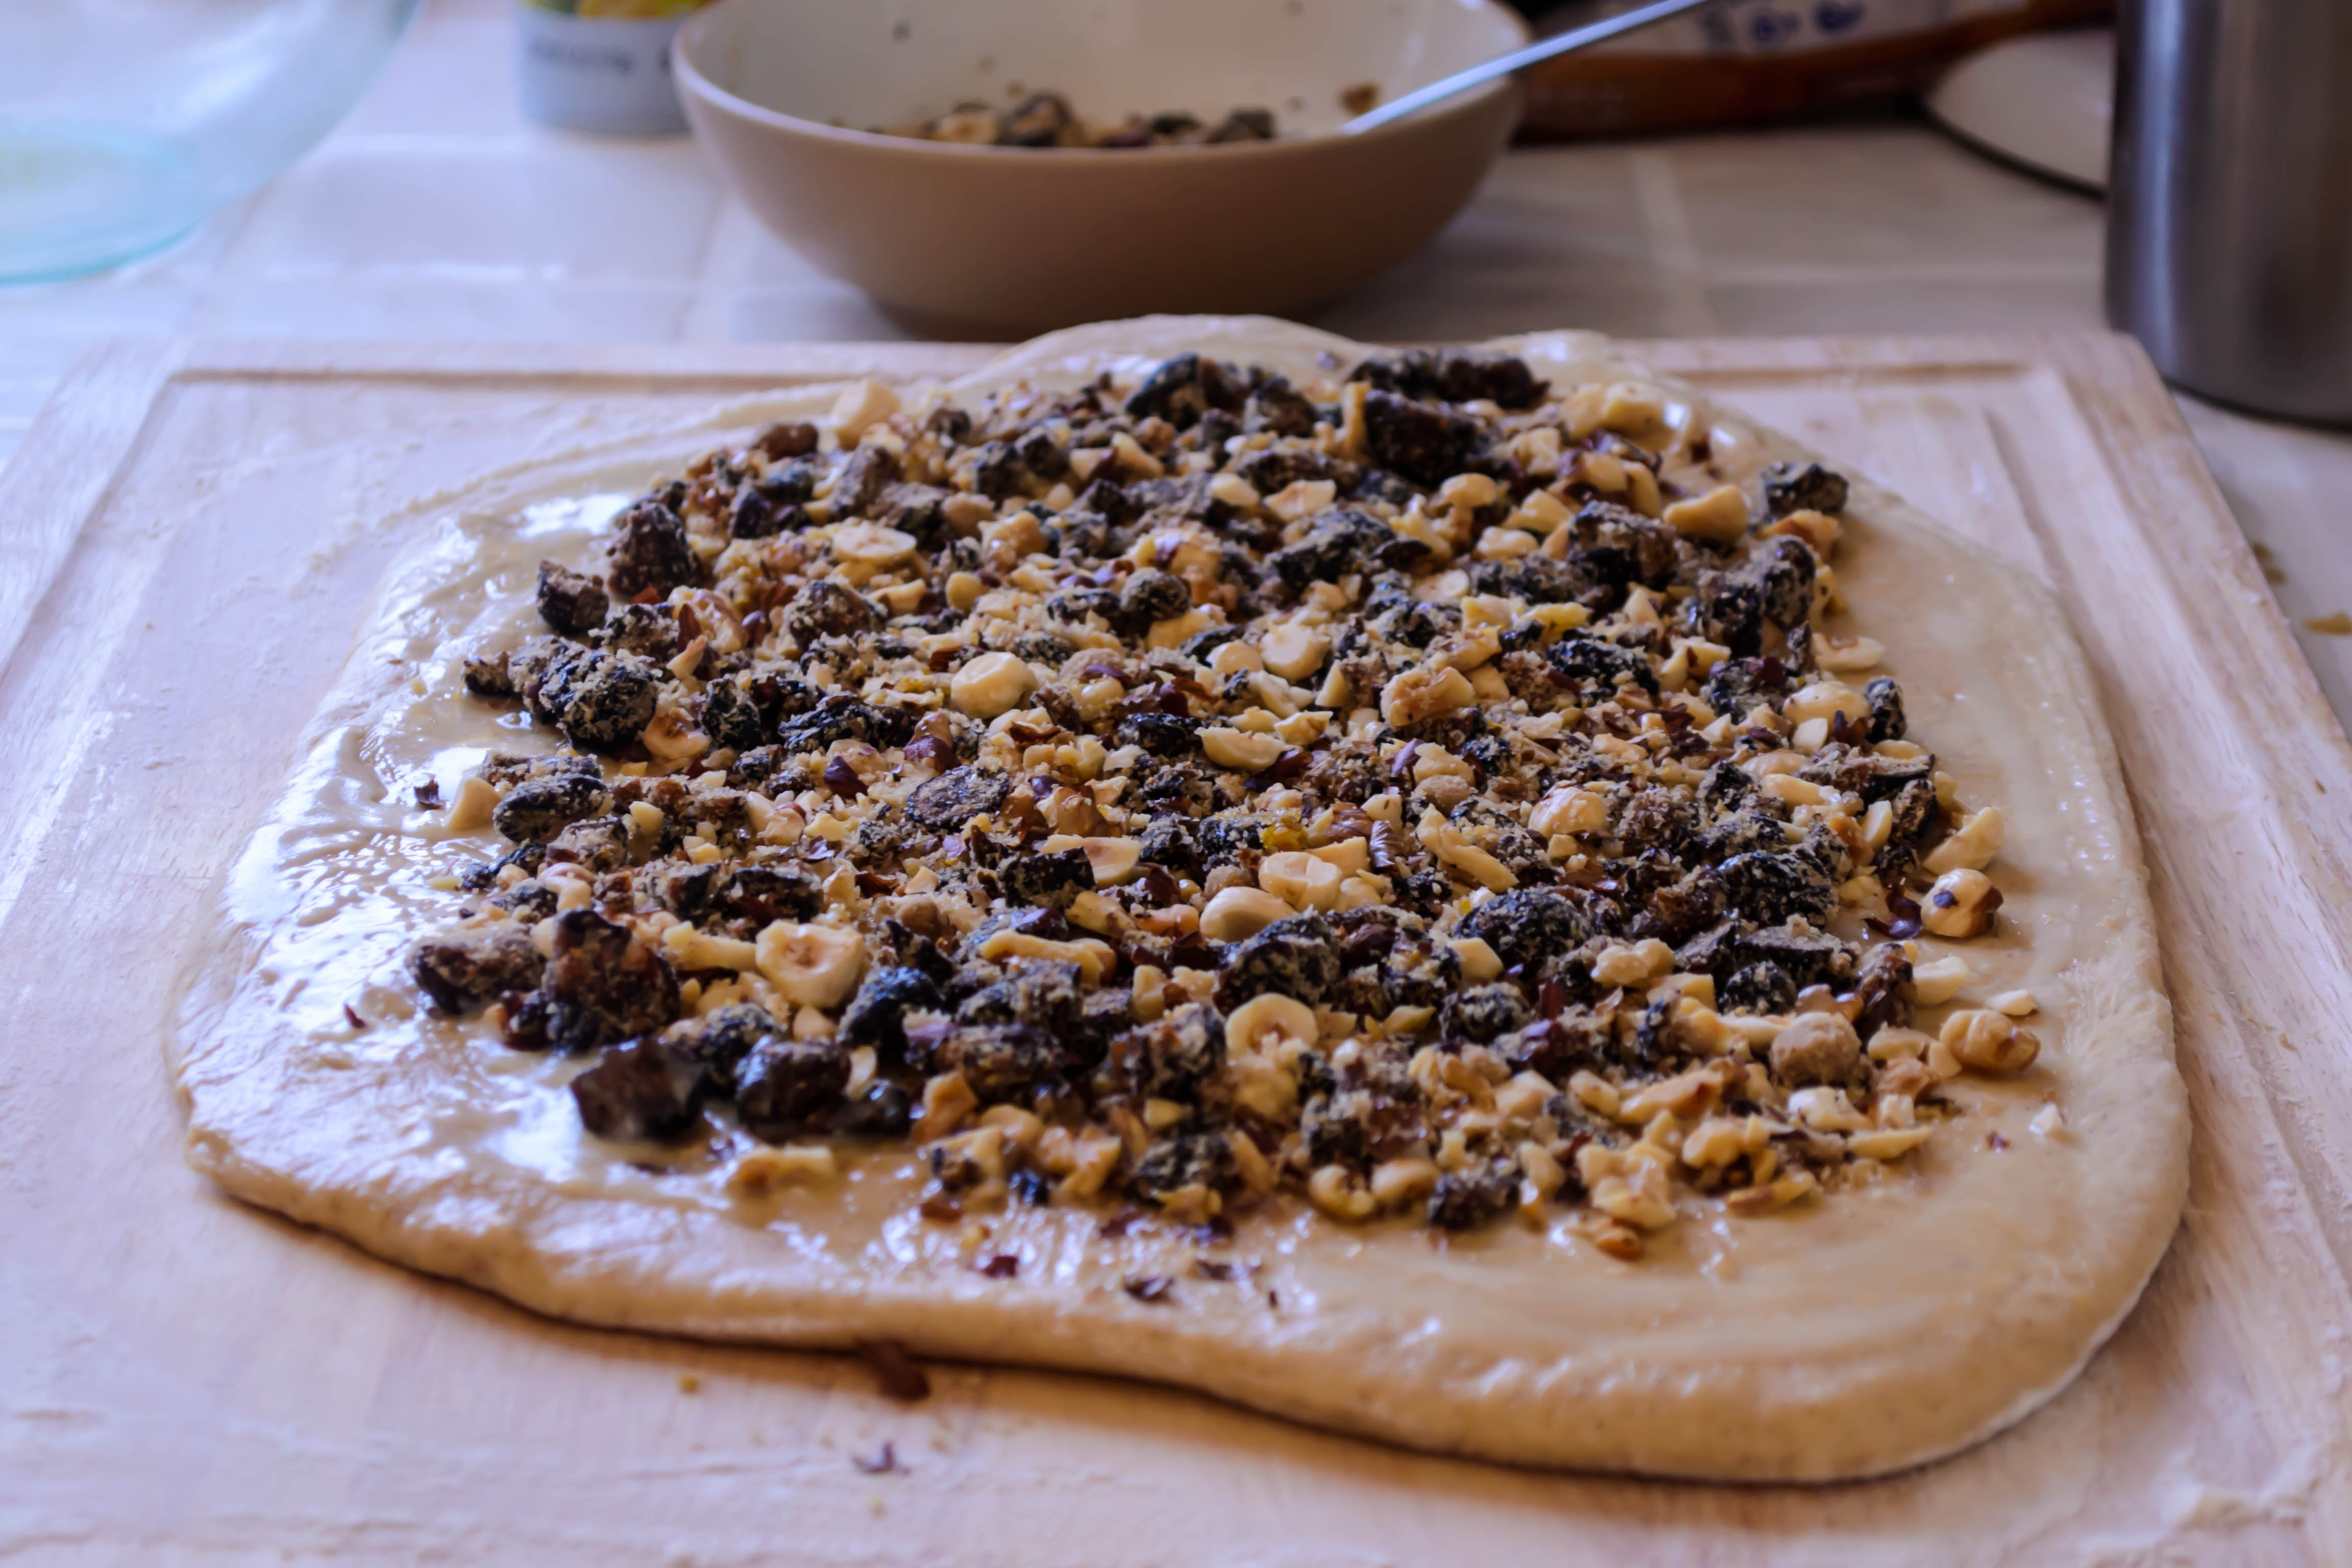
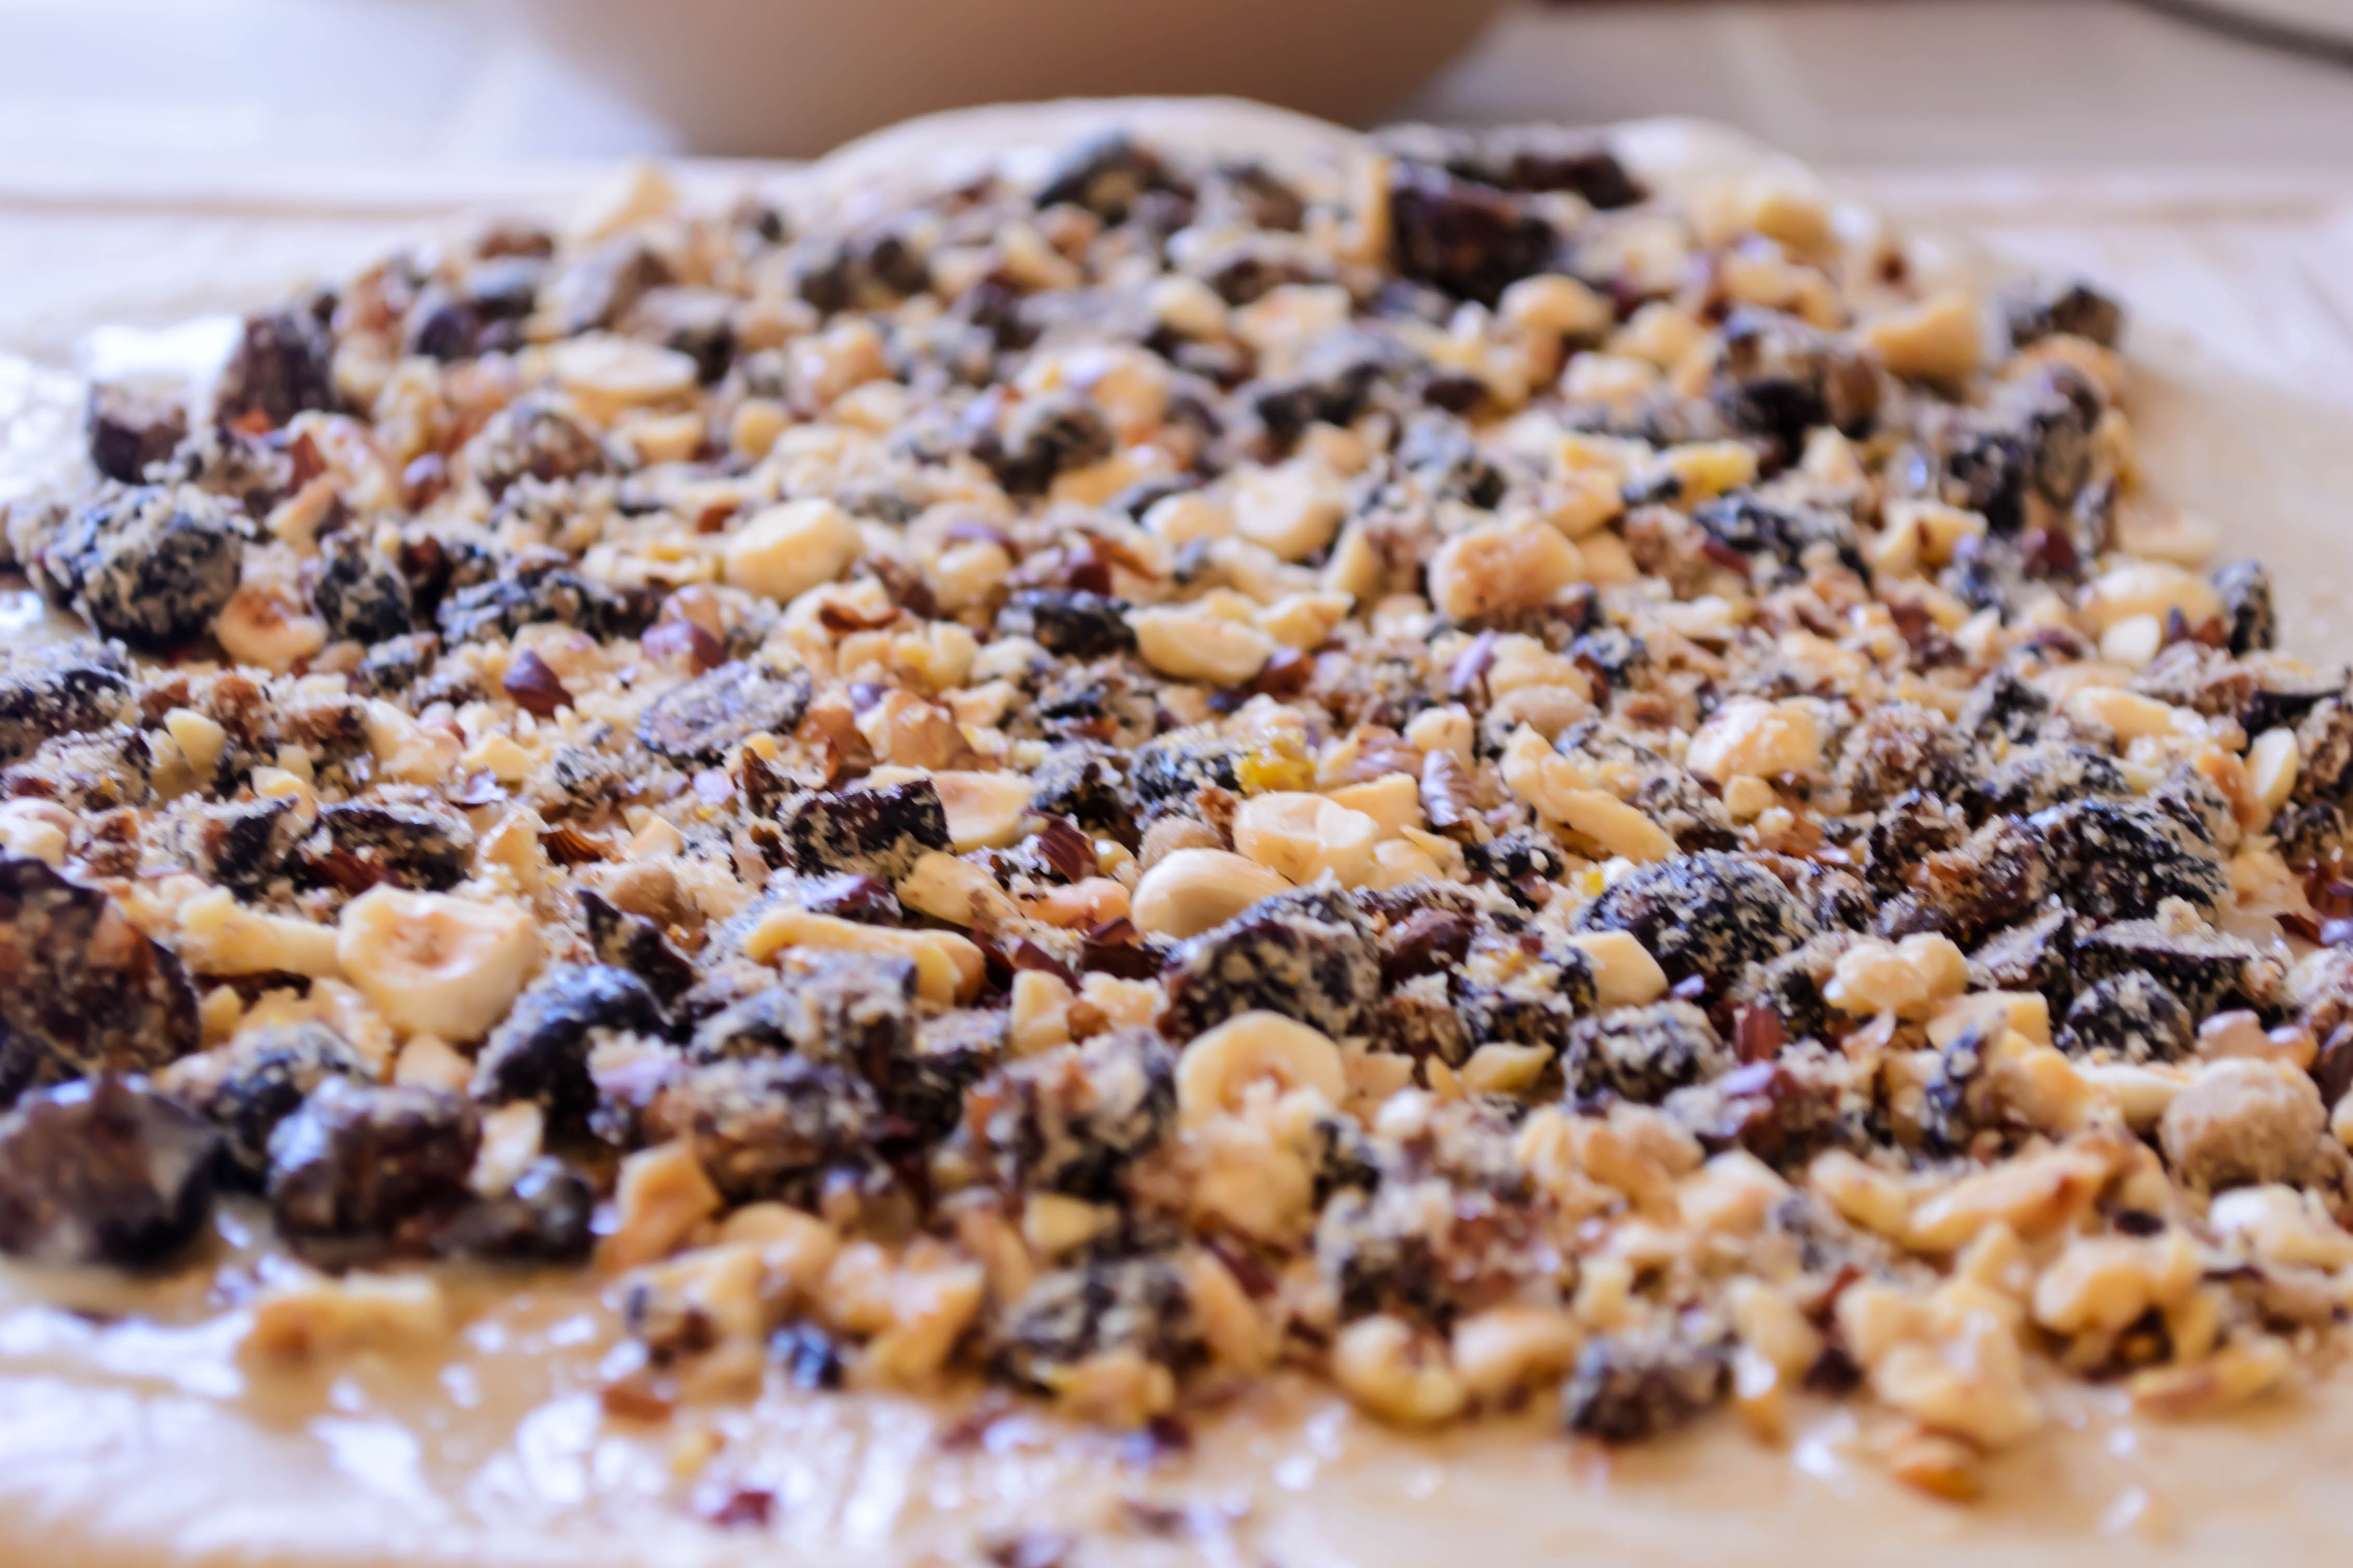
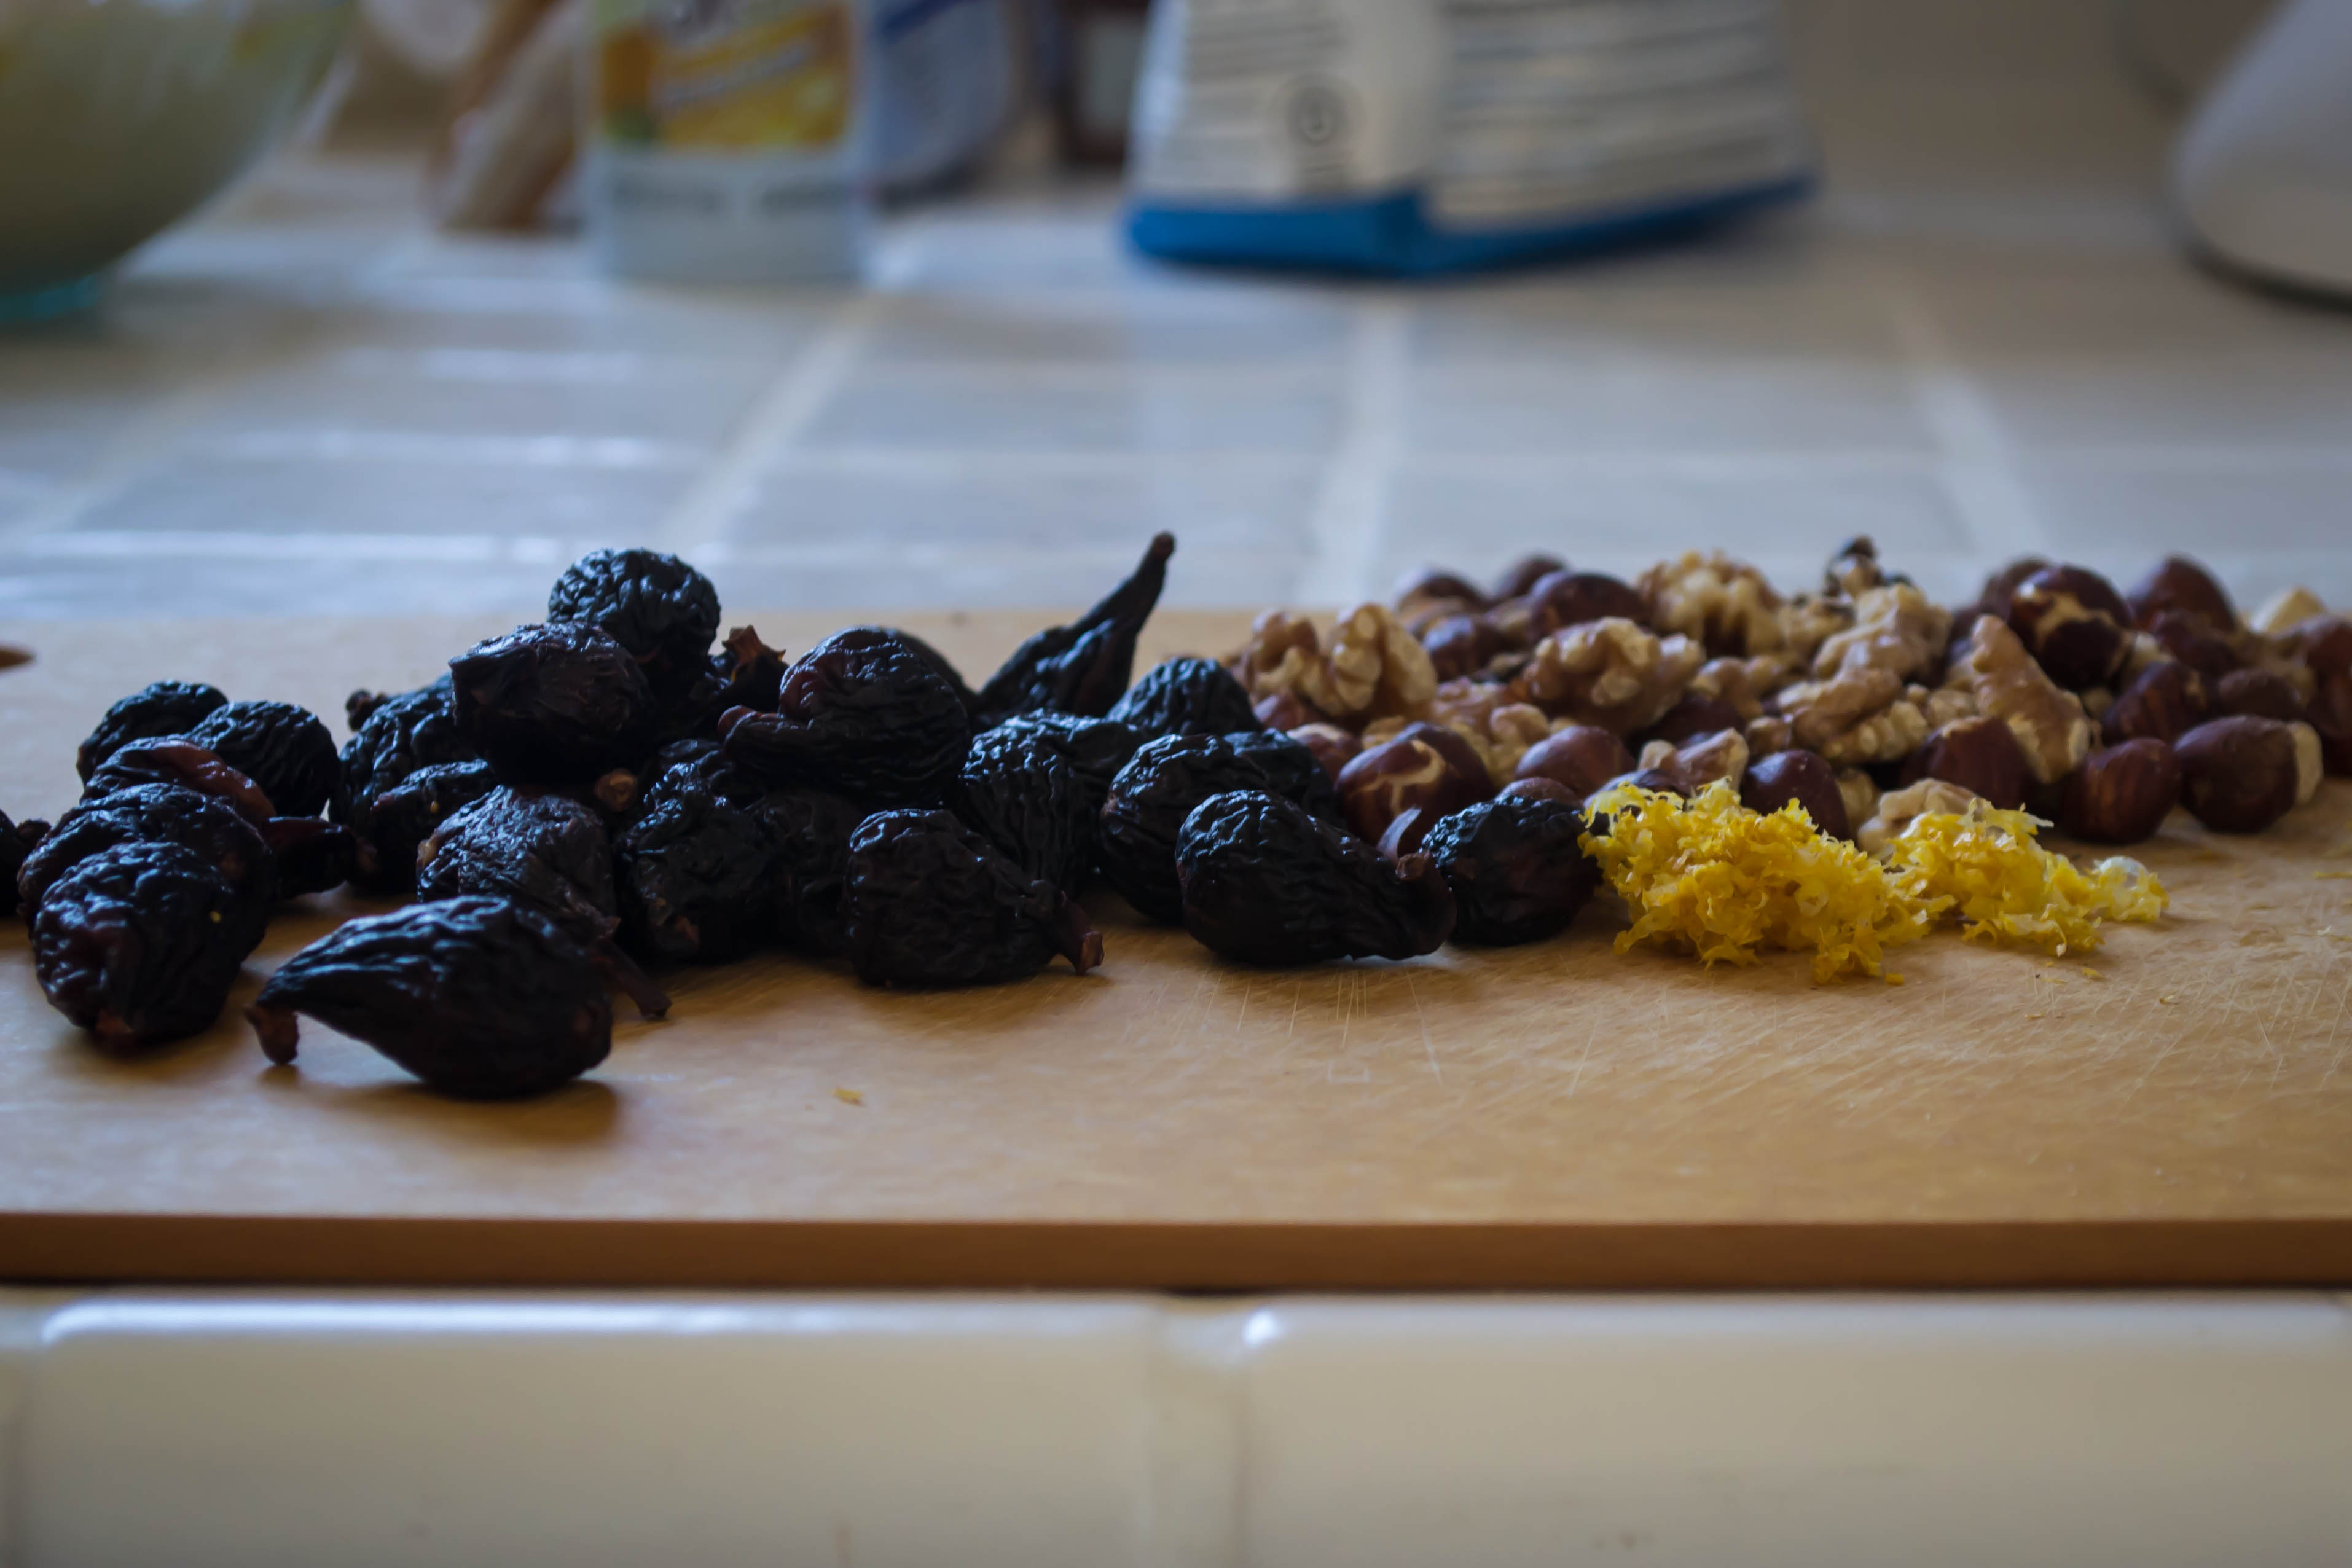 Well, she chops up some figs, and some well-toasted walnuts, and some hazelnuts for good measure, because she was almost out of walnuts. She whirls together a soft, supple dough laced with brown sugar, cinnamon, and sour cream. Nutmeg and lemon zest find their way in. And she rolls up a crunchy crumbly sweet layer of fruit and nuts inside the dough, twists it to dispense the swirl, and lets it rise into a triumphant bulging loaf.

 And what results, after it’s been rubbed with butter and cinnamon sugar for good measure and baked until golden and puffy, is something that drives standard cinnamon-raisin bread straight out of her mind.
 The sour cream adds a beguiling richness to this loaf, making it almost unnecessary to add a slick of butter or cream cheese to a breakfast slice. The figs and walnuts are a pleasingly earthy combination, and though I wasn’t crazy about the lemon zest I added at the spur of the moment, you might like the brightness it brings to the filling.
 So. Food snob? Maybe. But really, when you’re sitting down to breakfast with a loaf of homemade, fig-filled bread, your mouth is probably too full to complain.
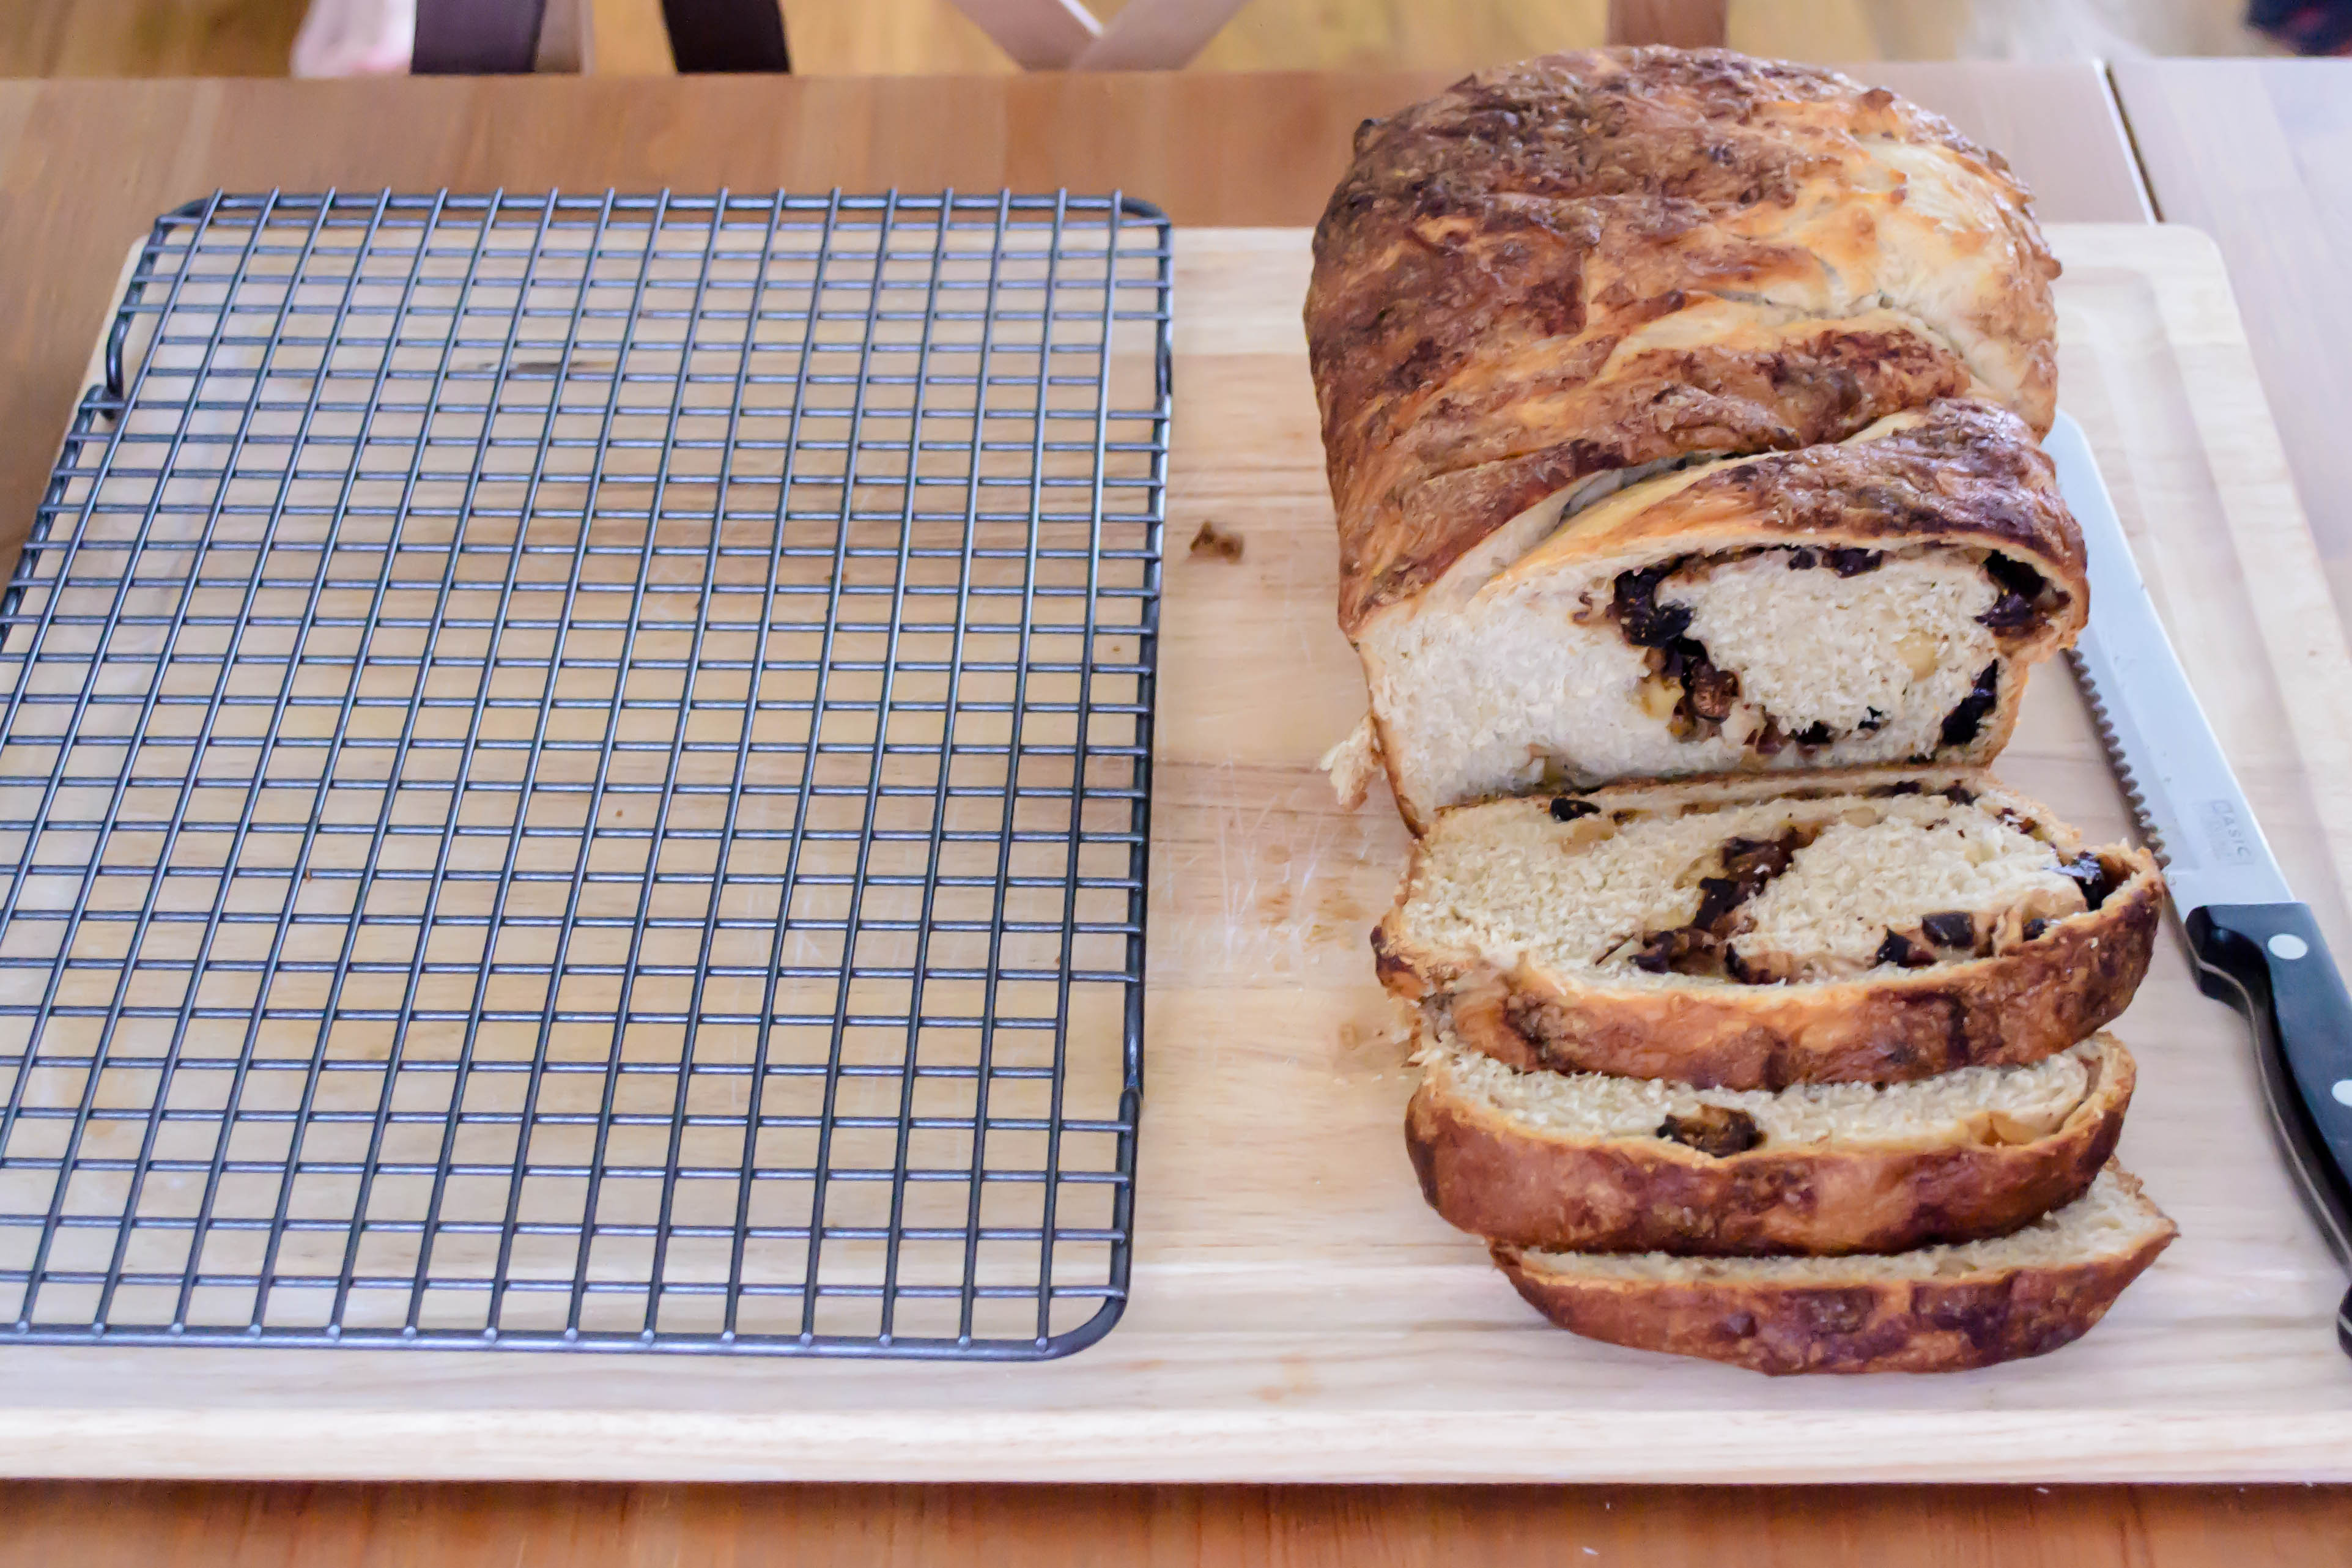 Fig and Walnut Swirl Bread
 Chances are, where you are, or were, or will be soon, it’s hot. Or it was. Or it’s going to be. But past, present, future, when it’s hot out, and you still want dessert, you are probably going to have certain demands: it must be easy. Mimimal measuring. Simple directions. No fine chopping or dicing or mincing. It must require short cooking time, if any. No long baking times (sorry, bread pudding), no stewing or roasting or brûléeing. It must be refreshing and delicious and maybe even a bit surprising, to pull you out of your mid-summer funk. Not that I’m having one of those…

Frozen sangria. Does that make your sweat-beaded forehead wrinkle with interest? It makes mine feel a little curious, a little intrigued, a little go-on-I’m-listening…

(Sometimes feet get in the way of photoshoots…)
Frozen sangria requires relatively little of you. It wants flavor – some sugar, some spice, some whatever’s-your-favorite red wine. It wants just a little simmering to infuse the liquid with cinnamon sticks, with cloves, with orange peel. We’re playing a little game with ourselves here: imparting winter flavors into an icy treat. Maybe the reminders of that holiday season half a year away will help us cool down just as much as the temperature of our dessert.
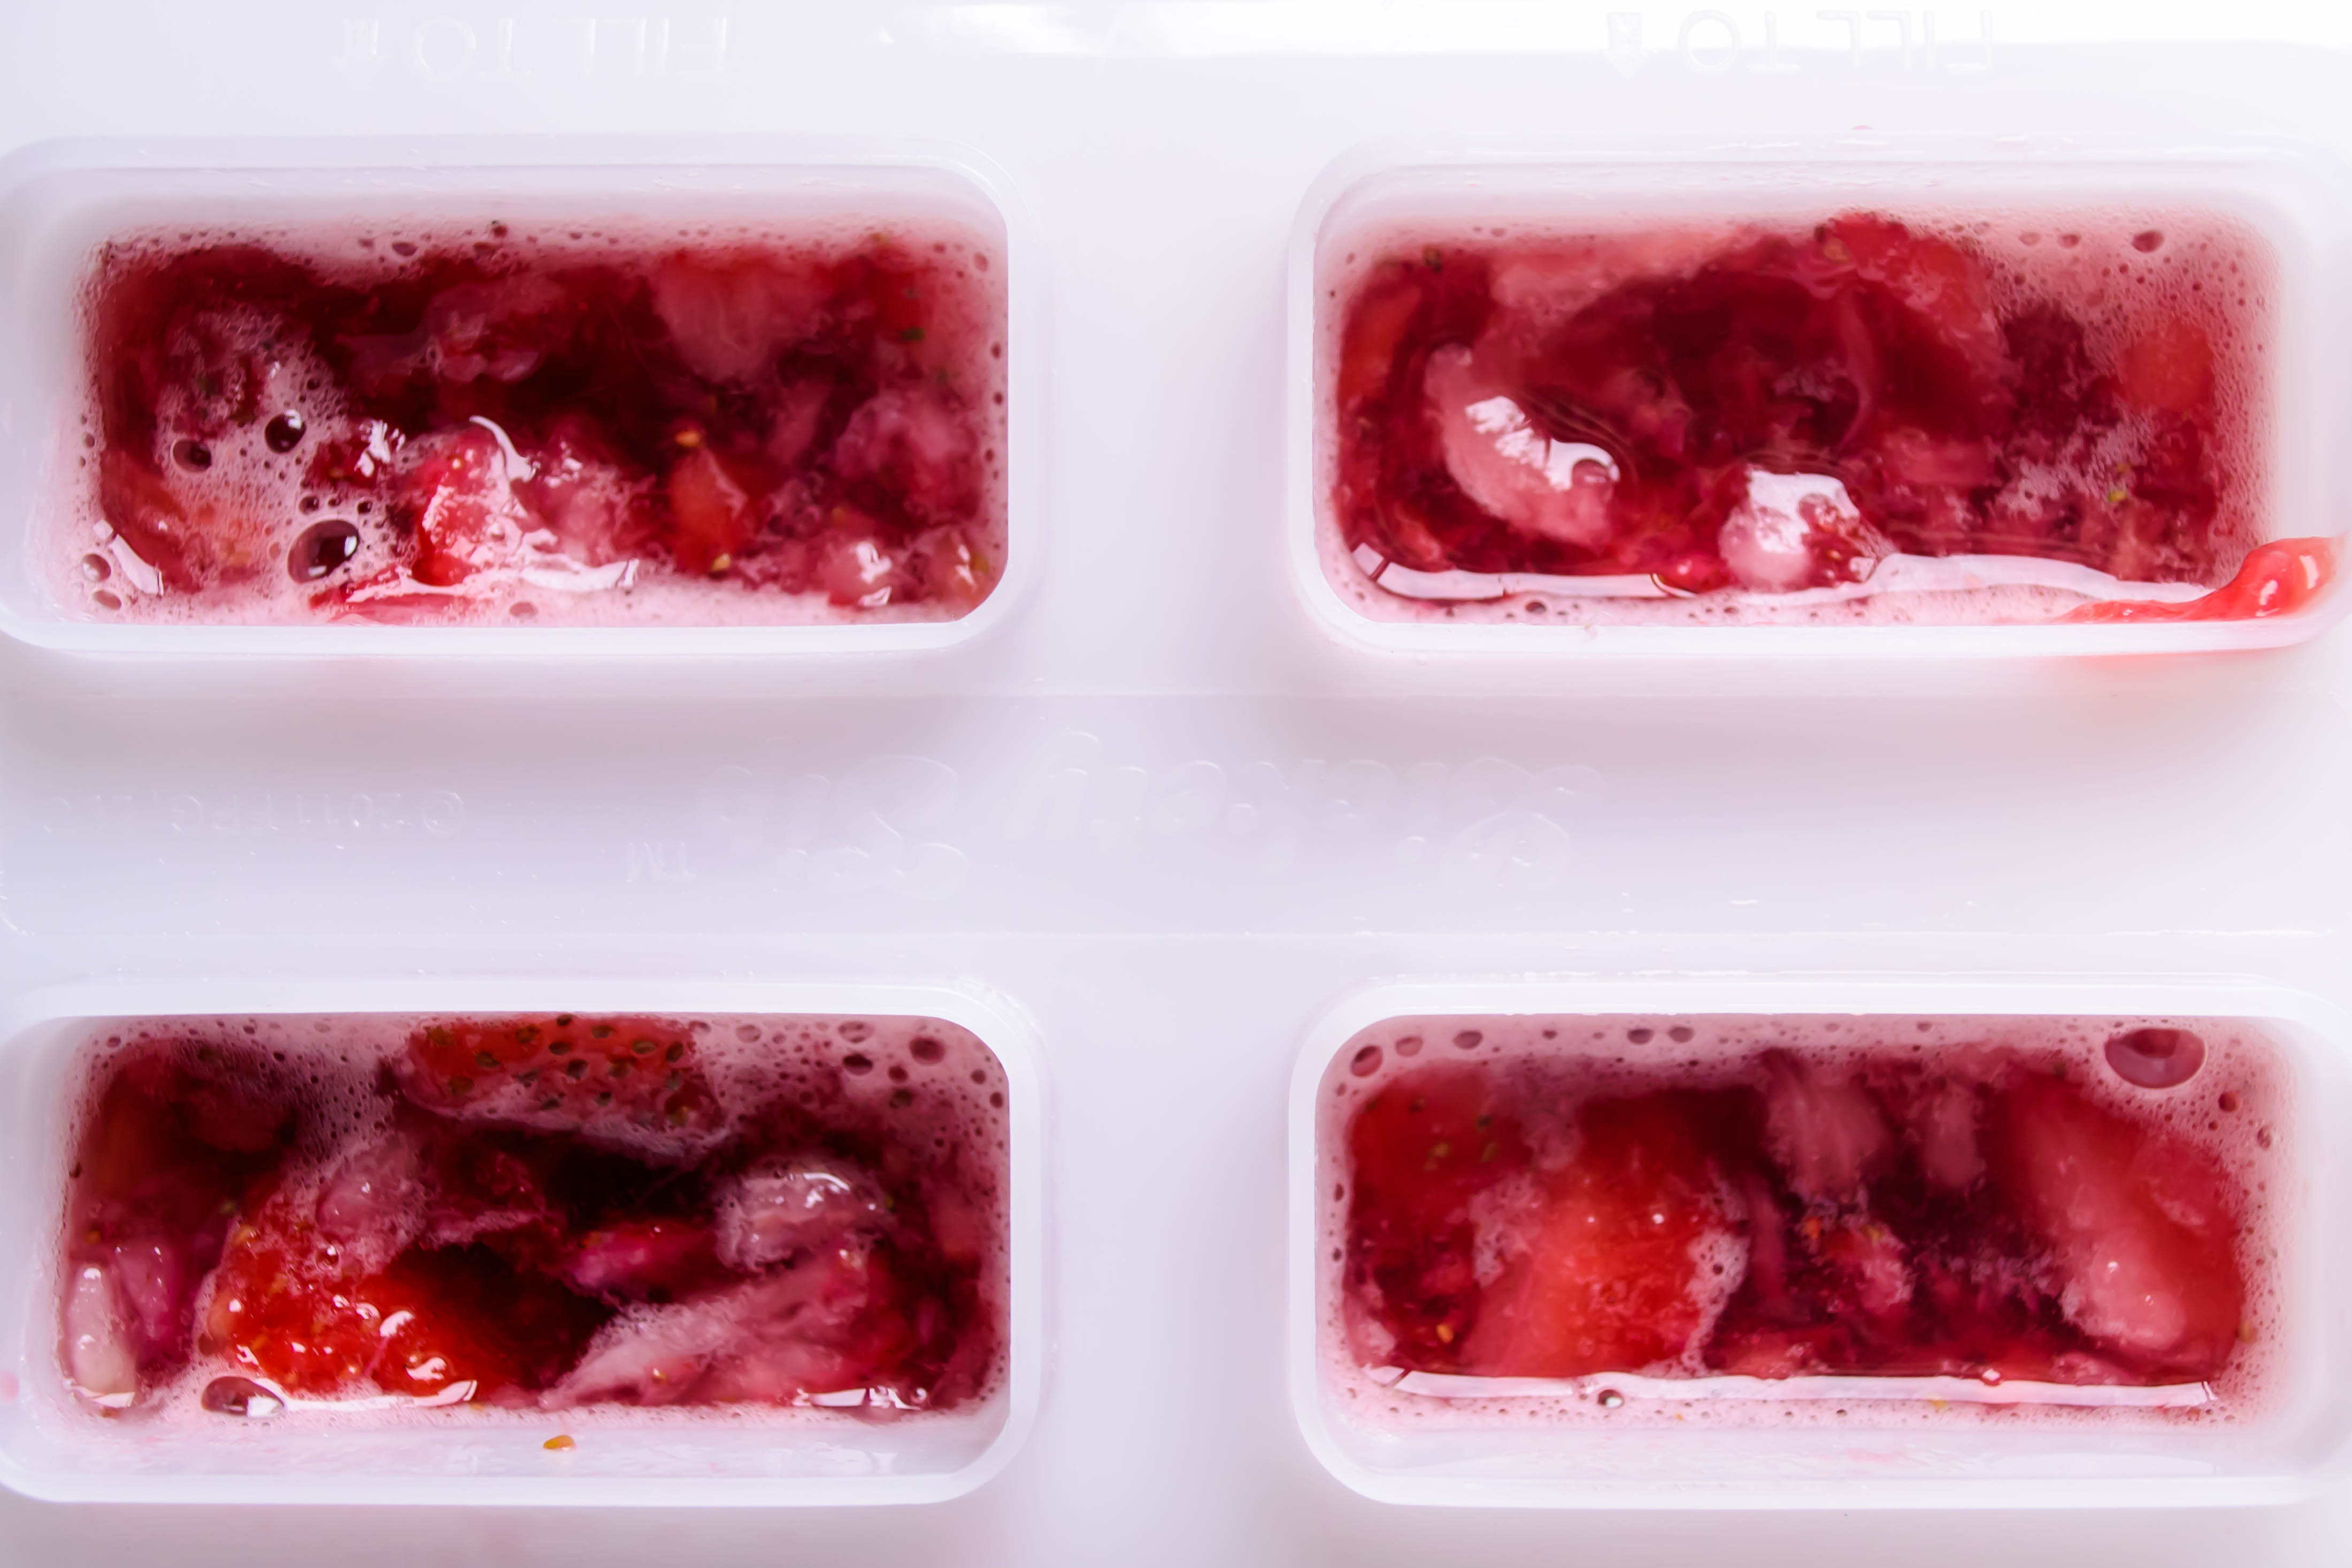
 Finally, frozen sangria wants time. Because we’re dealing with alcohol, freezing is going to take longer than if we were working with juice or water or even ice cream. It will freeze – most wines are between 9 and 13% alcohol, and this relatively low percentage will still solidify, but it will take a little longer. For satisfactory results, you’ll want to start this little project the day before. I know; planning ahead is not always on your mind when you are struck with the yen for a frozen treat. But this icy, deeply flavored bomb of spice, tipsy with wine, sparkling with citrus from freshly squeezed orange juice and freckled with mashed strawberries, is worth the extra wait.
 Here, because I care about you, and I want you to know your options before you have to brave the melting temperatures to find your way back to the kitchen, I’m giving you two preparations (well, three, if you count the plain ol’ sangria itself).
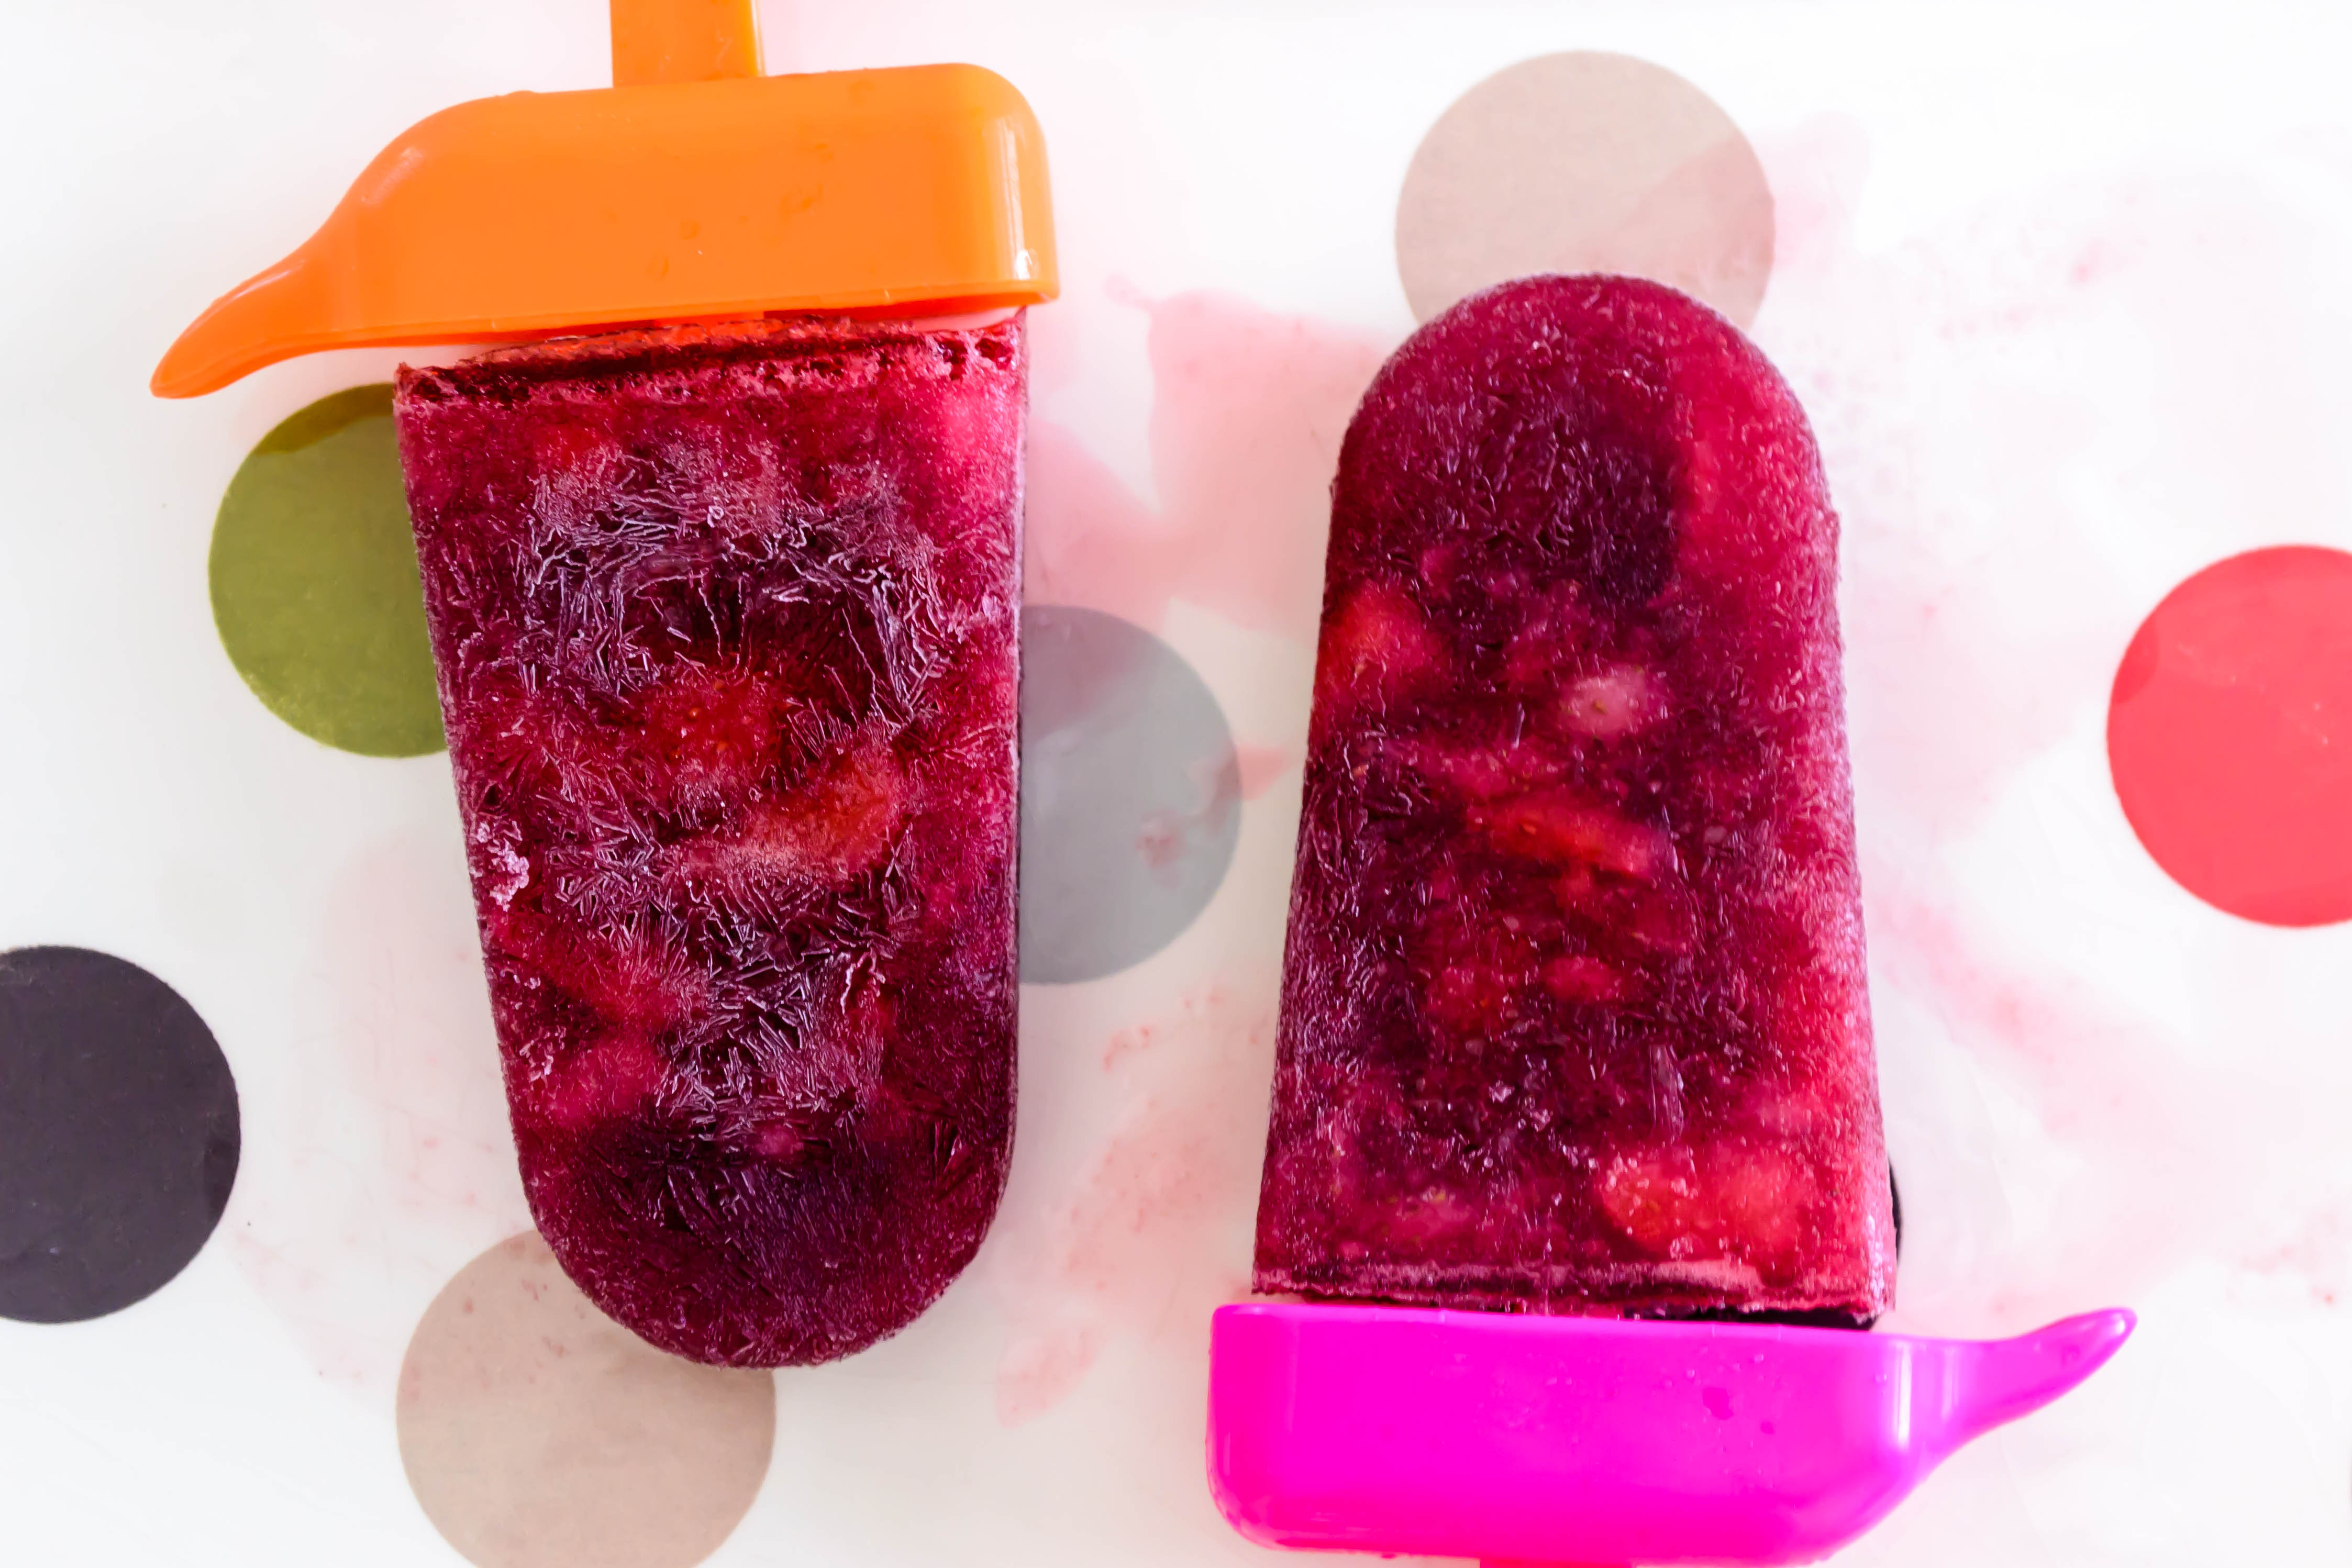
 First, let’s talk casual, fun, surprising: the popsicle. Red wine, orange juice, tiny, tooth-freezing pockets of strawberry, frozen together in a shape that will pull you back to childhood even while the ingredients remain oh so adult. Once they are poured and put up, you have a secret cache of popsicles ready for your next girls’ night, or barbeque, or just a late afternoon so oppressing that standing barefoot on the kitchen’s tile floor just doesn’t cut it anymore.
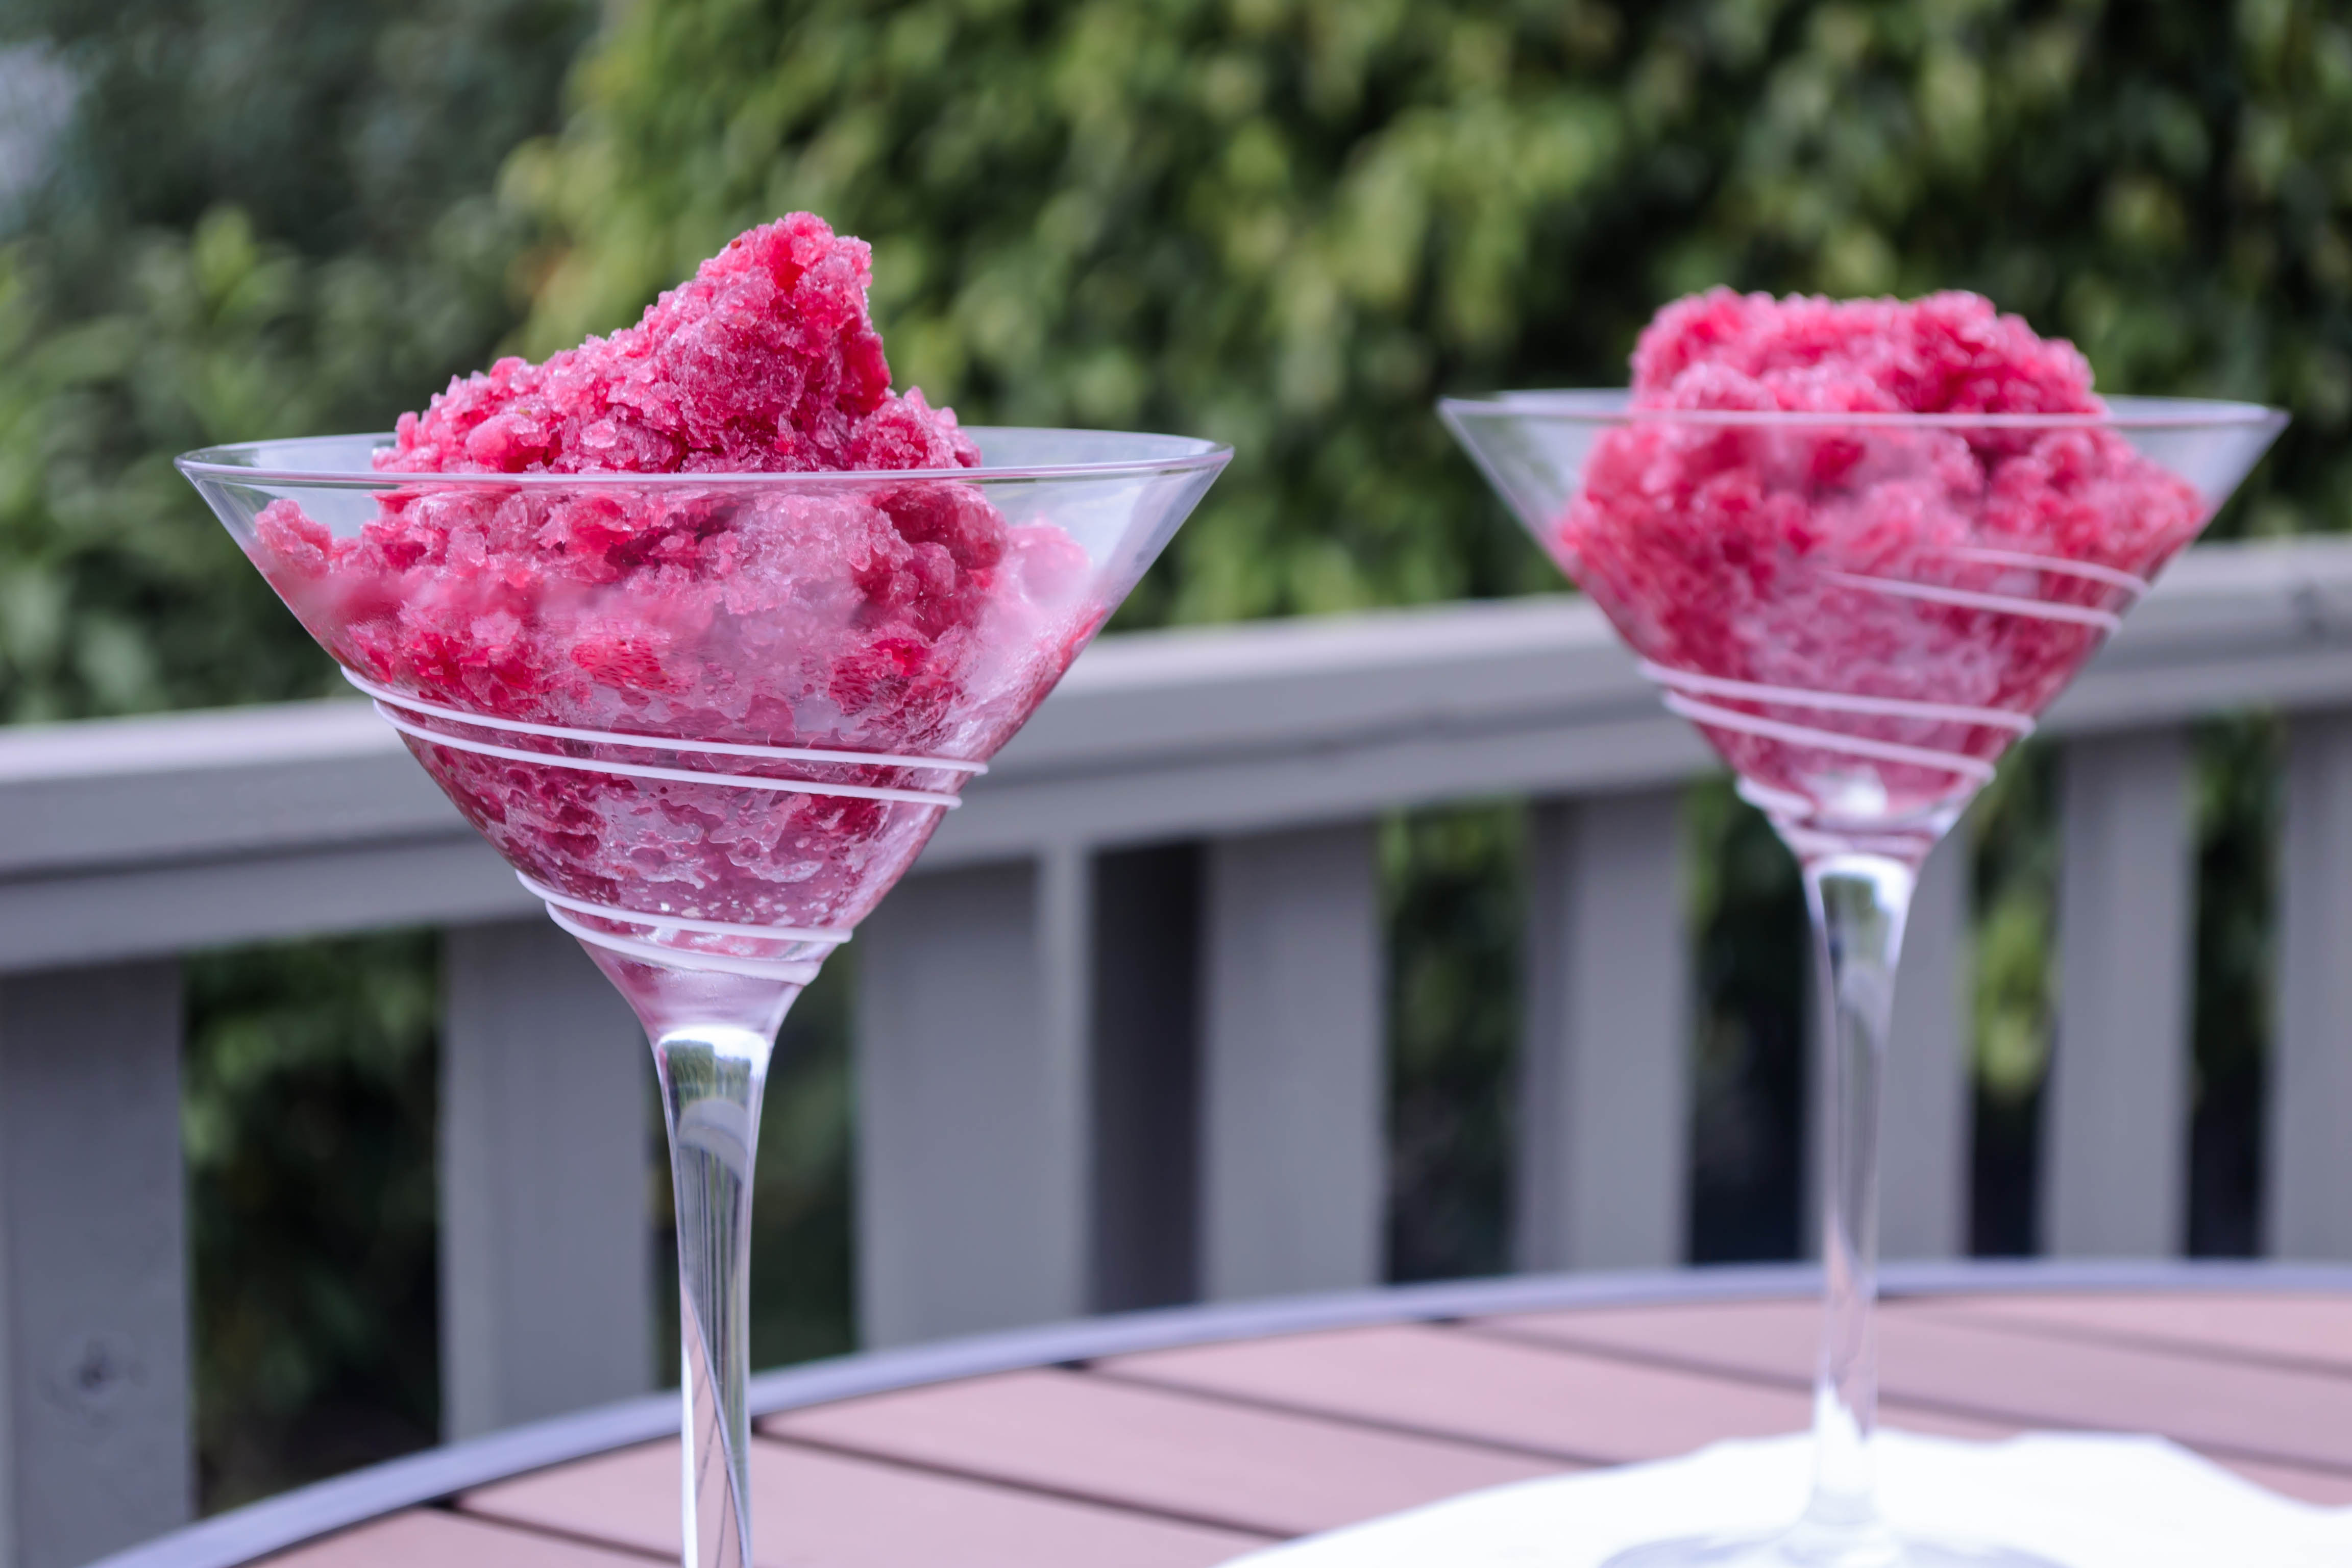
 Our second preparation is a bit more elegant, a bit more dinner party, but still almost as easy: the granita. Granitas are Italian desserts related to sorbets, except that they have a crystalline texture more like snow or shave ice. Here, instead of spooning the sangria mixture into popsicle molds, it gets poured into a wide, shallow vessel, like a 9×13 baking dish, and again, moved to the freezer. After a few hours, though, you pull it out and scrape through it with a fork. This prevents the liquid from freezing into a solid mass. After this initial freezing period, return once every few hours and scrape again, agitating the mixture into separated crystals (and strawberry chunks). Several of these scraping sessions in, your liquid will be frozen and clustered in deep red flurries: a mound of feathery ice ready to be scooped and crunched after dinner or, if you prefer, perhaps even before. That’s what your favorite patio table is for, right?
Note: these are great options for a stay-home dessert, but if you are traveling or feeding them to guests who will be traveling, be cautious about the serving size: unlike warm desserts, where you simmer off most of the alcohol, this is basically a frozen bottle of wine with some flavorings added in – the majority of the alcohol content is still there.
Frozen Sangria
Why, I thought, as a rivulet of sweat coursed from neck to waist, do I insist on frying in the summer? The instant read thermometer I was using to check the temperature of the oil sat next to the stove, registering 91F. Normal people wait for summer and then anxiously stuff themselves on grilled meats, fresh salads, wedges of cool melon. Foods that don’t make your back bead up. But here I am, on my first real day of summer vacation, celebrating by standing over a pot of shimmering heat, making pakoras for lunch.
 Maybe it’s a cultural thing. I don’t mean the pakoras. I mean frying. Fried foods are a treat frequently enjoyed during the summer months; Americans + carnivals or county fairs = frying anything we can think of. Depending on where you are in the country, corn dogs, funnel cake, hush puppies, twinkies, tortillas, even oreos, all get dunked into vats of hot oil and floated cautiously around until they transform into variously shaped clumps of deep, crispy gold.
So to bring summer traditions like sweating and eating fatty foods and looking at award-winning livestock and riding in twirling cars where the metal shrieks and you smell the grease with every turn into my own kitchen, I’m making pakoras for a weekday lunch?
Partly. But not all.
I’ve talked before about my friend Ph., who even has a whole category on this little site dedicated to her (Phoebe-Phriendly, if you’re interested). Ph. is gluten-intolerant, can’t eat dairy or tree nuts, and is no longer able to process corn or rice. This makes cooking for her a challenge. However, she is one of the reasons I started stretching my food boundaries and knowledge; we became close friends in graduate school, and I wanted to be able to make food that she could eat! We got into a conversation in the comments of her blog the other day, and I brought up pakoras because she was playing with garbanzo bean flour. She had never made them, so we decided I should come up with a recipe she could use. That’s where you, my friends, luck out.
 Pakoras are an Indian street food: assorted vegetables (or paneer, or bread, or apparently sometimes even chicken) dredged in a well-spiced batter of besan or gram flour (which is made with garbanzo beans) and water. I added some baking powder to my mix as well, for fluff and lightness. Most often the vegetables are cut into manageable pieces and dipped into the batter individually before they are fried, resulting in something I’ve been thinking about as essentially an Indian spiced tempura.* Sometimes, though, they are cut into smaller pieces, tossed together in the batter, then levered carefully into the oil in chunky mixed fritters. I chose the first of these methods for our lunch, so we could have the fun of mixing and matching which vegetables we crunched our way through. We chose cauliflower, potatoes, and onions. My favorite ended up being the cauliflower, while N. couldn’t get enough of the puffy potato slices.
 Though they are eaten year round (depending on where you are), I discovered during my research about this delightful little snack that they are particularly popular during monsoon season, dipped into or sauced with a variety of chutneys, and served alongside a cup of chai. This makes sense – a warm treat to enjoy when it is wet and booming with storms outside – and though the weather in my California kitchen is far (far, far, far) from identical, it is currently monsoon season in India, so it turns out this was, after all, a timely choice.
We had ours with a cilantro mint chutney – lightly spicy, fresh, grassy from the herbs, and bright from the addition of lime juice. I’ve included that recipe here as well.
 Pakoras are best served as hot as your mouth can handle them. They are crispiest that way. As they sit, the batter loses its magnificent crunch. They are acceptable reheated in a 400F oven the next day, but, as with all fried foods (with perhaps the magical exception of a really good fried chicken), they are best eaten immediately.


* I realize tempura is quite different: rice flour is typical, for one, and the liquid used is often carbonated water to make the batter even lighter. But the essentials – vegetables coated in batter and fried – are the same.
Pakoras are best consumed as soon as they are cool enough for your mouth to handle. As they sit, the batter gets soggy. It’s still tasty, but not as triumphantly crunchy.
Let’s talk about your spice cabinet. No? Okay, then let’s talk about mine. I really started cooking when I moved to Oregon, and that first Christmas, coming back home to Northern California after three months of what seemed like non-stop rain, the gift I wanted more than anything else was a spice rack. This, I was sure, would be the essential catalyst in my longed-for transition from college-graduate-experimental-cook to full-scale domestic goddess. Mom and I went to kitchen store after kitchen store, looking for the right one. It needed to hang, so it couldn’t be too big. It had to have a fair number of bottles, but I wanted them empty, not filled, because I wanted to choose my own spices. We finally found it in Cost Plus World Market, which was convenient, because it was immediately adjacent to their spice selection. We picked out ten or twelve of the usual suspects, and then Mom said “okay, now turn around while I put it in the cart, and forget what you saw here,” which has, since the days of Santa Claus, always been our funny way of buying presents for each other in full view of the giftee.
 This little spice rack worked fine, and hung proudly from a nail above my stove, until my spice requirements exceeded the twelve little bottles the shelves would hold. Suddenly whole AND ground cumin were necessary. Tumeric and cayenne and cream of tartar and even the dreaded pre-mixed pumpkin pie spice found their way into my kitchen and demanded homes.
So I’ve ended up with something I am going to guess looks familiar to many of you:
 This is not a good system. There, I said it. It’s just not! It holds the whole collection nicely, but it’s dark back there, and things fall over, and sometimes I don’t feel like digging around to see if I have any poultry seasoning, and then it’s Thanksgiving and I’m in a dark, cranky place and I think “screw this noise!” and buy a new bottle. So then I have four. What I really need, what I covet and dream about, is something like Aarti’s magnetic spice wall.
In the absence of space or motivation to build something that fancy, though, I stick with my system. Every once in a while, I summon the courage and the patience to investigate the dark reaches of the cabinet, to get a sense of what’s in there, what needs replacing, and what deserves a space in my weekly menu. The early days of summer are a good time to do this, because they offer a prime opportunity to make a smoky, spicy, aromatic rub for grilling.

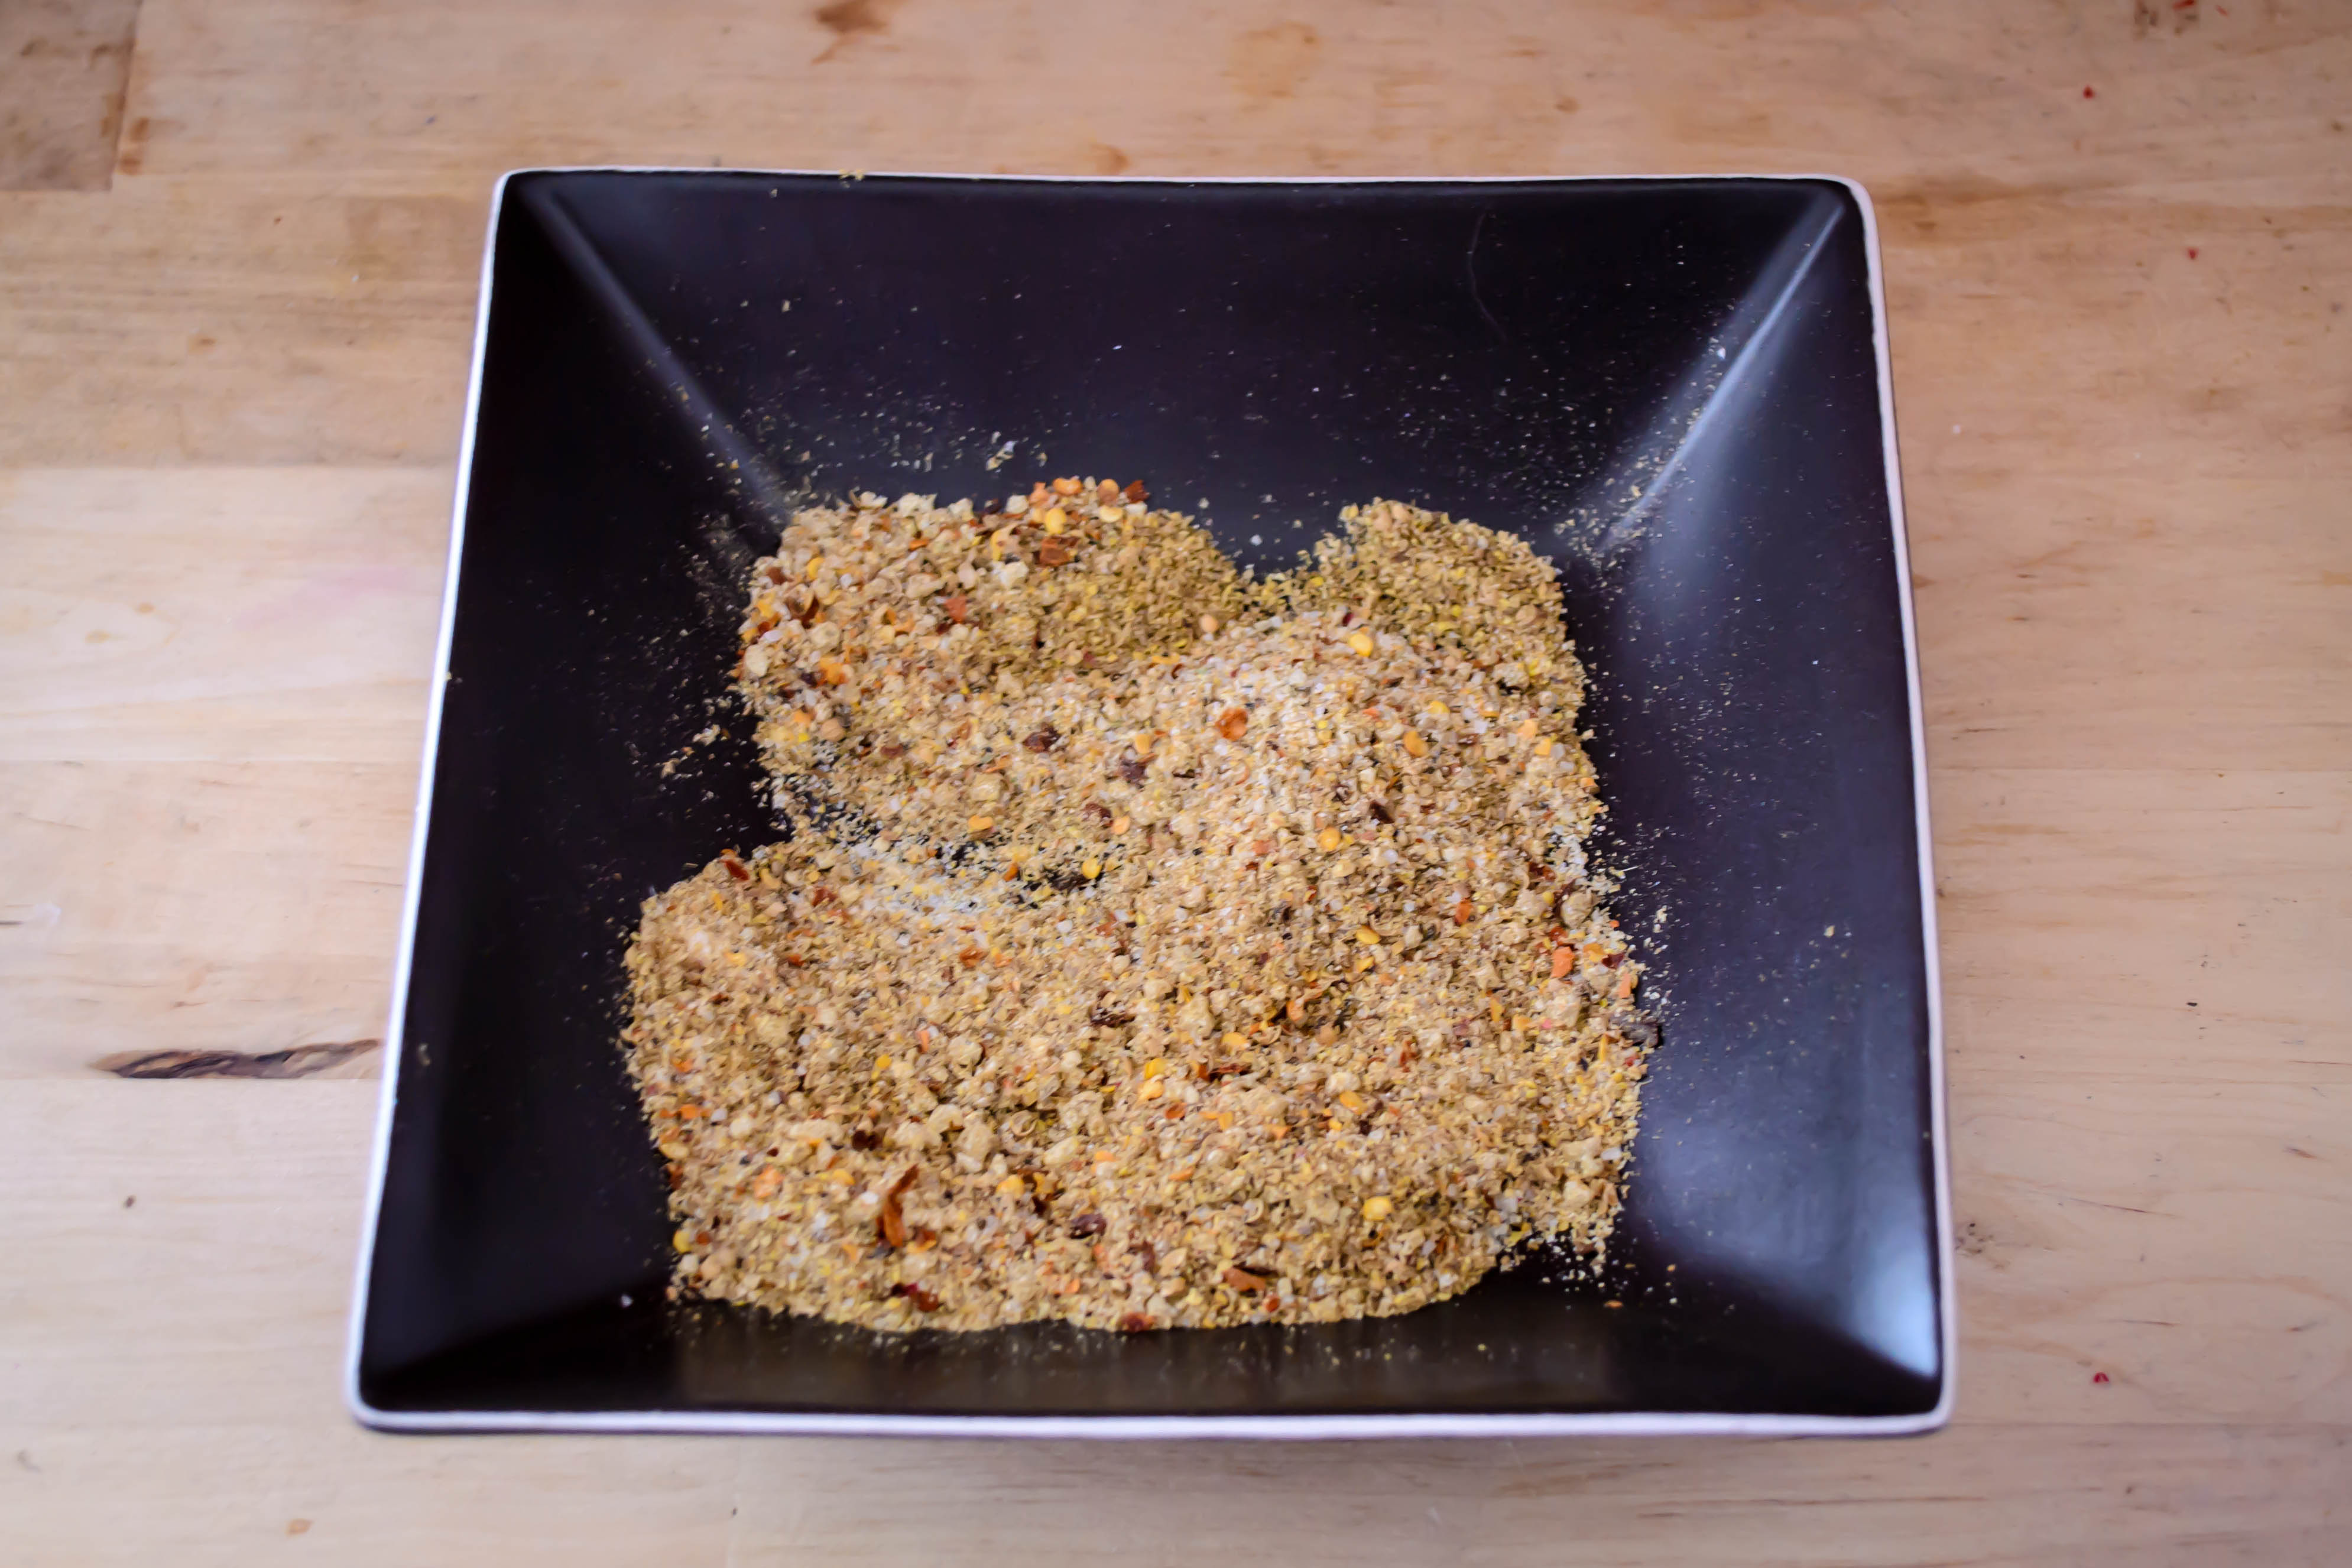
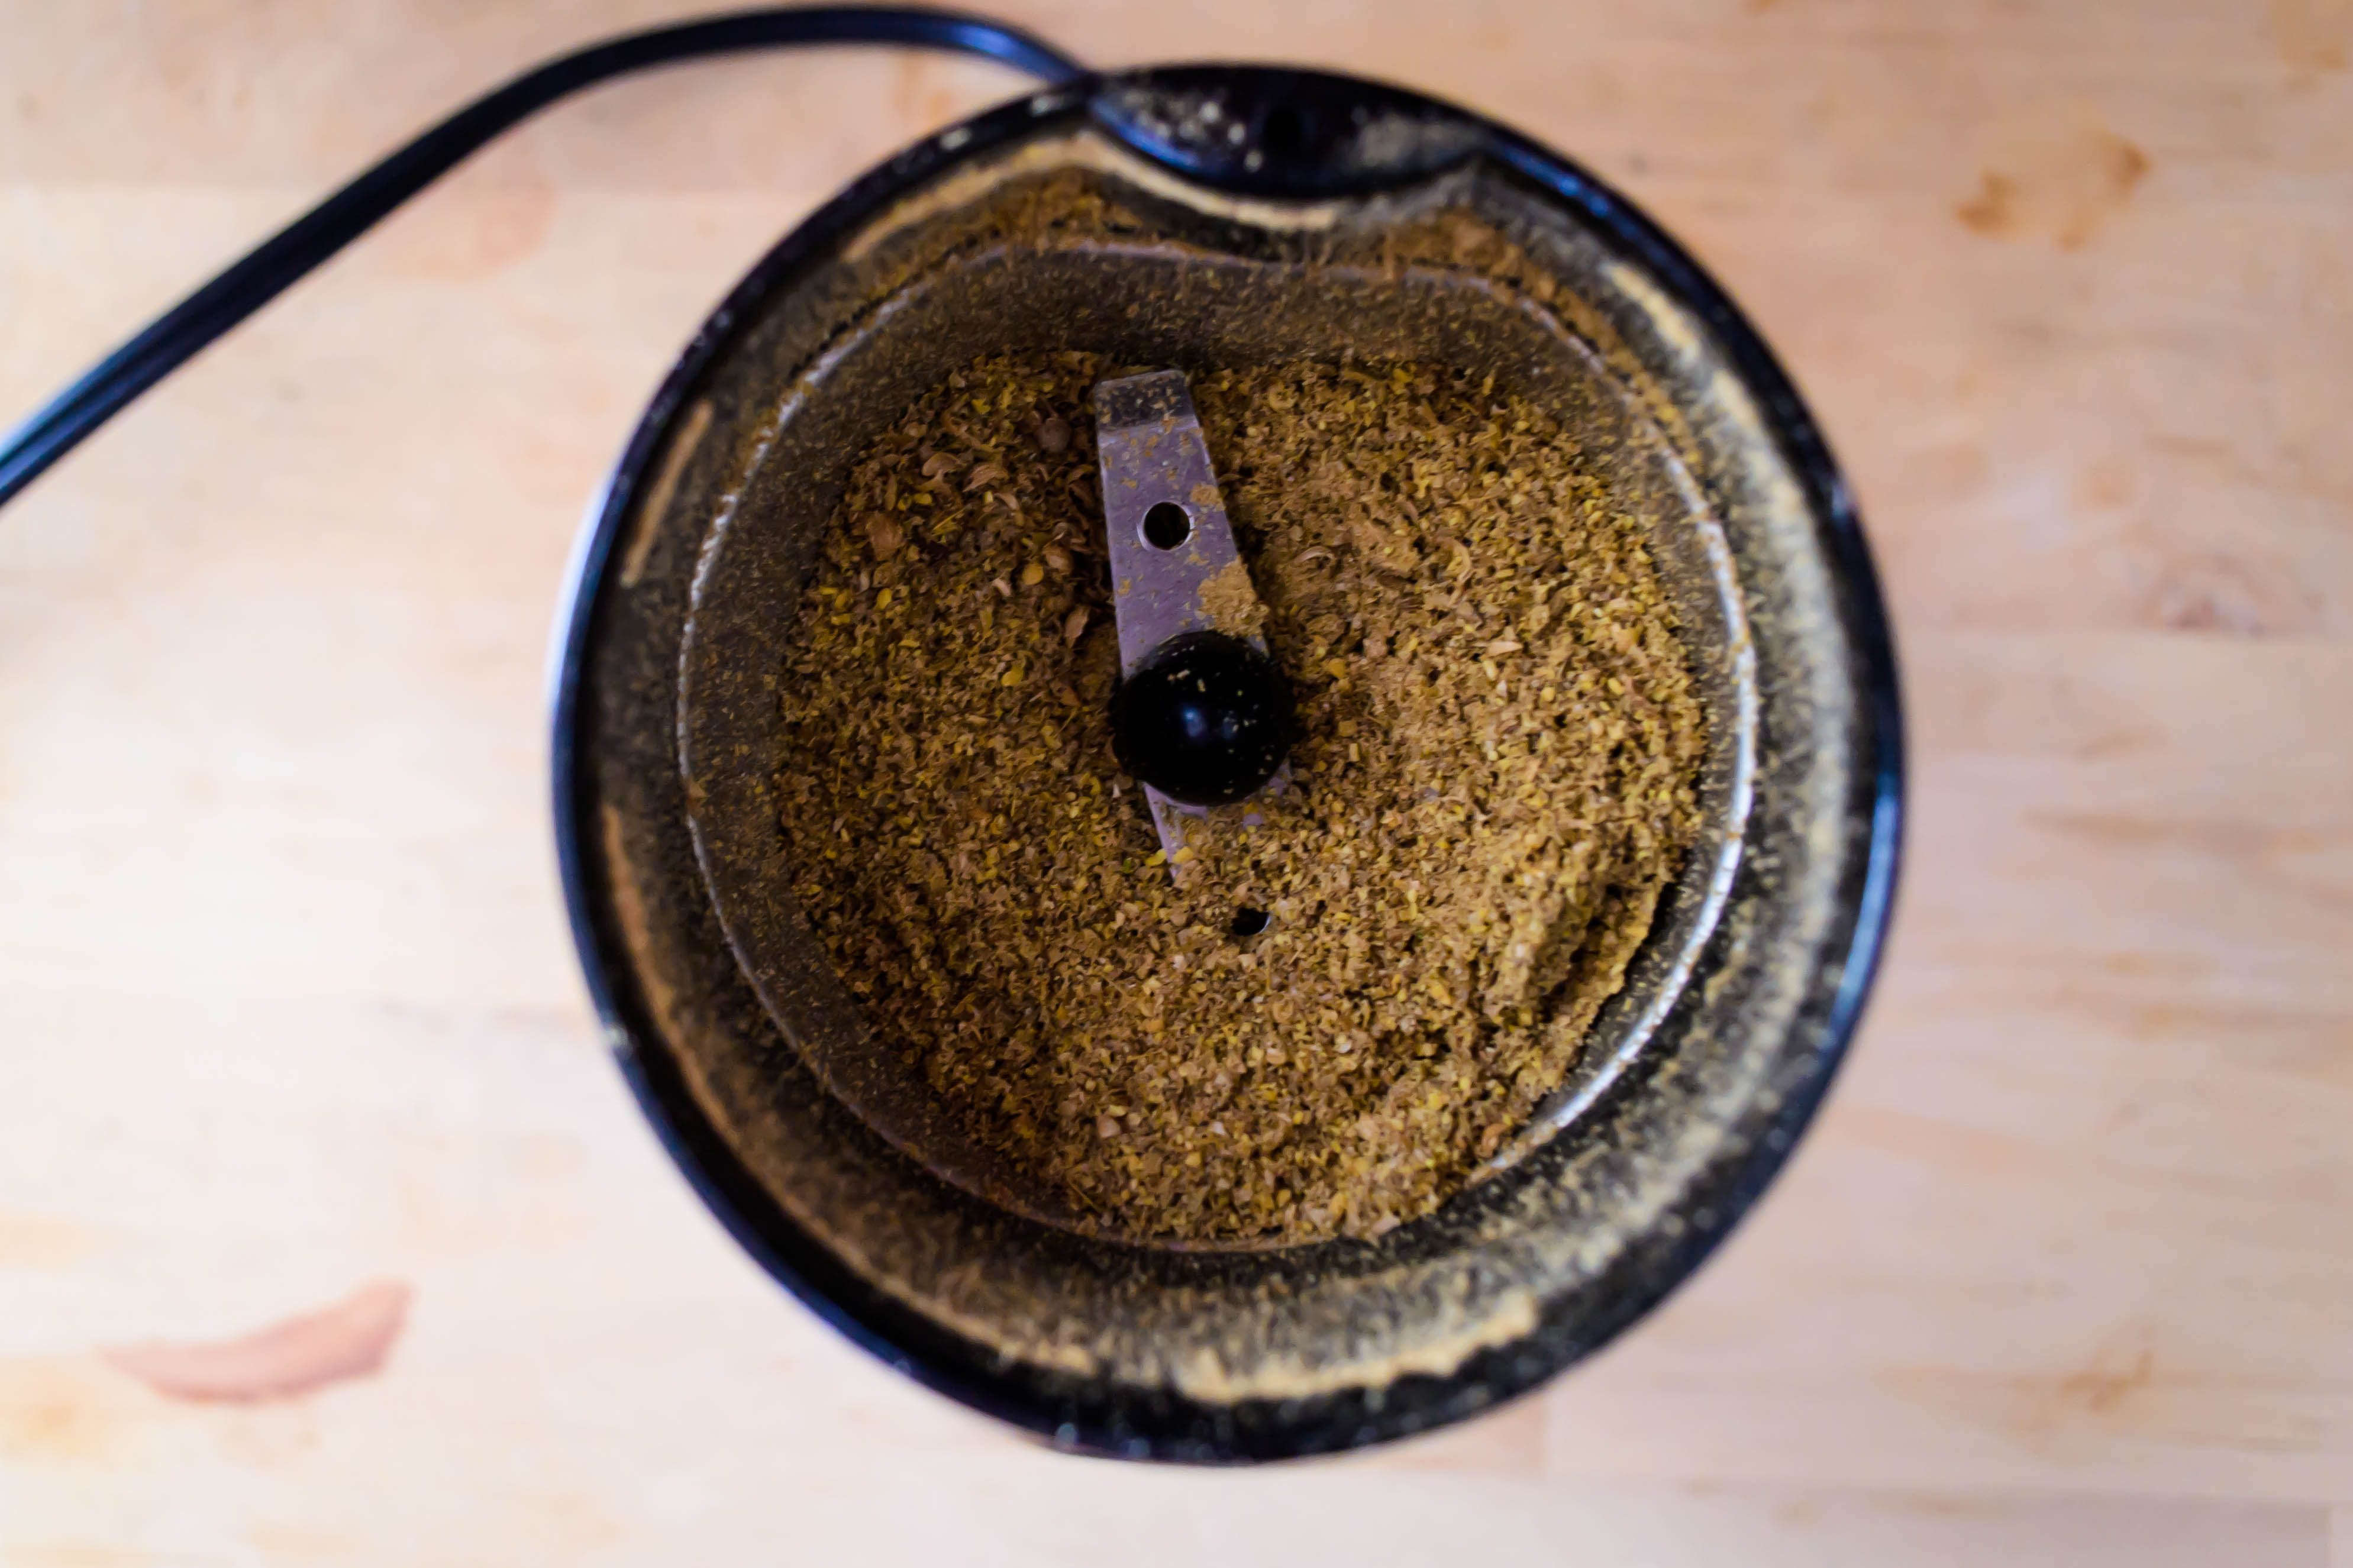 I started with a recipe from Fine Cooking originally designed for beer can chicken, and then I tweaked and adjusted and adapted for what was, as you might have guessed, in my spice collection. It’s got cumin, it’s got crushed red pepper, it’s loaded with garlic powder and mustard seeds and sea salt and just a hint of ginger for an intriguing and different kind of heat.
 This is a tasty rub for grilled meat, obviously (we like it for chicken, patted on before a liberal slather of equal parts Dijon mustard and apricot jam), but I think it would also be great on slabs of pressed tofu, or buttered corn, or potato wedges (you make your steak fries on the grill in the summer, right?). And if you were really feeling adventurous, you might even add some to a light, lemony vinaigrette to carry the flavors through your side salad.
 This recipe makes enough for several applications, which means you’ll have enough to last part of the summer. It keeps well in a sealed zip top bag. And in between grilling, you can just store it… in… your spice cabinet. Oh. Well, just jam it in at the front, for easy access. Maybe it will help you forget the
 mess nightmare treasure trove behind it. Plus, it’s got so many tasty flavors in it, you surely won’t need anything else for the rest of the summer, right? Right.
 Happy grilling!
A fabled land of farmers, farm shares, fancy (and not so fancy) restaurants, family meals, food projects and more.
cooking my way through my dissertation, one egg at a time
Fearless cooking from a tiny NYC kitchen.
food, in so many words.
Recreating the famous dishes of famous writers. Part recipe blog, part historical discussion, entirely unabashed love of books.
Epicurean Adventures from Eugene, Oregon
Celebrating the Harvest
Modern Iranian aka Persian Food & Culture Blog - Cuisine, Recipes, Stories , Photos, Pictures, DIY tutorials
Exploring Culinary Traditions of Africa, African America and the African Diaspora
food, in so many words.
food, in so many words.
food, in so many words.
Food-Stories-Recipes-Love
WordPress.com is the best place for your personal blog or business site.
