Blackberry Bourbon Bread (#Twelve Loaves April)

I’m a sucker for alliteration.  Call it having been an English major for so many years.  So when I read on April’s Twelve Loaves challenge that the objective was berry bread, I may have freaked out a little.  And when the idea of blackberries and bourbon zinged into my brain – dark, sultry, tartly perfumed – I may have freaked out a little more.  Food Blog April 2013-1083

Blackberries, bourbon, yogurt, and crumbly pebbly streusel all done up in a quickbread that we’ll pretend isn’t really an excuse for cake.  How could you want anything more?  Well, maybe a warming breath of cinnamon.  Granted.  And maybe some browned butter. Food Blog April 2013-1138

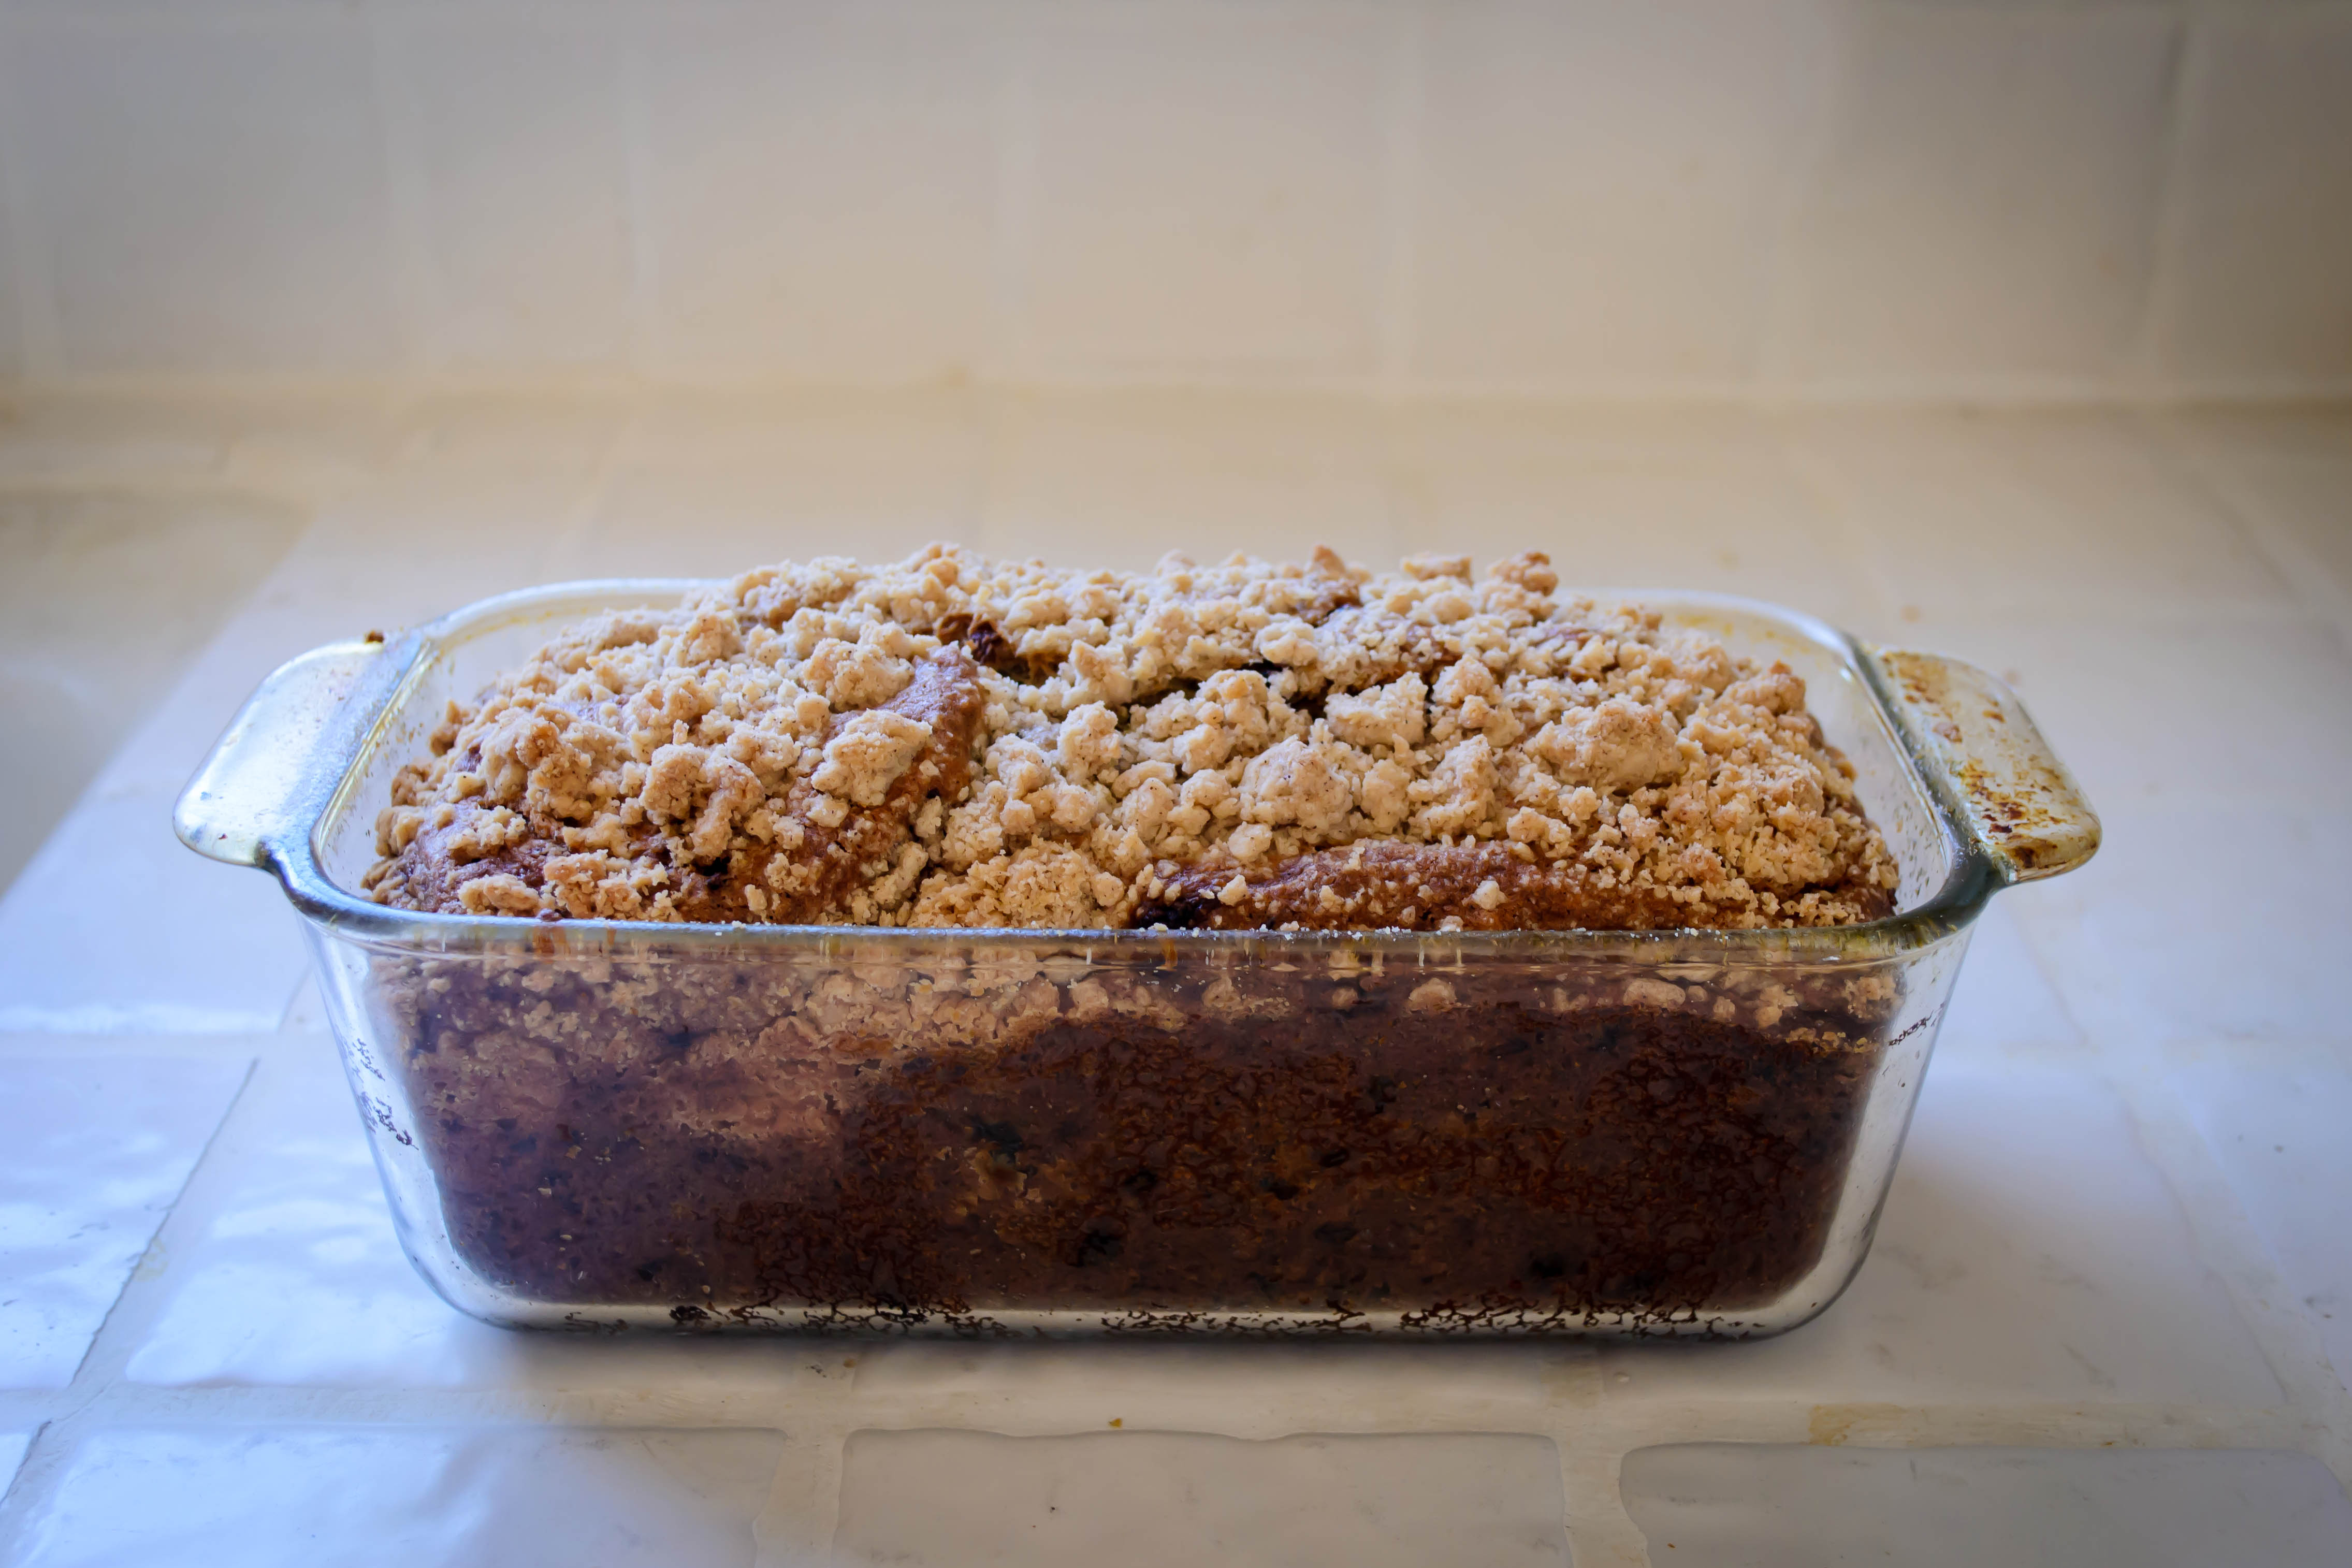
Just as this is barely a bread, it’s also barely a dough.  It only fits into my dough challenge by virtue of its attachment to the idea of bread, which, as I’ve noted, isn’t a very strong attachment at all.  Aren’t “quickbreads” really just desserts that we like to eat at non-dessert hours of the day?  But it is delicious, and warm, and comforting, and I think we could all do with a bit of that after this week.

Food Blog April 2013-1110
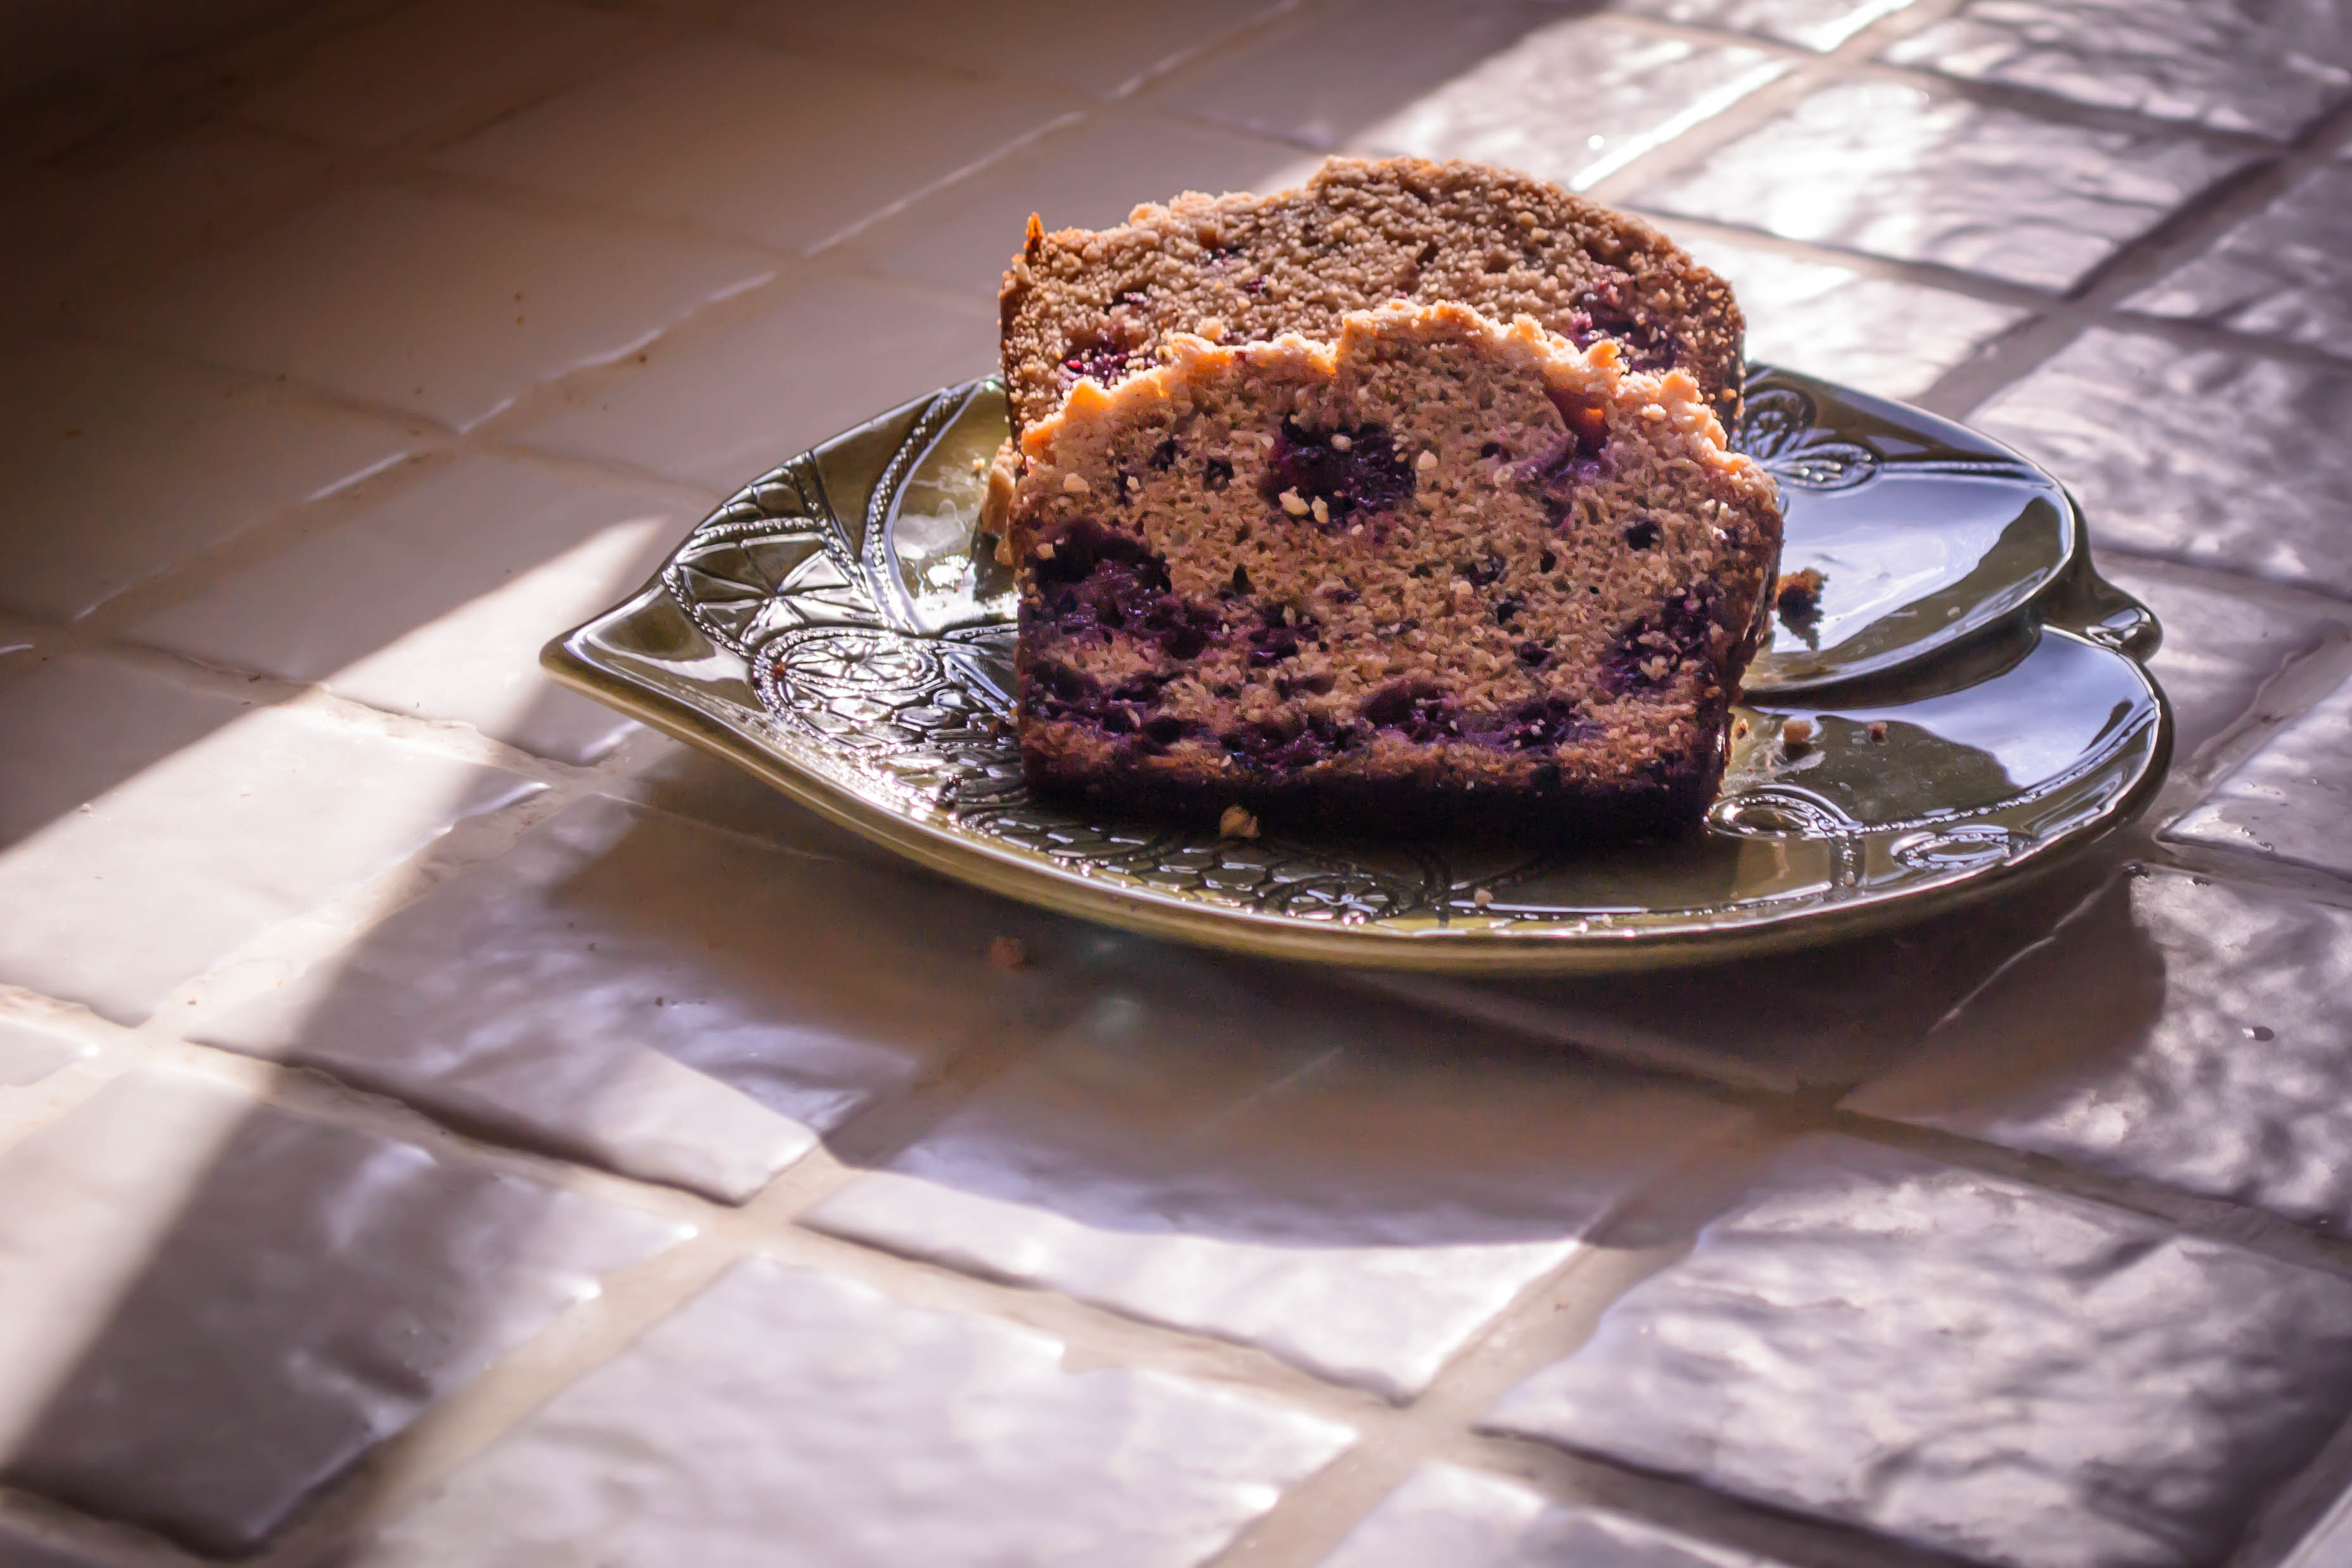
Yogurt, browned butter, blackberries, bourbon, streusel, and cinnamon all in the same bread sounds a bit overwhelming, but really, all of the components played very well together.  Blackberries and yogurt scream breakfast, and mixed in a thick batter with plenty of melted butter they produce a moist, slightly dense loaf splotched with purple pockets of jammy tartness.  But the addition of bourbon makes this a naughty thing to consider having a slice of too early in the morning (unless you are still up from the night before, I suppose).  When I tasted the batter, I was concerned about how assertively the alcohol came through, but after baking what lingers is a lovely floral aroma – all the peaty, throat-searing headiness fades (and honestly, it left me wondering whether another tablespoon or two of bourbon might be welcome in the recipe).  Really, this is a loaf perfect for that most wonderful of British institutions we are sadly lacking in the U.S: afternoon tea.  And if you slathered a thick slice with clotted cream, I don’t think anyone would complain. Food Blog April 2013-1115

Blackberry Bourbon Bread

Makes 1 large 9×5 loaf

For the bread:
1 ½ sticks butter (12 TB, or ¾ of a cup)
2 eggs
1 ½ cups sugar
1 tsp vanilla
¼ cup bourbon (I like Knob Creek)
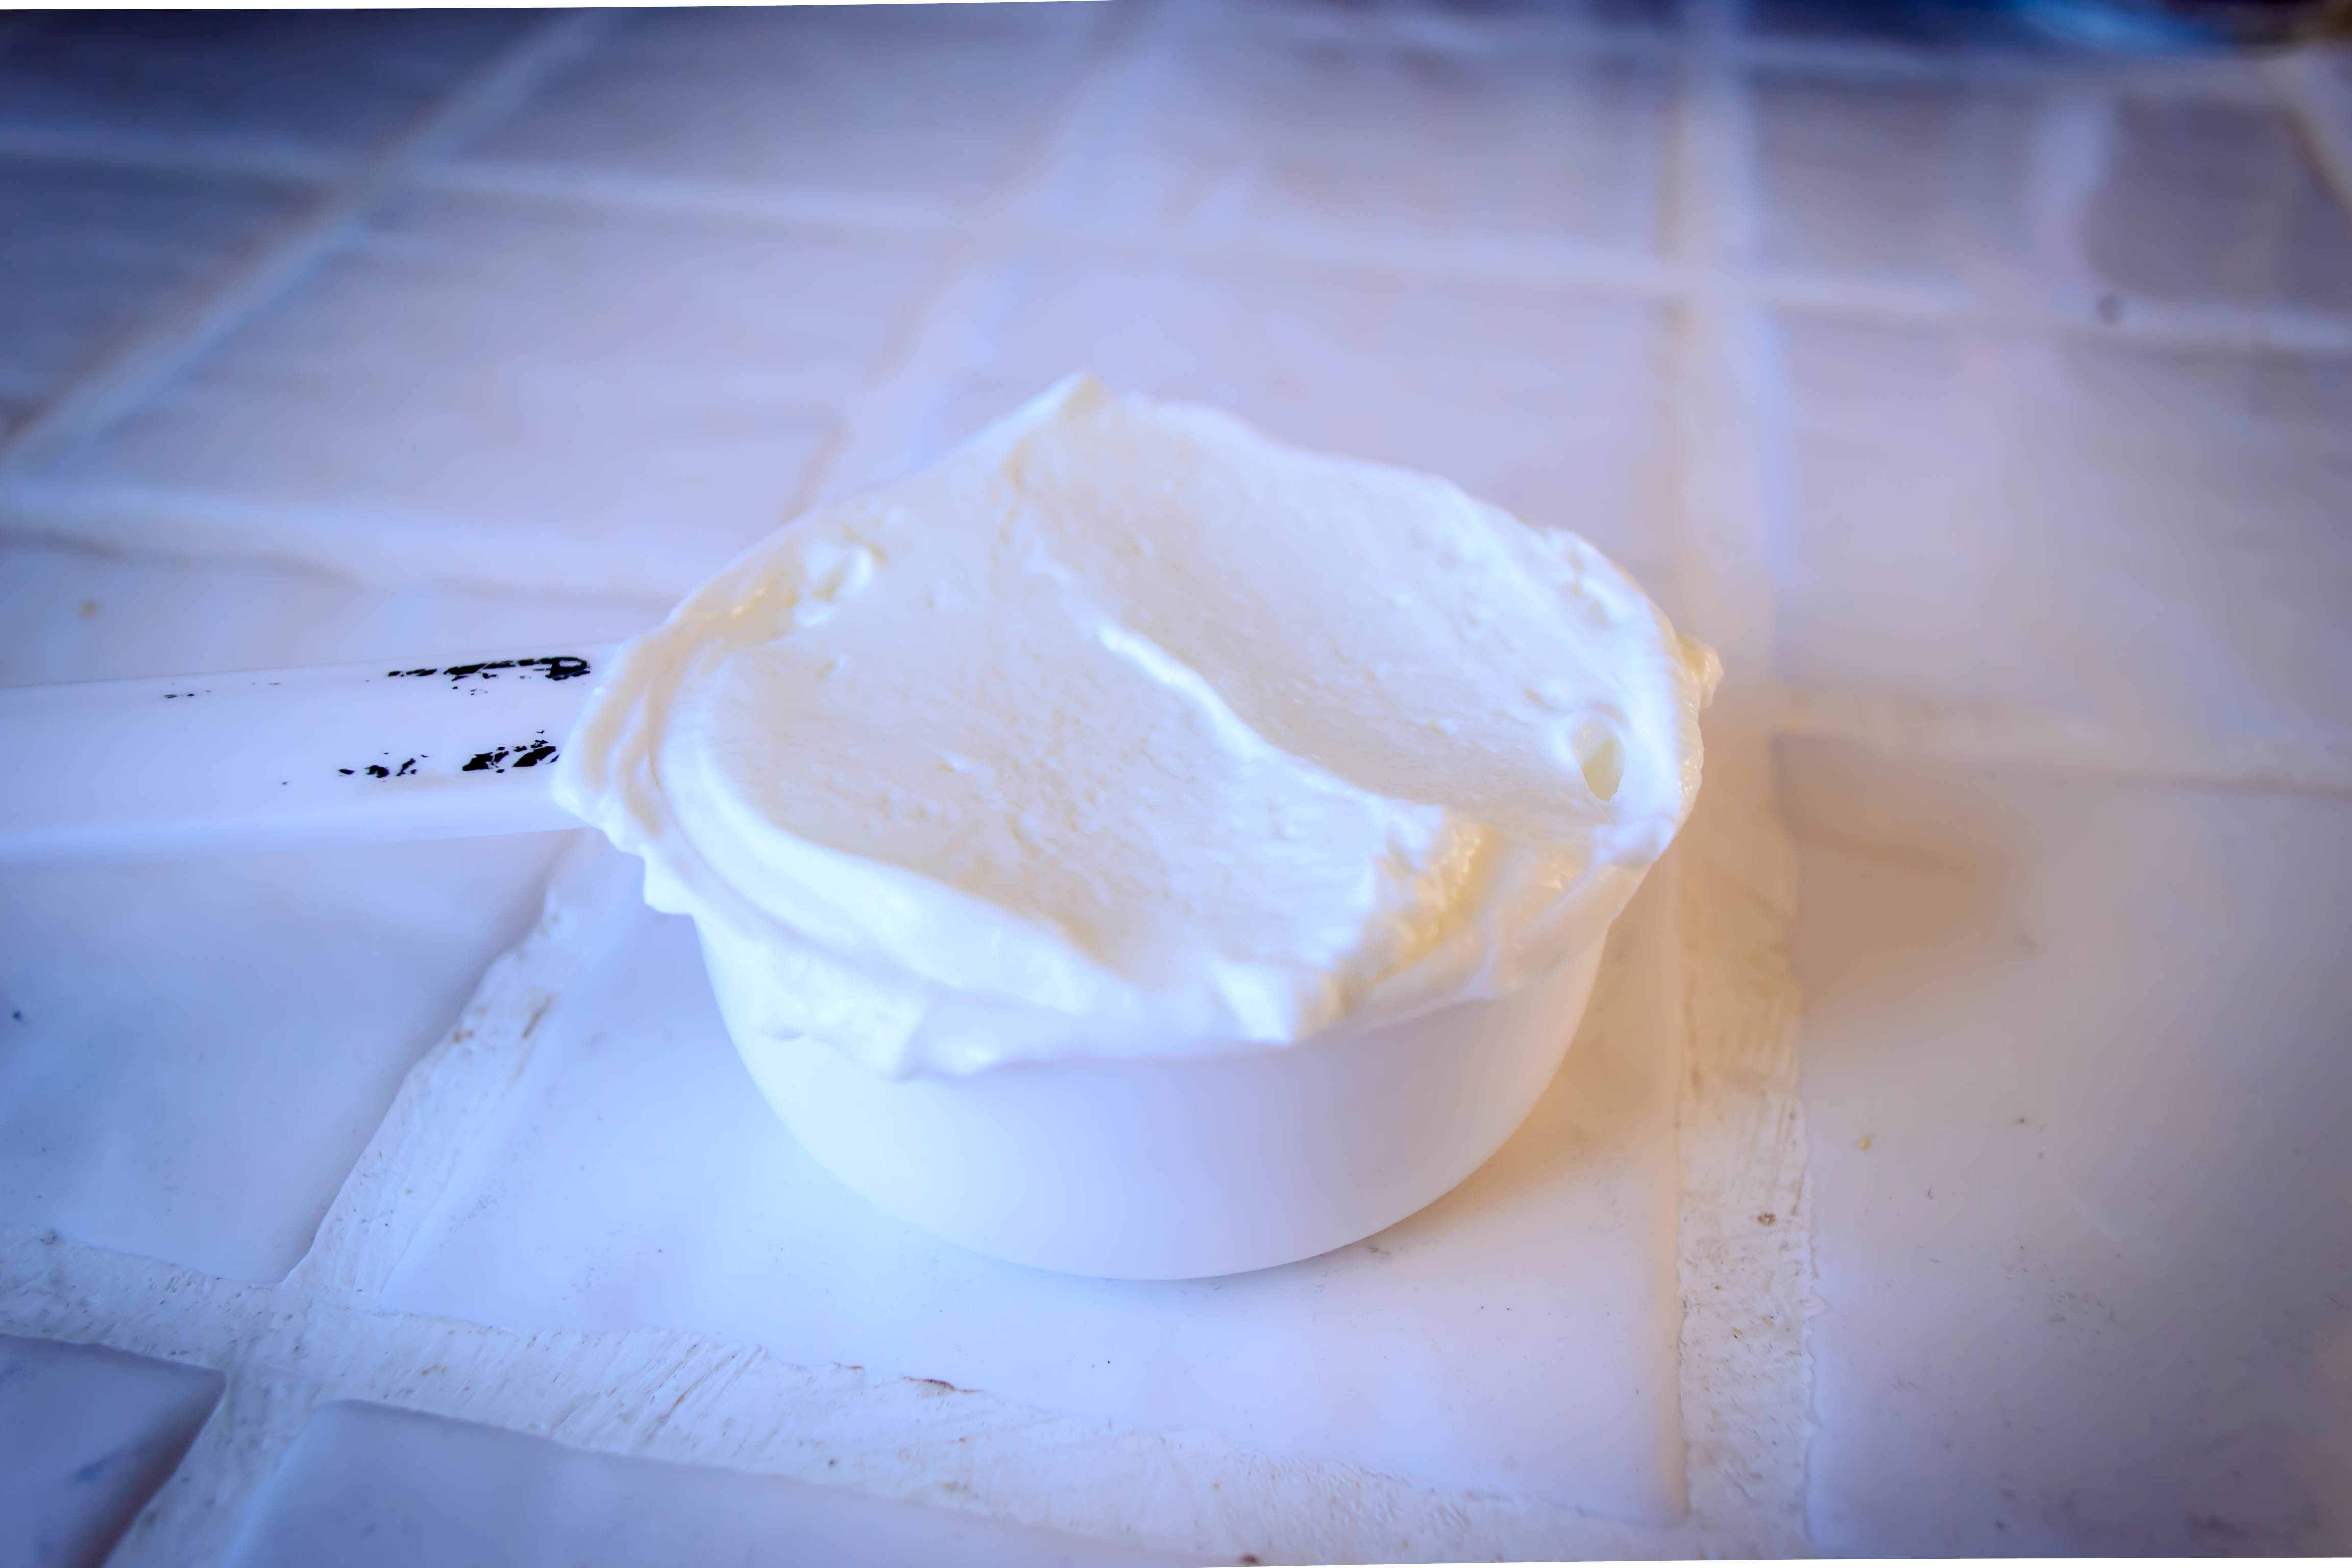
½ cup Greek yogurt, though likely any plain, unsweetened yogurt would do
2 cups flour
1 tsp salt
1 tsp cinnamon
1 tsp baking soda
12 oz. blackberries, rinsed and air-dried (I realize this is an odd quantity, but that’s how much was in the container I found.  The advantage here is that it means you can start with two pints [16 oz.], and the inevitable handful you end up eating by sneaking “just one more” at a time will leave you with just the right amount!)
Food Blog April 2013-1123For the streusel:
½ cup flour
½ cup powdered sugar
½ tsp cinnamon
4 TB (½ a stick) cold butterFood Blog April 2013-1124
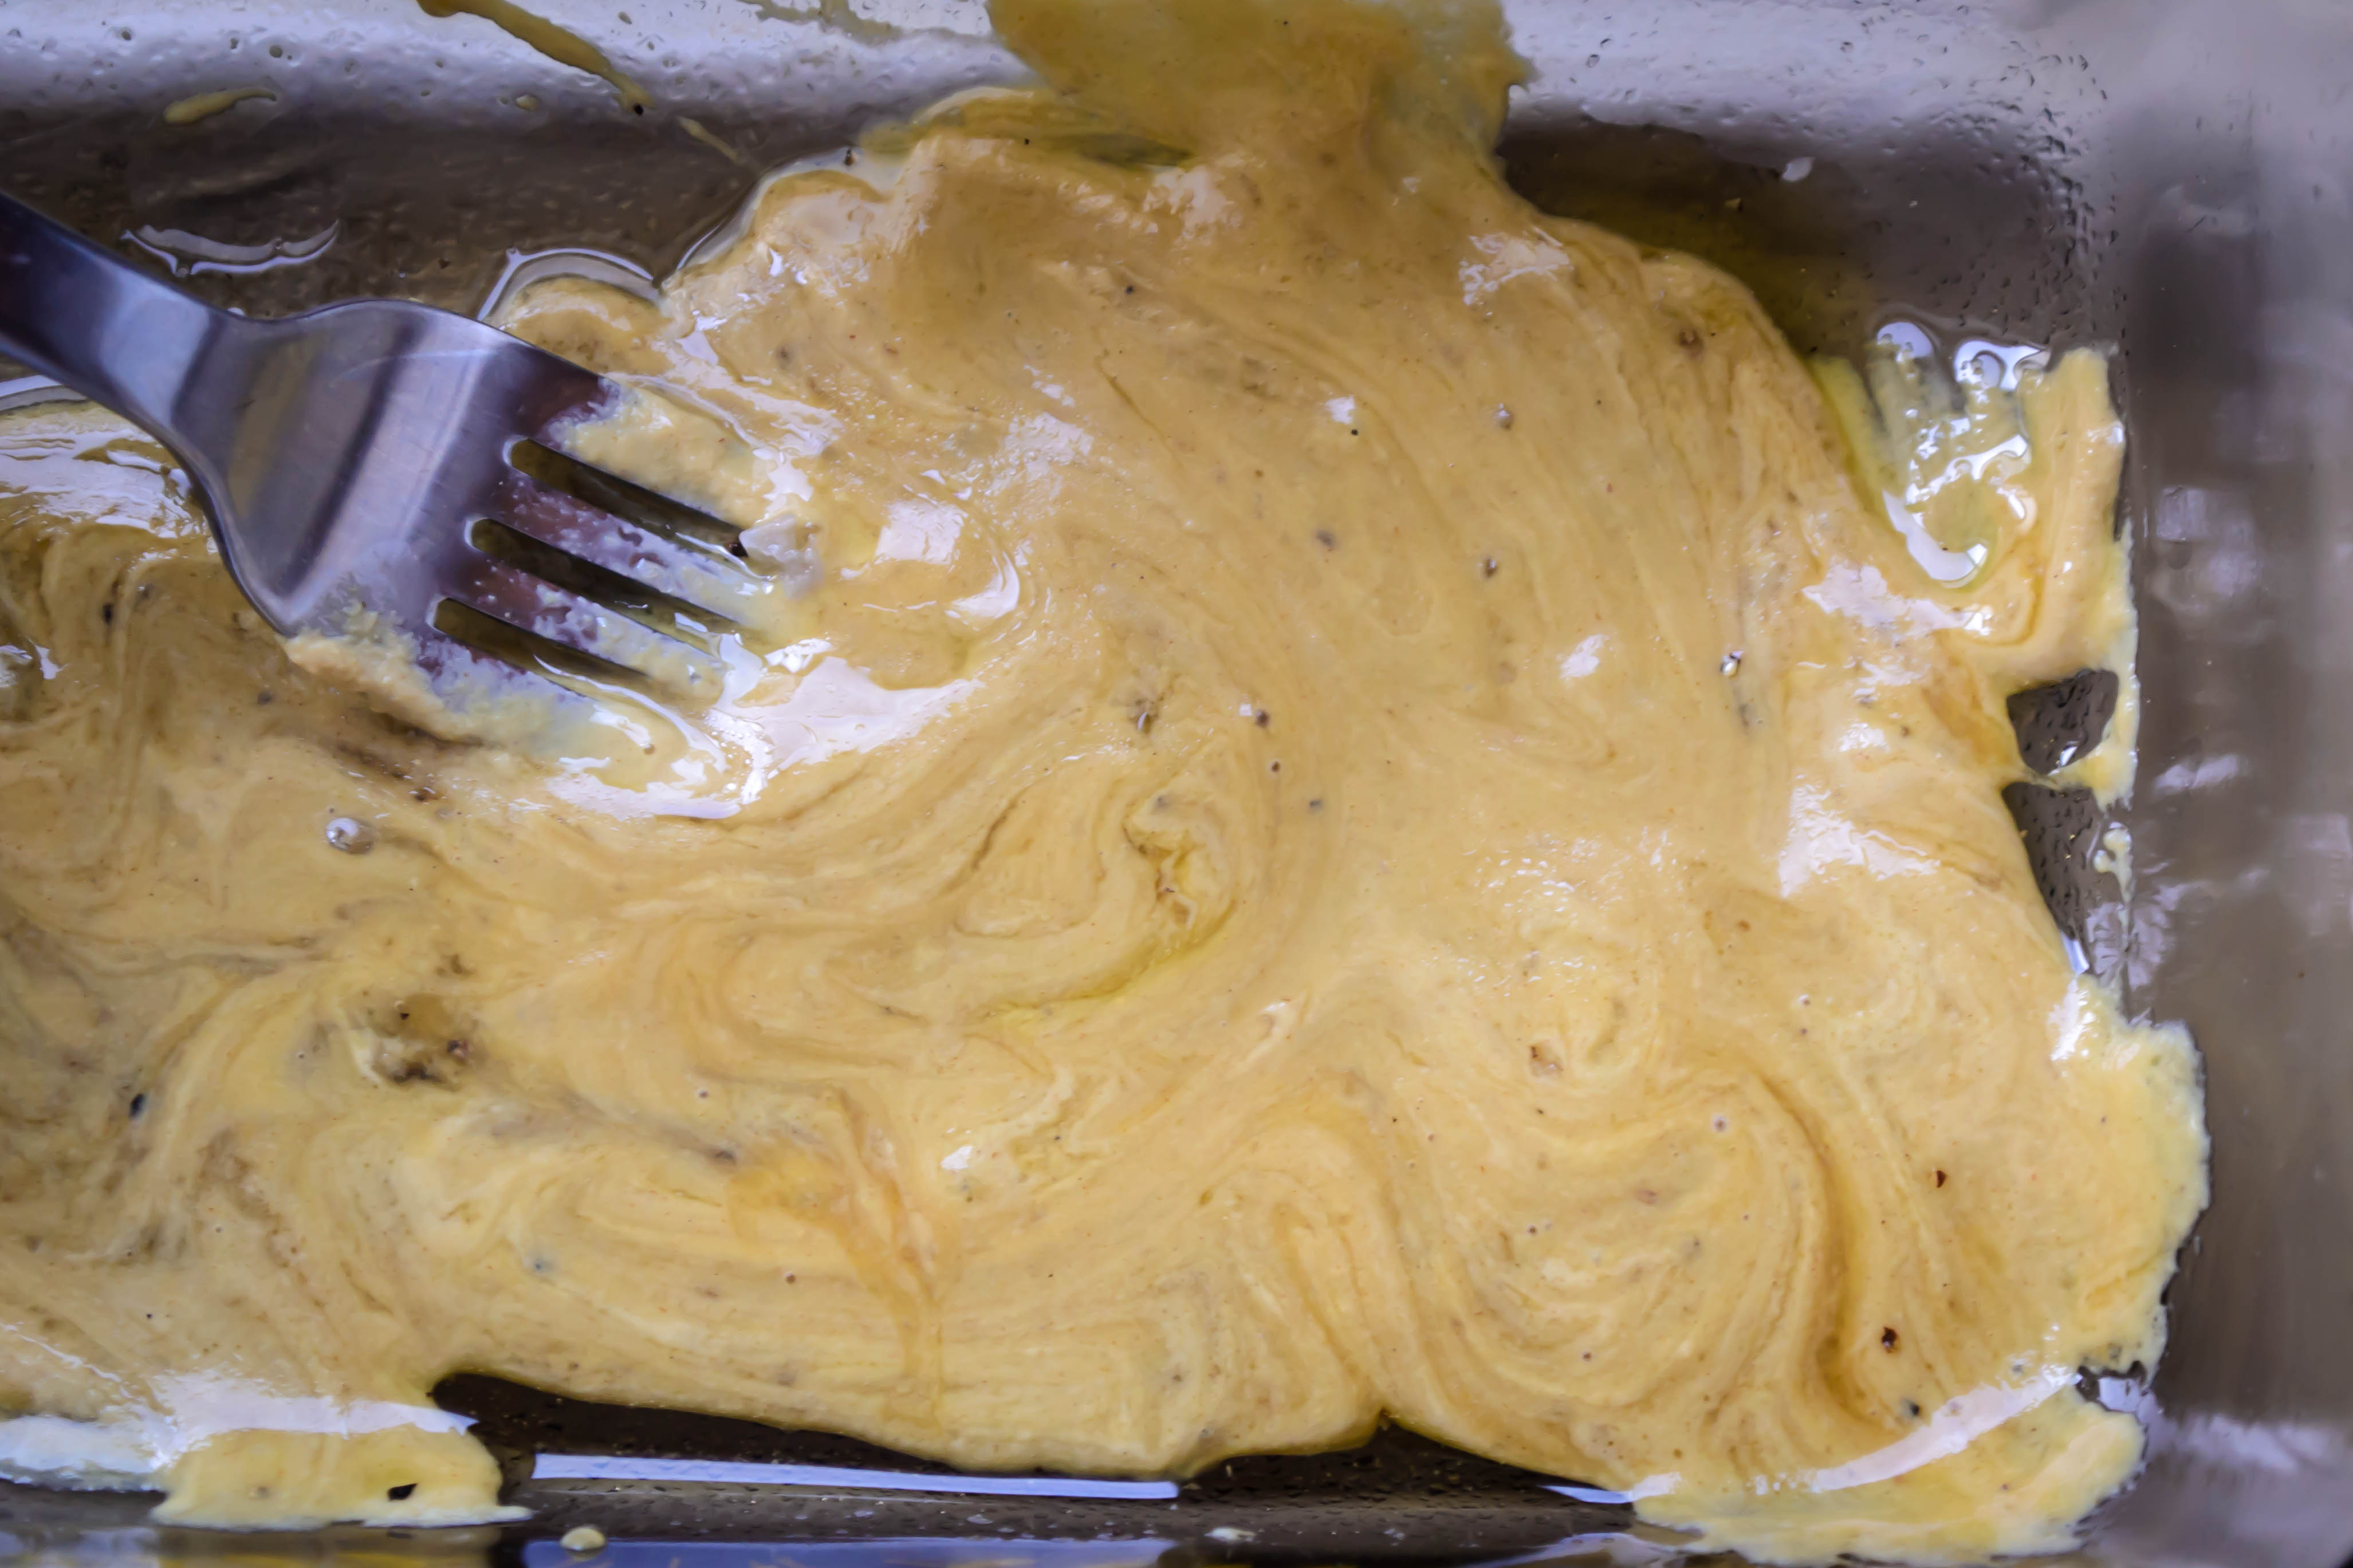
  • First, you’ll need to brown the butter for the bread.  In a small saucepan, preferably not black (it’s harder to see the browning against a dark background), melt the butter over medium heat.  Continue cooking, occasionally swirling gently, as it foams up.  That’s the water separating and steaming away.  After a few minutes, the solids will start to collect on the bottom of the pot, and begin to darken to gold and then coppery brown.  When that happens, turn off the heat.  It’s amazing how quickly those cooking solids go from perfectly brown to burned.  Set the pot aside to cool while you work with the other ingredients (I stuck mine in the freezer on top of a pot holder to chill down quickly).
  • While your butter cools, preheat the oven to 350F and prepare a 9×5” loaf pan by rubbing the bottom and sides with butter or spraying with a non-stick spray.
  • In a large bowl (or the bowl of your stand mixer), beat the eggs until slightly foamy.  With the mixer running (you could do this by hand with a whisk, I suppose, but an electric mixer of any kind will make it much easier), add the sugar ½ a cup at a time, integrating it completely before the next addition.  When all of the sugar is added, continue mixing for another 2 minutes, or until the mixture has become quite pale in color and increased in volume.
  • Add the vanilla, bourbon, yogurt, and cooled butter, and mix until well combined.  The yogurt may break up a bit and make things look curdled, but don’t worry.  Once you add the dry ingredients everything will be fine.
  • In a medium bowl, whisk together the flour, baking soda, salt, and cinnamon.  Add 1/3 of the dry mix to the wet ingredients, mixing on low speed just until the flour is integrated.  Add another 1/3 of the dry mix and combine again.
  • When you have just 1/3 of the dry mixture left, toss the blackberries in it gently.  This will help keep them evenly distributed in the batter as it bakes, rather than all sinking to the bottom.  Add this final portion of flour, with the berries, to the batter and fold it in gently with a spatula.  This is harder to do evenly, but will keep the berries intact better than using a mixer blade.  The resulting batter will be quite thick.
  • Scrape-pour the batter into your prepared loaf pan.  Mine got tremendously full, and to prevent any chance of overflow during baking, I relocated some of the batter to a 6-inch cake pan instead.  If you are concerned about overflow, I suggest filling the loaf pan only about 2/3 full, and make muffins or tiny cakes out of the rest of the batter. Food Blog April 2013-1116
  • For the streusel, which I insist you use because it adds such a nice textural contrast, combine the flour, sugar, and cinnamon in a small bowl.  Using a fork to whisk them together works nicely.
  • Rub in the butter with your fingers or a pastry blender until it is very well integrated.  Ordinarily I use a pastry blender for this sort of thing, but here I think your fingers really do work best, since you can squash and smoosh the butter more efficiently.  You want tiny pebbles – the biggest should be smaller than peas and the smallest like grains of couscous.
  • Sprinkle the streusel over the surface of your bread in an even, thick layer.  You will probably have a bit extra, but I think that’s hardly a bad thing. Food Blog April 2013-1117
  • Deposit your loaf in the oven and bake for 80 minutes, or until a toothpick or cake tester inserted in the middle comes out with only a few moist crumbs clinging to it.  Since ovens are all different, I recommend you first test for doneness at 60 minutes, just to be safe.
  • Remove and cool in the pan on a wire rack until you can’t stand it any longer.  Then slice and enjoy with tea, with cream, with a dollop of yogurt, or just all on its own. Food Blog April 2013-1160

Honey Mustard Roasted Carrots

If you’re frequenting your Farmers’ Market this spring, you have probably seen the amazing bundles of carrots cropping up everywhere.  Some are knobbly and stubby and round, like little turnips, some are almost wispy-thin and well-whiskered.  The ones that drew me, and made last week’s side dish for our biscuits, were the rainbow bunches: orange and yellow, but also the vibrant, veiny purple that was probably the original color of these funny, beloved roots (orange carrots were reputedly a Dutch development: in the 17th century the color was cultivated to celebrate William of… wait for it… Orange. Harold McGee agrees on the date and location, but he doesn’t mention political motivations).
Food Blog April 2013-0986
The treatment I subjected these little bolts of spring to was so good that rather than dawdling through a lengthy bread recipe, I wanted to share these instead.  I can’t stop thinking about them (we’re probably having them with dinner again tonight), and since it is the perfect season for it, I can’t really fault us for that.
Carrots sometimes seem too straightforward: sweet and crisp, made only marginally complex by a mild grassiness.
Food Blog April 2013-0987
Liberally slicked with a mixture of honey, mustard, and olive oil, then roasted until their skins almost blackened under the heat, ours became intensely savory and yet also caramelized, homely to the eye but stunners on our tongues.  Their taut skins, lacquered with crackly coating, retained a barest crunch while the interiors just slid down our teeth like cold butter.
Food Blog April 2013-0997
(Admission: I did make bread this week: my first attempt at baguettes.  They were okay, but nothing amazing – the interior had a nice spongy crumb but the crust was a bit thicker than I like, with none of the shattering crispness that makes a really good French loaf.  They were bumpy in shape and the deep scores I made across their surface didn’t puff the way they do in bakery cases.  They were far from shameful, and tasty sliced, toasted and spread with salted butter, but still. So pedestrian. You deserved something more exciting.)
 Food Blog April 2013-1015
Honey Mustard Roasted Carrots
Serves 1-2 as a side dish


This is almost too simple to be a real recipe, but a few of those are nice to have in your repertoire.  Note: cooking time and ingredient quantities may differ depending on the number and thickness of the carrots you are using.  Start with these amounts, then adjust as suits your palate and pantry.


2 bunches (12-15 individual) rainbow carrots (though I suspect any carrots would be great). If you are using a Farmers’ Market variety, you won’t even need to peel them.  The skin will caramelize beautifully, and any wispy roots clinging on will gain an addictive roasty crunch.
2 TB dijon mustard
2 TB honey
2 TB olive oil
pinch freshly ground black pepper
scant sprinkle of sea salt
  • Preheat the oven to 400F and line a baking sheet with aluminum foil.
  • To prepare your carrots, remove the greens, scrub them well (if they are dirty), and roll them around on a clean kitchen towel to dry.
  • In a shallow dish, use the tines of a fork to combine the honey, mustard, and olive oil.  If the honey refuses to play nicely, send the mixture through 10-15 seconds in the microwave.  Add salt and pepper to taste, though I recommend under-salting just a tad.  The flavors intensify so much after roasting that you’ll only need a tiny hit of salt.
  • Toss the cleaned, dry carrots in the honey mustard mixture, then tumble them onto your baking sheet and spread them out so none are touching.  If you have too many carrots for that, at least be sure they are in a single layer.  We want as much surface area to be heat blasted as possible.
  • Place the loaded baking sheet in the oven and roast for 30-45 minutes, or until carrots are well-caramelized and tender.  This is a wide range of time, I know, but everything depends upon the size and thickness of your carrots.  Plunge the tines of a fork into your thickest specimen.  If you meet with considerable resistance, leave it in the oven for another 10-15 minutes before checking again.  If the tines slide in easily, or you get only a bit of push back from the flesh of the carrot, it’s probably ready.  Your own preferences also play a role here: roast them until they have the texture you like best.
They will be amazingly hot when they first emerge from the oven, so if they sit for a minute or two before serving, all the better.  But once you start tasting, don’t expect them to last long.

Mom’s Challah

Friends, this is the motherlode.  Or, if you’ll forgive the terrible pun, the Mother loaf.*  In that same red binder of recipes I received as a wedding gift that contains my Nana’s sweet roll dough recipe, my mom included her “secret” recipe for challah (in my recipe collection, Mom promises that she’s only given this challah recipe to one other person.  This, as it turns out, has become a lie.  Both my Aunt Nancy and my cousin Julie have this recipe.  Who knows how many other people do too, by now!).  When she was much younger (read: before two children kept her waking hours a blur of busy), Mom baked bread a lot.  I don’t know where she got this recipe for challah, that wonderful, doughy, braided loaf of egg bread traditionally prepared for Jewish holidays and the sabbath, but even in our gentile household it became a holiday essential for us.
Food Blog March 2013-0971
For the past few years, my sister has taken up the challah mantle and has been preparing it, with Mom’s help, on Christmas Eve so we could slather it with apple butter or cinnamon sugar or honey to enjoy on Christmas morning.  It’s not an easy bread (are any of them, really?).  With an incredibly sticky dough, not one or two, but three rises, and a tendency to overbake, it has always intimidated me.  At any phase of the process, something could go wrong!  If I could master challah, I thought privately, I would really have a handle on this bread thing.
So, a number of loaves under my belt, with Easter coming up, and this month’s Twelve Loaves challenge of holiday breads, it seemed like the right time.  Friday morning, after quizzing my mom on a few details, I pushed my sleeves up, swallowed the disparaging warnings of that little gargoyle of doubt who often sits on my shoulder, and dove into Mom’s recipe.
Food Blog March 2013-0920Food Blog March 2013-0930Food Blog March 2013-0932
This is, as I mentioned above, a sticky dough.  After kneading it becomes elastic and smooth, but there is still a tackiness about it that leaves your bowl streaked with gummy strands and your hands, if not well floured, stringy with delicious remnants.  It takes a long time – with three rises averaging over an hour each, you aren’t starting this loaf in mid afternoon and expecting it to be ready for dinner.
Food Blog March 2013-0933Food Blog March 2013-0935
I’ve seen plenty of recipes suggesting overnight refrigeration time – Michael Ruhlman’s blog, in fact, has a guest post on challah by Marlene Newell that begins the night before it is baked – but Mom has never done it that way.  If you’ve scheduled a lazy day at home, or perhaps a day punctuated by laundry, tidying up, and the odd brief errand carefully placed during a rise, this could just become your best friend.  It’s soft, it’s rich and tasty, it looks impressive (even if, like me, you only do a three strand braid instead of the more traditional six strand), and it keeps fairly well, provided you wrap it well in aluminum foil.  I find plastic storage gives the crust an unpleasing texture.  Of course, it’s so tasty that I can’t imagine it needing to keep well – it will be gone within a day or two.  On that topic, I’ve never understood the comments that it makes wonderful french toast.  In our house, the full loaf has dwindled to half by lunch time, and as the afternoon wears on slice after slice seemingly evaporate, until the bread board contains only a lonely half heel and a small pile of crumbs.  This is the first time I can remember, with only N. and me indulging (Lucy asked with pleading eyes of liquid velvet, but it’s too good to share), that the loaf has made it to day three of existence.
DSC_0910
Despite my lingering doubt, I had only a few moments of anxiety as I put together this loaf.  The stickiness of the dough stressed me out a little – even after adding the full amount of flour in the recipe (as I will note again below, you only incorporate part of the flour at first, adding in additional ¼ cups at a time as needed to work the dough), thick gobbets clung to the sides of my mixing bowl, my dough hook, and my fingers.  One rise down, however, and the stickiness diminished.
Food Blog March 2013-0937Food Blog March 2013-0940Food Blog March 2013-0943
Faced with three thick strands of dough, I forgot how to braid for a moment.  Heavy, stretchy worms of raw dough are a far cry from pigtails or Barbie hair, my braid targets in a past life.  But braid made and ends tucked under, I had something that actually looked like my mom’s longed for loaf.
Food Blog March 2013-0944Food Blog March 2013-0949
A quick glaze of egg wash and a generous sprinkle of poppy seeds, and I started getting excited.  A quick, almost half hour in the oven later (the loaf goes from moist and springy to overbaked in what feels like an instant), and I was staring at a near perfect replica of Mom’s bread.
Food Blog March 2013-0958
It’s hard to wait the requisite 15-20 minutes to let the bread cool and the internal structure solidify, but you should.  It makes slicing much more successful.  And once you have waited, you should cut thick slices, and garnish them with butter or jam or just your own teeth and tongue.  Happy Sunday, whatever you might be celebrating.
Food Blog March 2013-0966
Mom’s Challah
1 tsp + 1/4 cup sugar, divided
½ cup warm water
2 tsp active dry yeast (or 1 package, which contains 2 ¼ tsp)
½ cup vegetable oil
½ cup warm water (again)
2 tsp salt
2 eggs, lightly beaten
3 ¾ – 4 cups flour (I used bread flour, but Mom has always used all-purpose)
Poppy seeds or sesame seeds for sprinkling
1 egg yolk beaten with 1 TB water


  • Dissolve the sugar in the first ½ cup warm water in a large bowl (or the bowl of your stand mixer, if you are using one).  Sprinkle yeast on top and let it stand to burble and breathe for about 10 minutes.
  • When your yeast has woken, and smells like bread and beer, use your paddle attachment (if you are using a stand mixer) to incorporate the oil, second ½ cup of warm water, sugar, salt, and beaten eggs.
Food Blog March 2013-0928
  • Add 3 cups of the flour and beat well.  The dough will be very sticky, but as Mom says, that’s okay.  Cover the sticky mass with a cloth and let it rest for 10-20 minutes.
  • If you are using a stand mixer, exchange your paddle attachment for the dough hook and begin kneading at low to medium speed.  As needed, add the additional flour by ¼ cups at a time.  Knead for 8-10 minutes or until the dough passes the windowpane test.  When I asked Mom about this, she looked at me like I was speaking a different language, then said “I always use the baby’s bottom test,” which got the same look back from me.  She was talking about smoothness and texture, but considering she often gives the dough a little smack when she’s done kneading it, I wondered about the ethics of this measuring device…
  • If you are kneading by hand, turn the sticky mass out onto a well floured board.  With equally well-floured hands, knead for 10 minutes, incorporating more flour as needed, until the dough is smooth and has a shiny surface (and feels, apparently, like a baby’s bottom).
  • In either case, now is the time to place the ball of dough into a lightly oiled bowl and stow it in a warm place to rise for 1-2 hours.  I like to use my oven, letting it heat for 5 minutes and then turning it off for 5 minutes before putting the dough inside.
  • After the dough has risen to double in size, punch it down (Mom notes “this is fun!”), cover it with a clean cloth, and let it rise again until doubled again – about 45 minutes.
  • Divide the dough into three equal parts.  Shape each third into a long rope, place on a greased or parchment lined baking sheet and braid together loosely, pinching the ends firmly and tucking them under on each side.  Cover with a cloth or kitchen towel and, once again, let it rise for 45 minutes to an hour.  See why you need all day for this loaf?
Food Blog March 2013-0947
  • When the braid has swollen again, preheat the oven to 350F.  While you wait, beat an egg yolk with about a tablespoon of water to make an egg wash.  Brush the top and sides of the braid with your egg wash, then sprinkle with poppy or sesame seeds (we prefer poppy, in our house).
Food Blog March 2013-0951
  • Bake in your preheated oven for 30 minutes, or until the internal temperature of the bread is 180-190F.  The top will be golden brown and the bottom will feel delicately hollow when thumped.  Hot ovens tend to overbake this bread, so be sure to check at 30 minutes, or even just before.
  • When the bread tests done, take it out of the oven and let it cool on its baking sheet for 15-20 minutes, to allow the delicate internal crumb structure to firm up a bit.  This will make for easier slicing.
 Food Blog March 2013-0965
Thanks, Mom!

DSC_9042

* still not as bad as N.’s pun: he keeps saying “holla for challah!” and even though he admits this is neither in good taste nor particularly funny, finds he can’t stop doing it…

Pizza and Beer

Food Blog March 2013-0802Sometimes, a week calls for pizza.  But you don’t want the delivery variety dripping with grease and lazy with a smattering of mix-n-match toppings.  You want something fresher.  Better.  You want the feel of dough you can stretch under your hands and control over the size and shape of the pie and choice in the quality and variety of ingredients.

Homemade pizza.

N. and I have often talked about pizza memories, and how, when we were kids, pizza just wasn’t the same without a side of root beer.  It had to be in one of those hard plastic molded glasses, and it had to be with a clear straw.  And sometimes, you forgot you’d ordered root beer instead of Coke or Pepsi, and that first gulp with its spicy depth would be a tremendous surprise.

As we got older, the “root” part of the equation melted, and suddenly it was pizza and beer, plain and simple, one of the mother food and beverage combinations (is that a thing?  Like mother sauces?  It should be.  After all, beer is the third most popular beverage worldwide, and variations on pizza have been around since ancient Greece).

As I thought my way through this pizza plan this week, I wondered whether they had to be separate.  I mean, yeast makes bread dough and beer possible.  Beer is liquid, and there seemed no logical reason why it couldn’t be substituted for the water I’d ordinarily use to make a pizza crust.

Once this idea was lodged in my head, it wouldn’t go away.  This just seemed too perfect.  Beer and pizza, kneaded together – a truly complete meal.

Even though beer is essentially water with yeast and flavorings, I wasn’t sure what would happen when I mixed the two.  I heated a bottle of amber ale in the microwave with a couple teaspoons of honey, just until it was body temperature.  When I added the yeast and engaged the lightest of stirs, the whole measuring cup erupted with bubbles and I had a head at least three inches high.  This slowly collapsed, but I took it to mean the yeast was satisfied with its new spa treatment.

Food Blog March 2013-0772I used a combination of bread flour and whole wheat flour, and produced a spectacularly nutty tasting dough that was also the stickiest I’ve ever worked with.  It slithered and dripped off of my stand mixer’s dough hook and plopped thickly into the oiled bowl I coaxed it into, and I crossed my fingers and hoped that after its six hour chill in the fridge it turned into pizza crust.

Food Blog March 2013-0777When I liberated it and faced it again, it wasn’t the easiest dough to work with, but it did work.  It wouldn’t deign to be tossed like a pizzeria pie, but I stretched and spread and pushed it across a cookie sheet liberally spread with cornmeal, and it turned into a rustic, bubbly, delicious crust.  Topped with mozzarella, sausage, and sun-dried tomatoes, it baked into a glorious symphony of assertive flavors.  We sprinkled on a few leaves of fresh basil while it was still steaming hot, and declared it one of my best homemade pizzas. Food Blog March 2013-0780This is a sticky, wet dough, but it works.  I’m going to make it again and tweak the quantities of flour and olive oil, but trust me: this is worth fooling with for the flavor alone.  The beer comes through right at the end of each bite as a deep yeasty earthiness.  It lends the tiniest bit of bitter flavor that contrasts really well with the fatty sausage and tart sun-dried tomato.  And really, why shouldn’t it?  It’s beer, and this is pizza.  They were made to be together.

Food Blog March 2013-0797

Beer-crust pizza

12 oz. beer (I used an amber ale.  I think a darker brew would be even better)

2 tsp honey

2 tsp yeast

¼ cup olive oil

2 ½ cups bread flour

1 cup whole wheat flour

2 tsp salt

¼-½ tsp black pepper Food Blog March 2013-0774

Heat the beer and honey in the microwave (or a small saucepan) until the liquid is body temperature – you should feel only the slightest heat when you dip in a curious finger.  This took about 45 seconds in the microwave for me.  It will take longer if your beer has been refrigerated.

Swirl the mixture to distribute the honey, then sprinkle the yeast over the surface and set it aside for 5 minutes.  If you stir the yeast in, you will get a tremendous amount of foam on the surface, so in case of overflow I think it’s better to just let it sit.

While you wait for the yeast to perk up, combine the flours, salt, and pepper in a mixing bowl or the bowl of your stand mixer.

When the yeast and beer have married to create a thick foam, stir in the olive oil, then add the liquid mixture to the dry ingredients.  Using the paddle attachment (if you are using a stand mixer), combine at low speed just until ingredients come together into a rough, uneven dough.  Replace the paddle attachment with the dough hook and knead on medium-low speed for 5-7 minutes.

This dough will not pass the windowpane test.  It will not even stay together particularly well.  It will seem like an exercise in futility and disaster, and you will be sorely tempted to add more flour.  But if you resist, and plop it into an oiled bowl, and cover that bowl with plastic-wrap and leave it in the refrigerator for 6-8 hours, it will turn into something more like normal pizza dough.  I promise.

Food Blog March 2013-078390 minutes before you intend to bake, take the bowl of dough out of the fridge and set it on the counter to finish rising and come to room temperature.  After this time has passed, and the dough is considerably increased in size (it may not quite double, unless your counter is quite warm), stretch it to your desired shape – it easily makes a thick 9×13” rectangular crust, and might be coaxed into 2 medium sized, somewhat thin round crusts – on a cornmeal or flour speckled board or tray.  I just doused my cookie tray with cornmeal and pressed and pushed the dough directly on it until I was happy with the shape.

Food Blog March 2013-0789Food Blog March 2013-0786Food Blog March 2013-0792When adequately stretched, add toppings and bake in a preheated 450F oven for 12-15 minutes, or until puffed, crisp, and golden.  Wait 5 minutes before you cut it, to give the cheese time to congeal just a little.

Food Blog March 2013-0804We ate this in embarrassingly large squares and left enough in leftovers to serve as lunch the next day.  Cut slightly smaller and for slightly less voracious eaters (or if you add a side salad), this would be an adequate dinner for 4.

Go-To Dough 2

Because my little house sits smack between the concentrated skyscrapers of downtown Santa Monica and the constant ascent path from LAX, because I can hear the freeway from my backyard and see, from just down the block, the Hollywood sign in the distance, it sometimes slips my mind that I only live a few miles from the ocean.  Los Angeles is a funny place: loud, boisterous, urban, crowded, and yet along its edges it’s a beach town, where it’s just as loud and crowded, but people seem to move just a little slower.
Hard to remember, sometimes, but this past week we were treated to afternoons that reminded me I’m only a few minutes from the water.  Warmth gave way to brisk, fresh breezes heavy with the smell of salt.  Fog rolled over and it felt like a summer day on the Oregon coast.  These reminders of the Pacific Northwest made me want to call on ocean flavors: smoked salmon, crunchy salt crystals, and the grassy headiness of fresh dill.
Food Blog February 2013-0621There are so many different methods for making bread that it’s a wonder anyone becomes a master at it.  This week I decided to try a process slightly more complex than Ruhlman’s basic boule, working with a recipe for French Boule from the Feburary 2009 issue of Cuisine at Home.  The process for this round loaf starts the night before, with a sticky, soggy, tasteless combination of flour, yeast and water called a poolish.  C@H tells us this came from the French pronunciation of “Polish,” from whom they learned this technique (19).  The long, slow fermentation time allows for plenty of yeast development and supposedly contributes a nuttier flavor to the end product.  It is supposed to look like pancake batter, and when you pull it out the following morning and add more water, it is supposed to be very thin.  Mine was, when I put it in the fridge for its overnight chill session, more like the texture of silly putty.  When I added water the following morning, it refused to combine evenly, its sticky strands getting soggier and stickier at the same time.  I was skeptical about this, but followed procedure anyway, and once it had been kneaded aggressively into my dough it didn’t seem to matter.
With the starter crises resolved, I considered flavorings.  Thanks to the overcast coastal feeling of our afternoons and a recent episode of Top Chef, dill sprang to mind as the most logical choice.  It would pair perfectly with our dinner: gemelli pasta draped with smoked salmon and vodka cream sauce.  Black pepper sounded like a nice foil for the dill – pungent and dry where the dill was fresh and mild.  I sprinkled them onto the flattened dough, then rolled the whole thing up into a long tube and kneaded through before letting it rise.  You could certainly add other flavor combos – kalamata olives and cloves of roasted garlic sound incredible – and gently roll and then knead them through the dough.

Food Blog February 2013-0611

Food Blog February 2013-0608
The usual procedure followed: rise, shape, rise again, and prepare for baking.  Olive oil, mustard seeds, and a good sprinkle of coarse salt seemed like the right things to add.
This time, instead of using a Dutch oven, I opted for my cast iron pan.  I was nervous about the bread sticking, which is probably silly, but what can I say?  I’ve lost several chunks of flatbread to that pan because I get anxious and rush the cooking process, so I took out some insurance and settled my loaf onto a layer of parchment paper sandwiched between it and the surface of the pan.
My recipe called for a heavy misting of water over the bread and into the inside of my preheated oven.  I didn’t have a spray bottle on hand with which to mist, so I just flicked droplets in with the tips of my fingers.  The sizzle was tremendous, but seemed to work well.  The resulting loaf was not as big as my first boule attempt, but it was lighter and not overbrowned on the bottom.  The crust was thin but crisp, and we loved the flavor combination.  The mustard didn’t do much besides providing a fun crunchy-pop texture on the edges, but the dill and black pepper were the right contrast of fresh and sharp and incredibly aromatic.  We each took a slice to eat in the car on the way to a soccer game at my husband’s school – had to make sure it was suitable for dinner, after all.  We ate thick slices with our pasta, running them around our plates to pick up every drop of sauce.  We ate more the next day, spread with salted butter, and were surprised and saddened the following morning to find that the loaf was nearly gone.  Dreaming of this bread again, I could see it toasted lightly, smeared with artisan goat cheese and topped with a luscious slice of smoked salmon: the Oregon coast in one bite.
Food Blog February 2013-0615
Dill and Black Pepper Boule
(adapted from Cuisine at Home, February 2009)
For the poolish starter:
1¼ cups bread flour
¾ cup room-temperature water
¼ tsp yeast (I used active dry yeast)
Rehydrate the yeast by combining it in a small dish with 1 TB of the water you’ll be using for the starter.  Let it sit for a few minutes.
Combine the flour, water, and yeast mixture in a bowl or a large measuring cup.  Stir well; the mixture should come together into a texture somewhere between pancake batter and silly putty.
Cover your mixture with plastic wrap and let it sit at room temperature for 3-4 hours, then move to the refrigerator and leave it alone overnight.
The next day, take it out about an hour before you intend to start, so it can return to room temperature and the yeast can wake up a little.
For the bread:
2 cups all-purpose flour (I’m not sure what the advantage is of combining bread flour and AP flour here, but I followed the directions anyway…)
1½ tsp salt
½ tsp yeast
½ cup room temperature water
Poolish starter
2 TB chopped fresh dill
½ tsp (or to taste) fresh ground black pepper
1 TB mustard seeds
1 TB coarse salt
Olive oil for drizzling
Fit your stand mixer with the paddle attachment and use it to combine the flour and salt (you could likely add the dill and pepper here too).
Rehydrate the yeast with 1 TB of the ½ cup water.  Add the remaining water to the room temperature poolish starter and combine.  Mine did not become very thin, as my recipe said.  In fact, mine refused to combine particularly well (read: at all) with the poolish, but it seemed to work out just fine anyway.
Add rehydrated yeast and poolish mixture to the dry ingredients and stir with paddle attachment until the whole mess comes together a bit.  It will be quite sticky.
Scrape sticky mass of just-barely-dough onto a well-floured board and work it with a bench scraper, adding more flour in small sprinkles until some of the stickiness abates and it seems like it could be worked by hand.
At this point, let the dough rest for 10-15 minutes.  The recipe suggests turning a bowl over it (I presume to prohibit drafts), but I think draping on a clean, dry kitchen towel would work just as well.
After the dough has rested, it’s time to knead.  You can do this by hand for 10-15 minutes, or in a stand mixer with the dough hook for 8-10 minutes, until it passes the windowpane test.
Food Blog February 2013-0606
When the dough is smooth, elastic, and stretchy enough to pass the test, if you haven’t added your flavor extras already, flop it onto a floured board and push, pull, or roll out into a rectangle.  Sprinkle on the toppings, then roll up lengthwise and knead together until the dill and pepper are distributed; you’ll be able to see green and black flecks throughout.  I don’t think it matters much when you add something finely chopped like dill, but if you are using a more delicate addition like olives or even sundried tomatoes, be sure to add it this way so it doesn’t get bashed up during the kneading.

Food Blog February 2013-0612

Set the dough in an oiled bowl and let it rise for an hour in a warm, draft-free place (like a briefly heated, then switched off oven).  It should double in size.
Once the dough has risen, remove it from the bowl and shape it into a boule by spinning it away from you with one hand and tucking the dough under with the other.  Let it rise for another hour.
While the dough rises, preheat your oven to 475F and put a cast iron skillet inside (mine is a 9” skillet).  If you are worried about the loaf sticking or getting too brown, prep a piece of parchment paper by cutting or tearing it to cover the bottom and sides of the skillet (don’t be too fussy about this – mine was a square that protruded above the sides of the pan and it was just fine).

Food Blog February 2013-0614

Turn the dough out onto the parchment paper, then pull the skillet out from the oven and set the loaf – on parchment paper if you are using it – into the center.  Slash the top, drizzle with olive oil, and sprinkle liberally with mustard seeds and salt.  Using the tips of your fingers or a spray bottle, mist or dribble the top of the loaf with water.
Place the laden skillet back into the oven, spritz the inside of the oven with ten flicks or so of water, and shut the door.  Wait 30 seconds and repeat the spritzing process.
Reduce heat to 450F and bake for ten minutes.
Reduce heat to 425F and bake for ten more minutes.
Finally, reduce the heat to 375F and bake another twenty minutes.  Remove from oven and cool on a rack for 45 minutes before slicing and devouring.

Food Blog February 2013-0619

Lemon Ginger Shortbread with Hazelnut “Crust”

Inspired by numerous sources, but mostly the deep golden orbs on my backyard lemon tree and a winter-blues-banishing post from Hannah at Inherit the Spoon, this post had to be about shortbread.  This is a cookie of the most basic sort, crisp and sandy, with only the three essentials: flour, butter, and sugar.  No leavening to worry about, no eggs to tussle with (incidentally, do you know how hard it is to crack eggs without making a mess when you’ve sliced the tip of your thumb and  it’s therefore awkwardly bandaged?), just the base, the sweetener, and the fat.
Food Blog February 2013-0584
These are, as Ruhlman points out in Ratio, an “adult” sort of cookie.  Dry, unadorned, plain, but equally ideal for a dunk in tea or chocolate ganache, and amenable to all sorts of attempts to “play dress-up,” which makes them  not just easy and tasty, but suitable for kids-at-heart.
Recently I’ve become obsessed with the combination of lemon and ginger.  Hannah’s citrus shortbread and my tree with its laboring, weighty boughs all but begged me to try this combination.  When a quick web search turned up only recipes featuring one or the other, I knew I had to insist on their marriage in my version.

Food Blog February 2013-0480

Then insanity struck.  I got the ridiculous notion that I wanted to create a hazelnut “crust” for these cookies.  Yes, that’s right, I decided to add a crust to a cookie that is commonly used itself as a crust.  I’m not sure where this idea came from, although if I must place blame it’s going to be on my sister, who commented at Thanksgiving that I should pursue the lemon-ginger-hazelnut flavor combo because it sounded so outstanding.  So really, R., these are for you.
Food Blog February 2013-0484I scoured multiple recipes to put this dough together, checking the likes of Martha Stewart, Ina Garten, Paula Deen (who I was surprised doesn’t have more sweet versions), and of course Deb Perelman.  But with the exception of a few technique ideas, I came back to Ruhlman’s basic 1-2-3 cookie dough as my backbone (1 part sugar, 2 parts fat, 3 parts flour).
The butter, I decided, needed to be browned (another recent obsession).  This would add depth and nuttiness in case the crazy hazelnut idea didn’t work out.  The ginger would be candied and minced into a sticky pile, and the lemon would be zested into mild spritzy confetti.  This made for a dough that, while delicious, was perhaps not the easiest to work with – I refrigerated it too long and was then impatient to roll it out, so there were cracks.  I rolled it quite thin, which made the cracking worse, and created a painfully delicate cookie.  The chunks of ginger, too sticky to mince very finely, stood up like carbuncles through the buttery dough and made slicing difficult.

Food Blog February 2013-0574

The hazelnuts I pulverized in the food processor with some ground ginger (in case the candied chunks didn’t come through) and a healthy sprinkling of turbinado sugar.  Faced with a bread board of delicate cookies on one side and a pie plate full of hazelnut crumbs on the other, I almost opted to forget the whole “crust” idea altogether, but I’m glad I didn’t.  You can transfer crumbs to cookie in a number of ways, including pressing the cookie into the crumbs, which I don’t recommend  (they adhere only reluctantly and the raw dough tends to break), or mounding crumbs on top of the cookies and pressing them in with a rolling pin, which I do recommend.  Then you can gently lift the cookie and flip it quickly and firmly onto a parchment lined baking sheet so the hazelnut layer is on the bottom.  The crumbs will try to scatter.  Don’t let them!  Press the cookie down lightly but firmly back into the crumbs, and they will adhere as they bake.
When they came out of the oven, they were too soft to move.  They needed a good five minutes alone on their baking sheet, undisturbed, to cool and crisp.  But once crisp, they were perfectly sandy and satisfying, tasting of – I can’t think of a better description – powdered butter.  At first I couldn’t detect the ginger or lemon, aside from the now chewy bits of candy distributed through the dough, but a day later, and then two days later, the more delicate flavors started to shine past the overwhelming richness of the brown butter.  The hazelnuts, with their earthy crunch, were perfect the whole time.  You could probably mix the nut crumbs in with the rest of the ingredients and save yourself a bit of time and frustration, but I loved the way they looked as a crisp layer on the bottom.  Cookies with their own crust.  Glorious.  My sister got to taste them during an unexpected visit, and pronounced them delicious.  The lemon-ginger-hazelnut trifecta is a triumph.  And the leftover ginger-spiked hazelnut crumbs make an excellent topping for oatmeal.
 Food Blog February 2013-0578
Lemon Ginger Shortbread with Hazelnut “Crust”
8 oz. butter (1 cup, or 2 sticks)
4 oz. sugar (1/2 cup + 1 TB)
12 oz. flour (2 – 2½ cups)
½ cup chopped candied ginger
Rind from 1 lemon, finely chopped (some pith is okay)  (about ¼ cup)
1 cup hazelnuts
1 TB ground ginger
2 TB raw sugar, like turbinado or demerrara
Melt the butter in a small saucepan, swirling gently on occasion, over medium to medium-low heat.  Once melted, the butter will foam up, then clear slightly, and then the magic: the solids will sink to the bottom of the pan and begin to brown slightly.  At this point, turn off the heat.  You want this beautiful browning, but you don’t want those solids to burn.  There is only a small window between browning and burning, so watch carefully as the butter reaches this stage.
Pour the melted butter and browned bits (which you may have to scrape off the bottom of the pan) into the bowl you will use to make the cookies.  I used my stand mixer bowl.  Stow it in the fridge for 10-15 minutes, or until the butter gets sludgy.

Food Blog February 2013-0562

When the butter has solidified a bit, pull it back out and add the sugar, then cream (or goo) well until everything is incorporated and has become a beautiful flecked mixture the rough consistency of frosting.
Add the flour and mix until crumbly.

Food Blog February 2013-0563

Add the lemon zest and the ginger and mix again.  First the dough will become large crumbs, then come together into something more like wet sand.  This takes a minute or two.  If it isn’t coming together right away, don’t worry.  The wet sugar and butter mixture needs some time to moisten the flour.

Food Blog February 2013-0564

Once the dough is the consistency of wet, packable sand, dump it out of the bowl onto a sheet of plastic wrap.  Using the plastic wrap to help you, shape the dough into a rectangle of 5×8 inches or so, wrap up securely, and refrigerate for about 30 minutes.

Food Blog February 2013-0568

While the dough chills, pulverize the hazelnuts, ground ginger, and raw sugar crystals in a food processor (or chop finely with a sharp knife) until some of the hazelnuts are reduced to powder and some remain in very small bits.  Don’t overprocess – you don’t want this to turn into nut butter.  Stop before it becomes moist.
When your dough has had a chance to chill, unwrap it onto a floured board and roll or press out to about ¼ inch thick.  This takes a bit of patience, especially if you, like me, let it chill for too long and try to roll it out before it’s ready.  Cold rolling results in cracking.  Just relax, let the dough warm up a tiny bit, and roll gently with a floured rolling pin, patching cracks as you go.  This would also be a good time to preheat your oven to 350F.

Food Blog February 2013-0570

Once you’ve achieved even thickness (minus the odd tall chunk of ginger), use a pizza cutter to trim off uneven edges, and slice the remaining rectangle into smaller rectangles the size of your choosing.  Mine were probably about 1×3 inches, which seemed like a nice sized cookie.
Now it’s time to add the hazelnut crust.  As noted above, you can do this in a number of ways.  You can, if you wish, lift the cookies, place them into a dish of crumbs, and press down, hoping for adherence without breaking the cookie itself.  This method requires almost excruciating gentleness.  You can also press handfuls of the hazelnut crumbs down on top of the cookies on the board, applying firm but gentle pressure, and then lift the cookies one at a time and invert them onto a parchment lined baking sheet.  As you flip, some of the hazelnut crumbs will loosen.  That’s okay.  Just get your cookie settled on the baking sheet and then press down again gently but firmly to re-stick the crumbs.  They will adhere better as they bake.

Food Blog February 2013-0571

Once you have a full baking sheet (mine each fit 15-18 cookies in various arrangements), pierce the cookies gently with a fork to achieve that pricked look so popular in shortbread, and bake for 18 minutes.  The cookies will become lightly golden all over, and the hazelnut crumbs will darken and get a bit toasty.

Food Blog February 2013-0576

At 18 minutes, take them out of the oven, set the baking sheet on a cooking rack, and walk away.  The cookies need 4-5 minutes to set before you try to move them.  They are much too soft at their moment of emergence to transport intact.  As they cool, they will deflate and crisp up a bit, and you can move them to a cooling rack or a marble countertop or surface of your choice.

Food Blog February 2013-0583

You can certainly eat these warm, but I liked them better completely cooled.  In fact, I liked them better the next day, once the flavors had melded and developed.

Food Blog February 2013-0580

Stored in an airtight container, these keep deliciously for over a week.  They even, wrapped carefully, stay crisp and fresh through the mail.
This recipe probably made about 3 dozen cookies, and could have made more if I had eaten less of the dough scraps.  I, alas, didn’t make a count before I started sampling, which is always a tasty, tasty mistake.